This easy sugar cookie recipe creates perfectly soft, buttery cookies with a hint of vanilla that hold their shape for decorating. Using simple ingredients like flour, butter, sugar, and eggs, this approachable recipe is perfect for beginners and includes tips for both chewy and crispy results, with a no-chill option for when you’re short on time.
There’s something magical about a classic sugar cookie. It might be their sweet simplicity, their soft, melt-in-your-mouth texture, or the blank canvas they offer for decorating. Yet, for many home cooks, baking the perfect batch can feel daunting. If you’ve ever been overwhelmed by complex recipes, you’re in the right place to discover the joy of effortless baking.
At Recipesmondial, we believe cooking should be enjoyable and stress-free. That’s why we perfected the best easy sugar cookie recipe for home cooks like you. This guide will help you create tender, flavorful sugar cookies that hold their shape perfectly. They are ideal for all your decorating whims, from holiday festivities to everyday delights. Our step-by-step cooking guidance ensures reliable results, helping you build confidence and enjoy your time in the kitchen.
Get ready to turn simple ingredients into a batch of delicious cookies that will impress family and friends. We’ll cover everything from essential tips to making the perfect icing—and even a beginner-friendly no-chill option! With clear instructions and a sugar cookie recipe that truly works, you’ll see just how approachable home cooking can be. Let’s make some magic in your kitchen!
Why You’ll Love This Easy Sugar Cookie Recipe
If you’re searching for an easy recipe that brings joy, look no further. Our easy sugar cookie recipe is special because it delivers perfect results every time. It’s straightforward and fun, allowing you to say goodbye to being overwhelmed by complex recipes. Get ready to love making these delightful cookies!
Here’s why this will become your new favorite best sugar cookie recipe:
- Effortlessly Simple Steps: Designed for home cooks of all levels, our clear step-by-step cooking guidance makes baking a breeze and builds your confidence in the kitchen.
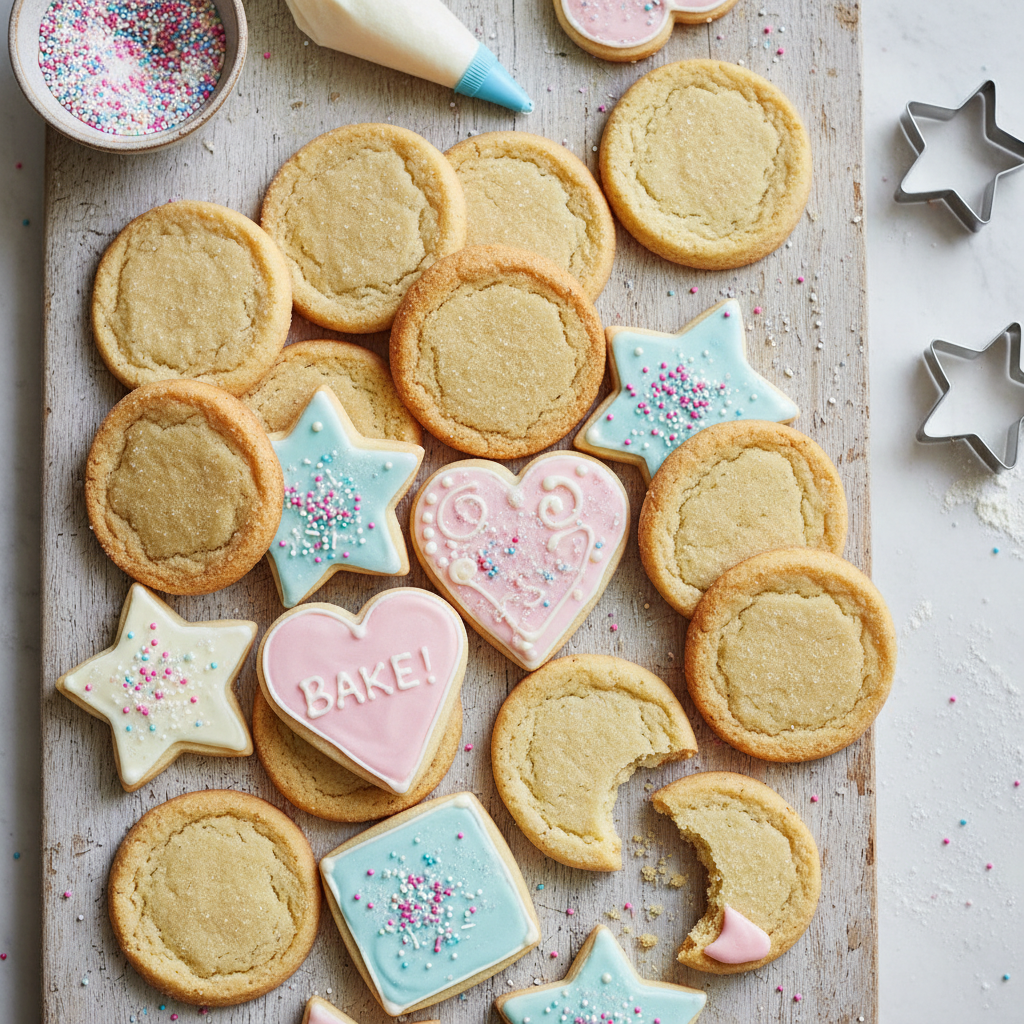
- Perfect for Decorating: These sugar cookies bake up flat and stable, creating the ideal canvas for your creative decorating ideas. Say goodbye to spreading or misshapen cookies!
- Incredibly Flavorful: With a classic vanilla flavor, these cookies are perfectly sweet, wonderfully tender, and taste as amazing as they look. This is flavorful meals made easy.
- A Family-Friendly Meal Favorite: Baking sugar cookies is a wonderful activity to share. Gather your loved ones to have fun and create lasting memories together.
- Build Your Cooking Confidence: This beginner-friendly recipe is designed for success, helping you gain confidence with each batch. You’ll be a cookie expert in no time!
- Enjoy Cooking Without Stress: Our philosophy of approachable home cooking lets you forget the stress and focus on the joy of creating.
With this recipe from Recipesmondial, you’re guaranteed a delightful baking experience and delicious results. Get ready to bake, decorate, and enjoy!
What Ingredients Do You Need for Perfect Sugar Cookies?
Essential Pantry Staples
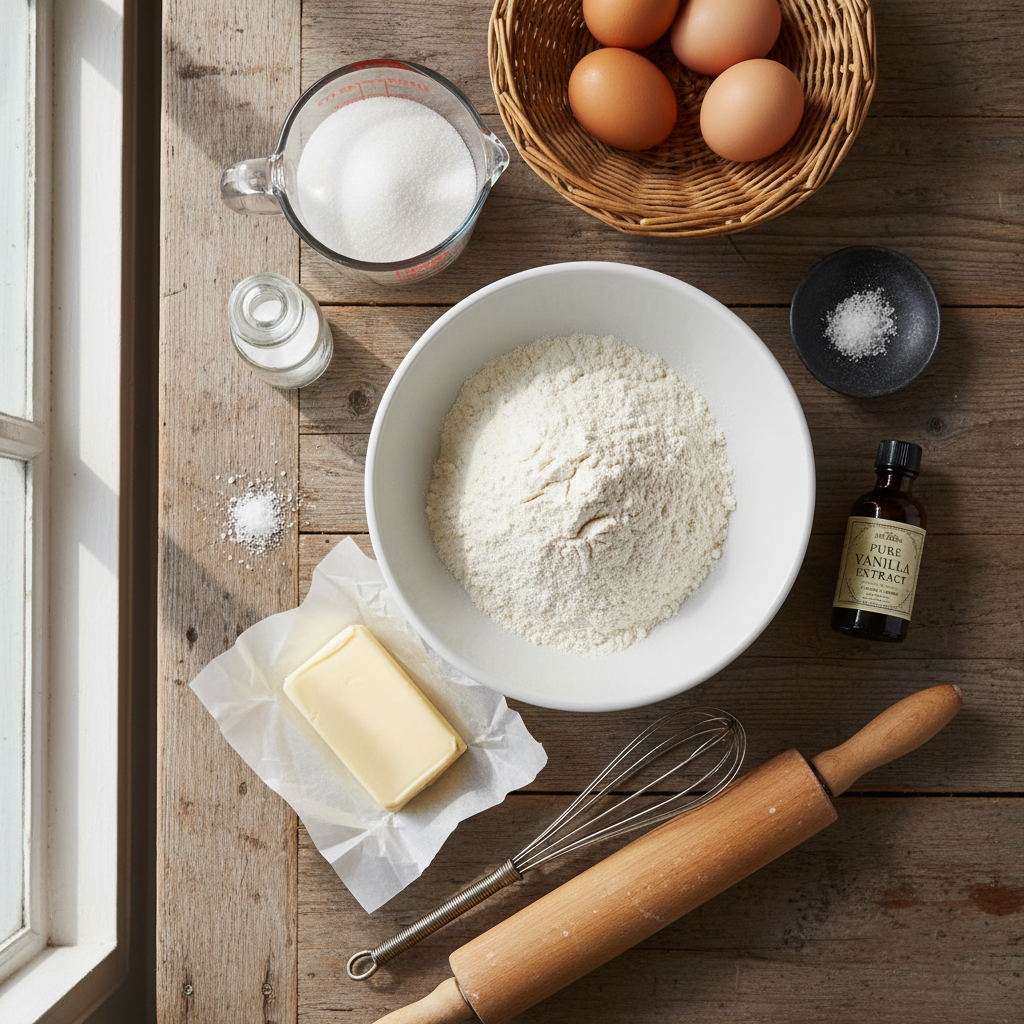
Perfect sugar cookies start with a few simple, everyday ingredients you likely already have in your kitchen. We focus on using basic items to make home cooking easy and approachable for everyone.
- All-Purpose Flour: This is the foundation of your delicious sugar cookie recipe. It gives cookies their structure and helps them hold their shape for decorating.
- Granulated Sugar: Beyond sweetness, sugar contributes to the cookie’s tender texture and helps create that lovely crisp edge.
- Unsalted Butter: For the best flavor and tenderness, unsalted butter is a must. It allows you to control the exact salt content in your cookies.
- Large Egg: The egg acts as a binder, bringing all the ingredients together. It also adds moisture and richness to the dough, ensuring your cookies are soft.
- Pure Vanilla Extract: A touch of vanilla is crucial, giving your cookies that classic, warm, and irresistible flavor.
- Baking Powder: A small amount of baking powder helps your cookies rise slightly, keeping them soft and preventing them from becoming too dense.
- Salt: Just a pinch of salt is vital. It balances the sweetness beautifully and enhances all the other flavors in the dough.
Ingredient Substitutions & Tips
Don’t let a missing ingredient or a dietary need stop your baking fun! Here are some practical tips and easy substitutions to help you adapt the recipe and make the best sugar cookies for your kitchen.
- Butter Temperature is Key: For a smooth dough, softened butter is vital because it creams easily with sugar to create an airy texture. If you forgot to take it out, you can soften it quickly: Cut the cold butter into small pieces and microwave for 10-15 seconds, or beat it with a rolling pin until pliable.
- Measure Flour Correctly: Adding too much flour is a common mistake that leads to dry, crumbly cookies. To measure accurately, spoon the flour into your measuring cup, then level it off with a flat edge like a knife. This prevents you from packing in too much.
- Vanilla Extract Alternatives: Out of vanilla? Almond extract is a wonderful substitute for a unique flavor, but use half the amount since it’s stronger. For a bright, fresh twist, you can also use a little lemon zest.
- Salted vs. Unsalted Butter: Our recipe calls for unsalted butter. If you only have salted, simply reduce the added salt in the recipe by about 1/4 teaspoon to maintain the perfect flavor balance.
- Make it Gluten-Free: You can absolutely make delicious gluten-free sugar cookies. Just swap the all-purpose flour for a 1-to-1 gluten-free baking blend that includes xanthan gum for the best results.
- Vegan Cookie Options: For a plant-based version, use vegan butter sticks and replace the egg with a “flax egg.” To make one, mix 1 tablespoon of ground flaxseed with 3 tablespoons of water and let it sit for 5 minutes to gel.
- Enhance Flavor with Extracts: Consider adding a drop of another extract, like peppermint, almond, or lemon. This is a simple way to introduce new and exciting flavors to your classic sugar cookies.
How to Make Sugar Cookies: A Step-by-Step Guide

Step 1: Cream the Butter and Sugar
The first crucial step is to cream the butter and sugar. This process incorporates air into the dough, which is the secret to light, tender cookies.
- In a large mixing bowl, add your softened unsalted butter.
- Next, add the granulated sugar.
- Using an electric mixer, beat them together on medium speed.
- Mix until the mixture is light in color and fluffy. This usually takes about 2 to 3 minutes.
Helpful Hint: If your butter is too cold, microwave it for 10-15 seconds. It should be soft enough to indent with your finger, but not melted.
Step 2: Mix in Eggs and Vanilla
Next, it’s time to mix in the eggs and vanilla. These ingredients add moisture and bind the dough together.
- Crack one large egg into the creamed butter and sugar mixture.
- Beat it on medium speed until just combined.
- Add the second large egg. Continue beating until it is fully incorporated.
- Stir in the pure vanilla extract. Beat briefly until everything is smooth and well-mixed.
Flavor Tip: A high-quality vanilla extract will significantly improve the flavor and aroma of your cookies.
Step 3: Combine the Dry Ingredients
Preparing your dry ingredients separately ensures an even distribution. This avoids pockets of unmixed flour or leavening.
- In a separate medium bowl, whisk together the all-purpose flour, baking powder, and salt.
- Gradually add this dry mixture to the wet ingredients in the large mixing bowl.
- Mix on low speed until just combined. Be careful not to overmix!
A Quick Note: Be careful not to overmix. Overmixing develops the flour’s gluten, which will make your cookies tough rather than tender.
Step 4: Chill the Dough (and a No-Chill Option!)
Chilling your dough is a game-changer for sugar cookies. It helps prevent spreading and makes the dough easier to handle.
Why Chill Your Dough?
- Prevents Spreading: Cold butter melts slower in the oven. This helps your cookies keep their shape beautifully.
- Easier to Roll: Chilled dough is less sticky and much simpler to roll out.
- Deeper Flavor: Chilling allows the flavors to meld together, enhancing the cookie’s taste.
- Gather the dough into a ball.
- Flatten it into a disk shape.
- Wrap the disk tightly in plastic wrap.
- Refrigerate for at least 30 minutes, or up to 2 hours. For best results, chill for 1 hour.
No-Chill Option for Quick Baking!
If you’re short on time, you can skip the chilling step. This option is perfect for when you need cookies in a hurry.
Simply roll out the dough immediately after mixing. Your cookies may spread slightly more, but they will still be delicious!
Speedy Solution: If skipping the chill, ensure your kitchen is cool. This helps keep the dough firm while you work.
Step 5: Roll and Cut Your Cookies
This is where the fun begins, especially if you’re decorating!
- Lightly flour a clean surface or use parchment paper.
- Take half of your chilled dough. Keep the other half refrigerated.
- Roll out the dough to about ¼-inch thickness. Aim for an even thickness across the whole sheet to ensure uniform baking.
- Dip your cookie cutters in flour before each cut. This prevents sticking.
- Press firmly to cut out your desired shapes.
- Carefully transfer the cut-out cookies to a baking sheet lined with parchment paper. Leave about 1 inch between each cookie.
- Gather any dough scraps. Gently combine them, re-roll, and cut more cookies.
Pro Tip: Don’t overwork the dough scraps when re-rolling. Too much handling can make the cookies tough.
Step 6: Bake to Perfection
Almost there! Your kitchen will soon smell amazing.
- Preheat your oven to 375°F (190°C).
- Place your baking sheet with cookies into the preheated oven.
- Bake for 8 to 10 minutes. Baking time can vary slightly depending on your oven and cookie thickness.
- Look for cookies that are lightly golden at the edges. The centers should still look pale.
- Remove the baking sheet from the oven. Let the cookies cool on the sheet for 5 minutes.
- Carefully transfer the cookies to a wire rack. Allow them to cool completely before decorating or storing.
Doneness Check: Underbaked cookies will be very soft and prone to breaking. Overbaked cookies will be too crispy. A light golden edge is your perfect cue!
How Do You Make The Best Sugar Cookie Icing?

Simple Buttercream Frosting
The best sugar cookie needs the perfect icing, and this simple buttercream is a wonderful choice. It’s creamy, sweet, and incredibly easy to make, giving your cookies a lovely, soft finish. This recipe is perfect for home cooks of all levels.
Because it’s so forgiving and delicious, buttercream is a fantastic option for fun family decorating sessions. It’s one of our favorite easy recipes for sweet treats.
Ingredients for Simple Buttercream Frosting:
- 1/2 cup (1 stick) unsalted butter, softened
- 2 cups powdered sugar (confectioners’ sugar)
- 1-2 tablespoons milk or cream
- 1/2 teaspoon vanilla extract
- Pinch of salt (optional, to balance sweetness)
- Food coloring (optional)
How to Make Simple Buttercream Frosting:
- Cream the Butter: In a medium mixing bowl, beat the softened butter with an electric mixer until it is light and fluffy. This usually takes about 2-3 minutes.
- Add Sugar Gradually: Slowly add the powdered sugar, about 1/2 cup at a time. Mix on low speed until combined after each addition. This prevents a sugar cloud!
- Mix in Liquids: Once all the sugar is incorporated, add the milk or cream and vanilla extract. Beat on medium speed until the frosting is smooth and creamy. Start with one tablespoon of milk and add more if you need a thinner consistency.
- Adjust and Color: If desired, add a pinch of salt to enhance the flavor. Mix in food coloring a drop at a time until you reach your desired shade.
Tips for Perfect Buttercream:
- Softened Butter is Key: Ensure your butter is truly softened, not melted. It should give slightly when pressed.
- Consistency: For a thicker frosting, add less milk. For a thinner, spreadable frosting, add a bit more milk, half a teaspoon at a time.
- Flavor Variations: You can swap vanilla extract for almond extract, lemon extract, or even a dash of peppermint for festive cookies.
- Storage: Store leftover buttercream in an airtight container in the refrigerator for up to a week. Let it come to room temperature and re-whip before using.
Easy Royal Icing for Decorating
For an icing that dries firm with crisp, clean lines, royal icing is your go-to choice. It’s perfect for adding detailed, professional-looking designs to your sugar cookies. This easy recipe uses meringue powder, which makes it beginner-friendly, safe, and consistent. [1] Meringue powder ensures you get great results every time, helping you create visually stunning treats.
Ingredients for Easy Royal Icing:
- 3 cups powdered sugar (confectioners’ sugar)
- 2 tablespoons meringue powder
- 1/4 teaspoon vanilla extract (or other clear extract like almond)
- 4-6 tablespoons warm water
- Food coloring (optional)
How to Make Easy Royal Icing:
- Combine Dry Ingredients: In a large mixing bowl, whisk together the powdered sugar and meringue powder. This ensures there are no lumps.
- Add Wet Ingredients: Add the vanilla extract and 4 tablespoons of warm water. Beat with an electric mixer on medium-high speed for 5-7 minutes. The icing should become very thick, glossy, and form stiff peaks.
- Adjust Consistency:
- For Outlining/Piping: The icing should be thick enough to hold its shape. If it’s too stiff, add water a few drops at a time.
- For Flooding/Filling: Add additional warm water, 1 teaspoon at a time, until the icing reaches a “10-second” consistency. This means if you drag a knife through it, the line disappears within 10 seconds. This is perfect for filling in your cookie designs.
- Color Your Icing: Divide the icing into separate bowls for different colors. Add gel food coloring slowly with a toothpick until you achieve your desired hues. Gel colors are best as they don’t thin the icing.
Tips for Using Royal Icing:
- Keep it Covered: Royal icing dries quickly! Always cover your mixing bowl and piping bags with a damp cloth or plastic wrap when not in use.
- Piping Bags and Tips: Use small piping bags and decorating tips (like PME #1.5 or Wilton #2) for fine details and outlines. For flooding, you can use a slightly larger tip or a squeeze bottle.
- Drying Time: Allow royal icing to dry completely before stacking or packaging your cookies. This can take anywhere from 6-24 hours, depending on humidity and thickness.
- Practice Makes Perfect: Don’t be overwhelmed by intricate designs. Start with simple outlines and flood fills. You’ll gain confidence with practice and soon create cookies that look as amazing as they taste.
Tips for Success: Making the Best Sugar Cookies
For Soft and Chewy Cookies
Achieving soft and chewy sugar cookies is a delightful goal, and these tips will help you create that tender, melt-in-your-mouth texture. The secret lies in careful preparation and timing.
- Don’t overmix the dough: Mix dry and wet ingredients only until they are just combined. Overmixing develops too much gluten, which can lead to tough cookies.
- Use room temperature ingredients: Softened butter and eggs mix together more evenly, creating a smoother and more consistent dough.
- Slightly underbake your cookies: Remove cookies from the oven when the edges are set but the centers still look a little soft. They will continue to bake on the hot sheet, which helps them retain moisture.
- Add an extra egg yolk: For a simple trick with a big impact, add an extra egg yolk to the dough. This boosts both richness and chewiness.
- Chill the dough longer: Chilling allows the ingredients to meld and prevents the cookies from spreading too much. A well-chilled dough bakes up thicker and chewier.
For Crispy, Snappy Cookies
If you prefer a cookie with a delightful snap, making crispy sugar cookies is just as easy. A few small adjustments are all it takes to get that satisfying crunch.
- Roll the dough thinner: Thinner cookies bake faster and dry out more in the oven, which leads to a crispier final texture.
- Bake until golden brown: Keep your cookies in the oven a little longer, until they are a light golden brown around the edges. This ensures they are fully baked and crisp.
- Use only granulated sugar: Granulated sugar contributes to a crispier texture and helps prevent the soft, chewy bite found in other recipes.
- Increase baking time slightly: Just a minute or two extra in the oven can transform chewiness into crispiness. Be sure to watch them closely.
- Cool completely on racks: Transfer cookies to a wire rack immediately after baking. Proper air circulation prevents sogginess and ensures maximum crispness.
How to Prevent Spreading
Cookie spreading is a common challenge, but nobody wants flat, misshapen sugar cookies. Luckily, a few easy steps can help you achieve beautifully shaped treats, which is especially important when making sugar cookies for decorating.
- Chill your dough thoroughly: This is the most crucial step. Because cold butter melts slower, chilled dough helps cookies hold their shape. Chill for at least 30 minutes, but an hour or more is even better.
- Measure ingredients precisely: An imbalance of ingredients, like too much butter or not enough flour, can lead to spreading. Use a kitchen scale for the best accuracy. [2]
- Don’t overcrowd the baking sheet: Leave enough space between cookies. Overcrowding lowers the oven’s effective temperature, which can cause the cookies to spread more as they bake.
- Use parchment paper or silicone mats: These surfaces regulate heat and prevent sticking, allowing cookies to bake more evenly and better hold their shape.
- Maintain correct oven temperature: An oven that’s too cool will cause butter to melt before the cookie structure sets, leading to spreading. Always preheat it thoroughly and consider using an oven thermometer for accuracy. [3]
Storing Your Sugar Cookies
Proper storage is key to keeping your sugar cookies fresh and delicious for as long as possible. Follow these tips for storing both plain and decorated cookies to ensure they stay enjoyable.
- For undecorated cookies:
- Store them in an airtight container at room temperature.
- They will stay fresh for up to 5-7 days.
- Adding a slice of bread to the container can help keep them soft.
- For decorated cookies (with royal icing):
- Allow icing to fully harden, which can take 6-12 hours.
- Store in a single layer in an airtight container.
- Keep at room temperature for up to 2 weeks.
- Avoid stacking until the icing is completely dry to prevent smudging.
- For decorated cookies (with buttercream frosting):
- Since buttercream is softer, store these cookies in an airtight container.
- Keep them in the refrigerator for up to 3-5 days.
- Let them come to room temperature before serving for the best flavor and texture.
- Freezing baked cookies:
- Baked, undecorated cookies freeze very well.
- Place cooled cookies in a freezer-safe airtight container.
- Separate any layers with parchment paper.
- Freeze for up to 3 months.
- Thaw at room temperature before decorating or serving.
- Freezing raw cookie dough:
- Wrap the dough tightly in plastic wrap, then place it in a freezer bag.
- Freeze for up to 1 month for the best quality.
- Thaw dough in the refrigerator overnight.
- Proceed with rolling and baking as the recipe directs.
Frequently Asked Questions About Sugar Cookies
What is the best sugar cookie recipe for decorating?
This is our best sugar cookie recipe for decorating because the dough holds its shape beautifully while baking. This means you won’t get puffy, uneven cookies, ensuring your intricate designs stay clear and crisp. The key is a perfect balance of ingredients that creates a sturdy yet tender base. For the best results, chill the dough to prevent spreading [4], which makes decorating much more enjoyable. Pair them with our simple buttercream frosting or easy royal icing to achieve professional-looking sugar cookies and build your baking confidence.
How do you make a crispy sugar cookie recipe?
Making a crispy sugar cookie recipe is simple—it just requires a few adjustments. First, try increasing the baking time slightly or using a lower oven temperature, around 325°F (160°C), to allow more moisture to evaporate. You can also use a higher ratio of granulated sugar and less fat to contribute to crispiness. Roll your dough thinner than usual and bake until the edges are golden brown. Letting them cool completely on a wire rack helps them crisp up even more, creating a delightful snap for those who prefer a firmer texture. It’s an easy way to customize your baking.
Can I make this a sugar cookie recipe with no chill time?
Yes, you can absolutely make a sugar cookie recipe with no chill time! Our recipe includes a no-chill option that’s perfect for busy families who need a quick dessert. While chilling dough helps prevent spreading and makes it easier to handle, you can skip this step if you’re in a hurry. Here’s how to do it successfully:
- Work quickly with the dough.
- Keep your countertop and kitchen cool.
- Roll the dough between two sheets of parchment paper.
- This prevents sticking and helps maintain shape.
Your cookies might spread a tiny bit more, but they will still be delicious and hold their shape well. This option is great for busy weeknights, letting you enjoy freshly baked sugar cookies without the wait. Don’t let chill time stop you from baking!
What makes a sugar cookie chewy?
Several factors create a wonderfully chewy sugar cookie, and the type of sugar plays a big role. Adding brown sugar significantly increases chewiness because its molasses content adds moisture and softness. A higher fat content, like using a good amount of butter, also helps create a chewy texture. Slightly underbaking the sugar cookies is another key. Remove them from the oven when the edges are set but the centers still look slightly soft. They’ll continue to cook on the hot baking sheet, which creates that desirable soft, bendy texture. Proper mixing is also important. Be careful not to overmix the dough after adding flour, as this can develop too much gluten and result in a tougher, less chewy cookie. Our best sugar cookie recipe can be easily adapted for extra chewiness.
Leave a Reply