Category: Appetizers, Sides, and Snacks

  • How to Make Perfect Overnight Oats: The Easiest Recipe for Beginners

    How to Make Perfect Overnight Oats: The Easiest Recipe for Beginners

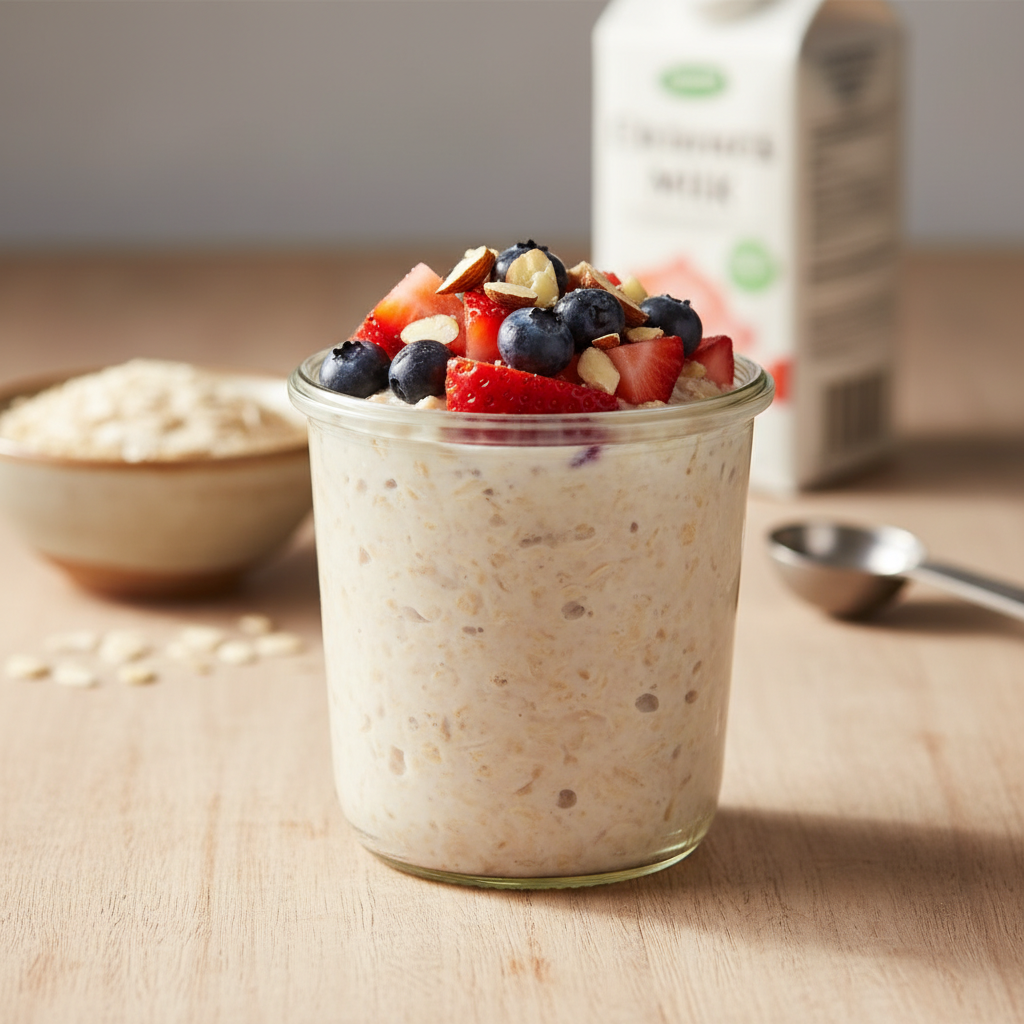
    Overnight oats are a no-cook breakfast made by soaking rolled oats in a liquid, typically milk, yogurt, or water, overnight in the refrigerator. The basic formula is a 1:1 ratio of oats to liquid, plus any desired mix-ins like chia seeds, sweeteners, or fruit. This process softens the oats, creating a creamy, pudding-like texture for a ready-to-eat meal in the morning.

    Are your mornings a whirlwind of activity? Do you struggle to find time for a nutritious, satisfying breakfast? It can be overwhelming to plan family-friendly meals that are both healthy and quick, especially when you lack the confidence to try new recipes. But what if there was a delicious, effortless solution to transform your busy mornings into a calm, flavorful start?

    Enter overnight oats. This simple, versatile dish is the ultimate quick breakfast for anyone seeking easy recipes and a stress-free start to their day. Our beginner-friendly recipe is designed to make cooking enjoyable. We’ll guide you with clear, step-by-step instructions to create a wholesome meal that practically makes itself while you sleep. Whether you need healthy snacks or more quick breakfast ideas, this is a fantastic way to build your kitchen confidence without the stress.

    Get ready to say goodbye to rushed mornings and hello to a delicious, ready-to-eat breakfast. In this guide, you will discover the magic of overnight oats, from the basic formula to exciting variations and practical meal prep tips. Let’s explore why this is the perfect quick breakfast, whether you’re a complete beginner or just looking for new inspiration.

    Why Are Overnight Oats the Perfect Quick Breakfast?

    Are your mornings a whirlwind? Do you struggle to find time for a nutritious meal before heading out the door? If so, overnight oats are the secret weapon you need for quick breakfast ideas.

    Because busy lives demand simple solutions, this easy recipe is designed to transform your morning routine. Overnight oats offer a perfect blend of convenience, nutrition, and flavor, making them the ideal solution for a stress-free start to your day.

    Let’s explore why this beginner-friendly recipe is a game-changer for home cooks everywhere:

    • Ultimate Time-Saver: The biggest advantage of overnight oats is their convenience. Simply prepare them the night before, which means zero cooking is required in the morning. Just grab your jar from the fridge and enjoy! It’s an ideal meal prep tip for hectic schedules.
    • Effortless Preparation: Forget complex cooking steps or intimidating kitchen gadgets. Making overnight oats involves just a few simple stirs. No heat is required, making this a fantastic option for anyone who feels overwhelmed by complex recipes.
    • Endless Customization: Overnight oats are incredibly versatile. You can tailor them to your exact taste preferences and dietary needs. Add your favorite fruits, nuts, seeds, spices, or sweeteners—every day can bring a new flavor adventure!
    • Packed with Nutrition: Oats are a whole grain rich in fiber, which helps you feel full and satisfied. By supporting stable energy levels throughout your morning, overnight oats are a healthy and delicious way to fuel your body [source: https://www.hsph.harvard.edu/nutritionsource/food-features/oats/].
    • Budget-Friendly: Because they’re made with inexpensive pantry staples like rolled oats and milk, this breakfast is very economical. You’ll save money compared to buying breakfast on the go.
    • Family-Friendly Favorite: Kids love the creamy texture and sweet toppings, making overnight oats an easy way to add healthy grains to their diet. You can even involve them in choosing mix-ins, turning it into a family-friendly meal.

    With overnight oats, you can trade mealtime stress for an enjoyable, organized morning. Start your day confidently, knowing a delicious meal is ready and waiting. Recipesmondial is here to help you discover how simple ingredients can lead to fantastic flavors with approachable home cooking.

    What is the basic formula for overnight oats?

    Core Ingredients You’ll Need

    Crafting delicious overnight oats is wonderfully simple, requiring only a few basic pantry staples. These ingredients come together to create a wholesome and satisfying breakfast that’s perfect for busy mornings and friendly for beginners.

    • Rolled Oats (Old-Fashioned Oats): These are the foundation of your recipe. Rolled oats soak up liquid beautifully, creating the perfect chewy texture. Avoid using instant or quick oats, as they can become mushy, and steel-cut oats won’t soften enough with this method.
    • Milk (or Dairy-Free Alternative): The liquid is what softens and transforms the oats. Cow’s milk, almond milk, soy milk, oat milk, or your favorite dairy-free alternative will all work wonderfully to create a creamy base.
    • Chia Seeds: While optional, these tiny powerhouses are highly recommended. They absorb liquid to create a thicker, pudding-like consistency and also add healthy fats and fiber, making your breakfast even more satisfying.
    • Sweetener (Optional): A touch of sweetness enhances the flavor. Maple syrup, honey, agave nectar, or a mashed banana are all great choices. Feel free to adjust the amount to your personal taste.
    • Flavor Boosters (Optional Mix-ins): This is where you can get creative. A pinch of cinnamon, a splash of vanilla extract, or a spoonful of cocoa powder can add wonderful depth of flavor and make your breakfast feel extra special.

    With these core ingredients on hand, you’re ready to create a delicious and convenient breakfast. This simple method saves time on busy mornings and will have you prepping with confidence.

    The Perfect Liquid-to-Oat Ratio

    Getting the right balance of oats to liquid is the key to achieving the perfect consistency—creamy, but not too watery or thick. Following a simple ratio guarantees reliable results every time, removing any guesswork.

    The standard starting point is a simple 1-to-1 ratio, meaning one part oats to one part liquid. If you add chia seeds to make your oats thicker and more nutritious, you will need to increase the amount of liquid.

    Here is a basic formula for a single serving:

    • 1/2 cup Rolled Oats
    • 1/2 cup Milk (or Dairy-Free Alternative)
    • 1 tablespoon Chia Seeds (This is optional, but highly recommended for creaminess and nutrition.)

    When using the optional chia seeds from the recipe above, you may want to increase the liquid to 3/4 cup to achieve that ideal creamy texture. Don’t be afraid to experiment to find what you like best!

    Remember, this is a flexible formula. If you prefer thicker oats, use slightly less liquid. If you like them thinner, add a bit more. Adjusting the ratio to your liking is part of the fun!

    How do you make overnight oats?

    A glass jar of overnight oats topped with fresh strawberries, blueberries, and almonds on a wooden table, with ingredients in the background.
    A photorealistic, professional food photography style image of a clear glass jar filled with classic overnight oats, topped with fresh berries (strawberries, blueberries) and a sprinkle of chopped almonds. The oats are perfectly creamy and inviting. The jar is placed on a light wooden surface, with a soft, warm light coming from the side. In the background, slightly out of focus, are a small bowl of rolled oats, a carton of milk, and a measuring spoon, suggesting the simple ingredients. High-quality food magazine photo, focus on freshness and appealing texture. No people. No artistic interpretations, no illustrations, no vector graphics, no abstract art.

    Step 1: Choose Your Jar and Add Oats

    Overnight oats are one of the easiest make-ahead breakfasts. To start, you’ll need the right container. We recommend a glass jar with a lid, as it lets you see the delicious layers. Mason jars, old jam jars, or even small food storage containers work perfectly.

    Next, add your oats. We suggest using rolled oats (also known as old-fashioned oats) for the best texture. Instant oats can become too mushy, while steel-cut oats won’t soften enough overnight. For a single serving, you will need:

    • ½ cup (45g) rolled oats

    This simple step is the foundation for your breakfast.

    Step 2: Pour in Your Liquid and Add Mix-ins

    Now it’s time to add your liquid, which is the key to creamy results. You can use any milk you prefer—dairy, almond, soy, and oat milk are all great choices. Using the right liquid-to-oat ratio ensures a creamy, not watery, consistency.

    Next, add your mix-ins for flavor and nutrients. Here’s a basic recipe:

    • ¾ cup (180ml) milk (or non-dairy alternative)
    • 1-2 teaspoons sweetener (like maple syrup, honey, or stevia)
    • 1 tablespoon chia seeds (these help thicken the oats and add healthy omega-3s [1])
    • Optional: ½ teaspoon vanilla extract for extra flavor
    • Optional: ¼ teaspoon cinnamon for warmth

    Don’t feel overwhelmed by the choices. Start with these basics, and you’ll see how easy it is to customize your meal.

    Step 3: Stir, Seal, and Refrigerate

    Give everything a good stir in the jar, making sure the oats and mix-ins are fully combined with the liquid. This prevents dry patches and helps the oats soften evenly. A fork or a small spoon works well for this.

    Once stirred:

    • Place the lid tightly on your jar. An airtight seal keeps your oats fresh and prevents them from absorbing other odors from the fridge.
    • Refrigerate for at least 4 hours. For the best texture, leave the jar in the fridge overnight (which is how they get their name!).

    That’s it! You’ve just prepared a delicious breakfast for a stress-free morning.

    Step 4: Add Toppings and Serve

    In the morning, your breakfast is ready to go—no cooking required. Just grab the jar from the fridge. Now for the fun part: toppings. This is where you can get creative and add more flavor, texture, and nutrition.

    Some of our favorite topping ideas include:

    • Fresh berries: blueberries, raspberries, sliced strawberries
    • Sliced banana or other fruits: apples, peaches
    • Nuts: almonds, walnuts, pecans
    • Seeds: flax seeds, pumpkin seeds, sunflower seeds
    • Nut butters: almond butter, peanut butter
    • A sprinkle of granola for crunch
    • A drizzle of honey or maple syrup for extra sweetness

    Enjoy your oats cold, straight from the fridge, or warm them in the microwave for 30-60 seconds if you prefer. Enjoy your delicious, homemade breakfast!

    What are the best recipe variations?

    Three clear glass jars of overnight oats in different flavors: chocolate peanut butter, tropical, and apple cinnamon, topped with various garnishes.
    A high-quality food magazine photo, professional food photography style, showcasing three distinct variations of overnight oats beautifully arranged on a light-colored kitchen counter. The first clear glass jar features chocolate peanut butter overnight oats, topped with a drizzle of melted chocolate and chopped peanuts. The second clear glass jar contains tropical overnight oats, garnished with sliced mango, shredded coconut, and a lime wedge. The third clear glass jar displays apple cinnamon overnight oats, topped with thinly sliced apples and a sprinkle of cinnamon. All jars are clear glass, displaying layers. The lighting is bright and natural, creating a warm and inviting atmosphere. Photorealistic. No people. No artistic interpretations, no illustrations, no vector graphics, no abstract art.

    High-Protein Overnight Oats

    Do you often feel hungry before lunch? If so, this high-protein version is your perfect answer. It helps you stay full and energized all morning, making it an excellent choice for a hearty and quick breakfast. Protein also supports muscle growth and recovery [2]. It’s a fantastic way to boost your morning meal.

    This recipe is incredibly simple, even for beginners. You just add a few key ingredients to our basic overnight oats base.

    Key Ingredients for High-Protein Oats:

    • Rolled Oats: Your base for fiber and slow-release energy.
    • Milk or Plant-Based Milk: Almond, soy, or dairy milk all work wonderfully.
    • Protein Powder: Use vanilla or unflavored whey, casein, or a plant-based option.
    • Chia Seeds: These add omega-3s, fiber, and even more protein.
    • Greek Yogurt (Optional): For an extra creamy texture and a protein boost.

    How to Make Them:

    1. In a jar, combine ½ cup rolled oats and 1 tablespoon chia seeds.
    2. Add 1 scoop of your favorite protein powder.
    3. Pour in ¾ cup milk or plant-based milk.
    4. If using, add ¼ cup plain Greek yogurt for extra creaminess.
    5. Stir thoroughly until the protein powder dissolves completely.
    6. Cover your jar and refrigerate overnight, or for at least 4 hours.
    7. In the morning, top with fresh berries, sliced almonds, or a drizzle of nut butter.

    Recipesmondial Tip: Always choose a protein powder flavor you enjoy. This ensures your breakfast is both nutritious and delicious, solving the struggle to find healthy, tasty meals on busy mornings.

    Overnight Oats with Yogurt

    Adding yogurt to overnight oats transforms them into an incredibly creamy and satisfying treat. This variation offers a delightful texture and a boost of probiotics, which are great for gut health. It also adds a tangy freshness that perfectly complements fruit toppings, resulting in a flavorful, easy-to-make breakfast.

    Why Add Yogurt?

    • Creamier Texture: Yogurt makes your oats rich and luxurious.
    • Probiotic Benefits: Supports a healthy digestive system.
    • Extra Protein: Greek yogurt, in particular, increases the protein content.
    • Tangy Flavor: Adds a lovely counterpoint to sweet fruits.

    Core Ingredients for Yogurt Overnight Oats:

    • Rolled Oats: The foundation of your breakfast.
    • Milk or Plant-Based Milk: Choose your favorite type.
    • Plain or Vanilla Yogurt: Greek yogurt is recommended for its thickness and protein.
    • Sweetener (Optional): A touch of maple syrup or honey works well.

    Making Your Creamy Creation:

    1. In a jar, combine ½ cup rolled oats and ⅓ cup plain or vanilla yogurt.
    2. Add ½ cup milk or plant-based milk.
    3. Stir in 1 tablespoon of your preferred sweetener, if using.
    4. Mix all ingredients thoroughly until well combined.
    5. Cover the jar and refrigerate for at least 4 hours, or overnight.
    6. Serve with toppings like sliced bananas, toasted coconut, or a sprinkle of cinnamon.

    Recipesmondial Tip: For a fruit-flavored version, use a fruit-on-the-bottom yogurt or stir in a spoonful of fruit jam before chilling. It’s a simple way to customize your breakfast with minimal effort.

    Overnight Oats for Weight Loss

    If you’re looking for a healthy, satisfying meal to support your weight loss goals, this overnight oats variation is ideal. It focuses on nutrient-dense ingredients that keep you feeling full without excess calories. Perfect for breakfast (or even a light dinner!), this recipe supports healthy habits without the stress of complex meal prep.

    Key Principles for Weight Loss Oats:

    • High Fiber: Promotes fullness and aids digestion.
    • Lean Protein: Helps maintain muscle mass and keeps you satisfied.
    • Low in Added Sugars: Relies on the natural sweetness from fruit.
    • Portion Control: Mindful serving sizes are essential.

    Ingredients for a Lighter Start:

    • Rolled Oats: Provides sustained energy.
    • Unsweetened Almond Milk: Low in calories and adds creaminess.
    • Chia Seeds: An excellent source of fiber and omega-3s.
    • Fresh Berries: Naturally sweet and packed with antioxidants.
    • A Touch of Sweetener (Optional): Such as stevia or a tiny bit of maple syrup.

    Your Simple Weight Loss Recipe:

    1. In a jar, combine ½ cup rolled oats and 1 tablespoon chia seeds.
    2. Pour in ¾ cup unsweetened almond milk.
    3. Add a pinch of cinnamon for flavor, if desired.
    4. Stir well to combine all ingredients.
    5. Cover and refrigerate overnight.
    6. In the morning, top with ¼ cup fresh berries, like blueberries or raspberries.

    Recipesmondial Tip: Avoid high-calorie add-ins like excessive nuts, chocolate chips, or sugary syrups. Instead, focus on fresh fruits and a sprinkle of spices for flavor. This approach keeps your meal prep simple and aligned with your health goals.

    Simple Overnight Oats for Kids

    Getting kids to eat a healthy breakfast can be a challenge. Simple overnight oats make mornings easy and fun for the whole family! This recipe is designed to appeal to kids with its mild flavor and fun, customizable toppings. It’s a perfect family-friendly solution for busy mornings.

    Making Oats Kid-Friendly:

    • Mild Flavors: Not too strong or spicy.
    • Light Sweetness: Just enough to be tasty, not overly sugary.
    • Fun Toppings: Letting kids choose makes breakfast exciting.
    • Safe Ingredients: Avoid common allergens or choking hazards for very young children.

    Kid-Approved Ingredients:

    • Rolled Oats: The wholesome base.
    • Whole Milk or Vanilla Plant Milk: For a slightly sweeter, richer taste.
    • A Hint of Sweetener: Maple syrup or honey.
    • Fun Toppings: Sprinkles, mini chocolate chips, sliced fruit, or even animal crackers.

    The Easiest Recipe for Little Ones:

    1. In a small jar or container, combine ½ cup rolled oats.
    2. Add ¾ cup whole milk or vanilla plant milk.
    3. Stir in 1 teaspoon maple syrup or honey.
    4. Mix well until everything is combined.
    5. Cover and refrigerate overnight.
    6. In the morning, let your child pick their favorite fun toppings! Ideas include:
      • Sliced strawberries or bananas
      • A few mini chocolate chips
      • A sprinkle of colored sprinkles (in moderation!)
      • A spoonful of applesauce

    Recipesmondial Tip: Involve your kids in choosing their toppings! This helps them feel excited about their healthy breakfast. This simple recipe makes breakfast a fun and stress-free activity for the whole family.

    Tips for Meal Prepping and Storing Overnight Oats

    Four clear glass jars of prepped overnight oats lined up on a kitchen counter, with a person's hands placing a lid on one jar.
    A photorealistic, professional food photography image depicting a set of four identical clear glass jars, neatly lined up on a clean, light-colored kitchen counter. Each jar is filled with classic overnight oats, prepped and ready for storage, with lids placed loosely or on the side. A real human’s hands are gently placing a lid on one of the jars in the foreground, demonstrating meal prep. The kitchen background is bright, warm, and tidy, with soft focus on a fruit bowl or a plant. The scene emphasizes organization, simplicity, and ease of meal prepping. High-quality food magazine photo. No artistic interpretations, no illustrations, no vector graphics, no abstract art.

    Meal prepping overnight oats is a true game-changer, offering a fantastic solution for busy mornings. This approach allows you to enjoy a delicious and quick breakfast idea without any fuss. It not only saves valuable time but also ensures you start your day feeling well-nourished. With a little planning, you can have a week’s worth of easy, flavorful meals made easy. Let’s dive into the best tips for preparing and storing your overnight oats recipe.

    Choosing the Right Containers for Storage

    Selecting the proper container is crucial for keeping overnight oats fresh and tasty. An airtight seal is key, as it keeps your oats from drying out and prevents them from absorbing unwanted fridge odors.

    • Glass Jars: Mason jars (8oz or 12oz are ideal) are a perfect choice. They are durable, visually appealing, reusable, and eco-friendly. Plus, you can easily see your delicious creation inside.
    • Food Prep Containers: Any container with a tight-fitting lid will work. For convenience, look for portion-sized, BPA-free plastic or glass options.
    • Airtight is Best: Always use containers that seal tightly to stop air from getting in. This simple step preserves the texture and flavor of your oats for much longer.

    How Long Do Overnight Oats Last?

    One of the best features of overnight oats is their impressive shelf life. Because you can prepare them well ahead of time, they are ideal for meal prep tips.

    • General Rule: Prepared overnight oats typically last for 3 to 5 days in the refrigerator, though this can depend on the freshness of your ingredients. [3]
    • Ingredient Impact: If you use very ripe fruit, the oats might spoil sooner. For best results, always use fresh milk or milk alternatives.
    • Smell and Sight: Trust your senses. If the oats smell off or look discolored, it’s best to discard them.
    • Freezing: While possible, freezing overnight oats is generally not recommended. The texture can become mushy upon thawing, so it’s better to enjoy them fresh from the fridge.

    Batch Prepping for Effortless Mornings

    Batch prepping overnight oats is a smart move that transforms stressful mornings into enjoyable, organized starts to your day. You’ll thank yourself later!

    • Assembly Line Method: Line up your containers and add the oats to each one. Then, pour in your liquid and add core mix-ins like chia seeds or protein powder. Stir, seal, and refrigerate.
    • Vary Your Flavors: To keep your breakfasts exciting, avoid making the same flavor for every day. Instead, consider different additions for each jar, such as berry, banana-nut, or apple-cinnamon.
    • Label and Date: Use a small label or a marker on your containers to note the date you prepared them. This will help you keep track of freshness.

    When to Add Your Toppings

    Toppings add fantastic flavor, texture, and nutrition to your easy recipes. However, adding them at the right moment is crucial for ensuring the best results.

    • Add Just Before Serving:
      • Fresh Fruit: Items like berries, sliced bananas, diced apples, or mango can get mushy or discolored if added too early.
      • Crunchy Toppings: Granola, nuts, seeds, and shredded coconut will lose their crispness if left to soak overnight.
      • Drizzles: Honey, maple syrup, nut butter, or chocolate sauce are best added last for a fresh finish.
    • Add During Prep (Optional):
      • Spices: Cinnamon, nutmeg, or pumpkin pie spice will meld well with the other ingredients overnight.
      • Protein Powder: This should be mixed in with the oats and liquid so it can dissolve properly and help thicken the mixture.
      • Dried Fruit: Raisins, cranberries, or chopped dates can be added at night, which allows them to soften and plump up.

    Common Mistakes to Avoid

    Even with a recipe as simple as overnight oats, a few common errors can occur. Being aware of them will help you make perfect oats every time.

    • Not Using an Airtight Container: This is a big one. An open container allows air to get in, which can lead to dry oats or the absorption of unwanted fridge flavors.
    • Adding All Toppings Too Early: We discussed this, but it’s worth repeating. Soggy granola or discolored fruit can ruin the experience. Keep those crunchy and fresh items separate until morning.
    • Incorrect Liquid-to-Oat Ratio: Too much liquid makes the oats soupy, while too little makes them thick and dry. For best results, stick to the recommended ratio in the main recipe.
    • Forgetting the Chill Time: Overnight oats need adequate time to thicken and soften. Rushing this step will result in a watery breakfast. Give them at least 4 hours, but ideally a full night, to set.

    Following these simple meal prep tips will help you master the art of making overnight oats. You’ll be able to plan your weekly breakfasts efficiently, ensuring you always have a delicious meal ready to go. Enjoy cooking and eating well with Recipesmondial!

    Frequently Asked Questions About Overnight Oats

    Is overnight oats actually healthy?

    Yes, overnight oats are a healthy choice for a quick breakfast or snack. This simple dish is full of nutritional benefits.

    First, oats are packed with soluble fiber, which helps lower cholesterol and supports digestive health. This fiber also keeps you feeling full for longer, making you less likely to snack before your next meal [source: https://www.hsph.harvard.edu/nutritionsource/food-features/oats/].

    In addition, oats provide complex carbohydrates for sustained energy throughout your morning, helping you avoid a mid-morning slump. They also contain important vitamins and minerals, including manganese, phosphorus, magnesium, and B vitamins.

    The overall healthiness of your overnight oats depends on what you add. With the right mix-ins, you can easily create a nutrient-dense meal:

    • Fresh or frozen fruit for vitamins and natural sweetness.
    • Nuts or seeds for healthy fats and extra protein.
    • A scoop of protein powder for high-protein overnight oats.
    • A dollop of Greek yogurt for added probiotics and creaminess.

    However, be mindful of added sugars from toppings or sweetened milks, as these can increase the calorie count. By making smart choices, overnight oats can be a cornerstone of a healthy, balanced diet.

    What if I eat overnight oats every day?

    Eating overnight oats every day can be a great habit for a healthy lifestyle, especially if you need quick breakfast ideas. You’ll consistently get a good dose of fiber, vitamins, and minerals, which can improve digestion and provide steady energy levels.

    However, variety is key to a healthy diet. To ensure you get a full range of nutrients, switch up your mix-ins. For example, try different fruits each day—use berries one day and sliced bananas or diced apples the next. This introduces a wider range of vitamins and antioxidants.

    Furthermore, alternate your protein and healthy fat sources, such as switching between chia seeds, flax seeds, and almonds. You can also experiment with different types of milk. This strategy prevents dietary boredom and ensures a broader nutrient intake, keeping your daily overnight oats both beneficial and flavorful.

    What not to add to overnight oats?

    While overnight oats are versatile, some additions can detract from their health benefits or ruin the texture. To keep your breakfast delicious and wholesome, here are a few ingredients to avoid or limit:

    • Excessive Added Sugar: While many recipes call for maple syrup or honey, use them sparingly. Too much added sugar can turn a healthy breakfast into a dessert. Instead, opt for the natural sweetness from fruit.
    • Sugary Cereals or Candies: These toppings may add a sweet crunch, but they also add empty calories and refined sugars with little nutritional value.
    • Large Chunks of Hard Fruit: Hard fruits like whole grapes or large apple pieces might not soften enough overnight, leading to an unpleasant texture. For best results, always chop them into small, bite-sized pieces.
    • Too Many High-Calorie Toppings: Although nuts, seeds, and nut butters are healthy, they are also calorie-dense. Be sure to measure your portions, as too much can significantly increase the overall calorie count.
    • Carbonated Liquids: Never use soda or sparkling water, as they will create an unappetizing texture. Stick with milk, water, or plant-based milk alternatives.

    By focusing on simple, fresh ingredients, you can enhance both the flavor and nutritional value of your meal.

    Can I make overnight oats with water instead of milk?

    Yes, you can absolutely make overnight oats with water instead of milk. This is a great option if you are avoiding dairy, want a lighter breakfast, or are looking for a budget-friendly choice.

    Keep in mind that using water will affect the taste and texture. Milk and plant-based milks create a creamier, richer consistency and add more flavor and protein. Oats made with water will have a plainer, less creamy base.

    To enhance the flavor and texture when using water, consider these tips:

    • Add More Fruit: Berries, bananas, or mango naturally sweeten and add creaminess.
    • Include Seeds: Chia seeds or ground flax seeds thicken the mixture while providing healthy fats and fiber.
    • Sweeten Naturally: A touch of maple syrup, honey, or a mashed date can add sweetness.
    • Boost Flavor: A pinch of cinnamon, vanilla extract, or a swirl of nut butter can transform the taste.
    • Add Yogurt: For extra creaminess and protein, stir in a spoonful of yogurt just before serving.

    Using water is a practical and beginner-friendly choice that allows for easy customization. With a few simple additions, you can still enjoy delicious and healthy overnight oats.


    Sources

    1. https://www.hsph.harvard.edu/nutritionsource/food-features/chia-seeds/
    2. https://www.ncbi.nlm.nih.gov/pmc/articles/PMC8308892/
    3. https://food.unl.edu/food-preparation-and-storage

  • 25+ Easy Quinoa Recipes for Breakfast, Lunch, and Dinner

    25+ Easy Quinoa Recipes for Breakfast, Lunch, and Dinner

    Quinoa is a highly versatile, gluten-free seed used in countless healthy recipes. It works well in savory dishes like salads, dinner bowls with chicken or vegetables, and hearty soups, as well as sweet preparations like breakfast porridge. Its mild, nutty flavor and fluffy texture make it a popular and easy-to-prepare base for any meal.

    Struggling with complex recipes and stressful meal prep? Quinoa is the simple solution you’ve been looking for. This versatile superfood, packed with protein and fiber, is a game-changer for anyone wanting quick, healthy, and tasty meals. It’s perfect for busy home cooks, beginner chefs, and everyone who wants to make cooking a stress-free experience.

    At Recipesmondial, we believe cooking should be an enjoyable experience, not a chore. That’s why we’ve gathered over 25 easy quinoa recipes to build your confidence and inspire creativity. Our step-by-step guidance ensures reliable results for every meal, whether you need quick breakfast ideas, simple lunches, or hearty, flavorful dinner recipes. You’ll also discover a world of effortless options, from healthy snacks to comforting global flavors.

    Ready to unlock the full potential of quinoa? We’ll start by showing you how to cook perfect, fluffy quinoa every time—a key foundational skill. Then, we’ll dive into our collection of beginner-friendly recipes. Each one offers practical tips and approachable inspiration to make mealtime delicious and stress-free. Let’s make cooking with quinoa simple, flavorful, and rewarding!

    Why Is Quinoa a Great Choice for Easy Meals?

    Looking for wholesome meals that are also easy to prepare? Quinoa is the perfect solution. This popular “superfood” is a favorite in kitchens worldwide for good reason, making it an excellent choice for anyone who wants to enjoy stress-free cooking.

    At Recipesmondial, we understand the need for quick and reliable meal solutions. Quinoa delivers just that, transforming simple ingredients into delicious, beautiful meals. With this versatile grain, you’ll discover new flavors and build confidence in the kitchen.

    Why Quinoa is a Kitchen Essential

    Quinoa is more than just a trend—it’s a kitchen staple that makes healthy, flavorful meals accessible to everyone. Here’s why it should be your go-to for easy recipes:

    • Nutritional Powerhouse: Quinoa is a complete protein, containing all nine essential amino acids, which makes it a fantastic choice for vegetarians, vegans, and anyone looking to boost their protein intake [source: https://www.hsph.harvard.edu/nutritionsource/food-features/quinoa/]. It’s also rich in fiber to aid digestion and help you feel full longer.
    • Effortless to Prepare: As simple as boiling water, quinoa cooks much faster than other grains—often in just 15–20 minutes. This speed makes it perfect for quick meals on busy days and removes the stress of complex recipes.
    • Incredibly Versatile: Quinoa’s mild, nutty flavor makes it an ideal canvas for any cuisine, from savory to sweet. Use it as a base for simple dinner recipes, a hearty addition to salads, or even a creative ingredient in quick breakfast ideas.
    • Perfect for Meal Prep: Cook a large batch of quinoa at the start of the week to use in various dishes for days. This simple strategy is one of our top meal prep tips because it saves valuable time and keeps you organized during busy weekdays.
    • Naturally Gluten-Free: Quinoa is a safe and delicious option for anyone with gluten sensitivities or dietary restrictions, allowing you to enjoy grain-based meals without worry.
    • Absorbs Flavors Beautifully: While it has a subtle, nutty taste on its own, quinoa readily soaks up the flavors of dressings, sauces, and spices. This unique quality allows you to create flavorful meals made easy without needing complex techniques.

    With quinoa, you can confidently prepare healthy, tasty, and family-friendly meals in minutes. It simplifies home cooking, making it a truly enjoyable and stress-free experience.

    How to Cook Perfect, Fluffy Quinoa Every Time

    A close-up of a bowl of perfectly cooked, fluffy white quinoa, steaming lightly.
    Professional food photography, photorealistic, high-quality food magazine photo. A perfectly cooked bowl of fluffy white quinoa, steaming gently, shot with a shallow depth of field to emphasize the individual grains. The quinoa is presented in a rustic ceramic bowl on a light wooden surface, with soft, natural lighting creating subtle shadows. No artistic interpretations, no illustrations, no vector graphics, no abstract art.

    How to Cook Perfect, Fluffy Quinoa Every Time

    Cooking quinoa perfectly is a simple skill that transforms healthy, tasty meals. While it might seem daunting, our step-by-step guide makes it easy to get fluffy, flavorful results every time. This versatile, grain-like seed is perfect for quick family dinners and beginner-friendly recipes. Let’s make cooking quinoa a stress-free and enjoyable part of your routine.

    The Ideal Quinoa-to-Water Ratio

    The secret to fluffy quinoa is the ratio of grain to liquid. Too much liquid makes quinoa mushy, while too little leaves it undercooked. For the perfect light and airy texture, a reliable ratio is key.

    For most types of quinoa (white, red, or black), use this simple formula:

    • 1 cup dry quinoa
    • 2 cups liquid (water or broth)

    This ratio helps the grains absorb just enough liquid to become tender and separate, preventing them from clumping. Mastering this is a simple step that guarantees great results.

    Step-by-Step Cooking Instructions

    Following these simple steps will give you perfectly cooked quinoa every time. Prepare to go from uncertain to confident in just a few minutes!

    1. Rinse the Quinoa: Place the dry quinoa in a fine-mesh sieve and rinse it under cold running water for about 30 seconds. This crucial step removes saponin, a natural coating that can give quinoa a bitter taste. [1]
    2. Combine Ingredients: Transfer the rinsed quinoa to a medium saucepan. Pour in 2 cups of your chosen liquid (water or broth works well) and add a pinch of salt to enhance the flavor.
    3. Bring to a Boil: Place the saucepan over medium-high heat and bring the liquid to a rolling boil.
    4. Reduce and Simmer: Once boiling, immediately reduce the heat to low and cover the saucepan tightly with a lid. Let it simmer gently for 15 minutes. Try not to lift the lid during this time.
    5. Rest Off Heat: After 15 minutes, remove the saucepan from the heat but keep the lid on. Let the quinoa rest and steam for another 5-10 minutes. This step is essential for making the grains extra fluffy.
    6. Fluff and Serve: Finally, remove the lid and use a fork to gently fluff the quinoa. The grains should be light, separate, and tender. Your perfect quinoa is ready to serve!

    This straightforward method consistently delivers delicious, fluffy quinoa perfect for any meal.

    Tips for Adding More Flavor

    While delicious on its own, quinoa is also a perfect canvas for other flavors. These simple additions can easily transform it from a simple side to the star of the dish.

    • Use Broth: Instead of water, cook your quinoa in vegetable, chicken, or beef broth to instantly infuse it with a savory depth.
    • Aromatics First: Before adding the quinoa, sauté finely diced onion or garlic in a little olive oil in the saucepan until fragrant.
    • Herbs and Spices: Stir in dried herbs like oregano, thyme, or a bay leaf while the quinoa simmers. Add fresh herbs like parsley or cilantro after fluffing.
    • Citrus Zest: After cooking, stir in a teaspoon of lemon or lime zest for a bright, fresh finish that complements many dishes.
    • Toasted Nuts or Seeds: For added texture and flavor, fold in a handful of toasted pine nuts, slivered almonds, or pumpkin seeds after fluffing.
    • A Dash of Fat: Stir in a small pat of butter or a drizzle of extra virgin olive oil after fluffing to add richness and a beautiful sheen.

    Use these tips to get creative in the kitchen. At Recipesmondial, our goal is to help you discover new flavors and make mealtime delicious and stress-free.

    Quick and Healthy Quinoa Breakfast Recipes

    A colorful quinoa breakfast bowl topped with fresh berries, banana, chia seeds, and honey.
    Professional food photography, photorealistic, high-quality food magazine photo. A vibrant and appealing quinoa breakfast bowl, artfully arranged. The bowl contains cooked quinoa topped generously with fresh, colorful ingredients: sliced strawberries, blueberries, a few banana slices, a sprinkle of chia seeds, and a delicate drizzle of maple syrup or honey. The background is softly blurred, suggesting a cozy kitchen setting with natural morning light. No artistic interpretations, no illustrations, no vector graphics, no abstract art.

    Starting your day with a nutritious breakfast sets a positive tone, and quinoa is a fantastic choice. As a complete protein, it contains all nine essential amino acids, making it a powerful ingredient for quick and healthy breakfast recipes [1]. Plus, quinoa is incredibly versatile.

    You can easily transform this superfood into delicious, energy-boosting morning meals. Forget complex instructions; our step-by-step guidance makes it simple. Let’s explore some flavorful ways to enjoy quinoa for breakfast.

    Comforting Quinoa Porridge (Sweet)

    Think of quinoa porridge as a warm, comforting, and gluten-free alternative to oatmeal. This beginner-friendly recipe is perfect for busy mornings, as you can prepare a large batch and enjoy it all week.

    Basic Quinoa Porridge Recipe

    This simple recipe is an excellent starting point for making your own delicious quinoa porridge.

    1. Combine Ingredients: In a small saucepan, combine 1/2 cup cooked quinoa, 1 cup milk (dairy or non-dairy), and 1/4 teaspoon cinnamon.
    2. Simmer Gently: Bring the mixture to a gentle simmer over medium heat, stirring occasionally.
    3. Thicken: Continue cooking for 5-7 minutes until the porridge thickens to your desired consistency.
    4. Sweeten and Serve: Remove from the heat and stir in 1-2 teaspoons of maple syrup or honey. Serve warm.

    Flavorful Variations and Topping Ideas

    Personalize your quinoa porridge to make every bowl unique. These ideas add wonderful flavor and texture.

    • Fresh Fruit: Sliced bananas, berries, diced apples, or peaches add natural sweetness.
    • Nuts and Seeds: A sprinkle of chopped almonds, walnuts, chia seeds, or flaxseeds boosts healthy fats and crunch.
    • Dried Fruit: Raisins, cranberries, or chopped dates are also delicious additions.
    • Spices: A pinch of nutmeg, cardamom, or pumpkin pie spice blend enhances the flavor.
    • Nut Butters: A swirl of almond butter or peanut butter adds creaminess and extra protein.

    Energizing Savory Quinoa Breakfast Bowls

    If you prefer a savory start to your day, quinoa bowls are an excellent choice. They are quick, satisfying, and highly adaptable, making them perfect for meal prep. Best of all, you can use any leftover cooked quinoa.

    Simple Savory Quinoa Bowl Idea

    Follow this basic formula to turn simple ingredients into a delicious and healthy meal.

    1. Warm Quinoa: Gently warm 1 cup of cooked quinoa in a pan or microwave.
    2. Add Protein: Top with a fried egg, scrambled eggs, or some leftover cooked chicken.
    3. Introduce Veggies: Add your favorite cooked vegetables, such as sautéed spinach, roasted bell peppers, or cherry tomatoes.
    4. Garnish and Enjoy: Finish with sliced avocado and a sprinkle of everything bagel seasoning or fresh herbs. A dash of hot sauce is optional.

    Creative Savory Quinoa Toppings

    Experiment with different toppings to keep your breakfast exciting. These combinations offer variety and bold flavor.

    • Cheese: Crumbled feta, goat cheese, or a sprinkle of cheddar.
    • Beans: Black beans or chickpeas for added fiber and plant-based protein.
    • Pesto or Salsa: A spoonful adds a burst of instant flavor.
    • Hummus: A dollop of hummus makes the bowl extra creamy and delicious.

    Handy Quinoa Breakfast Bites (Meal Prep Friendly)

    For truly busy mornings, these grab-and-go quinoa breakfast bites are a lifesaver. They are easy to make ahead, making them a perfect meal prep solution for the whole family.

    How to Make Quinoa Breakfast Bites

    These nutrient-packed bites are like mini frittatas and are incredibly easy to prepare.

    1. Preheat Oven: Preheat your oven to 375°F (190°C) and lightly grease a muffin tin.
    2. Combine Ingredients: In a large bowl, whisk 4 eggs. Stir in 1 cup cooked quinoa, 1/2 cup shredded cheese, and 1/4 cup finely chopped vegetables (e.g., bell peppers, spinach, zucchini). Season with salt and pepper.
    3. Fill Muffin Tin: Spoon the mixture evenly into the muffin cups.
    4. Bake: Bake for 15-20 minutes, or until the bites are set and lightly golden.
    5. Cool and Store: Let the bites cool before removing them from the tin. Store in an airtight container in the fridge for up to 4 days.

    Delicious Flavor Combinations

    Get creative with your breakfast bites! Here are some ideas to inspire you:

    • Mediterranean: Feta cheese, sun-dried tomatoes, and spinach.
    • Southwestern: Black beans, corn, diced jalapeño, and cheddar cheese.
    • Broccoli Cheddar: Steamed, chopped broccoli florets with sharp cheddar.

    Tips for the Best Quinoa Breakfasts

    Keep these practical tips in mind to make your morning routine even smoother.

    • Pre-cook Quinoa: Cook a large batch of quinoa at the start of the week and store it in the fridge. This saves significant time each morning.
    • Customize to Taste: Quinoa is a blank canvas, so feel free to adjust sweetness, spices, and toppings to suit your preferences.
    • Use Up Leftovers: Savory quinoa bowls are fantastic for using up leftover roasted vegetables or cooked meats from dinner.
    • Add Protein: Boost your breakfast by adding eggs, nuts, seeds, or even a scoop of protein powder to sweet porridges.

    With these quick and healthy quinoa breakfast recipes, you’re ready to start your day with a flavorful, stress-free meal. Whether you prefer sweet or savory, quinoa is a simple and versatile ingredient for a nutritious morning. Enjoy!

    Simple Quinoa Recipes for Lunch and Salads

    Looking for a lunch that’s quick, nutritious, and incredibly tasty? Quinoa is your answer. It’s a fantastic choice for satisfying lunches and vibrant salads, packed with protein and fiber to keep you full and energized all afternoon.

    At Recipesmondial, we believe cooking should be enjoyable, not stressful. That’s why we bring you easy quinoa recipes that are flavorful, approachable, and perfect for busy weekdays. Say goodbye to complicated instructions and hello to confidence in the kitchen with our clear, step-by-step guidance.

    Why Quinoa Excels for Lunch & Salads

    Quinoa isn’t just a healthy grain; it’s a versatile foundation for countless easy meals. Here’s why it stands out as a lunch and salad superstar:

    • Quick to Cook: Quinoa cooks in about 15 minutes, making it perfect for last-minute meals.
    • Nutrient Powerhouse: It’s a complete protein with all essential amino acids and is rich in fiber, iron, and magnesium [1].
    • Excellent for Meal Prep: Cook a large batch on the weekend to use in different lunches throughout the week.
    • Absorbs Flavors: Quinoa beautifully takes on the flavors of dressings, herbs, and other ingredients.
    • Naturally Gluten-Free: It’s a safe and delicious option for anyone with gluten sensitivities.

    Crafting the Perfect Quinoa Salad or Bowl

    Building a delicious quinoa lunch is simpler than you think. Just focus on layering complementary flavors and textures. Here are the core components to consider:

    • Fluffy Quinoa: Start with a base of perfectly cooked quinoa.
    • Fresh Vegetables: Add color and nutrients with chopped cucumber, tomatoes, bell peppers, or leafy greens.
    • Protein Boost: To make your meal more satisfying, include grilled chicken, chickpeas, black beans, or feta cheese.
    • Flavorful Dressing: A simple vinaigrette or creamy sauce brings all the elements together.
    • Crunchy Elements: Finish with toasted nuts, seeds, or crispy croutons for a delightful texture.

    Simple Quinoa Recipes for Delicious Lunches

    Ready to get started? Here are a few beginner-friendly recipes perfect for quick lunches, easy dinners, or weekly meal prep.

    1. Zesty Mediterranean Quinoa Salad

    Bursting with fresh Mediterranean flavors, this vibrant salad is a healthy, balanced, and family-friendly meal that’s incredibly easy to make.

    Ingredients:
    • 1 cup cooked quinoa, cooled
    • 1 cup chopped cucumber
    • 1 cup cherry tomatoes, halved
    • 1/2 cup crumbled feta cheese (omit for dairy-free)
    • 1/4 cup chopped red onion
    • 1/4 cup chopped fresh parsley
    • 1/4 cup Kalamata olives, halved
    • For the Lemon Vinaigrette:
      • 3 tablespoons extra virgin olive oil
      • 2 tablespoons fresh lemon juice
      • 1 teaspoon dried oregano
      • 1/2 teaspoon salt
      • 1/4 teaspoon black pepper
    Instructions:
    1. In a large bowl, combine the cooled quinoa, cucumber, tomatoes, feta, red onion, parsley, and olives.
    2. In a small bowl, whisk together the olive oil, lemon juice, oregano, salt, and pepper.
    3. Pour the dressing over the quinoa mixture and toss gently to combine.
    4. Serve immediately, or chill for at least 30 minutes to allow the flavors to meld.
    Tips & Variations:
    • Add Protein: For a heartier meal, stir in grilled chicken or chickpeas.
    • Spice it Up: A pinch of red pepper flakes adds a nice kick.
    • Meal Prep: Prepare the quinoa and chop vegetables ahead of time. Store the dressing separately and combine just before serving to keep it fresh.

    2. Southwestern Black Bean & Corn Quinoa Bowl

    This flavorful, budget-friendly meal is a go-to for quick lunches. Packed with plant-based protein and fiber, it’s also incredibly satisfying.

    Ingredients:
    • 1 cup cooked quinoa, cooled
    • 1 (15-ounce) can black beans, rinsed and drained
    • 1 cup corn (frozen, canned, or fresh)
    • 1/2 cup chopped red bell pepper
    • 1/4 cup chopped red onion
    • 2 tablespoons chopped fresh cilantro
    • 1 avocado, diced
    • For the Creamy Lime Dressing:
      • 1/4 cup plain Greek yogurt or sour cream (use dairy-free for vegan)
      • 2 tablespoons lime juice
      • 1 tablespoon olive oil
      • 1/2 teaspoon cumin
      • 1/4 teaspoon chili powder
      • Salt and pepper to taste
    Instructions:
    1. In a large bowl, combine the cooled quinoa, black beans, corn, red bell pepper, red onion, and cilantro.
    2. In a separate small bowl, whisk together all dressing ingredients until smooth.
    3. Pour the dressing over the quinoa mixture and toss to combine.
    4. Gently fold in the diced avocado just before serving to prevent browning.
    Tips & Variations:
    • Add Heat: Include a diced jalapeño or a dash of your favorite hot sauce.
    • Extra Crunch: Top with crushed tortilla chips for added texture.
    • Roast the Corn: For a deeper, smokier flavor, roast fresh or frozen corn kernels before adding them.

    3. Green Goddess Quinoa Salad

    Wonderfully refreshing and full of fresh herbs, this healthy salad makes a perfect light lunch or a vibrant side dish.

    Ingredients:
    • 1 cup cooked quinoa, cooled
    • 2 cups mixed greens (spinach, romaine, or spring mix)
    • 1/2 cup chopped cucumber
    • 1/2 cup green peas (frozen, thawed)
    • 1/4 cup chopped green onions
    • 2 tablespoons toasted pumpkin seeds or sunflower seeds
    • For the Green Goddess Dressing:
      • 1/2 cup plain Greek yogurt (or dairy-free yogurt for vegan)
      • 1/4 cup fresh parsley leaves
      • 1/4 cup fresh dill sprigs
      • 2 tablespoons fresh chives, chopped
      • 1 tablespoon lemon juice
      • 1 tablespoon olive oil
      • 1 small garlic clove, minced
      • Salt and pepper to taste
    Instructions:
    1. First, prepare the dressing. Combine all Green Goddess dressing ingredients in a blender or food processor and blend until smooth and creamy.
    2. In a large bowl, combine the cooled quinoa, mixed greens, cucumber, green peas, and green onions.
    3. Pour your desired amount of dressing over the salad and toss gently to coat.
    4. Serve immediately, garnished with toasted seeds.
    Tips & Variations:
    • Add Chicken or Chickpeas: For more protein, add shredded cooked chicken or a can of drained chickpeas.
    • Different Veggies: Try adding blanched asparagus, broccoli florets, or diced avocado.
    • Make it a Wrap: Spoon the finished salad into large lettuce leaves or whole wheat tortillas.

    Smart Meal Prep Tips for Quinoa Lunches

    Planning lunches ahead of time is a game-changer for busy weeks. These simple tips will streamline your routine and make healthy eating easy:

    • Cook Quinoa in Bulk: Make a large batch of quinoa once a week. Store it in an airtight container in the fridge for up to 5 days.
    • Chop Ahead: Wash and chop your vegetables on prep day and store them in separate containers for quick assembly.
    • Dressings on the Side: Always store dressings separately from your salad ingredients to prevent sogginess and keep vegetables crisp.
    • Layer Your Bowls: When packing lunches, place quinoa at the bottom, followed by heavier vegetables, and finish with leafy greens on top.
    • Portion Control: Use individual containers for each lunch for easy grab-and-go meals.

    With these approachable recipes, you can confidently cook healthy and tasty meals in no time. Enjoy discovering new flavors with Recipesmondial!

    Hearty and Flavorful Quinoa Dinner Recipes

    Vegetarian Quinoa Recipes

    Looking for easy, healthy dinner ideas that are bursting with flavor? Quinoa is your perfect plant-based hero. It’s a complete protein, meaning it contains all nine essential amino acids [source: https://www.ncbi.nlm.nih.gov/pmc/articles/PMC8900010/], which makes it a fantastic base for satisfying vegetarian meals. With these beginner-friendly recipes, you’ll discover new simple dishes and enjoy stress-free cooking.

    Mediterranean Quinoa Bowls

    Full of fresh tastes, these vibrant bowls are quick to assemble, making them perfect for a light yet filling dinner. To make weeknight meals a breeze, you can easily prep the quinoa and chop the vegetables ahead of time.

    • Ingredients: Cooked quinoa, chopped cucumber, cherry tomatoes (halved), Kalamata olives, crumbled feta cheese, red onion (thinly sliced), chickpeas (rinsed and drained), fresh parsley, lemon vinaigrette.
    • Simple Steps:
      1. In a large bowl, combine the cooked quinoa, cucumber, tomatoes, olives, feta, red onion, and chickpeas.
      2. Drizzle with lemon vinaigrette.
      3. Toss gently to combine all ingredients.
      4. Garnish with fresh parsley before serving.
    • Tips & Variations:
      • Add grilled halloumi or roasted bell peppers for extra flavor.
      • Swap chickpeas for cannellini beans.
      • For a vegan option, omit feta and add avocado slices.
      • For easy meal prep, prepare the components ahead of time and store the dressing separately.

    Black Bean and Corn Quinoa Stuffed Bell Peppers

    A visual treat, these colorful stuffed peppers are an incredibly satisfying and family-friendly way to enjoy a hearty, vegetable-based meal.

    • Ingredients: Large bell peppers (any color), cooked quinoa, black beans (rinsed and drained), corn (fresh, frozen, or canned), diced onion, minced garlic, cumin, chili powder, salsa, shredded cheese (optional), olive oil.
    • Simple Steps:
      1. Preheat your oven to 375°F (190°C).
      2. Cut the bell peppers in half lengthwise, then remove the seeds and membranes.
      3. In a bowl, mix the cooked quinoa, black beans, corn, diced onion, garlic, cumin, chili powder, and salsa.
      4. Lightly grease a baking dish and place the pepper halves inside, cut-side up.
      5. Spoon the quinoa mixture into each pepper half.
      6. Bake for 20-25 minutes.
      7. If using cheese, sprinkle it on top during the last 5 minutes of baking.
    • Tips & Variations:
      • Add diced zucchini or spinach to the filling.
      • For a smoky flavor, add a pinch of smoked paprika.
      • Serve with a dollop of sour cream or Greek yogurt.
      • Use mini bell peppers to create a fun appetizer.

    Quinoa Recipes with Chicken

    For a robust and satisfying dinner, try incorporating chicken into your quinoa dishes. These simple recipes deliver great protein and flavor, making them perfect for busy families or anyone looking for approachable home cooking.

    Lemon Herb Chicken and Quinoa Skillet

    This easy skillet meal brings together tender chicken, fluffy quinoa, and fresh herbs for a quick and flavorful dinner. Plus, with minimal cleanup, it’s a perfect weeknight solution.

    • Ingredients: Boneless, skinless chicken breasts (diced), cooked quinoa, chicken broth, lemon juice, fresh parsley (chopped), dried oregano, garlic powder, olive oil, salt and pepper.
    • Simple Steps:
      1. Heat olive oil in a large skillet over medium-high heat.
      2. Add the diced chicken and season with salt, pepper, and garlic powder.
      3. Cook until the chicken is browned and cooked through, then remove it from the skillet.
      4. Pour the chicken broth into the skillet and bring it to a simmer.
      5. Stir in the cooked quinoa, lemon juice, and oregano.
      6. Return the chicken to the skillet and heat through for 2-3 minutes.
      7. Stir in fresh parsley just before serving.
    • Tips & Variations:
      • Add some frozen peas or chopped spinach for extra vegetables.
      • Use dried thyme or rosemary instead of oregano.
      • A splash of white wine can deepen the flavor.
      • Serve with a side salad for a complete meal.

    Quick Chicken and Veggie Quinoa Stir-Fry

    A versatile and healthy option, this stir-fry incorporates quinoa for added texture and nutrition. It’s also a quick way to use up leftover vegetables, creating a balanced meal in minutes.

    • Ingredients: Cooked chicken (shredded or diced), cooked quinoa, mixed stir-fry vegetables (broccoli, carrots, snap peas, bell peppers), soy sauce (or tamari), ginger (grated), garlic (minced), sesame oil, olive oil.
    • Simple Steps:
      1. Heat olive oil in a large wok or skillet over medium-high heat.
      2. Add minced garlic and grated ginger, and cook for 30 seconds until fragrant.
      3. Add the stir-fry vegetables and cook for 5-7 minutes until tender-crisp.
      4. Stir in the cooked chicken and cooked quinoa.
      5. Pour in the soy sauce and sesame oil, then toss everything to combine.
      6. Cook for another 2-3 minutes to ensure all ingredients are heated through.
    • Tips & Variations:
      • Add a sprinkle of sesame seeds for garnish.
      • Use different vegetables based on what you have.
      • For a spicy kick, add a dash of sriracha.
      • This is a great meal prep idea; portions can be stored for lunches.

    Family-Friendly One-Pan Meals

    One-pan meals are a busy cook’s best friend because they involve simple steps and incredibly easy cleanup. These recipes simplify cooking, so you can enjoy more time with your family without sacrificing a flavorful meal.

    One-Pan Sausage, Veggies, and Quinoa

    The epitome of a simple dinner, this dish combines protein, vegetables, and grain on a single baking sheet. It’s a perfect, crowd-pleasing solution for busy weeknights.

    • Ingredients: Cooked quinoa, chicken or turkey sausage (sliced), broccoli florets, bell peppers (chopped), red onion (wedges), olive oil, garlic powder, paprika, salt, pepper.
    • Simple Steps:
      1. Preheat your oven to 400°F (200°C).
      2. Line a large baking sheet with parchment paper for easy cleanup.
      3. On the baking sheet, toss the sausage, broccoli, bell peppers, and red onion with olive oil, garlic powder, paprika, salt, and pepper.
      4. Spread the ingredients in a single layer.
      5. Roast for 20-25 minutes, or until the vegetables are tender and slightly caramelized.
      6. Remove from the oven and stir in the cooked quinoa directly on the baking sheet.
      7. Serve immediately.
    • Tips & Variations:
      • Add other quick-cooking vegetables like zucchini or cherry tomatoes.
      • A sprinkle of grated Parmesan cheese adds a savory finish.
      • Use your favorite seasonings for a custom flavor profile.
      • This method is great for meal prep throughout the week.

    Cheesy Quinoa Taco Bake

    If your family loves tacos, they will adore this easy, cheesy bake. It offers all the classic taco flavors in a comforting, crowd-pleasing casserole style.

    • Ingredients: Cooked quinoa, ground beef or turkey (cooked and drained), taco seasoning, black beans (rinsed and drained), corn, canned diced tomatoes with green chilies (undrained), shredded cheddar or Mexican blend cheese.
    • Simple Steps:
      1. Preheat your oven to 375°F (190°C).
      2. In a large oven-safe dish (like a 9×13 inch baking dish), combine the cooked quinoa, cooked ground meat, taco seasoning, black beans, corn, and diced tomatoes with green chilies.
      3. Stir well to mix all ingredients evenly.
      4. Sprinkle the shredded cheese generously over the top.
      5. Bake for 20-25 minutes, or until the cheese is melted and bubbly.
      6. Let the dish rest for a few minutes before serving.
    • Tips & Variations:
      • Top with fresh cilantro, sour cream, or avocado slices.
      • Add a layer of crushed tortilla chips before baking for extra crunch.
      • For a vegetarian version, swap the meat for extra beans or lentils.
      • This dish reheats beautifully for next-day lunches.

    Frequently Asked Questions About Cooking With Quinoa

    What are the best quinoa recipes for beginners?

    Starting your quinoa journey is exciting! The best recipes for beginners are simple, use everyday ingredients, and build your confidence. These easy recipes will show you just how versatile quinoa can be.

    We recommend starting with basic preparations to get comfortable with cooking quinoa perfectly. Once you master the basics, you can easily add your favorite flavors.

    • Basic Fluffy Quinoa Side Dish: Simply cook quinoa with water or broth to create a fantastic base. You can serve it instead of rice or pasta, as it pairs well with almost any meal.
    • Quick Quinoa Salad: Once your quinoa is cooked and cooled, toss it with chopped cucumbers, tomatoes, bell peppers, and a simple lemon vinaigrette. It’s a fresh, healthy lunch idea and an easy staple for home cooking.
    • Simple Quinoa Breakfast Bowl: Cook quinoa with milk (dairy or non-dairy), then add a pinch of cinnamon and a touch of maple syrup. Top with fresh berries and nuts for a nourishing and delicious breakfast.
    • Easy Quinoa Stuffed Bell Peppers: Mix cooked quinoa with ground turkey or black beans, corn, and your favorite salsa. Stuff this mixture into bell peppers and bake until tender for a simple dinner that looks impressive.

    These beginner-friendly recipes require minimal fuss and offer a great introduction to cooking with quinoa. You will be making easy, flavorful meals in no time!

    What are some good quinoa recipes for dinner?

    Quinoa is a true dinner hero that easily transforms into hearty, flavorful meals. Because it soaks up flavors so well, it’s perfect for making simple dinner recipes shine on busy weeknights or during relaxed family dinners.

    Here are some excellent quinoa recipes for dinner that are both delicious and easy to make:

    • One-Pan Lemon Herb Chicken and Quinoa: This family-friendly meal cooks everything together for easy cleanup. Combine chicken pieces, quinoa, and vegetables like broccoli or asparagus. Toss them with lemon, herbs, and olive oil, then roast until cooked through.
    • Vegetarian Quinoa Chili: This comforting and robust chili features quinoa, beans, tomatoes, and your favorite chili spices. It is a fantastic option for a healthy, satisfying dinner. Serve with a dollop of Greek yogurt or avocado.
    • Quinoa Stuffed Sweet Potatoes: Bake sweet potatoes until tender, then stuff them with a mixture of cooked quinoa, black beans, corn, and a sprinkle of cheese. A drizzle of lime juice adds brightness to this wonderfully nutritious and tasty dinner.
    • Mediterranean Quinoa Bowls: Build a bowl with a base of cooked quinoa. Top it with grilled chicken or chickpeas, Kalamata olives, feta cheese, cherry tomatoes, and cucumber. Drizzle with a red wine vinaigrette for a vibrant and balanced meal.
    • Spicy Shrimp and Quinoa Stir-Fry: As a great alternative to rice in stir-fries, quinoa pairs perfectly with sautéed shrimp and vegetables. Serve your favorite stir-fry over a bed of fluffy quinoa for a quick and flavorful meal.

    These options provide variety and prove that cooking with quinoa can be both simple and incredibly satisfying for dinner.

    How can I use quinoa for weight loss?

    If you’re focusing on weight loss, quinoa is a fantastic ally. It’s packed with nutrients that support a healthy diet, and its unique nutritional profile helps you feel full longer. That’s why we often feature it in our balanced meals at Recipesmondial.

    Here’s why quinoa is great for weight loss and how to use it:

    • High in Protein: Quinoa is a complete protein, meaning it contains all nine essential amino acids. Protein helps reduce appetite and increase satiety, which can help you eat less overall and maintain muscle mass during weight loss [2].
    • Rich in Fiber: Quinoa is high in dietary fiber, which adds bulk to your meals and helps you feel full faster. Fiber also aids digestion and can prevent overeating, helping you manage hunger.
    • Low Glycemic Index: Quinoa has a relatively low glycemic index, so it causes a slower rise in blood sugar. Stable blood sugar levels can help control cravings and support consistent energy throughout your day.
    • Nutrient Density: Quinoa provides essential vitamins and minerals, including magnesium, B vitamins, iron, and zinc. Eating nutrient-dense foods like quinoa keeps your body nourished and helps prevent deficiencies.

    To use quinoa for weight loss, incorporate it into your meals regularly:

    • Replace Refined Grains: Swap white rice or pasta for quinoa to instantly boost the protein and fiber in your meal.
    • Build Balanced Bowls: Create balanced meal bowls by combining cooked quinoa with a lean protein like chicken or fish, plenty of non-starchy vegetables, and a light dressing.
    • Meal Prep with Quinoa: Cook a large batch of quinoa at the start of the week. Use it for quick breakfasts, easy lunches, or simple dinners. This simple meal prep strategy ensures you always have a healthy option ready.
    • Mindful Portions: While healthy, quinoa still contains calories. Pay attention to portion sizes to support your weight loss goals. A half-cup serving of cooked quinoa is a good starting point for most meals.

    By making these simple changes, you can enjoy delicious, filling meals with quinoa that help you work towards your weight loss goals without feeling deprived.


    Sources

    1. https://www.hsph.harvard.edu/nutritionsource/food-features/quinoa/
    2. https://www.hsph.harvard.edu/nutritionsource/what-should-you-eat/protein/

  • How to Make The Best Green Bean Casserole (Easy Step-by-Step Recipe)

    How to Make The Best Green Bean Casserole (Easy Step-by-Step Recipe)

    Green bean casserole is a classic American baked side dish perfect for holidays like Thanksgiving. It combines tender green beans and a creamy sauce made from cream of mushroom soup, which is then topped with crispy fried onions. This simple, comforting dish is baked until golden and bubbly, making it a family-friendly favorite.

    Are you dreaming of that classic, creamy, and crispy green bean casserole? It’s a beloved staple for holiday tables and a comforting side dish for any family dinner, but making it can feel daunting. Perhaps you’ve been overwhelmed by complex recipes or are simply looking for a foolproof method for perfect results. We believe cooking should be an enjoyable experience, not a source of stress.

    Here at Recipesmondial, we make home cooking simple, flavorful, and inspiring. That’s why we perfected this easy, step-by-step green bean casserole recipe—it delivers the best results without any fuss. This guide is perfect for beginner cooks building confidence and for busy home cooks seeking reliable meal solutions. You’ll learn how to transform simple ingredients into a memorable dish, ensuring your table is always set for success.

    Get ready to impress your family and friends with an exceptional green bean casserole. We’re confident this method will become your go-to for the timeless classic. So, what makes this recipe stand out? Let’s dive in and discover exactly why this is the best green bean casserole recipe you’ll ever make.

    Why Is This the Best Green Bean Casserole Recipe?

    Are you searching for the ultimate green bean casserole recipe? You’ve found it. This isn’t just another recipe—it’s your new go-to for a dish that consistently shines. At Recipesmondial, we specialize in reliable and delicious recipes with easy-to-follow instructions.

    Our goal is to make cooking enjoyable and stress-free, and this green bean casserole is a perfect example. It delivers incredible flavor without complicated steps or hard-to-find ingredients. Say goodbye to guesswork and hello to confidence in the kitchen!

    Here’s why this recipe stands out as the best:

    • Uncomplicated Steps: We provide simple, step-by-step guidance. You won’t be overwhelmed by confusing instructions or technical terms.
    • Everyday Ingredients: This recipe uses accessible, common ingredients you likely already have. No special shopping trips are needed.
    • Reliably Delicious: Enjoy a creamy, savory, and perfectly crispy green bean casserole every time. It’s a family-friendly dish that’s guaranteed to be a hit.
    • Flavorful Simplicity: We focus on maximizing classic, comforting flavor with minimal fuss. You can get rich taste without endless effort.
    • Quick to Prepare: Designed for busy schedules, this recipe helps you get a delicious side dish on the table fast.
    • Versatile & Adaptable: This recipe works beautifully with fresh, frozen, or canned green beans. We also include simple variations to suit different tastes and dietary needs.
    • Boosts Your Confidence: Our clear instructions help you build skills in the kitchen, so you can create flavorful meals like a pro.

    At Recipesmondial, we believe in stress-free cooking. This green bean casserole is the perfect example of how simple ingredients can create truly delicious results. Get ready to impress your family and friends with this foolproof dish!

    What Ingredients Do You Need for Green Bean Casserole?

    Choosing Your Green Beans: Canned, Frozen, or Fresh?

    Your green bean casserole journey begins with choosing the right beans. Each option—canned, frozen, or fresh—offers unique benefits, so let’s explore which is best for you.

    • Canned Green Beans: Super convenient and pre-cooked, canned beans are ready to use, making them perfect for quick meals and simple dinner recipes. Be sure to drain them well before mixing.
    • Frozen Green Beans: Frozen beans often taste fresher than canned and still save on prep time. Simply thaw them or blanch them quickly to help maintain their bright color. They are a great middle-ground choice.
    • Fresh Green Beans: For the best flavor and crisp-tender texture, choose fresh green beans. You will need to trim the ends and blanch them briefly to ensure they are perfectly tender, but fresh beans elevate the casserole with a vibrant, garden-fresh taste.

    Tip: No matter which type you choose, ensure your green beans are tender-crisp, not mushy, to create the best possible texture for your casserole.

    For the Creamy Mushroom Sauce

    The rich, creamy sauce is the heart of any classic green bean casserole, bringing all the ingredients together with incredible savory depth. Making it is straightforward with these key ingredients.

    • Canned Cream of Mushroom Soup (10.5 ounces): This traditional base provides instant creaminess and a savory, earthy mushroom flavor. Using canned soup is a significant time-saver, perfect for a family-friendly meal.
    • Milk (1/2 cup): Any type of milk works, though whole milk makes the sauce extra rich. Milk helps thin the soup slightly to create a smoother, more pourable consistency.
    • Soy Sauce (1 teaspoon): This secret ingredient adds a boost of umami! It deepens the savory notes and balances the flavors beautifully, so don’t skip this small but mighty addition.
    • Black Pepper (1/4 teaspoon): A pinch of pepper adds a little kick and enhances all the other flavors. Freshly ground pepper is always best.

    Substitution Tip: If you prefer a homemade approach, you can make your own mushroom sauce for a fresher taste. While we cover this variation later, canned soup is a winner for an easy, stress-free recipe.

    For the Crispy Onion Topping

    The iconic crispy onion topping is a must-have, providing a delightful crunch that makes this casserole truly special. It’s the perfect finishing touch.

    • Canned Crispy Fried Onions (2.8 ounces): These are the classic choice, offering a golden, crunchy texture and savory flavor that perfectly complements the creamy beans. For the best result, divide the onions: use some in the casserole and save the rest for the top to ensure a final crunch.

    Variation Idea: Feel free to get creative with your topping. Crushed crackers, panko breadcrumbs, or even homemade crispy fried onions are all excellent alternatives. Trying these variations is a fun way to create personalized, flavorful meals and discover new simple dishes.

    How to Make Green Bean Casserole From Scratch

    Step 1: Prepare Your Green Beans

    The first step is preparing the green beans. Whether you use fresh, frozen, or canned, follow these simple instructions.

    For Canned Green Beans:

    • Thoroughly drain two (14.5-ounce) cans of cut green beans.
    • Pat them dry with a paper towel to prevent a watery casserole.

    For Frozen Green Beans:

    • Cook two (10-ounce) packages of frozen cut green beans according to package directions until tender-crisp.
    • Drain thoroughly to remove all excess water.

    For Fresh Green Beans:

    • Wash and trim one pound of fresh green beans.
    • Blanch in boiling, salted water for 5-7 minutes or steam until tender-crisp.
    • Immediately plunge into an ice bath to stop the cooking and preserve their vibrant green color.
    • Drain completely before using.

    Tip: Draining the green beans properly is the key to a creamy, not soupy, casserole.

    Step 2: Mix the Casserole Base

    Now it’s time to mix the creamy casserole base. This step comes together in just a few minutes.

    1. Preheat the oven to 375°F (190°C) and lightly grease a 1½-quart baking dish.
    2. In a large bowl, whisk together the cream of mushroom soup, milk, black pepper, and garlic powder until smooth.
    3. Gently fold in the prepared green beans until they are evenly coated.
    4. Pour the mixture into the prepared baking dish and spread evenly.

    Beginner-Friendly Tip: Feel free to taste the sauce before adding the green beans and adjust the seasonings to your liking.

    Step 3: Bake to Bubbly Perfection

    The first bake heats the casserole through, creating a warm, bubbly base for the crispy topping.

    1. Place the baking dish in the preheated oven.
    2. Bake for 25-30 minutes, until the sauce is bubbly around the edges and the beans are tender.

    Watch Out For: Avoid overbaking at this stage. You are simply heating the casserole before adding the topping in the final step.

    Step 4: Add the Final Crispy Topping

    The final step adds the classic crunchy texture that makes this dish a favorite.

    1. Carefully remove the casserole from the oven.
    2. Sprinkle the crispy fried onions evenly over the top.
    3. Return the casserole to the oven and bake for an additional 5-10 minutes, until the onions are golden brown and crisp.

    Serving Suggestion: Let the casserole rest for a few minutes before serving. This allows the sauce to set slightly.

    Enjoy your homemade green bean casserole! Recipesmondial is here to help you discover more approachable recipes that build confidence in the kitchen.

    What are some variations on the green bean casserole recipe?

    Cheesy Green Bean Casserole

    Want to elevate your classic green bean casserole? Adding cheese is a fantastic and easy way to make it richer and more comforting. This family-friendly variation introduces new textures and flavors that everyone will love.

    For a cheesy twist, simply mix shredded cheese into the green bean and mushroom sauce mixture before baking. You can also sprinkle extra cheese on top during the last few minutes in the oven to create a gorgeous, melted crust.

    • Cheese Options:
      • Cheddar: Sharp or mild, it adds a familiar, savory tang.
      • Monterey Jack: This cheese melts beautifully and offers a milder flavor.
      • Parmesan: Sprinkle this on top for a salty, umami kick.
      • Swiss: This brings a slightly nutty note to the casserole.
    • When to Add: Stir about 1 cup of shredded cheese into the green bean mixture before transferring it to the baking dish. For a bubbly, golden-brown top, sprinkle an additional 1/2 cup over the casserole during the last 10-15 minutes of baking.
    • Pro Tip: For an extra-crispy topping, mix the shredded cheese with panko breadcrumbs before sprinkling it over the casserole. This creates a wonderful textural contrast.

    Homemade Mushroom Sauce (No Canned Soup)

    Prefer cooking from scratch and avoiding canned ingredients? Making your own mushroom sauce is a surprisingly simple, beginner-friendly way to elevate your green bean casserole. A homemade sauce delivers a fresh, vibrant flavor that canned soup can’t match, and it’s often a healthier choice for family-friendly meals.

    Here’s how to create a rich, creamy sauce without any canned soup:

    • Ingredients You’ll Need:
      • 2 tablespoons unsalted butter
      • 8 ounces fresh mushrooms (cremini or button), sliced
      • 1/2 cup finely diced yellow onion
      • 2 cloves garlic, minced
      • 1/4 cup all-purpose flour
      • 2 cups chicken or vegetable broth
      • 1/2 cup heavy cream (or milk for a lighter version)
      • Salt and black pepper to taste
    • Step-by-Step Instructions:
      1. Sauté Aromatics: Melt butter in a medium saucepan over medium heat. Add the mushrooms and onion, cooking until the mushrooms release their liquid and brown, about 5-7 minutes. Stir in the garlic and cook for one more minute until fragrant.
      2. Make a Roux: Sprinkle the flour over the mushroom mixture and cook, stirring constantly, for 1-2 minutes to cook out the raw flour taste.
      3. Whisk in Liquid: Slowly whisk in the broth a little at a time to keep the mixture smooth. Continue whisking as the sauce thickens and comes to a gentle boil.
      4. Finish with Cream: Reduce the heat to low and stir in the heavy cream or milk. Season with salt and pepper, then simmer for a few minutes until the sauce is creamy and heated through.
    • Why You’ll Love It: This homemade sauce offers a deeper, more natural mushroom flavor and gives you complete control over the ingredients. Knowing exactly what’s in your food is a great confidence booster. Furthermore, homemade sauces often contain less sodium than their canned counterparts [1].

    Adding Bacon for Extra Flavor

    For a smoky, savory kick, add bacon to your green bean casserole. This simple addition is a game-changer, bringing incredible texture and a new depth of flavor that makes this family-friendly dish even more exciting.

    You can mix crumbled bacon into the casserole, sprinkle it on top with the crispy onions, or do both for maximum flavor.

    • How to Prepare Bacon:
      1. Cook Bacon: Cook 6-8 slices of bacon in a skillet over medium heat until crispy.
      2. Drain & Crumble: Transfer the bacon to a paper towel-lined plate to drain the grease. Once cool enough to handle, crumble it into small pieces.
    • When to Add Bacon:
      • Into the Mix: Stir half of the crumbled bacon into the green bean and sauce mixture before baking to infuse the entire casserole with smoky flavor.
      • As a Topping: Sprinkle the remaining bacon over the casserole along with the crispy fried onions during the last few minutes of baking. This adds a delightful crunch and visual appeal.
    • Chef’s Tip: Save a tablespoon or two of the rendered bacon fat and use it in your homemade mushroom sauce instead of butter. This simple trick creates an even richer, smokier flavor profile, adding a whole new dimension to the dish.

    Tips for the Perfect Casserole Every Time

    A friendly home cook proudly holding a perfectly baked green bean casserole with a golden, crispy topping.
    A professional food photography scene of a home cook, a friendly and encouraging woman in her 40s, smiling warmly while holding a freshly baked, perfectly golden green bean casserole. She is in a clean, inviting kitchen with warm lighting. Her hands are gently supporting the casserole dish, which is steaming slightly. The casserole top is beautifully browned with abundant crispy fried onions. The image conveys success, ease, and the joy of home cooking. Photorealistic, high-quality food magazine photo.

    How to Avoid a Watery Casserole

    A watery green bean casserole is a common and frustrating problem. Luckily, you can prevent it with a few simple tricks. Follow these tips to ensure a perfectly creamy and delicious result every time.

    • Drain Green Beans Thoroughly: This is the most crucial step to prevent a soupy casserole. Whether you&#39re using canned or frozen green beans, drain them well in a colander. For the best results, gently press on the beans to remove any remaining water.
    • Thicken Your Sauce: If you&#39re making a homemade sauce, ensure it’s properly thickened. A roux (a simple butter and flour mixture) is perfect for this. Cook it into a smooth paste before adding your liquids to create a rich, creamy base.
    • Don’t Overcrowd the Dish: Give your casserole ingredients room to breathe in the baking dish. An overcrowded dish traps steam, which creates excess moisture. If your ingredients seem too packed, simply switch to a larger dish.
    • Bake at the Right Temperature: A hot, properly preheated oven helps excess moisture evaporate as the casserole bakes. This ensures a consistent texture and prevents a watery bottom.

    Make-Ahead and Storage Instructions

    Preparing your green bean casserole in advance can save so much time, making it a perfect dish for holidays or busy weeknights. Here’s how to make it ahead and store any leftovers.

    Make-Ahead Instructions:

    • Assemble Without Topping: Mix the green beans and creamy sauce, then pour the mixture into your baking dish. Cover it tightly with plastic wrap or foil.
    • Refrigerate: You can store the unbaked casserole in the refrigerator for up to 2 days.
    • Before Baking: Let the casserole sit at room temperature for about 30 minutes to help it bake more evenly. Add the crispy onion topping just before baking as directed. You may need to add 5-10 minutes to the total baking time.

    Storing Leftovers:

    • Cool Completely: Let the casserole cool to room temperature before storing.
    • Refrigerate: Transfer leftovers to an airtight container and store them in the refrigerator for up to 3-4 days.
    • Freezing (Optional): For longer storage, place cooled leftovers in a freezer-safe container. The casserole will keep well for up to 2-3 months. Thaw it overnight in the refrigerator before reheating.
    • Reheating: Reheat individual portions in the microwave or warm larger amounts in a 300°F (150°C) oven until heated through. If it seems dry, add a splash of milk or broth.

    What to Serve with Green Bean Casserole

    A beloved classic, green bean casserole pairs wonderfully with many main courses, from holiday feasts to simple weeknight dinners. Here are some family-friendly and delicious pairings to consider.

    • Roasted Turkey or Chicken: This is a classic combination, as the savory flavors complement each other perfectly.
    • Ham: A glazed ham is another fantastic partner. The sweetness of the ham balances the richness of the casserole.
    • Pot Roast: For a comforting dinner, serve it alongside a tender pot roast for a hearty and satisfying meal.
    • Pork Loin: A juicy pork loin is a lighter, yet equally delicious, option.
    • Mashed Potatoes: You can never go wrong with another comforting side. Mashed potatoes create a truly indulgent plate.
    • Cranberry Sauce: The tartness of cranberry sauce cuts through the richness and provides a lovely contrast in flavors.
    • Simple Salad: A fresh, crisp green salad adds brightness and a healthy balance to the creamy casserole.
    • Dinner Rolls: Warm dinner rolls are perfect for soaking up any delicious sauce.

    Frequently Asked Questions

    Can you make green bean casserole with fresh green beans?

    Yes, you absolutely can! Using fresh green beans is a wonderful way to bring a vibrant, garden-fresh flavor to this classic comfort food.

    Fresh beans offer a crisp-tender texture that contrasts beautifully with the creamy sauce, giving the casserole a more gourmet touch.

    Here’s how to adapt your recipe for fresh green beans:

    • Prepare the Beans: Wash and trim about 1 1/2 pounds of fresh green beans, snapping off both ends.
    • Blanch Them: Bring a pot of salted water to a boil. Add the green beans and cook for 5-7 minutes until they are bright green and tender-crisp.
    • Shock Them: Immediately transfer the blanched beans to an ice bath. This stops the cooking process, helping them retain their bright color and snap.
    • Drain Well: Drain the beans thoroughly and pat them dry with a paper towel. Excess water can make your casserole watery.
    • Proceed with Recipe: Use these prepared beans in place of canned or frozen ones, then follow the rest of your green bean casserole recipe as written.

    This simple switch results in a truly flavorful meal and is a perfect step up for home cooks wanting to impress!

    How do you make a 3 ingredient green bean casserole?

    Making a green bean casserole with just three ingredients is incredibly easy, making it a perfect quick meal for busy families or beginner cooks. This recipe proves that delicious dishes don’t need to be complex.

    Here’s what you need and how to do it:

    • Ingredients:
      • 2 (14.5 ounce) cans green beans, drained (or 1 pound frozen green beans, thawed and drained)
      • 1 (10.5 ounce) can condensed cream of mushroom soup
      • 1 (6 ounce) can crispy fried onions
    • Instructions:
      1. Preheat Oven: Set your oven to 350°F (175°C).
      2. Combine: In a medium mixing bowl, gently stir together the drained green beans and cream of mushroom soup.
      3. Pour: Transfer the mixture into an 8×8 inch baking dish.
      4. Bake: Bake for 20-25 minutes, or until the casserole is hot and bubbly.
      5. Add Topping: Remove from the oven and sprinkle the crispy fried onions evenly over the top.
      6. Finish Baking: Return to the oven for another 5 minutes, until the onions are golden brown and extra crispy.
      7. Serve: Let it cool for a few minutes before serving warm.

    This easy recipe is a true time-saver and a fantastic option for a stress-free meal.

    What is in a classic old fashioned green bean casserole recipe?

    A beloved side dish, the classic old-fashioned green bean casserole has been a staple on dinner tables for decades, especially during holidays. This simple yet satisfying recipe was invented in 1955 by Dorcas Reilly at Campbell’s Soup Company [2].

    Famous for its creamy texture and crispy topping, this iconic dish relies on just a few key ingredients that blend together to create a comforting, flavorful experience. It’s an approachable home cooking classic.

    The essential ingredients for a classic green bean casserole recipe are:

    • Canned Green Beans: Usually cut or French-style, they provide the tender vegetable base.
    • Condensed Cream of Mushroom Soup: This is the secret to the signature creamy sauce, adding a rich, savory flavor.
    • Milk: A splash of milk thins the soup slightly to ensure a smooth consistency.
    • Black Pepper: This simple seasoning enhances the overall taste.
    • Crispy Fried Onions: Sprinkled on top, these provide a delightful crunchy texture and savory kick.

    These straightforward components combine to create a timeless and delicious side—a true taste of tradition.

    Can you make green bean casserole in a slow cooker?

    Absolutely! Making green bean casserole in a slow cooker is a fantastic and convenient option, especially during busy holidays. This method frees up valuable oven space and allows you to prepare the side dish with minimal effort, making it perfect for any home cook.

    Using a slow cooker is simple and results in a wonderfully creamy and flavorful dish, making it a great choice for a family-friendly meal.

    Here’s how you can adapt your favorite green bean casserole recipe for the slow cooker:

    • Grease the Slow Cooker: Lightly grease the inside of your slow cooker insert to prevent sticking.
    • Combine Ingredients: In a large bowl, mix together the green beans (drained canned or thawed frozen), cream of mushroom soup, milk, and any seasonings like black pepper or garlic powder.
    • Transfer: Pour the mixture into your prepared slow cooker.
    • Cook Time:
      • Cook on LOW for 3-4 hours.
      • Alternatively, cook on HIGH for 1.5-2 hours.

      The casserole should be heated through and bubbling around the edges.

    • Add Topping: About 15-20 minutes before serving, stir in about half of the crispy fried onions and sprinkle the remaining onions on top.
    • Finish: Continue cooking until the onions are warm. For extra crispiness, you can then transfer the casserole to a baking dish and broil for a few minutes. Watch carefully to prevent burning!

    This flexible method is a reliable way to make a comforting side dish without stress.


    Sources

    1. https://www.heart.org/en/healthy-living/healthy-eating/eat-smart/sodium/sodium-and-your-health
    2. https://news.campbells.com/how-the-green-bean-casserole-became-an-american-classic/

  • 60+ Easy Appetizers, Sides, and Snacks: The Ultimate Guide for Any Occasion

    60+ Easy Appetizers, Sides, and Snacks: The Ultimate Guide for Any Occasion

    Appetizers, sides, and snacks are small dishes served before a meal, alongside a main course, or between meals. They range from simple finger foods like dips and crackers to more elaborate small plates and vegetable dishes, designed to complement a meal or satisfy a craving. Their primary purpose is to enhance the dining experience, provide variety, or offer a light bite.

    Struggling to decide what to make for a potluck, a casual family dinner, or just a quick snack? It’s easy to feel overwhelmed by complex recipes, especially when you want to impress without the stress. We’ve all felt that pressure, lacking the confidence or the right plan when an occasion calls for something special.

    At Recipesmondial, we believe cooking should be enjoyable and stress-free. That’s why we created the ultimate guide to over 60 easy appetizers, sides, and snacks. This collection is your go-to resource for approachable home cooking, filled with flavorful recipes perfect for any occasion. From quick finger foods and comforting casseroles to fresh salads and creamy coleslaw, we provide beginner-friendly instructions to ensure every dish is a success.

    Whether you’re creating a visually appealing holiday feast, seeking simple party food, or just need reliable inspiration for everyday bites, you’ll find it all right here. We’ll help you replace kitchen uncertainty with cooking confidence, making mealtime organized and enjoyable. Ready to discover the difference between appetizers, sides, and snacks and unlock a world of delicious possibilities?

    What’s the Difference Between Appetizers, Sides, and Snacks?

    Ever wonder about the real difference between an appetizer, a side dish, and a snack? While these terms are often used interchangeably, each plays a unique role in a meal. Knowing the distinctions can help you plan more delicious and balanced menus. Let’s break it down!

    Here is a quick overview of their main distinctions:

    Category Main Purpose When Served Key Characteristics Example Recipes
    Appetizer To stimulate appetite Before the main meal; social events Small portions, varied, often finger foods, shareable Crispy bruschetta, vibrant homemade salsa with chips, mini quiches
    Side Dish To complement the main course Alongside the main meal Balances flavors, adds nutrition, often larger portion Creamy coleslaw, fluffy Mexican rice, comforting Jiffy corn casserole
    Snack To curb hunger or for enjoyment Between meals; anytime Quick, convenient, portable, can be healthy or indulgent Fresh fruit, nuts, crackers with cheese, a small portion of Ambrosia salad

    Appetizers: Setting the Stage for Flavor

    Appetizers, or starters, are the small, flavorful bites served before the main course. Their primary purpose is to stimulate the appetite, not to fill you up. Think of them as a preview that awakens your taste buds for the dishes to come.

    Common at parties, gatherings, or as the first course of a dinner, appetizers are typically small and easy to share. Many easy recipes are perfect for creating these shareable bites.

    • Purpose: To stimulate the appetite and excite the palate.
    • When: Before the main meal or during social events.
    • Characteristics: Small, flavorful, often shareable finger foods.
    • Examples:

    Appetizers kick off your meal with a burst of flavor and make the dining experience more enjoyable.

    Side Dishes: The Perfect Companions

    A side dish is served alongside the main event to create a complete and well-rounded family-friendly meal. Its role is to complement the central protein or entrée by adding flavor, texture, and nutrition. Unlike appetizers, sides aren’t meant to be eaten alone but work as part of a team on the plate.

    Typically made from vegetables, grains, or starches, side dishes turn a simple main course into a more satisfying and complete dining experience.

    They bring all the flavors and textures together into one harmonious meal.

    Snacks: Bites for Any Time

    A snack is any small portion of food eaten between main meals. Its purpose is straightforward: to satisfy hunger, provide a quick energy boost, or simply for enjoyment. Unlike appetizers and side dishes, snacks are designed to stand alone.

    Snacks are all about convenience and portability, making them perfect for satisfying afternoon cravings or as healthy snacks on the go.

    • Purpose: To curb hunger, provide energy, or offer a quick treat.
    • When: Between meals, or anytime you need a small bite.
    • Characteristics: Quick, convenient, portable, and versatile.
    • Examples:
      • Fresh fruit, such as an apple or a banana.
      • A handful of nuts or seeds.
      • Yogurt with a sprinkle of berries.
      • A small portion of a sweet treat, like a light Ambrosia salad.
      • Crackers with cheese, or cucumber sticks with leftover homemade salsa.

    Snacks keep you fueled and satisfied between your main meals and are a practical way to manage hunger.

    The Best Easy Appetizer Recipes for a Crowd

    A festive, overhead view of a rustic wooden table filled with a variety of easy appetizers, including mini quiches, bruschetta, a cheese board, and fruit skewers, ready for a crowd.
    Professional food photography, photorealistic, high-quality food magazine photo. A vibrant and appealing overhead shot of a beautifully arranged rustic wooden table laden with a diverse spread of easy-to-make, crowd-pleasing appetizers. Include mini quiches, colorful bruschetta with fresh tomatoes and basil, an elegant cheese and cracker board with grapes and berries, and skewers of colorful fruit. The lighting is warm and inviting, casting soft shadows, highlighting the textures and freshness of the ingredients. The background is slightly blurred, focusing on the abundance of food. The setting feels cozy yet refined, perfect for a friendly gathering. No people visible, focus is purely on the food.

    Crowd-Pleasing Dips and Spreads

    When you’re feeding a hungry crowd, dips and spreads are your best friends. They’re easy to prepare, always disappear quickly, and are a great way to cook confidently. These simple and reliable ideas will help you make amazing-tasting appetizers with minimal stress.

    Simple & Flavorful Dip Ideas:

    • Homemade Salsa: Making a vibrant salsa recipe is incredibly easy. Simply chop fresh tomatoes, onions, cilantro, and jalapeños, then add a squeeze of lime juice. It’s much fresher than store-bought versions and always a crowd-pleaser. For a tangy twist, try a salsa verde recipe with tomatillos.
    • Creamy Spinach Dip: Mix frozen spinach (thawed and squeezed dry) with cream cheese, mayonnaise, and a packet of vegetable soup mix. Serve chilled with crusty bread or crackers for an instant classic.
    • Quick Hummus: Blend canned chickpeas, tahini, lemon juice, garlic, and a splash of water until smooth. A drizzle of olive oil on top completes this healthy and delicious option.

    These dips require minimal cooking skills, making them perfect for beginners. Best of all, most can be prepared ahead of time, saving you precious time on the day of your event.

    Quick & Easy Finger Foods

    Finger foods are ideal for parties, allowing guests to mingle and munch without needing cutlery. These simple recipes transform basic ingredients into delicious, visually appealing bites that keep the atmosphere casual and fun.

    Effortless Finger Food Suggestions:

    • Caprese Skewers: For a simple yet elegant starter, thread cherry tomatoes, small mozzarella balls (bocconcini), and fresh basil leaves onto skewers. Drizzle with balsamic glaze right before serving.
    • Mini Quiches: Use store-bought puff pastry or pie crust. Press small circles of pastry into mini muffin tins. Add a whisked egg mixture with cheese and your favorite fillings, like chopped ham or spinach, and bake until golden.
    • Veggie Sticks with Dip: A classic for a reason! Arrange colorful bell pepper strips, cucumber slices, carrot sticks, and celery. Serve with one of the dips mentioned above for a fresh and crunchy option.

    These approachable recipes are perfect for any gathering and make party planning a breeze, even for busy families.

    Simple & Elegant Starters

    Impress your guests without spending hours in the kitchen. These easy-to-follow starters prove that sophisticated doesn’t have to mean complicated, helping you serve an elegant first course with confidence.

    Stylish Starter Ideas:

    • Prosciutto-Wrapped Melon: Simply wrap thin slices of prosciutto around cubes or balls of cantaloupe or honeydew melon. The sweet-and-salty combination is a timeless favorite.
    • Goat Cheese and Fig Bites: This starter looks fancy but takes just minutes to assemble. Spread soft goat cheese on crostini or crackers, then top with a dollop of fig jam and a sprinkle of chopped walnuts.
    • Marinated Olives and Feta: Combine a mix of your favorite olives with cubes of feta cheese, fresh herbs like rosemary or oregano, and a good quality olive oil. Let the mixture marinate for at least an hour before serving with crusty bread.

    Each of these options is an enjoyable, stress-free way to discover a new favorite dish for your entertaining rotation.

    Global Flavors to Share

    Broaden your culinary horizons with accessible appetizers inspired by global flavors. These dishes bring exciting new tastes to your table with minimal effort, making international cooking easy for any skill level.

    Easy International Appetizer Ideas:

    • Guacamole with Tortilla Chips: A classic Mexican staple, fresh guacamole is always a hit. Mash ripe avocados with lime juice, chopped onion, cilantro, and a pinch of salt. Avocados have been cultivated in Mexico for thousands of years [1].
    • Mexican Corn Dip: Mix canned corn (drained), sour cream, mayonnaise, chili powder, and cotija cheese. Serve with tortilla chips for a creamy, zesty snack reminiscent of street corn. This is a quick alternative to a full corn casserole recipe.
    • Spiced Chickpea Salad Cups: Toss canned chickpeas with finely diced red onion, bell pepper, and a dressing of olive oil, lemon juice, cumin, and paprika. Serve in small lettuce cups for a light and healthy snack.

    These reliable recipes are a quick and flavorful way to introduce your guests to exciting new tastes from around the world.

    Simple & Flavorful Side Dishes for Any Meal

    An inviting display of simple and flavorful side dishes on a kitchen counter, featuring roasted root vegetables, a fresh green salad, and a light grain salad.
    Professional food photography, photorealistic, high-quality food magazine photo. A beautifully composed shot on a light-colored kitchen countertop, showcasing an array of simple yet flavorful side dishes. Feature a bowl of perfectly roasted root vegetables (carrots, parsnips, sweet potatoes) garnished with fresh herbs, a vibrant green salad with mixed greens, cherry tomatoes, and a light vinaigrette in an elegant glass bowl, and a simple grain salad (like quinoa or couscous) with chopped vegetables. The dishes are presented on modern, clean ceramic plates and bowls. Natural daylight illuminates the scene, enhancing the fresh colors and inviting textures. The overall mood is fresh, wholesome, and approachable, highlighting practical home cooking.

    Classic Potato Sides

    Potatoes are a true kitchen hero. They are versatile, affordable, and incredibly satisfying. These easy recipes transform humble potatoes into delicious side dishes for any meal.

    The simplicity of potato dishes makes them a favorite for many home cooks. They are perfect for beginners and great for family-friendly meals. These recipes will help you cook potatoes with confidence, no complex techniques required.

    • Garlic Herb Roasted Potatoes: Dice potatoes into bite-sized pieces. Toss them with olive oil, minced garlic, rosemary, and thyme, then roast until golden and crispy. This simple yet flavorful side dish is perfect for any dinner.
    • Creamy Mashed Potatoes: Boil peeled potatoes until fork-tender. Mash them with butter, warm milk, salt, and pepper. For extra richness, add a touch of cream cheese or sour cream. This classic side is a comforting staple.
    • Quick Potato Salad: Cook and dice potatoes. Combine them with a simple dressing of mayonnaise, mustard, celery, red onion, and fresh dill. It is a refreshing side, ideal for potlucks or picnics.

    Tip: For extra crispy roasted potatoes, soak the cut potatoes in cold water for 30 minutes before roasting. Pat them completely dry before seasoning.

    Comforting Casserole Recipes

    Casseroles are the ultimate solution for busy families seeking quick, reliable meals. They are hearty, require minimal hands-on time, and can be prepared ahead, making mealtime stress-free.

    These dishes are ideal for approachable home cooking and deliver incredible flavor without requiring advanced skills. Here are a few of our favorite comforting casserole ideas:

    • Easy Corn Casserole: This beloved, family-friendly dish combines a can of whole kernel corn (drained), a can of creamed corn, a box of Jiffy cornbread mix, sour cream, and melted butter. Bake until golden and bubbly. It is a beginner-friendly recipe that always impresses.
    • Cheesy Potato Casserole: Layers of thinly sliced potatoes, creamy sauce, and plenty of cheese create a rich side dish perfect for potlucks or special occasions. You can easily adapt it with different cheeses or herbs.
    • Green Bean Casserole (from scratch!): Elevate this classic with fresh green beans and a homemade mushroom sauce. Top with crispy fried shallots instead of canned onions. This from-scratch version is a rewarding and flavorful upgrade to the classic.

    Substitution: For the corn casserole, you can add diced jalapeños for a little kick or shredded cheddar cheese for extra flavor.

    Roasted, Grilled, and Baked Vegetables

    Adding a vibrant vegetable side dish is an excellent way to boost nutrition and flavor. These cooking methods bring out the natural sweetness of vegetables, helping you create healthy, tasty meals quickly and easily.

    These simple techniques are perfect for beginners and turn basic ingredients into delicious, visually appealing sides. Discover how easy it is to prepare flavorful vegetables.

    • Sheet Pan Roasted Broccoli and Carrots: Toss chopped broccoli florets and carrot slices with olive oil, salt, pepper, and a pinch of garlic powder. Roast at a high temperature until tender-crisp and slightly caramelized. This easy recipe creates a healthy and delicious side dish.
    • Grilled Asparagus with Lemon: Snap off the woody ends of fresh asparagus. Toss with olive oil, salt, and pepper. Grill over medium-high heat for 3-5 minutes, then squeeze fresh lemon juice over them before serving.
    • Baked Sweet Potatoes: Pierce sweet potatoes several times with a fork and bake until very tender. Slice them open and top with a pat of butter, a sprinkle of cinnamon, or a drizzle of maple syrup. They are naturally sweet and full of nutrients [2].

    Tip: Don’t overcrowd the pan when roasting vegetables. This ensures they roast rather than steam, leading to better flavor and texture.

    Fresh Salads and Slaws

    Fresh salads and slaws offer a crisp, refreshing contrast to richer main dishes. They are quick to prepare, easily customized, and can simplify your meal prep.

    These recipes are excellent for adding healthy, balanced meals to your table. They provide approachable inspiration for creative, flavorful dishes.

    • Classic Creamy Coleslaw: Finely shred green cabbage and carrots. For the dressing, whisk together mayonnaise, a splash of apple cider vinegar, a touch of sugar, and a pinch of salt and pepper. Combine with the vegetables and chill. This easy recipe is a crowd-pleaser.
    • Tangy Vinegar Slaw: If you prefer a lighter option, mix shredded cabbage and carrots with a dressing made from olive oil, white vinegar, a little Dijon mustard, and herbs. This is a great, fresh alternative to creamy slaws.
    • Easy Garden Salad: Combine mixed greens, cherry tomatoes, cucumber, and bell peppers. Top with your favorite vinaigrette. It is a simple yet effective way to add fresh vegetables to any meal.
    • Ambrosia Salad: A sweet and fluffy fruit salad. Combine canned pineapple chunks, mandarin oranges, shredded coconut, mini marshmallows, and sour cream or whipped topping. It is a delightful, family-friendly treat.

    Variation: Add thinly sliced red onion or chopped celery to your coleslaw for extra crunch and flavor.

    Hearty Grains, Beans, and Rice

    Grains, beans, and rice are foundational elements in many cuisines worldwide. As economical, filling, and versatile staples, they are an excellent way to add value and nutrition to your meals.

    These recipes transform simple ingredients into delicious, satisfying sides. Learn basic cooking skills effortlessly with these step-by-step ideas.

    • Simple Mexican Rice: Sauté white rice in a little oil until lightly toasted. Add diced onion, garlic, tomato sauce, chicken broth, and common spices like cumin and chili powder. Simmer until the liquid is absorbed and the rice is fluffy. This easy recipe is a perfect companion to tacos or fajitas.
    • Quick Spanish Rice: Similar to Mexican rice, this version often includes bell peppers and peas. A rich tomato base is the key to creating a family-friendly dish that bursts with flavor.
    • Black Beans with Cilantro and Lime: Simmer canned black beans with a little onion, garlic, cumin, and oregano. Finish with fresh cilantro and a squeeze of lime juice. This makes a healthy and balanced side.
    • Fluffy Quinoa Pilaf: Cook quinoa according to package directions. Sauté diced vegetables like zucchini and bell peppers, then combine with the cooked quinoa and a light dressing. It is a nutritious and quick side.

    Pairing Tip: Serve your Mexican or Spanish rice with homemade salsa or salsa verde for an extra layer of fresh flavor.

    Healthy & Delicious Snack Ideas for Everyone

    A home cook's hands reaching for a variety of healthy and delicious snacks, including fresh fruit, vegetable sticks with hummus, and homemade energy bites, arranged on a cutting board in a brightly lit kitchen.
    Professional food photography, photorealistic, high-quality food magazine photo. A bright and airy kitchen scene featuring a home cook’s hands reaching for a selection of healthy and delicious snacks arranged on a light marble or wooden cutting board. The snacks include perfectly sliced vibrant fruits (berries, orange slices, apple wedges), crisp vegetable sticks (carrots, celery, bell peppers) with a small bowl of creamy hummus, and homemade energy bites or granola bars. The scene is well-lit with soft, natural light coming from a window, emphasizing freshness and natural colors. The human element of a home cook’s hands adds an approachable, encouraging cooking companion vibe. The background shows a clean, modern kitchen environment.

    Snacks are essential for bridging the gap between meals, boosting your energy, and satisfying cravings. At Recipesmondial, we believe snacks should be delicious, easy to make, and contribute to your well-being. You don’t need complex recipes to eat well—we have you covered!

    Quick and Healthy Bites

    Fueling your body with smart choices is simple. These healthy snacks can be prepared quickly, making them perfect for busy schedules and supporting your healthy eating goals. You’ll find these easy recipes are truly beginner-friendly.

    • Greek Yogurt with Berries and Honey: This protein-packed classic combination keeps you feeling full. Simply combine 1 cup of plain Greek yogurt with ½ cup of mixed berries and add a drizzle of honey or maple syrup. Berries are rich in antioxidants [3].
    • Apple Slices with Peanut Butter: A satisfying crunch meets creamy goodness. Slice one medium apple and spread 2 tablespoons of natural peanut butter on the slices. This snack provides healthy fats and fiber. For a nut-free option, use sunflower seed butter.
    • Veggies with Hummus: This is an easy way to get your daily dose of vegetables. Cut up carrots, celery, bell peppers, or cucumber and serve with ¼ cup of your favorite hummus. Hummus offers plant-based protein and fiber, and you can even make your own at home!
    • Hard-Boiled Eggs: A protein powerhouse, hard-boiled eggs are also incredibly convenient. Boil a batch at the start of the week, then grab one or two whenever hunger strikes for a perfect on-the-go snack.
    • Avocado Toast on Whole Grain: This nutritious option works well as a quick breakfast or a snack. Mash ¼ avocado onto one slice of whole-grain toast and season with a pinch of salt and pepper. For a kick, add a sprinkle of red pepper flakes.

    Chef’s Tip: Prepare your healthy snacks ahead of time by washing and chopping vegetables or portioning out yogurt and berries. This simple meal prep saves time and makes healthy choices effortless throughout the week.

    Fun Party Snacks

    Hosting a gathering should be fun, and preparing snacks for guests should be easy. Forget overwhelming recipes; these simple, family-friendly dishes are guaranteed crowd-pleasers. Your guests will love these flavorful and easy-to-make snacks.

    • Homemade Salsa and Tortilla Chips: Vibrant and full of flavor, fresh salsa is always a hit. Our recipe uses fresh tomatoes, onion, cilantro, and lime for a delicious result.
      • Quick Salsa Recipe:
        1. Dice 3 ripe Roma tomatoes.
        2. Finely chop ½ small red onion.
        3. Chop ¼ cup fresh cilantro.
        4. Combine all ingredients in a bowl.
        5. Squeeze in the juice of ½ lime.
        6. Add salt and pepper to taste and mix well.

        Serve immediately with your favorite tortilla chips for a perfect appetizer.

    • Easy Corn Casserole (Jiffy Corn Casserole Style): This comforting side dish doubles as a great party snack. It’s creamy, slightly sweet, and incredibly satisfying.
      • Simple Corn Casserole Steps:
        1. Preheat the oven to 350°F (175°C).
        2. In a large bowl, combine 1 (15 oz) can of drained whole kernel corn and 1 (15 oz) can of undrained cream-style corn.
        3. Add 1 (8.5 oz) package of Jiffy corn muffin mix.
        4. Stir in 1 cup of sour cream and ½ cup of melted unsalted butter.
        5. Pour the mixture into a greased 8×8 inch baking dish.
        6. Bake for 45-60 minutes, or until golden brown and set.

        This cornbread casserole is a guaranteed crowd-pleaser.

    • Creamy Coleslaw: A refreshing and crunchy addition to any spread, our easy coleslaw recipe uses a simple dressing.
      • Basic Creamy Coleslaw:
        1. In a large bowl, combine 1 (14 oz) bag of shredded coleslaw mix (cabbage and carrots).
        2. For the dressing, whisk together ½ cup of mayonnaise, 2 tablespoons of apple cider vinegar, 1 tablespoon of sugar, ½ teaspoon of celery seed, and salt and pepper to taste.
        3. Pour the dressing over the coleslaw mix and toss to combine.
        4. Refrigerate for at least 30 minutes before serving to allow the flavors to meld.

        It’s a fresh alternative to heavier snacks.

    Chef’s Tip: Many party snacks, like salsa and coleslaw, can be prepared in advance. Making them ahead of time reduces last-minute stress and helps you enjoy the party with your guests.

    Sweet Treats and Fruit Salads

    When you’re craving something sweet, these refreshing options offer natural sweetness without being too heavy. They deliver fantastic flavor and are simple enough for everyone to love.

    • Colorful Fruit Salad: A bowl of fresh fruit is always appealing, especially when you combine seasonal varieties for the best flavor.
      • Easy Fruit Salad Mix:
        1. Dice 1 cup of strawberries, 1 cup of blueberries, 1 cup of green grapes (halved), and 1 cup of melon (cantaloupe or honeydew).
        2. Gently mix them together in a large bowl.
        3. For a brighter taste and to prevent browning, squeeze the juice of half a lime over the fruit.

        This sweet, visually appealing dish is simple to make.

    • Classic Ambrosia Salad: This sweet and creamy retro favorite brings a touch of nostalgia. Our version is approachable and uses simple ingredients.
      • Simplified Ambrosia Salad:
        1. In a large bowl, gently combine 1 (15 oz) can of mandarin oranges (drained), 1 (15 oz) can of pineapple chunks (drained), and 1 cup of miniature marshmallows.
        2. Add ½ cup of shredded coconut and ¼ cup of chopped pecans (optional).
        3. Fold in 1 cup of whipped topping (like Cool Whip) or freshly whipped cream.
        4. Chill for at least 1 hour before serving.

        It’s a delightful sweet treat that’s perfect for a gathering.

    • Berry Yogurt Parfaits: Create a satisfyingly sweet and crunchy snack by layering Greek yogurt, fresh berries, and granola. This treat is easily customizable—just use your favorite berries!

    Chef’s Tip: For the best fruit salads, always use fresh, ripe fruit to maximize flavor. Store leftovers in an airtight container in the fridge, where they will stay fresh for 2-3 days.

    How Do You Choose the Right Dish for an Occasion?

    Perfect Thanksgiving and Christmas Side Dishes

    Choosing the right side dishes for Thanksgiving and Christmas can feel overwhelming. These holidays are all about comfort, tradition, and delicious food, but you don’t need complex recipes to create a memorable feast. At Recipesmondial, we help home cooks prepare easy, family-friendly meals that truly shine.

    When planning your holiday menu, consider dishes that can be prepared ahead of time to reduce stress on the big day. Many classic sides are surprisingly simple to make, yet they deliver incredible taste. We focus on approachable home cooking, ensuring every step is clear and easy to follow.

    Consider these popular and straightforward options:

    • Corn Casserole: A holiday staple, this dish is incredibly easy to make and always a crowd-pleaser. Our simple corn casserole recipe uses everyday ingredients, like Jiffy corn mix for extra convenience. It’s creamy, slightly sweet, and pairs wonderfully with roasted meats. It’s also a great make-ahead option that reheats beautifully.
    • Ambrosia Salad: For a touch of retro charm and fruity sweetness, ambrosia salad is a fantastic choice. This light and fluffy “salad”—made with fruit, marshmallows, and coconut—offers a refreshing contrast to rich holiday fare. It’s a beginner-friendly recipe that adds a lovely pop of color to your table.
    • Classic Green Bean Casserole: This quintessential holiday side is always a hit. You can easily elevate a simple version with fresh ingredients or stick to the traditional comfort of cream of mushroom soup.
    • Roasted Vegetables: Sweet potatoes, Brussels sprouts, or carrots roasted with simple seasoning make a perfect, healthy side. They add vibrant color and essential nutrients to your meal, and the process is as easy as chop, toss, and roast.

    Remember, the goal is to enjoy cooking for your loved ones. Our step-by-step guidance helps you easily create flavorful meals and build confidence in the kitchen.

    Winning Super Bowl and Game Day Food Ideas

    Game day calls for exciting, shareable food that’s easy to eat while cheering on your team. Forget being stuck in the kitchen—with Recipesmondial, you can prepare delicious appetizers and sides that let you join the fun. We provide quick and reliable meal solutions packed with flavor.

    These dishes are perfect for a casual gathering, as they are often hearty, flavorful, and simple to serve buffet-style.

    • Homemade Salsa: A fresh salsa recipe is a must for any game day party. It’s incredibly versatile, pairing well with chips, tacos, or grilled chicken. You can whip up a classic tomato salsa or try a vibrant salsa verde recipe for something different. Making your own is easier than you think and tastes so much better than store-bought options [4].
    • Creamy Coleslaw: For a refreshing crunch, a simple coleslaw recipe is unbeatable. It’s a fantastic side for sliders, pulled pork sandwiches, or hot dogs, and a good dressing is key to delicious slaw. Many home cooks love to recreate a KFC coleslaw recipe for that familiar, tangy-sweet flavor. Best of all, this quick side can be prepped ahead of time.
    • Chilaquiles: For something more substantial and unique, consider chilaquiles. This classic Mexican dish, often eaten for breakfast, also makes a fantastic game-day snack. Our chilaquiles recipe guides you through creating crispy tortilla pieces smothered in salsa and topped with cheese and other additions. It’s a flavorful, comforting dish that’s easy to customize.
    • Loaded Nachos: Nachos are a game day staple. They are easy to make with simple ingredients and can be piled high with your favorite toppings like salsa, cheese, and beans.

    Ultimately, the best game day food is easy to grab and enjoy. These ideas will help you discover simple new dishes and make cooking a stress-free part of the fun.

    Easy Recipes for Potlucks and Parties

    Bringing a dish to a potluck or party shouldn’t be stressful. The best potluck recipes travel well, can be made ahead, and appeal to a wide variety of tastes. Recipesmondial provides easy options that ensure you always have a winning dish to share.

    When selecting a dish, think about practicality and broad appeal. You want something simple to prepare that still delivers on flavor. These options are perfect for sharing:

    • Hearty Mexican Rice or Spanish Rice: A flavorful Mexican or Spanish rice is an excellent choice for a potluck. It’s budget-friendly, feeds a crowd, and pairs wonderfully with many main courses. This dish is robust enough to travel well and can be kept warm easily. It’s also a great way to incorporate global comfort foods into your meal.
    • Versatile Coleslaw: Coleslaw is a true potluck hero. Its fresh, tangy crunch makes it a perfect complement to richer dishes. You can prepare it hours in advance, allowing the flavors to meld beautifully. It’s a healthy and balanced component that requires minimal effort.
    • Comforting Corn Casserole: This potluck superstar is always a hit. Its creamy texture and sweet corn flavor are universally loved, and the recipe is simple enough for any beginner to get delicious results every time.
    • Homemade Salsa and Chips: Never underestimate the power of a good homemade salsa. It’s quick to prepare, relatively inexpensive, and always disappears fast. A fresh salsa recipe shows thoughtfulness without requiring hours in the kitchen.

    Our goal is to make mealtime stress-free so you can enjoy the gathering. With approachable recipes and step-by-step guidance, you’ll feel confident sharing your culinary creations at any party.

    Frequently Asked Questions About Appetizers, Sides, and Snacks

    What is the difference between an appetizer and a side dish?

    Understanding the role of each dish makes meal planning much easier. Although appetizers and side dishes both add flavor and variety to your table, they serve distinct purposes during a meal.

    Appetizers: Setting the Stage

    An appetizer, also known as a starter, is served before the main course. Its purpose is to stimulate the appetite and offer a small preview of the meal to come.

    • Purpose: To awaken the appetite and offer a small taste of what’s to come.
    • Timing: Served before the main meal.
    • Portion Size: Typically small, bite-sized, or shareable portions.
    • Examples: Mini spring rolls, bruschetta, a small bowl of olives, or a simple dip like homemade salsa with tortilla chips. Many appetizers are designed to be easy-to-eat finger foods.

    Side Dishes: Complementing the Star

    A side dish is served alongside the main course. It’s designed to complement the main dish, adding balance, texture, and extra nutrition to complete the meal.

    • Purpose: To enhance the main dish and provide variety on the plate.
    • Timing: Served at the same time as the main meal.
    • Portion Size: Larger than appetizers, usually a single serving per person.
    • Examples: Roasted vegetables, mashed potatoes, a fresh garden salad, or a hearty cornbread casserole.

    In short, appetizers get the party started, while side dishes complete the main event. Both are fantastic ways to add more delicious food to your meal!

    What are some good cold appetizers for a party?

    Cold appetizers are a host’s best friend. They are perfect for party planning because you can often make them ahead of time, freeing you up to enjoy your guests.

    Here are some of our favorite easy recipes that are always a hit:

    • Classic Homemade Salsa with Tortilla Chips: This is a vibrant, fresh option. Our simple recipe uses ripe tomatoes, onions, cilantro, and lime juice. You can easily adjust the spice level to your liking.
    • Creamy Veggie Dip with Crudités: A colorful platter of carrot sticks, cucumber slices, bell pepper strips, and cherry tomatoes is always refreshing. Pair it with a simple ranch or dill dip.
    • Caprese Skewers: Thread cherry tomatoes, small mozzarella balls, and fresh basil leaves onto toothpicks. For an elegant touch, drizzle with balsamic glaze right before serving.
    • Hummus Platter: Whether store-bought or homemade, hummus is a fantastic choice. Serve it with warm pita bread, cucumber slices, and bell pepper strips. Add a sprinkle of paprika for visual appeal.
    • Cucumber Bites with Herbed Cream Cheese: Slice a cucumber into thick rounds. Top each slice with a dollop of cream cheese mixed with fresh herbs like dill or chives for a light and refreshing finger food.
    • Fruit Skewers: This is a healthy and refreshing option. Alternate pieces of melon, berries, grapes, and pineapple on skewers to add beautiful color to any food spread.

    These beginner-friendly recipes require minimal cooking but deliver maximum flavor, making them perfect for family gatherings or any special occasion.

    What are the easiest snacks to make for a crowd?

    When you need quick and reliable snacks for a gathering, simplicity is key. The best crowd-pleasers are straightforward to prepare, use everyday ingredients, and deliver big on flavor.

    Here are some fantastic, easy recipes for feeding a crowd:

    • Jiffy Corn Casserole (or Cornbread Casserole): This comforting, family-friendly dish is incredibly easy to make with a box of Jiffy mix, canned corn, and a few other staples. It bakes up golden and delicious, perfect for any potluck.
    • Sheet Pan Nachos: On a baking sheet, layer tortilla chips with cheese, seasoned ground beef (optional), beans, and jalapeños. Bake until the cheese is melted and bubbly. Serve with bowls of sour cream, homemade salsa, and guacamole.
    • Popcorn Bar: Offer a large bowl of freshly popped popcorn alongside various toppings. Include options like melted butter, nutritional yeast, chili powder, parmesan cheese, or even mini chocolate chips for a sweet and salty twist.
    • Fruit Platter with Yogurt Dip: Arrange a colorful assortment of sliced fruits like strawberries, grapes, melon, and apples. Serve it with a simple dip made from Greek yogurt, honey, and a splash of vanilla extract for a healthy snack everyone enjoys.
    • Pretzel Bites with Cheese Sauce: Warm up a bag of frozen pretzel bites and serve them with a creamy, easy-to-make cheese sauce. This is always a crowd-pleaser, especially on game day.

    These ideas focus on approachable home cooking, helping you serve flavorful food with ease, even when you’re short on time. They prove you don’t need to be a gourmet chef to whip up delicious party snacks.

    How do you make a simple coleslaw dressing?

    Making your own coleslaw dressing is simple, and it tastes much fresher than store-bought versions. This classic, creamy recipe is perfect for elevating a bag of shredded cabbage or your own homemade slaw mix.

    Simple Creamy Coleslaw Dressing Recipe

    This recipe yields about 1 cup of dressing, enough for a 14-16 oz bag of slaw mix (about 6-8 cups).

    Ingredients:

    • ½ cup mayonnaise
    • 2 tablespoons apple cider vinegar
    • 1 tablespoon granulated sugar (or to taste)
    • 1 teaspoon Dijon mustard
    • ¼ teaspoon salt
    • ⅛ teaspoon black pepper
    • 1-2 tablespoons milk or buttermilk (optional, for a thinner consistency)

    Step-by-Step Instructions:

    1. Combine Ingredients: In a medium bowl, whisk together the mayonnaise, apple cider vinegar, sugar, and Dijon mustard until smooth.
    2. Season: Add the salt and black pepper and whisk again until everything is well combined.
    3. Adjust Consistency (Optional): If you prefer a thinner dressing, slowly whisk in 1 to 2 tablespoons of milk or buttermilk until you reach the desired consistency.
    4. Taste and Adjust: Taste the dressing and adjust the seasoning if needed. You can add more sugar for sweetness, vinegar for tang, or salt for flavor.
    5. Mix with Slaw: Pour the dressing over your shredded cabbage and carrot mix. Toss gently to coat everything evenly.
    6. Chill: For the best flavor, cover the coleslaw and refrigerate for at least 30 minutes before serving. This allows the flavors to meld together.

    Tips for Perfect Coleslaw:

    • Freshness is Key: For the best texture, use fresh, crisp cabbage and carrots.
    • Make Ahead: The dressing can be made a day or two in advance and stored in an airtight container in the refrigerator. To prevent sogginess, mix it with the vegetables just before serving.
    • Spice It Up: Add a pinch of celery seed for a more traditional flavor, or include a dash of hot sauce for a spicy kick.
    • KFC-Inspired Coleslaw: For a sweeter, creamier dressing similar to KFC’s, increase the sugar slightly and be sure to chop your vegetables very finely.

    This beginner-friendly recipe ensures reliable results and shows how easy it is to make delicious sides at home.


    Sources

    1. https://www.smithsonianmag.com/arts-culture/a-brief-history-of-avocado-180963283/
    2. https://www.healthline.com/nutrition/sweet-potato-benefits
    3. https://www.hsph.harvard.edu/nutritionsource/food-features/berries/
    4. https://www.foodnetwork.com/recipes/articles/50-salsas