Category: Dinner and Main Courses

  • Easy Butter Chicken Recipe: A Step-by-Step How-To Guide

    Easy Butter Chicken Recipe: A Step-by-Step How-To Guide

    Butter chicken, also known as Murgh Makhani, is a popular Indian dish featuring marinated and grilled chicken pieces simmered in a rich, velvety tomato and cream-based sauce. Its signature flavor comes from a balanced blend of mild spices, tangy tomatoes, and the richness of butter and cream, creating a comforting and luxurious curry.

    Craving the rich, creamy butter chicken you love at your favorite Indian restaurant? Many home cooks feel intimidated by this classic dish, fearing complex ingredients or difficult techniques. But making restaurant-quality butter chicken at home is surprisingly simple. This guide will help you leave complicated recipes behind and create something truly special in your own kitchen.

    At Recipesmondial, we believe delicious, family-friendly meals should be accessible to everyone, regardless of cooking experience. That’s why we created this easy butter chicken recipe, designed with beginner-friendly recipes in mind. Our step-by-step instructions will guide you through each stage, ensuring great results and building your confidence. You’ll see how simple it is to turn everyday ingredients into an amazing meal, transforming a culinary challenge into a fun adventure.

    This guide shares everything you need to know to make the best butter chicken, from marinating the chicken to perfecting the silky, creamy tomato sauce. We cover practical tips, smart ingredient substitutions, and how to avoid common mistakes for a stress-free cooking experience. Get ready to impress your family and friends with a dish that is sure to become a new favorite in your recipe rotation.

    Why Is This The Best Butter Chicken Recipe for Home Cooks?

    This butter chicken recipe is a game-changer for home cooks. We know that finding an easy version can feel overwhelming, as many recipes call for too many ingredients or complex techniques. That’s why our guide focuses on an incredibly flavorful meal that’s approachable for everyone, from beginners to seasoned cooks.

    What makes our specific butter chicken recipe stand out?

    • Simple, Step-by-Step Guidance: We eliminate confusion with clear, easy-to-follow instructions. By breaking down each stage into simple, actionable steps, you’ll build kitchen confidence and enjoy a stress-free cooking experience.
    • Everyday Ingredients: Forget trips to specialty stores. This delicious, budget-friendly dish uses common ingredients you can find at your local grocery store, making it easy to create amazing global comfort food at home.
    • Guaranteed Flavorful Results: This isn’t just an easy recipe—it’s a truly delicious one. You’ll create a rich, creamy, and wonderfully spiced butter chicken that tastes just like your favorite restaurant version, making it simple to enjoy flavorful meals at home.
    • Time-Saving for Busy Lives: We know your time is valuable, so this recipe is designed for efficiency. It delivers a fantastic, family-friendly meal without hours in the kitchen, making it a perfect solution for busy weeknights.
    • Boost Your Cooking Confidence: Whether you’re new to Indian cooking or just want to build your skills, this recipe is the perfect starting point. You’ll master basic techniques and discover how satisfying it is to prepare a delicious meal from scratch.
    • Family-Friendly Favorite: As a universally loved dish, butter chicken’s mild, creamy flavor appeals to all ages—even picky eaters. It’s an ideal choice for simple dinner recipes and is sure to become a family favorite.

    At Recipesmondial, we specialize in approachable home cooking. Our step-by-step guidance helps you move from uncertainty to confidence, transforming simple ingredients into delicious, visually appealing meals. Discover new flavors and recipes with ease.

    What Ingredients Do You Need for Butter Chicken?

    A top-down view of fresh ingredients for butter chicken, including chicken, tomatoes, cream, butter, and various spices.
    Professional food photography, photorealistic, high-quality food magazine photo: A vibrant and meticulously organized flat lay of all fresh, high-quality ingredients for an easy butter chicken recipe, arranged on a rustic wooden cutting board or a light marble countertop. Key ingredients include raw chicken pieces, canned crushed tomatoes, heavy cream, unsalted butter, a whole onion, garlic cloves, fresh ginger, an array of Indian spices (garam masala, turmeric powder, Kashmiri chili powder, ground cumin, ground coriander), raw cashews, and a bunch of fresh cilantro. The lighting is soft, natural, and inviting, emphasizing the freshness and accessibility of each component, creating a clean and appealing visual for home cooks.

    Ready to make delicious butter chicken? The secret to a truly flavorful dish is using the right ingredients. Don’t worry—we’ll guide you through each component. A global comfort food, this classic recipe traces its origins to Delhi, India, in the 1950s [1]. The best part? You likely have many of these items in your pantry already.

    For the Chicken Marinade

    First, gather the ingredients for the chicken marinade. This essential step infuses the chicken with spices, ensuring every piece is tender, juicy, and packed with flavor.

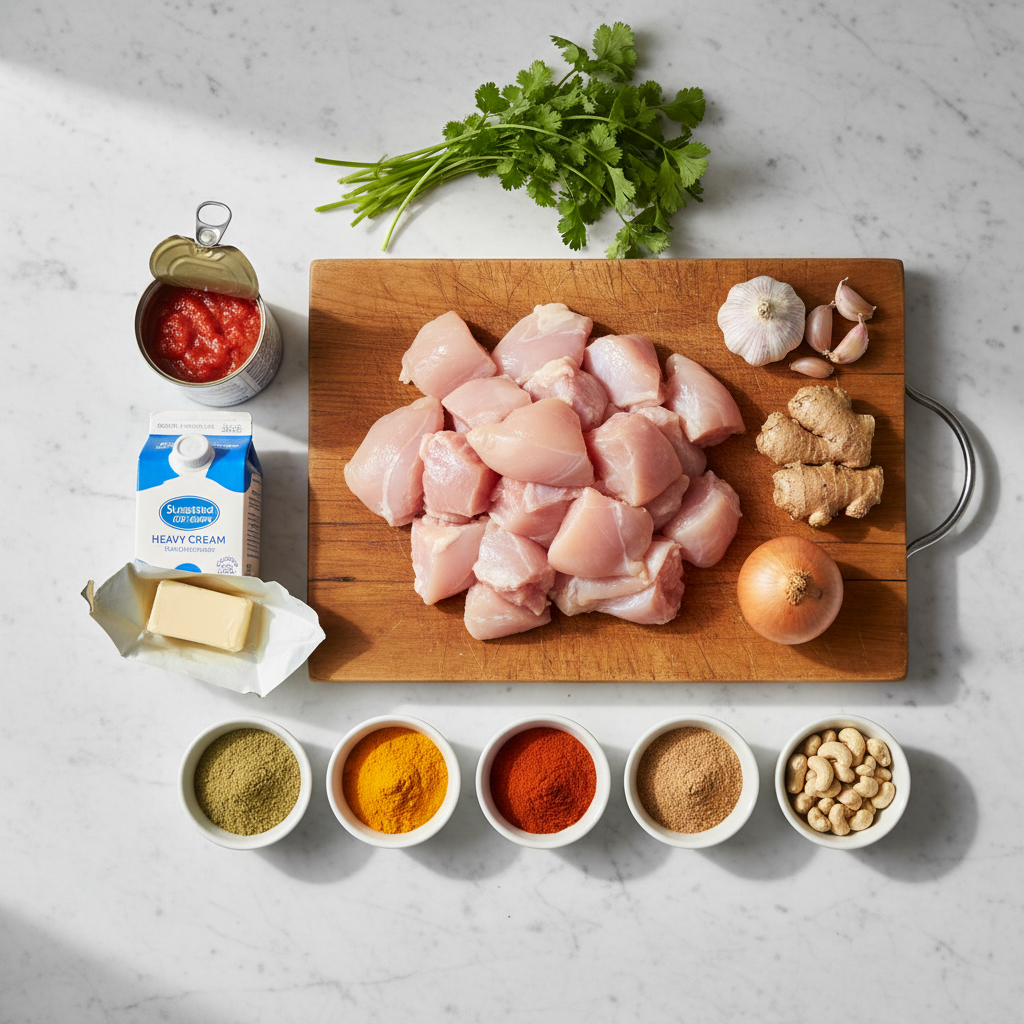
    • Chicken: 1.5 lbs (about 680g) boneless, skinless chicken thighs or breasts, cut into 1-inch pieces. (Thighs are recommended for juiciness and tenderness).
    • Plain Yogurt: 1/2 cup (120ml) full-fat plain yogurt. (Greek yogurt also works well; it helps tenderize the chicken and bind the spices).
    • Ginger-Garlic Paste: 1 tablespoon. (Available pre-made, or you can make your own by crushing equal parts fresh ginger and garlic).
    • Fresh Lemon Juice: 1 tablespoon. (Adds brightness and aids in tenderizing).
    • Ground Turmeric: 1/2 teaspoon. (For color and a touch of earthy flavor).
    • Red Chili Powder: 1 teaspoon (or paprika for a milder kick if preferred).
    • Garam Masala: 1 teaspoon. (A fragrant Indian spice blend crucial for authentic taste).
    • Ground Cumin: 1/2 teaspoon.
    • Salt: 1 teaspoon.

    For the Creamy Tomato Sauce

    Next up is the heart of the dish: the rich and creamy makhani sauce. This is what gives butter chicken its famously silky texture and incredible depth of flavor.

    • Unsalted Butter: 3 tablespoons. (It’s butter chicken, after all! Using unsalted butter allows you to control the final saltiness of the dish).
    • Vegetable Oil (or Ghee): 1 tablespoon. (For sautéing aromatics at the start).
    • Onion: 1 medium, finely chopped. (Forms the sweet and savory base of the sauce).
    • Ginger-Garlic Paste: 1 tablespoon. (This essential aromatic adds another deep layer of flavor to the sauce).
    • Canned Crushed Tomatoes: 1 (28-ounce/794g) can, or tomato purée. (This is key for the sauce’s body and tangy depth).
    • Whole Cashews: 1/4 cup (about 30g). (Soaking them in hot water for 15 minutes is recommended. They blend to create a luxurious, creamy thickness).
    • Garam Masala: 1 teaspoon.
    • Ground Turmeric: 1/2 teaspoon.
    • Red Chili Powder: 1 teaspoon (adjust to your personal spice preference).
    • Fenugreek Leaves (Kasoori Methi): 1 tablespoon, crushed between your palms. (This dried herb is essential for authentic flavor. Look for it in Indian grocery stores—its unique taste is a game-changer!).
    • Granulated Sugar: 1 teaspoon. (Balances the acidity of the tomatoes and rounds out the flavors).
    • Heavy Cream: 1/2 cup (120ml). (Adds the signature rich and velvety finish to the sauce).
    • Salt: To taste.
    • Water or Chicken Broth: 1/2 to 1 cup (120-240ml), as needed. (Use as needed to achieve your desired sauce consistency).

    How to Make Butter Chicken Step-by-Step

    Creamy, delicious butter chicken simmering in a pot, garnished with a swirl of cream and fresh cilantro.
    Professional food photography, photorealistic, high-quality food magazine photo: A close-up, mouth-watering shot of rich, creamy butter chicken simmering gently in a vibrant orange-red sauce within a rustic cast-iron Dutch oven or a large, inviting stainless steel pot on a gas stovetop. The tender chicken pieces are perfectly coated, and the sauce has a beautiful, velvety texture. A subtle wisp of steam rises from the dish. The butter chicken is garnished with a fresh swirl of heavy cream and a sprinkle of bright green chopped cilantro leaves. The background is softly blurred, suggesting a warm, inviting home kitchen environment with natural light.

    Step 1: Marinate the Chicken

    Marinating is the key to tender, juicy, and flavorful chicken. This essential step allows the spices to penetrate the meat, creating a delicious foundation for your butter chicken.

    • Prepare your chicken: Pat the chicken pieces dry with paper towels. This helps the marinade adhere properly.
    • Combine the marinade: In a large bowl, whisk the yogurt, ginger-garlic paste, lemon juice, and all marinade spices until well combined.
    • Add the chicken: Add the chicken pieces to the bowl and toss gently to ensure every piece is fully coated.
    • Chill and wait: Cover the bowl and refrigerate for at least 30 minutes. For the best results, marinate for 2 to 4 hours, or even overnight.

    Pro Tip: Don’t skip this step! Even a 30-minute soak will significantly improve the flavor and tenderness of your chicken.

    Step 2: Cook the Chicken

    Next, we will cook the marinated chicken. Searing the pieces until golden-brown adds a rich, deep flavor to the final dish.

    • Heat your pan: Place a large skillet or heavy-bottomed pan over medium-high heat and add oil or ghee. Ensure the pan is hot before you begin.
    • Sear the chicken: Working in batches to avoid overcrowding, add the chicken pieces to the hot pan. Cook for 3-5 minutes per side until golden-brown and slightly charred. The chicken does not need to be fully cooked at this stage.
    • Remove and set aside: Once seared, remove the chicken from the pan and set it aside.

    Cooking Confidence Boost: Overcrowding the pan steams the chicken instead of searing it. Give each piece enough space to develop that perfect golden crust. Building flavor step-by-step is the secret to great results.

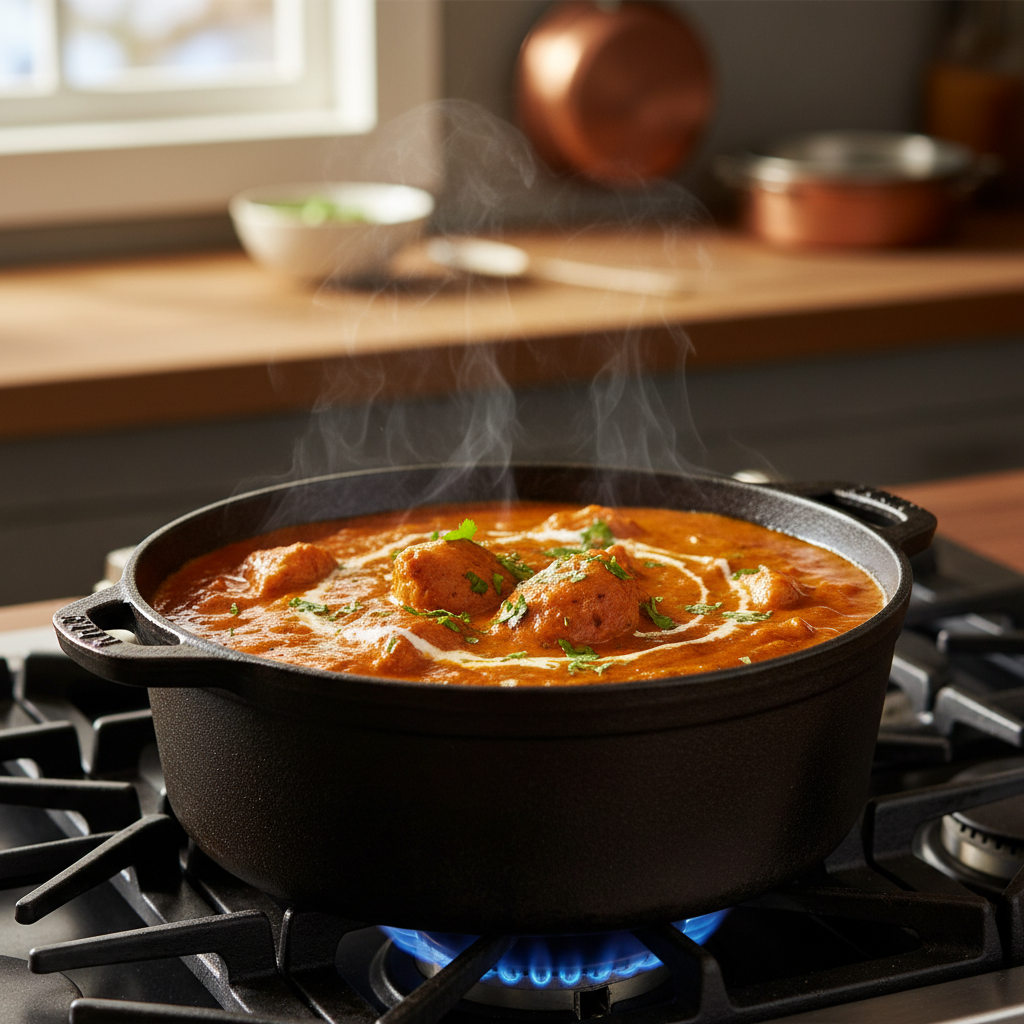
    Step 3: Prepare the Makhani (Butter) Sauce

    Now it’s time to create the creamy, rich butter chicken sauce, also known as Makhani sauce. Achieving a restaurant-quality flavor at home is easier than you think.

    • Sauté aromatics: In the same pan, melt the butter over medium heat. Add the chopped onions and cook for 5-7 minutes until softened and translucent. Stir in the ginger-garlic paste and cook for one more minute until fragrant.
    • Bloom the spices: Add all the sauce spices (turmeric, garam masala, chili powder, etc.). Stir constantly for about 30 seconds until their aroma is released.
    • Add tomatoes and simmer: Pour in the crushed tomatoes and tomato paste, stirring to combine. Add the cashews (if using) and a splash of water, then bring to a gentle simmer. Reduce the heat to low, cover, and cook for 15-20 minutes to allow the flavors to meld.
    • Blend for smoothness: Carefully transfer the sauce to a blender (an immersion blender also works well) and blend until completely smooth. For an extra-silky texture, strain the sauce through a fine-mesh sieve back into the pan.

    Chef’s Secret: Thoroughly blending the sauce is crucial for achieving the signature velvety texture of authentic butter chicken. Take your time on this step.

    Step 4: Combine and Simmer

    You’re almost done! The final step is to bring all the components together to create your delicious, finished butter chicken.

    • Combine sauce and chicken: Return the smooth Makhani sauce to the pan over low heat. Gently add the seared chicken pieces and stir to coat them evenly.
    • Enrich the sauce: Pour in the heavy cream. Crush the kasuri methi (dried fenugreek leaves) between your palms as you add it to the sauce to release its aroma, then stir everything together.
    • Simmer to finish: Let the butter chicken simmer gently for 10-15 minutes, uncovered. This allows the chicken to finish cooking and the sauce to thicken slightly.
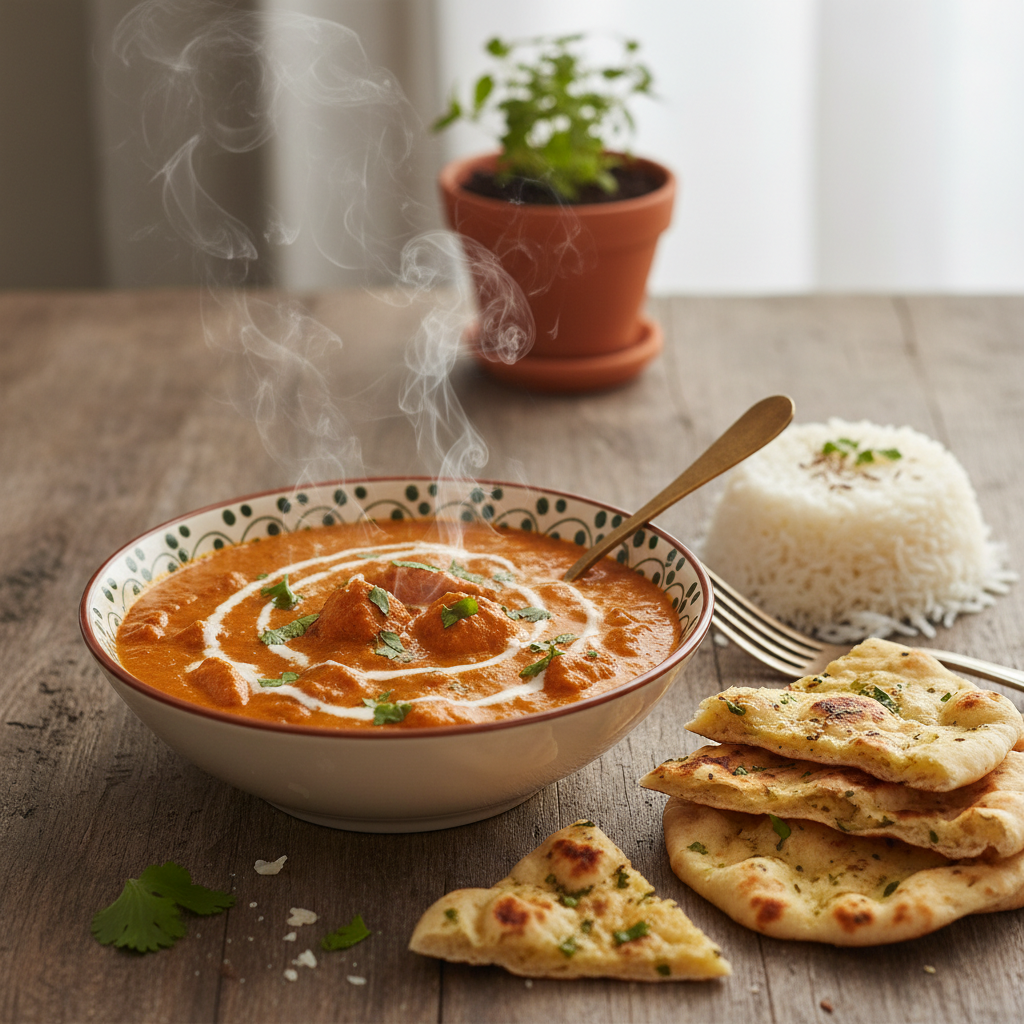
    • Season and serve: Taste the sauce and adjust the seasoning with salt and a pinch of sugar to balance the flavors. Garnish with fresh cilantro and an optional drizzle of cream before serving.

    Serving Suggestion: This dish pairs perfectly with warm naan bread or fluffy basmati rice for a truly satisfying meal. Enjoy!

    What Are Some Tips for the Perfect Creamy Butter Chicken?

    Achieving the Silky-Smooth Sauce

    The hallmark of a truly great butter chicken is its rich, silky-smooth sauce. Achieving this texture is simpler than you might think. With a few easy steps, your homemade butter chicken will rival any restaurant dish.

    • Blend for Bliss: After simmering the tomato sauce base, blend it until completely smooth. An immersion blender works directly in the pot, or you can carefully transfer the sauce to a regular blender. This step creates a luxurious foundation for your meal.
    • Strain for Perfection: For an extra-velvety, restaurant-quality texture, pass the blended sauce through a fine-mesh sieve. This removes any remaining bits of onion or tomato skin.
    • Simmer Slowly: Gently simmer the sauce to allow the flavors to meld together. This slow simmer also thickens the sauce naturally, ensuring a rich and creamy finish.
    • High-Quality Tomatoes: The quality of your tomatoes makes a big difference. Use good canned crushed tomatoes to create a deep, rich flavor base for your sauce.

    Ingredient Substitutions and Variations

    One of the best things about cooking is making a recipe your own. This butter chicken recipe is wonderfully adaptable, so feel free to adjust it to suit your tastes or dietary needs.

    • Chicken Alternatives: Not a fan of chicken? No problem!
      • Paneer: For a vegetarian option, use cubed paneer. Add it during the final simmering stage to heat through.
      • Chickpeas: Canned chickpeas work well as a quick protein source. Simply drain, rinse, and stir them into the sauce at the end.
      • Mixed Vegetables: Add florets of cauliflower or broccoli and cook them in the sauce until tender for a healthy, balanced meal.
    • Dairy-Free Options: You can still enjoy creamy butter chicken without dairy.
      • Coconut Milk: Substitute full-fat coconut milk for heavy cream. It adds a subtle, tropical richness to the sauce.
      • Cashew Cream: Soak raw cashews in hot water for 30 minutes, then blend with fresh water until smooth. Use this as a direct replacement for heavy cream.
    • Spice Level: Adjust the heat to your preference.
      • More Heat: Add an extra pinch of cayenne pepper or include a chopped green chili with the onions.
      • Less Heat: Reduce the amount of chili powder, or skip the cayenne pepper entirely for a milder dish.
    • Healthier Twists: You can lighten up this dish with a few simple swaps.
      • Less Cream: Use half the amount of heavy cream and replace the other half with milk or plain yogurt.
      • Ghee Instead of Butter: Ghee (clarified butter) is a flavorful alternative with a higher smoke point.

    How to Avoid Common Mistakes

    Cooking butter chicken is a delightful process, but a few common pitfalls can affect the result. Follow these simple tips to ensure your dish turns out perfectly every time.

    • Don’t Overcook the Chicken: Marinated chicken cooks quickly, so cook it just until browned and cooked through. Overcooking will make the chicken dry and tough instead of juicy and tender.
    • Sauté Spices Properly: To develop their full flavor, sauté your aromatics and ground spices until they become fragrant. Undercooked spices can taste raw, so don’t skip this vital step.
    • Add Cream at the End: Add heavy cream at the very end of cooking and simmer gently for just a few minutes. Boiling cream vigorously can cause it to separate, ruining the sauce’s smooth texture.
    • Balance Flavors: A great butter chicken has a perfect balance of sweet, sour, and savory notes. Always taste the sauce before serving and adjust with a pinch of sugar or a squeeze of lemon juice as needed.
    • Use Fresh Ingredients: Whenever possible, use fresh ginger and garlic instead of powdered versions. Their vibrant flavor truly elevates the dish. For instance, fresh garlic is not only more flavorful but also provides more health benefits than dried garlic [source: https://www.healthline.com/nutrition/11-proven-health-benefits-of-garlic].

    What Should You Serve With Butter Chicken?

    A complete meal featuring butter chicken with basmati rice, garlic naan, and a side of raita on a cozy table.
    Professional food photography, photorealistic, high-quality food magazine photo: A beautifully composed and inviting shot of a complete butter chicken meal, ready to be enjoyed. The main focus is a generous serving of butter chicken in an attractive ceramic bowl, its rich sauce and tender chicken highlighted. It is accompanied by a mound of fluffy, pearly basmati rice, a side of warm, golden garlic naan bread torn into pieces, and a small bowl of fresh cucumber raita or a vibrant green salad. The setting is a cozy dining table with warm, soft lighting, emphasizing the comfort and deliciousness of the entire meal. The composition should make the viewer want to reach for a fork.

    Best Breads for Butter Chicken

    Butter chicken’s rich, creamy sauce is its signature, and you’ll want the perfect bread to scoop up every last drop. Serving the right bread completes the meal. Here are some fantastic and easy options:

    • Naan Bread: A classic for a reason, naan is a soft, fluffy flatbread traditionally baked in a tandoor oven. Its texture is ideal for soaking up the creamy sauce. You can find ready-made plain or garlic naan in most grocery stores—just warm it in the oven or on a pan before serving.
    • Roti or Chapati: As a lighter alternative to naan, these thin, unleavened flatbreads are a great choice. Roti is typically made with whole wheat flour, offering a simple and wholesome pairing. They are available fresh or frozen and cook up in minutes.
    • Pita Bread: If you can’t find Indian flatbreads, pita bread is an excellent substitute. It has a similar soft texture that works well with the curry. For easy dipping, warm the pita and cut it into triangles. This is a practical and convenient option.
    • Garlic Bread: For a fun, non-traditional twist, try garlic bread. Its crunchy texture and savory garlic butter complement the creamy curry beautifully. This is a family-friendly choice that is sure to be a hit.

    Rice and Side Dishes

    Beyond the bread, the right rice and side dishes will round out your butter chicken dinner. These simple options add balance and texture, creating a complete and satisfying meal.

    • Basmati Rice: Fragrant, long-grain basmati rice is the classic partner for butter chicken. Its delicate aroma and fluffy texture complement the curry without overpowering it. For extra flavor, cook it with a pinch of salt and a bay leaf.
    • Jasmine Rice: Jasmine rice is another excellent and fragrant option, similar to basmati but with a slightly stickier texture. It’s easy to prepare and widely available, making it another great choice.
    • Brown Rice: For a healthier whole-grain option, try brown rice. It has a nuttier flavor and offers more fiber, though it does take longer to cook than white rice.
    • Cucumber Raita: This cool, yogurt-based side provides a refreshing contrast that cuts through the richness of the curry. To make it, simply combine plain yogurt with grated cucumber, fresh mint, and a sprinkle of cumin. It’s a simple recipe that adds a big impact.
    • Simple Green Salad: A crisp green salad acts as a wonderful palate cleanser. Dressed lightly with a lemon vinaigrette, it adds a welcome freshness and a pop of color to your meal.
    • Roasted Vegetables: Roasted vegetables like broccoli, cauliflower, or green beans make a simple and healthy side. Just toss them with a little oil, salt, and pepper, then roast until tender-crisp. They add satisfying texture and nutrition to the meal.

    How Do You Store and Reheat Leftovers?

    Refrigerating

    Properly storing leftover butter chicken keeps it fresh for several days, making it a great option for meal prep. Follow these steps to ensure your meal stays safe and delicious.

    How to Refrigerate Butter Chicken

    1. Cool It Quickly: Let the butter chicken cool to room temperature, making sure this happens within two hours of cooking. This step is crucial for preventing bacterial growth (source).
    2. Store Airtightly: Transfer the cooled butter chicken to an airtight container with a tight-fitting lid. This locks in freshness by keeping air out.
    3. Refrigerate Promptly: Place the sealed container in the refrigerator. Your butter chicken will stay delicious for 3 to 4 days.

    How to Reheat Refrigerated Butter Chicken

    When you are ready to eat, reheat the leftovers gently. You can warm it on the stovetop over low heat or in the microwave, stirring often to ensure it heats through evenly.

    Freezing

    Yes, you can absolutely freeze butter chicken! Freezing is a fantastic meal prep solution that extends the life of your flavorful meal for months.

    To preserve its taste and texture, follow these steps:

    • Cool It Down: Always allow the butter chicken to cool completely before placing it in the freezer.
    • Portion It Out: Divide the cooled butter chicken into single or family-sized servings using freezer-safe containers or heavy-duty freezer bags.
    • Seal Tightly: Remove as much air as possible from the container or bag before sealing to help prevent freezer burn.
    • Label and Date: Clearly write the date on each container so you can keep track of how long it’s been stored.
    • Freeze: Place the sealed portions in the freezer. Your butter chicken will maintain its quality for 2 to 3 months.

    Reheating frozen butter chicken is simple. For the best results, follow these tips:

    • Thaw Slowly: For the best texture, transfer the frozen butter chicken to the refrigerator and let it thaw overnight.
    • Reheat on Stovetop: Pour the thawed butter chicken into a saucepan and warm it over low to medium heat. Stir occasionally until it is simmering gently and heated through.
    • Microwave Option: For a quicker method, place the thawed butter chicken in a microwave-safe dish. Heat in 1- to 2-minute intervals, stirring between each one to ensure even warming.
    • Add Moisture (Optional): If the sauce seems thin after thawing, stir in a splash of cream or water to restore its original creamy texture.
    • Serve Fresh: Enjoy your reheated butter chicken with fresh naan or rice. It will taste just as delicious as the day it was made!

    Frequently Asked Questions About Butter Chicken

    What are the main ingredients in a butter chicken recipe?

    A classic butter chicken recipe, known as Murgh Makhani, relies on a few key components. These work together to create its signature rich, comforting flavor profile.

    • Chicken: Boneless, skinless chicken thighs or breasts are ideal. Marinating the chicken in yogurt and spices makes it tender and flavorful.
    • Tomato Base: Crushed or pureed tomatoes form the foundation of the sauce, providing a lovely tang and depth.
    • Butter and Cream: These are essential for the sauce’s luxurious richness and silky texture. In fact, they give butter chicken its name!
    • Aromatics: Fresh ginger and garlic paste are crucial for building a flavorful base.
    • Spices: A blend of common Indian spices like garam masala, turmeric, red chili powder (or Kashmiri chili for color), and cumin seeds is used.
    • Sweetness: A touch of sugar or honey balances the acidity of the tomatoes and enhances the overall taste.

    At Recipesmondial, we focus on using everyday ingredients, making this flavorful dish approachable for any home cook.

    How do you make butter chicken extra creamy?

    Achieving a wonderfully velvety smoothness in your butter chicken is simpler than you might think. Here are our best tips for an extra creamy sauce:

    • Blend the Sauce: After simmering the tomato base, use an immersion blender or a regular blender (carefully!) to purée the sauce until it is completely smooth. This step is a game-changer for a restaurant-quality texture.
    • Use Full-Fat Dairy: For the richest result, opt for full-fat heavy cream or cashew cream. Skimping on fat here will impact the final creaminess.
    • Add Yogurt: Adding plain, full-fat yogurt to the chicken marinade—and sometimes a touch to the sauce—adds a lovely creamy consistency and tangy flavor.
    • Cashew Paste: For an indulgent, thick sauce, blend soaked cashews into a smooth paste and stir it into your simmering sauce. This adds incredible body and richness. Just be sure to soak the cashews in hot water for at least 15-20 minutes beforehand.
    • Simmer Gently: Allow the sauce to simmer for at least 15-20 minutes after adding the cream. This helps the flavors meld and allows the sauce to thicken naturally.

    Following these steps will help you create a wonderfully luscious and satisfying butter chicken—a guaranteed hit for your family-friendly meals!

    Is this an authentic Indian butter chicken recipe?

    Our butter chicken recipe is an approachable version inspired by the authentic Indian classic, Murgh Makhani. The original dish originated in Delhi, India, in the 1950s [2], and our goal at Recipesmondial is to make its incredible flavors easy for you to recreate.

    While we respect traditional methods, our recipe is designed for busy home cooks. We streamline the steps and use readily available ingredients without sacrificing the rich, delicious flavor that makes this dish so popular.

    Our recipe is a reliable, step-by-step guide to achieving a wonderfully tasty butter chicken in your own kitchen. Although it may not follow every nuance of a traditional preparation, it absolutely captures the delicious essence that has made butter chicken a global favorite. You can confidently create this beloved international dish at home!


    Sources

    1. https://en.wikipedia.org/wiki/Butter_chicken
    2. https://indianexpress.com/article/lifestyle/food-wine/butter-chicken-history-birthplace-7634351/

  • The Easiest Fish and Chips Recipe (Perfectly Crispy & Simple)

    The Easiest Fish and Chips Recipe (Perfectly Crispy & Simple)

    Making classic fish and chips involves creating a simple batter for a firm white fish, such as cod or haddock, and double-frying potatoes for extra crispy chips. The keys to success are maintaining the correct oil temperature for a light, golden-brown finish and keeping the batter cold before use.

    There’s something uniquely comforting about a plate of golden, crispy fish and fluffy, hot chips. While this classic British takeaway has captured hearts worldwide, making it at home can feel like a daunting task. Complex recipes can leave you overwhelmed by technical terms, and you might be unsure how to get that perfect crunch without a professional fryer. We understand the challenge of cooking healthy, tasty meals quickly, especially when you’re planning family-friendly dinners or just need a confidence boost in the kitchen.

    At Recipesmondial, we believe enjoying delicious meals shouldn’t be a source of stress. That’s why we’ve crafted the easiest fish and chips recipe for every home cook. It’s perfect for beginners or anyone seeking reliable, beginner-friendly recipes. Imagine serving perfectly crispy battered fish and golden chips, all made from scratch in your own kitchen, without any fuss. Our step-by-step guidance will boost your confidence and make cooking enjoyable again. With our collection of simple dinner recipes, you’ll discover new dishes that become instant family favorites.

    Get ready to transform simple ingredients into a spectacular meal. We’ll walk you through every step, from choosing the best fish to mastering the crispy batter and golden chips. Say goodbye to guesswork and hello to a homemade fish and chips experience that rivals your favorite takeaway. This approachable home cooking guide will make the iconic dish an easy and flavorful staple in your home. Let’s dive in!

    Why You’ll Love This Simple Fish and Chips Recipe

    A platter of golden-brown crispy fish fillets and thick-cut chips, garnished with lemon and parsley, with a side of tartar sauce.
    Professional food photography, photorealistic, high-quality food magazine photo of a beautifully plated, golden-brown fish and chips dish, perfectly crispy, served on a rustic wooden board with vibrant lemon wedges, a sprinkle of fresh chopped parsley, and a small ceramic ramekin of creamy tartar sauce. The focus is on the inviting texture of the crispy batter and perfectly golden chips, with subtle steam rising, illuminated by warm, natural light creating a mouth-watering, appealing scene.

    Imagine a classic British takeaway right in your own kitchen. Our simple fish and chips recipe makes it happen! If you’ve ever felt overwhelmed by complex instructions or struggled to get that perfectly crispy finish, this recipe is for you.

    We believe cooking should be fun, not stressful. This guide makes creating delicious, restaurant-quality fish and chips incredibly easy, building your confidence along the way. Get ready to say goodbye to guesswork and hello to homemade perfection!

    Here’s why you will absolutely love making this:

    • Effortless Perfection: Our step-by-step cooking guidance is designed for success, ensuring you get golden, crispy fish and fluffy chips every time.
    • Beginner-Friendly: You don’t need any special culinary skills. As an ideal beginner-friendly recipe, it uses only basic techniques and everyday ingredients.
    • Family-Favorite Meal: A guaranteed crowd-pleaser! This perfect family-friendly meal makes dinner enjoyable for all ages.
    • Achieve Crispy Bliss: Learn our secrets for a light, crunchy batter that leaves your fish perfectly flaky inside and your chips golden and tender.
    • Enjoy Cooking Without Stress: Our simplified process helps you transform simple ingredients into flavorful meals made easy, so you can truly enjoy your time in the kitchen.
    • Quick and Reliable: When you need a tasty dinner fast, this simple dinner recipe delivers delicious, reliable results in no time.
    • Boost Your Confidence: Mastering this classic dish will empower you to move from uncertainty to confidence in the kitchen. Discover the joy of approachable home cooking.

    What Ingredients Do You Need for Fish and Chips?

    For the Fish

    The secret to irresistible homemade fish and chips begins with the right fish. You’ll want a mild, flaky white fish that holds its shape well during frying. Using the right type of fish ensures your easy recipe turns out perfectly every time!

    • Cod Fillets: About 1.5 lbs (680g) total, cut into 4 equal portions. Cod is a classic choice for its mild flavor and firm, flaky texture. It is very forgiving for beginners and always delivers delicious results.
    • Haddock Fillets: Haddock is another fantastic option. It has a slightly sweeter flavor than cod and a wonderful texture that fries up beautifully crispy.
    • Salt and Black Pepper: Just a pinch of each to season the fish before battering. This simple step enhances the flavor of your family-friendly meal.

    Pro Tip: Pat your fish fillets completely dry with paper towels before seasoning and battering. Excess moisture prevents the batter from sticking properly and results in a less crispy finish. This small trick makes a big difference!

    For the Chips (Fries)

    Crispy, golden chips are just as important as the fish. Starting with the right potatoes is the key to achieving a perfectly fluffy interior and a crunchy exterior.

    • Russet Potatoes (or Maris Piper if available): About 2 lbs (900g). Russets are ideal because their high starch content helps them get wonderfully crispy on the outside while staying fluffy inside. In the UK, Maris Piper potatoes are the traditional choice for their excellent frying qualities.
    • Cold Water: You’ll need this for soaking the cut potatoes. This step removes excess starch, which is the secret to making your chips extra crispy.
    • Vegetable Oil (or other high smoke point oil): About 6-8 cups (1.5-2 liters) for deep frying. You need enough oil to fully submerge the chips and fish. Canola or sunflower oil also work well for this simple dinner recipe.
    • Salt: For seasoning your chips as soon as they come out of the fryer. A generous sprinkle brings out their flavor.

    Beginner’s Tip: Cut your potatoes into even-sized sticks, about 1/2-inch thick. This ensures they all cook at the same rate. Don’t worry if they aren’t perfect—consistency is the goal!

    For the Batter

    A great batter is what gives your fish that incredible light and airy crunch. This beginner-friendly recipe uses simple ingredients to create a coating with maximum flavor and crispness.

    • All-Purpose Flour: 1.5 cups (180g). This forms the base of the crispy coating.
    • Baking Powder: 1 teaspoon. As a leavening agent, it helps the batter become light and puffy as it fries.
    • Salt: 1/2 teaspoon. A little salt in the batter enhances the overall flavor of the fish.
    • Cold Beer (Lager or Pale Ale works great): 1 cup (240ml). Carbonation from the beer creates tiny air pockets, resulting in a light and airy texture. The yeast also adds a lovely depth of flavor.
    • OR Cold Sparkling Water: 1 cup (240ml). For a non-alcoholic option, sparkling water is an excellent substitute. It provides the same carbonation needed for a crispy, light batter, making this an adaptable and approachable home cooking solution.

    Quick Tip: Make sure your beer or sparkling water is very cold! A chilled liquid inhibits gluten development in the flour, which creates a thinner, crispier batter. This is a key step for flavorful meals made easy.

    How to Make the Best Fish and Chips: A Step-by-Step Guide

    Step 1: Prepare the Potatoes for Perfect Chips

    Creating wonderfully crispy chips starts with careful potato preparation. This essential first step ensures a fluffy interior and a golden, crunchy exterior for your homemade fish and chips.

    1. Choose Your Potatoes: For the best texture, start with starchy potatoes like Russets or Maris Pipers.
    2. Peel and Cut: Peel the potatoes, then cut them into even strips, about 1/2 inch thick. Consistent sizing helps them cook evenly.
    3. Rinse and Soak: Place the cut potatoes in a large bowl of cold water and let them soak for at least 30 minutes. This key step removes excess starch, which is crucial for achieving extra crispiness.
    4. Dry Thoroughly: Drain the potatoes well, then lay them in a single layer on a clean kitchen towel or paper towels. Pat them completely dry. This is critical, as any remaining moisture will cause the oil to splatter and prevent the chips from becoming crisp.

    Step 2: Mix the Crispy Batter

    A light, airy, and super-crispy batter is the heart of amazing fish and chips. This simple recipe ensures a delicious, golden coating for your fish.

    1. Combine Dry Ingredients: In a large mixing bowl, whisk together the all-purpose flour, cornstarch, baking powder, and salt until there are no lumps. The cornstarch is a key ingredient for crispiness.
    2. Add Wet Ingredients: Gradually pour in the very cold beer or sparkling water, whisking gently until just combined. A few small lumps are perfectly fine—be careful not to overmix. Overmixing develops gluten, which will make the batter tough instead of light and crispy.
    3. Chill the Batter: For the best results, place the batter in the refrigerator to chill for at least 15-20 minutes. A cold batter adheres better to the fish and creates a lighter texture when it hits the hot oil.

    Tip from Recipesmondial: If you prefer a non-alcoholic option, chilled sparkling water or club soda works beautifully instead of beer. Both create bubbles that give the batter a lovely airy texture, making this a truly easy recipe for everyone.

    Step 3: First Fry for the Chips

    To achieve ultimate crispiness, we’ll cook the chips twice. This first fry cooks them through, making them perfectly tender on the inside.

    1. Heat the Oil: Pour about 3-4 inches of a neutral oil like vegetable, canola, or peanut oil into a large, heavy-bottomed pot or deep fryer. Heat the oil to 325°F (160°C), using a kitchen thermometer for accuracy.
    2. First Fry the Chips: Carefully add about half of the dried potatoes to the hot oil. Be sure not to overcrowd the pot, as this lowers the oil temperature and results in soggy, not crispy, chips.
    3. Cook Until Soft: Fry the chips for 5-7 minutes. They should be soft and cooked through but not yet golden brown.
    4. Drain and Rest: Using a slotted spoon, remove the chips and place them on a wire rack set over a baking sheet. Let them rest while you prepare and fry the fish.

    Step 4: Fry the Fish

    Now it’s time to cook your delicious fish. This step is quick and delivers a perfectly golden and flaky result.

    1. Increase Oil Temperature: While the chips are resting, increase the oil temperature to 375°F (190°C).
    2. Prepare the Fish: Pat your fish fillets completely dry with paper towels to help the batter stick, then season them lightly with salt and pepper.
    3. Dip in Batter: Working with one fillet at a time, dip the fish into the cold batter, ensuring it’s completely coated. Allow any excess batter to drip off.
    4. Fry the Fish: Carefully lower the battered fish into the hot oil. To prevent overcrowding, fry just one or two fillets at a time.
    5. Cook Until Golden: Fry for 5-8 minutes, depending on the thickness of your fillets, until the batter is golden brown and the fish flakes easily.
    6. Drain: Remove the cooked fish with a slotted spoon and place it on a wire rack to drain. To keep it warm, you can place the rack in a low oven (around 200°F/95°C) while you finish the chips.

    Beginner-friendly tip: Using a thermometer is crucial for achieving perfectly crispy results. If the oil is too cool, your food will be greasy; if it’s too hot, it will burn before cooking through.

    Step 5: Second Fry for Extra Crispy Chips

    This final step is the secret to achieving that ultimate golden crunch, transforming your chips into the best part of a classic fish and chips meal.

    1. Reheat Oil: Make sure your oil is back up to the target temperature of 375°F (190°C).
    2. Second Fry: Carefully return the par-fried chips to the hot oil, working in batches if necessary to avoid overcrowding.
    3. Cook to Golden Perfection: Fry for an additional 2-4 minutes, until the chips are a deep golden brown and wonderfully crisp.
    4. Drain and Season: Immediately remove the chips from the oil and place them on a paper-towel-lined wire rack. For the best flavor, season them generously with salt while they are still hot.

    Step 6: Serve and Enjoy

    Your delicious, easy-to-make fish and chips are ready to serve. This is a truly satisfying meal perfect for the whole family.

    1. Assemble Plates: Arrange the hot, crispy fish and golden chips on individual plates.
    2. Add Classic Sides: Serve immediately with your favorite accompaniments. Traditional choices include creamy tartar sauce, tangy malt vinegar, and a sprinkle of sea salt. Mushy peas or fresh lemon wedges are also fantastic additions.
    3. Savor Your Creation: Enjoy your perfectly crispy and flavorful homemade fish and chips! It’s an approachable home cooking triumph.

    This step-by-step cooking guidance helps you create restaurant-quality results right in your own kitchen. Recipesmondial makes flavorful meals made easy!

    What is the best fish for fish and chips?

    Top Choices: Cod and Haddock

    Choosing the right fish is essential for perfect fish and chips. The ideal choice is a white fish with a mild flavor and flaky flesh that’s firm enough to hold up to frying. This combination ensures a delicious, crispy coating and tender, moist fish every time.

    When it comes to the classic recipe, two types of fish consistently stand out as the best:

    • Cod: Arguably the most popular and traditional choice, cod has a mild, clean flavor and large, flaky fillets. It cooks beautifully, staying moist and tender inside a crispy batter. Its wide availability also makes it an excellent and convenient choice for most home cooks [1].
    • Haddock: Another fantastic option, haddock is often preferred for its slightly richer, sweeter flavor compared to cod. Its flesh is a bit firmer but still becomes wonderfully flaky once cooked. Many fish and chip connoisseurs argue that haddock provides the most authentic taste.

    You truly can’t go wrong with either cod or haddock. Both promise a delicious, authentic fish and chips experience, making them perfect choices for even a first-time cook.

    Other Great Options

    What if cod or haddock aren’t available? Or maybe you’re just looking to try something new. Luckily, several other types of fish work beautifully for homemade fish and chips.

    Here are some excellent alternatives for your next meal:

    • Pollock: A member of the cod family, pollock offers a similar mild flavor and flaky texture but is often a more budget-friendly option. It fries exceptionally well, making it a great substitute when cod isn’t available.
    • Plaice: This flatfish has delicate fillets and a subtle, sweet flavor. Because it’s so light, plaice cooks up with an incredibly crispy coating, making it a lovely choice for a more refined taste.
    • Tilapia: Known for its very mild flavor and wide availability, tilapia is an easy-to-cook fish that holds its shape well during frying. This makes it an approachable and reliable option for any home cook.
    • Halibut: If you’re looking for a more premium option, halibut is a superb choice. It has firm, thick, white flesh with a richer, sweeter flavor. Keep in mind that it is typically pricier than the other fish on this list.

    Ultimately, the best fish for your recipe is any white, flaky variety that is fresh. When in doubt, don’t hesitate to ask your fishmonger for their recommendation. They can guide you to the best catch of the day. Enjoy discovering the perfect fish for your next homemade meal!

    What sauce goes with fish and chips?

    The right sauce is essential for the perfect plate of homemade fish and chips. These classic accompaniments add extra layers of flavor and texture, elevating every bite. Choosing your favorite dip is part of the fun!

    Classic Tartar Sauce

    Tartar sauce is a timeless partner for crispy fish. It’s wonderfully creamy and tangy.

    • Flavor Profile: With its bright, zesty flavor, this sauce provides a perfect contrast to rich, fried fish.
    • Key Ingredients: Most recipes start with a mayonnaise base, then add chopped capers, gherkins (or pickles), fresh dill, and a squeeze of lemon juice.
    • Why It Works: The acidity from the lemon and pickles cuts through the richness of the fried fish, creating a balanced and satisfying taste.
    • Quick Tip: You can find excellent ready-made tartar sauce at your local grocery store. For a homemade touch, simply mix good-quality mayonnaise with finely chopped cornichons, capers, and a bit of fresh parsley.

    Mushy Peas

    A beloved British tradition, mushy peas are a surprisingly delicious addition to fish and chips.

    • What They Are: These are simply dried marrowfat peas that have been soaked and then gently mashed, resulting in a distinctive, earthy flavor and a vibrant green color.
    • Flavor Profile: Mushy peas offer a comforting, slightly sweet taste and a creamy consistency, providing a welcome textural contrast.
    • Why It Works: Their soft texture and sweet notes beautifully complement the crispy fish and salty chips, making for a comforting and authentic pairing.
    • Finding Them: You can often find canned mushy peas in the international aisle of larger supermarkets. Just heat them gently before serving.

    Curry Sauce

    Curry sauce is a hugely popular choice, especially in UK chippies. It brings a delightful warmth to your meal.

    • Flavor Profile: Typically mild and savory, this golden-colored sauce gets its comforting depth from a blend of gentle spices.
    • Growing Popularity: Its popularity has soared in recent years, becoming a top pick for fish and chips. Many consider it a modern classic [2].
    • Why It Works: The warm, aromatic spices pair perfectly with the crispy batter and fluffy chips for a truly satisfying combination.
    • Quick Tip: You can buy ready-made chip shop curry sauce mixes or jars. Simply follow the package directions to heat it up for an easy option.

    Malt Vinegar and Salt

    For the purists, nothing beats a generous splash of malt vinegar and a sprinkle of salt. This is the most traditional way to enjoy fish and chips.

    • Simplicity is Key: This classic pairing highlights the natural flavors of the fish and chips without any fuss or fancy preparation.
    • Flavor Profile: The sharp tang of malt vinegar cuts through the richness of the fried food, while a sprinkle of salt enhances all the flavors.
    • How to Use: Simply sprinkle salt liberally over your hot fish and chips, then drizzle malt vinegar to your liking.
    • The Authentic Experience: Many believe this is the only way to savor authentic British fish and chips. It’s a simple yet perfect pairing.

    Tips from Our Kitchen for Recipe Success

    Keep the Batter Cold

    For truly crispy fish, this tip is a game-changer. When cold batter hits hot oil, it creates a powerful steam reaction that causes the batter to puff up. The result is an incredibly light and crunchy coating.

    • Chill your ingredients: Use very cold water, or even ice water, when mixing your batter.
    • Mix just before frying: Prepare your batter right before you dip the fish and keep it in the fridge until ready to use. This simple step helps you achieve that perfect, airy coating for your homemade fish and chips.

    Get the Oil Temperature Right

    The right oil temperature is vital for successful frying, as it’s the key to preventing greasy fish and chips. If the oil is too cool, your food will absorb too much of it. If it’s too hot, the outside will burn before the inside cooks through.

    • Use a thermometer: A thermometer is your best friend for stress-free frying. For the perfect golden chips, aim for around 325-350°F (160-175°C) for the first fry.
    • Maintain consistent heat: For your fish, keep the oil at about 350°F (175°C). Maintaining a consistent temperature ensures even cooking and delivers that wonderful crispness to every piece [3].
    • Adjust as needed: The temperature will drop slightly when you add food, so be prepared to increase the heat briefly to bring it back up.

    Don’t Overcrowd the Pan

    Overcrowding the pan is a common mistake that dramatically lowers the oil’s temperature. When the oil cools down too much, your food steams instead of fries, resulting in a soggy, oily finish.

    • Fry in small batches: Give your fish and chips plenty of space in the pan. This allows each piece to cook evenly while helping to maintain the ideal oil temperature.
    • Be patient: While frying in batches takes a little longer, the superior texture and crispiness are absolutely worth the extra time.

    Drain Excess Oil Properly

    Don’t let your hard work go to waste with a greasy finish. Draining your fish and chips correctly is the final step to ensuring they stay perfectly crispy and delicious.

    • Use a wire rack: Instead of placing fried food on paper towels, set a wire rack over a baking sheet. Then, arrange your freshly fried fish and chips on top of the rack.
    • Allow air circulation: This setup allows air to circulate completely around the food, letting excess oil drip away. As a result, the coating stays wonderfully crisp and the bottom won’t turn soggy.

    Recipe Variations: How to Adapt Your Fish and Chips

    How to Make Fish and Chips Without Beer

    Craving crispy fish and chips but want to skip the beer? No problem. This simple variation on our classic batter recipe is perfect for anyone who avoids alcohol or just wants an easy alternative. You’ll still get a wonderfully light and crunchy coating.

    The secret lies in using a carbonated liquid. The carbonation creates tiny air bubbles in the batter that expand when fried, resulting in the same airy, crispy texture you get from a traditional beer batter.

    Simple Beer-Free Batter Swaps:

    • Sparkling Water: This is our top recommendation. Use it chilled for the best results. It provides excellent fizz.
    • Club Soda: Another great option. It offers similar carbonation to sparkling water.
    • Lemon-Lime Soda: For a subtle hint of sweetness and citrus, try this. Opt for a clear soda.

    How to Adapt Your Batter:

    Making the swap is incredibly easy. Simply replace the beer in our main recipe with an equal amount of your chosen carbonated beverage. For the best results, make sure your substitute is very cold. A cold liquid helps keep the batter thick and bubbly, leading to maximum crispiness.

    Making Fish and Chips in an Air Fryer

    For a quicker, less oily method, your air fryer is the perfect tool. It uses circulating hot air to give the fish and chips a satisfying crispness with a fraction of the oil used in deep-frying. This makes it a great option for a faster, healthier meal.

    For Your Chips:

    1. Prepare Potatoes: Follow Step 1 of our main recipe for cutting and soaking the potatoes. This step is key for achieving crispy chips.
    2. Season: Pat the potatoes completely dry, then toss them with 1-2 teaspoons of oil until lightly coated.
    3. Air Fry Chips: Preheat your air fryer to 375°F (190°C). Arrange the chips in a single layer in the basket, making sure not to overcrowd it. Cook for 15-20 minutes, shaking the basket halfway through. For extra crispness, increase the temperature to 400°F (200°C) and cook for another 5-7 minutes.

    For Your Fish:

    A traditional wet batter doesn’t work well in an air fryer, as it can drip off the fish before it has a chance to set. Instead, we recommend using a simple breading method to ensure a perfectly crispy coating.

    1. Season Fish: Pat your fish fillets dry and season them with salt and pepper.
    2. Dredge: Create a three-station dredging line.
      • First, plain flour.
      • Second, beaten egg.
      • Third, panko breadcrumbs. Panko gives a super crispy texture.
    3. Coat Fish: Dip each fillet first in flour, then egg, and finally in the panko. Press the breadcrumbs gently to ensure they adhere.
    4. Air Fry Fish: Lightly spray the coated fish with cooking oil and place it in the preheated air fryer. Cook at 380°F (195°C) for 10-15 minutes, flipping halfway through. The cooking time will vary depending on the thickness of your fillets. The fish is done when it’s flaky and the coating is golden brown.

    This straightforward air fryer method is a stress-free way to enjoy this classic dish, making it a perfect beginner-friendly recipe.

    Oven-Baked Fish and Chips for a Healthier Option

    Oven-baking is the ideal choice for a significantly healthier version of fish and chips. This method uses very little oil but still produces delicious, crispy results, making it a wonderful way to enjoy a lighter, family-friendly meal.

    For Your Chips:

    The trick to wonderfully crispy oven-baked chips is high heat and proper preparation.

    1. Prepare Potatoes: Wash, peel, and cut your potatoes into even chip shapes. Soaking them in cold water for at least 30 minutes removes excess starch. Afterwards, pat them completely dry.
    2. Season and Toss: Preheat your oven to a hot 425°F (220°C) and line a large baking sheet with parchment paper. Toss the dried chips with 1-2 tablespoons of olive oil, salt, and pepper. You can also add a pinch of paprika for color.
    3. Bake Chips: Spread the chips in a single, even layer on the baking sheet, ensuring they are not overcrowded. Bake for 25-35 minutes, flipping them halfway through, until they are golden brown and tender on the inside.

    For Your Fish:

    Similar to the air fryer method, a breaded coating works best for oven-baked fish because it creates a reliably crispy crust without the need for deep-frying.

    1. Season Fish: Pat your fish fillets dry. Season them with salt, pepper, and a squeeze of lemon juice.
    2. Breading Station: Set up a dredging station with a plate of flour, a shallow dish of beaten egg, and a third plate of panko breadcrumbs. For extra flavor, mix herbs like parsley or dill into your panko.
    3. Coat Fish: Dip each fillet into the flour, then the egg, then the panko. Make sure it’s fully coated, pressing gently to help the breadcrumbs stick.
    4. Bake Fish: Place the coated fillets on a separate baking sheet lined with parchment paper and lightly spray them with olive oil to promote browning. Bake alongside your chips for 15-20 minutes, depending on thickness. The fish is done when the crust is golden and the inside is opaque and flaky.

    This oven-baked method is a simple and approachable way to make a classic dish, proving you don’t need a deep fryer for fantastic fish and chips.

    Frequently Asked Questions

    What is the traditional British recipe for fish and chips?

    Traditional British fish and chips is a comforting classic. The dish features fresh white fish, typically cod or haddock, which is dipped in a light, crispy batter and deep-fried until golden brown. The accompanying “chips” are thick-cut potatoes, often twice-fried for a fluffy interior and a perfectly crunchy exterior. Traditionally, the meal is served with a sprinkle of salt and a splash of malt vinegar. Popular sides include mushy peas, tartar sauce, or even a rich curry sauce [4]. Our easy-to-follow recipes embrace this tradition while providing simple dinner ideas for your family.

    What is the secret to a crispy batter?

    Achieving a perfectly crispy batter is simpler than you might think. For best results, follow these key tips:

    • Keep it cold: Use very cold liquid, like ice water or beer, in your batter. This temperature difference helps create a super-crispy coating when the batter hits the hot oil.
    • Leavening power: Many traditional batters use a leavening agent, such as baking powder or a carbonated liquid like beer or soda water. The bubbles trapped in the batter expand during frying, making it light and airy.
    • Don’t overmix: Mix your batter just until the ingredients are combined; a few lumps are fine. Overmixing develops gluten, which can make the batter tough instead of crisp.
    • Hot oil is key: Ensure the oil is at the right temperature (around 350-375°F or 175-190°C). If the oil is too cool, the batter will absorb it and become greasy. If it’s too hot, the batter will burn before the fish cooks through.
    • Light coating: Aim for a relatively thin coating of batter on your fish. Too much batter can make the final result heavy and less crispy.

    Following these beginner-friendly steps will help you master a wonderfully crispy batter every time.

    Can you make fish and chips in the oven?

    Yes, you can definitely make a delicious version of fish and chips in the oven. While it won’t have the exact same texture as its deep-fried counterpart, this method is a fantastic, healthier alternative that creates less mess. Here’s a simple guide to this approachable home-cooking technique:

    • For the fish: Pat your fish fillets dry, brush them with a little oil, and then coat them in seasoned panko breadcrumbs for extra crunch. Bake on a parchment-lined baking sheet until cooked through and golden.
    • For the chips: Cut your potatoes into thick fries and toss them with a little oil, salt, and pepper. Roast them on a separate baking sheet, flipping them halfway through, until they are tender inside and crispy outside.

    This oven-baked method results in a satisfying, lower-calorie meal that’s perfect for busy families. To save even more time, you can prepare the potatoes and bread the fish ahead of time.

    What is the history of fish and chips?

    The rich history of fish and chips dates back to the mid-19th century in the United Kingdom, though its two main components developed separately. Fried fish was introduced by Jewish immigrants from Portugal and Spain, who brought their tradition of frying fish in oil [5]. Meanwhile, fried potatoes, or chips, gained popularity due to French culinary influence. Eventually, street vendors began selling the two foods together, creating an affordable and filling meal for working-class families. The dish quickly spread across the country and remains a beloved symbol of British cuisine today, often enjoyed as a comforting and simple dinner.


    Sources

    1. https://www.fishwatch.gov/profiles/atlantic-cod
    2. https://www.theguardian.com/lifeandstyle/wordofmouth/2012/nov/29/fish-and-chips-curry-sauce
    3. https://www.seriouseats.com/the-best-way-to-fry-food
    4. https://www.historic-uk.com/CultureUK/Fish-Chips/
    5. https://www.nationalgeographic.com/culture/article/a-brief-history-of-fish-and-chips
  • How to Make The Best Sloppy Joe Recipe (Quick & Easy!)

    How to Make The Best Sloppy Joe Recipe (Quick & Easy!)

    This classic sloppy joe recipe involves browning one pound of ground beef with diced onion and bell pepper. The mixture is then simmered in a savory, sweet, and tangy sauce made from ketchup, Worcestershire sauce, brown sugar, and mustard until thickened. Serve the flavorful meat on toasted hamburger buns for a quick and easy family-friendly meal.

    Need a stress-free dinner idea that your whole family will love? Planning weeknight meals that are both delicious and easy can be a challenge. Sometimes, the simplest classics are the best solution, and few dishes are as comforting as a hearty sloppy joe. This crowd-pleasing meal guarantees minimal fuss and maximum flavor, making it a perfect choice for any night of the week.

    At Recipesmondial, we believe approachable home cooking should be joyful, not daunting. That’s why we’re sharing our ultimate sloppy joe recipe, designed to transform simple ingredients into a flavorful, easy meal. This beginner-friendly recipe provides clear, step-by-step guidance to ensure perfect homemade sloppy joes every time. You’ll create an incredible dish that comes together quickly, proving that simple dinner recipes can be truly spectacular.

    Whether you’re an experienced cook or just starting out, this guide will help you master the perfect sloppy joe. We’ll show you what makes this version stand out—from its balanced savory and tangy flavor to its incredibly simple preparation. Get ready to make a quick and easy classic that is guaranteed to become a regular request at your dinner table.

    Why Will You Love This Easy Sloppy Joe Recipe?

    A perfectly built sloppy joe sandwich, overflowing with savory meat, served on a toasted bun with pickle chips on the side.
    Professional food photography, photorealistic, high-quality food magazine photo. A perfectly assembled, mouth-watering Sloppy Joe sandwich, featuring a generous mound of rich, savory ground beef mixture spilling slightly from a golden-toasted brioche bun. The sandwich is presented on a rustic wooden board or a simple ceramic plate, with a few crinkle-cut dill pickle chips on the side. Soft, warm overhead lighting highlights the glossy sauce and the texture of the bun, creating an inviting and appealing scene. Shallow depth of field. Clean, approachable kitchen background slightly out of focus.

    Searching for a delicious, easy dinner that brings smiles to every face and doesn’t keep you in the kitchen all evening? This homemade sloppy joe recipe is the perfect weeknight hero. Here’s why you’ll love it:

    • It’s Incredibly Simple: This recipe offers clear, step-by-step guidance and uses common ingredients you likely already have. It’s incredibly beginner-friendly, making it a perfect starting point for new cooks.
    • It’s Super Quick: Ideal for busy families, this dish is wonderfully quick to prepare. You can have a hot, hearty meal on the table in under 30 minutes, solving those frantic weeknight dinner dilemmas.
    • It’s a Family Favorite: This family-friendly meal appeals to all ages. The sweet and savory flavor is a guaranteed hit, and kids especially adore the messy, delicious fun of a classic sloppy joe.
    • It Builds Kitchen Confidence: Because this recipe delivers reliable and delicious results every time, it’s a fantastic way to build your skills. You’ll enjoy a stress-free cooking experience and feel more confident in the kitchen.
    • It Embodies Recipesmondial’s Values: This recipe is a perfect example of what we love: approachable home cooking that transforms your kitchen experience. We aim to take you from feeling uninspired to discovering delicious new flavors.

    What Ingredients Do You Need for Homemade Sloppy Joes?

    An overhead flat lay of fresh ingredients for sloppy joes, including ground beef, diced vegetables, sauces, spices, and hamburger buns.
    Professional food photography, photorealistic, high-quality food magazine photo. An organized overhead flat lay shot of all fresh ingredients for homemade Sloppy Joes. Ingredients include a package of lean ground beef, finely diced yellow onion and green bell pepper in small prep bowls, minced garlic, a small can of tomato paste, a bottle of classic ketchup, a bottle of Worcestershire sauce, yellow mustard, and a selection of dry spices (chili powder, cumin, salt, black pepper) in small ramekins. Fresh, soft hamburger buns are stacked neatly nearby. All items are artfully arranged on a clean, light marble countertop or a rustic wooden board. Bright, natural, even lighting from above, with vibrant colors.

    Ready to make incredible homemade sloppy joes? This recipe is simple, using accessible, everyday ingredients you likely already have. It’s a stress-free way to cook a delicious, family-friendly meal. Let’s gather what you need!

    For the Meat Mixture

    A flavorful meat mixture is the foundation of any great sloppy joe. We’re aiming for a hearty base that will soak up all the delicious sauce.

    • Ground Beef: We suggest lean ground beef (85-90%) for a rich flavor without excessive grease. It also cooks down beautifully. For a lighter option, ground turkey works well too.
    • Onion: A finely chopped yellow onion adds essential aromatic depth, creating a wonderful savory base.
    • Garlic: Fresh minced garlic elevates the flavor profile, bringing a fragrant note that perfectly complements the beef.
    • Olive Oil: Just a touch helps sauté the vegetables, allowing them to soften and release their flavors before you add the beef.
    • Salt and Black Pepper: These pantry staples are crucial for enhancing all the other flavors in the dish.

    Expert Tip: Brown the ground meat well. This step develops a deeper flavor and helps prevent a watery sauce.

    For the Tangy Sauce

    The magic of sloppy joes is in the sauce. Our recipe creates an irresistible combination of sweet, tangy, and savory flavors using simple ingredients for a big impact.

    • Ketchup: This is the classic base for sloppy joe sauce, bringing sweetness and a rich tomato flavor.
    • Tomato Paste: Adding tomato paste intensifies the tomato notes and helps thicken the sauce to the perfect consistency.
    • Brown Sugar: A touch of brown sugar balances the tanginess with a subtle molasses flavor and a hint of sweetness.
    • Apple Cider Vinegar: This adds a crucial zing that cuts through the richness of the meat and sugar, creating a perfectly balanced sauce.
    • Worcestershire Sauce: A secret weapon for umami, this sauce adds complexity and depth that makes the flavor truly special.
    • Mustard: Yellow or Dijon mustard adds a sharp, complementary note to the sauce.
    • Chili Powder: This adds a mild warmth and earthy flavor—not spicy, just a comforting touch.
    • Garlic Powder and Onion Powder: These seasonings reinforce the fresh aromatics, ensuring a consistent savory flavor throughout the sauce.
    • Water or Beef Broth: A small amount thins the sauce to the right consistency and helps the flavors meld as it simmers.

    Substitution Idea: For a version with no ketchup, use tomato sauce or crushed tomatoes instead. You’ll need to adjust the sugar and vinegar to taste, but it’s a great way to customize the recipe or experiment in the kitchen.

    How to Make Sloppy Joes From Scratch: A Step-by-Step Guide

    A close-up of a bubbling cast iron skillet filled with sloppy joe meat, being stirred by a hand with a wooden spoon.
    Professional food photography, photorealistic, high-quality food magazine photo. A close-up, eye-level shot of a sturdy cast-iron skillet bubbling with the rich, thick, and glossy Sloppy Joe meat mixture. A real human hand, belonging to a home cook, is gently stirring the mixture with a wooden spoon, creating motion and indicating the cooking process. Subtle steam rises from the pan. The background shows a warm, inviting, and clean home kitchen counter and stovetop, slightly blurred to keep focus on the simmering pan. Warm, natural lighting.

    Step 1: Brown the Ground Beef

    Browning the ground beef is the crucial first step to building flavor in your homemade sloppy joes. Best of all, it’s a straightforward process, making this a fantastic beginner-friendly recipe!

    1. Heat Your Pan: Place a large skillet or Dutch oven over medium-high heat. If your beef is very lean, add a tablespoon of olive oil. Otherwise, the fat from the beef will be sufficient.
    2. Add the Beef: Carefully add 1 pound of ground beef to the hot pan.
    3. Break It Up: Use a wooden spoon or spatula to break the beef into smaller crumbles.
    4. Cook Until Browned: Continue cooking and stirring occasionally until the beef is fully browned with no pink remaining, about 5-7 minutes.
    5. Drain the Fat: Once browned, carefully drain the excess fat to prevent a greasy result. You can do this by tilting the pan and scooping the fat out or by using a colander.
    6. Return to Pan: Return the drained beef to the skillet.

    Expert Tip: For the best browning, don’t overcrowd the pan. If you’re doubling the recipe, brown the beef in two separate batches. Properly browned meat creates a depth of flavor that is key to a truly delicious meal.

    Step 2: Create the Sauce Base

    Now it’s time to build the rich, tangy sauce. This step layers in delicious aromatics and seasonings and is easy to follow, even for new cooks.

    1. Sauté the Aromatics: Add 1 small chopped onion and 1 small chopped green bell pepper to the skillet with the beef. Cook over medium heat for 5-7 minutes, stirring occasionally, until softened.
    2. Stir in Garlic: Add 2 cloves of minced garlic and cook for 1 minute more, stirring constantly to prevent it from burning.
    3. Add Tomato Paste: Stir in 2 tablespoons of tomato paste and cook for 1-2 minutes. Cooking the paste deepens the tomato flavor and removes any raw taste.
    4. Add Liquids and Spices: Pour in 1 cup of beef broth and 1/2 cup of ketchup. Then, add 1 tablespoon of Worcestershire sauce, 1 tablespoon of brown sugar, 1 teaspoon of yellow mustard, and 1/2 teaspoon each of salt and black pepper.
    5. Mix Well: Stir thoroughly until all ingredients are completely combined.

    Substitutions and Variations: For a slightly different twist, you can use chicken or vegetable broth instead of beef broth. If you don’t have a green bell pepper, red or yellow bell peppers work wonderfully too!

    Step 3: Simmer to Perfection

    This is where all the flavors meld together into that classic sloppy joe taste. Simmering thickens the sauce and allows the ingredients to combine perfectly. A little patience here makes all the difference!

    1. Bring to a Simmer: Bring the mixture to a simmer over medium heat.
    2. Reduce Heat and Cook: Once simmering, immediately reduce the heat to low. Let it cook, uncovered, for 15-20 minutes.
    3. Stir Occasionally: Stir the mixture every few minutes to prevent it from sticking to the bottom of the pan.
    4. Check Consistency: The sauce will thicken as it simmers. If it gets too thick for your liking, add a splash of beef broth or water. If it’s too thin, simply simmer for a few more minutes.
    5. Taste and Adjust: Before serving, give it a taste. Adjust the seasonings if needed—you might want a little more salt, pepper, or brown sugar.

    Tip for Confidence: Don’t worry if it’s not perfect on the first try! Adjusting seasonings to your personal taste is a key part of home cooking. This is how you make a good recipe into your best sloppy joe recipe!

    Step 4: Assemble Your Sandwiches

    You’re at the best part! With the filling ready, it’s time to assemble your delicious sloppy joe sandwiches. This quick assembly makes for a perfect family-friendly meal any night of the week.

    1. Prepare the Buns: Lightly toast your hamburger buns in a dry skillet, under the broiler, or in a toaster. Toasting helps the buns hold up to the saucy filling and adds a pleasant texture.
    2. Scoop the Filling: Generously spoon the warm sloppy joe mixture onto the bottom half of each toasted bun. Don’t be shy—it’s called “sloppy” for a reason!
    3. Add the Top: Place the top half of the bun over the filling.
    4. Serve Immediately: Serve your delicious sloppy joes while they are warm.

    Creative Serving Ideas:

    • Add a slice of cheddar cheese on top of the warm meat before adding the bun for a gooey, extra-cheesy treat.
    • Top with pickles, a dollop of coleslaw, or a sprinkle of fresh chives for added texture and freshness.
    • Turn it into a “sloppy joe bowl” by serving the meat mixture over rice, mashed potatoes, or baked potatoes.

    You’ve just made a fantastic, flavorful meal from scratch! Enjoy!

    Expert Tips for the Best Homemade Sloppy Joes

    Crafting the best homemade sloppy joes is surprisingly simple. With these expert tips, you can elevate your dish and create a memorable meal every time. Let’s make your next cooking adventure both stress-free and delicious.

    Achieve Perfect Ground Beef Browning

    The first step to a flavorful sloppy joe is browning your ground beef correctly. This crucial process adds immense flavor, so be sure not to rush it. Achieving a good sear on the meat will result in a much richer final taste.

    Layering Flavors for Depth

    Building layers of flavor is what makes homemade sloppy joes truly stand out. This technique transforms simple ingredients into something special, creating a depth you can’t get from a can.

    • Sauté aromatics: Cook onions and bell peppers first. They soften and release their sweet flavors. This creates a wonderful base.
    • Garlic last: Add garlic towards the end of sautéing. It cooks quickly. This prevents it from burning and becoming bitter.
    • Bloom spices: Briefly cook any dry spices with the aromatics. This brings out their full aroma and taste.

    Mastering Your Sloppy Joe Sauce

    The sauce is the heart of any sloppy joe, and balancing its sweet, tangy, and savory notes is key. The best part is that you can easily adjust the ingredients to match your family’s preferences.

    • Adjust sweetness: Taste the sauce as it simmers. Add a little more brown sugar if you like it sweeter.
    • Boost tanginess: A splash of apple cider vinegar or extra mustard works wonders. This brightens the flavor profile.
    • Umami depth: A dash of Worcestershire sauce or a tiny bit of soy sauce adds complexity. It provides a savory depth to the sauce.

    The Art of Simmering

    Simmering is a crucial step that both melds the flavors and thickens the sauce to perfection. Allowing the mixture to gently bubble is how you develop that classic, rich sloppy joe taste.

    • Low and slow: Keep the heat on low. Let the sauce gently bubble. This allows flavors to combine fully.
    • Uncovered simmer: Simmer with the lid off. This helps the sauce reduce and thicken. It ensures your sloppy joes aren’t watery.
    • Taste and adjust: Always taste before serving. Add salt, pepper, or more sauce ingredients as needed. This ensures a perfect final dish.

    Choosing the Right Bun

    Don’t underestimate the importance of the bun; it’s more than just a holder for the meat. Choosing the right one is an essential part of the sloppy joe experience and can make a good meal great.

    • Soft, sturdy buns: Choose brioche buns or soft hamburger buns. They absorb the sauce without falling apart.
    • Toast them: Briefly toast the buns. This adds texture and prevents sogginess. It also enhances their flavor.
    • Consider brioche: Brioche buns offer a slight sweetness. This complements the savory sloppy joe meat beautifully.

    Smart Make-Ahead and Meal Prep Tips

    Sloppy joes are an excellent choice for meal prep, making them a fantastic option for busy families. By preparing the meat mixture ahead of time, you can have a quick and delicious dinner ready in minutes.

    • Cook in advance: Make the sloppy joe meat mixture a day or two ahead. Store it in an airtight container in the fridge. This saves time on busy evenings.
    • Freeze for later: The cooked sloppy joe mixture freezes well. Portion it into freezer-safe bags or containers. It is great for future family-friendly meals.
    • Reheat gently: Thaw frozen mixture in the fridge overnight. Reheat on the stovetop over low heat. Add a splash of water or broth if it seems too thick. This helps you enjoy flavorful meals made easy.

    What Are Some Common Recipe Variations?

    Cooking is all about making a dish your own, and our homemade sloppy joes are a fantastic starting point. You can easily tweak this recipe to fit your taste or dietary needs. These simple variations help make cooking enjoyable and stress-free.

    Sloppy Joe Recipe with Turkey

    For a lighter, family-friendly meal, try swapping ground beef with ground turkey. This popular variation makes your sloppy joes leaner while still delivering classic flavor. It’s a great way to enjoy a healthier twist on a favorite dish.

    • How to Substitute: Simply use an equal amount of ground turkey in place of the ground beef.
    • Cooking Tips: Ground turkey often cooks faster than beef. Break it up well as it browns. You might need a tiny bit of extra oil if your turkey is very lean, as it has less natural fat. Drain any excess liquid after browning.
    • Flavor Profile: The sauce’s robust flavor shines through, making ground turkey a great choice for a healthy and balanced meal without sacrificing taste.

    Sloppy Joe Recipe with No Ketchup

    Ketchup is a staple in many sloppy joe recipes, but it’s not essential. Whether you’ve run out or simply prefer a different flavor profile, you can still create a delicious sauce from scratch. This easy adjustment is perfect for keeping your beginner-friendly recipes exciting.

    Here are some excellent alternatives:

    • Tomato Paste & Vinegar: Combine tomato paste with a touch of apple cider vinegar or white vinegar. Add a pinch of sugar to balance the acidity. This creates a rich, tangy base.
    • Canned Crushed Tomatoes: Use crushed tomatoes for a fresh, robust tomato flavor. You’ll still want to add a bit of sweetness (like brown sugar) and tang (vinegar or mustard) to mimic ketchup’s balance.
    • Tomato Sauce + Seasonings: A can of plain tomato sauce works well. Enhance it with extra Worcestershire sauce, a dash of hot sauce, and a teaspoon or two of brown sugar. This ensures your sloppy joe has that signature sweet and savory balance.

    Adding Extra Vegetables

    It’s easy to boost the nutrition and texture of your sloppy joes by adding extra vegetables. This is a fantastic way to create more well-rounded, family-friendly meals and use up any produce lingering in your fridge.

    Consider these easy-to-add vegetables:

    • Bell Peppers: Diced red, green, or yellow bell peppers add color, crunch, and a subtle sweetness.
    • Carrots: Finely diced carrots add a touch of sweetness and extra nutrients. They blend right into the sauce.
    • Zucchini: Grated or finely diced zucchini is nearly invisible in the sauce but adds moisture and health benefits.
    • Mushrooms: Sliced mushrooms add an earthy, umami depth.

    When to Add: For the best texture, sauté tougher vegetables like carrots and bell peppers with the onion. Add softer vegetables, such as zucchini or mushrooms, during the simmering stage to prevent them from becoming mushy. Adding vegetables significantly increases the nutritional density of your meal, and it’s a great strategy for meal prep, making your batches even more versatile [1].

    What Should You Serve with Sloppy Joes?

    So, you’ve mastered the best sloppy joe recipe! Now, let’s find the perfect sides to serve with this family-friendly favorite. The right dish can elevate your meal from a simple dinner into a complete, satisfying feast. These easy recipes will help you confidently create a flavorful meal every time.

    Classic Comfort Sides

    Since sloppy joes are a nostalgic comfort food, classic comfort sides are a natural fit. These tried-and-true recipes are sure to please everyone at your table.

    • Crispy French Fries or Tater Tots: A timeless companion, these salty, crunchy delights provide the perfect textural balance to the sweet and savory sloppy joe meat. For a slightly healthier option, try baking them. It’s no surprise they’re one of America’s favorite side dishes [2].
    • Creamy Coleslaw: A refreshing coleslaw provides a wonderful, tangy contrast. Its crisp cabbage and creamy dressing cut through the richness of the meat, adding a cool crunch to every bite.
    • Macaroni and Cheese: For the ultimate comfort food pairing, you can’t go wrong with a warm bowl of mac and cheese. The creamy, cheesy texture makes it a hearty and satisfying addition that’s always a crowd-pleaser.
    • Crunchy Potato Chips: When time is short, nothing is easier than a bowl of your favorite potato chips. They provide a satisfying, salty crunch with zero prep time, making them the simplest way to complete your meal.

    Fresh and Flavorful Vegetable Sides

    To balance the richness of the main dish, consider a lighter, vegetable-based side. These fresh and flavorful options are easy to prepare and help create a more well-rounded meal.

    • Simple Green Salad: A crisp green salad tossed in a light vinaigrette brightens the entire plate. It adds a welcome freshness and crunch that cuts through the savory sauce.
    • Roasted Vegetables: Roasting vegetables like broccoli, green beans, or sweet potatoes brings out their natural sweetness and earthiness. Simply toss them with olive oil, salt, and pepper, then roast until tender and slightly caramelized for a nutritious and delicious side.
    • Corn on the Cob or Steamed Corn: Whether you serve it on the cob or as steamed kernels, sweet corn adds a pop of natural sweetness and texture. It’s a quick, satisfying choice that contrasts nicely with the savory sloppy joe recipe.

    Quick and Simple Additions

    For those busy weeknights, sometimes the best sides require almost no effort at all. These simple additions add extra flavor and texture to your meal without any fuss.

    • Pickle Spears or Chips: The bright, vinegary tang of a pickle offers a fantastic, zesty crunch that acts as the perfect counterpoint to the rich meat sauce in your sloppy joe recipe.
    • Fresh Fruit Salad: A colorful fruit salad with berries, melon, or grapes provides a refreshing and sweet finish to the meal. It’s an easy and healthy way to add a light, balancing side dish.

    How Do You Store and Reheat Leftover Sloppy Joe Meat?

    Making delicious homemade sloppy joes is perfect for meal prepping, allowing you to enjoy your hard work more than once. Storing and reheating your sloppy joe meat is simple, ensuring you have a quick, flavorful meal ready whenever you need it.

    This is a great strategy for busy families and anyone looking for easy recipes to make mealtime less stressful. Let’s explore how to keep your leftovers tasty and safe to eat!

    Storing Your Leftover Sloppy Joe Meat

    To keep your leftover sloppy joe recipe fresh and safe, proper storage is essential. The first step is to always let the meat cool down before putting it away, as this helps prevent bacterial growth.

    For Refrigerator Storage:

    • Cool First: Allow the cooked sloppy joe meat to cool to room temperature. For safety, this should happen within two hours of cooking.
    • Use Airtight Containers: Transfer the cooled meat mixture into a clean, airtight container.
    • Refrigerate Promptly: Store the container in the refrigerator for up to 3 to 4 days. [3] This sets you up for quick meals later in the week!

    For Freezer Storage:

    • Cool and Portion: Once cooled, divide the sloppy joe meat into single-serving or family-sized portions for easier use later.
    • Freezer-Safe Containers: Place portions in airtight freezer bags or containers. Be sure to squeeze any excess air from bags to prevent freezer burn.
    • Freeze Duration: You can safely freeze sloppy joe meat for up to 2 to 3 months for the best quality. [4]
    • Thawing: When you’re ready to use it, thaw the frozen meat overnight in the refrigerator. For a quicker option, use your microwave’s defrost setting.

    Reheating Sloppy Joe Meat for Delicious Results

    When you’re ready for another meal, reheating your leftover homemade sloppy joes is easy. This means less time cooking and more time enjoying! For safety, always reheat the meat until it is steaming hot throughout.

    On the Stovetop:

    • Gentle Heat: Place the thawed sloppy joe meat in a saucepan or skillet and warm it over medium-low heat.
    • Add Moisture: If the mixture looks dry, add a splash of water or beef broth to restore its saucy texture.
    • Stir Often: Stir frequently until the meat is heated through, reaching an internal temperature of 165°F (74°C). [5]

    In the Microwave:

    • Microwave-Safe Dish: Put the sloppy joe meat in a microwave-safe dish and cover it loosely to prevent splatters.
    • Short Intervals: Heat on high for 1-2 minutes, stir well, and then continue heating in 30-second intervals until it’s fully heated.
    • Check Temperature: Make sure the meat reaches an internal temperature of 165°F (74°C).

    Important Food Safety Tips

    Your safety is our priority. Following these simple food handling rules will ensure every meal is both delicious and worry-free.

    • Cool Quickly: Never leave cooked food at room temperature for more than two hours.
    • Reheat Thoroughly: Always reheat leftovers to an internal temperature of 165°F (74°C) to kill any harmful bacteria.
    • One Reheat Rule: For the best quality and safety, you should only reheat leftover sloppy joe meat once.
    • Trust Your Senses: If the meat smells off, has an unusual appearance, or you have any doubts about its freshness, it is safest to discard it.

    By following these simple meal prep tips, you can ensure you always have a fantastic, flavorful meal made easy and ready to enjoy. This approach helps transform meal planning from a chore into a stress-free part of your routine.

    Frequently Asked Questions About This Sloppy Joe Recipe

    What is sloppy Joe sauce made of?

    Sloppy Joe sauce is the heart of the classic American sandwich, known for its signature blend of sweet, tangy, and savory flavors. This easy recipe uses common pantry staples to create a delicious sauce from scratch.

    The main ingredients for a classic homemade sloppy Joe sauce include:

    • Tomato Base: Often ketchup, tomato paste, or tomato sauce, this ingredient provides a rich, foundational taste.
    • Sweetener: Brown sugar or honey balances the tanginess, creating the signature sticky-sweet flavor.
    • Acidity: Apple cider vinegar or mustard adds a zesty kick that brightens the overall taste.
    • Savory Enhancers: Worcestershire sauce provides depth and umami—a little dash goes a long way.
    • Aromatics: Sautéed onion and garlic build a flavorful foundation for a comforting taste.
    • Spices: Chili powder, paprika, or a pinch of red pepper flakes can add warm, subtle heat.

    This combination results in a rich, spoonable sauce that perfectly coats the ground meat, making every bite flavorful and satisfying. Best of all, it’s incredibly simple to whip up.

    How do you make old fashioned sloppy joes?

    Making old-fashioned sloppy joes is straightforward, relying on classic ingredients and simple cooking methods. Following these traditional steps will help you achieve the nostalgic, comforting flavor everyone loves.

    Here’s the basic approach for these family-friendly meals:

    1. Brown the Ground Meat: Start by browning ground beef (or your preferred meat) in a large skillet, then drain any excess fat.
    2. Sauté Aromatics: Add diced onions and garlic to the pan and cook until soft and fragrant to build the flavor foundation.
    3. Stir in Sauce Ingredients: Whisk together the tomato base, sweetener, vinegar, mustard, and spices, then pour the mixture over the browned meat and aromatics.
    4. Simmer to Perfection: Bring the mixture to a gentle simmer and let it cook for 15-20 minutes. This allows the flavors to meld and the sauce to thicken.
    5. Assemble: Serve the hot, saucy meat mixture on toasted hamburger buns for a quick and simple meal perfect for any night.

    This simple process ensures a rich, savory, and perfectly balanced sloppy Joe. It’s an easy recipe that consistently delivers delicious results, making it ideal for busy families and beginner cooks.

    Can I make this sloppy joe recipe with ground turkey?

    Yes, this sloppy Joe recipe works wonderfully with ground turkey. It’s a fantastic substitution for a leaner option and creates a slightly lighter, yet still balanced, meal.

    Here are a few tips for using ground turkey:

    • Cooking Time: Ground turkey often cooks faster than ground beef, so keep a close eye on it to prevent overcooking.
    • Add Moisture: Since ground turkey is leaner, it can sometimes be dry. Consider adding a tablespoon of olive oil when browning the meat to help keep it moist.
    • Flavor Boost: Turkey has a milder flavor than beef, so be generous with aromatics like onion and garlic. You can also add a pinch more of your favorite spices to enhance the taste.
    • Texture: As the turkey browns, break it up well to ensure a consistent, crumbly texture.

    Using ground turkey makes this recipe versatile, allowing you to tailor it to your dietary preferences. The delicious sauce ensures the flavor remains rich and satisfying.

    What’s the difference between Manwich and homemade sloppy joes?

    While both Manwich and homemade sloppy joes make for a delicious meal, they differ significantly in ingredients, flavor, and preparation. The primary tradeoff is control and freshness (homemade) versus ultimate convenience (Manwich).

    Here’s a look at the key differences:

    • Ingredients:
      • Homemade: Uses fresh ingredients like ground meat and real vegetables, plus pantry staples for the sauce. You know exactly what goes into your meal.
      • Manwich: A convenient, pre-made sauce mix containing a blend of tomato puree, high-fructose corn syrup, and seasonings [6]. You just add it to cooked ground meat.
    • Flavor Profile:
      • Homemade: Offers a rich, complex, and customizable flavor. You can easily adjust the sweetness, tanginess, and spice to your liking.
      • Manwich: Provides a distinct, consistent flavor that is often sweeter and tangier than homemade versions. Its taste is classic and familiar to many.
    • Preparation Time:
      • Homemade: Requires more time for chopping vegetables and making the sauce from scratch, typically taking 30–40 minutes.
      • Manwich: Extremely quick and takes only 10–15 minutes. Simply brown the meat, drain it, and stir in the canned sauce.
    • Nutritional Control:
      • Homemade: Gives you full control over the amount of sugar, salt, and fat, allowing for healthier modifications.
      • Manwich: The nutritional content is fixed and can be higher in sodium and sugar than a comparable homemade sauce.

    Ultimately, the choice is yours. A homemade sloppy joe allows for a more creative and flavorful meal, while Manwich is the perfect solution when you need a quick, no-fuss dinner.


    Sources

    1. https://www.choosemyplate.gov/eat-healthy/vegetables
    2. https://yougov.com/topics/food/articles-reports/2021/07/28/what-are-americas-favorite-side-dishes
    3. https://www.fsis.usda.gov/food-safety/safe-food-handling-and-preparation/food-safety-basics/how-chill-food-properly
    4. https://www.fsis.usda.gov/food-safety/safe-food-handling-and-preparation/food-safety-basics/freezing-and-food-safety
    5. https://www.fsis.usda.gov/food-safety/safe-food-handling-and-preparation/food-safety-basics/how-reheat-food-safely
    6. https://www.conagrabrands.com/our-brands/manwich/original

  • Easy Beef Wellington Recipe: A Foolproof Guide for Beginners

    Easy Beef Wellington Recipe: A Foolproof Guide for Beginners

    Beef Wellington is a classic British dish featuring a beef tenderloin fillet coated with pâté and a mushroom mixture called duxelles. The entire assembly is then wrapped in puff pastry and baked until golden. This recipe is celebrated for its impressive presentation and rich, savory flavors, making it a show-stopping centerpiece for special occasions.

    The Beef Wellington. The name alone conjures images of culinary mastery—a magnificent roast encased in golden, flaky pastry. For many home cooks, this classic dish feels like a daunting challenge, one reserved for professional chefs or special occasions. You may have felt overwhelmed by complex recipes or lacked the confidence to tackle such an impressive meal. But what if we told you that mastering this iconic dish is not only achievable but genuinely enjoyable?

    At Recipesmondial, we believe cooking should be enjoyable, not stressful. Our goal is to help you transform simple ingredients into extraordinary meals. That’s precisely why we created this easy Beef Wellington recipe—a foolproof guide designed for beginners and busy families. Instead of intimidating technical terms, we provide clear, step-by-step guidance to make the process approachable. This isn’t just a recipe; it’s your invitation to build confidence and create a show-stopping dish with ease.

    With our approachable techniques, you can master the classic Beef Wellington and turn kitchen uncertainty into a delicious triumph. We’ll guide you through every step—from selecting the perfect beef to achieving that irresistible golden pastry—to ensure a perfect result. Are you ready to impress everyone with a truly memorable meal and add this elegant dish to your repertoire of delicious, family-friendly meals? Let’s dive into why this is the easiest Beef Wellington recipe you’ll ever find.

    Why Is This the Easiest Beef Wellington Recipe?

    Beef Wellington is a classic special-occasion dish that often intimidates home cooks. But at Recipesmondial, we believe every delicious meal should be within reach, and our easy Beef Wellington recipe is proof.

    We meticulously designed this guide for beginners so you can conquer the elegant dish without stress. It’s the easiest version you’ll find.

    What Makes This Beef Wellington Recipe So Approachable?

    By breaking down the complexity into simple, actionable steps, our approach builds your confidence and helps you create a truly impressive meal.

    • Clear, Step-by-Step Guidance: We use plain language instead of confusing jargon, so each step is easy to follow and you’ll always know what to do next. We make step-by-step cooking guidance a priority.
    • Simplified Techniques: By focusing on essential techniques and streamlining the process, you get maximum flavor with minimal fuss. This is approachable home cooking at its best.
    • Everyday Ingredients, Elevated: While some components are special, we ensure the ingredients are easy to find. For instance, using quality store-bought puff pastry saves significant time and effort without sacrificing flavor.
    • Confidence-Building Tips: We anticipate common challenges and provide tips to help you avoid mistakes, so you feel supported throughout the entire cooking journey. It’s perfect for anyone lacking confidence in cooking skills.
    • Strategic Prep for Success: Our guide on how to prepare ahead reduces last-minute rush, allowing you to enjoy the process instead of feeling overwhelmed by complex recipes.

    This beginner-friendly recipe transforms a daunting classic into a doable project. You’ll not only enjoy the cooking process but also love the delicious results. Our goal is to make flavorful meals made easy, and you can absolutely create this show-stopping dish!

    What Ingredients Do You Need for Beef Wellington?

    An overhead shot of all fresh ingredients for Beef Wellington, neatly arranged on a wooden table.
    A beautifully arranged flat lay of all the fresh ingredients for an Easy Beef Wellington recipe, presented on a light, rustic wooden surface. Ingredients include a raw beef tenderloin, a block of puff pastry, fresh cremini mushrooms, shallots, garlic, prosciutto slices, Dijon mustard, fresh thyme sprigs, an egg yolk in a small bowl, olive oil, salt, and black pepper. Each ingredient is perfectly clean, vibrantly colored, and artfully positioned. The lighting is soft and natural, emphasizing freshness and quality. Professional food photography, photorealistic, high-quality food magazine photo, overhead shot.

    Crafting a show-stopping Beef Wellington might sound intimidating, but our recipe breaks it down into simple, manageable steps. The ingredients are straightforward and easy to find, making your cooking journey enjoyable rather than overwhelming.

    Each component plays a vital role in building layers of flavor and texture. These ingredients are the key to making this classic dish approachable for any home cook. Let’s explore what you’ll need to create this impressive, family-friendly meal.

    The Best Cut of Beef for Wellington

    The heart of any Beef Wellington is the beef itself, so choosing the right cut is crucial for a tender, flavorful result. For this recipe, we recommend the best option.

    Beef Tenderloin: This cut is the star of Beef Wellington for a reason: it’s incredibly tender and lean. This allows it to cook beautifully inside the pastry. Look for a center-cut piece, aiming for about 2 to 2.5 pounds, which will serve 4-6 people. A good butcher can help you select a high-quality piece and even trim any excess fat, saving you time and effort.

    For the Mushroom Duxelles

    Mushroom duxelles, a savory paste, adds a rich, earthy flavor and acts as a crucial moisture barrier to keep the puff pastry crisp.

    Here are the ingredients you will need:

    • Mushrooms: About 1 pound of cremini or button mushrooms, finely chopped or pulsed in a food processor.
    • Shallots: Two small shallots, minced. They offer a milder, sweeter onion flavor.
    • Garlic: Two cloves of garlic, minced.
    • Fresh Thyme: One tablespoon of fresh thyme leaves. This herb pairs beautifully with mushrooms and beef.
    • Butter: Two tablespoons of unsalted butter for sautéing.
    • Brandy or Dry Sherry (Optional): One tablespoon. This adds a touch of sophistication and deepens the flavor.
    • Salt and Freshly Ground Black Pepper: To taste.

    The secret to perfect duxelles is cooking them until all the moisture has evaporated. This concentrates their flavor and prevents the pastry from becoming soggy.

    Pâté and Prosciutto: The Flavor Layer

    This layer of pâté and prosciutto is essential to a traditional Beef Wellington. It creates a savory shield around the beef, adding incredible flavor and protecting the pastry.

    • Pâté: You’ll need 4-6 ounces of smooth liver pâté (chicken or duck work best). It adds a rich, luxurious flavor while providing extra moisture to prevent the beef from drying out. If you prefer, a mushroom pâté can be a delightful alternative.
    • Prosciutto: Use 8-10 thin slices. This salty, savory cured ham is key to absorbing any juices from the beef, which protects the pastry from getting wet and adds another delicious layer of flavor. If prosciutto is hard to find, thinly sliced Parma ham or good-quality deli ham can work as a substitute.

    Choosing the Right Puff Pastry

    The puff pastry is the delicious, flaky envelope for your Beef Wellington. Using a high-quality, store-bought puff pastry is a fantastic shortcut that makes this impressive dish much more approachable for beginners.

    You will need:

    • Frozen Puff Pastry: Two sheets of all-butter puff pastry. All-butter varieties offer superior flavor and flakiness, so look for brands that specify “all-butter” for the best result [1].
    • Egg: One large egg, beaten, to create an egg wash for a beautiful, golden-brown crust.

    Remember to thaw your puff pastry according to the package directions, which is typically overnight in the refrigerator. This step ensures the dough is pliable and easy to work with.

    How to Make Beef Wellington: A Step-by-Step Guide

    Step 1: Sear the Beef Tenderloin

    The first step to a perfect Beef Wellington is searing the beef tenderloin. This simple but crucial process locks in flavor and creates a beautiful crust, setting the foundation for a delicious result.

    How to Sear Your Beef:

    1. Pat the Beef Dry: Use paper towels to pat the beef tenderloin completely dry. A dry surface is essential for achieving a perfectly crisp crust.
    2. Season Generously: Coat the entire tenderloin with a generous amount of salt and freshly ground black pepper. Don’t be shy—this is the primary seasoning for the beef.
    3. Heat Your Pan: Place a heavy-bottomed skillet (such as cast iron) over high heat. Add a tablespoon of olive oil or butter and heat until it shimmers and just begins to smoke.
    4. Sear Quickly: Carefully place the seasoned tenderloin in the hot pan. Sear for 1–2 minutes on all sides until a deep brown crust forms. The inside should remain raw, so avoid overcooking.
    5. Remove and Cool: Once seared, transfer the beef to a wire rack to cool completely. This step helps it retain its juices and prepares it for wrapping.

    Pro Tip: A quick, high-heat sear is key to building a deep flavor foundation. Cooling the beef completely is just as important, as it prevents the puff pastry from becoming soggy or cooking unevenly.

    Step 2: Prepare the Mushroom Duxelles

    Duxelles may sound fancy, but it’s just a finely chopped mushroom paste. This savory layer adds incredible depth of flavor and creates a vital moisture barrier, which keeps the puff pastry bottom perfectly crisp.

    Making Your Flavorful Duxelles:

    1. Finely Chop Mushrooms: Wash and trim cremini or white button mushrooms, then chop them very finely. For best results, use a food processor to achieve a consistent, paste-like texture [2].
    2. Sauté the Mushrooms: Heat a large skillet over medium-high heat with a tablespoon of butter or olive oil. Add the finely chopped mushrooms to the pan.
    3. Cook Until Dry: Continue to sauté, stirring occasionally, until all the liquid has evaporated and the mixture becomes a thick, dry paste. This can take 10–15 minutes and is the most critical step for preventing a soggy pastry.
    4. Flavor Boost: Stir in a minced shallot and a clove of minced garlic, and cook for another 2–3 minutes until fragrant. Season the mixture with salt, pepper, and a touch of fresh thyme.
    5. Cool Completely: Transfer the duxelles to a plate and spread it in a thin layer to cool quickly. It must be completely cold before wrapping the beef to prevent the other ingredients from warming up.

    Beginner-Friendly Tip: Don’t rush the process of cooking the moisture out of the duxelles. A dry mixture is your best defense against a soggy bottom. Ensuring it’s also fully cooled will prevent the pastry from becoming greasy.

    Step 3: Chill and Wrap the Beef

    Now it’s time to build the flavorful layers around the seared beef. This step not only adds flavor but also helps the tenderloin hold its shape. Keeping every component cold is essential for a flaky, non-greasy puff pastry.

    Layering Your Beef Wellington:

    1. Prepare Your Surface: Lay a large piece of plastic wrap on your counter, ensuring it’s long enough to fully encase the beef.
    2. Arrange the Prosciutto: On the plastic wrap, create a rectangle of overlapping prosciutto slices large enough to fully encase the tenderloin. Prosciutto adds a salty, savory flavor and acts as another barrier against moisture.
    3. Spread the Pâté: Gently spread a thin, even layer of liver pâté over the prosciutto for added richness. While you can omit this ingredient, it contributes significantly to the classic Beef Wellington flavor.
    4. Add the Duxelles: Evenly spread the cooled mushroom duxelles over the pâté, leaving a small border around the edges.
    5. Position the Beef: Place the seared and cooled beef tenderloin in the center of the duxelles-covered prosciutto.
    6. Wrap Tightly: Use the edge of the plastic wrap to lift and roll the layers tightly around the beef, forming a compact log. Twist the ends of the plastic wrap securely to create a firm, uniform package.
    7. Chill Thoroughly: Refrigerate the wrapped log for at least 30 minutes. This crucial chilling period helps the layers set and firm up, which ensures the Wellington holds its shape and is easier to wrap in pastry.

    Meal Prep Guidance: The beef log can be prepared up to this point and stored in the refrigerator for 24 hours. This makes final assembly much quicker on the day you plan to serve it.

    Step 4: Assemble the Beef Wellington

    With the beef log perfectly wrapped and chilled, it’s time for the final assembly. In this step, you’ll encase the flavorful core in a sheet of buttery puff pastry. It’s simpler than it looks!

    Bringing It All Together:

    1. Roll Out Puff Pastry: On a lightly floured surface, unroll a chilled sheet of puff pastry. It should be large enough to completely encase the beef log with a small overlap.
    2. Egg Wash Prep: In a small bowl, whisk one egg with a tablespoon of water to create an egg wash, which will seal the pastry and give it a golden shine.
    3. Position the Beef: Unwrap the chilled beef log and place it in the center of the puff pastry.
    4. Wrap the Pastry: Drape the puff pastry over the beef log, trimming any excess to leave about a 1-inch overlap where the seams will meet.
    5. Seal the Seams: Brush the overlapping edge with egg wash and press firmly to create a tight seal, which will prevent juices from escaping during baking. You can crimp the seam with a fork for a decorative touch.
    6. Seal the Ends: Trim the pastry at the ends, then fold it up and over the beef. Brush with egg wash and press to seal securely, ensuring the beef is completely encased.
    7. Decorate (Optional): If you have pastry scraps, you can cut out decorative shapes like leaves and attach them to the top of the Wellington using a little egg wash.
    8. Final Chill: Place the assembled Wellington on a parchment-lined baking sheet. Brush the entire surface with egg wash, then return it to the refrigerator for at least 15–20 minutes. This final chill is crucial for achieving an extra-crisp, flaky crust.

    Confidence-Building Tip: Don’t worry about making it perfect. Puff pastry is quite forgiving, so just take your time and focus on getting a good seal. Your guests will be impressed!

    Step 5: Bake to Golden Perfection

    This is the final step where everything comes together. Baking transforms your creation into a showstopper with a golden, flaky pastry crust and tender, perfectly cooked beef inside.

    Baking Your Masterpiece:

    1. Preheat Oven: Preheat your oven to 400°F (200°C). A hot oven helps the pastry puff up quickly and prevents a soggy bottom.
    2. Score and Glaze: Remove the chilled Wellington from the refrigerator and brush it again with egg wash. For a professional look, use a sharp knife to lightly score the top of the pastry in a crosshatch or diagonal pattern.
    3. Bake Until Golden: Place the Wellington in the preheated oven and bake for 30–40 minutes, or until the pastry is golden brown and puffed. The exact time will depend on your desired beef doneness.
    4. Check Internal Temperature: Use a meat thermometer inserted into the thickest part of the beef. For medium-rare, look for 125–130°F (52–54°C). For medium, aim for 135–140°F (57–60°C) [3].
    5. Rest the Wellington: This is a non-negotiable step. Remove the Wellington from the oven and let it rest on a cutting board for at least 10–15 minutes before slicing. Resting allows the juices to redistribute throughout the meat, ensuring every slice is tender and flavorful.
    6. Slice and Serve: Use a sharp serrated knife to cut the Beef Wellington into thick slices and serve immediately.

    Outcome Focus: You’ve successfully transformed simple ingredients into a stunning and delicious meal. Enjoy your homemade Beef Wellington, a true showstopper that proves elegant cooking can be approachable and rewarding.

    What Are Some Tips for a Perfect Beef Wellington Every Time?

    Keeping Everything Cold

    Temperature control is the key to creating a beautiful Beef Wellington, a truly impressive yet easy recipe. For beginner-friendly recipes like this one, cold ingredients are your secret weapon. The butter in the puff pastry must stay firm, which prevents it from melting too quickly. If the butter melts early, you’ll end up with a greasy, dense pastry instead of a flaky one.

    Here’s how to keep everything perfectly chilled:

    • Chill Your Components: Before you start wrapping, ensure your seared beef tenderloin and mushroom duxelles are both completely cold. This simple step prevents the pastry from warming up prematurely.
    • Work Quickly: Assemble your Wellington as efficiently as possible. The less time it spends at room temperature, the flakier your final pastry will be. You’ll build confidence as you see the difference this makes.
    • Use Cold Surfaces: If your kitchen is warm, chill your baking sheet in the fridge before using it. You can even work on a lightly floured countertop that has been chilled for a few minutes.
    • Refrigerate Between Steps: If you feel the pastry or filling is getting too warm, don’t hesitate to put the partially assembled Wellington back in the fridge. Even 15-20 minutes can make a significant difference.

    This focus on temperature helps you enjoy cooking without stress and leads to a delicious, visually stunning Beef Wellington every time.

    Ensuring a Crisp Pastry Bottom

    A soggy bottom is one of the biggest worries for home cooks making Beef Wellington. But don’t fret! We have simple tricks to guarantee a crisp, golden base. These tips help you create flavorful meals made easy in your own kitchen.

    • Super Sear the Beef: A deep, even sear on the beef creates a barrier that locks in juices, preventing them from seeping into the pastry. This is your first and best defense against sogginess.
    • The Prosciutto Layer: More than just flavor, prosciutto acts as a crucial moisture barrier. It absorbs any lingering juices from the beef and duxelles, keeping the puff pastry dry and crisp.
    • Egg Wash Seal: A thorough egg wash does more than give a golden shine; it also creates a protective layer that seals the pastry. Ensure all seams are brushed and sealed tightly.
    • Preheat Your Baking Sheet: Place your baking sheet in the oven while it preheats. Baking the Wellington on a hot surface gives the bottom pastry an immediate blast of heat, helping it crisp up right away. This is a practical tip for approachable home cooking.

    By following this step-by-step cooking guidance, you’ll achieve a perfect pastry that is golden and flaky from top to bottom.

    Resting is Non-Negotiable

    After all your effort, your Beef Wellington is out of the oven, looking magnificent and smelling incredible. It’s tempting to slice into it right away, but waiting is crucial for a truly flavorful meal made easy.

    • Why Rest? Resting allows the juices in the beef to settle and redistribute evenly throughout the meat. If you cut into it too soon, those juices will spill out, leaving you with dry meat and a less flavorful result.
    • How Long? For a standard Beef Wellington, aim to rest it for at least 15-20 minutes. A larger one may need up to 30 minutes. This period is a non-negotiable step for a perfect outcome.
    • Tent with Foil: Loosely tent the Beef Wellington with aluminum foil while it rests. This will keep it warm without trapping steam, which could soften the crisp pastry.

    This simple resting step ensures every slice is moist, tender, and bursting with flavor. It’s a small wait for a huge payoff, making your beginner-friendly recipes truly shine.

    What Should You Serve With Beef Wellington?

    A plated slice of Beef Wellington with roasted asparagus and creamy mashed potatoes.
    A beautifully plated serving of Easy Beef Wellington, featuring a thick slice of the golden-brown pastry-wrapped beef, accompanied by vibrant, roasted asparagus spears and creamy mashed potatoes. The Beef Wellington slice reveals its succulent, pink interior and duxelles layer. The plate is white and elegant, set on a warm-toned wooden dining table. A soft, inviting glow from a nearby window creates a cozy, friendly atmosphere. The focus is on the delicious, comforting meal, suggesting an easy yet impressive dinner. Professional food photography, photorealistic, high-quality food magazine photo.

    After your fantastic work preparing a showstopping Beef Wellington, the next step is choosing the perfect accompaniments. You’ll want sides and sauces that complement its rich flavors without adding extra stress. We’re here to help you pick delicious, simple-to-prepare pairings, so you can serve a complete and memorable dinner with confidence and ease.

    Classic Side Dishes

    Selecting the right side dishes is key to elevating your Beef Wellington experience. The goal is to balance the main course’s richness with fresh, lighter flavors. These easy-to-prepare options use everyday ingredients, making them perfect for home cooks of any skill level.

    • Roasted Asparagus: A simple yet elegant choice, roasted asparagus adds a lovely green color and a fresh, healthy bite to the meal. Just toss fresh spears with olive oil, salt, and pepper, then roast until tender-crisp.
    • Creamy Mashed Potatoes: This timeless, comforting classic offers a smooth texture that pairs perfectly with the savory Beef Wellington. For the best results, use high-quality potatoes, butter, and a splash of milk or cream.
    • Green Bean Almondine: For a delightful crunch, try this impressive yet easy dish. Simply sauté fresh green beans until tender, then toss them with toasted slivered almonds and a hint of lemon for a bright, flavorful side.
    • Glazed Carrots: Sweet glazed carrots provide a beautiful color and a lovely contrast to the savory meat. Steam or boil them until tender, then gently glaze them in a pan with a little butter and brown sugar to enhance their natural sweetness.
    • Garlic Smashed Potatoes: For a rustic twist on mashed potatoes, try smashing small, boiled potatoes and tossing them with roasted garlic and herbs. This approachable dish offers a more textured alternative with an intense, savory flavor.

    Quick Tip: To save time, many of these sides can be partially prepped ahead of serving. For the best taste, always look for fresh, seasonal vegetables.

    Easy Beef Wellington Sauce Ideas

    A delicious sauce is the perfect finishing touch for your Beef Wellington, bringing all the meal’s flavors together. You don’t need complicated techniques to create something special; these easy options will elevate your dish with minimal effort.

    • Red Wine Reduction: This classic sauce is surprisingly simple to make. Just reduce a quality red wine with beef broth, a sprig of thyme, and a touch of butter to create a rich, savory, and elegant finish.
    • Creamy Horseradish Sauce: For a quick, zesty option that requires no cooking, simply mix prepared horseradish with sour cream or crème fraîche and a pinch of salt and pepper. Its tangy kick perfectly cuts through the richness of the beef.
    • Mushroom Cream Sauce: Building on the mushroom flavor in the duxelles, this creamy sauce is a natural winner. Sauté sliced mushrooms, deglaze the pan with a splash of white wine or broth, and stir in heavy cream. Simmer until thickened for an incredibly flavorful result.
    • Simplified Béarnaise Sauce: Traditional Béarnaise can be tricky, but a simplified version is much more approachable. Whisk egg yolks over gentle heat with white wine vinegar and tarragon, then slowly whisk in melted butter. For ultimate ease, a high-quality store-bought sauce is also a great option.

    Chef’s Insight: Always use the pan drippings from searing your beef—they’re packed with flavor. Adding them to your sauce provides an incredible depth of taste. This simple step makes a huge difference and ensures a spectacular result.

    Recipe Variations for Every Occasion

    Individual Beef Wellington Recipe

    Craving the elegance of Beef Wellington but want a more manageable portion? This individual Beef Wellington recipe is your secret weapon. It’s perfect for dinner parties, special occasions, or simply treating yourself without committing to a large roast. Plus, it makes serving a breeze.

    Making smaller versions is also a fantastic way to practice your skills, as the single portions can feel less intimidating than a large, showstopper roast.

    How to Create Individual Wellingtons

    • Portion the Beef: Instead of one large tenderloin, use smaller 4-6 ounce (113-170g) beef tenderloin medallions. You can also cut a larger tenderloin into uniform portions. Just ensure each piece has an even thickness for consistent cooking.
    • Sear Individually: Sear each beef medallion on all sides until nicely browned to lock in the flavor. Allow them to cool completely before proceeding.
    • Adjust Duxelles and Layers: Prepare your mushroom duxelles as instructed in the main recipe, but use a smaller amount for each portion. To assemble, spread a thin layer of pâté (if using) over each cooled medallion. Wrap each one snugly in prosciutto, then carefully coat the prosciutto with the duxelles mixture.
    • Cut the Pastry: Roll out your puff pastry slightly thinner than you would for a large Wellington. Cut it into squares or rectangles large enough to fully encase each beef portion. A 6×6 inch (15×15 cm) square per medallion is a good starting point.
    • Assemble with Care: Place each prepared beef portion onto a puff pastry square. Bring the pastry edges together over the top and seal them securely, trimming any excess. If you like, you can use decorative pastry scraps to adorn the top.
    • Bake Shorter: Individual Wellingtons cook much faster than a large one. Bake at the same temperature (400°F or 200°C), but for a shorter time—typically 20-25 minutes. Always use a meat thermometer to check for doneness, aiming for an internal temperature of 130-135°F (54-57°C) for medium-rare.

    Tips for Success

    • Even Sizing Matters: Try to keep your beef portions uniform in size and shape. This ensures they all cook at the same rate.
    • Chill Thoroughly: Always chill your wrapped individual Wellingtons for at least 30 minutes before baking. This crucial step helps the pastry hold its shape and cook properly.
    • Egg Wash for Shine: For that beautiful golden, glossy finish, brush each Wellington generously with an egg wash right before baking.

    This individual Beef Wellington recipe makes a sophisticated dish more approachable, helping home cooks of any skill level create a delicious and impressive meal with confidence.

    Beef Wellington Recipe for 2

    Planning a romantic dinner or a special meal for two? This Beef Wellington recipe is ideal. It offers all the grandeur of the classic dish in a more intimate, manageable size, delivering an impressive culinary experience without the stress of a large roast.

    It’s also a perfect option for beginners, allowing you to focus on technique without being overwhelmed by larger quantities.

    Adapting for Two Servings

    • Select a Smaller Beef Tenderloin: Choose a single beef tenderloin roast that weighs between 8-12 ounces (225-340g). Look for a piece that is uniform in shape for even cooking.
    • Scale Down Ingredients: Reduce the quantities of your other ingredients accordingly. You’ll likely need about half the amount of mushroom duxelles, pâté, and prosciutto. The key is to have just enough to create a complete, thin layer around the beef.
    • Sear and Chill: Sear the tenderloin on all sides until a lovely crust forms. As with the full-sized version, chilling it thoroughly afterward is crucial to prevent the pastry from becoming soggy.
    • Use Less Pastry: Roll out a single sheet of store-bought puff pastry. You’ll need a rectangle large enough to comfortably wrap your tenderloin, often around 10×12 inches (25×30 cm).
    • Assemble and Seal: Lay the puff pastry on your work surface. Create the layers directly on the pastry: first, arrange the prosciutto slices in the center, then spread the duxelles evenly over the prosciutto. Place the chilled tenderloin on top (after coating it with pâté, if using). Carefully fold the pastry over the beef, sealing the edges tightly. Trim any excess and crimp the edges for a decorative finish.
    • Adjust Baking Time: A Wellington for two bakes faster than a full-size version, typically taking 25-30 minutes at 400°F (200°C). As always, rely on a meat thermometer to ensure it’s cooked to your liking. For medium-rare, aim for an internal temperature of 130-135°F (54-57°C).

    Chef’s Notes for a Smaller Wellington

    • Quality Ingredients Shine: With a simpler dish, the quality of each component stands out. Opt for fresh mushrooms, good-quality prosciutto, and a choice cut of beef.
    • Don’t Skimp on Chilling: Chilling the assembled Wellington for at least 30-60 minutes before it goes in the oven is essential. This step ensures the puff pastry becomes golden and flaky.
    • Rest is Best: After baking, let your Beef Wellington rest for 10-15 minutes before slicing. This allows the juices to redistribute, resulting in a tender and more flavorful bite.

    This scaled-down version makes Beef Wellington an achievable yet impressive dinner for couples. It lets you create a flavorful, visually stunning meal to impress a loved one without the stress.

    Frequently Asked Questions About Beef Wellington

    What is the traditional beef Wellington recipe?

    A classic beef Wellington is an impressive dish made of several distinct layers, each contributing to its rich taste and texture. The centerpiece is a perfectly seared beef tenderloin, the most tender cut of beef.

    The tenderloin is first coated with duxelles, a savory mixture of finely chopped mushrooms that adds an earthy depth. Next, a thin layer of prosciutto or pâté is often applied to add richness and seal in the juices. The entire assembly is then carefully wrapped in golden, flaky puff pastry and baked until the crust is crisp and the beef is cooked to the desired doneness.

    What is a good sauce for beef Wellington?

    The right sauce can elevate your beef Wellington, complementing the savory flavors of the beef and pastry. Fortunately, several excellent options are easy to make at home.

    Here are some popular sauce ideas:

    • Red Wine Reduction: A classic choice, this sauce is rich, robust, and full of flavor. It can be made with beef broth, red wine, and a few simple aromatics.
    • Madeira Sauce: Similar to a red wine reduction, this sauce uses Madeira wine for a slightly sweeter, nuttier profile that adds a touch of elegance.
    • Horseradish Cream: If you enjoy a bit of a kick, this creamy sauce provides a sharp, delightful contrast to the rich Wellington and is simple to prepare.
    • Simple Au Jus: Don’t underestimate the power of pan drippings. Simply deglaze the searing pan with a little broth or wine to create a quick, flavorful au jus.

    Any of these sauces will help you create a memorable and delicious meal.

    Can I make beef Wellington ahead of time?

    Yes, preparing beef Wellington in advance is a great way to reduce stress, especially when entertaining. You can do most of the assembly ahead of time and bake it just before you’re ready to serve.

    Follow these steps to prepare your Wellington in advance:

    • Assemble and Chill: The beef Wellington can be fully assembled up to 24 hours beforehand. This includes searing the beef, letting it cool, and wrapping it with the duxelles, prosciutto, and puff pastry.
    • Refrigerate Properly: Once assembled, wrap the Wellington tightly in plastic wrap and store it in the coldest part of your refrigerator. Keeping it very cold is the key to a crisp, flaky pastry.
    • Bake When Ready: When you’re ready to cook, just unwrap the Wellington and bake as the recipe directs. You may need to add a few minutes to the baking time to account for it being thoroughly chilled.
    • Freezing Option: For longer-term storage, an unbaked Wellington can be frozen for up to a month. Wrap it tightly in plastic wrap, followed by a layer of foil. Thaw it in the refrigerator overnight before baking.

    This make-ahead approach helps ensure excellent results with less last-minute effort.

    Who invented beef Wellington?

    The exact origin of beef Wellington is unclear, but the dish is widely believed to be named after Arthur Wellesley, the 1st Duke of Wellington. He was celebrated for defeating Napoleon at the Battle of Waterloo in 1815 [4].

    One theory is that the dish was created to celebrate his victory. Some stories suggest the Duke particularly enjoyed a dish of beef, mushrooms, and pastry, which later evolved into the modern recipe. Another possibility is that it was an English adaptation of a similar French dish, “filet de bœuf en croûte”. Regardless of its origins, beef Wellington is a celebrated centerpiece known for its impressive presentation.


    Sources

    1. https://www.seriouseats.com/what-is-puff-pastry-types-and-how-it-works
    2. https://www.foodnetwork.com/recipes/food-network-kitchen/mushroom-duxelles-recipe-2104112
    3. https://www.beefitswhatsfordinner.com/cooking/beef-temperature
    4. https://www.britannica.com/topic/Duke-of-Wellington-beef

  • Classic Stuffed Peppers Recipe: A Simple Step-by-Step Guide

    Classic Stuffed Peppers Recipe: A Simple Step-by-Step Guide

    A classic stuffed peppers recipe involves hollowing out bell peppers and filling them with a savory mixture of cooked ground beef, rice, onions, and seasonings. The peppers are then typically topped with a simple tomato sauce and cheese and baked in the oven until the peppers are tender and the filling is heated through, creating a delicious and complete meal.

    Are you looking for a hearty dinner that’s comforting but not complicated? Planning family-friendly meals everyone will enjoy is a common challenge, especially on busy weeknights. The good news is that an impressive meal can be surprisingly simple, even for beginner cooks. Get ready to rediscover a true classic: stuffed peppers, a perfect example of flavorful meals made easy.

    At Recipesmondial, we believe cooking should be a stress-free and enjoyable experience. That’s why we created this ultimate guide to classic stuffed bell peppers. Our simple recipe walks you through each step, ensuring great results whether you’re building confidence or just looking for approachable home cooking. We want to help you cook confidently and turn basic ingredients into a truly special meal.

    In this step-by-step guide, you’ll learn everything from choosing the perfect bell peppers to mastering a savory filling and baking it to perfection. We also share clever variations, including vegetarian options and meal prep tips, to help this dish become a staple in your rotation. Say goodbye to complicated recipes and hello to a simple, satisfying dinner guaranteed to please.

    Why You’ll Love This Easy Stuffed Peppers Recipe

    Two golden-brown classic stuffed bell peppers, garnished with parsley, served on a wooden board in a warm kitchen setting.
    A professional food photography shot, photorealistic, high-quality food magazine photo, featuring two perfectly baked classic stuffed bell peppers arranged on a rustic wooden cutting board. The peppers are vibrant, glossy, and slightly browned on top, overflowing with a rich, savory filling of seasoned ground meat and rice, topped with melted cheese and fresh chopped parsley. A hint of steam rises gently from one pepper. The background is a softly blurred, warm kitchen setting, emphasizing an inviting and comforting meal. Natural, warm overhead lighting. Shot at eye level, making the dish appear approachable and delicious.

    Looking for a reliable, delicious dinner that impresses without the stress? This classic stuffed peppers recipe is a true crowd-pleaser, perfect for busy weeknights or a cozy family meal. Our step-by-step guide is designed for home cooks, making the entire process enjoyable and straightforward.

    Here’s why you’ll fall in love with this easy stuffed peppers recipe:

    • Simple Dinner Solution: This recipe simplifies mealtime by offering a complete, flavorful meal in just one dish. It’s the perfect go-to for an easy weeknight dinner.
    • Beginner-Friendly Cooking: Forget overwhelming instructions. Our clear, approachable guide builds your confidence in the kitchen, helping you master this classic dish with ease.
    • Unforgettable Flavor: Every bite is a perfect blend of tender bell peppers, savory meat, and a rich tomato sauce. It’s a satisfying and flavorful meal, made easy.
    • Perfect for Families: This is a classic family-friendly meal. Both kids and adults love the colorful presentation and comforting taste, making it a great way to serve more vegetables.
    • Customizable and Versatile: Easily adapt this recipe to suit your tastes or what’s in your pantry. Try a vegetarian filling, use a different grain, or add your favorite spices. Our meal prep tips also help you plan.
    • Stress-Free Prep: We guide you through each step, removing the guesswork from planning and cooking. You can relax and enjoy the process from start to finish.
    • Nourishing and Wholesome: Enjoy a balanced dish packed with protein and fresh vegetables. It’s a satisfying and hearty meal for any day of the week.

    This stuffed peppers recipe is a perfect example of our commitment at Recipesmondial: providing simple, delicious recipes for every home cook. Get ready to turn everyday ingredients into a memorable meal!

    What Ingredients Do You Need for Classic Stuffed Peppers?

    A flat lay of fresh, colorful ingredients for classic stuffed peppers, including bell peppers, ground meat, rice, and herbs, arranged on a light kitchen counter.
    A professional food photography shot, photorealistic, high-quality food magazine photo, featuring a beautiful flat lay of all the fresh ingredients for classic stuffed peppers. The layout is clean and organized on a light, neutral-toned countertop. Components include whole, vibrant bell peppers (red, yellow, orange, green), a bowl of uncooked ground beef, a bowl of uncooked rice, a can of crushed tomatoes, a head of garlic, a whole onion, fresh parsley and basil, shredded cheese, and a small dish of spices. Each ingredient is clearly visible, fresh, and appealing. Bright, even overhead lighting.

    Choosing the Right Bell Peppers

    The first step to making classic stuffed peppers is choosing the right bell peppers, as they are the star of this easy recipe.

    You can use any color you prefer. Green bell peppers have a traditional, slightly bitter taste, while red, yellow, and orange varieties are sweeter and soften beautifully during baking.

    When selecting peppers for stuffing, look for large, firm ones with a flat bottom. This shape helps them stand upright, which makes them easier to fill and ensures they hold their savory contents in the oven.

    • Green Bell Peppers: These are the classic choice. They have a robust, earthy flavor.
    • Red, Yellow, or Orange Bell Peppers: Opt for these if you prefer a sweeter taste. They also add a vibrant pop of color.
    • Size Matters: Select larger peppers, as they are easier to stuff and provide a more satisfying portion.
    • Stability: Pick peppers with a flat bottom. This helps them stay stable in your baking dish.

    Pro Tip: Remove the core and seeds carefully, then give the peppers a quick rinse to prepare them for stuffing.

    For the Savory Filling

    This hearty and flavorful filling is the heart of the dish, creating a satisfying meal the whole family will enjoy.

    Seasoned Ground Beef and fluffy rice create the base, while aromatics and tomato add depth and moisture. This simple combination results in a balanced and delicious stuffing.

    • Ground Beef: 1 pound (450g) lean ground beef. This forms the delicious base.
    • Rice: 1 cup (185g) uncooked white rice. Long-grain or medium-grain works well. We cook it partially first.
    • Onion: 1 medium onion, finely chopped. It adds a lovely sweetness and depth.
    • Garlic: 2 cloves garlic, minced. Garlic is essential for rich flavor.
    • Canned Diced Tomatoes: 1 (14.5 ounce / 411g) can, undrained. These add moisture and a tangy element.
    • Tomato Paste: 2 tablespoons. It intensifies the tomato flavor.
    • Beef Broth: 1/2 cup (120ml). This adds savory liquid to the filling.
    • Worcestershire Sauce: 1 tablespoon. It brings a umami punch.
    • Dried Oregano: 1 teaspoon. A classic herb for Italian-inspired dishes.
    • Salt: 1/2 teaspoon, or to taste.
    • Black Pepper: 1/4 teaspoon, or to taste. Freshly ground is always best.

    Substitution Idea: For a lighter version, feel free to swap ground beef for ground turkey or chicken. You can also use pre-cooked rice to save time.

    For the Simple Tomato Sauce and Topping

    A simple tomato sauce is poured around the peppers before baking. It keeps them moist, adds extra flavor, and comes together in minutes. To finish, a generous layer of melted cheese creates the perfect golden, bubbly topping.

    • Tomato Sauce: 1 (15 ounce / 425g) can. This forms the base of our savory sauce.
    • Water or Beef Broth: 1/2 cup (120ml). This thins the sauce slightly.
    • Brown Sugar: 1 tablespoon. It balances the acidity of the tomatoes.
    • Shredded Mozzarella Cheese: 1 cup (113g). This creates a gooey, golden topping.

    Variation Tip: Experiment with different cheeses! Cheddar, Monterey Jack, or a blend of Italian cheeses all work beautifully. You can also add a pinch of red pepper flakes to the sauce for a subtle kick.

    Gathering these simple ingredients is the first step toward a delicious, easy-to-make dinner!

    How to Make Stuffed Peppers: A Step-by-Step Guide

    A pair of hands in a home kitchen carefully filling a halved red bell pepper with a seasoned meat and rice mixture.
    A professional food photography shot, photorealistic, high-quality food magazine photo, capturing a home cook’s hands actively stuffing a vibrant red bell pepper with the prepared savory meat and rice filling. The scene is set in a clean, bright, and inviting home kitchen with warm, natural light. The cook’s hands are visible, demonstrating the approachable nature of the task. Other prepped ingredients, like a baking dish and more empty bell pepper halves, are softly blurred in the background, keeping the focus on the hands and the stuffing process. The filling looks moist and rich. Eye-level shot.

    Step 1: Prepare the Bell Peppers

    First, get the bell peppers ready. This essential prep work ensures your stuffed peppers cook evenly and become perfectly tender.

    • Choose Your Peppers: Select 6 medium-sized bell peppers. Any color works, but red, yellow, and orange varieties are typically sweeter.
    • Wash and Halve: Rinse the peppers under cool water, then carefully slice each one in half lengthwise.
    • Remove Seeds and Core: Use a small spoon to scoop out the seeds and white membrane from each half, creating a clean cavity for the filling.
    • Optional: Blanch for Softer Peppers: To ensure an extra-tender texture, you can blanch the peppers. Bring a large pot of salted water to a boil, add the pepper halves, and cook for 3–5 minutes. This pre-cook step prevents them from being too firm after baking. Drain them well and set aside. This is a great tip if you’re new to cooking!

    Step 2: Cook the Beef and Rice Filling

    Next, create the savory filling. This is the key to a successful stuffed bell pepper recipe, and it will make your kitchen smell amazing.

    1. Brown the Beef: In a large skillet, heat 1 tablespoon of olive oil over medium-high heat. Add 1 pound of lean ground beef and break it apart with a spoon as it cooks. Continue cooking until the beef is fully browned with no pink remaining.
    2. Drain Excess Fat: Carefully drain the excess fat from the skillet. This step makes the filling lighter.
    3. Sauté Aromatics: Add 1 diced onion and 2 cloves of minced garlic to the beef. Sauté for 5–7 minutes, until the onion is soft and translucent.
    4. Combine Ingredients: Stir in 1 cup of cooked white rice (leftover or freshly cooked), 1 (14.5-ounce) can of undrained diced tomatoes, 1 teaspoon of dried oregano, 1 teaspoon of dried basil, 1/2 teaspoon of salt, and 1/4 teaspoon of black pepper.
    5. Simmer to Blend Flavors: Mix all ingredients thoroughly and let the filling simmer for 5 minutes. This allows the flavors to meld together perfectly.

    Chef’s Tip for Beginner Cooks: Pre-cooking the rice ensures it’s tender. If you use uncooked rice, you will need to add more liquid and increase the baking time. Using cooked rice is the best way to get consistent results for this easy recipe.

    Step 3: Assemble the Stuffed Peppers

    Now it’s time to assemble the peppers. This is a simple process that gets your family-friendly meal ready for the oven.

    1. Prepare the Baking Dish: Pour 1/2 cup of tomato or marinara sauce into the bottom of a 9×13-inch baking dish. This adds moisture and prevents sticking.
    2. Fill Each Pepper Half: Spoon the beef and rice mixture generously into each pepper half. Avoid packing the filling too tightly.
    3. Arrange in the Dish: Place the filled pepper halves cut-side up in the prepared baking dish. Arrange them snugly to help them stay upright.
    4. Top with More Sauce: Spoon a little more tomato sauce over the top of the filling in each pepper to keep them moist during baking.

    Quick Idea: Have extra filling? Save it for a quick lunch or serve it as a side dish. It’s delicious on its own!

    Step 4: Bake the Peppers

    Finally, it’s time to bake. This last step melds the flavors and makes your stuffed bell peppers wonderfully tender.

    1. Preheat Oven: Set your oven to 375°F (190°C). A properly preheated oven ensures everything cooks evenly.
    2. First Bake (Covered): Cover the baking dish tightly with aluminum foil and bake for 30 minutes. This initial step steams the peppers, making them tender.
    3. Add Cheese (Optional): Carefully remove the foil and sprinkle about 1 cup of shredded mozzarella or cheddar cheese over the tops.
    4. Second Bake (Uncovered): Return the dish to the oven and bake uncovered for another 15–20 minutes. The peppers are done when they are fork-tender and the cheese is melted and bubbly.
    5. Rest Before Serving: Let the peppers rest for 5–10 minutes after baking. This allows the juices to settle, making them easier to serve.

    Pro-Tip for Flavorful Meals: For a golden, bubbly topping, place the peppers under the broiler for 1–2 minutes after baking. Watch them closely to prevent burning. This adds a beautiful finish to your flavorful meal!

    What to put in stuffed peppers?

    Easy Recipe Variations

    Stuffed peppers are a versatile dish, perfect for culinary creativity. You can adapt this classic recipe to suit your tastes, use ingredients you have on hand, or create a fun meal the whole family will enjoy. These straightforward swaps simplify meal planning without the need for complex recipes.

    • Switch Your Protein: While ground beef is classic, feel free to use other ground meats.
      • Ground Turkey or Chicken: For a lighter option, these are excellent choices. They cook quickly and absorb flavors beautifully.
      • Ground Pork or Sausage: For a richer flavor, try ground pork or sausage. Italian sausage works wonderfully for a different twist.
    • Add More Veggies: Boost the nutrition and texture of your filling.
      • Mushrooms: Sautéed diced mushrooms add an earthy depth.
      • Zucchini or Spinach: Finely diced zucchini or wilted spinach blend seamlessly into the filling.
      • Corn or Peas: Introduce a touch of sweetness and color.
    • Spice it Up: Experiment with different herbs and spices to change the flavor profile.
      • Italian Herbs: Add oregano, basil, and a pinch of fennel for an Italian flair.
      • Smoked Paprika: A smoky note pairs well with the beef and tomato.
      • Garlic Powder and Onion Powder: These staple seasonings always enhance flavor.

    Vegetarian Stuffed Peppers

    Creating delicious vegetarian stuffed peppers is surprisingly simple. It’s a fantastic option for a healthy, balanced meal that’s also perfect for family dinners. With fillings this flavorful, you won’t miss the meat.

    Here are some simple, hearty bases to make your stuffed peppers vegetarian:

    • Lentil Love: Packed with protein, cooked brown or green lentils provide a wonderful texture. Mix them with diced vegetables and a tomato base for a satisfying filling [1].
    • Quinoa Power: As a complete protein, cooked quinoa offers a light, fluffy texture. Combine it with black beans, corn, and your favorite seasonings.
    • Mushroom Magic: Finely chopped mushrooms, sautéed until deeply browned, mimic the texture of ground meat. Mix them with breadcrumbs and herbs for a savory filling.
    • Bean Blast: A mix of black beans, kidney beans, and corn creates a robust filling. Add some salsa and spices for a zesty flavor.

    Remember to adjust seasonings to your taste. A little extra cheese or breadcrumbs can help bind your vegetarian fillings.

    Stuffed Peppers Without Rice

    If you’re looking for rice alternatives, you have plenty of great choices. These options offer dietary flexibility and can introduce new textures and flavors to your classic stuffed bell peppers, making it easy to customize your meal.

    Consider these simple and delicious rice substitutes:

    • Quinoa: Cooked quinoa offers a protein boost and a texture similar to rice, making it a great choice for a healthy, balanced meal.
    • Cauliflower Rice: For a low-carb option, use riced cauliflower. Sauté it lightly before mixing with your other filling ingredients to help remove excess moisture.
    • Couscous: This tiny pasta cooks very quickly and provides a soft, delightful texture, making it a simple addition to your savory filling.
    • Breadcrumbs or Crushed Crackers: Use these to bind your filling. They add a comforting texture and are perfect for budget-friendly cooking.
    • Lentils: As mentioned, lentils are an excellent substitute that adds heartiness and protein.
    • Barley: A nutritious grain, cooked pearl barley offers a chewy texture that holds up well in baked dishes.

    When swapping ingredients, taste your filling before baking and adjust seasonings as needed to ensure a flavorful result.

    Mexican-Style Stuffed Peppers

    Transform your classic stuffed peppers into a vibrant, Mexican-inspired dish that brings global comfort food right to your kitchen. The bold and satisfying flavors are sure to make this a new family favorite.

    To create Mexican-style stuffed peppers, simply adjust your filling ingredients:

    • Spices: Add generous amounts of chili powder, cumin, and a pinch of cayenne pepper. A dash of smoked paprika enhances the flavor.
    • Beans: Include black beans or kidney beans. Rinse them well before adding them to your filling.
    • Corn: Fresh, frozen, or canned corn adds sweetness and texture.
    • Salsa or Diced Tomatoes with Chilies: Use these in place of plain tomato sauce in your filling for a zesty kick.
    • Cheese: Top your peppers with Monterey Jack, cheddar, or a Mexican blend cheese.
    • Garnish: Finish with fresh cilantro, a dollop of sour cream or Greek yogurt, and a squeeze of lime juice after baking.

    These variations prove just how versatile stuffed peppers can be, allowing you to create a quick and flavorful meal every time!

    Tips for the Perfect Stuffed Bell Peppers

    How to Prevent Soggy Peppers

    Nobody wants a soggy bell pepper! Achieving that perfect tender-crisp texture for your stuffed bell peppers is easier than you think. Here are our top tips to ensure your stuffed peppers hold their shape and flavor beautifully.

    • Pre-Cook Your Peppers: A quick par-cook softens the peppers slightly before you stuff them, which helps them cook evenly with the filling. You can either boil them for 3-5 minutes or bake them empty for 10-15 minutes.
    • Don’t Overfill: Avoid overstuffing the peppers, as this can make them collapse and prevent the filling from cooking thoroughly. Be sure to leave a small gap at the top.
    • Drain Your Filling: Excess liquid in the filling, especially from meat, will make the peppers mushy. Be sure to drain it well before stuffing to prevent the pepper walls from getting soggy.
    • Control Baking Time: Follow the recipe’s baking time closely to avoid soft, overcooked peppers. For a nicely browned and caramelized top, bake them uncovered for the last 10-15 minutes.

    Meal Prep and Storage Instructions

    Our classic stuffed peppers recipe is perfect for meal prep, saving you precious time on busy weeknights. You can easily prepare these flavorful, family-friendly dishes ahead of time.

    • Assemble Ahead: To save time, you can fully assemble the stuffed peppers, cover them tightly, and refrigerate for up to 2 days before baking. Just add an extra 15-20 minutes to the baking time to account for the cold temperature.
    • Freezing Cooked Peppers: Once cooked, stuffed bell peppers freeze beautifully. First, let them cool completely. Then, wrap each pepper individually in plastic wrap and store them in a freezer-safe bag or container for up to 3 months.
    • Reheating from Frozen: To reheat, remove the wrapping and place the frozen peppers in a baking dish. Cover with foil and bake at 350°F (175°C) for 45-60 minutes, or until heated through. You can also microwave individual peppers on high for 5-7 minutes.
    • Refrigerating Leftovers: Store leftover cooked stuffed peppers in an airtight container in the refrigerator for 3-4 days. Reheat them in the oven or microwave.

    What to Serve with Stuffed Peppers

    While stuffed peppers are a satisfying meal on their own, pairing them with a simple side dish can elevate your dinner. These suggestions will help you create a balanced and delicious experience for any family meal.

    • Fresh Green Salad: A crisp green salad with a light vinaigrette provides a refreshing contrast and is a healthy, quick addition to your meal.
    • Crusty Bread: A warm, crusty baguette or Italian bread is perfect for soaking up any delicious sauce, making the meal extra comforting.
    • Steamed or Roasted Vegetables: Simply seasoned vegetables like broccoli, green beans, or asparagus add extra nutrients and a pleasant texture that complements the rich flavors of the peppers.
    • Simple Grains: If your stuffed peppers don’t contain rice, a side of quinoa or couscous works wonderfully to absorb the savory sauce.

    Frequently Asked Questions

    How do you make a simple stuffed peppers recipe?

    Making stuffed peppers is wonderfully straightforward. At Recipesmondial, we specialize in easy recipes, and this classic dish is no exception. It’s a perfect beginner-friendly meal that the whole family will enjoy.

    Here is a quick overview of the steps:

    • Prepare the Peppers: First, wash your bell peppers. Slice them in half lengthwise, then remove the seeds and membranes. This creates the perfect little bowls for your filling.
    • Make the Filling: Next, cook ground meat (like beef or turkey) with onions and garlic until browned. Stir in cooked rice, tomato sauce, and your favorite seasonings. This savory mixture is the heart of the dish.
    • Stuff and Sauce: Fill each pepper half generously with the meat and rice mixture and place them in a baking dish. Pour a little tomato sauce around the peppers and sprinkle cheese on top for extra flavor.
    • Bake to Perfection: Finally, bake the stuffed peppers until they are tender and the filling is heated through. The result is a delicious and easy meal every time.

    Can you make stuffed peppers ahead of time?

    Yes, absolutely! Stuffed peppers are an excellent choice for meal prep. Preparing them in advance saves time during the week and makes it easier to serve a delicious, stress-free dinner.

    You have a couple of great options for making them in advance:

    • Prepare the Filling Only: Cook the meat and rice filling, let it cool completely, and store it in an airtight container in the refrigerator for up to 3 days. When you’re ready, simply stuff fresh peppers and bake as directed. This method helps keep the peppers crisp.
    • Assemble Fully: For a grab-and-bake option, you can assemble the peppers completely. Stuff them, place them in a baking dish, and cover tightly with plastic wrap or foil. Refrigerate for up to 24 hours. Just add a few extra minutes to the baking time when cooking straight from the refrigerator.
    • Freeze for Later: For longer storage, freeze unbaked stuffed peppers. Place the fully assembled peppers on a baking sheet and freeze until solid. Then, transfer them to a freezer-safe bag or container. They will last for up to 3 months. Thaw them overnight in the refrigerator before baking, or bake from frozen by adding significant extra cooking time.

    These practical tips from Recipesmondial make home cooking even more convenient and approachable.

    Do you have to cook the meat before stuffing the peppers?

    Yes, for the best results, you should always pre-cook ground meat before stuffing the peppers. This simple step is crucial for several key reasons, ensuring your dish is both flavorful and well-cooked.

    • Enhances Flavor: Browning the meat develops a rich, savory flavor that creates a delicious foundation for the filling. Raw meat cooked inside the pepper will not be as flavorful.
    • Removes Excess Fat: Pre-cooking allows you to drain off excess grease from the meat. This important step prevents the final dish from becoming oily or soggy.
    • Ensures Even Cooking: Fully cooking the ground meat beforehand guarantees the filling is safe to eat. It also ensures the peppers don’t get overcooked while you wait for raw meat to reach a safe temperature. This way, the filling and peppers are perfectly done at the same time.
    • Better Texture: Sautéing ground meat creates a pleasant, crumbly texture. If you use raw meat, it can sometimes clump together or turn rubbery when baked inside the pepper.

    Following this simple, beginner-friendly tip helps you get delicious and reliable results every time.

    How do I make a healthy stuffed peppers recipe?

    It’s easy to make a healthy stuffed peppers recipe with a few simple substitutions. While stuffed peppers are already quite wholesome, you can boost their nutritional value to create a delicious and balanced meal.

    Consider these simple swaps and tips:

    • Choose Leaner Protein: Instead of ground beef, use lean ground turkey or chicken to reduce saturated fat. Plant-based crumbles are also a great vegetarian alternative.
    • Boost Veggies: Finely dice extra vegetables like carrots, zucchini, mushrooms, or spinach and add them to the filling to increase vitamins, minerals, and fiber.
    • Opt for Whole Grains: Swap white rice for a higher-fiber option like brown rice, quinoa, or lentils. Whole grains keep you feeling full longer, and quinoa also adds extra protein.
    • Control Sodium: Use low-sodium broth and tomato sauce. Build flavor with herbs and spices like garlic powder, oregano, and basil instead of relying only on salt.
    • Lighten the Cheese: If you’re adding cheese, choose a reduced-fat variety or simply use less. A small sprinkle on top is often all you need for great flavor.
    • Add Beans: Incorporate black beans or kidney beans into the filling for an easy and budget-friendly boost of plant-based protein and fiber.

    These simple adjustments help you create a flavorful meal that aligns with your health goals and makes home cooking work for your lifestyle.


    Sources

    1. https://www.hsph.harvard.edu/nutritionsource/food-features/lentils/
  • Easy Goulash Recipe: A Simple Step-by-Step Guide for Beginners

    Easy Goulash Recipe: A Simple Step-by-Step Guide for Beginners

    Goulash is a comforting stew made with beef, onions, and paprika. This easy goulash recipe is an American-style version featuring ground beef and macaroni cooked in a rich, savory tomato sauce. It’s a one-pot, family-friendly meal that is perfect for a quick weeknight dinner and comes together in about 30 minutes.

    Are you looking for a comforting, hearty meal that won’t keep you in the kitchen for hours? We understand. Planning family-friendly dinners can feel like a constant quest for easy, flavorful recipes. Many home cooks feel overwhelmed by complex instructions or lack confidence when trying a new dish. But what if we told you that a classic, deeply satisfying goulash is surprisingly simple to master?

    At Recipesmondial, our mission is to make home cooking a joy, not a chore. That’s why we’ve crafted this ultimate easy goulash recipe. Forget the intimidating jargon; our step-by-step guide will walk you through creating a delicious beef goulash perfect for any weeknight. Whether you’re a beginner or an intermediate cook seeking new simple dinner recipes, you’ll learn to create flavorful meals with confidence and ease.

    Get ready to transform simple ingredients into a rich, savory masterpiece. This beginner-friendly guide ensures you can cook without stress, creating a Hungarian goulash that tastes like it took hours to prepare. Let’s dive in and discover why this is the perfect goulash recipe for busy families!

    Why Is This The Perfect Goulash Recipe for Busy Families?

    For busy families, a delicious, satisfying dinner without the kitchen chaos can feel like a dream. This goulash recipe makes it a reality. More than just a meal, it offers a solution to common dinner dilemmas and is designed with your busy schedule in mind for a truly stress-free cooking experience.

    At Recipesmondial, we believe cooking should be enjoyable, not a chore. This easy goulash recipe helps you put a flavorful, comforting classic on the table while also saving you precious time. It transforms simple ingredients into a meal your family will request again and again.

    Why Our Goulash Recipe Stands Out for Busy Families

    This beef goulash is the perfect weeknight solution for your bustling household because it seamlessly combines ease, flavor, and practicality. It’s a marvel of approachable home cooking.

    • Effortless Preparation: Forget complex instructions. This simple recipe features clear, step-by-step guidance, so even beginner cooks can feel confident in the kitchen. There are no overwhelming technical terms.
    • Family-Friendly Flavors: With a rich, savory taste that appeals to all ages, goulash is a true crowd-pleaser. Its comforting, hearty flavors make it a go-to meal the whole family will love.
    • Time-Saving Solution: Designed for your busy schedule, this meal comes together quickly. By minimizing active cooking time, it allows you to enjoy more precious moments with your family.
    • Budget-Friendly Ingredients: This goulash uses everyday pantry staples, which helps keep grocery costs down. It’s an excellent choice for budget-conscious cooking because eating well shouldn’t break the bank.
    • Versatile and Adaptable: This recipe is flexible, so you can easily make substitutions to suit your family’s tastes. It’s also perfect for meal prep—simply double the batch for quick lunches or dinners later in the week.
    • Confidence Booster: Mastering this flavorful meal will build your kitchen skills and confidence. You’ll discover that cooking delicious, simple dishes without stress can be your new reality.

    This goulash recipe is a testament to the Recipesmondial promise: to provide delicious, reliable, and approachable recipes. It’s designed to help you move from uncertainty to confidence, so you can start enjoying your time in the kitchen again.

    What Ingredients Do You Need for Easy Beef Goulash?

    For the Goulash:

    This comforting beef goulash recipe uses simple, everyday ingredients to create a meal packed with flavor. You likely have many of these staples in your pantry already. Here’s what you’ll need to get started.

    • 1 ½ pounds beef chuck roast: Cut into 1-inch cubes. This cut is perfect for slow simmering.
    • 2 tablespoons olive oil: For browning beef and sautéing vegetables.
    • 1 large yellow onion: Chopped. It adds a sweet, aromatic base.
    • 3 cloves garlic: Minced. Essential for deep, savory flavor.
    • 2 tablespoons tomato paste: Adds a concentrated boost of tomato flavor.
    • 1 (28-ounce) can crushed tomatoes: Forms the rich, flavorful base of the sauce.
    • 2 cups beef broth: Enhances the meaty flavor and creates a perfect consistency.
    • 1 tablespoon Worcestershire sauce: Adds a layer of umami and depth.
    • 2 tablespoons sweet Hungarian paprika: The signature spice for authentic goulash.
    • 1 teaspoon dried thyme: A classic herb that complements beef beautifully.
    • 2 bay leaves: Infuses subtle, earthy notes as the goulash simmers.
    • 1 teaspoon salt: Adjust to taste.
    • ½ teaspoon black pepper: For a gentle warmth.
    • 12 ounces egg noodles: Or your favorite short pasta, cooked separately for serving.
    • Optional: Fresh parsley: Chopped, for a bright garnish.
    • Optional: Sour cream: Adds a dollop of creamy richness when serving.

    Ingredient Substitutions & Variations

    Don’t be afraid to make this recipe your own. Feel free to adjust the ingredients based on what you have on hand or what your family prefers. Use these simple variations to accommodate different tastes and dietary needs.

    • Beef Alternatives:
      • Ground Beef: Use 1 ½ pounds of ground beef instead of chuck roast for a quick meal. Brown it well and drain any excess fat.
      • Pork Shoulder: Cubed pork shoulder also works wonderfully for a rich, tender stew.
    • Vegetable Boost:
      • Carrots and Celery: Add 1 cup of diced carrots and 1 cup of diced celery with the onion for extra flavor and nutrition.
      • Bell Peppers: For added sweetness and color, add sliced bell peppers (any color) during the last 30 minutes of simmering.
      • Mushrooms: Sliced mushrooms are a great addition for an earthy flavor. They can also be used as a meat substitute for a vegetarian option.
    • Pasta Choices:
      • Different Short Pasta: Instead of egg noodles, any short pasta like macaroni, penne, or rotini will work well.
      • Gluten-Free Pasta: Simply use your favorite gluten-free pasta to make this a gluten-friendly dish.
    • Spice it Up (or Down!):
      • Smoked Paprika: For a deeper, smoky flavor, try using a mix of sweet and smoked paprika.
      • A Touch of Heat: Add a pinch of cayenne pepper or a dash of hot sauce if you enjoy a little kick.
    • Broth Options:
      • Vegetable Broth: If you’re out of beef broth, a good quality vegetable broth is an excellent substitute.
    • Dairy-Free Creaminess:
      • Coconut Cream: For a dairy-free topping, a swirl of full-fat coconut cream can replace sour cream, adding a subtle richness.

    How to Make Goulash: A Step-by-Step Guide

    A close-up of a rustic cast-iron pot filled with rich, simmering beef goulash with tender beef and colorful vegetables on a stovetop.
    A professional food photography, photorealistic, high-quality food magazine photo of a large, rustic cast-iron pot of rich, simmering beef goulash on a stovetop. The goulash is bubbling gently, showcasing tender chunks of beef, colorful pieces of red and green bell peppers, and a thick, savory paprika-infused sauce. Soft, warm steam is subtly rising from the pot, indicating deliciousness. The lighting is warm and inviting, highlighting the deep, appetizing colors and textures of the dish, creating a comforting home-cooked feel.

    Step 1: Brown the Beef and Sauté Aromatics

    This first step builds a deep, savory base for your goulash. First, you’ll brown the beef to create a rich crust, and then you’ll sauté aromatics like onion and garlic to add warmth and complexity. Don’t rush this process—it’s the key to a flavorful result.

    1. Prepare Your Pan: Place a large Dutch oven or heavy-bottomed pot over medium-high heat and add 1 tablespoon of olive oil. Allow the oil to become hot enough to shimmer, but not smoke.
    2. Brown the Beef: Add 1.5 pounds of cubed beef chuck, stew meat, or ground beef to the hot pan in a single layer. To avoid overcrowding the pan and steaming the meat, work in batches if necessary. Cook for 5-7 minutes, turning occasionally, until the beef is well-browned on all sides. A dark crust equals more flavor. Transfer the browned beef to a plate and set it aside, leaving the drippings in the pot.
    3. Sauté the Onions: Add the remaining 1 tablespoon of olive oil to the pot. Add 1 large chopped yellow onion and cook for 5-7 minutes, stirring often, until softened and translucent.
    4. Add Garlic: Stir in 3 cloves of minced garlic and cook for 1 minute more until fragrant. Be careful not to burn the garlic, as it can quickly turn bitter.

    Chef’s Tip: Properly browning meat triggers the Maillard reaction, a chemical process that creates hundreds of new flavor compounds. Don’t skip this step; it’s essential for the richest-tasting goulash.

    Step 2: Create the Savory Sauce

    Next, you’ll create the rich, savory sauce that forms the heart of the goulash. By combining spices and liquids in the same pot, you’ll capture all the flavor from the beef and aromatics, turning it into a cohesive and comforting sauce.

    1. Toast the Spices: Reduce the heat to medium-low. Add 2 tablespoons of sweet paprika, 1 teaspoon of dried oregano, 1/2 teaspoon of salt, and 1/4 teaspoon of black pepper to the pot. Stir constantly for 1 minute to toast the spices and release their aroma.
    2. Deglaze the Pan: Pour in 1/2 cup of beef broth. Use a wooden spoon to scrape up any flavorful browned bits stuck to the bottom of the pot.
    3. Add Liquid Ingredients: Stir in 1 (14.5-ounce) can of diced tomatoes with their juice, 1 (8-ounce) can of tomato sauce, and 1 tablespoon of Worcestershire sauce. For a deeper tomato flavor, add 1 tablespoon of tomato paste as well.
    4. Return the Beef: Add the browned beef back into the pot. Stir gently to ensure the beef is fully coated in the sauce.

    Substitution Idea: For a richer, slightly smoky flavor, you can use smoked paprika instead of sweet paprika. This offers a lovely twist for those who enjoy a bolder taste.

    Step 3: Simmer to Perfection

    This step requires patience, but the reward is worth it. A long, gentle simmer makes the beef incredibly tender while allowing the flavors to meld into a rich, cohesive sauce. This slow cooking process is what creates that classic, comforting goulash taste.

    1. Bring to a Simmer: Increase the heat to medium-high and bring the sauce to a gentle bubble.
    2. Reduce Heat and Cover: Immediately reduce the heat to low to maintain a gentle simmer, not a boil. Cover the pot with a tight-fitting lid.
    3. Cook Until Tender: Simmer the goulash for 1.5 to 2 hours, stirring occasionally to prevent sticking. The beef is ready when it is fork-tender and easily falls apart. This slow cooking time is essential for maximum tenderness.

    Helpful Hint: If the sauce thickens too much during simmering, stir in a splash of beef broth or water until it reaches a rich, hearty consistency that can perfectly coat the pasta.

    Step 4: Cook and Add the Pasta

    In this final step, you’ll cook the pasta and combine it with the goulash. Cooking the pasta separately and adding it at the end is key to achieving the perfect texture. This method ensures the pasta is perfectly coated in sauce without becoming mushy.

    1. Cook the Pasta: During the last 20 minutes of the goulash’s simmer time, bring a separate large pot of salted water to a rolling boil. Add 2 cups of elbow macaroni or another small pasta shape and cook according to package directions until al dente (tender but with a slight bite).
    2. Drain the Pasta: Drain the cooked pasta well in a colander. Do not rinse it.
    3. Combine Goulash and Pasta: Stir the drained pasta directly into the pot with the finished goulash. Mix gently until the pasta is fully coated in the sauce.
    4. Serve Immediately: Ladle the goulash into bowls. If desired, garnish with fresh parsley. Serve hot and enjoy.

    Meal Prep Tip: For the best leftovers, store the goulash sauce and cooked pasta in separate containers in the refrigerator. This prevents the pasta from absorbing too much liquid and becoming soft. Combine and reheat portions as needed for optimal texture.

    Helpful Tips for Making the Best Goulash

    Don’t Overcook the Pasta

    Perfect timing is essential when cooking goulash, especially for the pasta. A common pitfall is overcooking it, which can turn a hearty goulash into a mushy disappointment. To avoid this, aim for al dente pasta—tender with a slight bite.

    Overcooked pasta doesn’t just lose its texture; it also absorbs too much of the rich, savory sauce, leaving the final dish dry and less flavorful. To get it right, follow the recipe’s guidance carefully. Adding the pasta at the precise moment ensures it finishes cooking in the sauce to perfection. The goal is for every forkful to be a perfect blend of tender beef, flavorful sauce, and perfectly cooked pasta.

    Let the Flavors Meld

    Like many stews, goulash tastes even better with time. The key is allowing the flavors to “meld,” or fully combine, which creates a deeper and more complex taste. As the goulash rests, the spices and ingredients continue to infuse the sauce, enriching the entire dish.

    While it’s tempting to eat it immediately, letting your goulash rest after cooking is worth the wait. Even just 30 minutes off the heat can make a noticeable difference. For the best possible flavor, prepare it a day in advance. Gently reheating it the next day allows the flavors to intensify even further, turning a great meal into an amazing one. This simple step is the secret to elevating your goulash.

    How to Store and Reheat Goulash

    Since goulash often tastes even better the next day, it’s a fantastic choice for meal prep. To enjoy it again safely, proper storage and reheating are key. Here’s how to do it right.

    • Refrigeration: Let the goulash cool at room temperature for no more than two hours before transferring it to an airtight container. It will keep in the refrigerator for up to 3-4 days [source: https://www.foodsafety.gov/food-safety-charts/cold-food-storage-chart], making it perfect for quick lunches or dinners.
    • Freezing: For longer storage, goulash freezes beautifully. Once cooled, pack it into freezer-safe containers or bags, removing as much air as possible to prevent freezer burn. It can be frozen for up to 2-3 months. For best results, thaw it overnight in the refrigerator before reheating.
    • Reheating on the Stovetop: Place the goulash in a saucepan over medium-low heat, stirring occasionally until it simmers gently. If the sauce has thickened, add a splash of beef broth or water to reach your desired consistency.
    • Reheating in the Microwave: For a single serving, place the goulash in a microwave-safe bowl. Heat it on medium power, stirring every minute or so until it is piping hot throughout. You can also add a little liquid to loosen the sauce.

    Before serving, always ensure your leftovers reach an internal temperature of 165°F (74°C) for food safety. With these storage tips, you can enjoy your flavorful goulash more than once.

    What Should You Serve With Goulash?

    A beautifully plated bowl of beef goulash garnished with parsley, served with fluffy egg noodles and a dollop of sour cream on a warm dining table.
    A professional food photography, photorealistic, high-quality food magazine photo of a perfectly plated bowl of hearty homemade beef goulash, garnished with a sprinkle of fresh chopped parsley. The goulash is served alongside a generous portion of fluffy, golden egg noodles and a dollop of sour cream on a warm, inviting wooden dining table. The setting is cozy and friendly, with soft, natural light illuminating the dish, making it look incredibly appetizing and comforting, ready for a family meal.

    Our easy goulash recipe is a hearty, all-in-one meal featuring tender beef and pasta in a rich tomato sauce. To make your dinner even more special, consider adding a simple side dish. The right pairing creates a balanced, flavorful experience for your family, and these easy suggestions are perfect for any busy weeknight.

    Complementary Sides for Your Beef Goulash

    The best sides for goulash either offer a fresh, crisp contrast to its richness or help you soak up every drop of the delicious sauce. Here are a few fantastic, easy-to-prepare options:

    • Crusty Bread or Garlic Bread: A classic for a reason, warm crusty bread is perfect for soaking up the savory goulash sauce. Toasted garlic bread adds another layer of flavor, making this a simple and beloved addition to the meal.
    • Simple Green Salad: For a quick and healthy option, a crisp green salad provides a refreshing balance to the goulash’s richness. Simply toss mixed greens, cherry tomatoes, and cucumber slices with a light vinaigrette.
    • Cucumber Salad: Offering a cool, tangy counterpoint, this refreshing salad is easy to prepare. Just toss thinly sliced cucumbers with vinegar, dill, and a pinch of sugar for a bright side that cuts through the hearty sauce.
    • Steamed Green Beans or Broccoli: For a simple, nutritious side, quickly steam some green beans or broccoli. They add vibrant color to your plate, and a drizzle of olive oil with a sprinkle of salt is all they need to be delicious.
    • Roasted Root Vegetables: Roasting vegetables like carrots and parsnips with olive oil brings out their natural sweetness. This adds a more substantial, flavorful layer of texture to your meal.

    Making Mealtime Easy and Enjoyable

    Choosing the right side dish transforms a simple goulash into a complete and satisfying meal your family will love. At Recipesmondial, we believe cooking should be enjoyable, not stressful. Our goal is to help you gain confidence in the kitchen with approachable recipes and effortless meal-planning ideas so you can focus on sharing delicious food with your loved ones. Explore our platform for more quick meal solutions and beginner-friendly recipes.

    Frequently Asked Questions About Goulash

    What is the difference between Hungarian goulash and American goulash?

    If you’ve ever wondered about the difference, you’re not alone! While both are comforting dishes, they come from distinct culinary traditions. As a result, they offer unique flavors and textures, making each one a great family-friendly meal.

    Here’s a simple breakdown:

    Feature Hungarian Goulash American Goulash
    Origin Hungary, a traditional stew or soup. Developed in the United States, often called “American chop suey.”
    Main Ingredients Plenty of beef (or other meat), onions, and a generous amount of paprika. It often includes carrots, potatoes, and sometimes caraway seeds. Ground beef, pasta (like elbow macaroni), canned tomatoes, onions, and often bell peppers.
    Consistency A hearty, rich, and thick stew or soup meant to be eaten with a spoon. A saucy, casserole-like dish that is typically thicker than Hungarian goulash but not as stew-like.
    Spice Profile Deep, earthy, and aromatic from sweet Hungarian paprika, which provides a warm, rich flavor. Savory and tomato-based, with milder seasonings like Italian seasoning or chili powder.
    Serving Often served on its own, with a slice of rustic bread, or with a dollop of sour cream. Typically served as a one-pot meal, perfect for busy families looking for simple dinner recipes.

    Our easy goulash recipe leans toward the American style, making it an approachable home cooking dish. By simplifying dinner prep, it delivers a flavorful meal with minimal fuss, which is perfect for beginners.

    Can I make this goulash recipe in a slow cooker?

    Absolutely! A slow cooker is a fantastic tool for making this recipe, as it creates tender, flavorful meals with minimal effort. It’s especially useful for busy families and for meal prep. Better yet, adapting our goulash recipe for your slow cooker is simple and transforms the cooking experience into an even more relaxed process.

    Follow these easy steps:

    • Brown the Beef: First, brown the beef in a skillet on the stovetop and drain any excess fat. This step is vital for developing a deep, rich flavor, so don’t skip it!
    • Sauté Aromatics: Next, briefly sauté the onions and garlic in the same skillet until they soften and release their aroma.
    • Combine Ingredients: Transfer the browned beef, sautéed aromatics, tomatoes, broth, and seasonings to your slow cooker. Stir well to combine.
    • Cook Low and Slow: Cook on low for 6-8 hours or on high for 3-4 hours. During this time, the beef will become wonderfully tender as all the flavors meld together.
    • Add Pasta: About 30-45 minutes before serving, stir in the uncooked pasta. If the sauce seems too thick, add a little extra liquid. Continue cooking until the pasta is tender.

    Using a slow cooker is a fantastic way to enjoy this hearty goulash. Because you can prepare it ahead, it helps reduce stress at mealtime and ensures a delicious, reliable result every time.

    What is the best beef to use for beef goulash?

    Choosing the right cut of beef is key to a delicious goulash. For this recipe, you’ll want a cut that becomes rich and tender after simmering, which is why meats designed for slow cooking are the best choice. These cuts offer the ideal flavor and texture for a hearty stew.

    Here are our top recommendations for beef goulash:

    • Chuck Roast: Often called a “chuck eye roast” or “blade roast,” this cut is a fantastic choice. Its marbling (intramuscular fat) breaks down during slow cooking, making the meat incredibly tender and juicy.
    • Stew Beef/Stew Meat: Most grocery stores sell pre-cut “stew beef,” which usually comes from the chuck or round. It’s a convenient, budget-friendly option that’s perfect for beginner-friendly recipes.
    • Round Steak (Bottom Round, Top Round): While leaner than chuck, these cuts can also work well. Just be sure to cut them into smaller pieces and allow for a longer cooking time to ensure they become tender.

    For the best results, we highly recommend chuck roast. Its marbling guarantees a melt-in-your-mouth texture that will elevate your goulash. Best of all, chuck roast is generally affordable, making it perfect for budget-friendly cooking without sacrificing taste.

    What kind of pasta works best for goulash?

    In American-style goulash, the right pasta can make all the difference. You’ll want a shape that can stand up to simmering in the sauce while being easy to eat. The best choices are pastas that absorb flavor and hold their shape, ensuring a comforting, balanced bite every time.

    Here are the best pasta choices for goulash:

    • Elbow Macaroni: This is the classic choice. Its small, curved shape is perfect for scooping up the savory sauce and ground beef.
    • Ditalini: These tiny, tube-shaped pasta pieces are even smaller than elbow macaroni. They are excellent for blending seamlessly into the sauce.
    • Small Shells (Conchigliette): The hollows in small shell pasta are perfect for catching bits of meat and sauce, adding delightful texture to each spoonful.
    • Rotini or Spirals: These corkscrew shapes are also a great choice, as their nooks and crannies excel at holding the rich goulash sauce.
    • Penne or Ziti (cut short): If you prefer a slightly larger bite, short-cut penne or ziti can work well. Just make sure the pieces are small enough to be easily managed in one spoonful.

    Regardless of the shape you choose, be careful not to overcook the pasta. Add it directly to the simmering sauce near the end of the cooking time. This method ensures it cooks to a perfect al dente texture without becoming mushy, leading to a more satisfying and reliable result.

  • Easy Jambalaya Recipe: A Flavorful One-Pot Meal for Beginners

    Easy Jambalaya Recipe: A Flavorful One-Pot Meal for Beginners

    Jambalaya is a popular Louisiana comfort food dish with Spanish, French, and West African influences, consisting of meat, vegetables, and rice cooked together in one pot. The core ingredients typically include sausage (like andouille), chicken or pork, and seafood such as shrimp, all seasoned with a mix of onions, bell peppers, and celery known as the ‘holy trinity’.

    Craving a hearty, flavorful meal for the whole family but feel overwhelmed by complex recipes? Imagine serving a vibrant, comforting dish that tastes like it took hours, yet comes together easily in just one pot. That’s the magic of a truly great jambalaya!

    At Recipesmondial, we believe cooking should be stress-free and rewarding. Our easy jambalaya recipe is designed for beginners, offering clear, step-by-step guidance to build your confidence in the kitchen. We’ll show you how to combine everyday ingredients into an incredible meal, proving that delicious, family-friendly meals don’t have to be complicated.

    Get ready to discover why this simple jambalaya recipe will become a new favorite in your kitchen. We’ll guide you through every step, from selecting the right ingredients to mastering the perfect simmer, so you can create an authentic, mouthwatering dish with amazing results every time.

    Why You’ll Love This Simple Jambalaya Recipe

    Ready to find your new favorite weeknight meal? This easy jambalaya recipe is your path to stress-free, delicious cooking. We believe cooking should be enjoyable, not a chore, and this dish is the perfect proof.

    Here’s why you’ll absolutely love making this simple jambalaya:

    • It’s a One-Pot Wonder: Forget about a sink full of dishes! This flavorful meal comes together in a single pot, meaning less cleanup and more time to enjoy your dinner. It’s the ultimate easy recipe for busy evenings.
    • Perfect for Beginners: We’ve broken down the recipe into simple, clear instructions—without any intimidating culinary jargon. This approachable home cooking guide is designed to build your confidence in the kitchen.
    • Packed with Flavor: Get incredible taste without complicated techniques. Each bite of this jambalaya offers a satisfying blend of savory spices, tender meats, and perfectly cooked rice.
    • A Family Favorite: This hearty and comforting meal is sure to please everyone at the table. Kids and adults alike will devour this dish, putting an end to mealtime struggles.
    • Quick and Convenient: Get a delicious, homemade dinner on the table in no time. This recipe is perfect for anyone seeking quick meals without sacrificing flavor, making weeknight decisions easy.
    • Builds Your Cooking Skills: Our step-by-step guidance helps you master basic techniques while creating an impressive dish. You’ll grow your kitchen confidence and see just how simple cooking can be.

    This simple jambalaya is more than just a recipe; it’s a way to cook confidently and eat well. It shows you how to transform basic ingredients into a delicious, memorable meal. Get ready to enjoy stress-free cooking and bring incredible flavor to your table!

    What Ingredients Do You Need for Jambalaya?

    An overhead view of raw jambalaya ingredients including rice, shrimp, sausage, chopped vegetables, and seasoning laid out on a counter.
    A perfectly composed flat lay, professional food photography shot of all raw, fresh jambalaya ingredients neatly arranged on a light-colored, slightly textured kitchen countertop or wooden board. Ingredients include uncooked long-grain rice in a small bowl, raw peeled shrimp, sliced chicken andouille sausage, diced green bell peppers, red bell peppers, yellow bell peppers, diced celery, diced onion, a can of crushed tomatoes, a carton of chicken broth, and a small pile of Cajun seasoning with a measuring spoon. Each ingredient is pristine and clearly separated, with bright, natural overhead lighting. Photorealistic, high-quality food magazine photo style. No artistic interpretations, illustrations, vector graphics, or abstract art.

    The ‘Holy Trinity’ of Cajun Cooking

    Every authentic jambalaya starts with a foundational blend of vegetables known as the “Holy Trinity” in Cajun and Creole cooking. This trio builds the base flavor for countless dishes, including this easy jambalaya.

    The Holy Trinity consists of three simple, yet powerful, ingredients:

    • Onion: Adds sweetness and depth to the dish.
    • Celery: Provides a subtle, earthy flavor and texture.
    • Green Bell Pepper: Brings a fresh, slightly bitter note that balances the richness.

    These vegetables are diced and sautéed together, a process that builds a rich aroma and taste. This is the essential first step for developing that incredible jambalaya flavor. Best of all, you can find these common ingredients in any grocery store, making this a delicious and accessible meal.

    Choosing Your Protein: Sausage, Chicken, and Shrimp

    One of the best parts about jambalaya is its versatility. Feel free to use a combination of proteins or stick to just one, making it an adaptable dinner recipe. Our beginner-friendly version uses a classic mix for a truly satisfying meal.

    Here are the proteins we recommend for a flavorful jambalaya:

    • Andouille Sausage: This traditional, smoked sausage adds a wonderful spicy and smoky depth. Look for a good quality brand at your local butcher or supermarket. If you cannot find Andouille, smoked kielbasa or a spicy Italian sausage makes a great substitute.
    • Chicken: Boneless, skinless chicken thighs are perfect because they stay moist and tender during cooking. Cut them into bite-sized pieces to ensure they cook evenly. While chicken breasts can also be used, be careful not to overcook them, as they can become dry. Chicken makes the dish extra hearty.
    • Shrimp: Add raw, peeled, and deveined shrimp near the end of cooking. This timing is key to ensuring they cook quickly and remain succulent. Both fresh and frozen shrimp work well; just be sure to thaw frozen shrimp completely before adding them to the pot. The shrimp provides a delicious seafood element that makes the jambalaya feel extra special.

    Feel free to adjust the protein amounts to suit your budget or preferences. For a quicker meal, you can use just the sausage and omit the other proteins. This flexibility makes jambalaya a great, stress-free option for dinner.

    The Best Rice and Spices for Authentic Flavor

    The right rice and spice blend are crucial for transforming simple ingredients into a deeply flavorful jambalaya. Following these tips will help ensure your dish turns out perfectly every time.

    Getting the Rice Right

    Choosing the right rice is key to preventing a mushy jambalaya. Long-grain white rice is the standard choice because it absorbs the rich broth while still holding its shape, ensuring each grain remains separate and flavorful [1].

    • Long-Grain White Rice: This is the non-negotiable choice for authentic jambalaya. While varieties like Jasmine or Basmati can also work, the key is to always rinse your rice before cooking. Rinsing removes excess starch and helps prevent the final dish from becoming sticky.

    Avoid short-grain or medium-grain rice varieties, as they release too much starch and can make your jambalaya sticky and clumpy.

    Spices for that Signature Taste

    The spice blend brings all the flavors together and gives jambalaya its characteristic warmth and zest. You can use a pre-made Cajun seasoning or create your own blend.

    Essential spices and aromatics include:

    • Cajun Seasoning: A good quality blend is your shortcut to flavor. It typically contains paprika, garlic powder, onion powder, cayenne pepper, and dried herbs.
    • Garlic: Fresh minced garlic adds a pungent, aromatic base.
    • Dried Thyme: Earthy and slightly floral, it’s a classic Cajun herb.
    • Bay Leaves: These infuse the dish with a subtle, aromatic background flavor. Remember to remove them before serving.
    • Paprika: Sweet paprika adds color and a mild, peppery flavor. For a smokier taste, opt for smoked paprika.
    • Cayenne Pepper: For adjustable heat. Add more or less depending on your preference.
    • Salt and Black Pepper: Essential for seasoning the dish to perfection. Taste and adjust as you go.

    Building these layers of flavor is what makes home-cooked jambalaya so rewarding. These spices are readily available in most grocery stores and are key to creating the dish’s signature taste. Mastering this blend will give you the confidence to tackle many other classic Cajun recipes.

    How to Make Jambalaya Step-by-Step

    A home cook stirring a bubbling pot of jambalaya with a wooden spoon on the stovetop.
    A professional food photography shot capturing a close-up of a home cook’s hands, stirring a large, deep cast-iron Dutch oven filled with simmering jambalaya on a stovetop. Steam gently rises from the pot, indicating its warmth and freshness. The rich, savory mixture of rice, sausage, shrimp, and vegetables is clearly visible, glistening under bright, inviting kitchen lighting. The cook’s hands are natural and engaged in the cooking process. The focus is on the action within the pot, with the kitchen environment subtly blurred in the background. Photorealistic, high-quality food magazine photo style. No artistic interpretations, illustrations, vector graphics, or abstract art.

    Step 1: Brown the Sausage and Chicken

    To create a deep, savory foundation for your jambalaya, start by browning the sausage and chicken. This crucial first step unlocks rich flavors and builds complexity with minimal effort.

    Don’t be intimidated; this simple technique is the secret to a flavorful base for any one-pot meal.

    1. Heat a large, heavy-bottomed pot or Dutch oven over medium-high heat.
    2. Add 1 tablespoon of olive oil (if needed, depending on your sausage).
    3. Place the sliced smoked sausage (like Andouille) into the hot pot.
    4. Cook for 5-7 minutes, stirring occasionally, until it’s nicely caramelized.
    5. Remove the sausage with a slotted spoon and set it aside on a plate.
    6. Add the diced chicken to the same pot.
    7. Brown the chicken on all sides, which usually takes 5-8 minutes.
    8. Ensure the chicken is cooked through with no pink remaining.
    9. Remove the chicken and add it to the plate with the sausage.

    Tip for Success: For the best flavor, don’t overcrowd the pot. Cook the meats in batches if needed to ensure they brown properly instead of steaming.

    Step 2: Sauté the Vegetables

    Next, build aromatic depth with the “Holy Trinity” of Cajun cooking: onion, bell pepper, and celery. This trio is a cornerstone of flavor in many authentic global comfort foods.

    This straightforward step transforms simple ingredients into the heart of your jambalaya, making it a beginner-friendly way to build a delicious base.

    1. Reduce the heat to medium.
    2. Add the remaining 1 tablespoon of olive oil to the pot, if the pot is dry.
    3. Stir in 1 large chopped onion, 1 large chopped green bell pepper, and 2 chopped celery stalks.
    4. Cook for 8-10 minutes, until the vegetables soften and become translucent.
    5. As you stir, scrape up any browned bits from the bottom of the pot. These bits add immense flavor.
    6. Add 3 cloves of minced garlic during the last minute of cooking.
    7. Stir constantly for that final minute to prevent the garlic from burning.

    Substitution Idea: No green bell pepper? Red or yellow peppers work wonderfully, offering a slightly sweeter flavor that’s perfect for family-friendly meals.

    Step 3: Toast the Spices and Add Liquids

    Awaken the spices by toasting them directly in the pot. This simple technique deepens their flavor and makes your jambalaya incredibly fragrant.

    Pouring in the liquids immediately after toasting allows all the flavors to meld perfectly, creating a well-balanced dish.

    1. Sprinkle 2 teaspoons of Creole seasoning (or Cajun seasoning), 1 teaspoon of dried thyme, and ½ teaspoon of black pepper over the sautéed vegetables.
    2. Stir for about 1 minute until the spices become fragrant.
    3. Pour in 1 (14.5 ounce) can of diced tomatoes with their juices.
    4. Add 4 cups of chicken broth to the pot.
    5. Stir everything together, scraping any final bits from the bottom.
    6. Bring the mixture to a gentle simmer.

    Meal Prep Tip: To save time on a busy weeknight, chop your vegetables ahead of time and store them in an airtight container in the fridge.

    Step 4: Cook the Rice

    Now, it’s time to bring the dish together. By cooking the rice directly in the seasoned broth, you’ll infuse every single grain with flavor. Following these steps will ensure perfect results.

    If you’re worried about sticky or undercooked rice, don’t be. These clear instructions are designed to guarantee a great texture.

    1. Add 2 cups of uncooked long-grain white rice to the simmering liquid.
    2. Stir gently just once to combine, ensuring the rice is fully submerged.
    3. Return the browned sausage and chicken to the pot.
    4. Bring the liquid back to a simmer.
    5. Cover the pot with a tight-fitting lid.
    6. Reduce the heat to low.
    7. Cook for 20-25 minutes. Do not lift the lid during this time.
    8. After 20-25 minutes, all the liquid should be absorbed by the rice.

    Common Mistake to Avoid: Avoid stirring the rice as it cooks. Stirring releases starch, which can make the jambalaya gummy. For the best texture, let it simmer undisturbed.

    Step 5: Add the Shrimp and Finish

    In this final step, you’ll add shrimp for a burst of fresh seafood flavor. Since shrimp cooks very quickly, adding it at the end ensures it will be perfectly tender, not rubbery.

    With this finishing touch, your delicious, family-friendly meal is just moments away from the table.

    1. After the rice has cooked for 20-25 minutes, remove the pot from the heat.
    2. Immediately stir in 1 pound of peeled and deveined raw shrimp.
    3. Replace the lid securely.
    4. Let the jambalaya stand, covered, for another 5-7 minutes.
    5. The residual heat from the pot will cook the shrimp to pink perfection.
    6. Uncover and gently fluff the jambalaya with a fork.
    7. Garnish with fresh chopped parsley or green onions.
    8. Serve your magnificent jambalaya immediately.

    Flavorful Finish: For an extra kick, finish with a dash of your favorite hot sauce, like Tabasco or Crystal. It’s an optional but delicious addition for anyone who enjoys a bit of heat.

    Expert Tips for the Perfect Jambalaya

    Recipe Variations and Substitutions

    Jambalaya is a wonderfully adaptable dish, making it a creative cooking experience. You can easily adjust the recipe to fit your pantry, preferences, or dietary needs. These simple tweaks will help you cook with confidence.

    • Protein Power: Experiment with your protein choices. For a lighter version, use diced boneless, skinless chicken breast. For a vegetarian option, replace the meat with kidney beans, black beans, or chickpeas. Plant-based sausages also work well, providing a similar texture and flavor.
    • Spice Level Swaps: Control the heat by adjusting the cayenne pepper to your liking. Reduce or omit it for a milder jambalaya. For those who like more spice, add a dash of hot sauce to individual servings.
    • Veggie Boosts: Feel free to add more vegetables to this recipe. Sliced bell peppers of different colors add sweetness and vibrant appeal. You can also stir in a handful of fresh spinach at the very end; it will wilt perfectly into the hot rice. [2]
    • Broth Choices: Opt for low-sodium chicken or vegetable broth to control the final saltiness. If you have homemade broth, use it for an even deeper flavor.
    • Dietary Friendly: This jambalaya recipe is naturally gluten-free, but always double-check your sausage and broth labels to ensure they are certified. This makes it an easy meal solution for those with gluten sensitivities.

    How to Store and Reheat Leftovers

    One of the best things about jambalaya is the leftovers—it often tastes even better the next day! This makes it perfect for meal prep and stress-free weekday lunches.

    • Refrigeration: For food safety, first allow the jambalaya to cool completely. Then, transfer it to an airtight container and refrigerate within two hours of cooking. It will stay fresh for 3 to 4 days.
    • Freezing for Later: Jambalaya freezes beautifully, making it a great option for meal planning. To freeze, portion the cooled jambalaya into freezer-safe bags or containers, labeling each with the date. It will keep for up to 3 months. Thaw it overnight in the refrigerator before reheating.
    • Reheating Methods:
      • Microwave: Place a single serving in a microwave-safe dish. To prevent it from drying out, add a splash of broth or water (1 to 2 tablespoons). Cover and heat on medium power for 2 to 3 minutes, stirring halfway through, until thoroughly hot.
      • Stovetop: For larger batches, transfer the leftovers to a pot or skillet. Add a little broth or water and heat over medium-low, stirring often until steaming and heated through.

    Common Mistakes to Avoid

    Even beginners can make perfect jambalaya by avoiding a few common pitfalls. Follow these simple tips for success in the kitchen.

    • Over-Stirring the Rice: Resist the urge to stir the rice constantly after adding it. Over-stirring releases starches that can make the final dish gummy or mushy. Stir only when the recipe directs you to.
    • Skipping the Browning Step: Don’t rush the browning step for the sausage and chicken. Searing the meat is a crucial step that builds a deep, caramelized flavor base for the entire dish.
    • Lifting the Lid Too Often: Once the rice and liquid are simmering, keep the lid on tightly. Lifting the lid releases steam, which is essential for cooking the rice properly. Keeping it covered ensures every grain becomes tender and fluffy.
    • Incorrect Liquid Ratio: Using the correct liquid-to-rice ratio is key. Too much liquid will make the jambalaya soupy, while too little will leave the rice hard and undercooked. Follow the recipe’s measurements carefully to achieve the perfect consistency.
    • Overcrowding the Pot: Use a wide, heavy-bottomed pot to avoid overcrowding. A cramped pot prevents ingredients from browning properly and leads to uneven cooking. If your pot isn’t large enough, brown the sausage and chicken in batches to ensure even heat and the best flavor.

    Frequently Asked Questions About Jambalaya

    What are the types of jambalaya?

    There are two primary styles of jambalaya: Cajun and Creole. Both are delicious one-pot meals, perfect for feeding a crowd or enjoying as a hearty family dinner.

    • Cajun Jambalaya: Originating in rural Louisiana, this version is known for its brown color. It gets its deep flavor from browning meat in the pot and does not contain tomatoes.
    • Creole Jambalaya: Hailing from New Orleans, this style is often called “red jambalaya” because it includes tomatoes. It tends to have a more complex flavor from a wider variety of spices.

    Both versions bring the signature taste of Louisiana to your kitchen and are surprisingly simple to prepare at home.

    What is the difference between Cajun and Creole jambalaya?

    While both jambalaya styles are delicious, their key differences lie in the ingredients and cooking methods. Understanding these distinctions will help you appreciate the unique culinary heritage of each dish.

    Here’s a quick comparison:

    Feature Cajun Jambalaya Creole Jambalaya
    Origin Rural Louisiana New Orleans [3]
    Tomatoes No tomatoes are used. Always includes tomatoes or tomato paste.
    Color Brown, from browned meat and stock. Red or orange, due to the tomatoes.
    Roux Flavor comes from browning meat to create a fond. A dark roux is sometimes used. A roux is less common, but a light one may be used for thickening.
    Flavor Profile Hearty, smoky, and meat-focused. Slightly brighter, with a complex flavor from a wider array of spices.

    Our easy jambalaya recipe is a Creole-style version with tomatoes, making it a vibrant and flavorful meal perfect for beginners.

    What is the best rice for jambalaya?

    The best choice for authentic jambalaya is a good quality long-grain white rice. This type of rice is ideal for several reasons:

    • Absorbs Flavor: Long-grain rice soaks up the spices and broth without becoming mushy, ensuring every bite is flavorful.
    • Maintains Texture: Unlike stickier varieties, long-grain kernels remain separate after cooking, which gives jambalaya its classic texture.
    • Provides Consistent Results: It’s a forgiving rice that’s easy to cook correctly, making it a reliable choice for cooks of all levels.

    Avoid short-grain or medium-grain rice, as they can release too much starch and make the dish sticky. While Basmati or jasmine rice can work in a pinch, standard long-grain white rice will give you the best results.

    What sausage is best for a jambalaya recipe?

    For the most authentic flavor, Andouille sausage is the top choice. This smoked pork sausage brings a rich, spicy, and savory flavor that is essential to a classic jambalaya.

    If you can’t find Andouille, several other types of sausage work well:

    • Smoked Sausage: A high-quality smoked sausage, such as Kielbasa, is an excellent alternative. Look for one with a robust, smoky flavor.
    • Spicy Italian Sausage: If you prefer extra heat, spicy Italian sausage adds a great kick. Be sure to brown it thoroughly to render the fat.
    • Spanish Chorizo: Not to be confused with Mexican chorizo, this firm, cured sausage lends a delicious smoky and spicy flavor.

    The goal is to use a flavorful sausage that holds its shape during cooking. Any of these options will ensure your jambalaya is bursting with taste.


    Sources

    1. https://www.louisianatourism.com/culinary/cooking/cajun-creole-recipes/jambalaya
    2. https://www.foodnetwork.com/recipes/articles/cajun-and-creole-cooking-101
    3. https://www.louisianatravel.com/blog/difference-between-cajun-and-creole-cuisine
  • The Ultimate Mississippi Pot Roast Recipe (So Easy, So Good!)

    The Ultimate Mississippi Pot Roast Recipe (So Easy, So Good!)

    Mississippi Pot Roast is a famously tender and flavorful slow-cooked beef roast, celebrated for its simplicity. It requires just five main ingredients: a beef chuck roast, a packet of ranch seasoning, a packet of au jus gravy mix, a stick of butter, and pepperoncini peppers. The combination results in a savory, tangy, and rich dish that’s incredibly easy for any home cook to prepare.

    Finding a dinner recipe with big flavor that doesn’t require a mountain of effort can be a challenge. It’s easy to feel overwhelmed by complex instructions or the struggle to find family-friendly meals everyone will love. If this sounds familiar, meet your new weeknight hero: the Mississippi Pot Roast. This beloved dish is famous for a reason. It’s an incredibly simple dinner recipe that delivers fall-apart tender meat and a rich, savory gravy with very little fuss.

    We believe cooking should be enjoyable, not stressful. Delicious meals shouldn’t require gourmet skills or a lengthy ingredient list, which is why we’re so excited to share our ultimate Mississippi Pot Roast recipe. It’s the perfect example of approachable home cooking, transforming a few simple ingredients into an unforgettable meal. More than just an easy recipe, it proves that simple techniques can produce incredibly flavorful results. This dish is perfect for building your confidence in the kitchen and making mealtime stress-free, whether you’re a beginner or an experienced cook looking for a reliable favorite.

    Discover why this Mississippi Pot Roast recipe is hailed as one of the easiest and most satisfying family-friendly meals around. We’ll provide step-by-step guidance to help you achieve a perfect, melt-in-your-mouth roast every time. Along the way, we’ll share practical tips, serving suggestions, and delicious variations. Let’s make some magic in your kitchen!

    Why Is This the Best Mississippi Pot Roast Recipe?

    Are you searching for a dinner that’s packed with rich flavor but requires minimal effort? Our Mississippi Pot Roast recipe is the ultimate choice. We know home cooks want delicious, reliable meals without the stress, and this recipe is designed to make your cooking journey both enjoyable and successful.

    Here’s why our Mississippi Pot Roast stands out:

    • Unbeatable Simplicity: This truly easy recipe requires just a few pantry staples and can be made in a slow cooker, Instant Pot, or Dutch oven. It fits perfectly into any busy schedule and is ideal for cooks of all skill levels.
    • Mouth-Watering Flavor: This pot roast melts in your mouth, offering a perfect balance of savory, tangy, and slightly spicy notes. From the incredible aroma to the last comforting bite, it’s a true delight.
    • Consistently Tender Results: Say goodbye to tough, dry roasts. Our simple dinner recipe guarantees fall-apart tender results every single time, giving you confidence in the kitchen.
    • Perfect for Any Family: This family-friendly meal is a crowd-pleaser that brings everyone to the table for a hearty and satisfying dinner.
    • Stress-Free Cooking: Avoid feeling overwhelmed by complex instructions. Our step-by-step cooking guidance makes the process clear and simple, so you can enjoy your time in the kitchen.
    • Versatile & Adaptable: Easily tailor this approachable home cooking dish to your liking. Add vegetables for a complete one-pot meal, or adjust the seasonings to suit your taste.

    At Recipesmondial, we are dedicated to helping you cook with confidence, and this Mississippi Pot Roast exemplifies our mission of making flavorful meals easy. Get ready to impress your family and friends with a delicious dinner that requires minimal effort.

    What Do You Need for Mississippi Pot Roast?

    About the 5 Simple Ingredients

    Making a delicious Mississippi Pot Roast is surprisingly simple, requiring just five core ingredients. These common items are available at any grocery store and combine to create a deeply flavorful, comforting meal perfect for any night of the week.

    This easy recipe for Mississippi pot roast makes preparing family-friendly meals a breeze. Here’s a closer look at what you’ll need:

    • Chuck Roast: The star of this dish is the chuck roast. This humble cut of beef becomes exceptionally tender when slow-cooked. We’ll discuss why it’s the best choice in more detail below.
    • Ranch Seasoning Mix: A packet of dry Ranch dressing mix adds a tangy, herbaceous flavor and is one of the unique secrets to this recipe’s success.
    • Au Jus Gravy Mix: This seasoning packet provides a rich, savory depth that helps create the wonderful gravy.
    • Butter: A stick of unsalted butter melts over the roast as it cooks, adding a luxurious richness and helping to tenderize the meat.
    • Pepperoncini Peppers (and their juice!): Don’t be intimidated by the name! These mild, pickled peppers are not spicy. Instead, they provide a tangy, briny counterpoint that adds a delightful brightness to the rich beef. Be sure to include a splash of their juice for extra flavor!

    These simple dinner recipes truly shine with minimal effort. You’ll be amazed at the flavor you get from these common ingredients!

    Which Cut of Beef is Best?

    To achieve the incredibly fall-apart tender roast this recipe is famous for, choosing the right cut of beef is essential. For this beginner-friendly recipe, you’ll want a cut that benefits from long, slow cooking. This method allows the tough connective tissues to break down, resulting in exceptionally juicy and tender meat.

    Here are the best cuts of beef for your Mississippi pot roast recipe:

    • Chuck Roast: This is, without a doubt, the top choice. Often labeled as “chuck eye roast,” “chuck roll,” or simply “pot roast,” this cut comes from the shoulder. It has excellent marbling (streaks of fat) and plenty of connective tissue. During the slow cooking process, this fat and collagen melt, making the meat incredibly moist and flavorful. Many culinary experts agree that chuck roast is ideal for slow cooking [1].
    • Bottom Round Roast: While leaner than a chuck roast, the bottom round is still a good option. It will be slightly less tender, but the long cooking time will yield a delicious result.
    • Brisket (Flat or Point): Brisket is another excellent choice for slow cooking. Both the leaner flat cut and the fattier point cut will become wonderfully tender.

    When you’re at the grocery store, look for a roast with visible marbling, as this fat ensures a more flavorful and juicy result. A 3- to 4-pound roast is a great size for family-friendly meals and typically serves 4 to 6 people.

    How to Make Mississippi Pot Roast Step-by-Step

    Creating a truly delicious Mississippi Pot Roast is easier than you think. This classic comfort food delivers incredible flavor with minimal effort. At Recipesmondial, we want you to feel confident in the kitchen, so we provide clear, step-by-step guidance for three popular cooking methods. Each technique yields the same result: a fall-apart tender, savory roast that will become a family favorite.

    Crock-Pot / Slow Cooker Instructions

    The slow cooker method is a favorite for a reason—it’s the ultimate “set it and forget it” approach. Perfect for busy days, it fills your home with an amazing aroma and guarantees a simple, satisfying dinner is ready when you are.

    1. Sear the Beef (Optional, but Recommended): Heat a tablespoon of olive oil in a large skillet over medium-high heat. Sear all sides of the chuck roast until beautifully browned. This step locks in flavor and creates a richer final dish.
    2. Place in Slow Cooker: Transfer the seared chuck roast to your slow cooker. If you skipped searing, simply place the raw roast inside.
    3. Add Seasonings: Sprinkle one packet of ranch seasoning mix, followed by one packet of au jus gravy mix, evenly over the beef.
    4. Add Butter and Peppers: Place a stick of unsalted butter directly on top of the roast. Arrange about 1/4 cup of pepperoncini peppers around the beef, adding a splash of their juice for extra tang.
    5. Cook Low and Slow: Cover and cook on LOW for 6-8 hours or on HIGH for 3-4 hours. The beef is done when it’s incredibly tender and pulls apart easily with a fork.
    6. Shred and Serve: Carefully remove the roast from the slow cooker and place it on a cutting board. Use two forks to shred the beef, then return it to the cooking liquid. Stir well to coat and serve warm with your favorite sides.

    Recipesmondial Tips for Slow Cooker Success:

    • No Extra Liquid: Resist the urge to add water or broth. The roast and butter will release plenty of their own juices, creating a rich, flavorful sauce.
    • Butter Boost: The butter is essential for adding richness and helping to tenderize the beef, so don’t skip it!
    • Don’t Peek: Keep the lid closed while cooking. Opening it releases heat and steam, which can extend the cooking time.

    Instant Pot Instructions

    When you’re short on time, the Instant Pot is your best friend. This method delivers the same fork-tender results of a slow-braised roast in a fraction of the time, making it perfect for a last-minute, flavorful meal.

    1. Sear the Beef: Press the “Sauté” button on your Instant Pot and add a tablespoon of olive oil. Once hot, sear all sides of the chuck roast until browned. Remove the beef, set it aside, and press “Cancel.”
    2. Deglaze the Pot: Pour in 1/2 cup of beef broth or water. Use a wooden spoon to scrape up any browned bits from the bottom. This step is crucial for building flavor and preventing a “Burn” warning.
    3. Add Remaining Ingredients: Return the seared roast to the Instant Pot. Sprinkle both the ranch seasoning and au jus gravy mixes over the top. Add the stick of unsalted butter, then arrange 1/4 cup of pepperoncini peppers and a splash of their juice around the roast.
    4. Pressure Cook: Secure the lid and ensure the venting knob is in the “Sealing” position. Select “Manual” or “Pressure Cook” on High Pressure and set the timer for 60 minutes.
    5. Natural Release: When the cooking time is complete, allow the pressure to release naturally for at least 15 minutes. This important step helps keep the meat tender and juicy. Afterward, carefully turn the venting knob to release any remaining pressure before opening the lid.
    6. Shred and Serve: Remove the cooked roast from the pot and shred it with two forks. Return the shredded beef to the flavorful cooking liquid and stir to coat. Enjoy your quick, delicious roast!

    Recipesmondial Tips for Instant Pot Perfection:

    • Prevent Burn Notices: Always deglaze the pot thoroughly after searing to remove any food particles that could trigger the “Burn” message.
    • Natural Release is Key: Don’t rush the natural release; it allows the meat fibers to relax, resulting in incredibly tender beef.
    • Liquid Amount: While the Instant Pot requires some liquid to come to pressure, don’t add too much. The beef will release plenty of its own juices as it cooks.

    Dutch Oven / Oven-Braised Instructions

    For a traditional, deeply flavorful roast, the Dutch oven is the perfect tool. This classic oven-braising method develops rich, complex flavors and results in incredibly tender meat, filling your kitchen with the comforting aroma of a slow-cooked meal.

    1. Preheat Oven & Sear Beef: Preheat your oven to 300°F (150°C). On your stovetop, heat a tablespoon of olive oil in a large Dutch oven over medium-high heat. Sear all sides of the chuck roast until deeply browned.
    2. Add Seasonings and Liquid: Briefly remove the roast from the pot. Pour in 1/2 cup of beef broth or water and scrape up any browned bits from the bottom. Return the roast to the pot and sprinkle the ranch and au jus mixes over the top.
    3. Add Butter and Peppers: Place the stick of unsalted butter on top of the roast. Arrange 1/4 cup of pepperoncini peppers around the beef and pour in a splash of their tangy juice.
    4. Braise in the Oven: Cover the Dutch oven with its lid and transfer it to the preheated oven. Braise for 3 to 4 hours, or until the beef is fork-tender and shreds easily. The exact time will depend on the size of your roast.
    5. Rest and Shred: Remove the Dutch oven from the oven and let the roast rest in the pot, covered, for 10-15 minutes. This allows the juices to redistribute throughout the meat. Then, remove the roast, shred it using two forks, and stir it back into the sauce.
    6. Serve: Spoon the flavorful Mississippi pot roast and its sauce onto plates alongside your favorite hearty sides.

    Recipesmondial Tips for Oven-Braised Success:

    • Tight-Fitting Lid: A tight-fitting lid is crucial for oven braising, as it traps moisture and flavor to ensure a tender, juicy result.
    • Low and Slow: Don’t rush the oven time. The low, slow heat is what breaks down the tough meat fibers, yielding that signature fall-apart texture.
    • Check for Tenderness: The best way to know if the roast is done is to test it with a fork. If it still feels tough, it needs more time in the oven.

    Tips for Perfect, Fall-Apart Tender Roast Every Time

    The secret to an incredible Mississippi Pot Roast is achieving a melt-in-your-mouth, fall-apart tender texture—and it’s easier than you think. By following a few simple tips, you can confidently transform a humble cut of beef into a spectacular meal. Here’s how to get it right every time for a delicious, stress-free family dinner.

    • Start with the Right Cut

      For a truly tender pot roast, start with a chuck roast. Also known as chuck eye or chuck shoulder, this cut has the ideal amount of fat and connective tissue. During slow cooking, these elements break down into rich, flavorful gelatin, making the beef incredibly tender.

    • Sear for Deeper Flavor

      Never skip the searing step. Browning the roast in a hot pan before slow cooking creates a deeply flavorful crust. This simple action adds incredible depth and complexity to the finished dish by developing rich, savory notes.

    • Go Low and Slow

      Patience is crucial for a tender mississippi pot roast. No matter your cooking method—slow cooker, Instant Pot, or Dutch oven—the key is to cook at a low temperature for a long time. This gentle, slow process allows the tough connective tissues to break down, resulting in that signature fall-apart texture. Rushing this step will only lead to tough meat.

    • Maintain Enough Liquid

      Make sure there is always enough liquid in the pot. The combination of broth, pepperoncini juice, and butter not only keeps the roast moist but also creates the base for an incredible sauce. Without enough liquid, the roast will become dry and tough, as the braising liquid is essential for tenderizing the meat.

    • Keep it Covered

      Keep the pot tightly covered throughout the cooking process, whether you’re using a slow cooker, Dutch oven, or Instant Pot. This traps steam and moisture, which helps tenderize the meat evenly while preventing the surface from drying out.

    • Don’t Overcrowd the Pot

      Give the meat enough space. If you’re cooking a large mississippi roast, use a pot that’s big enough to hold it comfortably. Overcrowding prevents heat from circulating evenly, causing the meat to steam rather than braise. Proper spacing ensures every part of the roast cooks perfectly.

    • Let it Rest

      After cooking, don’t shred the meat right away. Let the mississippi pot roast recipe rest for 10-15 minutes out of the pot. This crucial step allows the juices to redistribute throughout the meat, making every bite more tender and moist. It’s a simple action that makes a huge difference.

    What to serve with Mississippi pot roast?

    Classic Side Dishes

    Once your flavorful Mississippi pot roast is ready, you’ll want to pair it with sides that complement its rich flavors. These classic choices are easy to prepare and perfect for soaking up the delicious gravy, helping you create a satisfying, family-friendly dinner.

    • Creamy Mashed Potatoes: A timeless choice, fluffy mashed potatoes are ideal for absorbing the savory pot roast juices for a truly comforting combination.
    • Fluffy White Rice: Simple and versatile, white rice provides a neutral base that lets the roast’s bold flavors shine. It’s also an incredibly easy side for any cook to master.
    • Buttery Egg Noodles: Tender egg noodles tossed with a bit of butter are perfect for catching every drop of the incredible sauce, making for an especially hearty meal.
    • Classic Cornbread: Slightly sweet cornbread beautifully balances the savory roast and adds a delightful texture to your plate. It’s a much-loved family favorite.
    • Steamed Green Beans or Asparagus: For a fresh, crisp counterpoint, add steamed vegetables. They bring a touch of green that lightens the meal and are quick and simple to cook.

    Low-Carb Options

    If you’re looking for lighter, low-carb alternatives, the Mississippi pot roast itself is a fantastic start. Because the beef is naturally low in carbohydrates, it’s easy to build a healthy, balanced meal around it. These simple sides keep the focus on flavor without adding extra carbs.

    • Cauliflower Mash: For an excellent low-carb substitute for mashed potatoes, try cauliflower mash. Simply steam or boil cauliflower, then mash it with butter and seasoning for a similar creamy texture.
    • Zucchini Noodles (Zoodles): Light and refreshing, zucchini noodles absorb the roast’s juices without adding significant carbs. For a quick side, simply sauté them until tender.
    • Roasted Asparagus or Broccoli: Roasting vegetables like asparagus and broccoli brings out their natural sweetness. A simple drizzle of olive oil, salt, and pepper is all you need for a flavorful, healthy side.
    • Garlic Green Beans: Sautéing fresh green beans with garlic creates a flavorful, low-carb side dish that adds a vibrant crunch to your plate.
    • Simple Side Salad: A fresh green salad with a light vinaigrette offers a crisp, easy contrast to the rich roast. It’s a perfect way to add more fresh vegetables to your meal.

    Recipe Variations & Substitutions

    Making it with Chicken or Pork

    While classic Mississippi Pot Roast uses beef, the recipe is versatile. The rich, savory, and tangy sauce also pairs wonderfully with other proteins, like chicken and pork. It’s a great way to enjoy this flavorful meal even if you’re out of beef or simply want to try something new.

    Here are some easy options:

    • Chicken: Use boneless, skinless chicken breasts or thighs for a delicious alternative. Since chicken cooks faster than beef, you’ll need to adjust the cooking time to prevent it from drying out. Chicken thighs are a great choice as they are more forgiving and stay juicy.
    • Pork: A pork shoulder (Boston butt) or pork loin are excellent substitutes. Pork shoulder will give you a fall-apart texture similar to beef chuck roast, making it perfect for shredding. Pork loin is a leaner option that cooks more quickly.

    Follow the same cooking method for any protein you choose. Just be sure to adjust the cooking time, as chicken and pork loin cook faster than beef. The goal is to achieve tender, flavorful meat every time.

    Adding Potatoes and Carrots

    Turn your Mississippi Pot Roast into a complete one-pot meal by adding vegetables. Cooking them directly with the meat creates a hearty dinner perfect for busy nights and simplifies cleanup.

    Consider these simple additions:

    • Potatoes: Small new potatoes, red potatoes, or Yukon Gold potatoes are ideal. Cut larger potatoes into 1-2 inch chunks. These starchy veggies soak up all the wonderful flavors of the roast.
    • Carrots: Whole baby carrots or large carrots cut into 1-inch pieces add sweetness and color. They also hold their shape well during slow cooking.
    • Onions: Quartered onions or pearl onions can be added for an extra layer of savory flavor.

    For the best texture, add vegetables to the slow cooker during the last 1.5 to 2 hours of cooking. If you add them at the beginning, they can become too soft. This timing ensures they cook until perfectly tender while still holding their shape.

    Making Your Own Seasoning Mix

    Making your own seasoning mix is a great way to customize the flavor of your pot roast. It allows you to control the ingredients, especially sodium, and adjust the taste to your preference.

    Here’s a simple, homemade alternative to a ranch seasoning packet:

    Homemade “Ranch-Style” Seasoning Mix:

    Combine these dried spices in a small bowl:

    • 1 tablespoon dried parsley
    • 1 teaspoon garlic powder
    • 1 teaspoon onion powder
    • ½ teaspoon dried dill
    • ½ teaspoon salt (adjust to your preference)
    • ¼ teaspoon black pepper

    Tips for your homemade mix:

    • Adjust Flavors: Feel free to increase or decrease any spice to match your taste. For example, add more garlic powder for a stronger garlic kick.
    • Add a Spicy Kick: Add a pinch of cayenne pepper for a little heat.
    • Storage: Make a larger batch and store it in an airtight container to have on hand for future meals.

    Using a homemade seasoning mix gives you complete control over what goes into your meal, making it a perfect option for a family-friendly dinner.

    How to Store and Reheat Leftovers

    This Mississippi Pot Roast recipe is so easy and delicious, you might not have any leftovers! But if you do, don’t let that flavorful meat go to waste. Properly storing and reheating your pot roast ensures every bite is just as tender and tasty as the first. It’s a fantastic option for meal prep or quick family dinners throughout the week.

    Storing Your Delicious Mississippi Pot Roast

    Keeping your leftover Mississippi Pot Roast fresh is simple. Follow these guidelines to enjoy it safely for days to come.

    In the Refrigerator:

    • Cool It Down Quickly: To ensure food safety, let the pot roast cool to room temperature within two hours of cooking.
    • Use Airtight Containers: Transfer the roast and its juices into shallow, airtight containers. This will protect it from air and other food odors.
    • Refrigerate Promptly: Place the containers in the refrigerator. For best quality and safety, eat the leftovers within 3 to 4 days [2].

    In the Freezer (For Longer Storage):

    For longer storage, freezing is an excellent choice. It’s also perfect for meal prepping and planning ahead.

    • Portion It Out: Divide the cooled pot roast into individual or family-sized servings for easy reheating later.
    • Use Proper Storage: Place portions in heavy-duty freezer bags or freezer-safe containers. If using bags, press out as much air as possible to prevent freezer burn.
    • Label and Date: Don’t forget to label your containers with the contents and the date.
    • Store Safely: Your Mississippi Pot Roast will keep in the freezer for up to 3 months.
    • Thaw Before Reheating: For best results, thaw the frozen pot roast overnight in the refrigerator. You can also use the defrost setting on your microwave if you’re short on time.

    How to Reheat Mississippi Pot Roast

    The key to reheating pot roast is to keep it from drying out. Follow these methods to restore its original flavor and tenderness.

    In the Oven (Recommended Method):

    Using the oven is the best way to keep the meat moist and tender, just like when it was first cooked.

    1. Preheat your oven to 300°F (150°C).
    2. Place the thawed pot roast and its juices in an oven-safe dish. If needed, add a splash of beef broth to add moisture.
    3. Cover the dish tightly with aluminum foil to trap steam and ensure even heating.
    4. Heat for 20–30 minutes, or until the roast is warmed through. The time will vary based on the portion size.

    On the Stovetop (For Smaller Portions):

    This is a quick and effective method, especially for smaller amounts of pot roast.

    1. Place the pot roast and its juices into a saucepan or skillet.
    2. Add a tablespoon or two of beef broth or water to create steam.
    3. Cover and heat over medium-low, stirring occasionally to prevent sticking.
    4. Once it reaches a gentle simmer, it’s ready to serve. This gentle heating keeps the meat from drying out.

    In the Microwave (Quickest Method):

    While the microwave is the fastest option, be careful not to overcook the meat.

    1. Place a single serving of pot roast and gravy in a microwave-safe dish.
    2. Cover the dish loosely to allow steam to vent while keeping the meat moist.
    3. Heat on medium power (50%) for 1–2 minutes to start.
    4. Stir the pot roast, then continue heating in 30-second intervals until it’s warmed through.

    Tips for Using Leftover Pot Roast

    Leftover Mississippi Pot Roast is incredibly versatile and can be transformed into brand new meals. Here are a few ideas:

    • Always Add Moisture: No matter how you reheat it, always include some of the original cooking liquid or gravy. This is the key to preventing dry meat.
    • Shred for New Meals: Shred the leftover meat to use in sandwiches, tacos, quesadillas, or sliders. It’s also a fantastic topping for loaded baked potatoes or nachos.
    • Avoid Overheating: Gently reheat the roast only until it is warmed through. Overcooking will make the meat tough and dry, ruining its signature fall-apart texture.

    Frequently Asked Questions About Mississippi Pot Roast

    Is Mississippi pot roast spicy?

    Many home cooks wonder about the spice level of Mississippi pot roast. The good news is that it’s generally not spicy. In fact, this dish is wonderfully flavorful and very mild.

    The pepperoncini peppers are the key ingredient that causes this confusion. However, these peppers add a tangy, zesty kick rather than true heat. They provide a bright, acidic counterpoint to the rich beef, similar to a gourmet pickle. The mild brine from the jar also contributes delicious flavor without adding heat.

    So, you can confidently enjoy this comforting dish. It’s a perfect family-friendly meal, even for those sensitive to spice.

    What are the ingredients for Mississippi Pot Roast?

    The beauty of the classic Mississippi pot roast recipe is its simplicity. You only need five core ingredients to create an incredibly rich and tender dish:

    • A large cut of beef roast: A chuck roast is the typical choice, as it becomes wonderfully fall-apart tender when slow-cooked.
    • Ranch seasoning mix: This dry packet adds a savory, herb-infused flavor.
    • Au jus gravy mix: This dry packet adds a deep, beefy flavor and helps create a delicious sauce.
    • Butter: Unsalted butter is often used. It melts into the roast, adding incredible richness and moisture.
    • Pepperoncini peppers (and some of their brine): These provide the signature tangy, zesty flavor that balances the rich meat.

    That’s it! With these easy-to-find ingredients, you are well on your way to a simple and flavorful meal.

    Can I make this recipe without pepperoncini peppers?

    Yes, you can certainly make Mississippi pot roast without pepperoncini peppers, and it will still be delicious. While they are a signature ingredient, they mainly add a unique tangy note that cuts through the richness of the beef and butter.

    If you leave them out, the flavor profile will be richer and more savory, but it will lack that distinct zesty tang. If you’re looking for a similar acidic balance, consider these easy substitutions:

    • A splash of apple cider vinegar: This can offer a mild tang. Use sparingly, starting with 1-2 tablespoons.
    • A squeeze of lemon juice: Add this toward the end of cooking for a touch of brightness.
    • Dill pickle slices or relish: If you enjoy dill, a few slices or a spoonful of relish can mimic some of the tang and brininess.

    Ultimately, part of the fun is making this beginner-friendly recipe your own. Feel free to adjust it based on your family’s preferences and what you have on hand.

    Why is my pot roast tough?

    It’s disappointing when your pot roast doesn’t turn out fall-apart tender. This is a common issue, but a tough roast is usually caused by a few key factors. Understanding them will help you achieve perfect results every time.

    Here are the main reasons why your pot roast might be tough:

    • Not enough cooking time: This is the most common reason. Chuck roast, the preferred cut, is full of tough connective tissue. It needs a long, slow cooking time for this tissue to break down into tender gelatin. If you cut the cooking time short, the meat will remain tough. Aim for at least 6-8 hours on low in a slow cooker or 3-4 hours in a Dutch oven.
    • Too high heat: Cooking the roast at too high a temperature can make the muscle fibers contract, resulting in dry, tough meat. The secret to a juicy pot roast is cooking it “low and slow.”
    • The wrong cut of beef: While other cuts can work, chuck roast (also called shoulder roast or blade roast) is ideal. Leaner cuts, like sirloin or round roast, have less fat and connective tissue, so they are more likely to dry out and become tough. For best results, always choose a well-marbled chuck roast.
    • Not enough liquid: Although this recipe doesn’t require much added liquid, there needs to be enough moisture in the pot to steam and braise the meat. The butter and pepperoncini brine usually provide plenty.

    Don’t get discouraged! With these tips, you can cook confidently and enjoy wonderfully tender pot roast. Remember, patience is the key ingredient.


    Sources

    1. https://www.certifiedangusbeef.com/cuts/Chuck-Roast.php
    2. https://www.foodsafety.gov/food-safety-charts/cold-food-storage-chart

  • Easy Chicken Piccata Recipe: A Step-by-Step Guide for Beginners

    Easy Chicken Piccata Recipe: A Step-by-Step Guide for Beginners

    Chicken piccata is a classic Italian-American dish made with thinly sliced chicken cutlets that are dredged in flour, pan-fried, and served with a bright sauce. The signature piccata sauce consists of lemon juice, butter, chicken broth or white wine, and capers, creating a flavorful and elegant meal that is simple to prepare at home.

    Are you searching for easy recipes that impress without the fuss? When you’re short on time or new to the kitchen, complex dishes can feel overwhelming. Imagine serving a gourmet-tasting meal that comes together effortlessly. That’s where a classic like chicken piccata shines. Though it sounds elegant, this flavorful dish is surprisingly simple to master—even for beginners—and promises a delightful, stress-free dining experience.

    At Recipesmondial, we believe mealtimes should be enjoyable. That’s why we’ve created the ultimate beginner-friendly chicken piccata recipe. Our step-by-step guide will walk you through preparing succulent chicken cutlets in a bright, tangy lemon-butter sauce. You’ll build confidence and see how simple dinner recipes can transform your weeknights into delicious culinary experiences, perfect for family-friendly meals.

    Get ready to discover why this easy chicken piccata recipe is about to become a new family favorite. We’ll cover everything from using everyday ingredients to sharing practical tips for perfecting your sauce. With our guide, you can expect reliable results every time. Let’s dive in and make this beloved dish accessible to everyone!

    What Is Chicken Piccata?

    Chicken Piccata is a classic Italian-American dish featuring tender, thin chicken cutlets pan-fried until golden brown. The cutlets are then bathed in a bright and zesty sauce, which is the heart of this incredibly flavorful meal.

    Home cooks love this dish because it delivers gourmet results with minimal effort. Its simplicity and impressive taste make it a perfect choice for an easy yet elegant weeknight dinner.

    The Heart of Piccata: Chicken and Sauce

    At its core, a classic chicken piccata recipe combines two main elements:

    • Thin Chicken Cutlets: The dish starts with boneless, skinless chicken breasts pounded to about 1/4 inch thick, which ensures they cook quickly and evenly. A light dredge in flour before pan-frying creates a beautiful, crispy crust.
    • Lemony Caper Sauce: This vibrant sauce is what makes piccata so unique. Its base combines savory chicken broth with fresh lemon juice for brightness and rich butter for a luxurious texture. The addition of tiny, briny capers provides a salty pop that perfectly balances the rich and tangy notes.

    Why Home Cooks Love This Easy Recipe

    Chicken piccata is a fantastic choice for cooks of all skill levels because it offers incredible flavor without requiring complex techniques. It’s an ideal, beginner-friendly recipe for anyone looking to create a restaurant-quality meal at home.

    Recipesmondial focuses on approachable home cooking, and this recipe embodies that philosophy. It’s a quick, reliable, and family-friendly meal that delivers impressive flavor without the stress. With every delicious plate, you’ll gain confidence and find more joy in the kitchen.

    What Does “Piccata” Mean?

    The Italian word “piccata” can mean “larded” or “punished” in a culinary context. More commonly, it refers to a method of preparing meat that has been thinly sliced, pounded flat, dredged in flour, and pan-fried. This technique is used for various proteins, with veal piccata being another popular variation. [1]

    Why Is This the Best Chicken Piccata Recipe for Home Cooks?

    Welcome to your new favorite way to make chicken piccata! While many home cooks feel overwhelmed by complex recipes, we believe you deserve delicious results without the stress. That’s why this recipe is specifically crafted for you.

    At Recipesmondial, we focus on making cooking enjoyable by helping you create flavorful meals with confidence. This chicken piccata recipe is a perfect example, and it stands out for several key reasons:

    • Super Simple Steps: We break down the cooking process into clear, easy-to-follow instructions so you’ll never feel lost in the kitchen. This makes it a perfect beginner-friendly recipe.
    • Quick Weeknight Solution: Need a fast meal after a busy day? This easy recipe delivers a restaurant-quality dish in no time, making it ideal for simple dinner recipes and family-friendly meals.
    • Everyday Ingredients: Forget trips to a specialty store. Our chicken piccata uses common items you likely already have or can easily find at your local grocery store.
    • Guaranteed Delicious Flavor: You don’t need to be a chef to create an amazing dish. This recipe guarantees a bright, zesty, and savory taste, ensuring a truly flavorful meal made easy.
    • Build Your Confidence: Mastering a classic dish like piccata is a great way to boost your kitchen skills. Our step-by-step cooking guidance is designed to help you cook with confidence every step of the way.
    • Practical Tips Included: We provide helpful advice throughout the recipe, including tricks for perfectly golden chicken and a velvety sauce. These tips help ensure reliable, delicious results every time.
    • Easy Variations: If you want to switch things up, we offer simple suggestions to customize your piccata, allowing you to adapt it to your taste or the ingredients you have on hand.

    Our approach transforms meal prep from a stressful chore into an enjoyable experience, guiding you from uncertainty to confidence in the kitchen. Get ready to discover new flavors and make mealtime stress-free with Recipesmondial!

    What Ingredients Do You Need for Chicken Piccata?

    Making delicious Chicken Piccata at home is surprisingly simple. This classic dish comes together with just a few everyday ingredients—no fancy items or complex preparations required. Many of these are likely already in your pantry. To keep it simple, we’ll break down the ingredients for the chicken cutlets first, followed by the signature lemon-butter sauce.

    For the Chicken Cutlets

    First, let’s gather what you need for the star of the dish. We use boneless, skinless chicken breasts because they cook quickly and absorb flavors beautifully, helping you get a delicious dinner on the table fast.

    • Boneless, Skinless Chicken Breasts: 2 large (about 1.5 lbs total). These will be sliced or pounded thin for quick cooking.
    • All-Purpose Flour: ½ cup. This creates a light, golden crust on the chicken and helps thicken our piccata sauce.
    • Salt: ½ teaspoon. Essential for seasoning the chicken.
    • Black Pepper: ¼ teaspoon. Freshly ground pepper offers the best flavor.
    • Olive Oil: 2 tablespoons. For pan-frying the chicken to a perfect golden brown.

    Chef’s Tip: To get thin cutlets, you can either slice each chicken breast horizontally to create two thinner pieces, or place them between two sheets of plastic wrap and gently pound them to about ½-inch thickness with a rolling pin or meat mallet. Thinner cutlets cook faster and stay more tender, making this a truly quick and easy recipe.

    For the lemon-butter piccata sauce

    Next up is the bright, tangy lemon-butter sauce that truly defines this classic dish. It comes together in just a few minutes and relies on a handful of common pantry staples.

    • Unsalted Butter: ¼ cup (4 tablespoons). Butter adds richness and a silky texture to the sauce.
    • Garlic: 2 cloves, minced. Fresh garlic adds a wonderful aromatic base to the sauce.
    • Chicken Broth: ¾ cup. Low-sodium broth is best. It provides savory depth without being too salty.
    • Fresh Lemon Juice: ¼ cup (from about 1-2 lemons). This is non-negotiable for authentic piccata flavor. Always use fresh for the best taste.
    • Capers: 2 tablespoons, drained. These tiny, briny flower buds add a distinct salty and tangy pop. They are a signature ingredient of piccata.
    • Fresh Parsley: 2 tablespoons, chopped. A sprinkle of fresh parsley adds color and a herbaceous finish.

    Substitution Idea: While fresh parsley offers the best vibrant flavor and appearance, dried parsley can work in a pinch. The one non-negotiable ingredient is fresh lemon juice; bottled juice simply lacks the bright, zesty taste essential for authentic piccata. For a richer sauce, you can add a splash of white wine during the deglazing step, as highlighted in our “Chicken Piccata with White Wine” variation.

    How to Make Chicken Piccata: A Simple Step-by-Step Guide

    Step 1: Prepare the Chicken

    First, let’s prepare the chicken. This initial step ensures the chicken cooks evenly and quickly, making it perfect for a weeknight meal.

    1. Slice the Chicken: If your boneless, skinless chicken breasts are thick, slice them horizontally to create thinner cutlets. You should get two or three cutlets from each breast.
    2. Pound the Chicken: Place a chicken cutlet between two sheets of plastic wrap or inside a large zip-top bag. Using a meat mallet or heavy rolling pin, gently pound the chicken to a uniform ¼-inch thickness. This step is key for tender results and even cooking.
    3. Season Well: Remove the chicken from the plastic. Season both sides of each cutlet with salt and black pepper to build flavor from the start.

    Chef’s Tip: Don’t skip pounding the chicken! This extra step tenderizes the meat and helps it cook much faster—a great skill for many quick recipes.

    Step 2: Dredge and Pan-Fry

    With the chicken prepped, it’s time to create a golden-brown crust. This is where the dish builds its signature flavor and texture.

    1. Set Up for Dredging: On a shallow plate, combine the all-purpose flour with a pinch of salt and pepper.
    2. Dredge the Chicken: Dip each seasoned chicken cutlet into the flour mixture, coating both sides. Gently shake off any excess flour; a thin, even layer is all you need for a perfect crust.
    3. Heat the Pan: Place a large skillet over medium-high heat. Add the olive oil and butter. When the butter is melted and the oil begins to shimmer, the pan is ready.
    4. Pan-Fry the Chicken: Carefully place 2-3 chicken cutlets in the hot skillet, making sure not to overcrowd the pan. Cook for 3-4 minutes per side, until golden-brown and cooked through.
    5. Remove and Rest: Transfer the cooked chicken to a clean plate and cover it loosely with foil to keep warm. Letting the chicken rest keeps it juicy and tender while you make the sauce.

    Beginner’s Insight: Overcrowding the pan lowers its temperature, causing the chicken to steam instead of brown. For the best results, cook the chicken in batches if needed.

    Step 3: Make the Piccata Sauce

    The key to chicken piccata is its bright, tangy lemon-butter caper sauce. This is what makes the dish a classic.

    1. Deglaze the Pan: Leave the flavorful browned bits in the bottom of the skillet. Pour in the chicken broth and use a wooden spoon to scrape the bottom of the pan. This process, called deglazing, builds the sauce’s foundation.
    2. Add Key Flavors: Stir in the fresh lemon juice, capers, and caper brine. Bring the mixture to a simmer and let it cook for 2-3 minutes to allow the flavors to meld.
    3. Finish with Butter: Reduce the heat to low. Add the cold butter one piece at a time, whisking constantly until it is fully melted and incorporated. This creates a smooth, emulsified sauce.
    4. Taste and Adjust: Sample the sauce and season with additional salt and pepper if needed to achieve a bright, savory balance.

    Flavor Focus: Freshly squeezed lemon juice is essential for the signature zesty flavor of chicken piccata. Avoid using bottled juice for the best results.

    Step 4: Combine and Serve

    In this final step, we’ll bring the chicken and the sauce together for a delicious finished dish.

    1. Return Chicken to Pan: Place the cooked chicken cutlets back into the skillet. Spoon the sauce over them and let everything warm through for 1-2 minutes.
    2. Garnish: Sprinkle fresh, chopped parsley over the chicken for a pop of color and fresh flavor.
    3. Serve Immediately: Transfer the chicken piccata to serving plates and drizzle any remaining sauce from the pan over the top.

    Your chicken piccata is ready to serve! This simple recipe delivers impressive flavor and is perfect for any night of the week. Enjoy your homemade meal.

    Tips for Perfecting Your Piccata Sauce

    A truly perfect chicken piccata recipe hinges on its delicious sauce. This bright, tangy, and rich sauce brings the whole dish together. Even as a beginner, you can master it with a few simple techniques. Let’s explore how to make your piccata sauce shine.

    Embrace the Pan Drippings (Fond)

    • After cooking the chicken, do not clean the pan. Those browned bits stuck to the bottom, known as “fond,” are packed with flavor and form the foundation of your sauce.
    • To harness that flavor, pour in your liquid (broth or wine) and gently scrape up the fond. This process, called deglazing, releases all those savory notes into the sauce.

    Use Fresh Lemon, Added Last

    • Always opt for fresh lemons over bottled juice. Bottled varieties simply lack the vibrant, zesty flavor needed for an authentic piccata.
    • To preserve its bright aroma, add the lemon juice at the very end of the cooking process. If you add it too early, the delicate flavor will cook off and dissipate.

    Choose Quality Broth or Wine

    • The quality of your liquid base matters. Choose a good-quality chicken broth—preferably low-sodium, so you can control the saltiness of the final sauce.
    • For extra depth and complexity, consider using a dry white wine like Pinot Grigio or Sauvignon Blanc. The alcohol will cook off, leaving only rich flavor behind.

    Swirl in Cold Butter for Silkiness

    Capers Are Essential

    • A hallmark of piccata, capers provide a unique, briny burst of acidity that is essential to the dish’s signature flavor.
    • Be sure to drain them well before adding them to the sauce. If you’re sensitive to salt, you can also give them a quick rinse under cold water.

    Always Taste and Adjust Seasoning

    • Taste your sauce frequently as you cook. This is the key to achieving a perfectly balanced flavor.
    • Adjust the seasoning with salt, pepper, or another squeeze of lemon as needed. Remember, even a small pinch of salt can amplify all the other flavors in the sauce.

    Master Sauce Consistency

    • Aim for a consistency that is just thick enough to coat the back of a spoon. This ensures the sauce clings beautifully to the chicken.
    • If the sauce is too thin, let it simmer gently (do not boil) to reduce and thicken. If it becomes too thick, simply whisk in a splash of broth or water until you reach the perfect texture.

    What to serve with chicken piccata?

    Pasta and Grains

    Pasta and grains are excellent choices for pairing with chicken piccata because they soak up its vibrant lemon-caper sauce, creating a comforting and filling meal. Best of all, they’re easy to prepare, making them ideal for any home cook.

    • Linguine or Angel Hair Pasta: These delicate pastas are perfect for gently absorbing the bright, tangy sauce. Cook until al dente for the best texture.
    • Orzo: This small, rice-shaped pasta blends seamlessly with the chicken and becomes infused with the sauce, offering a unique texture.
    • Rice: Steamed white or brown rice provides a neutral base that soaks up every drop of the delicious piccata sauce, making it a simple and reliable option.
    • Quinoa: For a nutritious whole-grain option, quinoa’s subtle nutty flavor and pleasant texture complement the chicken perfectly.

    After cooking your chosen pasta or grain according to package instructions, toss it with a spoonful of extra piccata sauce. This simple tip adds a major flavor boost and elevates the entire dish.

    Vegetable Sides

    Fresh vegetables balance the richness of chicken piccata while adding vibrant color and essential nutrients to the plate. Many options are also quick to prepare, saving precious time for busy families.

    • Steamed Asparagus: Steam asparagus until tender-crisp and finish with a squeeze of lemon juice to enhance its natural flavor. It’s an exceptional pairing for the piccata sauce.
    • Sautéed Green Beans: Sauté green beans with olive oil and garlic until they are tender with a slight crunch. This simple method yields a flavorful and easy side dish.
    • Roasted Broccoli or Broccolini: Roast broccoli or broccolini florets with olive oil, salt, and pepper until tender and slightly caramelized. Roasting brings out their natural sweetness, which complements the savory chicken.
    • Sautéed Spinach: For a light and healthy side, sauté fresh spinach with a touch of garlic. It wilts in minutes, making it a fantastic and quick addition to your meal.
    • Garlic Mashed Potatoes: For a more indulgent option, creamy garlic mashed potatoes are the perfect comforting side for soaking up every bit of the delicious sauce.

    These simple vegetable sides help you create a tasty, well-rounded meal. You can feel confident serving a delicious and balanced dinner to your family.

    Salads

    A crisp salad provides a refreshing contrast to the warm, savory chicken piccata recipe. Its lightness cuts through the richness of the sauce while adding a welcome crunch and bright flavor to the meal.

    • Simple Green Salad: Toss mixed greens or butter lettuce with a light lemon vinaigrette. This simple preparation keeps the flavors clean and bright, perfectly complementing the main dish.
    • Arugula Salad with Shaved Parmesan: The peppery bite of arugula pairs wonderfully with the chicken. Finish with a simple lemon dressing and shaved Parmesan for a sophisticated yet beginner-friendly salad.
    • Cucumber and Tomato Salad: For a colorful and hydrating option, combine diced cucumbers and tomatoes with a light vinaigrette or a simple drizzle of olive oil.

    A simple salad adds freshness to any meal and makes a great side for leftover chicken piccata. These easy recipes are designed to impress without adding stress, so you can enjoy the cooking process.

    Easy Recipe Variations to Try

    Once you’ve mastered the classic chicken piccata, you can explore delicious new twists. These simple variations add new flavors and textures, making it easy to adapt the dish to your taste. Experimenting with these recipes is a great way to discover new dishes and enjoy stress-free cooking.

    Creamy Chicken Piccata Recipe

    If you love a richer, smoother sauce, this creamy chicken piccata is a wonderfully comforting option. Perfect for a cozy family dinner, this easy variation adds a delightful richness to the classic dish.

    Here’s how to make it:

    • Prepare as usual: Follow steps 1 and 2 of our main recipe to dredge and pan-fry the chicken cutlets.
    • Add cream to the sauce: After making the lemon-butter piccata sauce in step 3, reduce the heat to low.
    • Stir in cream: Gently pour in about 1/2 cup of heavy cream or half-and-half, whisking until fully combined.
    • Simmer gently: Let the sauce simmer for 2 to 3 minutes until it thickens slightly. Avoid letting it boil vigorously.
    • Combine and serve: Return the chicken to the creamy sauce, toss to coat, and serve immediately.

    Chef’s Tip: For an extra luxurious touch, stir in a tablespoon of grated Parmesan cheese with the cream. This creates an even deeper flavor and is a fantastic way to elevate a simple dinner.

    Chicken Piccata with White Wine

    Adding white wine to your piccata sauce introduces a bright, acidic note and a wonderful depth of flavor. This popular variation is a staple in many kitchens and an easy way to elevate your meal.

    Here’s how to incorporate it:

    • Deglaze the pan: After removing the cooked chicken cutlets, keep the pan on medium-high heat.
    • Add wine: Pour in 1/4 cup of dry white wine, such as Sauvignon Blanc or Pinot Grigio.
    • Scrape up bits: Use a wooden spoon to scrape up the flavorful browned bits from the bottom of the pan.
    • Reduce the wine: Let the wine simmer for 1 to 2 minutes, or until it has reduced by about half. This will also cook off the alcohol.
    • Continue with sauce: Proceed with adding the chicken broth, lemon juice, capers, and butter as described in step 3 of the main recipe.

    Substitution Alert: If you prefer not to use wine, you can skip this step and add an extra 1/4 cup of chicken broth instead for a delicious, wine-free sauce.

    Making Piccata with Other Proteins (Fish, Beef)

    The beauty of piccata sauce lies in its versatility, as it pairs wonderfully with other proteins. This opens up a world of creative, flavorful, and family-friendly meals for when you want to change things up.

    • Fish Piccata:
      • Choose your fish: Firm white fish fillets like cod, tilapia, or snapper work best. Salmon also makes a delightful piccata.
      • Preparation: Pat the fish dry and lightly dredge it in seasoned flour, just like the chicken.
      • Cooking: Pan-fry the fish for 2-4 minutes per side until it is flaky and cooked through. Keep in mind that fish cooks much faster than chicken.
      • Sauce: Remove the fish and prepare the piccata sauce in the same pan. Gently return the cooked fish to the sauce to warm through before serving.
    • Beef Piccata:
      • Choose your beef: Use thinly sliced beef cutlets, such as sirloin or tenderloin.
      • Preparation: Lightly pound the beef to an even thickness and dredge it in seasoned flour.
      • Cooking: Quickly sear the beef in hot oil for 1-2 minutes per side, or to your desired doneness.
      • Sauce: Remove the beef and prepare the piccata sauce. Return the beef to the pan and toss to coat.

    These easy recipe variations allow you to use basic cooking skills in new ways and simplify mealtime decisions. Enjoy experimenting with these flavorful options!

    Frequently Asked Questions

    What does piccata mean?

    The Italian term “piccata” refers to a technique where meat is sliced, pounded thin, and then sautéed. This method not only makes the meat very tender but also allows it to cook quickly. Chicken piccata, for example, uses chicken cutlets prepared this way, ensuring every bite is soft and delicious. It’s perfect for quick meals and beginner-friendly recipes [2].

    What is piccata sauce made of?

    The classic piccata sauce is bright, zesty, and incredibly flavorful. This simple but elegant sauce is a highlight of the dish and typically includes these main ingredients:

    • Lemon Juice: This provides the signature bright, tangy flavor and cuts through the richness of the butter.
    • Capers: These small, briny flower buds add a distinct salty and savory punch essential to the authentic piccata flavor.
    • Chicken Broth: Forming the base of the sauce, it adds savory depth without being too heavy.
    • Butter: Swirled in at the end, butter creates a velvety texture and adds a delicious richness to the sauce.
    • Fresh Parsley: Chopped fresh parsley adds a pop of color and a fresh, herbaceous note.
    • Flour or Cornstarch (optional): A small amount of flour or cornstarch is sometimes used to thicken the sauce slightly.

    Together, these ingredients create a balanced sauce that is both tangy and savory, coating the chicken beautifully for a simple, flavorful meal.

    Can you serve chicken piccata with pasta?

    Absolutely! Chicken piccata and pasta are a classic, family-friendly pairing because the zesty lemon-butter caper sauce is perfect for coating noodles. This popular combination creates a satisfying and complete meal by adding incredible flavor to the pasta.

    Here are some popular ways to serve it with pasta:

    • Toss the piccata sauce directly with cooked spaghetti, linguine, or angel hair pasta.
    • Serve the chicken cutlets over a bed of pasta and drizzle extra sauce over everything.
    • Consider adding steamed or roasted vegetables to your plate for a more balanced meal.

    Serving piccata with pasta transforms the dish into an even more substantial and comforting meal, making it an excellent option for a quick and satisfying family dinner.

    What’s the difference between chicken piccata and chicken Milanese?

    While both Chicken Piccata and Chicken Milanese are delicious Italian-inspired dishes, they have key differences in their preparation and flavor. Understanding them will help you choose which one to make next.

    Feature Chicken Piccata Chicken Milanese
    Preparation Thin chicken cutlets are lightly floured, pan-fried until golden, and served with a bright lemon-butter caper sauce. Thin chicken cutlets are coated in seasoned breadcrumbs and pan-fried or baked until crispy.
    Breading A light dusting of flour, which helps create a golden crust. A substantial coating of seasoned breadcrumbs, often Panko for extra crunch.
    Sauce The signature of the dish is its vibrant lemon-butter caper sauce. Typically served without a sauce, just a simple squeeze of fresh lemon.
    Flavor Profile Tangy, savory, and rich, with a zesty kick from the lemon and briny notes from capers. Crispy and savory, with a milder flavor that comes from the seasoned breading and the chicken.
    Texture Tender chicken with a delicate, golden crust, coated in a smooth sauce. A very crispy exterior with a tender inside, offering a satisfying crunch.

    Both are excellent choices for home cooking, but they offer different experiences. Choose piccata for a saucy, zesty meal, or opt for Milanese when you want a satisfyingly crispy and simple dish. Recipesmondial helps you master both with step-by-step cooking guidance!


    Sources

    1. https://www.tasteofhome.com/article/what-is-chicken-piccata/
    2. https://en.wikipedia.org/wiki/Piccata

  • How to Cook the Perfect Rib Eye Steak (A Simple Recipe for Beginners)

    How to Cook the Perfect Rib Eye Steak (A Simple Recipe for Beginners)

    To cook a perfect rib eye steak, start by letting it rest at room temperature for 30 minutes, then season it generously with salt and pepper. Sear the steak in a very hot, oiled skillet for 3-5 minutes per side for a medium-rare finish. For best results, use a meat thermometer and let the steak rest for 10 minutes before slicing to ensure it’s juicy and tender.

    Imagine a perfectly cooked rib eye steak—tender, juicy, and with a beautiful crust—made right in your own kitchen. For many home cooks, making a restaurant-quality steak at home can feel daunting. You might worry about overcooking it, not getting that perfect sear, or feeling overwhelmed by complicated instructions. But what if cooking a delicious rib eye is much simpler than you think?

    At Recipesmondial, we believe cooking should be enjoyable, not stressful. That’s why our beginner-friendly rib eye recipe takes the guesswork out of the process. We provide clear, step-by-step instructions to build your confidence with every step. Forget about intimidating techniques and endless prep work. Our method focuses on approachable techniques and everyday ingredients to help you get a perfect sear and a juicy interior. Get ready to cook with confidence and create a meal that will impress.

    You don’t need to be a gourmet chef to make an incredible meal. With our simple dinner recipes, you’ll see just how easy it is to bring the steakhouse experience home. Let’s dive into what makes this method for cooking the perfect rib eye so straightforward and enjoyable.

    Why Is This the Easiest Rib Eye Steak Recipe?

    Many home cooks feel overwhelmed by complex steak recipes, but preparing a perfect rib eye doesn’t have to be difficult. This simple recipe is designed to be enjoyable, not stressful, empowering you to create a restaurant-quality meal right in your own kitchen. Follow along to build your confidence and master the perfect steak.

    So, why is this method the easiest rib eye steak recipe you will find?

    • Minimal Ingredients: Forget long, confusing shopping lists. You only need a few pantry staples and a great rib eye steak. Salt, pepper, and a little oil are all it takes to create incredible flavor.
    • Clear, Step-by-Step Guidance: We break down the entire process into simple, manageable actions. With no guesswork involved, you can follow our instructions with ease and achieve perfect results every time.
    • Focus on Core Techniques: Without using complicated jargon, this recipe teaches you the essentials. You’ll learn how to get a fantastic sear and cook your steak to your preferred doneness.
    • Reliable Results: Our straightforward method consistently delivers a tender, juicy, and flavorful rib eye. You’ll be proud to serve a steak that’s sure to impress your family and friends.
    • Quick and Efficient: Perfect for busy weeknights, this recipe is a fantastic option for family-friendly meals. You can achieve delicious results without spending hours in the kitchen.
    • Perfect for Beginners: If you’re new to cooking steak, this is the perfect recipe to start with. Our clear instructions and reliable method will have you cooking confidently in no time.

    This approachable guide transforms culinary uncertainty into kitchen success. Get ready to discover the joy of preparing a perfect, stress-free steak dinner.

    What You’ll Need for a Perfect Steak Dinner

    A collection of fresh ingredients for cooking rib eye steak, including a raw rib eye, herbs, garlic, salt, pepper, and butter.
    An overhead, professional food photography shot of high-quality, fresh ingredients for cooking a perfect rib eye steak. Display a thick, raw, well-marbled rib eye steak on a rustic wooden cutting board, alongside sprigs of fresh rosemary and thyme, whole cloves of garlic, a small pile of flaky sea salt, whole black peppercorns, and a knob of unsalted butter in a small ceramic dish. The background is a clean, inviting kitchen counter with soft, natural daylight, creating a warm and approachable aesthetic. The image should be 100 percent photorealistic, high-quality food magazine photo style, with no artistic interpretations or illustrations.

    Key Ingredients

    You don’t need a long list of fancy items for a delicious rib eye steak. These simple, easy-to-find ingredients are the backbone of a perfect steak dinner, making this a great beginner-friendly recipe.

    • Rib Eye Steak: As the star of the meal, choose a cut that’s 1 to 1.5 inches thick. Look for good marbling—the small streaks of fat within the muscle. This fat melts as it cooks, infusing the steak with incredible flavor and tenderness.
    • Coarse Sea Salt or Kosher Salt: Salt is crucial for enhancing the steak’s natural flavor. Don’t be shy; use a generous amount.
    • Freshly Ground Black Pepper: Freshly ground pepper adds a subtle spice and the best aroma, beautifully complementing the rich taste of the beef.
    • High Smoke Point Oil: Use an oil that can withstand high heat, like avocado, grapeseed, or canola oil. This is key to creating a beautiful, crisp crust without burning the steak.
    • Unsalted Butter (optional but recommended): Adding a pat of butter during the final minutes of cooking adds richness and is perfect for basting. It makes a huge difference in flavor.
    • Fresh Garlic and Herbs (optional): For extra aroma, toss a few garlic cloves and sprigs of rosemary or thyme into the pan with the butter. They’ll infuse the steak with a wonderful, herby flavor.

    This list focuses on everyday items you can find at any grocery store. Mastering these basics will help you cook with confidence and master approachable home cooking.

    Essential Kitchen Tools

    The right tools make all the difference, but you don’t need any fancy gadgets. These simple items are all it takes to guarantee a successful steak dinner, making this an easy and approachable recipe.

    • Cast Iron Skillet or Heavy-Bottomed Pan: A cast iron skillet is your most important tool because it heats evenly and retains heat exceptionally well. This is what creates that perfect, crispy sear on your steak.
    • Tongs: A good pair of tongs is essential for safely flipping the steak and keeping your hands away from the hot pan.
    • Instant-Read Meat Thermometer: Take the guesswork out of cooking and achieve reliable results every time. A meat thermometer is the only way to ensure your steak is cooked precisely to your preferred doneness.
    • Wire Rack and Baking Sheet: After cooking, rest your steak on a wire rack set over a baking sheet. This allows air to circulate, preventing the bottom from getting soggy while the sheet catches any drippings.
    • Cutting Board: Use a sturdy cutting board for seasoning and slicing. A board with a juice groove is ideal for catching any liquids from the rested steak.
    • Sharp Knife: A sharp chef’s knife or carving knife is crucial for clean, even slices, which makes serving much easier.

    Most of these tools are common kitchen staples. Using them correctly will help you cook a perfect steak confidently and without stress, simplifying the process of making delicious, family-friendly meals.

    How to cook rib eye steak

    A perfectly cooked rib eye steak, sliced to reveal a medium-rare interior, resting on a cutting board, with steam gently rising.
    A close-up, professional food photography shot capturing a perfectly seared rib eye steak with a beautiful golden-brown crust, just removed from a hot cast-iron skillet and resting on a wooden cutting board. A real home cook’s hand, with a confident and encouraging posture, is holding a sharp knife, beginning to slice into the steak, revealing a juicy, tender, medium-rare pink interior. Subtle steam is gently rising from the freshly cut meat. The kitchen background is softly blurred, indicating a warm, inviting home cooking environment. The image must be 100 percent photorealistic, high-quality food magazine photo style, with no artistic interpretations or illustrations.

    Step 1: Let the Steak Come to Room Temperature

    For a perfectly cooked rib eye, the steak must cook evenly. Starting with a cold steak can lead to an uneven result, where the outside burns before the inside is ready. To prevent this, take your rib eye out of the refrigerator and let it sit on the counter for 30 to 60 minutes.

    This simple step allows the steak to warm up slightly, which makes a big difference in achieving a beautiful, consistent doneness throughout.

    Step 2: Season Generously on All Sides

    Flavor starts here! Don’t be shy when seasoning your steak, as this is key to a delicious result.

    • Salt: Use coarse sea salt or Kosher salt to help create a fantastic crust.
    • Black Pepper: Freshly ground black pepper adds a wonderful aroma and bite.
    • Optional: A little garlic powder or onion powder can enhance the flavor. However, salt and pepper are truly all you need for a classic taste.

    Apply the seasoning generously to all sides, including the edges. You can do this right before cooking, or for a deeper flavor, season the steak 15-20 minutes beforehand. This allows the salt to draw out moisture and then reabsorb it, flavoring the meat more thoroughly.

    Step 3: Get Your Pan Perfectly Hot

    A hot pan is essential for creating an irresistible crust. Use a heavy-bottomed pan, like a cast-iron skillet, which holds heat exceptionally well. Place the pan over high heat for 3-5 minutes, or until you see a wisp of smoke.

    Next, add just enough high-smoke-point oil (like canola, grapeseed, or avocado oil) to lightly coat the bottom. Swirl the pan and wait until the oil shimmers before adding the steak. This ensures it won’t stick and helps form a perfect golden-brown crust.

    Step 4: Sear for a Beautiful Crust

    Now for the exciting part—searing your rib eye! Carefully place the seasoned steak into the hot pan. It should sizzle loudly; this sound means you’re doing it right!

    • First Side: Sear the steak for 2-3 minutes without moving it to create a deep, dark crust.
    • Second Side: Flip the steak and sear for another 2-3 minutes.
    • Edges: Use tongs to hold the steak on its side and sear the fat cap and edges to render the fat beautifully.

    To add even more flavor, add butter, fresh garlic cloves, and sprigs of rosemary or thyme to the pan during the last minute or two of searing. As the butter melts, tilt the pan and repeatedly spoon the liquid over the steak. This technique, known as basting, infuses the meat with incredible flavor and enhances the crust.

    Step 5: Check for Doneness (Temperature Guide)

    The best way to know when your steak is perfectly cooked is to use an instant-read meat thermometer. Insert it into the thickest part of the steak, avoiding any bone or large pieces of fat.

    Keep in mind that the steak’s temperature will continue to rise a few degrees after it’s removed from the heat—a process called carry-over cooking. To achieve your target doneness, you should pull the steak from the pan when it’s a few degrees below the final temperature.

    Desired Doneness Internal Temperature (Remove from Heat) Final Resting Temperature
    Rare 120-125°F (49-52°C) 125-130°F (52-54°C)
    Medium-Rare 125-130°F (52-54°C) 130-135°F (54-57°C)
    Medium 130-135°F (54-57°C) 135-140°F (57-60°C)
    Medium-Well 140-145°F (60-63°C) 145-150°F (63-66°C)

    For food safety, the USDA recommends a minimum internal temperature of 145°F (63°C) for whole cuts of beef, followed by a 3-minute rest [1]. Adjust to your preference, but always use a thermometer for reliable results.

    Step 6: Let It Rest Before Slicing

    For a juicy steak, this step is non-negotiable. Resting allows the juices inside the meat to redistribute throughout. If you slice it too soon, those juices will run out onto the cutting board, leaving you with a dry steak.

    • Remove: Transfer your cooked rib eye to a cutting board.
    • Tent: Loosely tent it with aluminum foil.
    • Wait: Let it rest for at least 5-10 minutes. Thicker steaks may require up to 15 minutes.

    After resting, slice the steak against the grain (perpendicular to the muscle fibers) for maximum tenderness. Serve your perfect rib eye steak immediately and enjoy!

    What to serve with rib eye steak

    A dinner plate with sliced rib eye steak, roasted asparagus, and creamy mashed potatoes on a wooden table.
    A beautifully plated, professional food photography image showcasing a perfectly cooked and sliced rib eye steak as the star, artfully arranged next to vibrant green roasted asparagus spears and a scoop of creamy, fluffy mashed potatoes. The plate is positioned on a rustic wooden dining table, illuminated by soft, warm ambient light, creating an inviting and delicious atmosphere. The background is a subtly blurred, warm home dining setting. The presentation is appetizing, approachable, and emphasizes a satisfying, homemade meal. The image must be 100 percent photorealistic, high-quality food magazine photo style, with no artistic interpretations or illustrations.

    Classic Side Dishes

    A perfectly cooked rib eye is the star of any meal, but it truly shines when paired with the right side dishes. These simple, flavorful additions can turn your meal into a restaurant-quality dinner at home. We’ve focused on classic, approachable recipes that anyone can master.

    Potato Perfection

    Potatoes are a comforting and always welcome companion to a rich rib eye. They are versatile and incredibly satisfying.

    • Garlic Herb Roasted Potatoes: These are incredibly easy to make. Simply chop potatoes into bite-sized pieces, then toss them with olive oil, minced garlic, fresh rosemary or thyme, salt, and pepper. Roast until golden brown and crispy for a perfect family-friendly side.
    • Creamy Mashed Potatoes: A classic for a reason. Boil potatoes until tender, then mash them with butter, warm milk, and a pinch of salt. For extra depth, mix in some roasted garlic. This simple side dish delivers big, comforting flavor.

    Vibrant Vegetable Sides

    Fresh vegetables balance the richness of the steak while adding color, texture, and nutrients to your plate. The following options are simple to prepare and packed with flavor.

    • Sautéed Green Beans with Garlic: Quickly sauté fresh green beans in a hot pan with olive oil and minced garlic. Finish with salt and a squeeze of lemon juice for a flavorful side that’s ready in minutes.
    • Roasted Asparagus: Toss asparagus spears with olive oil, salt, and pepper, then roast in a hot oven until tender-crisp. This elegant side is remarkably simple to prepare.
    • Creamed Spinach: For a more indulgent option, cook down fresh spinach with a touch of cream cheese or heavy cream, garlic, and a grating of nutmeg. This recipe feels fancy but is straightforward enough for any beginner.

    Fresh and Crisp Salads

    A light salad offers a quick, healthy, and refreshing contrast to a hearty steak.

    • Simple Green Salad: A simple mix of fresh greens, cherry tomatoes, and cucumber is perfect. Toss it with a light vinaigrette made from olive oil, vinegar, Dijon mustard, and honey for an easy, approachable side.
    • Classic Caesar Salad: Romaine lettuce, crunchy croutons, and a creamy Caesar dressing are always a hit. You can use store-bought dressing for an even quicker preparation.

    Simple Sauces and Toppings

    You don’t need complex culinary skills to elevate your rib eye. The right sauce or topping can make all the difference by enhancing the steak’s natural flavor without overwhelming it. These beginner-friendly ideas are a great place to start.

    Effortless Sauce Ideas

    These sauces come together quickly and add a gourmet touch to any steak dinner.

    • Garlic Herb Butter: While your steak rests, melt a tablespoon of butter in the same warm pan. Stir in minced garlic and fresh chopped herbs like parsley or chives, then spoon this luscious butter over the sliced steak for a quick flavor boost.
    • Quick Pan Sauce: After removing the steak, deglaze the hot pan with a splash of beef broth or red wine, scraping up the delicious browned bits from the bottom. Simmer for a minute until slightly reduced and finish with a knob of butter for extra richness. This method creates a flavorful sauce right in the pan and is perfect for beginners.
    • Fresh Chimichurri: This vibrant, herby sauce adds a wonderful burst of freshness. Simply combine finely chopped fresh parsley, cilantro, minced garlic, red wine vinegar, olive oil, and a pinch of red pepper flakes. It’s a surprisingly simple way to add bright, zesty flavor.

    Simple Toppings

    Sometimes, all you need is a sprinkle of something extra to enhance your steak.

    • Crumbled Blue Cheese: A sprinkle of pungent blue cheese adds a creamy, tangy kick that pairs wonderfully with rib eye.
    • Caramelized Onions: Slowly cook sliced onions in butter until deeply browned and sweet. This takes time, but the effort is minimal, and the reward is immense.

    With these simple sides and sauces, you can transform a great rib eye steak into a memorable meal for the whole family. Recipesmondial helps you build confidence in the kitchen, making every cooking experience enjoyable and stress-free.

    Tips and Tricks for a Restaurant-Quality Steak

    Elevate Your Steak Selection and Prep

    You’ve mastered the basics for a delicious rib eye, and now it’s time to unlock the secrets to a truly restaurant-quality steak. These expert tips will help you cook confidently and create flavorful meals with less stress.

    • Choose Quality Rib Eye: Look for good marbling, as these flecks of fat melt during cooking to create incredible tenderness and rich flavor.
    • Bring to Room Temperature: Letting your steak sit out for 30-60 minutes before cooking isn’t just a suggestion—it’s essential. A cold steak cooks unevenly, but this step ensures a perfect cook from edge to center [2].
    • Pat it VERY Dry: Moisture is the enemy of a good sear. Use paper towels to pat your steak completely dry, because a dry surface is what allows the steak to brown beautifully and form a desirable crispy crust.
    • Season Generously: Don’t be shy with salt and pepper, as they are essential for flavor. For extra depth, a pinch of garlic or onion powder can add a surprising amount of taste.

    Master the Searing and Basting

    Achieving a perfect crust and a juicy interior is simpler than you think. Follow these steps to take your rib eye to the next level.

    • Heat Your Pan Properly: A screaming-hot pan is essential for creating a beautiful, deep brown crust quickly. Wait until it’s smoking slightly before you add the steak.
    • Don’t Overcrowd the Pan: Cook only one or two steaks at a time. Overcrowding drops the pan’s temperature, causing the steak to steam instead of sear and preventing a crust from forming.
    • The Butter Baste Secret: After searing one side, add a tablespoon or two of butter, some fresh herbs like rosemary or thyme, and a smashed garlic clove. For the last few minutes of cooking, tilt the pan and continuously spoon the melted, aromatic butter over the steak. This technique infuses the meat with tremendous flavor and helps create an even, golden-brown crust.
    • Flip Often (But Not Too Often!): Flipping your steak every minute or so helps build a more even crust while promoting more even cooking throughout the steak [3].

    Nail the Doneness and Resting

    These final two steps are critical for a perfect, restaurant-quality steak. Don’t skip them, as they transform a good steak into an unforgettable one.

    • Trust Your Thermometer: The most reliable way to check for doneness, especially for beginners, is with an instant-read thermometer. Relying on touch can be tricky, so use a thermometer to hit your target temperature perfectly.
    • The Power of Resting: Once cooked, transfer the steak to a cutting board and let it rest for 5-10 minutes before slicing. This crucial step allows the juices to redistribute throughout the meat. If you cut it too soon, the juices will run out, leaving you with a dry, less flavorful steak. Resting ensures every bite is tender and juicy.

    Add Simple Finishing Touches

    For a truly exceptional dining experience, consider these easy additions that bring a gourmet flair to your steak dinner.

    • Compound Butter: Nothing beats a pat of herb butter melting over a hot steak. Simply mix softened butter with minced garlic, fresh parsley, chives, or a touch of chili flakes. You can make it ahead of time and keep it in the fridge for an easy flavor boost.
    • Fresh Herbs: A sprinkle of fresh chopped parsley or chives adds a welcome brightness and a lovely contrast of color.
    • A Pinch of Flaky Sea Salt: Just before serving, a final sprinkle of flaky sea salt elevates the flavor and adds a delightful textural crunch.

    Frequently Asked Questions

    What is the difference between a rib steak and a ribeye?

    While understanding different steak cuts can seem tricky, the difference between a rib steak and a ribeye is quite simple. Both cuts come from the cow’s rib section, an area known for excellent marbling and rich flavor.

    The main distinction is the bone. A rib steak is bone-in, which adds flavor and helps keep the meat moist as it cooks. A ribeye steak, on the other hand, is the same cut with the bone removed. Because they are easier to handle, boneless cuts are often featured in beginner-friendly recipes.

    Ultimately, both are fantastic choices for a flavorful meal. Your decision comes down to a personal preference for bone-in or boneless steak.

    Why is rib eye steak often expensive?

    Rib eye is a premium cut, and its price reflects several key factors. First, it comes from a little-used muscle, which makes it incredibly tender. This desirable texture is a key reason for its higher price. The cut also has significant marbling—the intramuscular fat that melts during cooking to add incredible flavor and juiciness. [4]

    Furthermore, consistently high demand for premium beef also drives up the price. The butchering process and quality grade affect the cost as well. Higher grades like USDA Prime or Choice signify superior quality, which comes with a higher price tag. Despite the cost, many find it a worthwhile indulgence for special occasions because it delivers such a rich, satisfying culinary experience.

    Is rib eye steak halal?

    The term “halal” refers to anything permissible under Islamic law. Whether a rib eye steak is halal depends entirely on how the animal was raised and processed. A rib eye itself is simply a cut of beef, so it is not inherently halal or non-halal.

    For a rib eye steak to be considered halal, the cattle must be slaughtered according to specific Islamic guidelines. These rules cover the method of slaughter, the recital of a prayer, and the complete draining of blood. [5]

    If you are seeking halal meat, it is crucial to buy from a certified halal butcher or look for a halal certification label on the packaging. Always confirm with your butcher directly to ensure the product aligns with your dietary needs.

    How should I store and reheat leftover steak?

    To keep your leftover rib eye delicious and safe, proper storage and reheating are key. Follow these practical, beginner-friendly tips to make your flavorful meal last longer.

    Storing Leftover Steak:

    • Cool Quickly: Let cooked steak cool to room temperature, but for no more than two hours.
    • Airtight Container: Place the cooled steak in an airtight container to prevent moisture loss and keep it fresh.
    • Refrigerate Promptly: Store the container in the refrigerator immediately.
    • Duration: Properly refrigerated cooked steak is best eaten within 3-4 days. [6]

    Reheating Leftover Steak:

    Reheating steak without overcooking or drying it out can be tricky. For best results, avoid the microwave, which often makes steak tough. Instead, try one of these simple methods:

    • Oven Method (Recommended):
      • Preheat your oven to a low temperature, around 250°F (120°C).
      • Place the steak on a wire rack set over a baking sheet.
      • Heat for 15-20 minutes, or until warmed through. This low-and-slow method is great for preventing the steak from overcooking.
    • Pan Method:
      • Heat a little butter or oil in a skillet over medium-low heat.
      • Add the steak and heat for 2-3 minutes per side until warmed through.
      • Covering the pan helps the steak retain moisture.
    • Slice First: For faster, more even results, slice the steak thinly before warming. This is perfect for quick meals like steak and eggs.
    • Add Moisture: A splash of beef broth or a pat of butter can help keep the steak juicy as it reheats.

    Remember to reheat steak only once to maintain its quality and ensure food safety.


    Sources

    1. https://www.fsis.usda.gov/food-safety/safe-food-handling-and-preparation/meat/beef-safety
    2. https://www.seriouseats.com/old-wives-tales-about-cooking-steak
    3. https://www.recipetineats.com/how-to-cook-steak/
    4. https://www.certifiedangusbeef.com/cuts/ribeye-steak/
    5. https://halalfoodauthority.com/what-is-halal
    6. https://www.foodsafety.gov/food-storage-chart