Tag: Baking Guide

  • How to Make Perfect Croissants: An Easy Step-by-Step Guide

    How to Make Perfect Croissants: An Easy Step-by-Step Guide

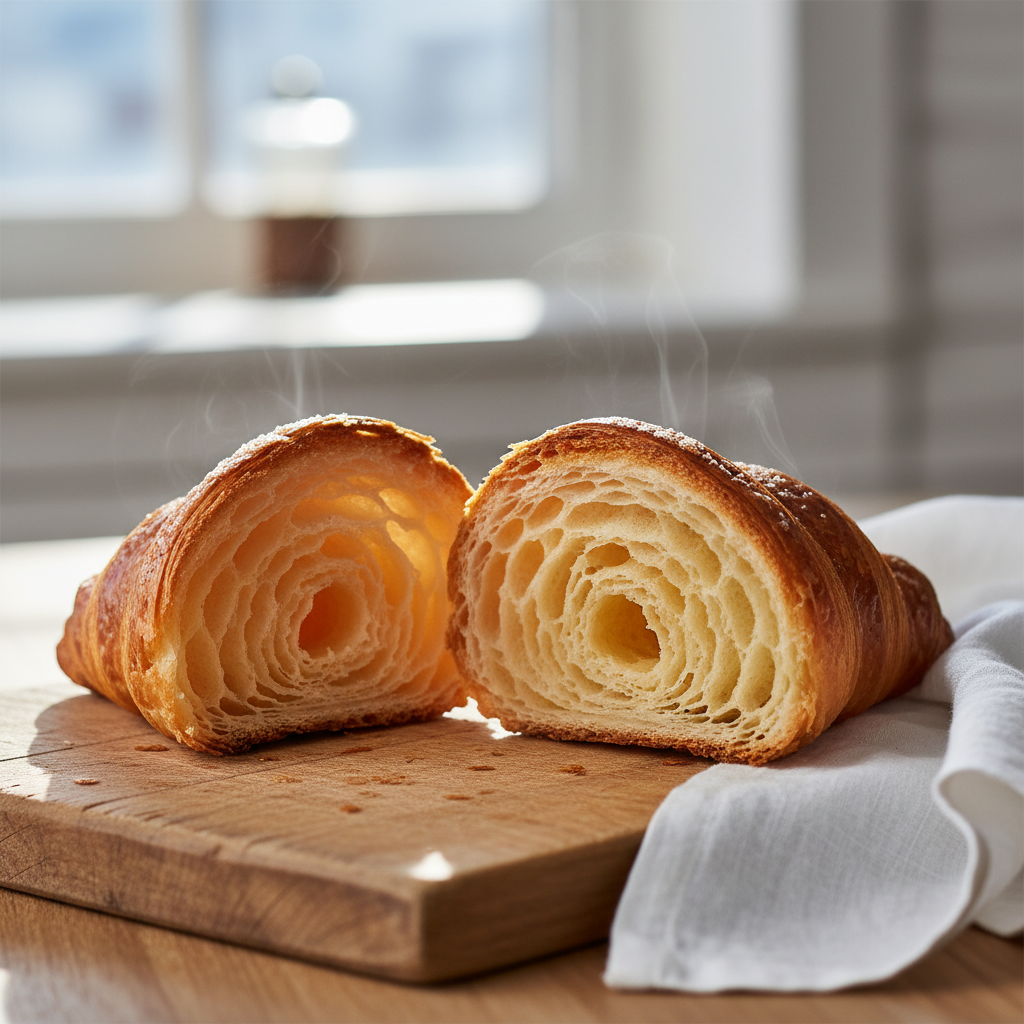
    A croissant is a buttery, flaky French pastry known for its distinct crescent shape and layered texture. It is made from a yeast-leavened dough that is laminated with butter, a process which involves repeatedly folding and rolling the dough to create hundreds of delicate, airy layers.

    Imagine waking up to the aroma of freshly baked, golden croissants with flaky layers waiting to be pulled apart. For many, the idea of creating these delicate French pastries from scratch can feel daunting. You might feel overwhelmed by complex recipes or lack the confidence for such an intricate bake, leading you to believe they’re best left to the professionals.

    At Recipesmondial, we believe every home cook deserves the satisfaction of mastering classic recipes, even challenging ones. That’s why we developed a step-by-step guide to demystify the art of making perfect croissants. Our beginner-friendly recipe removes the stress by focusing on clear, approachable techniques. It’s designed to deliver reliable results and boost your confidence in the kitchen.

    Get ready to transform simple ingredients into a delightful pastry experience. We’ll walk you through each stage, from preparing the dough to achieving the signature flaky texture and rich, buttery flavor. Ready to learn what sets a perfect homemade croissant apart? Let’s uncover the secrets to baking this iconic treat.

    What Makes a Perfect Homemade Croissant?

    A perfectly baked, golden-brown croissant, split open to show its airy, layered interior.
    Professional food photography, photorealistic, high-quality food magazine photo of a perfectly baked, golden-brown croissant, split in half to reveal its airy, open honeycomb interior and distinct, delicate layers. A subtle wisp of steam rises from the warm pastry. The croissant sits on a clean, light-colored rustic wooden board next to a simple white linen napkin, with soft, natural morning light. Emphasize crispness, flakiness, and depth of color. No people, no abstract art, no illustrations.

    Imagine biting into a warm, crisp pastry that shatters delicately in your mouth to reveal a tender, airy interior. This is the magic of a perfect homemade croissant. Achieving this bakery-quality delight at home is incredibly rewarding, transforming a simple breakfast into a special occasion. At Recipesmondial, we believe everyone can master this treat because our approach makes even complex-sounding recipes simple and enjoyable.

    So, what makes a croissant truly perfect? It comes down to a few key elements that create an unforgettable experience. Understanding these characteristics will not only help you bake with confidence but will also ensure delicious results every time.

    The Hallmarks of Croissant Perfection

    A truly perfect homemade croissant delights all your senses. It’s more than just a pastry—it’s a testament to careful technique and quality ingredients. Here are the qualities to aim for:

    • A Golden, Crisp Exterior: The outside should be a beautiful golden brown and crackle audibly when you break it. This signature crispness is a hallmark of proper lamination and baking.
    • An Airy, Honeycomb Interior: When sliced in half, a perfect croissant reveals a magnificent, open crumb structure resembling a delicate honeycomb. This indicates light, airy layers that are never dense or bready. These air pockets are formed by steam created during baking within the butter layers [1].
    • Rich, Buttery Flavor: Quality butter is essential, providing the irresistible, rich aroma and pure, luxurious taste that is the heart of any great croissant.
    • Feathery Lightness: Despite its richness, a perfect croissant feels incredibly light and practically melts in your mouth. This lightness comes from the many thin layers of dough and butter.
    • Delicate Flakiness: Each bite should offer a satisfying flakiness as the layers separate beautifully, creating a delightful texture. This is achieved through careful folding and chilling during lamination.
    • Beautiful Shape: A classic, visually appealing crescent shape signifies a properly rolled pastry and adds to the overall homemade charm.

    Achieving these results might seem daunting, but it’s entirely possible with our step-by-step guidance. Our beginner-friendly recipes are designed to make cooking flavorful meals easy and stress-free. Get ready to impress your family and friends with this classic treat!

    What Ingredients Do You Need for Croissants?

    A neatly arranged selection of croissant ingredients including flour, butter, milk, yeast, sugar, and salt on a marble counter.
    Professional food photography, photorealistic, high-quality food magazine photo of all essential raw ingredients for croissants neatly and aesthetically arranged on a clean, light marble countertop. Ingredients include a mound of unbleached all-purpose flour in a ceramic bowl, cold sticks of unsalted butter, a small pitcher of warm milk, a packet of active dry yeast, a small bowl of granulated sugar, and a pinch of salt. The setup is bright, well-organized, and inviting, with a shallow depth of field focusing on the ingredients. No hands, no people, no abstract art, no illustrations.

    For the Dough (Détrempe)

    The foundation of a perfect croissant is the dough, known in French baking as the “détrempe.” This is a simple mixture of pantry staples that creates the croissant’s signature structure and flavor. Don’t be intimidated by the name—this recipe is very beginner-friendly!

    Here’s what you’ll need:

    • All-Purpose Flour: Unbleached all-purpose flour provides the ideal gluten balance for a chewy yet tender crumb, forming the backbone of your dough.
    • Granulated Sugar: A small amount of sugar feeds the yeast to help the dough rise and adds a subtle sweetness to the finished pastry.
    • Fine Sea Salt: Salt is essential for flavor, but it also controls the yeast’s activity and strengthens the gluten structure.
    • Active Dry Yeast: This is the key to a light, airy croissant. As yeast produces carbon dioxide, it creates the delicate air pockets that define the pastry’s texture. Be sure your yeast is fresh for the best results.
    • Cold Water: Using cold water keeps the dough cool. This is crucial for controlling the yeast and preventing the butter from melting prematurely during lamination.
    • Whole Milk: Milk adds richness and tenderness to the dough and helps the croissants develop a beautiful golden-brown crust during baking.

    With these straightforward components, you’re on your way to creating a delicious pastry. Simple ingredients are often the starting point for the best baked goods, from croissants to other quick breakfast ideas.

    For the Butter Block (Beurrage)

    The “beurrage” is the block of butter that gets folded into the dough to create iconic, flaky layers. This step is where the magic happens, turning a simple dough into a spectacular pastry. It sounds technical, but it’s all about preparing one key ingredient correctly.

    You will need:

    • High-Quality Unsalted Butter: The quality of your butter is the single most important factor for great croissants. Choose a high-fat, European-style butter (ideally 82% fat or more) [2]. Its low water content creates supremely flaky layers and a richer flavor. Using unsalted butter also gives you full control over the final saltiness.

    Chef’s Tip: Your butter must be cold but pliable—it should bend without cracking. Achieving this texture is the key to successful lamination, as it allows the butter to spread evenly without melting into the dough.

    For the Egg Wash

    A simple egg wash is the final touch that gives your homemade croissants a professional, bakery-quality finish. While it’s a small step, it makes a huge difference in the appearance of the final pastry.

    For a perfect golden shine, you will need:

    • Large Egg: A whole egg provides richness and promotes a deep, even browning.
    • Splash of Water or Milk: Thinning the egg with a little water or milk helps it brush on smoothly, creating a consistent, glossy sheen after baking.

    This easy step ensures your croissants look as incredible as they taste, giving them a beautiful, golden-brown crust that’s impossible to resist.

    How to Make Croissants: A Step-by-Step Guide

    How to Make Croissants: A Step-by-Step Guide

    Ready to create flaky, buttery croissants in your own kitchen? This guide will walk you through each step, making the process simple and enjoyable. We’ll cover everything from preparing the dough to baking these golden delights. You’ll soon discover that making these delicious pastries is an incredibly rewarding experience, transforming simple ingredients into an extraordinary treat.

    Forget feeling overwhelmed by complex recipes. We’re here to guide you with approachable home cooking techniques. Let’s get baking!

    Step 1: Preparing the Dough (Détrempe)

    The journey to perfect croissants begins with a simple but crucial dough, known as the détrempe. This initial mixture sets the foundation for all the wonderful layers to come.

    • Warm the Milk: Gently heat 1 cup (240ml) of whole milk until it’s lukewarm, about 100-110°F (38-43°C). It should feel warm to the touch, but not hot.
    • Activate the Yeast: In a large mixing bowl, combine the warm milk, 2 ¼ teaspoons (7g) of active dry yeast, and 2 tablespoons (25g) of granulated sugar. Stir gently and let it sit for 5-10 minutes until it becomes foamy. This foam is a sign that your yeast is active and ready to work.
    • Mix Dry Ingredients: In a separate bowl, whisk together 3 ½ cups (420g) of all-purpose flour and 1 teaspoon (6g) of fine sea salt.
    • Combine and Knead: Add the dry ingredients to the activated yeast mixture. Mix with a spoon or your hands until a shaggy dough forms.
    • Knead the Dough: Turn the dough out onto a lightly floured surface and knead for 5-7 minutes. The dough should become smooth and elastic, and it should spring back when you lightly poke it.
    • Chill the Dough: Shape the dough into a flat 6×8 inch rectangle and wrap it tightly in plastic wrap. Refrigerate for at least 2 hours, or preferably overnight. This chilling step is essential for easier handling and creating a better texture.

    Step 2: Creating the Butter Block (Beurrage)

    The butter block, or beurrage, is the heart of a croissant’s flakiness. The key is to create a pliable block of butter that has the same consistency as your chilled dough.

    • Prepare the Butter: Start with 1 cup (226g) of cold, unsalted butter. European-style butter is ideal for its higher fat content and superior flavor.
    • Shape the Butter: Place the cold butter between two sheets of parchment paper. Using a rolling pin, pound and roll the butter into an 8×8 inch square, aiming for an even thickness throughout.
    • Chill the Butter: Place the parchment-enclosed butter block back into the refrigerator to chill. It needs to be firm but still pliable, which will prevent it from breaking apart during the lamination stage.

    Expert Tip: For perfect layers, the butter and dough must be roughly the same temperature. If the butter is too cold, it will shatter within the dough. If it’s too warm, it will melt and absorb into the dough, ruining the layers.

    Step 3: The Lamination Process (Making the Layers)

    This is where the magic happens. Lamination is the process of folding butter into dough to create hundreds of thin, alternating layers. Don’t be intimidated; we’ll break it down into a series of simple “turns.”

    The First Turn

    1. Roll out the Dough: On a lightly floured surface, roll your chilled dough into a 9×18 inch rectangle. Try to keep the edges as straight as possible.
    2. Place the Butter: Position the chilled butter block on one half of the dough, leaving a ½-inch border around the edges.
    3. Fold the Dough: Fold the empty half of the dough over the butter block, carefully lining up the edges. You have now encased the butter.
    4. Seal the Edges: Gently press the edges together to fully enclose the butter. This crucial step prevents the butter from leaking out while you roll.
    5. First Roll: Rotate the dough 90 degrees. Lightly flour the surface and your rolling pin. Carefully roll the dough into a 10×20 inch rectangle. Be firm but gentle to maintain an even thickness.
    6. First Fold (Letter Fold): Imagine the dough is a letter. Fold the bottom third of the dough up to the center, then fold the top third down over it.
    7. Chill: Wrap the folded dough tightly in plastic wrap and refrigerate for at least 30-45 minutes. This rest allows the gluten to relax and the butter to firm up again.

    The Second Turn

    1. Repeat Rolling: Remove the chilled dough from the fridge. On a lightly floured surface, place the dough so the seam is on your side. Roll it out again into a 10×20 inch rectangle.
    2. Second Fold: Perform another letter fold, just as you did before.
    3. Chill Again: Wrap the dough and refrigerate for another 30-45 minutes.

    The Third and Final Turn

    1. Last Roll: Remove the dough from the fridge. With the seam to your side, roll it one last time into a 10×20 inch rectangle.
    2. Final Fold: Complete a third and final letter fold.
    3. Final Chill: Wrap the dough tightly and refrigerate for at least 1-2 hours, or up to overnight. This extensive chill is vital for making the dough firm and easy to shape.

    Congratulations! You’ve successfully laminated your dough, creating the foundation for truly flaky, delicious croissants.

    Step 4: Shaping the Croissants

    Now for the fun part: transforming your laminated dough into its iconic crescent shape. This step is easier than you might think!

    • Prepare Your Workspace: Lightly flour a clean surface and remove your chilled dough from the refrigerator.
    • Roll the Dough: Carefully roll the dough into a large 12×24 inch rectangle that is approximately ¼ inch thick.
    • Trim and Cut: Using a sharp knife or a pizza cutter, trim the edges to create clean, straight lines. Cut the rectangle in half lengthwise to create two 6×24 inch strips.
    • Cut Triangles: On each strip, make alternating diagonal cuts to create long triangles with a base of about 4-5 inches.
    • Make a Slit: At the center of the wide base of each triangle, make a small ½-inch slit. This helps the croissant roll more evenly.
    • Roll the Croissant: Gently stretch the two points of the base outwards. Starting from the wide end, roll the dough towards the point. Roll snugly, but not so tightly that you compress the layers. Your goal is to create a visible spiral.
    • Shape the Crescent: Once rolled, gently curve the ends inward to form the classic crescent shape.
    • Place on Baking Sheet: Transfer the shaped croissants to a baking sheet lined with parchment paper, leaving plenty of space between them to allow for expansion.

    Creative Variation: For a delicious twist, make pain au chocolat by placing two small chocolate batons at the base of the triangle before rolling.

    Step 5: Proofing the Pastries

    Proofing is the final rise before baking. This critical step creates a light, airy texture and helps develop the beautiful honeycomb interior that makes croissants so special.

    • Create a Warm Environment: Place the baking sheets in a warm, humid, and draft-free spot to proof. A great option is to place them in an oven (turned off!) with a bowl of hot water inside to create the perfect environment.
    • Proofing Time: Let the croissants proof for 2-3 hours. The exact time will depend on the warmth and humidity of your kitchen.
    • Check for Proofing: They are ready when they have visibly puffed up, feel light, and jiggle when you gently shake the pan. If you gently press one, the indentation should spring back slowly. If it springs back immediately, they need more time. If it collapses, they are over-proofed.
    • Important Note: Avoid proofing in a place that is too hot. If the butter melts out of the dough, the layers will be ruined. The ideal temperature for yeast activity is typically between 75-95°F (24-35°C) [3].

    Troubleshooting Tip: Under-proofed croissants will be dense and bready. Over-proofed croissants may collapse in the oven or have a coarse texture. Patience is key here!

    Step 6: Baking to Golden Perfection

    This is the moment of truth! Baking will transform your proofed pastries into golden, crispy, and utterly delicious croissants. You’re just minutes away from enjoying the results of your hard work.

    • Preheat Oven: Preheat your oven to 400°F (200°C) for at least 20 minutes before baking.
    • Prepare Egg Wash: In a small bowl, whisk together 1 large egg with 1 tablespoon of milk or water.
    • Apply Egg Wash: Just before baking, gently brush the tops of the proofed croissants with the egg wash. This will give them a beautiful golden color and shine.
    • Bake the Croissants: Place the baking sheets in the preheated oven and bake for 10 minutes at 400°F (200°C).
    • Reduce Heat and Continue Baking: Without opening the oven, reduce the temperature to 375°F (190°C). Continue baking for another 10-15 minutes, or until the croissants are a deep golden brown and sound hollow when tapped on the bottom.
    • Cooling: Immediately transfer the baked croissants to a wire rack. Let them cool for at least 15-20 minutes before serving. This allows the butter to set and the interior to finish cooking.

    There you have it! Your homemade, perfect croissants are ready to be devoured. Enjoy this classic pastry for breakfast or as a delightful snack anytime. You have successfully transformed simple ingredients into an extraordinary treat!

    What Are the Most Common Mistakes to Avoid?

    Making perfect croissants can feel like a daunting culinary challenge, but many common errors are surprisingly easy to fix. We’re here to guide you through them. Learning from these mistakes will not only boost your baking confidence but also help you create delicious, flaky pastries every time. Let’s make your croissant journey stress-free and enjoyable!

    Ignoring Temperature Control

    When making croissants, temperature is one of your most critical factors. The entire process relies on keeping both the butter and the dough cold. If either gets too warm, you’ll run into problems.

    • Melting Butter During Lamination: If the butter gets too warm, it will mix into the dough instead of forming distinct layers, which prevents that beautiful, flaky texture. To avoid this, keep your kitchen cool, work quickly when rolling, and chill the dough often.
    • Dough Too Warm: Warm dough becomes sticky and difficult to handle, which also causes the butter to melt faster.
    • Dough Too Cold: On the other hand, dough that is too cold will be stiff and can tear during rolling, causing the butter block to break into pieces.

    Tip: To keep everything perfectly chilled, always return the dough to the fridge between each fold. A dough thermometer can also be a helpful tool; the ideal dough temperature is usually between 60-65°F (15-18°C) before lamination [4].

    Rushing the Lamination Process

    Lamination—the process of rolling and folding the dough to create many thin layers of butter—is what gives croissants their signature flaky texture. While it can be tempting to rush this step, patience is key.

    • Not Enough Turns: Insufficient folds result in fewer layers and, consequently, a dense, less flaky croissant. Be sure to follow your recipe’s instructions on the correct number of turns for optimal results.
    • Uneven Rolling: Aim to roll the dough evenly, avoiding thin spots or thick patches. Uneven thickness creates inconsistent layers and can cause pockets of raw dough or burnt sections in the final product.
    • Overworking the Dough: Too much handling develops excess gluten, which makes the dough tough and difficult to roll. This can lead to a chewy, rather than tender, croissant.

    Tip: Take your time, flour your work surface lightly, and use a gentle, even pressure when rolling. Think of it as stretching the dough, not forcing it.

    Incorrect Proofing

    Proofing, the final rise before baking, is a critical stage where your shaped croissants develop the air pockets that create their light, airy texture. Getting this step right is essential for success.

    • Under-Proofing: Croissants that haven’t proofed long enough will be dense and won’t rise much in the oven. Their texture will be more bready than airy, and they may also appear pale after baking.
    • Over-Proofing: Allowing croissants to proof for too long can cause their delicate structure to collapse and the butter to melt out during baking. This leads to greasy, flat pastries that don’t hold their shape.

    Tip: Always proof your croissants in a warm, humid, and draft-free place. To test for readiness, gently press a finger into the dough: it should spring back slowly. If it springs back quickly, it needs more time. If the indentation remains, it’s likely over-proofed. The ideal proofing temperature is around 75-78°F (24-26°C).

    Improper Baking Temperature

    The oven temperature directly impacts both the final texture and color of your croissants, so getting it right is crucial for a perfect bake.

    • Oven Too Hot: If the oven is too hot, the exterior can brown too quickly while the inside remains raw or undercooked. This intense heat can also cause the butter to escape too rapidly.
    • Oven Too Cold: Conversely, an oven that’s too cool will dry out the croissants, preventing them from achieving a beautiful golden color and a full, airy puff.
    • Forgetting Egg Wash: Don’t skip this simple step! A good egg wash is essential for creating a beautiful shine and encouraging a deep, golden-brown crust.

    Tip: Preheat your oven thoroughly and use an oven thermometer to ensure accuracy. To promote even baking, rotate your baking sheet halfway through. Your goal is a rich, golden-brown color for perfectly baked croissants.

    How Do You Pronounce Croissant Correctly?

    Want to pronounce croissants like a pro? When you’re exploring new global comfort foods, getting the name right is part of the fun. You’re not alone in wondering, and it’s simpler than it looks!

    Because the word “croissant” is French, it has a distinct sound. Don’t worry, we’re here to help you say it with confidence.

    Breaking Down the Pronunciation

    Here’s an easy way to remember how to say “croissant” correctly:

    • First part: “Kwah”

      This sounds like the beginning of the word “quality,” but quicker. Think “Kwah.”

    • Second part: “Sahn”

      This part has a soft, nasal sound. Imagine saying “song” but dropping the hard “g” at the end. The “n” is very light, not like the “ant” in “want.” Think “Sahn.”

    • Putting it together: “Kwah-Sahn”

      Say it smoothly as one word: “Kwah-Sahn.” Remember, the final ‘t’ is completely silent.

    Now you can confidently say you’ve made delicious “Kwah-Sahns”! Practicing is a fun part of your beginner-friendly recipes journey. Enjoy every flaky bite and every perfectly pronounced word!

    Frequently Asked Questions About Croissants

    What are the main ingredients in a croissant?

    Delicious croissants start with a few simple, everyday ingredients. The magic is in the technique, which combines these basic components through careful preparation and patience.

    Here are the core ingredients you’ll need for a classic croissant:

    • All-Purpose Flour: This forms the structure of your dough.
    • Active Dry Yeast: Yeast helps the dough rise, creating a light and airy texture.
    • Granulated Sugar: A touch of sugar feeds the yeast and adds a subtle sweetness.
    • Salt: Essential for flavor balance and strengthening the dough.
    • Whole Milk: Adds richness and moisture to the dough, contributing to a tender crumb.
    • Unsalted Butter: This is the star ingredient for lamination, creating those incredible, flaky layers.

    When combined with our step-by-step cooking guidance, these humble ingredients transform into an amazing pastry right in your own kitchen.

    How many calories are in a typical croissant?

    A classic, plain butter croissant is a wonderful treat. On average, a standard-sized one contains approximately 220-250 calories [5].

    However, this number can vary. For instance, larger croissants or those filled with chocolate, almond paste, or cheese will naturally have a higher calorie count. At Recipesmondial, our goal is to help you enjoy delicious food, whether it’s an occasional treat or a healthy and balanced meal. We believe in making informed choices while still savoring every bite!

    Is there an easy croissant recipe for beginners?

    Absolutely! We know many home cooks feel overwhelmed by complex recipes, especially when it comes to laminated pastries like croissants. Traditional recipes involve many specific steps and chilling times, which can feel like a major project. That’s why we focus on helping you find easy recipes fast and without stress.

    Here at Recipesmondial, we focus on beginner-friendly recipes and approachable home cooking. Our guide, “How to Make Perfect Croissants: An Easy Step-by-Step Guide,” breaks the process down into clear, manageable steps. We’ve simplified the techniques and provided the practical tips you need to build confidence in the kitchen.

    With our clear instructions, you’ll find that making croissants at home is a fun and rewarding experience. It’s all about making cooking enjoyable, even for those new to baking!

    What’s the difference between homemade and store-bought croissants?

    There’s a world of difference between homemade and store-bought croissants. Once you taste the homemade version, you’ll understand why!

    • Homemade Croissants:
      • Flavor: Unmatched freshness and depth of flavor. You control the quality of ingredients, like using premium butter, which makes a huge difference.
      • Texture: Incredibly flaky, tender, and airy. The layers are distinct and shatter delicately with each bite.
      • Ingredients: You know exactly what goes into them—no artificial flavors, preservatives, or unnecessary additives. This is great for those who prioritize healthy and balanced meals.
      • Effort & Reward: A labor of love that results in immense satisfaction and a superior pastry. It’s a fantastic way to develop your cooking skills and enjoy creating flavorful meals made easy at home.
    • Store-Bought Croissants:
      • Convenience: Ready to eat immediately, making them a perfect quick breakfast idea when you’re short on time.
      • Consistency: They generally have a consistent look and taste due to being mass-produced.
      • Ingredients: May contain dough conditioners, emulsifiers, and preservatives to extend shelf life. Sometimes, cheaper fats are used instead of pure butter.
      • Texture: Can be denser, less flaky, or have a more “bready” texture compared to homemade.

    While store-bought croissants offer convenience, nothing compares to the freshness, flavor, and pride of making your own. It’s a wonderful journey that transforms simple ingredients into a delightful pastry.


    Sources

    1. https://www.scientificamerican.com/article/the-science-of-baking-bread/
    2. https://www.seriouseats.com/what-is-european-style-butter-versus-american-style-butter
    3. https://bakerpedia.com/ingredients/yeast/
    4. https://www.kingarthurbaking.com/blog/2021/04/09/how-to-make-croissants-at-home
    5. https://fdc.nal.usda.gov/fdc-app.html#/food-details/780829/nutrients

  • The Perfect Bundt Cake Recipe: A Simple, Step-by-Step Guide

    The Perfect Bundt Cake Recipe: A Simple, Step-by-Step Guide

    A bundt cake is a cake that is baked in a Bundt pan, which gives it a distinctive ring shape with fluted sides. This unique shape allows for even baking and creates a beautiful cake that requires minimal decoration, often just a simple glaze or a dusting of powdered sugar. Any type of cake batter, from vanilla to chocolate, can be used to make a bundt cake.

    There’s nothing quite like a beautifully moist bundt cake. With its elegant curves, it often seems like a challenge reserved for experienced bakers. Many home cooks feel intimidated by complex instructions and technical jargon, which can take the joy out of cooking. The good news? Baking a stunning bundt cake is surprisingly simple, even if you’re new to the kitchen.

    That’s why we’re here. At Recipesmondial, we believe that delicious, flavorful meals made easy should be accessible to everyone, and baking should be a joy. This article is your ultimate beginner-friendly guide to mastering the bundt cake. We provide clear, step-by-step instructions to help you build confidence and create a show-stopping dessert. With our guidance, you can say goodbye to sticky pans or dry cakes and discover easy recipes for success.

    Get ready to unlock the secrets to the perfect bundt cake. We cover everything you need, from choosing and prepping the right pan to our most delicious recipe and clever tips for variations. Let’s dive in and discover how to easily bake this timeless dessert.

    What Makes a Bundt Cake So Special?

    Does the elegant look of a Bundt cake seem intimidating? You’re not alone. While they look impressive, Bundt cakes are actually one of the most delightful and approachable desserts you can make. At Recipesmondial, we believe cooking should be enjoyable and stress-free. So, let’s explore what makes a Bundt cake so special and why it deserves a spot on your table.

    A Bundt cake instantly elevates any dessert spread. Its signature fluted design turns a simple cake into a stunning centerpiece without any complex decorating. In fact, a simple dusting of powdered sugar or a quick glaze is often all you need for a spectacular finish. This “less is more” approach makes them perfect for anyone seeking an impressive dessert without the fuss.

    The secret to a Bundt cake’s success is its unique pan. The fluted shape and central tube allow heat to circulate evenly, ensuring the cake bakes perfectly from the inside out. This means you get a moist, tender result every time—no more undercooked centers or dry edges. For new bakers, this reliable performance is a fantastic way to build confidence in the kitchen.

    Beyond their simple beauty, Bundt cakes are incredibly versatile. You can use almost any cake batter, from rich chocolate to bright lemon or classic vanilla. The result can be moist and dense like a pound cake or wonderfully light and airy. This flexibility allows for endless flavor combinations, making a Bundt cake perfect for any occasion—from a quick breakfast treat to a simple dinner dessert.

    Here are a few reasons why we love Bundt cakes at Recipesmondial:

    • Stunning Presentation: The iconic shape creates a professional-looking dessert with minimal effort.
    • Easy Decoration: No advanced skills are needed; a simple glaze or dusting of sugar is all it takes.
    • Even Baking: The pan’s design guarantees a perfectly cooked cake and reliable results every time.
    • Incredible Versatility: Works with countless cake recipes and flavors, from dense pound cake to light sponge.
    • Perfect for Any Occasion: Ideal for everything from holiday gatherings to a simple weeknight treat.
    • Beginner-Friendly: Their impressive appearance hides a surprisingly simple baking process perfect for all skill levels.

    In short, a Bundt cake proves that magnificent desserts don’t require complicated techniques. It embodies what we stand for at Recipesmondial: simple, flavorful recipes that make cooking a joy. Now you’re ready to discover just how easy it is to bake a perfect Bundt cake of your own!

    Essential Equipment: Choosing Your Bundt Pan

    Why Your Bundt Pan Matters

    A beautiful bundt cake begins with the right pan. This choice is a crucial first step for any bundt cake recipe because it directly impacts how your cake bakes, releases, and ultimately looks. A quality pan helps you avoid common baking frustrations, leading to less stress and more enjoyment in the kitchen.

    The pan’s unique shape transforms simple ingredients into a stunning dessert, creating visually appealing flavorful meals made easy. To help you pick the perfect one and gain confidence with our beginner-friendly recipes, this guide will walk you through the essentials.

    Key Features to Look For

    When selecting a bundt pan, focusing on a few key features will make your baking experience much smoother. These considerations lead to reliable results every time you bake one of our easy recipes.

    Material Matters for Baking

    A bundt pan’s material determines its heat distribution, which directly impacts how evenly your cake bakes.

    • Cast Aluminum: The most popular choice, cast aluminum heats up quickly and evenly, ensuring your cake bakes uniformly. This durable material is also a favorite among professional bakers.
    • Non-Stick Coating: A high-quality non-stick interior is essential for an easy release. It prevents the cake from sticking, saving you from frustration and making cleanup a breeze.
    • Silicone: While flexible and very easy to release cakes from, silicone pans are less common for bundts. They can be too wobbly, which may compromise the cake’s intricate design.

    Choosing the Right Size

    Most bundt cake recipes call for a standard-sized pan. Knowing your pan’s capacity is important because it prevents messy overflows and ensures your cake bakes correctly.

    • Standard Size: A 10 to 12-cup bundt pan is ideal. This size fits most family-friendly meals and bundt cake recipes. It is the perfect starting point for your baking journey [1].
    • Mini Bundt Pans: These are fun for individual servings and great for parties or small gifts. Just remember to adjust baking times accordingly.

    Always check your pan’s capacity to ensure it can hold all the batter. This simple step helps you avoid messy kitchen mishaps and achieve a perfectly baked cake.

    Simple vs. Intricate Designs

    Bundt pans come in countless designs, from simple to highly detailed. Your choice will impact how easy the pan is to prepare before baking and to clean afterward.

    • Classic Fluted Designs: These are wonderful for beginners because they are easier to grease thoroughly. This simple preparation reduces the risk of sticking and makes the pan straightforward to clean.
    • Intricate Patterns: While these create stunning cakes, they require extra care when greasing. Every nook and cranny needs attention to ensure a perfect release. Consider a baking spray with flour for these detailed designs.

    Tips for Buying Your First Bundt Pan

    Ready to choose your perfect pan? These final tips will help you make a confident purchase and start baking delicious bundt cake creations in no time.

    • Read Reviews: Check what other home cooks say about a pan’s performance. Reviews offer practical insights and can highlight common issues to avoid.
    • Consider Your Experience Level: If you’re new to baking, start with a classic, less intricate design to build your confidence before exploring more complex patterns.
    • Sturdy Construction: Feel the pan’s weight. A heavier pan often indicates better quality and will conduct heat more consistently for superior baking results.
    • Check Non-Stick Quality: Look for a durable non-stick coating that feels smooth and even. This is crucial for ensuring your cake releases easily every time.

    Choosing the right bundt pan is an empowering first step toward creating amazing cakes. It makes cooking without stress a reality and ensures our step-by-step cooking guidance at Recipesmondial leads you to sweet success!

    How to Perfectly Prep Your Bundt Pan (And Avoid Sticking!)

    Hands demonstrating how to grease and flour a decorative metal Bundt cake pan on a kitchen counter.
    Professional food photography, photorealistic, high-quality food magazine photo of a home cook’s hands, clearly demonstrating the technique of greasing and flouring a decorative metal Bundt cake pan. The pan is on a clean, light-colored kitchen counter. The lighting is warm and natural, highlighting the texture of the flour coating the pan’s intricate details. The hands are clean and show gentle, precise movements, emphasizing ease and accessibility. No artistic interpretations, no illustrations, no vector graphics, no abstract art.

    Properly prepping your bundt pan is the most important step for a perfect cake. It guarantees your beautiful creation will slide out of the pan without sticking or breaking. This simple step truly makes all the difference.

    There are two reliable methods for achieving a picture-perfect bundt cake every time. Read about both below and choose the one that suits you best.

    The Grease and Flour Method

    This classic technique creates a reliable non-stick barrier between the batter and the pan, ensuring a clean release for a stress-free baking experience.

    Here’s how to do it:

    1. Gather your ingredients: You will need softened unsalted butter (or solid shortening) and all-purpose flour.
    2. Apply the grease: Using your fingers or a pastry brush, thoroughly coat the entire interior of the bundt pan. Be sure to cover every nook, cranny, and detailed design.
    3. Add the flour: Sprinkle about 1-2 tablespoons of flour into the greased pan.
    4. Coat evenly: Tilt and rotate the pan, allowing the flour to stick to all the greased surfaces in a thin, even layer.
    5. Tap out excess: Turn the pan upside down over a sink and tap it gently to remove any loose flour. This prevents a white, dusty coating on your finished cake.

    Expert Tip: For chocolate bundt cake recipes, use cocoa powder instead of flour! This prevents white spots on your dark cake. It’s a simple trick for a professional finish.

    Using Baking Spray with Flour

    For a quick and convenient option, use a baking spray that contains flour. This all-in-one product saves time by eliminating the need to grease and flour the pan in separate steps.

    Here’s how to use it effectively:

    1. Choose the right spray: Be sure to use a baking spray that includes flour. Regular cooking spray will not create a sufficient non-stick layer and can cause the cake to stick.
    2. Shake well: Give the can a good shake before using to ensure the flour is evenly mixed.
    3. Spray generously: Hold the can about 6-8 inches from the pan and apply a consistent, even coat to the entire interior surface. Pay special attention to the central tube and any intricate patterns.
    4. Avoid puddles: A thin, even coat is all you need. Do not allow the spray to pool in the bottom of the pan.

    Why it works: Baking sprays with flour are specially formulated to adhere to metal and create a strong non-stick barrier. This makes them a reliable choice for both new and experienced bakers.

    By following these simple guidelines, you can master bundt cake prep and enjoy a perfect, clean release every single time. A properly prepared pan is the key to a beautiful, stress-free result.

    Our Easiest, Most Delicious Bundt Cake Recipe

    A beautifully golden Bundt cake, lightly dusted with powdered sugar, presented on a ceramic cake stand.
    Professional food photography, photorealistic, high-quality food magazine photo of a perfectly baked, golden-brown Bundt cake, fresh out of the oven, cooled and elegantly presented on a simple, rustic wooden cutting board or a beautiful ceramic cake stand. The cake should have a delicate powdered sugar dusting or a light, glossy glaze gently drizzled. The background is a warm, inviting kitchen setting with soft, natural light. The focus is on the cake’s intricate shape, inviting texture, and overall delicious appeal. No artistic interpretations, no illustrations, no vector graphics, no abstract art.

    Ready to bake a showstopper with minimal fuss? There’s a reason this easy bundt cake is a favorite on Recipesmondial. It uses everyday ingredients to create a tender, moist cake with incredible flavor. Perfect for beginner bakers and seasoned home cooks alike, this recipe lets you create a delightful dessert for any occasion without the stress.

    Ingredients You’ll Need

    This recipe uses common pantry staples to keep things simple. You likely have most of these baking essentials in your kitchen already [2], so you won’t be overwhelmed by a complex shopping list.

    • For the Cake:
    • 1 ½ cups (3 sticks) unsalted butter, softened
    • 2 cups granulated sugar
    • 4 large eggs
    • 1 teaspoon vanilla extract
    • 3 cups all-purpose flour
    • 1 tablespoon baking powder
    • ½ teaspoon salt
    • 1 cup whole milk
    • For the Simple Glaze (Optional):
    • 1 ½ cups powdered sugar
    • 3-4 tablespoons milk or heavy cream
    • ½ teaspoon vanilla extract

    Step-by-Step Instructions

    Follow these simple steps to bake a perfect bundt cake. Our clear instructions will guide you through the process, ensuring a delicious result every time.

    1. Prep Your Bundt Pan: Thoroughly grease your bundt pan with butter or baking spray, then lightly flour it. This crucial step prevents the cake from sticking and ensures a clean release.
    2. Preheat Oven: Preheat your oven to 350°F (175°C) to ensure it reaches a consistent temperature for even baking.
    3. Combine Dry Ingredients: In a medium bowl, whisk together the flour, baking powder, and salt. Set aside.
    4. Cream Butter and Sugar: In a large mixing bowl, use an electric mixer to beat the softened butter and granulated sugar until light and fluffy, about 3-4 minutes.
    5. Add Eggs and Vanilla: Beat in the eggs one at a time, mixing well after each one. Once the eggs are incorporated, stir in the vanilla extract.
    6. Alternate Dry and Wet Ingredients: Add the dry mixture in three parts, alternating with the milk. Begin and end with the dry ingredients. Mix on low speed until just combined—be careful not to overmix, as this can make the cake tough.
    7. Fill the Pan: Pour the batter evenly into your prepared bundt pan. Gently tap the pan on the counter a few times to remove any air bubbles.
    8. Bake the Cake: Bake for 50-60 minutes, or until a wooden skewer or toothpick inserted into the center comes out clean.
    9. Cool the Cake: Let the cake cool in the pan on a wire rack for 10-15 minutes. This allows it to firm up slightly before you invert it. Then, carefully invert the cake onto the rack to cool completely.
    10. Make the Glaze (Optional): While the cake cools, whisk together the powdered sugar, milk or cream, and vanilla extract in a small bowl. Adjust the liquid amount for your desired consistency.
    11. Glaze and Serve: Once the cake is completely cool, drizzle the glaze over the top. Let the glaze set for a few minutes before slicing and serving. Enjoy!

    Tips for a Moist and Perfect Bundt Cake Every Time

    A close-up of a slice of Bundt cake on a white plate, revealing its moist and tender crumb texture.
    Professional food photography, photorealistic, high-quality food magazine photo of a single, generous slice of Bundt cake on a pristine white dessert plate, with a fork gently resting beside it. The focus is a close-up on the cut surface of the cake, clearly showcasing its moist, tender, and uniform crumb texture. The lighting is soft and inviting, emphasizing the cake’s deliciousness and perfect consistency. There might be a subtle hint of steam or a glistening crumb. No artistic interpretations, no illustrations, no vector graphics, no abstract art.

    Creating a moist, delicious bundt cake doesn’t have to be a challenge. With a few simple tricks, you can avoid common pitfalls and enjoy a perfect cake every time. Follow these tips to bake with confidence and make your next bundt a true showstopper!

    Mastering Your Bundt Cake Batter

    • Use Room Temperature Ingredients: This is a crucial step for success. Cold ingredients don’t combine well and can create a lumpy batter. Using room temperature butter, eggs, and dairy allows them to blend smoothly into a stable emulsion, which traps air and creates a lighter cake texture. [3]
    • Measure Accurately: Precision is essential in baking, especially for flour and leavening agents. Too much flour can make a cake dry, while too little leavening will affect its rise. Using a kitchen scale is the best way to ensure consistent, reliable results with your bundt cake recipes.
    • Don’t Overmix the Batter: Overmixing the batter develops too much gluten, resulting in a tough, dense cake. To achieve a tender crumb, mix only until the ingredients are just combined and no streaks of flour remain.
    • Sift Dry Ingredients: Sifting dry ingredients like flour, baking powder, and baking soda is important because it breaks up clumps and incorporates air. This simple step ensures even distribution, helping the leavening agents work effectively for a uniform rise.

    Baking for Perfect Moisture

    • Grease Your Pan Thoroughly (Again!): The importance of a well-greased and floured pan cannot be overstated. This critical step not only prevents the cake from sticking but also promotes even baking, saving you the frustration of a broken cake.
    • Don’t Overbake: Overbaking is the number one cause of dry bundt cakes. To prevent this, start checking for doneness a few minutes before the recipe suggests. Insert a wooden skewer into the thickest part; it should come out clean or with a few moist crumbs attached. For ultimate precision, the ideal internal temperature for most cakes is between 200-205°F (93-96°C) [4].
    • Add Moisture Boosters: Certain ingredients can significantly boost a cake’s moisture while also adding richness and tenderness.
      • Sour Cream or Plain Yogurt: These add fat and acidity, which react with baking soda for extra lift and keep cakes wonderfully moist.
      • Mashed Banana or Applesauce: These natural additions provide moisture and subtle flavor, and can even allow you to reduce sugar slightly.
      • Mayonnaise: Believe it or not, mayonnaise adds incredible moisture. It’s essentially oil and eggs, both of which are common cake ingredients.

    Cooling and Finishing Touches

    • Cool Properly in the Pan: Once baked, allow the bundt cake to cool in its pan for 10-15 minutes. This important step allows the cake to set, which helps prevent it from crumbling when you invert it.
    • Invert Onto a Wire Rack: After the initial 10-15 minutes, carefully invert the pan onto a wire rack to release the cake. Letting it cool completely on the rack allows air to circulate, preventing the bottom from becoming soggy. A fully cooled cake is also firmer, making it easier to frost and slice.
    • Glaze While Warm (Sometimes): While thick frostings should be applied to a completely cooled cake, some glazes are designed to be drizzled on while the cake is still slightly warm. This allows the glaze to soak in, adding extra moisture for a melt-in-your-mouth texture.

    By following these tips, you’ll be well on your way to baking a truly impressive bundt cake. Say goodbye to dry, crumbly results and hello to delicious, show-stopping creations. Recipesmondial is here to help you enjoy baking without the stress.

    Easy Bundt Cake Recipe Variations

    Classic Chocolate Bundt Cake

    Who can resist a rich, chocolatey bundt cake? This variation infuses our perfect bundt cake recipe with a deep, satisfying chocolate flavor that’s sure to please everyone at your table.

    To transform the base recipe, simply add a few extra ingredients. The result is a wonderfully moist and decadent treat, perfect for family gatherings or a comforting evening dessert.

    What You’ll Need (Adjusted Ingredients):

    • Unsweetened Cocoa Powder: 1/2 cup (sifted with flour)
    • Chocolate Chips (optional): 1 cup (milk, semi-sweet, or dark)
    • Hot Water or Coffee (optional): 1/2 cup (to deepen chocolate flavor)

    Simple Steps for Your Chocolate Bundt:

    1. Prepare your dry ingredients: Sift the cocoa powder together with your flour, baking powder, and salt to ensure no lumps and even distribution.
    2. Enhance the flavor: To intensify the chocolate notes, whisk the hot water or coffee into the wet ingredients before adding the dry mixture. Coffee is especially effective at deepening the flavor [5].
    3. Combine: Gently fold the chocolate chips into your batter just before pouring it into the prepared bundt pan.
    4. Bake: Follow the baking time and temperature from the main recipe.
    5. Serve: A simple dusting of powdered sugar is lovely. For extra indulgence, drizzle the cake with a chocolate ganache.

    This chocolate bundt cake is a true crowd-pleaser. It’s a wonderful example of how easy it is to create delicious desserts for any home cook!

    Zesty Lemon Bundt Cake

    Brighten your day with a refreshingly zesty lemon bundt cake! This variation adds a delightful tang and fragrant citrus aroma, making it a fantastic choice for spring brunches or a light dessert after any meal.

    This straightforward recipe infuses bright lemon flavor into both the cake and a simple glaze, creating a vibrant, cheerful dessert that’s surprisingly easy to make.

    What You’ll Need (Adjusted Ingredients):

    • Lemon Zest: 2 tablespoons (from 2-3 large lemons)
    • Fresh Lemon Juice: 1/4 cup (for the cake) + 1/4 cup (for the glaze)
    • Powdered Sugar: 1 1/2 cups (for the glaze)

    Simple Steps for Your Zesty Lemon Bundt:

    1. Infuse the batter: Add the lemon zest to your wet ingredients and cream them together well. This releases the zest’s oils, deeply flavoring the cake.
    2. Add lemon juice: Substitute 1/4 cup of the milk in the original recipe with fresh lemon juice for added moisture and a tangy kick.
    3. Bake: Prepare your bundt pan and bake according to the main recipe’s instructions.
    4. Prepare the glaze: While the cake cools, whisk together the powdered sugar and the remaining 1/4 cup of lemon juice in a small bowl. Adjust with more sugar or juice until you reach your desired drizzling consistency.
    5. Glaze and serve: Once the cake is completely cool, drizzle the lemon glaze generously over the top for an inviting finish.

    This zesty lemon bundt cake shows how simple ingredients can create a truly delicious dessert. It’s an approachable home cooking delight!

    Simple Vanilla Bundt Cake

    Sometimes, the simplest flavors are the most comforting. This vanilla bundt cake celebrates the timeless appeal of pure vanilla, creating an elegant and versatile dessert that’s always a hit.

    This beginner-friendly recipe highlights the pure, delicate flavor of vanilla and allows the quality of your ingredients to shine. It’s perfect for any occasion, from a casual coffee break to a special celebration.

    What You’ll Need (Key Ingredient Focus):

    • Good Quality Vanilla Extract: 2 teaspoons (or 1 teaspoon vanilla bean paste)

    Simple Steps for Your Vanilla Bundt:

    1. Emphasize vanilla: Use a high-quality vanilla extract or vanilla bean paste. Adding a little extra (up to 2 teaspoons total) will make the vanilla flavor the star of the show.
    2. Mix and bake: Follow all steps for mixing and baking from the main recipe, as no other ingredient changes are needed.
    3. Cool completely: Let the bundt cake cool fully on a wire rack to help it set properly and ensure a perfect slice.
    4. Decorate simply: A dusting of powdered sugar is elegant. You can also serve it with fresh berries and whipped cream, or make a simple glaze by mixing 1 cup powdered sugar with 2-3 tablespoons milk and 1/2 teaspoon vanilla extract.

    This simple vanilla bundt cake is a true home cooking staple, proving that easy recipes can be incredibly delicious and satisfying.

    Quick Bundt Cake Using a Cake Mix

    When life gets busy, you need a delicious dessert without all the fuss. This quick bundt cake using a cake mix is a fantastic shortcut. It’s incredibly easy, yet tastes surprisingly homemade—perfect for busy families who need a quick dessert.

    Don’t be overwhelmed by complex recipes when time is short. A boxed cake mix, with a few simple additions, can create a moist, flavorful bundt cake that saves time without sacrificing taste.

    What You’ll Need (Adjusted Ingredients for a Box Mix):

    • Boxed Cake Mix: 1 box (any flavor, like yellow, vanilla, or chocolate)
    • Eggs: Add 1 extra egg than the box calls for (e.g., if it says 3, use 4).
    • Milk: Instead of water, use the same amount of milk.
    • Melted Butter: Instead of oil, use the same amount of melted butter.
    • Instant Pudding Mix (optional): 1 small box (3.4 oz), matching your cake flavor or vanilla.

    Simple Steps for Your Quick Bundt:

    1. Prep your pan: Properly preparing your bundt pan is a crucial step, especially when using a boxed mix.
    2. Combine ingredients: In a large bowl, combine the cake mix, extra egg, milk, melted butter, and the optional instant pudding mix.
    3. Mix well: Beat with an electric mixer on medium speed for about 2-3 minutes, until the batter is smooth. Be careful not to overmix, which can result in a dry cake.
    4. Pour and bake: Pour the batter evenly into your prepared bundt pan.
    5. Adjust baking time: Boxed mixes often bake faster, so start checking for doneness around 30-35 minutes. A toothpick inserted into the center should come out clean.
    6. Cool and serve: Let the cake cool in the pan for 10-15 minutes before inverting it onto a wire rack. Serve with a simple glaze, powdered sugar, or fresh fruit.

    This quick bundt cake is a great example of a beginner-friendly recipe that delivers delicious results. You’ll be building confidence in the kitchen in no time!

    Frequently Asked Questions About Bundt Cakes

    How do you get a bundt cake out of the pan without it sticking?

    Getting your beautiful bundt cake out of the pan in one piece is crucial for avoiding kitchen frustration. Properly preparing your pan is the secret to ensuring your cake slides out easily, giving you perfect results every time.

    Here’s our reliable, step-by-step guide to prevent sticking:

    • Grease Generously: Use a solid shortening, softened butter, or a baking spray. Make sure to cover every nook and cranny, paying close attention to the pan’s intricate designs. A small pastry brush is a great tool for reaching tight spots.
    • Flour Lightly (or use cocoa powder for chocolate cakes): After greasing, dust the pan with a thin layer of flour. Rotate the pan to coat all surfaces evenly, then tap out any excess. For chocolate bundt cakes, use unsweetened cocoa powder instead of flour to keep the cake’s color consistent.
    • Try Baking Spray with Flour: For an effective shortcut, many home cooks use baking sprays that contain flour. These all-in-one sprays offer dual protection by greasing and flouring in one quick step, making them a great time-saver.
    • Chill Your Pan: After greasing and flouring, place the pan in the fridge for a few minutes. This simple step helps the coating adhere better, creating a firmer barrier that prevents the batter from sticking.
    • Cool Properly: Let your bundt cake cool in the pan for about 10-15 minutes. This allows the cake to set and shrink slightly from the sides. Then, invert it onto a wire rack to cool completely. Don’t leave it in the pan for too long, as over-cooling can cause it to stick.

    Following these steps will help you enjoy stress-free baking and confidently release your delicious bundt cake.

    What is the difference between a pound cake and a bundt cake?

    It’s easy to confuse these two wonderful treats, but pound cakes and bundt cakes are distinct. The main difference lies in the recipe versus the shape. A pound cake gets its name from its traditional recipe, which called for a pound each of butter, sugar, eggs, and flour [6], resulting in a dense, rich crumb.

    A bundt cake, on the other hand, is defined by the shape of the pan it’s baked in—one with a distinctive fluted design and a central hole. Any cake recipe baked in a bundt pan can be called a “bundt cake.” This means a pound cake can be a bundt cake if baked in that specific pan, but a bundt cake is not necessarily a pound cake.

    Here is a quick comparison:

    Feature Pound Cake Bundt Cake
    Definition A type of cake recipe. A cake baked in a specific pan shape.
    Typical Texture Dense, rich, moist, fine crumb. Can vary widely based on the recipe used.
    Key Ingredients Equal parts (by weight) butter, sugar, eggs, flour. Varies (can be any cake recipe).
    Shape Traditionally baked in loaf pans or tube pans. Always baked in a fluted, ring-shaped pan.

    On Recipesmondial, you can find many easy recipes, from traditional pound cakes to simple dinners, all designed for enjoyable cooking.

    How many calories are in a typical bundt cake?

    The number of calories in a bundt cake can vary significantly depending on several factors, primarily the ingredients and serving size. A typical slice can range from 300 to 600 calories. For example, a slice of a rich chocolate bundt cake will naturally have more calories than a lighter lemon version.

    Consider these points for calorie estimation:

    • Recipe Type: Cakes rich in butter, sugar, and add-ins (like chocolate chips or nuts) are higher in calories.
    • Serving Size: A larger slice naturally means more calories.
    • Glazes and Toppings: Syrups, cream cheese glazes, or heavy frosting add extra calories.

    For a more precise count, online food calculators can provide a nutritional estimate based on your specific ingredients [7]. At Recipesmondial, our goal is to make flavorful meals easy. We believe in enjoying everything, including dessert, in moderation as part of a balanced diet.

    Can I use any cake recipe in a bundt pan?

    While you can generally adapt most cake recipes for a bundt pan, some types work better than others. Denser cakes—like pound cakes, coffee cakes, and many easy dessert recipes—are ideal. Their sturdier batter is perfect for holding the pan’s intricate shape.

    For best results, keep these tips in mind:

    • Choose Denser Batters: Choose recipes with a thicker, more stable batter that will fill the pan’s crevices and release cleanly.
    • Adjust Baking Time: Because bundt pans conduct heat differently, you may need to adjust the baking time. Start checking for doneness 10-15 minutes earlier than the recipe suggests. The cake is ready when a wooden skewer inserted into the center comes out clean.
    • Fill Correctly: To prevent overflow during baking, fill the pan no more than two-thirds full.
    • Avoid Delicate Cakes: Avoid very delicate or airy cakes, as their structure may not hold the pan’s shape. Thin batters can also make it difficult to achieve clean, defined lines.

    With a little adjustment, many of your favorite dessert recipes can become beautiful bundt cakes. At Recipesmondial, we aim to inspire creativity in your cooking, so feel free to experiment with confidence!


    Sources

    1. https://www.kingarthurbaking.com/blog/2016/06/07/choosing-the-right-pan
    2. https://www.tasteofhome.com/article/baking-pantry-essentials/
    3. https://www.seriouseats.com/what-is-emulsification-why-it-matters-in-baking
    4. https://www.kingarthurbaking.com/blog/2016/09/27/cake-doneness
    5. https://www.seriouseats.com/does-coffee-enhance-chocolate-flavor
    6. https://www.britannica.com/story/what-is-the-difference-between-a-pound-cake-and-a-bundt-cake
    7. https://www.myfitnesspal.com/food/calorie-calculator