Tag: chicken recipes

  • Easy Korean Fried Chicken Recipe (Extra Crispy!)

    Easy Korean Fried Chicken Recipe (Extra Crispy!)

    Korean Fried Chicken is a popular chicken dish from Korea known for its signature extra-crispy exterior and flavorful coating. This unique texture is achieved through a double-frying method, which renders out the fat and creates an incredibly crunchy crust that stays crisp even when tossed in a sweet and spicy sauce, typically made with gochujang.

    There’s something uniquely irresistible about perfectly crispy, deeply flavorful Korean fried chicken. That golden crunch, juicy interior, and sweet and spicy glaze often feel like a special treat best enjoyed at a restaurant. But what if you could achieve that authentic, extra-crispy goodness at home? It’s not only possible—it’s surprisingly straightforward. Many home cooks feel intimidated by making korean fried chicken from scratch, fearing complex techniques or specialized ingredients. At Recipesmondial, we believe cooking should be an enjoyable, stress-free experience.

    Get ready to banish those doubts. Our easy Korean fried chicken recipe is designed to guide you through every step, ensuring a spectacular result every time. This dish brings restaurant-quality flavor into your home with approachable step-by-step cooking guidance. We’ll show you exactly how to create that signature crispy coating and whip up an addictive sweet and spicy gochujang sauce that will have your family asking for more. This isn’t just a recipe; it’s your ticket to discovering how flavorful meals made easy can transform your mealtime.

    Whether you’re looking for simple dinner recipes or want to impress with a new, exciting dish, this korean fried chicken recipe is a fantastic choice. It’s perfect for family-friendly meals or as a delightful treat for yourself. This recipe shows that delicious beginner-friendly recipes can be both exciting and achievable. So, if you’re ready to build confidence in the kitchen and enjoy the incredible taste of homemade korean fried chicken, let’s dive in.

    Why Will You Love This Korean Fried Chicken Recipe?

    Close-up of crispy Korean fried chicken coated in a glossy red sauce, garnished with sesame seeds and scallions, in a rustic bowl.
    Professional food photography, photorealistic, high-quality food magazine photo. A vibrant and enticing close-up shot of perfectly golden-brown, extra crispy Korean fried chicken pieces, generously coated in a glossy, savory-sweet red sauce. The chicken is artfully arranged in a rustic bowl on a light wooden table, garnished with a sprinkle of sesame seeds and finely chopped scallions. Soft, warm lighting highlights the crispy texture and the rich color of the sauce. The background is softly blurred, suggesting a cozy home kitchen environment.

    Ready to make your new favorite Korean fried chicken at home? This recipe is designed just for you, simplifying a typically complex dish without sacrificing flavor. You’ll be amazed at how easy it is to achieve restaurant-quality results right in your own kitchen.

    Cooking should be enjoyable, not stressful. That’s why this recipe provides clear, step-by-step guidance, making it perfect even for beginners. Leave complex, overwhelming instructions behind and say hello to a delicious meal and newfound cooking confidence!

    Here’s why this easy Korean fried chicken recipe will quickly become a cherished addition to your family-friendly meals:

    • Unbeatable Crunch: We reveal the secret to an extra-crispy crunch that lasts. Our double-fry method locks in an incredible texture that is sure to impress everyone at your table.
    • Irresistible Flavor: The addictive sweet and spicy gochujang sauce perfectly coats each piece of chicken, delivering a bold flavor combination that defines this popular dish.
    • Simple Steps for Success: You don’t need to be an expert chef to master this recipe. Our clear, approachable instructions break down every step, so you can cook with confidence from start to finish.
    • Perfect for Everyone: This recipe is a fantastic choice for family dinners or entertaining friends. It’s a guaranteed crowd-pleaser that will quickly become a favorite in your meal rotation.
    • Confidence in Every Bite: By following our reliable recipe and practical tips, you’ll turn simple ingredients into a truly stunning dish. This success helps build your skills and inspires more creativity in the kitchen.

    More than just a list of steps, this recipe from Recipesmondial is your guide to creating simple yet impressive dishes. It’s designed to help you prepare quick, reliable meals with ease. We hope you enjoy the entire process of making this incredibly delicious Korean fried chicken!

    What Ingredients Do You Need for Korean Fried Chicken?

    Overhead flat lay of Korean fried chicken ingredients including raw chicken, flour, gochujang, and spices, neatly arranged on a counter.
    Professional food photography, photorealistic, high-quality food magazine photo. A bright, overhead flat lay shot of all the fresh ingredients for Korean fried chicken neatly arranged on a clean, light-colored kitchen counter. Ingredients include raw chicken drumettes and wings, a bowl of flour mixture, a bowl of cornstarch, gochujang, soy sauce, rice vinegar, ginger, garlic, sugar, cooking oil in a bottle, and a bunch of fresh scallions. Each ingredient is clearly visible and beautifully presented, bathed in soft natural daylight. The overall impression is organized, fresh, and inviting.

    Ready to make incredibly crispy and flavorful Korean fried chicken at home? It’s easier than you might think! This guide breaks down the simple ingredients for both the extra-crispy chicken and its irresistible sweet and spicy sauce. We’ll show you how to make this delicious, family-friendly meal simple and enjoyable.

    For the Crispy Chicken Batter

    The secret to that signature crunch is the batter. Our recipe uses common ingredients to deliver professional-level results, so you won’t feel overwhelmed—even if you’re a beginner.

    • Chicken: 2.5-3 pounds chicken wings and drumettes, separated (about 12-15 pieces). Pat them very dry before starting.
    • All-purpose flour: 1 cup. This forms the essential base of the crispy coating.
    • Cornstarch: 1/2 cup. This is the key to an extra-crispy texture. While many traditional Korean fried chicken recipes use potato starch for a lighter crust [1], cornstarch is a fantastic and accessible alternative.
    • Baking powder: 1 teaspoon. It helps create a light, airy, and bubbly crust.
    • Salt: 1 teaspoon. For perfectly seasoning the chicken and batter.
    • Black pepper: 1/2 teaspoon. Adds a subtle peppery kick.
    • Cold water: 1 cup (approximately). Using very cold water prevents gluten from developing, ensuring a lighter batter.
    • Egg: 1 large (optional). An egg adds richness and helps the chicken brown beautifully.
    • Vegetable oil: 6-8 cups (for deep frying). Choose a neutral oil with a high smoke point, like canola, peanut, or sunflower oil.

    Quick tip for budget cooking: Chicken thighs or boneless chicken pieces also work well. Just be sure to adjust the frying time accordingly.

    For the Sweet & Spicy Gochujang Sauce

    This sauce is what defines the Korean fried chicken experience, perfectly balancing sweet, savory, and spicy notes. Better yet, it comes together using common pantry staples for an unforgettable flavor.

    • Gochujang (Korean chili paste): 1/4 cup. This fermented paste is the heart of the sauce. Look for it in the international aisle of most grocery stores.
    • Gochugaru (Korean chili flakes): 1 tablespoon (optional, for extra heat). Adjust the amount to your personal spice preference.
    • Soy sauce: 2 tablespoons. Adds crucial savory, umami depth. Use low-sodium if preferred.
    • Mirin (sweet rice wine): 2 tablespoons. Provides sweetness and a subtle tang. Rice vinegar can be a good substitute if needed.
    • Rice vinegar: 1 tablespoon. This brightens the sauce and cuts through its richness.
    • Brown sugar: 2 tablespoons. For essential sweetness. Honey or maple syrup also work well as substitutes.
    • Garlic: 3 cloves, minced. Fresh garlic makes a significant difference in the final flavor.
    • Ginger: 1 teaspoon, grated (optional). Adds a fresh, zesty note.
    • Sesame oil: 1 teaspoon. This aromatic oil is essential for an authentic Korean taste.
    • Water or chicken broth: 1/4 cup. Helps thin the sauce to the perfect consistency for glazing.
    • Cornstarch slurry: 1 teaspoon cornstarch mixed with 2 tablespoons cold water. This will thicken the sauce so it coats the chicken perfectly.

    Garnish (optional, but highly recommended for presentation and flavor):

    • Toasted sesame seeds.
    • Chopped green onions.

    You’ll love how these simple ingredients combine to create a flavor that rivals your favorite takeout. Get ready to enjoy this delicious meal with confidence!

    How to Make Korean Fried Chicken (Step-by-Step)

    How to Make Korean Fried Chicken (Step-by-Step)

    Ready to make your own irresistible Korean fried chicken? This step-by-step guide will help you create a delicious, extra-crispy batch with confidence.

    Step 1: Prepare and Season the Chicken

    Properly preparing the chicken is the key to ensuring maximum flavor and crispiness.

    1. Pat the chicken dry: Use paper towels to pat the chicken wings completely dry. Removing excess moisture helps the batter adhere and ensures the final result is extra crispy.
    2. Cut wings if needed: If using whole wings, separate them at the joints into drumettes and flats. Cut off and discard the wingtips, as they can burn easily, or save them for making chicken stock.
    3. Season generously: Place the dry chicken pieces in a large bowl and sprinkle with 1 teaspoon of salt and ½ teaspoon of black pepper. Toss well to ensure every piece is evenly coated.

    Step 2: Make the Batter and Coat the Wings

    A light, airy batter is essential for creating that signature crispy crunch.

    1. Combine dry ingredients: In a large mixing bowl, whisk together 1 cup all-purpose flour, ½ cup cornstarch, and 1 teaspoon baking powder. Cornstarch is vital for that extra crispiness!
    2. Add wet ingredients: Gradually pour in 1 cup of cold water, whisking until just combined. A few small lumps are fine—be careful not to overmix, as this can make the coating tough.
    3. Coat the chicken: Add the seasoned chicken pieces to the batter and toss gently until each piece is fully and evenly coated.

    Tip: You can also use a large resealable bag for coating. Add the chicken and batter, then shake to coat. This makes cleanup even easier!

    Step 3: Master the Double-Fry for Ultimate Crispiness

    The secret to incredibly crispy Korean fried chicken is the double-fry technique. This two-step process guarantees a light, crunchy coating that stays crisp.

    1. Heat the oil: Pour about 4-5 cups of neutral oil (like canola, vegetable, or peanut oil) into a large, heavy-bottomed pot or Dutch oven. Heat the oil over medium-high heat to 350°F (175°C). Use a cooking thermometer for accuracy.
    2. First Fry (Cooking through): Working in batches to avoid overcrowding the pot, carefully add the battered chicken to the hot oil. Fry for 6-8 minutes, until light golden brown and cooked through. The internal temperature should reach 165°F (74°C).
    3. Drain and rest: Remove the chicken from the oil and place it on a wire rack to drain. Repeat with the remaining chicken, then let all the chicken rest for at least 10 minutes. This crucial resting period allows moisture to escape, which is key for achieving a super-crispy texture in the second fry. The double-frying technique is known to achieve a lighter, shatteringly crisp coating by rendering out fat and moisture effectively [2].
    4. Second Fry (Crisping up): Increase the oil temperature to 375°F (190°C). Return all the chicken to the hot oil and fry for another 3-5 minutes, until deep golden brown and extra crispy.
    5. Final drain: Remove the chicken from the oil and place it on the wire rack to drain any excess oil.

    Common Mistake to Avoid: Don’t skip the rest between fries. This step is essential for expelling moisture and ensures your chicken stays crispy for longer.

    Step 4: Cook the Addictive Gochujang Sauce

    This quick and easy sweet and spicy gochujang sauce brings the signature flavor to Korean fried chicken.

    1. Combine sauce ingredients: In a medium saucepan, whisk together ¼ cup gochujang (Korean chili paste), ¼ cup soy sauce, ¼ cup honey, 2 tablespoons rice vinegar, 1 tablespoon minced garlic, and 1 teaspoon grated fresh ginger.
    2. Simmer the sauce: Place the saucepan over medium heat and bring to a gentle simmer, stirring frequently to prevent sticking.
    3. Thicken slightly: Simmer for 3-5 minutes, until the sauce thickens enough to coat the back of a spoon. Remove from the heat.

    Substitution Tip: If you don’t have fresh ginger, ½ teaspoon of ground ginger powder can work in a pinch. However, fresh ginger provides a brighter flavor!

    Step 5: Glaze the Chicken and Serve

    Now it’s time to bring everything together by coating the crispy chicken in the warm sauce.

    1. Toss to coat: Place the hot, crispy chicken in a large bowl. Pour the warm gochujang sauce over it and use tongs to gently toss until every piece is thoroughly coated.
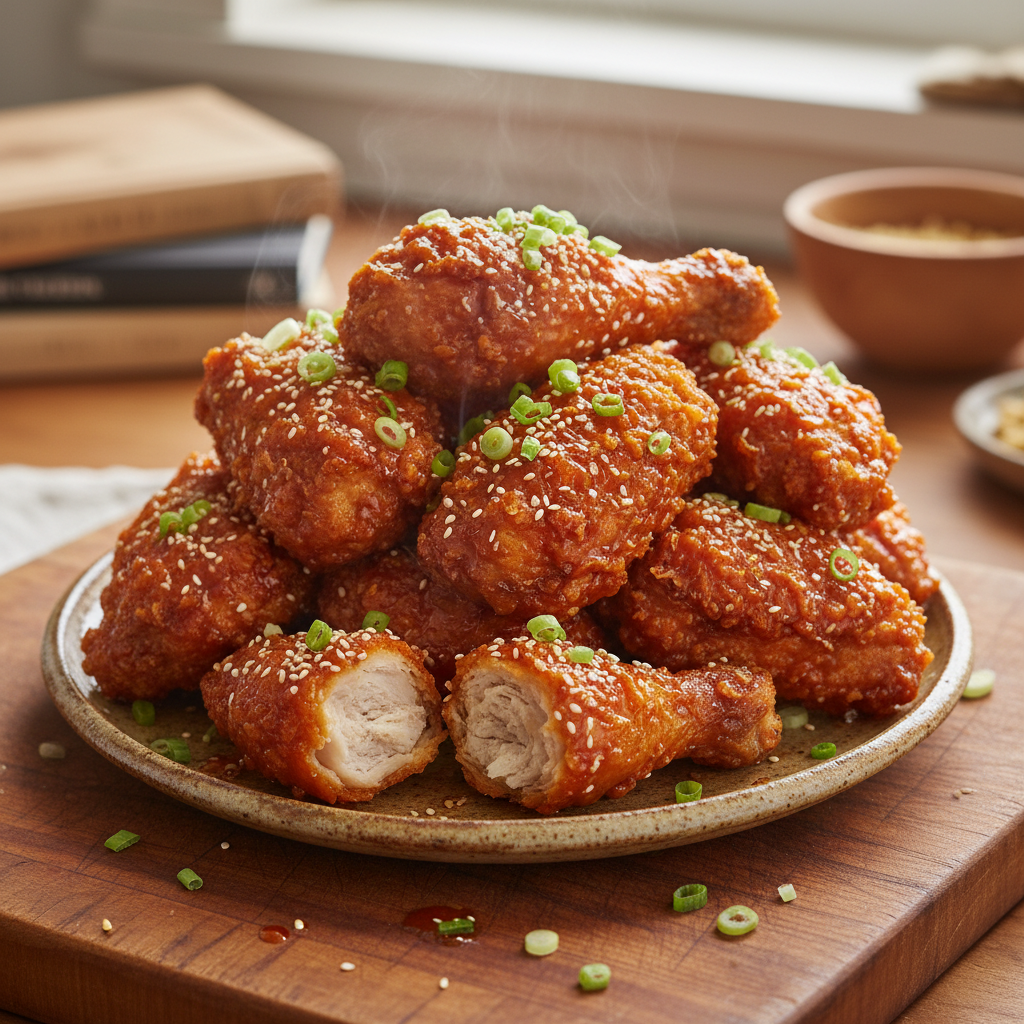
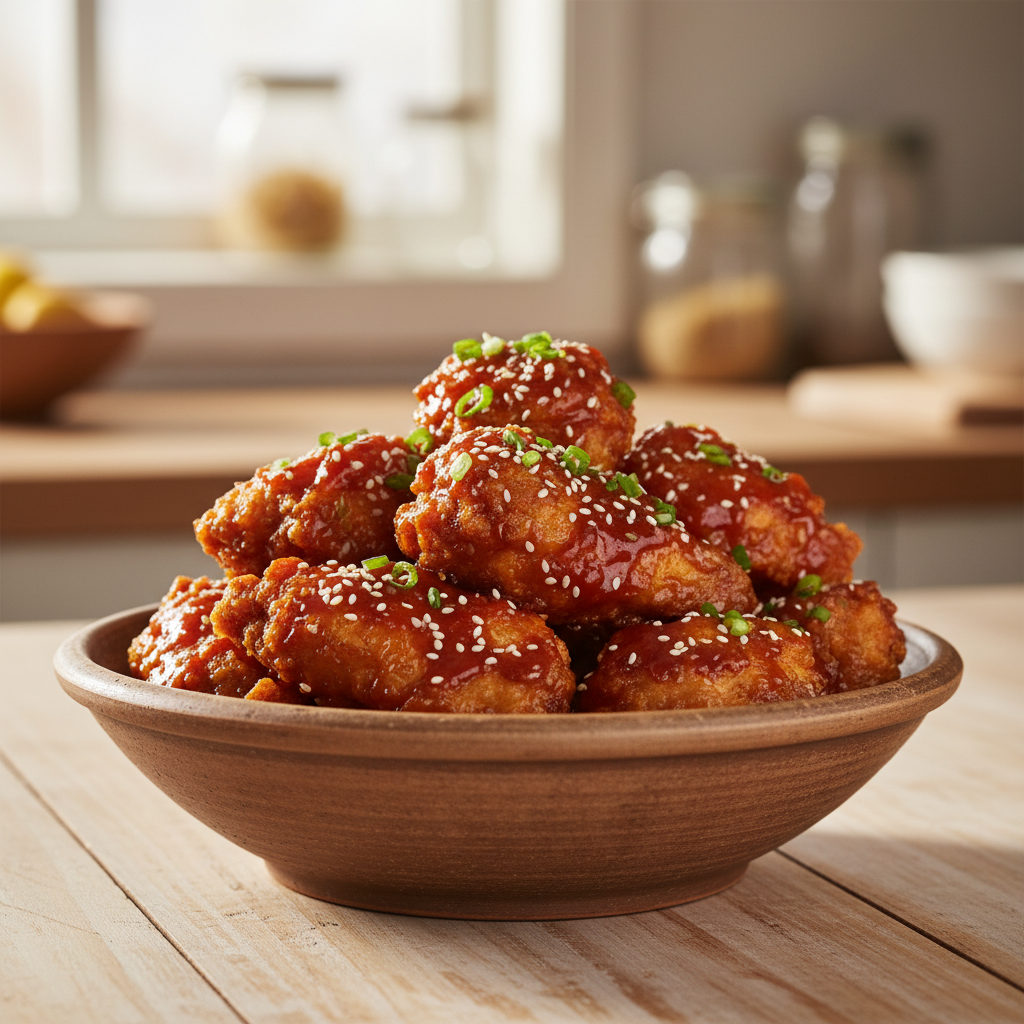
    2. Garnish and serve: Transfer the glazed korean fried chicken to a serving platter. Sprinkle with toasted sesame seeds and thinly sliced green onions for garnish.

    Serve immediately for the best texture. Enjoy your homemade, extra-crispy Korean fried chicken!

    Can I make Korean fried chicken in an air fryer?

    Yes, absolutely! You can make a delicious and much lighter version of Korean fried chicken using your air fryer. While it’s famous for its double-fried crispiness, this method is a fantastic alternative for home cooks. It’s an easy recipe that’s healthier, uses less oil, and creates less mess.

    Making Korean fried chicken in an air fryer is an approachable way to enjoy this popular global comfort food. It allows you to achieve a wonderfully crispy texture without the fuss of deep-frying, making it perfect for a quick weeknight meal.

    What to Expect from Air Fryer Korean Fried Chicken

    While the air fryer version won’t replicate the exact crunch of deep-frying, it offers its own delightful texture. Expect a satisfyingly crisp skin with tender, juicy chicken inside. This technique is an excellent solution for enjoying korean fried chicken at home quickly and simplifies the process, helping you avoid feeling overwhelmed by complex recipes.

    Tips for Crispy Air Fryer Korean Fried Chicken

    To get the best results from your air fryer, follow these simple tips:

    • Pat Chicken Dry: Always pat your chicken pieces very dry before coating. Excess moisture can prevent crisping.
    • Use Starch Generously: Cornstarch or potato starch is your best friend here. It creates that signature crispy coating.
    • Don’t Overcrowd: Cook the chicken in a single layer. This allows hot air to circulate properly around each piece. You might need to cook in batches.
    • Lightly Spray with Oil: A quick spray of cooking oil helps achieve an even crispier exterior. This is a crucial step for browning.
    • Flip Halfway: Turn the chicken pieces over about halfway through cooking. This ensures even crisping on all sides.
    • Consider a Double Cook: For extra crispiness, remove the chicken once cooked, let it rest for a few minutes, then air fry again for 5-7 minutes. This mimics the double-frying technique.

    Air Fryer Korean Fried Chicken Recipe Simplified Steps

    Adapting your korean fried chicken recipe for the air fryer is straightforward. Here are the basic steps:

    1. Prepare the Chicken: Cut your chicken into pieces (wings or boneless thighs work well). Season them lightly.
    2. Coat Thoroughly: Toss the chicken in a mix of cornstarch or potato starch, salt, and pepper. Ensure each piece is fully coated.
    3. Preheat Your Air Fryer: Set your air fryer to about 375°F (190°C). Preheating ensures a quicker crisp.
    4. Arrange and Spray: Place chicken in a single layer in the air fryer basket. Give them a light spray with cooking oil.
    5. Air Fry to Perfection: Cook for 20-25 minutes, flipping halfway. The exact time depends on chicken size and air fryer model. Chicken should reach an internal temperature of 165°F (74°C) [source: https://www.foodsafety.gov/food-safety-charts/safe-minimum-cooking-temperatures].
    6. Glaze and Serve: Once cooked, toss the hot chicken with your delicious sweet and spicy gochujang sauce. Serve immediately for the best experience.

    Ultimately, this air fryer method is a fantastic way to prepare flavorful meals made easy. It helps you build kitchen confidence by delivering delicious results without the stress and cleanup of deep-frying.

    Expert Tips for the Best Homemade Korean Fried Chicken

    Making delicious Korean fried chicken at home is a rewarding experience that brings a global comfort food right to your kitchen. To help you achieve an extra-crispy and flavorful result, we’ve gathered some expert tips. These simple tricks will help you cook with confidence and transform basic ingredients into an unforgettable meal.

    Here’s how to get the best results for your korean fried chicken recipe:

    • Pat Your Chicken Very Dry: Moisture is the enemy of crispiness, so use paper towels to thoroughly pat your chicken pieces dry before coating them. This crucial step helps the batter adhere better, resulting in a much crispier finish.
    • Keep Your Batter Cold: A cold batter, a secret used by many professional chefs, creates a lighter and more airy coating. For the best texture, use ice water when mixing your batter. This not only improves the coating but also prevents the chicken from absorbing too much oil.
    • Embrace the Double-Fry Method: The double-fry is the ultimate secret to shatteringly crisp Korean fried chicken. The first fry cooks the chicken through while helping to dry out the crust. Then, a second, hotter fry expels even more moisture to create that signature crunchy exterior and prevent any sogginess [3].
    • Mind Your Oil Temperature: Use a kitchen thermometer to maintain the correct oil temperature. If the oil is too cool, your chicken will be greasy; if it’s too hot, the outside will burn before the inside is cooked. Consistency is the key to perfect frying.
    • Don’t Overcrowd the Pan: Always fry in batches. Overcrowding the pan causes the oil temperature to drop rapidly, which leads to soggy, unevenly cooked chicken. Giving each piece enough space is essential for a proper fry.
    • Use Potato Starch: For a distinctively light and delicate crispiness, use potato starch in your batter. This ingredient is key to creating the unique texture that makes Korean fried chicken famous.
    • Sauce at the Last Minute: To keep your chicken wonderfully crisp, toss it in the sweet and spicy gochujang sauce right before serving. Saucing it too early will cause the coating to soften.
    • Adjust Spice Levels: The beauty of cooking at home is customization. Feel free to adjust the amount of gochujang or gochugaru (Korean chili flakes) to make the sauce perfectly suited to your family’s taste.
    • Add a Rest Period: Between fries, let the chicken rest for a few minutes. This important step allows trapped steam to escape and helps the coating firm up before its second, final fry.
    • Garnish for Freshness and Flavor: Elevate your finished dish with simple garnishes. A sprinkle of toasted sesame seeds adds a nutty flavor, while chopped green onions provide a fresh, vibrant crunch. For even more texture, consider adding crushed peanuts.

    By following these simple korean fried chicken tips, you can achieve restaurant-quality results in your own kitchen. Enjoy a stress-free cooking experience and get ready to impress everyone with your newfound skills!

    What Should I Serve with Korean Fried Chicken?

    While Korean fried chicken is a star on its own, the right side dishes can elevate it to a truly amazing meal. These additions help cut through the richness by adding fresh, contrasting flavors and textures. This balance prevents the meal from feeling too heavy and lets you enjoy every bite. Here are some simple and delicious ideas for your next feast.

    Classic Korean Pairings

    These traditional pairings are a perfect match for any style of Korean fried chicken, offering a delightful contrast in flavor and texture.

    • Kimchi: A must-have with almost any Korean dish, kimchi provides a spicy, fermented crunch. There are many varieties, from classic napa cabbage to radish kimchi (kkakdugi), each adding a healthy, tangy kick.
    • Pickled Radish (Chicken Mu): These small, sweet, and sour pickled daikon radish cubes are incredibly refreshing. They are meant to cleanse your palate between bites of crispy chicken. They are surprisingly easy to make at home, even for beginners.

    Fresh and Flavorful Sides

    Light and crisp sides beautifully balance the fried chicken’s richness. These options are quick to prepare and add a welcome touch of freshness.

    • Simple Coleslaw: A creamy, cool coleslaw is a perfect match. You can make a traditional Western style or a lighter, vinegar-based Korean version to provide a lovely crunch that cuts through the richness.
    • Green Salad with Light Dressing: A mixed greens salad with a tangy dressing is always a good choice. Try a ginger-sesame or a light vinaigrette for a quick and healthy option for your dinner table.
    • Cucumber Salad: Sliced cucumbers tossed with a touch of sesame oil, vinegar, and garlic are wonderfully refreshing. This simple side adds a cool counterpoint to the hot, savory chicken.

    Complementary Carb Options

    While the chicken is filling, adding a simple carbohydrate can turn your snack into a complete meal.

    • Steamed Rice: A simple bowl of fluffy white rice is the perfect comforting addition. It soaks up extra sauce and provides a neutral base to balance the chicken’s bold flavors.
    • French Fries: For a more Western-style experience, crispy French fries are always a hit. Serve them plain or with a sprinkle of Korean seasoning for a family-friendly favorite.

    Perfect Beverages

    The right drink completes the Korean fried chicken experience.

    • Soft Drinks: Classic choices like cola or lemon-lime soda offer a sweet fizz that pairs well with fried foods.
    • Korean Beer or Soju: For adults, cold beer (Maekju) is a traditional pairing. The combination is so popular it has its own name: “Chimaek” (chicken and maekju). Soju, a clear distilled spirit, is also a common choice for an authentic experience. [4]

    Serving Korean fried chicken with a few thoughtful sides elevates the entire meal. These simple additions help create a more satisfying and balanced dining experience, giving you the confidence to craft a memorable feast every time.

    Frequently Asked Questions

    What is the secret to extra crispy Korean fried chicken?

    Achieving that signature crunch in your homemade Korean fried chicken is truly rewarding! The biggest secret lies in a technique called double-frying. This method ensures your chicken is incredibly crispy.

    Here are the key elements for superior crispiness:

    • Double-Frying: This is the most crucial step for the ultimate crunch. First, fry the chicken at a lower temperature to cook it through. Then, fry it a second time at a higher temperature. This second fry is what creates a super-crisp exterior and prevents sogginess.
    • Starch-Based Batter: The batter needs a good amount of starch, like cornstarch or potato starch. Starch creates a lighter, crispier coating than flour alone. It also absorbs less oil, which helps prevent the chicken from becoming greasy.
    • Proper Oil Temperature: Maintaining the correct oil temperature is vital. If it’s too low, your chicken becomes greasy. If it’s too high, the outside will burn before the inside cooks. Aim for 325-350°F (160-175°C) for the first fry and 350-375°F (175-190°C) for the second. A reliable kitchen thermometer is your best friend here.
    • Resting Time: Let the chicken rest for a few minutes after the first fry. This allows moisture inside the chicken to redistribute, leading to an even crispier result during the second fry.
    • Don’t Overcrowd the Pot: Fry your chicken in batches. Overcrowding lowers the oil’s temperature, which leads to less crispy, greasier chicken.

    By following these steps, you will create a family-friendly meal with an irresistible crunch. RecipesMondial is here to help you cook confidently!

    What is in Korean fried chicken batter?

    The magic of Korean fried chicken batter is its simple yet effective blend of ingredients, which creates a uniquely light and super-crispy crust.

    Typically, a great Korean fried chicken batter includes:

    • All-Purpose Flour: This forms the base of the batter.
    • Starch (Cornstarch or Potato Starch): This is the secret ingredient for crispiness! Starch creates a lighter, more delicate coating than flour can alone. Potato starch is a traditional choice known for its excellent crisping properties.
    • Baking Powder: This leavening agent helps make the batter light and airy by creating tiny air bubbles, resulting in a delightfully crisp texture.
    • Salt and Pepper: These basic seasonings enhance the flavor of the chicken.
    • Water (often sparkling water): Water brings the dry ingredients together into a batter. Sparkling water is sometimes used because its carbonation can create an even lighter, airier crust.

    While you can add a pinch of sugar or a whisked egg white for extra color, the core combination of flour, starch, and baking powder is what truly makes the difference. This simple mix makes the recipe approachable and beginner-friendly.

    How do you make Korean fried chicken sauce from scratch?

    Making a delicious sweet and spicy Korean fried chicken sauce from scratch is surprisingly easy, and it adds incredible flavor to your crispy chicken. This sauce is a fantastic addition to your collection of simple dinner recipes.

    Here’s how to make a classic Gochujang-based sauce:

    1. Gather Your Ingredients: You will need gochujang (Korean chili paste), soy sauce, rice vinegar, a sweetener (such as honey, corn syrup, or sugar), minced garlic, and grated fresh ginger. A little sesame oil adds a wonderful aroma.
    2. Combine Ingredients: In a small saucepan, whisk together the gochujang, soy sauce, rice vinegar, sweetener, garlic, and ginger. If you’re using sesame oil, add it now.
    3. Simmer Gently: Place the saucepan over medium-low heat and bring the mixture to a gentle simmer. Stir occasionally to prevent it from sticking to the bottom of the pan.
    4. Thicken (Optional): If you prefer a thicker sauce, create a slurry by mixing one teaspoon of cornstarch with one tablespoon of cold water until smooth. Whisk the slurry into the simmering sauce and continue to cook for another minute, or until it thickens to your liking.
    5. Taste and Adjust: Taste the sauce and adjust the flavors as needed. You might want it sweeter, tangier, or spicier. This step ensures the sauce is perfectly balanced for your taste.
    6. Cool and Glaze: Let the sauce cool slightly before tossing it with your freshly fried chicken. Coating the hot chicken with warm sauce helps it adhere beautifully.

    This simple sauce recipe is reliable and transforms basic ingredients into a delicious coating for your chicken.


    Sources

    1. https://www.seriouseats.com/the-food-lab-korean-fried-chicken-recipe
    2. https://www.seriouseats.com/the-food-lab-how-to-fry-crispy-chicken-wings-and-more
    3. https://www.seriouseats.com/the-food-lab-how-to-fry-crispy-chicken-wings-best-korean-fried-chicken-recipe
    4. https://english.visitkorea.or.kr/enu/ATR/SI_EN_3_6.jsp?cid=1978248
  • Easy Butter Chicken Recipe: A Step-by-Step How-To Guide

    Easy Butter Chicken Recipe: A Step-by-Step How-To Guide

    Butter chicken, also known as Murgh Makhani, is a popular Indian dish featuring marinated and grilled chicken pieces simmered in a rich, velvety tomato and cream-based sauce. Its signature flavor comes from a balanced blend of mild spices, tangy tomatoes, and the richness of butter and cream, creating a comforting and luxurious curry.

    Craving the rich, creamy butter chicken you love at your favorite Indian restaurant? Many home cooks feel intimidated by this classic dish, fearing complex ingredients or difficult techniques. But making restaurant-quality butter chicken at home is surprisingly simple. This guide will help you leave complicated recipes behind and create something truly special in your own kitchen.

    At Recipesmondial, we believe delicious, family-friendly meals should be accessible to everyone, regardless of cooking experience. That’s why we created this easy butter chicken recipe, designed with beginner-friendly recipes in mind. Our step-by-step instructions will guide you through each stage, ensuring great results and building your confidence. You’ll see how simple it is to turn everyday ingredients into an amazing meal, transforming a culinary challenge into a fun adventure.

    This guide shares everything you need to know to make the best butter chicken, from marinating the chicken to perfecting the silky, creamy tomato sauce. We cover practical tips, smart ingredient substitutions, and how to avoid common mistakes for a stress-free cooking experience. Get ready to impress your family and friends with a dish that is sure to become a new favorite in your recipe rotation.

    Why Is This The Best Butter Chicken Recipe for Home Cooks?

    This butter chicken recipe is a game-changer for home cooks. We know that finding an easy version can feel overwhelming, as many recipes call for too many ingredients or complex techniques. That’s why our guide focuses on an incredibly flavorful meal that’s approachable for everyone, from beginners to seasoned cooks.

    What makes our specific butter chicken recipe stand out?

    • Simple, Step-by-Step Guidance: We eliminate confusion with clear, easy-to-follow instructions. By breaking down each stage into simple, actionable steps, you’ll build kitchen confidence and enjoy a stress-free cooking experience.
    • Everyday Ingredients: Forget trips to specialty stores. This delicious, budget-friendly dish uses common ingredients you can find at your local grocery store, making it easy to create amazing global comfort food at home.
    • Guaranteed Flavorful Results: This isn’t just an easy recipe—it’s a truly delicious one. You’ll create a rich, creamy, and wonderfully spiced butter chicken that tastes just like your favorite restaurant version, making it simple to enjoy flavorful meals at home.
    • Time-Saving for Busy Lives: We know your time is valuable, so this recipe is designed for efficiency. It delivers a fantastic, family-friendly meal without hours in the kitchen, making it a perfect solution for busy weeknights.
    • Boost Your Cooking Confidence: Whether you’re new to Indian cooking or just want to build your skills, this recipe is the perfect starting point. You’ll master basic techniques and discover how satisfying it is to prepare a delicious meal from scratch.
    • Family-Friendly Favorite: As a universally loved dish, butter chicken’s mild, creamy flavor appeals to all ages—even picky eaters. It’s an ideal choice for simple dinner recipes and is sure to become a family favorite.

    At Recipesmondial, we specialize in approachable home cooking. Our step-by-step guidance helps you move from uncertainty to confidence, transforming simple ingredients into delicious, visually appealing meals. Discover new flavors and recipes with ease.

    What Ingredients Do You Need for Butter Chicken?

    A top-down view of fresh ingredients for butter chicken, including chicken, tomatoes, cream, butter, and various spices.
    Professional food photography, photorealistic, high-quality food magazine photo: A vibrant and meticulously organized flat lay of all fresh, high-quality ingredients for an easy butter chicken recipe, arranged on a rustic wooden cutting board or a light marble countertop. Key ingredients include raw chicken pieces, canned crushed tomatoes, heavy cream, unsalted butter, a whole onion, garlic cloves, fresh ginger, an array of Indian spices (garam masala, turmeric powder, Kashmiri chili powder, ground cumin, ground coriander), raw cashews, and a bunch of fresh cilantro. The lighting is soft, natural, and inviting, emphasizing the freshness and accessibility of each component, creating a clean and appealing visual for home cooks.

    Ready to make delicious butter chicken? The secret to a truly flavorful dish is using the right ingredients. Don’t worry—we’ll guide you through each component. A global comfort food, this classic recipe traces its origins to Delhi, India, in the 1950s [1]. The best part? You likely have many of these items in your pantry already.

    For the Chicken Marinade

    First, gather the ingredients for the chicken marinade. This essential step infuses the chicken with spices, ensuring every piece is tender, juicy, and packed with flavor.

    • Chicken: 1.5 lbs (about 680g) boneless, skinless chicken thighs or breasts, cut into 1-inch pieces. (Thighs are recommended for juiciness and tenderness).
    • Plain Yogurt: 1/2 cup (120ml) full-fat plain yogurt. (Greek yogurt also works well; it helps tenderize the chicken and bind the spices).
    • Ginger-Garlic Paste: 1 tablespoon. (Available pre-made, or you can make your own by crushing equal parts fresh ginger and garlic).
    • Fresh Lemon Juice: 1 tablespoon. (Adds brightness and aids in tenderizing).
    • Ground Turmeric: 1/2 teaspoon. (For color and a touch of earthy flavor).
    • Red Chili Powder: 1 teaspoon (or paprika for a milder kick if preferred).
    • Garam Masala: 1 teaspoon. (A fragrant Indian spice blend crucial for authentic taste).
    • Ground Cumin: 1/2 teaspoon.
    • Salt: 1 teaspoon.

    For the Creamy Tomato Sauce

    Next up is the heart of the dish: the rich and creamy makhani sauce. This is what gives butter chicken its famously silky texture and incredible depth of flavor.

    • Unsalted Butter: 3 tablespoons. (It’s butter chicken, after all! Using unsalted butter allows you to control the final saltiness of the dish).
    • Vegetable Oil (or Ghee): 1 tablespoon. (For sautéing aromatics at the start).
    • Onion: 1 medium, finely chopped. (Forms the sweet and savory base of the sauce).
    • Ginger-Garlic Paste: 1 tablespoon. (This essential aromatic adds another deep layer of flavor to the sauce).
    • Canned Crushed Tomatoes: 1 (28-ounce/794g) can, or tomato purée. (This is key for the sauce’s body and tangy depth).
    • Whole Cashews: 1/4 cup (about 30g). (Soaking them in hot water for 15 minutes is recommended. They blend to create a luxurious, creamy thickness).
    • Garam Masala: 1 teaspoon.
    • Ground Turmeric: 1/2 teaspoon.
    • Red Chili Powder: 1 teaspoon (adjust to your personal spice preference).
    • Fenugreek Leaves (Kasoori Methi): 1 tablespoon, crushed between your palms. (This dried herb is essential for authentic flavor. Look for it in Indian grocery stores—its unique taste is a game-changer!).
    • Granulated Sugar: 1 teaspoon. (Balances the acidity of the tomatoes and rounds out the flavors).
    • Heavy Cream: 1/2 cup (120ml). (Adds the signature rich and velvety finish to the sauce).
    • Salt: To taste.
    • Water or Chicken Broth: 1/2 to 1 cup (120-240ml), as needed. (Use as needed to achieve your desired sauce consistency).

    How to Make Butter Chicken Step-by-Step

    Creamy, delicious butter chicken simmering in a pot, garnished with a swirl of cream and fresh cilantro.
    Professional food photography, photorealistic, high-quality food magazine photo: A close-up, mouth-watering shot of rich, creamy butter chicken simmering gently in a vibrant orange-red sauce within a rustic cast-iron Dutch oven or a large, inviting stainless steel pot on a gas stovetop. The tender chicken pieces are perfectly coated, and the sauce has a beautiful, velvety texture. A subtle wisp of steam rises from the dish. The butter chicken is garnished with a fresh swirl of heavy cream and a sprinkle of bright green chopped cilantro leaves. The background is softly blurred, suggesting a warm, inviting home kitchen environment with natural light.

    Step 1: Marinate the Chicken

    Marinating is the key to tender, juicy, and flavorful chicken. This essential step allows the spices to penetrate the meat, creating a delicious foundation for your butter chicken.

    • Prepare your chicken: Pat the chicken pieces dry with paper towels. This helps the marinade adhere properly.
    • Combine the marinade: In a large bowl, whisk the yogurt, ginger-garlic paste, lemon juice, and all marinade spices until well combined.
    • Add the chicken: Add the chicken pieces to the bowl and toss gently to ensure every piece is fully coated.
    • Chill and wait: Cover the bowl and refrigerate for at least 30 minutes. For the best results, marinate for 2 to 4 hours, or even overnight.

    Pro Tip: Don’t skip this step! Even a 30-minute soak will significantly improve the flavor and tenderness of your chicken.

    Step 2: Cook the Chicken

    Next, we will cook the marinated chicken. Searing the pieces until golden-brown adds a rich, deep flavor to the final dish.

    • Heat your pan: Place a large skillet or heavy-bottomed pan over medium-high heat and add oil or ghee. Ensure the pan is hot before you begin.
    • Sear the chicken: Working in batches to avoid overcrowding, add the chicken pieces to the hot pan. Cook for 3-5 minutes per side until golden-brown and slightly charred. The chicken does not need to be fully cooked at this stage.
    • Remove and set aside: Once seared, remove the chicken from the pan and set it aside.

    Cooking Confidence Boost: Overcrowding the pan steams the chicken instead of searing it. Give each piece enough space to develop that perfect golden crust. Building flavor step-by-step is the secret to great results.

    Step 3: Prepare the Makhani (Butter) Sauce

    Now it’s time to create the creamy, rich butter chicken sauce, also known as Makhani sauce. Achieving a restaurant-quality flavor at home is easier than you think.

    • Sauté aromatics: In the same pan, melt the butter over medium heat. Add the chopped onions and cook for 5-7 minutes until softened and translucent. Stir in the ginger-garlic paste and cook for one more minute until fragrant.
    • Bloom the spices: Add all the sauce spices (turmeric, garam masala, chili powder, etc.). Stir constantly for about 30 seconds until their aroma is released.
    • Add tomatoes and simmer: Pour in the crushed tomatoes and tomato paste, stirring to combine. Add the cashews (if using) and a splash of water, then bring to a gentle simmer. Reduce the heat to low, cover, and cook for 15-20 minutes to allow the flavors to meld.
    • Blend for smoothness: Carefully transfer the sauce to a blender (an immersion blender also works well) and blend until completely smooth. For an extra-silky texture, strain the sauce through a fine-mesh sieve back into the pan.

    Chef’s Secret: Thoroughly blending the sauce is crucial for achieving the signature velvety texture of authentic butter chicken. Take your time on this step.

    Step 4: Combine and Simmer

    You’re almost done! The final step is to bring all the components together to create your delicious, finished butter chicken.

    • Combine sauce and chicken: Return the smooth Makhani sauce to the pan over low heat. Gently add the seared chicken pieces and stir to coat them evenly.
    • Enrich the sauce: Pour in the heavy cream. Crush the kasuri methi (dried fenugreek leaves) between your palms as you add it to the sauce to release its aroma, then stir everything together.
    • Simmer to finish: Let the butter chicken simmer gently for 10-15 minutes, uncovered. This allows the chicken to finish cooking and the sauce to thicken slightly.
    • Season and serve: Taste the sauce and adjust the seasoning with salt and a pinch of sugar to balance the flavors. Garnish with fresh cilantro and an optional drizzle of cream before serving.

    Serving Suggestion: This dish pairs perfectly with warm naan bread or fluffy basmati rice for a truly satisfying meal. Enjoy!

    What Are Some Tips for the Perfect Creamy Butter Chicken?

    Achieving the Silky-Smooth Sauce

    The hallmark of a truly great butter chicken is its rich, silky-smooth sauce. Achieving this texture is simpler than you might think. With a few easy steps, your homemade butter chicken will rival any restaurant dish.

    • Blend for Bliss: After simmering the tomato sauce base, blend it until completely smooth. An immersion blender works directly in the pot, or you can carefully transfer the sauce to a regular blender. This step creates a luxurious foundation for your meal.
    • Strain for Perfection: For an extra-velvety, restaurant-quality texture, pass the blended sauce through a fine-mesh sieve. This removes any remaining bits of onion or tomato skin.
    • Simmer Slowly: Gently simmer the sauce to allow the flavors to meld together. This slow simmer also thickens the sauce naturally, ensuring a rich and creamy finish.
    • High-Quality Tomatoes: The quality of your tomatoes makes a big difference. Use good canned crushed tomatoes to create a deep, rich flavor base for your sauce.

    Ingredient Substitutions and Variations

    One of the best things about cooking is making a recipe your own. This butter chicken recipe is wonderfully adaptable, so feel free to adjust it to suit your tastes or dietary needs.

    • Chicken Alternatives: Not a fan of chicken? No problem!
      • Paneer: For a vegetarian option, use cubed paneer. Add it during the final simmering stage to heat through.
      • Chickpeas: Canned chickpeas work well as a quick protein source. Simply drain, rinse, and stir them into the sauce at the end.
      • Mixed Vegetables: Add florets of cauliflower or broccoli and cook them in the sauce until tender for a healthy, balanced meal.
    • Dairy-Free Options: You can still enjoy creamy butter chicken without dairy.
      • Coconut Milk: Substitute full-fat coconut milk for heavy cream. It adds a subtle, tropical richness to the sauce.
      • Cashew Cream: Soak raw cashews in hot water for 30 minutes, then blend with fresh water until smooth. Use this as a direct replacement for heavy cream.
    • Spice Level: Adjust the heat to your preference.
      • More Heat: Add an extra pinch of cayenne pepper or include a chopped green chili with the onions.
      • Less Heat: Reduce the amount of chili powder, or skip the cayenne pepper entirely for a milder dish.
    • Healthier Twists: You can lighten up this dish with a few simple swaps.
      • Less Cream: Use half the amount of heavy cream and replace the other half with milk or plain yogurt.
      • Ghee Instead of Butter: Ghee (clarified butter) is a flavorful alternative with a higher smoke point.

    How to Avoid Common Mistakes

    Cooking butter chicken is a delightful process, but a few common pitfalls can affect the result. Follow these simple tips to ensure your dish turns out perfectly every time.

    • Don’t Overcook the Chicken: Marinated chicken cooks quickly, so cook it just until browned and cooked through. Overcooking will make the chicken dry and tough instead of juicy and tender.
    • Sauté Spices Properly: To develop their full flavor, sauté your aromatics and ground spices until they become fragrant. Undercooked spices can taste raw, so don’t skip this vital step.
    • Add Cream at the End: Add heavy cream at the very end of cooking and simmer gently for just a few minutes. Boiling cream vigorously can cause it to separate, ruining the sauce’s smooth texture.
    • Balance Flavors: A great butter chicken has a perfect balance of sweet, sour, and savory notes. Always taste the sauce before serving and adjust with a pinch of sugar or a squeeze of lemon juice as needed.
    • Use Fresh Ingredients: Whenever possible, use fresh ginger and garlic instead of powdered versions. Their vibrant flavor truly elevates the dish. For instance, fresh garlic is not only more flavorful but also provides more health benefits than dried garlic [source: https://www.healthline.com/nutrition/11-proven-health-benefits-of-garlic].

    What Should You Serve With Butter Chicken?

    A complete meal featuring butter chicken with basmati rice, garlic naan, and a side of raita on a cozy table.
    Professional food photography, photorealistic, high-quality food magazine photo: A beautifully composed and inviting shot of a complete butter chicken meal, ready to be enjoyed. The main focus is a generous serving of butter chicken in an attractive ceramic bowl, its rich sauce and tender chicken highlighted. It is accompanied by a mound of fluffy, pearly basmati rice, a side of warm, golden garlic naan bread torn into pieces, and a small bowl of fresh cucumber raita or a vibrant green salad. The setting is a cozy dining table with warm, soft lighting, emphasizing the comfort and deliciousness of the entire meal. The composition should make the viewer want to reach for a fork.

    Best Breads for Butter Chicken

    Butter chicken’s rich, creamy sauce is its signature, and you’ll want the perfect bread to scoop up every last drop. Serving the right bread completes the meal. Here are some fantastic and easy options:

    • Naan Bread: A classic for a reason, naan is a soft, fluffy flatbread traditionally baked in a tandoor oven. Its texture is ideal for soaking up the creamy sauce. You can find ready-made plain or garlic naan in most grocery stores—just warm it in the oven or on a pan before serving.
    • Roti or Chapati: As a lighter alternative to naan, these thin, unleavened flatbreads are a great choice. Roti is typically made with whole wheat flour, offering a simple and wholesome pairing. They are available fresh or frozen and cook up in minutes.
    • Pita Bread: If you can’t find Indian flatbreads, pita bread is an excellent substitute. It has a similar soft texture that works well with the curry. For easy dipping, warm the pita and cut it into triangles. This is a practical and convenient option.
    • Garlic Bread: For a fun, non-traditional twist, try garlic bread. Its crunchy texture and savory garlic butter complement the creamy curry beautifully. This is a family-friendly choice that is sure to be a hit.

    Rice and Side Dishes

    Beyond the bread, the right rice and side dishes will round out your butter chicken dinner. These simple options add balance and texture, creating a complete and satisfying meal.

    • Basmati Rice: Fragrant, long-grain basmati rice is the classic partner for butter chicken. Its delicate aroma and fluffy texture complement the curry without overpowering it. For extra flavor, cook it with a pinch of salt and a bay leaf.
    • Jasmine Rice: Jasmine rice is another excellent and fragrant option, similar to basmati but with a slightly stickier texture. It’s easy to prepare and widely available, making it another great choice.
    • Brown Rice: For a healthier whole-grain option, try brown rice. It has a nuttier flavor and offers more fiber, though it does take longer to cook than white rice.
    • Cucumber Raita: This cool, yogurt-based side provides a refreshing contrast that cuts through the richness of the curry. To make it, simply combine plain yogurt with grated cucumber, fresh mint, and a sprinkle of cumin. It’s a simple recipe that adds a big impact.
    • Simple Green Salad: A crisp green salad acts as a wonderful palate cleanser. Dressed lightly with a lemon vinaigrette, it adds a welcome freshness and a pop of color to your meal.
    • Roasted Vegetables: Roasted vegetables like broccoli, cauliflower, or green beans make a simple and healthy side. Just toss them with a little oil, salt, and pepper, then roast until tender-crisp. They add satisfying texture and nutrition to the meal.

    How Do You Store and Reheat Leftovers?

    Refrigerating

    Properly storing leftover butter chicken keeps it fresh for several days, making it a great option for meal prep. Follow these steps to ensure your meal stays safe and delicious.

    How to Refrigerate Butter Chicken

    1. Cool It Quickly: Let the butter chicken cool to room temperature, making sure this happens within two hours of cooking. This step is crucial for preventing bacterial growth (source).
    2. Store Airtightly: Transfer the cooled butter chicken to an airtight container with a tight-fitting lid. This locks in freshness by keeping air out.
    3. Refrigerate Promptly: Place the sealed container in the refrigerator. Your butter chicken will stay delicious for 3 to 4 days.

    How to Reheat Refrigerated Butter Chicken

    When you are ready to eat, reheat the leftovers gently. You can warm it on the stovetop over low heat or in the microwave, stirring often to ensure it heats through evenly.

    Freezing

    Yes, you can absolutely freeze butter chicken! Freezing is a fantastic meal prep solution that extends the life of your flavorful meal for months.

    To preserve its taste and texture, follow these steps:

    • Cool It Down: Always allow the butter chicken to cool completely before placing it in the freezer.
    • Portion It Out: Divide the cooled butter chicken into single or family-sized servings using freezer-safe containers or heavy-duty freezer bags.
    • Seal Tightly: Remove as much air as possible from the container or bag before sealing to help prevent freezer burn.
    • Label and Date: Clearly write the date on each container so you can keep track of how long it’s been stored.
    • Freeze: Place the sealed portions in the freezer. Your butter chicken will maintain its quality for 2 to 3 months.

    Reheating frozen butter chicken is simple. For the best results, follow these tips:

    • Thaw Slowly: For the best texture, transfer the frozen butter chicken to the refrigerator and let it thaw overnight.
    • Reheat on Stovetop: Pour the thawed butter chicken into a saucepan and warm it over low to medium heat. Stir occasionally until it is simmering gently and heated through.
    • Microwave Option: For a quicker method, place the thawed butter chicken in a microwave-safe dish. Heat in 1- to 2-minute intervals, stirring between each one to ensure even warming.
    • Add Moisture (Optional): If the sauce seems thin after thawing, stir in a splash of cream or water to restore its original creamy texture.
    • Serve Fresh: Enjoy your reheated butter chicken with fresh naan or rice. It will taste just as delicious as the day it was made!

    Frequently Asked Questions About Butter Chicken

    What are the main ingredients in a butter chicken recipe?

    A classic butter chicken recipe, known as Murgh Makhani, relies on a few key components. These work together to create its signature rich, comforting flavor profile.

    • Chicken: Boneless, skinless chicken thighs or breasts are ideal. Marinating the chicken in yogurt and spices makes it tender and flavorful.
    • Tomato Base: Crushed or pureed tomatoes form the foundation of the sauce, providing a lovely tang and depth.
    • Butter and Cream: These are essential for the sauce’s luxurious richness and silky texture. In fact, they give butter chicken its name!
    • Aromatics: Fresh ginger and garlic paste are crucial for building a flavorful base.
    • Spices: A blend of common Indian spices like garam masala, turmeric, red chili powder (or Kashmiri chili for color), and cumin seeds is used.
    • Sweetness: A touch of sugar or honey balances the acidity of the tomatoes and enhances the overall taste.

    At Recipesmondial, we focus on using everyday ingredients, making this flavorful dish approachable for any home cook.

    How do you make butter chicken extra creamy?

    Achieving a wonderfully velvety smoothness in your butter chicken is simpler than you might think. Here are our best tips for an extra creamy sauce:

    • Blend the Sauce: After simmering the tomato base, use an immersion blender or a regular blender (carefully!) to purée the sauce until it is completely smooth. This step is a game-changer for a restaurant-quality texture.
    • Use Full-Fat Dairy: For the richest result, opt for full-fat heavy cream or cashew cream. Skimping on fat here will impact the final creaminess.
    • Add Yogurt: Adding plain, full-fat yogurt to the chicken marinade—and sometimes a touch to the sauce—adds a lovely creamy consistency and tangy flavor.
    • Cashew Paste: For an indulgent, thick sauce, blend soaked cashews into a smooth paste and stir it into your simmering sauce. This adds incredible body and richness. Just be sure to soak the cashews in hot water for at least 15-20 minutes beforehand.
    • Simmer Gently: Allow the sauce to simmer for at least 15-20 minutes after adding the cream. This helps the flavors meld and allows the sauce to thicken naturally.

    Following these steps will help you create a wonderfully luscious and satisfying butter chicken—a guaranteed hit for your family-friendly meals!

    Is this an authentic Indian butter chicken recipe?

    Our butter chicken recipe is an approachable version inspired by the authentic Indian classic, Murgh Makhani. The original dish originated in Delhi, India, in the 1950s [2], and our goal at Recipesmondial is to make its incredible flavors easy for you to recreate.

    While we respect traditional methods, our recipe is designed for busy home cooks. We streamline the steps and use readily available ingredients without sacrificing the rich, delicious flavor that makes this dish so popular.

    Our recipe is a reliable, step-by-step guide to achieving a wonderfully tasty butter chicken in your own kitchen. Although it may not follow every nuance of a traditional preparation, it absolutely captures the delicious essence that has made butter chicken a global favorite. You can confidently create this beloved international dish at home!


    Sources

    1. https://en.wikipedia.org/wiki/Butter_chicken
    2. https://indianexpress.com/article/lifestyle/food-wine/butter-chicken-history-birthplace-7634351/

  • 15 Best Crockpot Chicken Recipes (Simple, Healthy & Delicious)

    15 Best Crockpot Chicken Recipes (Simple, Healthy & Delicious)

    The best crockpot chicken recipes involve cooking chicken slowly over several hours, resulting in incredibly tender and flavorful meat with minimal effort. These simple recipes often use common pantry ingredients and are perfect for busy families, allowing you to ‘set it and forget it’ while the slow cooker does all the work for a delicious, stress-free meal.

    Do you ever stare into the fridge, wondering what to make for dinner? Or maybe you feel overwhelmed by complex recipes and struggle to plan meals the whole family will love. We’ve all been there. Life gets busy, and preparing a delicious, healthy dinner can feel like an impossible task. But what if there was a kitchen hero ready to make your meal prep wonderfully simple? Enter the humble crockpot!

    At Recipesmondial, we believe cooking should be enjoyable, not a chore. That’s why we’ve gathered the best crockpot chicken recipes to make your life easier and your meals more flavorful. These slow cooker chicken recipes are perfect for anyone, from beginner cooks who need step-by-step guidance to busy parents seeking easy weeknight dinners. Our collection covers everything from comforting classics and healthy options to quick 3-ingredient wonders. Get ready to discover approachable home cooking that delivers delicious results every time.

    Get ready to reclaim your evenings and fill your home with the inviting aromas of a perfectly cooked meal. We’ll show you how to master the art of slow cooking, ensuring your chicken turns out tender and juicy every time. You’ll find delicious slow cooker chicken breast recipes and options for other cuts, too. Let’s explore why the crockpot is about to become your favorite kitchen companion and dive into our top picks for simple, healthy meals.

    Why is a Crockpot Perfect for Cooking Chicken?

    Are you searching for easy recipes that deliver big flavor without the fuss? Your trusty crockpot is the answer, especially when it comes to chicken. If you feel overwhelmed by complex recipes or struggle to plan family-friendly meals, the slow cooker solves these common challenges by transforming simple ingredients into something special.

    Here’s why a crockpot is perfectly suited for delicious, stress-free crockpot chicken recipes:

    • Effortless Cooking: This is the ultimate “set it and forget it” method. Simply add your ingredients, turn it on, and let the crockpot work its magic. This frees up hours in your day, making busy weeknights much smoother.
    • Unbeatable Tenderness: The slow cooking process develops incredible tenderness. Even lean cuts, like those used in slow cooker chicken breast recipes, stay wonderfully juicy. Say goodbye to dry, bland chicken!
    • Flavor Infusion: Long cooking times allow flavors to deepen and meld together beautifully. Your spices, herbs, and sauces truly penetrate the chicken, making every bite burst with taste.
    • Healthy Meal Solutions: Crockpots require minimal added oils or fats, as the chicken cooks in its own natural juices or a light broth. This helps you create healthy and balanced meals for your family.
    • Budget-Friendly Meals: You can use less expensive cuts of chicken because the slow cooking process tenderizes them perfectly. It makes simple dinner recipes feel luxurious without the high cost.
    • Versatility for Any Dish: From shreddable chicken for tacos to whole pieces for comforting stews, a crockpot handles it all. You can easily adapt recipes to suit any craving or dietary need.
    • Fantastic for Meal Prep: Cook a large batch of crockpot chicken at once to save time later in the week. It’s perfect for easy lunches or as a quick component for weeknight dinners.

    Ultimately, cooking chicken in a crockpot helps you create delicious, family-friendly meals with confidence and without the stress. Recipesmondial is here to provide easy, step-by-step guidance for every recipe.

    Our Top 15 Foolproof Crockpot Chicken Recipes

    A beautifully plated dish of Lemon Herb Crockpot Chicken with fresh herbs, rice, and a lemon wedge.
    Professional food photography, photorealistic, high-quality food magazine photo of a hearty, perfectly cooked Crockpot Lemon Herb Chicken. The chicken is tender, golden-brown, with fresh herbs like rosemary and thyme scattered on top, resting in a rich, flavorful sauce. It’s served in a rustic ceramic bowl on a wooden cutting board, with a side of fluffy white rice and a sprig of fresh lemon. The lighting is warm and natural, creating an inviting and delicious visual. Shallow depth of field, focus on the chicken.

    Creamy & Comforting Crockpot Chicken Dinners

    There’s nothing quite like a warm, hearty meal that practically cooks itself. That’s why our collection of creamy crockpot chicken recipes is perfect for those busy weeknights.

    These simple dinner recipes deliver incredible, fuss-free flavor and are fantastic for feeding the whole family. Discover how easy it is to create satisfying dishes that taste like they took hours to prepare.

    • Creamy Tuscan Chicken: This dish combines tender chicken breasts with sun-dried tomatoes, spinach, and a rich, creamy sauce. Ideal served over pasta or rice, it’s a fantastic family-friendly meal.
    • Creamy Ranch Chicken & Potatoes: With just a few ingredients—chicken, potatoes, cream of chicken soup, and ranch seasoning—you can have a comforting meal ready. This easy recipe delivers a flavorful combination every time.
    • Slow Cooker Chicken & Dumplings: Enjoy a classic comfort food updated for your crockpot. This recipe features succulent chicken and fluffy dumplings in a savory broth. It’s a truly heartwarming dish.
    • Creamy Italian Chicken: Chicken breasts simmer in a creamy Italian dressing and Parmesan cheese sauce. Serve it with a side of steamed vegetables for a complete meal. This approachable recipe is a crowd-pleaser.
    • Chicken Pot Pie Filling: Get all the flavors of chicken pot pie without the pastry work. This creamy filling is perfect over biscuits, toast, or even on its own. It’s a wonderful solution for busy families.

    Pro Tip: For extra richness, stir in a block of cream cheese during the last 30 minutes of cooking. This simple step adds an irresistible velvety texture.

    Healthy & Light Slow Cooker Chicken Recipes

    Eating well doesn’t have to be complicated or time-consuming, and these healthy, balanced meals are proof. Our selection of slow cooker chicken breast recipes is designed for both ease and nutrition.

    These dishes are packed with flavor, not guilt, so you can enjoy delicious meals that support your wellness goals. As a versatile and lean protein, chicken is an excellent choice for a healthy diet, providing essential amino acids and nutrients [1].

    • Lemon Herb Chicken & Veggies: Chicken breasts cook with a medley of colorful vegetables and fresh herbs. A zesty lemon marinade keeps everything moist and flavorful. It’s a complete meal in one pot.
    • Slow Cooker Salsa Chicken: This incredibly simple dish is perfect for meal prep. Combine chicken breasts with your favorite salsa, then shred the cooked chicken for tacos, burrito bowls, or salads to make weeknight dinners easy.
    • Chicken & Vegetable Soup: A nourishing and light soup, perfect for any season. Load it with tender chicken, carrots, celery, and potatoes. It’s a comforting yet healthy option.
    • Mediterranean Chicken: Chicken thighs (or breasts) simmer with olives, artichoke hearts, sun-dried tomatoes, and a light herb sauce. This flavorful, easy meal will transport you to the Mediterranean.
    • Honey Garlic Chicken with Broccoli: A sweet and savory delight that’s lighter than takeout. Chicken cooks in a homemade honey-garlic sauce. Add fresh broccoli florets during the last hour.

    Substitution Idea: Swap chicken breast for boneless, skinless chicken thighs for extra moisture and flavor. Both are great options for healthy eating.

    Quick & Easy 3-Ingredient Crockpot Chicken

    Feeling overwhelmed by complex recipes? Our 3-ingredient crockpot chicken recipes are the ultimate solution for quick meals and beginner-friendly cooking.

    These simple dinner recipes require minimal effort yet deliver fantastic taste. You’ll find that cooking tasty meals quickly is absolutely achievable, and you’ll build confidence in your cooking skills along the way.

    • BBQ Crockpot Chicken: Combine chicken breasts or thighs with your favorite barbecue sauce. Cook until shreddable. Serve on buns for easy sandwiches. It’s a family-friendly meal.
    • Italian Dressing Chicken: Place chicken in the slow cooker with a bottle of Italian dressing. This creates a flavorful, tender chicken that can be shredded or sliced. It’s fantastic over pasta or in salads.
    • Salsa Chicken (again!): This versatile recipe is so good, it deserves another mention. Chicken and salsa: that’s it! It’s perfect for meal prep. Use it in countless ways throughout the week.
    • Cream of Mushroom Chicken: Chicken breasts and a can of cream of mushroom soup create a rich, savory dish. This is a classic for a reason. Serve over rice or egg noodles.
    • Grape Jelly Meatballs (with chicken!): A surprisingly delicious combination! Chicken meatballs cook in a sauce made from grape jelly and chili sauce. It’s a unique and easy appetizer or main dish.

    Common Mistake to Avoid: Do not lift the lid during cooking! Every peek adds at least 20 minutes to your cooking time. Trust your crockpot to do its magic.

    Family-Favorite Global Flavors

    Spice up your weeknight routine with global comfort foods! These crockpot chicken recipes introduce exciting flavors from around the world while remaining incredibly easy for home cooks.

    Discover simple new dishes your whole family will love. These recipes offer approachable inspiration for culinary adventures, taking the struggle out of planning family-friendly meals.

    • Slow Cooker Teriyaki Chicken: Chicken pieces simmer in a homemade or store-bought teriyaki sauce. Serve this flavorful, easy meal over sticky rice with steamed green beans. It’s a popular takeout dish, simplified.
    • Mild Chicken Curry: Enjoy the warmth of curry without excessive spice. Chicken, coconut milk, curry paste, and vegetables create a rich, aromatic dish. Adjust the curry paste to your family’s preference.
    • Chicken Fajitas: Skip the sizzling skillet and use your slow cooker! Chicken strips, bell peppers, and onions cook in fajita seasoning. Serve with warm tortillas and your favorite toppings.
    • Honey Sesame Chicken: A sweet and nutty chicken dish that’s incredibly easy to make. Chicken cooks in a sauce of honey, soy sauce, and sesame oil. Garnish with sesame seeds and green onions.
    • Hawaiian Pineapple Chicken: Bring a taste of the tropics to your table. Chicken, pineapple chunks, bell peppers, and a sweet and sour sauce create a vibrant dish. It’s a delightful change of pace.

    Variation Idea: For the curry, you can add potatoes or chickpeas for extra bulk and nutrition. This makes it a heartier, more budget-friendly cooking option.

    How Do You Get The Best Results From Your Slow Cooker?

    A home cook gently stirring a chicken dish in a slow cooker in a bright kitchen.
    Professional food photography, photorealistic, high-quality food magazine photo capturing a warm and inviting kitchen scene. A real human home cook, smiling and approachable, is gently stirring a delicious-looking chicken dish inside a working slow cooker on a clean countertop. Steam is subtly rising, suggesting warmth and freshness. The background is a slightly blurred, cozy kitchen setting with natural light coming from a window. The focus is on the cook’s hands and the slow cooker, conveying ease and a successful cooking process.

    Choosing the Right Cut: Chicken Breast vs. Thighs

    Choosing the right cut of chicken is key to delicious slow cooker results. While both chicken breasts and thighs work wonderfully, they each offer unique qualities for your crockpot chicken recipes. Understanding these differences will help you achieve the best outcome for your meal.

    Chicken Breast for Slow Cooker Success

    • Leaner Choice: Chicken breast is a healthy choice because it’s naturally low in fat.
    • Best for Shredding: This cut is perfect for dishes where you want tender, shredded chicken, such as tacos, sandwiches, or creamy pasta sauces.
    • Watch the Time: Because chicken breasts can become dry if overcooked, it’s crucial to monitor cooking times carefully.
    • Cooking Temperature: Cook until it reaches an internal temperature of 165°F (74°C).

    Flavorful Chicken Thighs in Your Crockpot

    • Juicier Results: Chicken thighs have a higher fat content, which keeps them incredibly moist and tender during long cooks.
    • Forgiving: They are much harder to overcook, making them ideal for longer slow cooker times and great for beginner-friendly recipes.
    • Richer Flavor: Thighs offer a deeper, more robust chicken flavor.
    • Versatile: Use them in stews, curries, or any dish that calls for a rich, deep flavor. They are excellent for family-friendly meals.

    For easy recipes, thighs are often a more foolproof choice because they forgive small timing mistakes. However, both cuts can create amazing family-friendly meals in your slow cooker. Your choice simply depends on the final texture and richness you desire.

    The Secret to Preventing Dry Chicken

    No one wants dry, rubbery chicken. This is a common concern with slow cooker chicken breast recipes in particular. Fortunately, keeping your chicken juicy is simple. A few key steps can ensure you achieve flavorful meals made easy every time.

    Here are our top tips for moist, tender crockpot chicken:

    • Use Enough Liquid: Always cook chicken in a liquid like broth, sauce, or even moisture-releasing vegetables. The liquid creates steam, which is essential for keeping the chicken tender.
    • Don’t Overcook: This is the most crucial tip. Chicken is done when it reaches an internal temperature of 165°F (74°C) [2]. Use a meat thermometer to check, as overcooking strips the chicken of its moisture.
    • Add a Little Fat: Incorporate ingredients like cream cheese, coconut milk, or a touch of olive oil. These fats add moisture and richness, which is especially helpful for crockpot chicken breast recipes.
    • Consider Bone-In, Skin-On: Bone-in, skin-on chicken pieces are another great option. The bone helps distribute heat evenly, while the skin provides a protective layer of fat that bastes the meat as it cooks.
    • Keep the Lid On: Resist the urge to peek! Every time you lift the lid, heat and moisture escape, which can extend the cooking time and dry out the chicken.
    • Shredding Wisdom: If you plan to shred the chicken, do it right before serving. Shredding it while hot helps the meat absorb the cooking liquid, boosting both flavor and tenderness.

    Following these simple guidelines will ensure juicy chicken every time, taking the stress out of planning simple dinner recipes. You’ll master step-by-step cooking guidance for truly approachable home cooking.

    Can You Put Frozen Chicken in a Crockpot?

    It’s a common question for busy cooks looking for quick meals and meal prep ideas: Can you toss frozen chicken directly into your slow cooker? The short answer is no. Food safety experts advise against it [3].

    Why Not to Cook Frozen Chicken in a Slow Cooker

    • Temperature Danger Zone: A slow cooker heats up gradually. This means frozen chicken spends too much time in the “danger zone” (40°F to 140°F or 4°C to 60°C) as it thaws. In this range, harmful bacteria can multiply rapidly.
    • Uneven Cooking: The chicken may not cook evenly. Its outside could be overcooked while the inside remains at an unsafe temperature.

    For safe and delicious family-friendly meals, it is always best to start with thawed chicken. This simple step protects against foodborne illness and ensures your chicken cooks properly, making your beginner-friendly recipes more reliable.

    Safe Alternatives for Busy Cooks

    Don’t worry, there are still easy ways to prepare chicken when time is short:

    • Thaw in the Fridge: The safest method is to plan ahead. Move frozen chicken to the refrigerator 24-48 hours before you plan to cook it.
    • Cold Water Thaw: For a faster option, place the chicken in a sealed, leak-proof bag and submerge it in cold water. Be sure to change the water every 30 minutes until thawed.
    • Microwave Thaw: If you’re very short on time, use your microwave’s defrost setting. It’s important to cook the chicken immediately after thawing this way.

    These methods ensure your chicken reaches a safe temperature quickly, helping you prepare simple dinner recipes with confidence. At Recipesmondial, our focus on approachable home cooking means we want you to enjoy the process without stress, knowing your food is both safe and delicious.

    Frequently Asked Questions About Crockpot Chicken

    What are the best simple crockpot chicken recipes?

    If you’re looking for easy and flavorful meals, the crockpot is the perfect solution. Simple crockpot chicken recipes are ideal for beginners and busy home cooks because they require minimal prep. Just set it, forget it, and let your slow cooker do all the work.

    Here are some of our top picks for simple crockpot chicken recipes:

    • Shredded Chicken Tacos or Sandwiches: Cook chicken breasts with taco seasoning and a little broth, then shred and serve. It’s a fantastic, family-friendly meal.
    • Creamy Italian Chicken: Combine chicken with a packet of Italian dressing mix, cream cheese, and a can of cream of chicken soup for a comforting and flavorful dish.
    • Lemon Herb Chicken: Place chicken breasts or thighs with lemon slices, fresh herbs like rosemary and thyme, and a splash of broth. It’s a healthy and balanced meal.
    • BBQ Pulled Chicken: Simply toss chicken with your favorite BBQ sauce. Once cooked, shred it for amazing sandwiches or wraps. This is an approachable home cooking staple.
    • Salsa Chicken: All you need is chicken and a jar of salsa. This quick recipe is incredibly versatile for bowls, burritos, or salads.

    Each of these recipes proves that you don’t need complicated steps to create a delicious meal. They are designed to be straightforward, helping you turn simple ingredients into a dinner you can be proud of.

    How do you keep chicken breast from drying out in a slow cooker?

    It’s a common concern—nobody wants dry chicken! Thankfully, slow-cooking chicken breast to juicy perfection is achievable with a few simple techniques.

    Here’s how to ensure your slow cooker chicken breast stays moist and tender:

    • Don’t Overcook It: Chicken breast cooks faster than you might think. Boneless, skinless breasts typically need just 2-3 hours on high or 3-4 hours on low. Use a meat thermometer to confirm an internal temperature of 165°F (74°C) [4].
    • Add Plenty of Liquid: Chicken needs moisture to stay juicy. Be sure to include a good amount of broth, sauce, or diced tomatoes in your crockpot. This creates a steamy environment that prevents the meat from drying out.
    • Consider Chicken Thighs: While the goal is moist chicken breast, mixing in a few boneless, skinless chicken thighs can help. Thighs are more forgiving and release more natural fat, keeping the entire dish juicy.
    • Sear First (Optional): A quick sear in a hot pan before slow cooking helps develop a rich flavor and can help seal in juices. While not required for most easy recipes, it’s a helpful step.
    • Don’t Peek: Every time you lift the lid, heat and steam escape. This can extend the cooking time and dry out your food. Trust the process and let your slow cooker work uninterrupted.

    By following these simple tips, you’ll get perfectly tender slow cooker chicken every time. Say goodbye to dry, tough meat for good!

    What can I make with 3 ingredients in a slow cooker with chicken?

    You don’t need a long list of ingredients to make a great meal. Three-ingredient crockpot chicken recipes are the ultimate in simple, budget-friendly cooking. They are proof that a delicious, family-friendly dinner can be incredibly easy to prepare.

    Here are some super simple 3-ingredient crockpot chicken ideas:

    • Chicken & Salsa:
      • Boneless, skinless chicken breasts or thighs
      • One jar of your favorite salsa
      • One packet of taco seasoning

      This creates flavorful shredded chicken for tacos, burritos, or salads. It’s an ideal beginner-friendly recipe.

    • BBQ Pulled Chicken:
      • Boneless, skinless chicken breasts or thighs
      • One bottle of your preferred BBQ sauce
      • One small chopped onion

      Perfect for sandwiches or sliders, this recipe makes mealtime decisions a breeze.

    • Creamy Italian Chicken:
      • Boneless, skinless chicken breasts
      • One packet of Italian salad dressing mix
      • One 8-ounce block of cream cheese

      Serve this rich sauce over pasta or rice for a comforting and simple dinner. It’s a go-to for many busy families.

    These simple recipes show how a few key ingredients can create a meal packed with flavor. They are designed for stress-free cooking and are perfect for any busy weeknight.


    Sources

    1. https://www.ncbi.nlm.nih.gov/pmc/articles/PMC6449439/
    2. https://www.fsis.usda.gov/food-safety/safe-handling-instructions/meat-poultry-egg-products/chicken-and-food-safety
    3. https://www.fsis.usda.gov/food-safety/safe-food-handling-and-preparation/food-safety-basics/slow-cooker-and-food-safety
    4. https://www.foodsafety.gov/food-safety-charts/safe-minimum-internal-temperatures
  • Easy BBQ Chicken Recipe: A Simple Guide for Juicy, Flavorful Results

    Easy BBQ Chicken Recipe: A Simple Guide for Juicy, Flavorful Results

    BBQ chicken is a classic dish featuring chicken cooked with barbecue sauce, serving as either a marinade, basting sauce, or finishing glaze. It is most commonly prepared by grilling, baking, or smoking, which results in tender, juicy meat with a sweet, smoky, and tangy caramelized exterior. This popular meal is a staple for cookouts, family dinners, and casual gatherings.

    Few dishes capture the essence of a relaxed, delicious meal quite like classic BBQ chicken. With its smoky aroma, sticky-sweet glaze, and perfectly tender bite, it’s pure comfort food. But making it at home can feel intimidating. Have you ever worried about dry chicken or struggled to find a reliable bbq chicken recipe that delivers amazing results? You’re not alone. Many home cooks feel overwhelmed by complex instructions or find it challenging to plan quick, healthy, and family-friendly meals everyone will love.

    At Recipesmondial, we believe cooking should be a stress-free, enjoyable experience. That’s why we’ve crafted the ultimate easy bbq chicken recipe, designed for home cooks of all skill levels—whether you’re a beginner or looking to perfect your weeknight dinner repertoire. Our guide offers simple, step-by-step cooking guidance to ensure your chicken turns out succulent and packed with flavor every single time. We focus on approachable home cooking, transforming simple ingredients into a truly memorable dish.

    Forget the guesswork and get ready to create a dish that will become a go-to in your kitchen. We’ll walk you through everything, from selecting the right chicken and mastering seasoning techniques to choosing your preferred cooking method—be it on the grill, in the oven, or even in the air fryer. Plus, we’ll share our best tips for the juiciest results and clever serving ideas. Let’s build your confidence to cook delicious, flavorful meals with ease!

    Why Is This the Best Beginner-Friendly BBQ Chicken Recipe?

    Ready to enjoy incredible BBQ chicken without the fuss? You’ve come to the right place. At Recipesmondial, we believe cooking should be a joy, not a chore. This isn’t just another recipe; it’s a guide designed for home cooks who want delicious results with minimal stress.

    We’ll guide you every step of the way, helping you build confidence in the kitchen. Our goal is to ensure you can create a flavorful, family-friendly meal that everyone will love.

    Why Our Recipe Stands Out for Beginners

    If you feel overwhelmed by complex instructions or worry about getting a tasty meal on the table quickly, this recipe is for you. We focus on making cooking enjoyable and stress-free. Here’s why our approach is perfect for beginners:

    • Simple Ingredients: This recipe uses common ingredients found at any grocery store. No need to hunt for specialty items.
    • Clear, Step-by-Step Guidance: We break down the entire process into simple, easy-to-follow steps. You’ll never be left wondering what to do next.
    • Multiple Cooking Methods: Whether you prefer grilling, baking, or using an air fryer, our guide covers it all. Choose the method that suits your equipment and comfort level for reliable results every time.
    • No Fancy Techniques: Forget about complicated marinades or precise knife skills. This recipe focuses on simple techniques that yield juicy, tender chicken every time.
    • Quick and Convenient: This recipe won’t keep you in the kitchen for hours. It’s a perfect solution for busy nights and anyone seeking quick meals, getting a delicious dinner on the table fast.
    • Guaranteed Flavor: Simplicity doesn’t mean sacrificing taste. We show you how to get that classic tangy and sweet BBQ flavor without any guesswork.
    • A Real Confidence Booster: Successfully making a delicious meal is incredibly rewarding. This recipe is designed to help you build skills and feel more confident in the kitchen.
    • Family-Friendly Favorite: BBQ chicken is a universal crowd-pleaser, and this recipe is sure to become a staple in your meal rotation. It’s one of those easy recipes that makes mealtime stress-free.

    Our goal at Recipesmondial is to help you enjoy cooking, discover new flavors, and make mealtime easier. This BBQ chicken recipe is a perfect example of what we stand for: simple, flavorful, and inspiring recipes for everyday life.

    What Ingredients Do You Need for Perfect BBQ Chicken?

    An overhead shot of fresh chicken pieces, BBQ sauce, garlic, olive oil, rosemary, salt, and pepper laid out on a wooden board.
    A professional food photography, photorealistic, high-quality food magazine photo of a flat lay composition showing all fresh, high-quality ingredients for an easy BBQ chicken recipe. The ingredients are neatly arranged on a rustic wooden cutting board or a clean, light-colored kitchen counter. Include raw chicken pieces (a mix of thighs and drumsticks), a small bowl of vibrant, homemade-looking BBQ sauce, a clear glass bottle of olive oil, fresh garlic cloves, a sprig of fresh rosemary, a pinch of coarse sea salt, and black peppercorns. The lighting is warm and natural, creating an inviting and approachable atmosphere, highlighting the freshness of the ingredients. No people visible.

    Creating perfect BBQ chicken starts with the right ingredients. Don’t worry if you’re new to cooking—this ingredient list is simple and approachable. By focusing on everyday items that deliver big flavor, you can make a delicious, stress-free family meal. Let’s get cooking!

    For the Chicken

    The foundation of our easy BBQ chicken recipe is the chicken itself. For juicy, flavorful results, we suggest using chicken thighs because they are incredibly forgiving and ideal for beginners. But you have other options, too!

    • 2-3 pounds Boneless, Skinless Chicken Thighs: These are our top pick. They cook quickly and stay moist, ensuring a delightful bite every time.
    • Alternatively, Bone-In, Skin-On Chicken Thighs: These offer more flavor and yield wonderfully crispy skin. Just be sure to adjust your cooking time if using this cut.
    • Substitution Tip: You can also use chicken breasts. To ensure they cook evenly, cut them into similar-sized pieces. Since breasts are leaner, cook them carefully to prevent dryness. They’re still a great option for healthy and balanced meals.

    Before you begin, make sure your chicken is thawed, then pat it completely dry with paper towels. This simple step helps seasonings stick better and promotes a crisp crust during cooking.

    For a Simple Homemade BBQ Sauce (or Your Favorite Store-Bought)

    A great BBQ sauce elevates your chicken from good to amazing. You have two fantastic choices: whip up a quick homemade version or grab your favorite from the store. Either option will give you delicious results and help you get dinner on the table fast!

    Homemade BBQ Sauce Ingredients

    Making your own BBQ sauce is easier than you think, and it uses common pantry staples. It’s a fantastic option for budget-friendly cooking, plus you get to control the flavor! Here’s what you’ll need:

    • 1 ½ cups Ketchup: This forms the base of our sauce.
    • ½ cup Brown Sugar (packed): For that classic sweet and smoky flavor. Adjust to your taste.
    • ¼ cup Apple Cider Vinegar: Adds a crucial tangy balance.
    • 2 tablespoons Worcestershire Sauce: Deepens the savory notes.
    • 1 tablespoon Dijon Mustard: Provides a pleasant zesty kick.
    • 1 teaspoon Garlic Powder: A fundamental flavor enhancer.
    • 1 teaspoon Onion Powder: Another essential aromatic.
    • ½ teaspoon Smoked Paprika: For a lovely, subtle smokiness. You can use regular paprika too.
    • ¼ teaspoon Black Pepper: Freshly ground is always best.
    • Optional: Pinch of Cayenne Pepper: If you like a little heat, add a dash!

    Simply combine these ingredients, and you’ll have a rich, flavorful sauce in minutes.

    Choosing Your Favorite Store-Bought BBQ Sauce

    When life calls for simplicity, a quality store-bought BBQ sauce is the perfect shortcut for busy families. With so many excellent options available—from smoky and sweet to tangy—you can easily find one you love. Just read the label to find a flavor profile that fits your preferences and get a delicious, family-friendly meal on the table with minimal effort.

    How Do You Make BBQ Chicken Step-by-Step?

    Close-up of glossy BBQ chicken sizzling on a hot grill with visible char marks and gentle smoke.
    A professional food photography, photorealistic, high-quality food magazine photo capturing a close-up, mouth-watering scene of juicy BBQ chicken pieces sizzling and charring slightly on a hot outdoor grill. The chicken has visible, enticing grill marks and is generously coated in a glistening, caramelized BBQ sauce. Wisps of smoke are gently rising from the grill grates. The background is softly blurred, hinting at a warm, inviting backyard or patio setting. The focus is entirely on the delicious texture and color of the chicken, emphasizing its juiciness and flavor. No people visible.

    Step 1: Prepare the Chicken

    Properly preparing your chicken is the key to a juicy, flavorful BBQ experience. This simple step sets the stage for success.

    • Pat Your Chicken Dry: Gently pat the chicken pieces dry with paper towels. This step removes excess moisture, which helps the seasoning stick better and creates a crispier skin.
    • Trim Excess Fat: Next, trim away any large pieces of excess fat from the chicken. Trimming prevents grill flare-ups and results in a leaner, more enjoyable bite.

    This quick prep is an essential part of our easy recipes, guaranteeing fantastic results for all beginner-friendly recipes.

    Step 2: Season Generously

    Now it’s time to build flavor. Generously seasoning the chicken creates a delicious base for your bbq chicken recipe, so don’t be shy with the spices!

    • A Little Oil Goes a Long Way: Lightly brush the chicken with a bit of olive oil. This simple coating helps the seasoning adhere and promotes even browning.
    • Season All Over: Sprinkle your chosen seasoning blend over every surface. For a classic barbecue flavor, use a generous pinch of salt and pepper, along with garlic powder, onion powder, and smoked paprika.
    • Consider a BBQ Rub: Alternatively, use your favorite store-bought BBQ rub. These blends are perfect for flavorful meals made easy. Just be sure to coat the chicken evenly.

    Proper seasoning is a vital step in our step-by-step cooking guidance, ensuring every bite is packed with taste.

    Step 3: Choose Your Cooking Method

    With your chicken prepped and seasoned, you’re ready to cook. You can achieve fantastic results with several different methods, giving you the flexibility to cook your bbq chicken perfectly.

    Consider the equipment you have and your personal preferences, as your choice will determine the next steps. This flexibility is what makes approachable home cooking so enjoyable.

    Step 4: Sauce and Finish to Perfection

    The final step is all about creating that signature sticky, sweet, and tangy glaze for your bbq chicken. Here, timing is crucial.

    • When to Add the Sauce: Wait to apply BBQ sauce until the final 10-15 minutes of cooking. The sugars in the sauce can burn easily, so adding it too early will result in a charred exterior.
    • Brush and Glaze: Use a pastry brush to generously coat the chicken with your favorite BBQ sauce. Flip the pieces once or twice during this process, brushing again after each turn to build an even, beautiful glaze.
    • Check for Doneness: To guarantee your chicken is both juicy and safe to eat, always use a meat thermometer. Insert it into the thickest part of the chicken without touching the bone. It’s fully cooked when the internal temperature reaches 165°F (74°C) [source: https://www.foodsafety.gov/food-safety-charts/safe-minimum-cooking-temperatures].
    • Rest Before Serving: After cooking, remove the chicken from the heat and let it rest for 5-10 minutes before serving. This important step allows the juices to redistribute, ensuring your chicken is wonderfully moist and tender.

    These simple techniques are the foundation of a great beginner-friendly recipe and will help you serve up perfectly finished, family-friendly bbq chicken every time.

    What Is the Best Way to Cook BBQ Chicken?

    How to Make BBQ Chicken on the Grill

    Grilling gives bbq chicken an irresistible smoky flavor that brings out the best in the meat. Plus, cooking outside is always a fun experience!

    Here’s how to get delicious, tender chicken on your grill:

    1. Preheat Your Grill: Preheat your grill to a medium-high heat, around 375-400°F (190-205°C), to ensure even cooking.
    2. Clean and Oil Grates: Clean your grill grates thoroughly, then lightly oil them to prevent the chicken from sticking.
    3. Arrange the Chicken: Place your seasoned chicken on the grill. For bone-in cuts, start skin-side down to achieve a nice sear.
    4. Cook and Flip: Cook for 6-8 minutes per side, flipping every few minutes to prevent burning and promote even cooking.
    5. Add BBQ Sauce: During the last 10-15 minutes of cooking, brush your favorite bbq chicken recipe sauce generously onto the chicken. Turn it frequently to build up a lovely caramelized layer.
    6. Check Doneness: Use a meat thermometer to check for doneness. The chicken is ready when it reaches an internal temperature of 165°F (74°C) in the thickest part of the meat [1].
    7. Rest and Serve: Remove the chicken from the grill and let it rest for 5-10 minutes before serving. This step is crucial for keeping the chicken juicy.

    Grilling Tips for Success:

    • Do not overcrowd the grill; leave enough space for heat to circulate evenly around each piece.
    • Keep a spray bottle of water handy to tame any sudden flare-ups from dripping fat.
    • For bone-in cuts, start with indirect heat to cook the chicken through, then finish over direct heat for crispy skin and sauce caramelization.

    How to Make BBQ Chicken in the Oven

    Cooking bbq chicken in the oven is a reliable method that gives you consistent results every time. It’s a perfect option for any weather, making it a truly family-friendly meal.

    Follow these easy steps for tender, flavorful oven-baked BBQ chicken:

    1. Preheat Oven: Preheat your oven to 400°F (200°C).
    2. Prepare Baking Sheet: Line a large baking sheet with foil and place a wire rack on top. The rack allows air to circulate, helping the chicken cook more evenly.
    3. Arrange Chicken: Place the seasoned chicken pieces in a single layer on the wire rack.
    4. Initial Bake: Bake the chicken for 20-25 minutes.
    5. First Sauce Application: Remove the chicken from the oven and brush it generously with your chosen BBQ sauce.
    6. Continue Baking: Return the chicken to the oven and bake for another 15-20 minutes, flipping and basting again halfway through.
    7. Final Sauce and Broil (Optional): For a thicker, caramelized sauce, brush with more sauce and broil for 2-3 minutes at the end. Watch carefully to prevent burning.
    8. Check Doneness: Confirm the chicken has reached an internal temperature of 165°F (74°C).
    9. Rest: Allow the chicken to rest for a few minutes before serving to keep the meat moist.

    Oven Baking Tips:

    • Using a wire rack is key to lifting the chicken off the pan, helping it crisp up on all sides.
    • Do not add the BBQ sauce too early in the cooking process, as its sugars can burn easily.
    • Line your baking sheet with foil for an easy cleanup.

    How to Make BBQ Chicken in the Air Fryer

    The air fryer is a fantastic tool for making quick and crispy bbq chicken, especially for smaller portions or when you need quick dinner ideas.

    Here’s how to create perfectly cooked air fryer BBQ chicken:

    1. Preheat Air Fryer: Preheat your air fryer to 375°F (190°C) for about 5 minutes.
    2. Lightly Oil Chicken: Lightly coat your seasoned chicken pieces with a little oil to help them get crispy.
    3. Place in Basket: Arrange the chicken in a single layer in the air fryer basket. Do not overcrowd it; work in batches if necessary.
    4. Initial Cook: Cook for 10-12 minutes, flipping the chicken halfway through.
    5. Add BBQ Sauce: Pull out the basket and brush a generous amount of BBQ sauce onto the chicken.
    6. Continue Cooking: Return the chicken to the air fryer and cook for another 5-7 minutes, or until the sauce is caramelized and bubbly.
    7. Check Doneness: Confirm the chicken’s internal temperature is 165°F (74°C) with a meat thermometer.
    8. Rest: Let the chicken rest for a couple of minutes before serving to lock in the juices.

    Air Fryer Tips:

    • Always cook in a single layer, as overcrowding prevents the hot air from circulating properly.
    • Shake the basket or flip the chicken a few times during cooking to ensure all sides cook evenly and get crispy.
    • Keep a close watch on your chicken, since air fryers cook quickly and food can burn easily.

    What Are Some Tips for the Juiciest BBQ Chicken?

    Creating juicy BBQ chicken is easier than you think. You can avoid dry, tough results with a few smart choices and simple techniques that ensure every bite is tender and full of flavor.

    Choosing the Right Cut: Thighs vs. Breasts

    The cut of chicken you choose plays a big role in the final juiciness. While both breasts and thighs work well for BBQ, they have different textures and cooking requirements.

    • Chicken Thighs: Because dark meat has a higher fat content, thighs are naturally more forgiving. They stay moist and tender even if slightly overcooked, which makes them a fantastic choice for beginner cooks.
    • Chicken Breasts: Leaner white meat means breasts can dry out quickly. If you prefer their milder flavor, be extra careful with cooking times. To help lock in moisture, consider using bone-in, skin-on breasts.

    For the juiciest result every time, we recommend bone-in, skin-on chicken thighs. They deliver rich flavor, incredible tenderness, and are forgiving enough to help you build confidence at the grill.

    The Secret to Preventing Dry Chicken

    No one likes dry chicken, but luckily, avoiding it is simple. Follow these key steps for perfectly moist results:

    • Don’t Overcook: This is the most common mistake. Since chicken continues to cook from residual heat after being removed from the grill, a meat thermometer is your most important tool.
    • Target Temperature: Cook chicken to an internal temperature of 165°F (74°C) in the thickest part [2]. This ensures it’s both safe to eat and perfectly juicy.
    • Rest Your Chicken: Always let the chicken rest for 5-10 minutes after cooking. This step allows the juices to redistribute throughout the meat, keeping it tender. Tenting it loosely with foil can help keep it warm.
    • Consider a Brine: For an extra layer of insurance against dryness, try a simple brine. A quick soak in a salt-water solution before cooking adds moisture and enhances the overall flavor.

    By following these tips, you can confidently create flavorful meals without the stress of serving dry chicken.

    When Is the Right Time to Add BBQ Sauce?

    Timing your BBQ sauce application is crucial. Since most sauces contain sugar, adding them too early is a common mistake that causes them to burn, leaving you with a bitter, charred exterior.

    Instead, follow this simple rule:

    • Add Sauce Towards the End: Brush BBQ sauce onto the chicken only during the last 10-15 minutes of cooking. This allows the sauce to caramelize and become sticky and delicious without burning.
    • Multiple Coats: For a thicker, more even layer of sauce, apply it in two or three thin coats. Brush on a coat, let it set for a few minutes, then repeat. This method builds a beautiful, glossy finish.

    This simple technique guarantees a sticky, flavorful crust and is the key to perfect BBQ chicken every time.

    What Can You Serve With BBQ Chicken?

    A serving of perfectly glazed BBQ chicken on a rustic plate, accompanied by a fresh green salad and grilled corn.
    A professional food photography, photorealistic, high-quality food magazine photo showcasing a perfectly plated serving of tender, glazed BBQ chicken. A beautifully browned and juicy chicken thigh, glistening with a rich BBQ sauce, is artfully arranged on a rustic, inviting ceramic plate. It is accompanied by vibrant, fresh side dishes: a small portion of a crisp green salad with cherry tomatoes and a light vinaigrette, and a piece of perfectly grilled corn on the cob. The setting is a warm, inviting dinner table, possibly outdoors or by a window with soft, natural light illuminating the dish, enhancing its appeal and highlighting the textures and colors of the food. No people visible.

    Your juicy, flavorful BBQ chicken is the star of the show, but a great main course deserves equally delicious companions. Choosing the right side dish transforms a good meal into a fantastic one. That’s why we’ve compiled this list of perfect pairings for your easy BBQ chicken recipe, designed for busy families and beginner cooks.

    You’ll find simple dinner ideas that are big on flavor, whether you’re looking for something quick, healthy, or comforting. Get ready to build a complete and satisfying family-friendly meal!

    Classic BBQ Sides That Always Delight

    Some dishes are simply meant to be served with BBQ chicken. These timeless classics complement its sweet and tangy flavors beautifully, bringing a comforting and familiar touch to your plate.

    • Creamy Coleslaw: A cool, crisp coleslaw provides a wonderful contrast. Its tanginess cuts through the richness of the BBQ sauce, making it a refreshing and easy side to whip up.
    • Homestyle Potato Salad: A true crowd-pleaser, creamy potato salad adds a hearty and satisfying element to your meal. It’s a classic comfort food that pairs wonderfully with chicken.
    • Baked Beans (Homemade or Canned): Sweet and savory baked beans are a quintessential BBQ side. They offer a rich flavor and a comforting texture. You can easily elevate canned beans with a few extra ingredients.
    • Corn on the Cob: Whether grilled, boiled, or roasted, sweet corn is always a hit. A little butter and salt are all it needs to become a simple, healthy side that tastes amazing.

    Fresh and Healthy Companions

    To balance the richness of BBQ chicken, try one of these fresh and healthy companions. They add vibrant flavor and nutrients to your bbq chicken meal, creating a balanced dinner without feeling heavy.

    • Simple Green Salad: A mixed green salad with a light vinaigrette is always a good choice. It adds a refreshing crunch and a vibrant taste, making it one of the easiest sides to prepare.
    • Grilled Vegetables: Zucchini, bell peppers, asparagus, or onions can be grilled right alongside your chicken. Grilling enhances their natural sweetness and smokiness—all you need is a drizzle of olive oil and some seasoning.
    • Roasted Sweet Potatoes: Cubed sweet potatoes roasted with a touch of olive oil and spices are delicious and offer a wonderful sweet-and-savory balance. Plus, they are packed with vitamins.
    • Quinoa Salad: A light quinoa salad with chopped cucumbers, tomatoes, and a lemon dressing is a filling yet healthy option. It’s packed with protein and fiber, making it a great choice for a balanced meal.

    Quick and Easy Additions for Busy Days

    When time is tight, you need sides that come together fast. These simple options will help you get a delicious, family-friendly dinner on the table without the stress.

    • White or Brown Rice: A simple bowl of rice is a versatile companion that soaks up all that wonderful BBQ sauce. For a healthier option, choose brown rice for its higher fiber content.
    • Garlic Bread or Dinner Rolls: Warm, crusty bread is perfect for dipping and a comforting addition that everyone enjoys. You can find ready-to-bake options for ultimate convenience.
    • Steamed Green Beans: For a healthy side that takes very little effort, quickly steam some fresh green beans. A simple pat of butter and a pinch of salt is all they need.
    • Boxed Macaroni and Cheese: Sometimes, comfort food is exactly what you need. A quick box of mac and cheese is a nostalgic favorite and a simple dinner recipe that kids always love.

    Tips for Perfect Pairings and Meal Planning

    Choosing the right sides goes beyond just taste. Consider balance, ease of preparation, and your family’s preferences. These practical tips will help you create a stress-free, flavorful meal.

    • Balance Flavors and Textures: Pair your rich BBQ chicken with something fresh or tangy, like a creamy coleslaw. This contrast creates a more interesting and balanced eating experience.
    • Consider Prep Time: If your chicken takes a while to cook, choose quick-prep sides. Using pre-chopped veggies or ready-made salads is a key strategy for efficient meal planning.
    • Use Seasonal Ingredients: Fresh, in-season produce always tastes best and often requires less work to make it shine. Buying seasonal is also a great way to cook on a budget.
    • Don’t Be Afraid to Mix and Match: You don’t need to stick to just one side. Offering two or three different options gives everyone at the table a choice and adds more variety to the meal.

    With these simple side dish suggestions, you can confidently serve a complete, delicious meal with your easy BBQ chicken. Enjoy cooking and eating well with Recipesmondial!

    How Should You Store and Reheat Leftovers?

    One of the best parts of a delicious BBQ chicken dinner is enjoying the leftovers! Proper storage and reheating are key to making sure your chicken stays safe and tastes just as amazing the second time around. Here at Recipesmondial, we want your home cooking experience to be stress-free from start to finish.

    Storing Your BBQ Chicken Safely

    To keep leftover BBQ chicken flavorful and safe to eat, follow these simple storage steps:

    • Cool Quickly: Let the chicken cool to room temperature, but for no more than two hours. This step is crucial for preventing bacteria growth.
    • Use Airtight Containers: Once cool, place the chicken in an airtight container. This locks in moisture and prevents the chicken from absorbing other fridge odors.
    • Refrigerate Promptly: Store the airtight container in the refrigerator for up to 3 to 4 days [3]. This makes leftovers perfect for quick lunches or easy weeknight meals.
    • Freeze for Longer Storage: To store chicken for up to 3 months, wrap individual portions tightly and place them in freezer-safe bags or containers [3]. Thaw it overnight in the refrigerator before you plan to reheat it.

    Following these guidelines will help you enjoy your easy recipes for days, making meal prep a breeze.

    Reheating Your BBQ Chicken for Best Flavor

    Proper reheating is the secret to enjoying your leftovers. The goal is to warm the chicken thoroughly without drying it out. For safety, always use a meat thermometer to ensure the internal temperature reaches 165°F (74°C).

    Reheating in the Oven (Recommended for Best Results)

    The oven is our top recommendation because it gently warms the chicken, keeping it moist while helping the skin crisp up again.

    1. Preheat your oven to 300°F (150°C).
    2. Place the chicken in an oven-safe dish.
    3. Add a splash of chicken broth or water to the dish. This creates steam and prevents the chicken from drying out.
    4. Cover the dish tightly with aluminum foil.
    5. Bake for 15–25 minutes. The exact time will depend on the size and thickness of the chicken pieces.
    6. For crispier skin, remove the foil for the last 5 minutes of heating.

    Reheating in the Air Fryer (Great for Small Portions)

    The air fryer is a fantastic option for reviving the chicken’s crispy texture, especially for smaller portions like wings or drumettes.

    1. Preheat the air fryer to 350°F (175°C).
    2. Lightly spray the chicken pieces with cooking oil to help them crisp up.
    3. Place the chicken in the basket in a single layer, making sure not to overcrowd it.
    4. Air fry for 5–8 minutes, flipping the pieces halfway through cooking.
    5. Check the internal temperature to ensure it’s fully heated.

    Reheating in the Microwave (Quickest Option)

    While it’s the fastest method, be careful not to overcook, as the microwave can make chicken rubbery. This method is best when you’re short on time.

    1. Place the chicken in a microwave-safe dish.
    2. Add a small splash of water or broth to the dish.
    3. Cover the dish with a microwave-safe lid or a damp paper towel to trap steam and keep the chicken moist.
    4. Heat on medium power (50%) in 60-second intervals. Check and flip the chicken after each interval to ensure even heating.
    5. Continue until the chicken is hot throughout.

    Tips for Juicy Reheated Chicken

    • Don’t Overheat: This is the most common mistake. Overheating is the fastest way to make chicken dry and tough.
    • Add Moisture: A splash of liquid—like broth, water, or even a fresh bit of BBQ sauce—makes a huge difference in keeping the chicken from drying out.
    • Slice Thick Pieces: For large pieces like chicken breasts, slice them before reheating. This helps them warm up quickly and evenly.
    • Check Temperature: Always use a meat thermometer to ensure your chicken reaches 165°F (74°C). This guarantees it’s safe to eat.

    With these simple tips, your leftover BBQ chicken will be just as delicious as when it was freshly cooked. At Recipesmondial, we’re here to make home cooking easy and enjoyable for everyone!

    Frequently Asked Questions About BBQ Chicken

    What is the best internal temperature for BBQ chicken?

    For juicy and safe BBQ chicken, cook it to an internal temperature of 165°F (74°C). This is the USDA-recommended temperature to ensure all poultry is cooked safely. [4]

    To check for doneness, use a meat thermometer. Insert it into the thickest part of the chicken, making sure it doesn’t touch any bones.

    Reaching 165°F not only guarantees the chicken is fully cooked, but it also helps keep the meat tender and flavorful. This simple check is the key to cooking with confidence every time.

    How do you get BBQ sauce to stick to chicken?

    Getting that perfect sticky, caramelized BBQ sauce on your chicken is easier than you think. The secret lies in timing and technique. Here’s how:

    • Pat the chicken dry: Before seasoning, gently pat your chicken pieces dry with paper towels. Excess moisture creates steam and prevents the sauce from adhering properly.
    • Apply in layers: Don’t smother the chicken in sauce too early. Instead, brush on thin layers during the final 10-15 minutes of cooking to allow each layer to set and caramelize.
    • Use moderate heat: If you’re grilling, move the chicken to a cooler, indirect heat zone before saucing. In an oven, keep the temperature moderate. This prevents the sugars in the sauce from burning.
    • Baste often: Apply a new layer of sauce every few minutes. This builds up a beautiful, glossy coating as the sugars thicken and create that delicious, sticky glaze.

    This method prevents the sauce from dripping off, giving you a wonderfully flavorful meal that’s perfect for any family dinner.

    Should you marinate chicken before making BBQ chicken?

    While marinating your chicken before grilling is optional, it’s an excellent way to elevate your dish. A marinade can significantly improve your BBQ chicken in three key ways:

    • Boosts flavor: A good marinade infuses the chicken with flavor, going much deeper than a surface-level dry rub.
    • Adds moisture: Marinades help the chicken retain its natural juices, preventing it from drying out during cooking.
    • Tenderizes the meat: Acidic ingredients like vinegar or buttermilk gently break down tough fibers, resulting in incredibly tender chicken.

    If you’re short on time, don’t worry. A good dry rub is a fantastic alternative, or you can simply let the rich flavor of your BBQ sauce shine. Both options offer great flexibility for a quick meal.

    Can I use chicken breasts instead of thighs for this recipe?

    Absolutely! Chicken breasts are a great substitute for thighs in this recipe. Because they are leaner, you’ll need to make a few small adjustments.

    Here are a few tips for using chicken breasts:

    • Watch the cooking time: Chicken breasts are leaner and cook much faster than thighs, so keep a close eye on them to prevent overcooking.
    • Monitor the temperature: Use a meat thermometer and pull the chicken from the heat the moment it reaches 165°F. This is crucial for preventing dry results.
    • Consider brining: For extra juicy breasts, a quick brine before seasoning can make a big difference by helping the meat retain moisture.
    • Pound them flat: Pounding chicken breasts to an even thickness helps them cook uniformly, ensuring no part becomes dry while another is still undercooked.

    While thighs are more forgiving, chicken breasts can be just as delicious when cooked carefully. Simply adjust your cooking time and monitor the temperature closely!


    Sources

    1. https://www.foodsafety.gov/food-safety-charts/safe-minimum-internal-temperature-chart
    2. https://www.foodsafety.gov/food-safety-charts/safe-minimum-cooking-temperatures
    3. https://www.foodsafety.gov/food-safety-charts/cold-food-storage-chart
    4. https://www.fsis.usda.gov/food-safety/safe-food-handling-and-preparation/food-safety-basics/safe-internal-temperature-chart

  • The Best Easy Buffalo Chicken Dip Recipe (A Step-by-Step Guide)

    The Best Easy Buffalo Chicken Dip Recipe (A Step-by-Step Guide)

    The best buffalo chicken dip is a creamy, cheesy, and spicy appetizer made from shredded chicken, cream cheese, ranch or blue cheese dressing, and a cayenne pepper hot sauce like Frank’s RedHot. The ingredients are combined and then baked in the oven or heated in a slow cooker until hot and bubbly, perfect for serving with chips, crackers, or vegetables.

    Need a show-stopping appetizer that’s guaranteed to disappear the moment it hits the table? Look no further. While classic buffalo chicken dip is a universal crowd-pleaser, the thought of making party snacks can feel daunting. We know it’s easy to feel overwhelmed by complex recipes when all you want is a reliable, tasty dish. That’s why we at Recipesmondial are thrilled to share our ultimate easy buffalo chicken dip. It’s designed to take the stress out of entertaining and deliver maximum flavor with minimal effort.

    This isn’t just any buffalo chicken dip—it’s your new go-to for creamy, cheesy, and perfectly spicy flavor. We crafted this recipe with beginner-friendly steps and everyday ingredients, ensuring anyone can achieve perfect results. Whether you’re a seasoned cook or just building confidence, our step-by-step guidance makes preparation a breeze. You’ll spend less time in the kitchen and more time enjoying your gathering. Get ready to impress everyone with this irresistible, stress-free dish.

    Ready to transform simple ingredients into an epic party favorite? In this guide, we’ll walk you through everything you need to know. We cover choosing the best chicken and hot sauce, different cooking methods, creative serving suggestions, and clever make-ahead tips. You’ll soon discover why this approachable home cooking staple is a dish you’ll absolutely love.

    Why You’ll Love This Easy Buffalo Chicken Dip Recipe

    This isn’t just another buffalo chicken dip recipe; it’s a game-changer for your gatherings and a comforting treat for your family! At Recipesmondial, we believe cooking should be enjoyable and stress-free. This easy buffalo chicken dip perfectly embodies that philosophy. It’s a crowd-pleaser that delivers big on flavor without requiring hours in the kitchen.

    If complex recipes overwhelm you, this dish is for you. Struggling to find family-friendly meals everyone enjoys? Look no further! We’ve designed it to be incredibly straightforward, using simple ingredients you likely already have. It’s a fantastic way to build confidence in your cooking skills while creating something truly delicious.

    Here’s why this buffalo chicken dip recipe will quickly become a favorite:

    • Super Simple to Make: Forget complicated steps. Our step-by-step guidance makes this recipe a breeze, even for beginners. You’ll be amazed at how quickly it comes together.
    • Unforgettable Flavor: Get ready for a perfect balance of creamy, cheesy, and spicy goodness. This addictive dip is guaranteed to be a hit with everyone.
    • Perfect for Any Occasion: From game day and potlucks to casual family dinners, this versatile dip is a perfect fit. Serve it as a crowd-pleasing snack or a simple dinner recipe alongside fresh veggies.
    • Uses Everyday Ingredients: You won’t need any fancy items for this recipe. It uses common pantry staples, making it both practical and budget-friendly.
    • Reliable Results Every Time: Say goodbye to cooking uncertainty! Our tried-and-true recipe ensures you’ll get a perfectly gooey and delicious dip every single time.
    • Boost Your Confidence: Enjoy a rewarding, pressure-free cooking experience. Successfully making this simple dish is a fantastic way to build your culinary confidence.

    This buffalo chicken dip recipe also offers great flexibility. You can easily adjust the spice level to suit your family’s tastes, making it an ideal solution for a busy weeknight or a quick, impressive appetizer. Get ready to impress your friends and family with minimal effort!

    What Ingredients Do You Need for Buffalo Chicken Dip?

    Overhead view of fresh ingredients for buffalo chicken dip, including shredded chicken, cream cheese, buffalo sauce, dressing, cheddar cheese, and green onions, arranged on a wooden counter.
    A professional food photography shot, photorealistic, of all the key ingredients for Buffalo Chicken Dip laid out invitingly on a clean, rustic wooden kitchen counter. The arrangement is a flat lay, brightly lit with warm, natural light. Ingredients include shredded cooked chicken, blocks of cream cheese, a bottle of vibrant buffalo sauce, a bowl of ranch or blue cheese dressing, a mound of shredded cheddar cheese, and a small bunch of fresh green onions or parsley. Each item is clear, fresh, and perfectly lit, emulating a high-quality food magazine photo.

    The Best Chicken to Use (Rotisserie, Canned, or Fresh)

    Choosing the right chicken is the first step to a delicious dip. To keep this recipe quick and easy, you have a few great options that minimize fuss.

    Here are your best chicken choices for buffalo chicken dip:

    • Rotisserie Chicken: A true time-saver, store-bought rotisserie chicken is already seasoned, tender, and ready to shred. It’s the perfect shortcut for busy families or quick weeknight meals.
    • Canned Chicken: Another fantastic shortcut, canned chicken is a budget-friendly option that’s pre-cooked and ready to use. Just drain it well and shred with a fork to ensure your dip comes together quickly.
    • Fresh Chicken Breast: If you prefer to cook from scratch, boneless, skinless chicken breasts are a wonderful choice. Simply boil or bake them until fully cooked, then shred them into bite-sized pieces. This option gives you complete control over the seasoning.

    Pro Tip for Shredding Chicken: Shredding any cooked chicken is simple. While you can use two forks to pull the meat apart, an even quicker method is to use a stand mixer with the paddle attachment [1]. It will shred warm, cooked chicken in seconds!

    The Creamy and Cheesy Base

    The heart of any great buffalo chicken dip is its creamy, cheesy base. This combination of ingredients is what makes the dip so rich, indulgent, and irresistible.

    You will need these key ingredients for the base:

    • Cream Cheese: For the richest flavor, use full-fat cream cheese. Be sure to soften it to room temperature first, as this helps it blend smoothly and prevents lumps. It’s the essential foundation for a creamy dip.
    • Cheddar Cheese: Freshly shredded cheddar cheese adds a sharp, tangy flavor and melts beautifully. While pre-shredded cheese works for convenience, shredding your own block of cheese will result in a smoother, creamier texture.
    • Ranch or Blue Cheese Dressing: Either ranch or blue cheese dressing will add vital moisture and flavor, helping to bind all the ingredients together. We will discuss which one to choose in a moment.

    Substitution Idea: Want to try different cheeses? Swap some of the cheddar for Monterey Jack, or use mozzarella for a milder, stretchier texture. Feel free to get creative to find your perfect cheese combination.

    Which Hot Sauce is Best? (Frank’s RedHot Guide)

    For the most authentic buffalo chicken dip, one hot sauce stands above the rest: Frank’s RedHot Original [2]. Its distinct flavor profile is the gold standard for that classic buffalo taste.

    Here’s why Frank’s RedHot is often recommended:

    • Classic Flavor: It offers the perfect balance of heat and tang that you’d expect from classic buffalo wings.
    • Vinegar Base: Its vinegar base brightens the rich, creamy dip, cutting through the fats and adding a delicious zing.
    • Consistent Heat: It provides a moderate, approachable level of spice that’s enjoyable for most palates without being overwhelmingly hot.

    Can I use other hot sauces? Absolutely! While Frank’s is traditional, feel free to experiment with other hot sauces. Just be aware that flavor profiles and heat levels can vary significantly. It’s always a good idea to start with less and add more to taste.

    Ranch vs. Blue Cheese Dressing

    The choice between ranch and blue cheese dressing is a classic debate. Both options add creamy flavor and essential moisture, so the decision really comes down to personal preference.

    Let’s compare these two popular options:

    Dressing Type Flavor Profile Texture Best For
    Ranch Dressing Creamy, savory, with hints of herbs like dill and chives. Generally milder. Smooth and thick. Those who prefer a milder, widely appealing taste. Excellent for family-friendly meals.
    Blue Cheese Dressing Tangy, pungent, with a distinct, sharp blue cheese flavor. More intense. Often thicker, with visible specks of blue cheese. Fans of a bold, traditional buffalo wing experience. Adds a gourmet touch.

    Both options create a fantastic dip. If you’re unsure which to choose, ranch is a safe bet for crowds, as its milder flavor is universally loved. For a more authentic and robust buffalo experience, however, blue cheese dressing adds a bold, tangy flavor that truly elevates the dish.

    How to Make Buffalo Chicken Dip in the Oven (Step-by-Step)

    A bubbling hot, golden-brown buffalo chicken dip in a ceramic baking dish, garnished with fresh green onions.
    A close-up, professional food photography shot, photorealistic, of a perfectly baked, bubbling hot Buffalo Chicken Dip in a rustic cast iron skillet or an attractive ceramic baking dish, just pulled from the oven. The dip’s surface is golden brown and visibly cheesy, with subtle steam rising. It’s garnished generously with freshly chopped green onions. The background is a softly blurred, warm and inviting home kitchen setting, suggesting comfort and deliciousness. This is a high-quality food magazine photo, mouth-watering and ready to serve.

    Get ready to make a delicious and easy baked buffalo chicken dip! Perfect for parties, game nights, or a cozy family meal, this simple recipe delivers incredible flavor with minimal effort. We’ll guide you through each step to ensure your dip is a crowd-pleasing success, even if you’re new to cooking. This guide makes it simple to turn basic ingredients into an impressive dish everyone will love.

    What You’ll Need

    Before you start, gather these essential items and ingredients:

    • A 9×13 inch (or similar) baking dish.
    • A large mixing bowl.
    • An electric mixer (optional, but helpful for cream cheese).
    • 2 cups cooked chicken, shredded or finely diced (about 1 pound raw).
    • 8 ounces cream cheese, softened.
    • ½ cup ranch dressing (or blue cheese dressing).
    • ½ cup buffalo hot sauce (like Frank’s RedHot).
    • 1 cup shredded cheddar cheese (or a cheddar-jack blend), divided.
    • Optional: Chopped green onions or fresh parsley for garnish.

    Step-by-Step Instructions

    Making buffalo chicken dip in the oven is one of the easiest recipes you’ll find. Just follow these simple steps for a crowd-pleasing dish:

    1. Preheat Your Oven: Start by preheating your oven to 375°F (190°C) to ensure the dip bakes evenly.
    2. Soften the Cream Cheese: In a large mixing bowl, beat the softened cream cheese until it’s smooth and creamy. A hand mixer makes this quick. If your cream cheese isn’t soft, microwave it for 15-20 seconds.
    3. Mix the Creamy Base: Add the ranch dressing and buffalo hot sauce to the cream cheese. Mix thoroughly until the base is smooth and well combined. This creamy, spicy mixture is the heart of your dip’s flavor.
    4. Fold in the Chicken: Gently fold the shredded chicken into the creamy base until it’s evenly coated.
    5. Prepare for Baking: Spread half of the chicken mixture into your baking dish. Sprinkle with half of the shredded cheddar cheese to create a cheesy middle layer.
    6. Layer and Top: Spread the remaining chicken mixture on top, then sprinkle the rest of the cheddar cheese over the entire dip. This top layer will bake into an irresistible golden crust.
    7. Bake to Perfection: Place the baking dish in your preheated oven and bake for 20-25 minutes. The dip is ready when it’s bubbly around the edges and the cheese on top is melted and lightly golden brown.
    8. Serve Warm: Carefully remove the dip from the oven and let it cool for a few minutes. This allows it to set slightly. Garnish with chopped green onions or parsley, if desired, before serving.

    Tips for Success with Your Buffalo Chicken Dip

    Achieving a perfect buffalo chicken dip is easy with a few extra pointers. These simple tips will help elevate your beginner-friendly recipe:

    • Room Temperature Cream Cheese: Always use softened cream cheese. It mixes much more easily, preventing lumps in your dip. Take it out of the fridge about 30 minutes before you start.
    • Shredding Chicken: For the best texture, shred your chicken evenly. This ensures every bite has chicken. Using two forks or a stand mixer with a paddle attachment works wonders for shredding.
    • Don’t Overbake: Keep an eye on your dip. Overbaking can dry it out. The goal is bubbly edges and melted, slightly golden cheese on top.
    • Make Ahead: You can assemble the dip completely up to 24 hours in advance. Just cover it and refrigerate. When ready to bake, add a few extra minutes to the cooking time [3].
    • Customizing Spice: If you like it spicier, add a little extra hot sauce. For a milder dip, reduce the hot sauce slightly or add a touch more ranch dressing. This flexibility makes it a great family-friendly meal.

    With this simple method, you can consistently create a creamy, cheesy, and perfectly spicy dip. It’s an easy and stress-free way to build confidence in the kitchen. Serve it warm and get ready to impress your friends and family with this incredible homemade buffalo chicken dip!

    How to Make Buffalo Chicken Dip in a Slow Cooker

    Your slow cooker is perfect for making a delicious and easy buffalo chicken dip recipe. Ideal for parties, game days, or a stress-free family dinner, this method simplifies the cooking process and frees up your oven. The slow cooker also keeps your dip warm and ready to serve for hours.

    Here’s how to create this flavorful dip with minimal effort.

    Ingredients for Slow Cooker Buffalo Chicken Dip

    This recipe uses simple, everyday ingredients like cooked chicken, cream cheese, hot sauce, and your favorite dressing to create a fantastic result.

    • Cooked Chicken: About 2 cups, shredded. Rotisserie chicken is a great shortcut!
    • Cream Cheese: 2 blocks (16 oz total), softened.
    • Buffalo Hot Sauce: 1/2 to 3/4 cup (like Frank’s RedHot).
    • Ranch or Blue Cheese Dressing: 1/2 cup.
    • Shredded Cheddar Cheese: 1 to 1 1/2 cups.
    • Shredded Mozzarella (optional): 1/2 cup for extra gooeyness.

    Step-by-Step Slow Cooker Instructions

    Follow these simple steps to make a warm, creamy, and irresistible buffalo chicken dip.

    1. Prepare Your Chicken: Ensure your chicken is cooked and shredded. If using fresh chicken breasts, boil or bake them first, then shred with two forks.
    2. Add Cream Cheese: Place the softened cream cheese blocks into your slow cooker. Using room temperature cream cheese makes this easier.
    3. Combine Liquids: Pour the buffalo hot sauce and ranch or blue cheese dressing into the slow cooker.
    4. Stir in Chicken: Gently add the shredded chicken.
    5. Add Cheese: Sprinkle in about half of the shredded cheddar cheese. If using mozzarella, add it now as well.
    6. Mix Well: Stir everything together until well combined. The cream cheese should begin to break down and mix with the other ingredients.
    7. Cook: Cover and cook on LOW for 1.5 to 2 hours or on HIGH for 45 minutes to 1 hour.
    8. Stir and Add Remaining Cheese: About halfway through the cooking time, stir the dip well to ensure everything is melting evenly. Mix in the remaining shredded cheddar cheese.
    9. Continue Cooking: Let the dip cook until it is hot, bubbly, and all the cheese has melted.
    10. Serve Warm: Switch your slow cooker to the “Keep Warm” setting to keep the dip at the perfect temperature for serving.

    Helpful Tips for Slow Cooker Buffalo Chicken Dip Success

    These practical tips will help you make the best possible easy buffalo chicken dip.

    • Soften Cream Cheese: Always use softened cream cheese to help it melt smoothly and blend easily. Take it out of the fridge about 30 minutes before you start.
    • Stirring is Key: Stir the dip periodically as it cooks. This prevents sticking at the bottom and ensures a consistent, creamy texture.
    • Consistency Check: If your dip seems too thick, add a splash of ranch dressing or a tablespoon of chicken broth. If it’s too thin, a little extra cream cheese or cheddar will help it thicken.
    • The “Keep Warm” Setting: Use the “Keep Warm” function to hold the dip at the perfect temperature for parties. This prevents overcooking and is ideal for events where guests eat at different times.
    • Prep Ahead: You can cook and shred your chicken a day in advance. Store it in an airtight container in the fridge to save time when you’re ready to cook.
    • Customize Your Heat: Adjust the amount of buffalo hot sauce to your liking. Add more for extra spice or use less for a milder flavor.

    Using your slow cooker makes creating delicious, flavorful dips like this one a breeze. Enjoy this simple and satisfying buffalo chicken dip!

    What Should You Serve with Buffalo Chicken Dip?

    Once you’ve mastered our easy buffalo chicken dip recipe, the next fun part is choosing the perfect pairings! This warm, creamy, and spicy dip is incredibly versatile, making it a star at game days, potlucks, or as a fun simple dinner recipe.

    The key to a great spread is balancing textures and flavors with a mix of crunchy, fresh, and hearty options. As part of our mission to help you enjoy flavorful meals made easy, we’ve gathered the best ideas for what to serve with your buffalo chicken dip. These beginner-friendly recipes are guaranteed to be a hit!

    Classic & Crunchy Dippers

    When you need a reliable, satisfying crunch, these go-to dippers are the perfect choice. They are sturdy enough to handle a generous scoop of buffalo chicken dip, making them a crowd-pleaser for any gathering.

    • Tortilla Chips: Sturdy and savory, perfect for scooping. Look for restaurant-style chips.
    • Pita Chips: These offer a slightly softer crunch and have a wonderful toasted flavor.
    • Crackers: Choose hearty options like Ritz or butter crackers to add a salty, buttery note.
    • Pretzel Crisps or Mini Pretzels: Their salty crunch provides a fantastic contrast to the creamy dip.

    Fresh & Healthy Bites

    To balance the dip’s rich flavor, add some fresh and healthy options. Crisp, cool vegetables offer a refreshing counterpoint and make your appetizer spread more colorful and well-rounded.

    • Celery Sticks: The classic pairing. Their crisp texture and mild flavor complement the dip perfectly.
    • Carrot Sticks: Sweet and crunchy, they add a vibrant touch of color.
    • Cucumber Slices: Refreshing and cool, these slices help cut through the richness of the dip.
    • Bell Pepper Strips: Red, yellow, or orange bell peppers provide a sweet, crunchy bite.
    • Broccoli Florets: A great way to add more green, they offer a uniquely satisfying bite.
    • Cherry Tomatoes: These add a juicy pop of freshness with every scoop.

    Warm & Hearty Breads

    For a more substantial pairing, serve the dip with warm breads. These options help turn your appetizer into a mini-meal, making them perfect for a cozy night in or as part of your family-friendly meals.

    • Sliced Baguette: Toast it lightly for the perfect amount of crunch.
    • Toasted Garlic Bread: Adds a delicious, savory layer of flavor.
    • Hawaiian Rolls or Slider Buns: Soft and slightly sweet, these are ideal for making mini sandwiches.
    • Pita Bread (warm): Cut into triangles for an easy and soft scooping option.
    • Potato Wedges or Tater Tots: Bake until crispy and use them as an indulgent dipper.

    Turn it into a Meal!

    Don’t limit this dip to just an appetizer! With a little creativity, you can transform buffalo chicken dip into a satisfying simple dinner recipe. These ideas are excellent quick meal solutions for busy families.

    • Buffalo Chicken Dip Wraps or Sandwiches: Spoon the dip into a tortilla or onto a bun with lettuce and tomato for a quick lunch.
    • Stuffed Bell Peppers: Halve bell peppers, fill them with the dip, and bake until tender for a healthy and balanced meal.
    • Quesadillas: Spread the dip between two tortillas with extra cheese and grill until golden brown.
    • Loaded Baked Potatoes: Top a baked potato with a generous scoop of dip for a comforting and approachable home cooking option.
    • Lettuce Wraps: For a lighter, low-carb meal, spoon the dip into large, crisp lettuce cups.

    With so many delicious options, you can serve your homemade buffalo chicken dip recipe a new way every time. Enjoy experimenting with these pairings to find your favorites! Recipesmondial is here to help you make every meal delicious and stress-free.

    Tips, Variations, and Storage

    How to Make it Spicier (or Milder)

    One of the best things about making homemade buffalo chicken dip is customizing the heat. Whether you love a fiery kick or prefer a milder, creamy flavor, it’s easy to adjust this recipe to your taste.

    Here’s how to tailor the heat:

    • For More Heat:
      • Add More Hot Sauce: Increase the amount of Frank’s RedHot (or your chosen brand) by 1-2 tablespoons.
      • Cayenne Pepper: Stir in a pinch of cayenne pepper with the cheese mixture. A little goes a long way!
      • Red Pepper Flakes: For a visible pop of spice, mix in 1/2 to 1 teaspoon of red pepper flakes.
      • Hotter Sauce: If you’re feeling adventurous, use a spicier variety of hot sauce.
    • For Milder Flavor:
      • Reduce Hot Sauce: Start with less hot sauce than the recipe calls for, such as 1/4 to 1/2 cup, and taste as you go.
      • More Cream Cheese: Add an extra 2-4 ounces of cream cheese to boost creaminess and mellow the heat.
      • More Dressing: Stir in an extra 1/4 cup of ranch or blue cheese dressing to balance the spice.
      • Use Milder Sauce: Some brands offer milder buffalo sauces, which are a great starting point for those who prefer less heat.

    Can You Make Buffalo Chicken Dip Ahead of Time?

    Absolutely! This dip is perfect for making ahead. You can assemble it in advance and bake it just before serving, making it a great option for parties or busy weeknights.

    • Assemble and Refrigerate:

      Mix all the ingredients as directed in the recipe, but do not bake. Transfer the mixture to your baking dish and cover it tightly with plastic wrap or foil.

    • Store in the Fridge:

      Refrigerate the unbaked dip for up to 2-3 days.

    • Bake When Ready:

      When you’re ready to serve, remove the dip from the fridge. Let it sit on the counter for about 15-20 minutes to take the chill off. Bake according to the recipe instructions, adding an extra 5-10 minutes to the baking time to account for the cold temperature.

    How to Store and Reheat Leftovers

    Proper storage will keep your buffalo chicken dip fresh and delicious. Here’s how to store and reheat any leftovers.

    • Storing Leftovers:
      • Cool Completely: Allow the dip to cool to room temperature before storing. This prevents condensation and keeps it fresh.
      • Airtight Container: Transfer the leftover dip to an airtight container.
      • Refrigerate Promptly: Store the dip in the refrigerator for up to 3-4 days [4].
      • Freezing (Optional): While you can freeze this dip, the creamy texture may change slightly upon thawing. To freeze, place it in a freezer-safe, airtight container for up to 2-3 months. Thaw overnight in the refrigerator before reheating.
    • Reheating Leftovers:
      • In the Oven:
        1. Preheat your oven to 350°F (175°C).
        2. Transfer the dip to an oven-safe dish. If it seems dry, stir in a splash of milk or chicken broth.
        3. Cover with foil to prevent it from drying out.
        4. Bake for 15-25 minutes, or until heated through and bubbly.
      • In the Microwave:
        1. Place an individual portion into a microwave-safe dish.
        2. Cover lightly with a paper towel to prevent splatters.
        3. Heat on medium power for 1-2 minutes, stirring halfway through. Continue heating in 30-second intervals until warmed to your liking.

    Frequently Asked Questions About Buffalo Chicken Dip

    What is the best chicken for buffalo chicken dip?

    Choosing the right chicken for buffalo chicken dip is simple, as you have several excellent, low-effort options. Each one helps you create a delicious dip.

    Here are the best types of chicken to use:

    • Cooked Rotisserie Chicken: A fantastic, time-saving choice for easy recipes, rotisserie chicken is already tender and flavorful. Simply shred the meat and add it to your dip for a quick meal solution.
    • Canned Chicken: This convenient pantry staple is another great option. Just be sure to drain it well before shredding it with a fork. It works wonderfully for a fuss-free beginner-friendly recipe.
    • Cooked Chicken Breast or Thighs: For those who prefer cooking from scratch, fresh chicken is ideal. You can poach, bake, or boil chicken breasts or thighs before shredding them. This option gives you full control over the seasoning and is also a great way to use up leftovers.

    Regardless of which chicken you choose, make sure it’s fully cooked and shredded finely. This texture helps it incorporate perfectly into the creamy dip base, making your flavorful meals made easy.

    Can you eat buffalo chicken dip cold?

    While technically safe to eat cold, buffalo chicken dip is almost always served warm. Warming the dip brings out its best flavors, as the cheeses become melty and creamy to create an irresistible, gooey texture. The hot sauce also tastes more vibrant when heated.

    However, eating cold leftovers is perfectly fine. Just know the texture will be different, as it will be much firmer and less spreadable. For the best experience, we always recommend reheating your dip to restore its fresh, delicious flavor. Our goal is to help you enjoy cooking without stress.

    How do you make buffalo chicken dip without ranch?

    Instead of ranch, many classic recipes call for blue cheese dressing. Its tangy, pungent flavor pairs wonderfully with spicy buffalo sauce, providing a deeper, more traditional flavor profile for a truly flavorful meal.

    If you dislike both ranch and blue cheese, you can still make a delicious dip. Consider this simple substitution:

    • Cream Cheese and Sour Cream: For a creamy base without a specific dressing flavor, combine extra cream cheese with a dollop of sour cream. Thin the mixture with a splash of milk or chicken broth. From there, you can customize the dip by adding seasonings like garlic powder or onion powder. This approach is part of our step-by-step cooking guidance.

    Experiment to find your perfect balance. You’ll quickly build confidence in the kitchen.

    What is the best hot sauce for buffalo dip?

    For an authentic buffalo chicken dip, Frank’s RedHot Original is the undisputed classic. This hot sauce offers the perfect balance of heat and vinegary tang, an iconic flavor that many consider essential for the true buffalo experience [5].

    However, you can certainly experiment with other hot sauces, as different brands offer varying heat levels and flavor notes. For example:

    • Louisiana-style Hot Sauces: These offer a similar vinegary kick but may be milder or feature a different chili pepper profile.
    • Spicier Options: If you love extra heat, choose a hotter cayenne pepper sauce or add a touch of habanero or ghost pepper hot sauce. Start small and taste as you go!

    Ultimately, the “best” hot sauce is the one you enjoy most, a principle at the heart of our approachable home cooking philosophy. Choosing a sauce you genuinely like ensures your easy recipes are always a hit.


    Sources

    1. https://www.thekitchn.com/the-easiest-way-to-shred-chicken-237190
    2. https://www.franksredhot.com/en-us/products/franks-redhot-original-cayenne-pepper-sauce
    3. https://www.foodsafety.gov/keep-food-safe/food-safety-by-events-and-seasons/parties-and-buffets
    4. https://www.foodsafety.gov/food-safety-charts/cold-food-storage-chart
    5. https://www.franksredhot.com/en-us/about-us