Tag: Classic recipe

  • The Only Deviled Eggs Recipe You’ll Ever Need (Classic & Easy)

    The Only Deviled Eggs Recipe You’ll Ever Need (Classic & Easy)

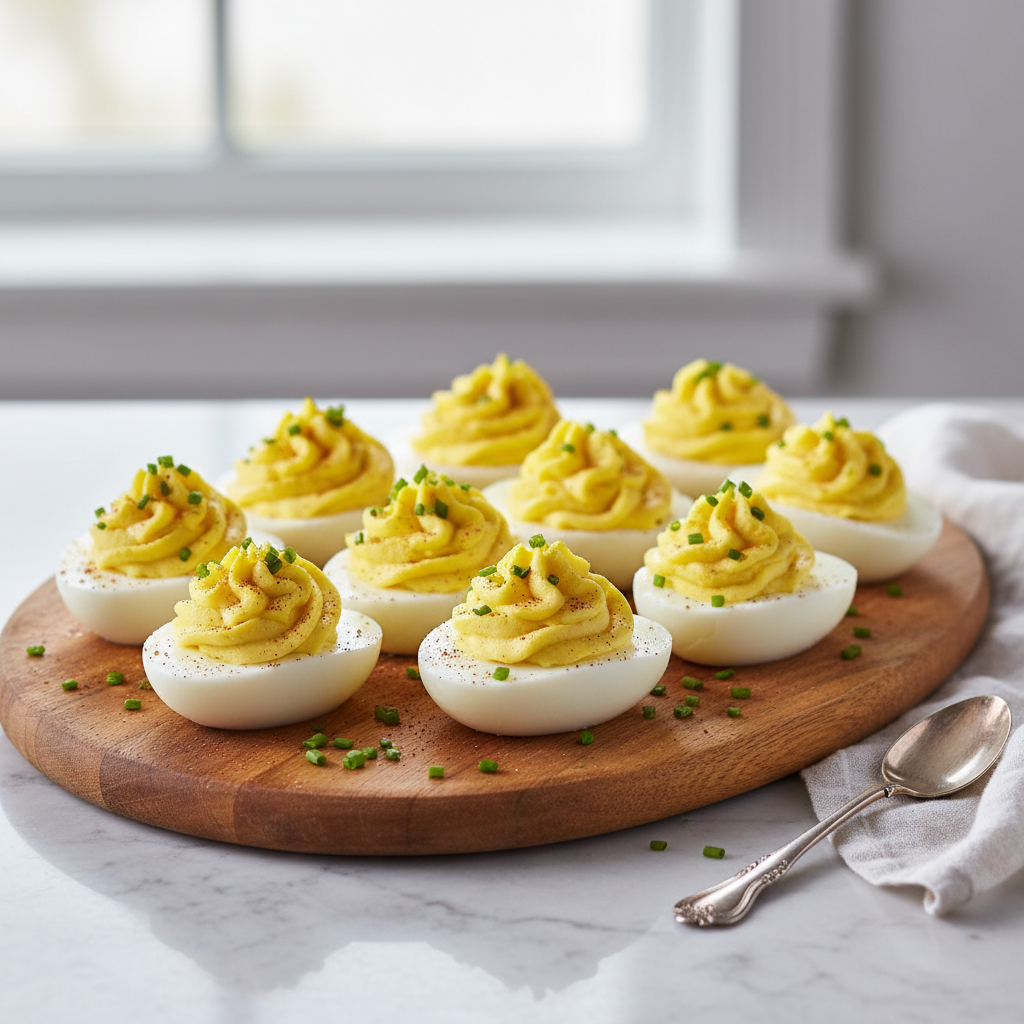
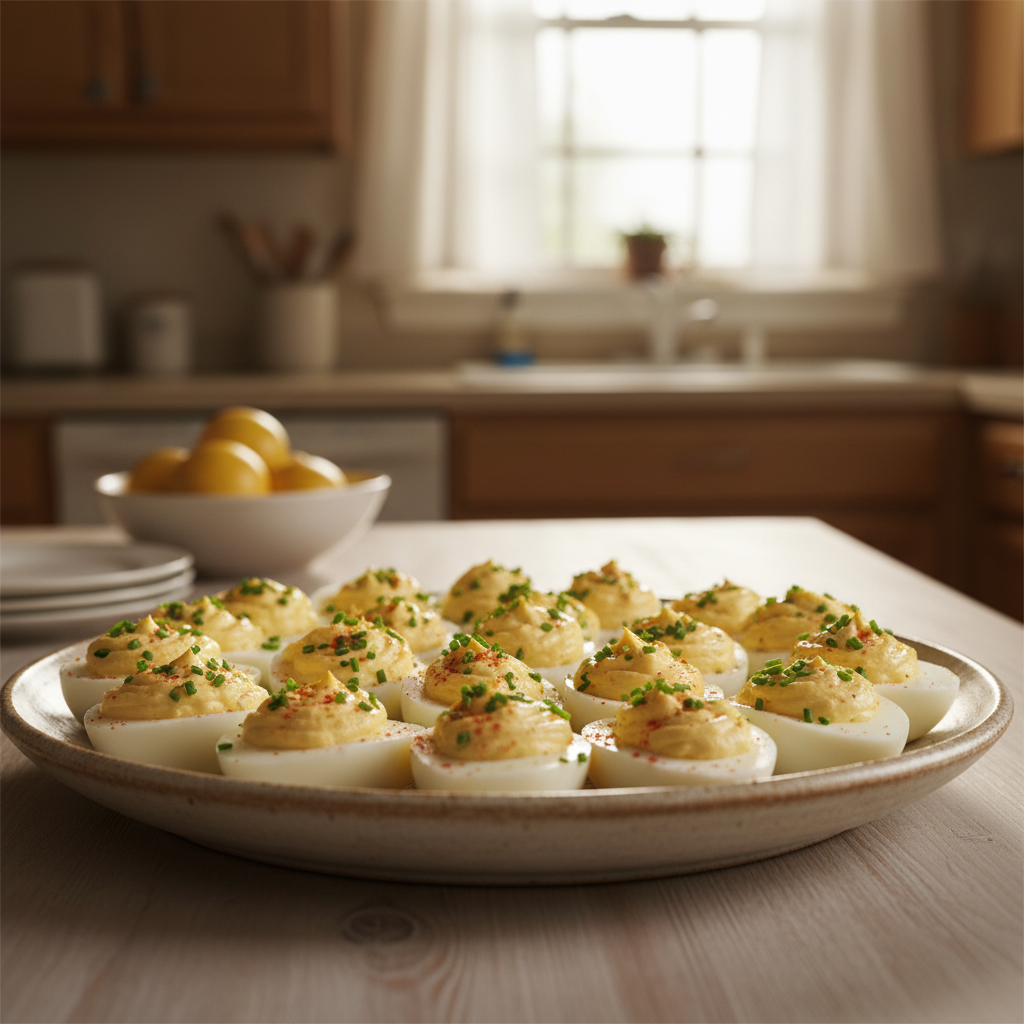
    A classic deviled eggs recipe involves boiling eggs until hard, peeling them, and slicing them in half. The yolks are then removed and mashed with mayonnaise, Dijon mustard, vinegar, and seasonings to create a smooth, creamy filling. This mixture is then piped or spooned back into the hollowed egg whites and garnished with paprika.

    Picture the perfect party spread: vibrant, delicious, and utterly irresistible. A platter of creamy, dreamy deviled eggs is likely front and center. This timeless appetizer is a crowd-pleaser for a reason, but achieving the perfect balance of flavor and texture can be tricky. If you’ve ever felt unsure in the kitchen, whether making appetizers or planning family-friendly meals, you’re in the right place.

    At Recipesmondial, we want you to enjoy cooking without stress. Our focus is on new simple dishes that deliver reliable results, and our ultimate classic deviled eggs recipe is a perfect example. With our step-by-step guidance, you’ll go from feeling unsure to cooking with confidence, creating flavorful meals made easy.

    This isn’t just any deviled eggs recipe; it’s a comprehensive guide perfect for busy home cooks and anyone looking for beginner-friendly recipes. We’ll share all our secrets for perfectly cooked eggs, a velvety smooth filling, and even creative variations to inspire your next gathering. Get ready to add this amazing deviled eggs recipe to your repertoire and delight everyone with your newfound confidence!

    Why You’ll Love This Classic Deviled Eggs Recipe

    A beautiful platter of classic deviled eggs, garnished with paprika and chives, ready for serving.
    100 percent photorealistic, professional food photography style, high-quality food magazine photo. A visually stunning platter of perfectly prepared classic deviled eggs, garnished with a sprinkle of vibrant paprika and fresh, finely chopped chives. The eggs are arranged artfully on a light-colored, rustic serving platter, set against a softly blurred, warm home kitchen background that suggests comfort and approachability. Natural, inviting daylight illuminates the scene, highlighting the creamy texture of the filling and the pristine whites. The overall impression is one of deliciousness, ease, and culinary satisfaction. NO artistic interpretations, NO illustrations, NO vector graphics, NO abstract art.

    Welcome to your new favorite deviled eggs recipe! At Recipesmondial, we believe cooking should be enjoyable, not stressful. We crafted this classic, easy-to-follow guide with that philosophy in mind. Get ready to see why this recipe will become a go-to in your kitchen.

    This recipe transforms a simple ingredient into a delightful bite perfect for any occasion. Best of all, it promises consistent, delicious results every single time.

    Why Our Deviled Eggs Recipe Stands Out

    We know home cooks want reliable guidance and easy recipes without complex steps. To solve common kitchen frustrations, we designed this deviled eggs recipe to be as straightforward as possible.

    • Effortlessly Simple: Tired of overwhelming recipes? We keep things straightforward with simple ingredients and clear instructions, so you can create this classic dish without any fuss.
    • Beginner-Friendly Approach: Lacking confidence in the kitchen? This recipe is for you. With step-by-step guidance that breaks down each part, you’ll build basic cooking skills as you go.
    • Irresistibly Delicious Flavor: Our recipe delivers the perfect creamy, tangy, and savory taste that makes deviled eggs a crowd-pleaser. They are an ideal family-friendly meal addition or party appetizer. In fact, deviled eggs are consistently a top favorite appetizer for holidays and gatherings [1].
    • Quick to Prepare: Need a fast snack or appetizer? This recipe comes together quickly, making it a fantastic solution for busy schedules.
    • Reliable Results: Say goodbye to cooking uncertainty. Our method ensures perfectly boiled eggs and a smooth, creamy filling, so you can cook confidently and achieve delicious results every time.
    • Versatile for Any Occasion: Whether it’s a potluck, a picnic, or a simple family dinner, these deviled eggs fit right in. They’re a classic for a reason!
    • Inspiring Creativity: Go beyond the classic with our fun variations. We encourage you to customize your deviled eggs and explore your culinary creativity.

    At Recipesmondial, our goal is to make mealtime stress-free so you can truly enjoy cooking. This deviled eggs recipe is a perfect example of that philosophy, turning simple ingredients into something special. Move from uncertainty to confidence in the kitchen and get ready to impress everyone with your delicious creations!

    What Ingredients Do You Need for Perfect Deviled Eggs?

    A flat lay photo showing all the fresh ingredients for deviled eggs, including whole eggs, halved egg whites, mayonnaise, mustard, and seasonings.
    100 percent photorealistic, professional food photography style, high-quality food magazine photo. A bright, clean flat lay composition showcasing all the fresh, simple ingredients required for classic deviled eggs. Featured items include several whole, perfectly hard-boiled eggs, some halved hard-boiled eggs with the yolks removed, a small bowl of creamy mayonnaise, a dollop of Dijon mustard, a splash of white vinegar, a pinch of salt and pepper, and a small, vibrant bunch of fresh dill or chives. The ingredients are neatly arranged on a pristine white marble or light wooden kitchen counter, bathed in soft, natural window light. The scene is uncluttered, inviting, and easy for a home cook to follow. NO artistic interpretations, NO illustrations, NO vector graphics, NO abstract art.

    You don’t need a long list of fancy ingredients to make perfect deviled eggs. In fact, the most delicious recipes use simple components you probably already have at home.

    At Recipesmondial, we’ll show you how to turn those everyday items into a flavorful, crowd-pleasing snack. Our guide makes crafting this classic deviled eggs recipe surprisingly easy.

    Essential Ingredients for Classic Deviled Eggs

    To create a batch of classic, creamy devilled eggs, you only need a few basic items. Here’s how these simple components come together for the perfect flavor.

    • Large Eggs (6-8): These are the star of your deviled eggs. Using slightly older eggs, about 7-10 days old, often makes them much easier to peel after boiling [2].
    • Mayonnaise (1/4 cup): This provides the creamy base for your yolk filling. Use your favorite brand for the best taste.
    • Dijon Mustard (1 teaspoon): Dijon adds a lovely tang and a hint of sophisticated flavor. If you prefer, classic yellow mustard also works wonderfully for a more traditional taste.
    • White Vinegar or Pickle Juice (1 teaspoon): A touch of acid brightens the filling. Pickle juice adds a unique, zesty twist.
    • Salt (1/4 teaspoon, or to taste): Seasoning is key to bringing out all the other flavors. Start with a little and add more if needed.
    • Black Pepper (1/8 teaspoon, or to taste): Freshly ground black pepper provides a subtle kick.
    • Smoked Paprika (for garnish): This vibrant spice adds color and a delicate smoky note, making it the perfect finishing touch for your deviled eggs.

    Tips for Ingredient Selection

    While the classic ingredients work well, a few smart choices can elevate your easy deviled eggs recipe. Use these tips to maximize flavor.

    • Egg Quality Matters: Start with high-quality eggs, as they form the foundation of your dish.
    • Mayonnaise Choice: Experiment with different mayonnaise brands—some are tangier, while others are sweeter. Finding your favorite is a simple way to customize beginner-friendly recipes.
    • Mustard Variety: Don’t be afraid to try other mustards, like spicy brown or honey mustard, for a fun variation. This simple swap shows how versatile flavorful meals made easy can be.
    • Fresh Herbs (Optional): For extra flair and freshness, add a sprinkle of fresh chives or dill as a garnish.

    With these basic ingredients, you’re ready to create delightful deviled eggs perfect for any occasion. This recipe shows how simple dinner recipes can also be adapted into amazing appetizers or healthy snacks!

    How to Make Deviled Eggs: A Step-by-Step Guide

    A close-up of hands piping creamy deviled egg yolk mixture into halved hard-boiled egg whites on a cutting board.
    100 percent photorealistic, professional food photography style, high-quality food magazine photo. A close-up, dynamic shot of a friendly, encouraging home cook’s hands (a real human cook) expertly piping the creamy, golden deviled egg filling back into the hollowed-out halves of the hard-boiled egg whites. The piping bag is held with a steady hand, creating a perfect swirl. The eggs are neatly arranged on a light-colored cutting board or serving tray, set within a bright, clean, and inviting home kitchen environment. Soft, overhead lighting emphasizes the texture and precision of the action, making the process look simple and achievable. NO artistic interpretations, NO illustrations, NO vector graphics, NO abstract art.

    Step 1: Boil the Eggs Perfectly

    The secret to delicious deviled eggs starts with a perfectly boiled egg. This crucial first step ensures they peel smoothly every time. Follow our simple, stress-free method and say goodbye to struggling with eggshells.

    Here’s how to get it right:

    1. Place Eggs in a Pot: Gently place your eggs in a single layer in a large pot.
    2. Cover with Water: Add enough cold water to cover the eggs by at least one inch.
    3. Bring to a Rolling Boil: Over high heat, bring the water to a full, rolling boil.
    4. Turn Off Heat & Cover: As soon as it boils, remove the pot from the heat and cover it tightly with a lid.
    5. Let Them Sit: Allow the eggs to sit in the hot water for 12-14 minutes. Do not skip this resting time.
    6. Prepare an Ice Bath: While the eggs rest, fill a large bowl with ice and cold water.
    7. Chill Immediately: Using a slotted spoon, carefully transfer the cooked eggs to the ice bath. Let them chill for at least 5 minutes to stop the cooking process and make them easier to peel [3].
    8. Peel with Ease: Once completely cool, gently crack and peel the eggs under cool running water.

    Pro Tip: Older eggs tend to peel more easily than very fresh ones. If you have very fresh eggs, steaming them can also help with peeling!

    Step 2: Prepare the Creamy Yolk Filling

    Next, it’s time to create the irresistible, creamy filling. You’ll be surprised how simple it is to achieve a perfectly smooth and flavorful mixture.

    1. Separate Yolks: Carefully slice each peeled egg in half lengthwise. Gently scoop the yolks into a medium-sized bowl and arrange the egg white halves on a serving platter.
    2. Mash the Yolks: Use a fork to mash the yolks until they are completely smooth and free of lumps.
    3. Add Creamy Ingredients: Add the mayonnaise, Dijon mustard, and a splash of white vinegar to the mashed yolks for a rich and tangy base.
    4. Season Well: Sprinkle in salt and black pepper to taste.
    5. Mix Until Smooth: Stir all the ingredients together with a fork or small whisk until the filling is perfectly smooth and creamy.

    Chef’s Secret for Creaminess: Don’t be shy with the mashing! The smoother your yolks are before adding other ingredients, the creamier your final filling will be. A touch of vinegar also brightens the flavor beautifully.

    Step 3: Fill the Egg Whites

    You’re almost done! Now for the fun part: filling the egg whites. With a few simple techniques, you can make your deviled eggs look professional and inviting.

    1. Choose Your Method: You have two main options for filling the egg whites:
      • Spoon Method (Easy & Quick): Use a small spoon to carefully scoop the yolk filling into each egg white half, creating a small mound.
      • Piping Bag Method (Elegant): For a more polished look, transfer the filling to a piping bag fitted with a star tip. Pipe an attractive swirl into each egg white half.
    2. Garnish (Optional but Recommended!): Lightly sprinkle the tops with a pinch of paprika. For an extra pop of color and flavor, add a tiny sprig of fresh parsley or dill.
    3. Arrange and Serve: Arrange your beautifully filled deviled eggs on your serving platter, and they are ready to be enjoyed!

    Quick Tip: If you don’t have a piping bag, you can snip off a corner of a sturdy Ziploc bag. This works wonderfully as a makeshift piping bag.

    Tips and Tricks for the Best Deviled Eggs Ever

    Want to take your deviled eggs from good to absolutely unforgettable? We’re sharing our favorite tips and tricks to help you master this classic appetizer. These simple techniques ensure every bite is creamy, flavorful, and perfect. Get ready to cook with confidence and impress everyone with your easy deviled eggs recipe!

    Achieving Perfectly Boiled Eggs

    The foundation of amazing deviled eggs starts with perfectly cooked, easy-to-peel eggs. Avoid dreaded green yolks and tricky shells with these simple steps.

    • Start Cold: Place your eggs in a saucepan and cover them with cold water by about an inch. This gradual heating helps prevent the shells from cracking.
    • Gentle Boil, Then Rest: Bring the water to a rolling boil over medium-high heat. Once it boils, immediately turn off the heat, cover the pot, and let the eggs sit for 12-14 minutes. This method cooks the eggs gently, resulting in creamy, evenly cooked yolks.
    • Ice Bath is Key: As soon as the eggs are done, transfer them to a bowl of ice water for at least 5 minutes. This step is crucial because it stops the cooking process and makes the shells much easier to peel.
    • Prevent Green Yolks: The green ring around the yolk is caused by a reaction between sulfur and iron, which happens when eggs are overcooked. Following the precise cooking time and using an ice bath will prevent this [4].

    Creamy, Dreamy Filling Every Time

    The secret to irresistible deviled eggs is a smooth, luscious filling. Follow these pointers for a filling that melts in your mouth.

    • Mash Thoroughly: Use a fork or a potato masher to break down the cooked yolks until they are completely smooth. For the creamiest possible texture, make sure there are no lumps.
    • Room Temperature Ingredients: Mayonnaise and mustard blend more easily when they aren’t cold. Using room temperature ingredients helps create a smoother, more cohesive filling.
    • Balance Flavors: Taste the filling as you mix it. Don’t be afraid to adjust the mustard, vinegar, and salt to your preference. A small splash of vinegar can significantly brighten the flavor.
    • Sieve for Silkiness (Optional): For a truly restaurant-quality filling, push the yolk mixture through a fine-mesh sieve with a spoon. This extra step removes any remaining small lumps, resulting in an exceptionally smooth and silky texture.

    Elevate Your Flavor

    While the classic recipe is wonderful, a few simple additions can take your deviled eggs to the next level. Get creative with these flavor boosters!

    • A Pinch of Heat: Add a dash of cayenne pepper, a tiny bit of hot sauce, or a sprinkle of smoked paprika for a subtle kick.
    • Herby Freshness: Finely chopped fresh chives, dill, or parsley can add a vibrant, fresh note and beautiful color.
    • Umami Boost: A tiny splash of Worcestershire sauce or a pinch of garlic powder can add a deeper, savory dimension.
    • Tangy Twist: A squeeze of fresh lemon juice brightens the overall flavor profile.

    Picture-Perfect Presentation

    Deviled eggs are as much about presentation as they are about taste. Make your deviled eggs visually appealing with these simple finishing touches.

    • Use a Piping Bag: For an elegant look, spoon the filling into a piping bag fitted with a star tip. This creates beautiful, uniform swirls. If you don’t have a piping bag, a ziptop bag with one corner snipped off works just as well.
    • Garnish Generously: A sprinkle of paprika is traditional and adds a pop of color. Also consider fresh herbs, a single caper, a small piece of cooked bacon, or even a tiny shrimp for a gourmet touch.
    • Clean Whites: Before filling, ensure the egg white halves are clean and dry. Gently wipe away any stray yolk to create a neat appearance.

    Prep Ahead for Stress-Free Serving

    Deviled eggs are a fantastic party appetizer because much of the work can be done in advance. Prepping the components separately helps you avoid stress on the day of your event.

    • Separate Components: You can boil and peel the eggs up to two days ahead of time. To maintain freshness, store the egg whites and the mashed yolk filling in separate airtight containers in the refrigerator.
    • Fill Just Before Serving: For the best texture and appearance, fill the egg whites no more than 2-4 hours before you plan to serve them. This prevents the whites from drying out and keeps the filling fresh.
    • Transport Safely: If you’re bringing deviled eggs to a gathering, use a deviled egg platter with indentations to keep them from sliding. Alternatively, place them in a single layer in a container lined with a paper towel.

    Fun Variations on the Classic Recipe

    Once you’ve mastered our classic deviled eggs recipe, it’s time for a kitchen adventure! These fun variations are simple to make and let you explore new flavors with minimal effort. You can easily adapt your trusted recipe to suit any craving or occasion. Get ready to impress your family and friends with these creative twists!

    Southern-Style Deviled Eggs

    Embrace the comfort and flavor of the South with this beloved twist. Often featuring a hint of sweetness and a tangy crunch, Southern-style deviled eggs are a staple at potlucks and family gatherings. These simple additions are an easy way to elevate your appetizer game.

    • Sweet Pickle Relish: Add 1-2 tablespoons of sweet pickle relish to your yolk mixture for a lovely sweetness and texture.
    • Dijon Mustard: Swap some of the classic yellow mustard for 1 teaspoon of Dijon, which offers a sharper, more complex flavor.
    • Apple Cider Vinegar: A tiny splash (about 1/2 teaspoon) can brighten up the entire filling.
    • Garnish: Sprinkle with a generous amount of smoked paprika. For an authentic touch, add a tiny sliver of candied jalapeño.

    With just a few simple changes, you’ll have a deviled egg that tastes wonderfully homemade and is a true crowd-pleaser at any gathering.

    Spicy Deviled Eggs

    If you love a little kick, these spicy deviled eggs are for you. Adding heat is simple and completely customizable, allowing you to make them as fiery or as mild as you like. This variation is a perfect, beginner-friendly way for spice lovers to add a punch to a classic appetizer.

    • Hot Sauce: Mix 1-2 teaspoons of your favorite hot sauce into the yolk filling. Start with a small amount and taste as you go.
    • Jalapeño: Finely mince 1-2 teaspoons of fresh or pickled jalapeño and fold it into the yolk mixture. Remember to remove the seeds for less heat.
    • Cayenne Pepper: Add 1/4 to 1/2 teaspoon of cayenne pepper for an even distribution of heat.
    • Garnish: Top with a sprinkle of red pepper flakes or a thin slice of fresh jalapeño.

    This spicy twist is a quick and reliable way to add excitement to your deviled eggs, helping you serve a memorable appetizer with confidence.

    Million Dollar Deviled Eggs

    Feeling a bit fancy? “Million Dollar” deviled eggs use luxurious ingredients to turn a simple snack into a gourmet treat. This variation is all about rich flavors and textures, and it’s surprisingly easy to make this impressive appetizer.

    • Crispy Bacon: Cook 2-3 slices of bacon until crispy. Crumble it finely, mixing most of it into the yolk filling while saving some for garnish.
    • Cream Cheese or Sour Cream: Add 1-2 tablespoons of softened cream cheese or sour cream to the yolk mixture. This makes the filling extra creamy and rich.
    • Fresh Chives: Finely chop 1 tablespoon of fresh chives and stir them into the filling for a mild oniony flavor.
    • Garnish: Top each deviled egg with a sprinkle of the reserved bacon crumbles and a few extra chives for an elegant look.

    Truly indulgent, these deviled eggs prove that simple ingredients can create a delicious and visually appealing appetizer. You’ll feel like a pro chef without the stress!

    How to Store Leftover Deviled Eggs Safely

    So, you’ve mastered our classic deviled eggs recipe. What’s the best way to keep those delicious leftovers safe and fresh? Storing deviled eggs correctly is crucial for both taste and food safety.

    At Recipesmondial, we want your cooking to be enjoyable and stress-free, from prep to storage. Follow these simple steps to store your deviled eggs with confidence.

    The Golden Rule: Keep Them Cold

    Because they contain mayonnaise and eggs, deviled eggs are highly perishable and require constant refrigeration. If left at room temperature for too long, harmful bacteria can grow quickly. Always follow the two-hour rule: never leave deviled eggs out for more than two hours [source: USDA FSIS], especially on a warm day.

    Best Way to Store Assembled Deviled Eggs

    Once your deviled eggs are assembled, follow these guidelines:

    • Use an Airtight Container: This is your best defense against spoilage and dryness. A shallow, airtight container prevents air from drying out the filling and egg whites.
    • Arrange in a Single Layer: Place the deviled eggs neatly in one layer. Stacking them can crush the delicate filling and toppings.
    • Seal Out Strong Odors: Eggs easily absorb smells from other foods in the refrigerator. Make sure your container is sealed tightly to prevent this.
    • Refrigerate Promptly: Don’t wait. Transfer the deviled eggs to the fridge as soon as you’re done serving. The sooner they are chilled, the safer they’ll be.

    Storing Unassembled Components (Meal Prep Tip!)

    Want to get a head start? Preparing the components of your deviled eggs separately is a fantastic meal prep trick that also extends their freshness.

    • Store Egg Whites: Place the hollowed-out egg white halves in an airtight container lined with a damp paper towel to keep them from drying out.
    • Store Yolk Filling: Keep the yolk mixture in a separate airtight container or a sealed piping bag. Using a piping bag makes assembly quick and clean later on.
    • Keep Separated and Chilled: Store both containers in the refrigerator. For the freshest taste and best texture, assemble the deviled eggs just before you plan to serve them.

    How Long Do Deviled Eggs Last?

    Even when stored properly, deviled eggs don’t last long. For the best quality, enjoy them within 1 to 2 days [source: FoodSafety.gov]. After that, the egg whites may become rubbery and the filling can lose its flavor.

    • Assembled Deviled Eggs: 1 to 2 days in the refrigerator.
    • Separated Components: The boiled egg whites and yolk filling can last up to 2-3 days when stored separately.

    Signs Your Deviled Eggs Have Gone Bad

    When it comes to food safety, trust your senses. You should discard your deviled eggs immediately if you notice any of these signs:

    • Off Smell: A sour, sulfurous, or otherwise unpleasant odor is a clear sign of spoilage.
    • Slimy Texture: The egg whites should be firm, not slimy or sticky.
    • Discoloration: Look for any changes in color on the whites or the filling that weren’t there before.
    • Mold: Any visible mold means the eggs are unsafe to eat and must be thrown away.

    With these tips, you can enjoy your homemade deviled eggs with confidence. At Recipesmondial, we provide easy recipes and practical advice to help you create delicious and safe family-friendly meals every day.

    Frequently Asked Questions About Deviled Eggs

    What is the secret to making good deviled eggs?

    The secret to truly delicious deviled eggs isn’t complicated; it’s all about focusing on a few key elements. These simple steps will help you create the perfect appetizer.

    • Perfectly Cooked Eggs: Start with perfectly boiled eggs that are easy to peel. This foundational step ensures smooth whites and vibrant, creamy yolks.
    • Quality Ingredients: Use fresh, high-quality mayonnaise and fresh herbs like chives or dill. These simple ingredients make a big difference in flavor.
    • Balanced Seasoning: Aim for a balance of tangy, savory, and a hint of spice. Mustard, vinegar or pickle juice, salt, and pepper are essential, while a dash of paprika adds color and mild flavor.
    • Creamy Texture: For a lump-free filling, mash the yolks until they are very fine. We cover this technique in more detail below.
    • Gentle Handling: Be careful when peeling the eggs and mixing the filling to keep the egg whites intact and looking their best.

    By focusing on these fundamentals, you’ll make delicious deviled eggs every time and enjoy the process!

    How do you make the filling so creamy?

    Achieving an irresistibly smooth deviled egg filling is simpler than you might think. Here’s how to get it perfectly creamy:

    • Finely Mash Yolks: First, mash the cooked egg yolks with a fork until they are completely smooth. For an extra-velvety texture, press the yolks through a fine-mesh sieve.
    • Choose Your Mayo Wisely: Full-fat mayonnaise yields the richest, creamiest result. While plain Greek yogurt can be a lighter substitute, it may alter the taste slightly.
    • Add a Touch of Tang: A splash of pickle juice, white vinegar, or apple cider vinegar not only brightens the flavor but also helps create a smoother consistency.
    • Include Mustard: Dijon or classic yellow mustard adds a tangy flavor and contributes to the filling’s silky texture.
    • Mix Thoroughly: Combine all your ingredients and mix well until no lumps remain. This ensures every component is fully incorporated for the best flavor and texture.

    Follow these tips, and you’ll love how easy it is to achieve a luxuriously smooth filling!

    Can you make deviled eggs the day before a party?

    Absolutely! Deviled eggs are a fantastic make-ahead appetizer. To ensure they stay fresh and look their best, it’s best to prepare the components separately.

    Here’s the best method for stress-free prep:

    1. Separate Components: Prepare the egg white halves and the yolk filling, but keep them separate for now.
    2. Store Properly: Place the egg whites in an airtight container. Keep the filling in a separate airtight container or a zip-top bag. Refrigerate both immediately.
    3. Cover the Filling: To prevent a dry crust from forming on the filling, press a piece of plastic wrap directly onto its surface before sealing the container.
    4. Assemble Just Before Serving: When you’re ready to serve, or up to an hour beforehand, pipe or spoon the filling into the egg whites. Garnish right before they go on the table to keep them looking fresh.

    This make-ahead method removes the last-minute rush, making your party planning much more enjoyable.

    What does ‘deviled’ mean in deviled eggs?

    The term ‘deviled’ is a culinary one that refers to food prepared with spicy or zesty seasonings. Despite the name, it has no religious connotation.

    The term first appeared in print in the late 18th century [5] to describe dishes with bold, piquant flavors. Common “deviling” ingredients include:

    • Mustard
    • Cayenne pepper
    • Red pepper flakes
    • Hot sauce
    • Paprika

    In deviled eggs, these ingredients add a delightful kick that elevates the classic recipe. So, when you see ‘deviled’ on a menu, simply think ‘spicy and flavorful.’


    Sources

    1. https://www.instacart.com/company/grocery-trends/thanksgiving-trends-2023/
    2. https://food.unl.edu/article/how-peel-hard-boiled-eggs
    3. https://www.nal.usda.gov/blogs/ask-experts/how-cook-hard-boiled-eggs
    4. https://food.unl.edu/food-safety-qa-eggs
    5. https://www.merriam-webster.com/word/deviled
  • The Best Classic Meatloaf Recipe (Easy, Juicy, and Flavorful!)

    The Best Classic Meatloaf Recipe (Easy, Juicy, and Flavorful!)

    This classic meatloaf recipe creates a perfectly moist and flavorful dinner using simple ingredients like ground beef, breadcrumbs, onion, milk, and a sweet, tangy ketchup-based glaze. The key to a juicy result is not overmixing the ingredients and allowing the loaf to rest after baking. This easy, step-by-step guide is perfect for a comforting family-friendly meal.

    A classic meatloaf is more than just a meal—it’s a comforting memory that brings families together. But creating that perfect, juicy loaf can feel like a challenge. Many home cooks worry about dry results or get frustrated by overly complex recipes. We understand, and we believe enjoying this timeless dish should be simple and stress-free.

    That’s where Recipesmondial comes in. We’re here to help you cook with confidence, starting with beloved dishes like this one. Our best classic meatloaf recipe is designed to be an incredibly easy meatloaf recipe. It’s perfect for beginner cooks and guarantees a juicy, tender result every time. Say goodbye to complicated steps. It’s time for approachable home cooking that delivers on taste and makes preparing family-friendly meals a joy.

    This meatloaf recipe isn’t just simple; it’s also packed with incredible flavor. It’s a true family favorite that will have everyone asking for seconds. We’ll walk you through every step, from choosing the right ingredients to forming the perfect loaf and creating that irresistible tangy glaze. Get ready to discover why this will become your go-to meatloaf. Flavorful meals made easy are truly within reach.

    Why Is This the Best Meatloaf Recipe?

    A thick slice of glazed meatloaf on a plate, revealing its juicy interior, served with mashed potatoes and green beans.
    A single, generous slice of classic meatloaf, showcasing a perfectly moist and tender interior, rich brown crust, and glistening glaze, artfully arranged on a rustic white ceramic plate with a small side of creamy mashed potatoes and green beans. The meatloaf has a slight sheen from the glaze. The background is a blurred, warm, inviting home kitchen. Photorealistic, professional food photography, high-quality food magazine photo, warm, soft lighting, focus on deliciousness and texture.

    If you’re looking for a meatloaf recipe that’s easy to make, incredibly juicy, and packed with flavor, you’ve found it. This classic recipe from Recipesmondial is perfect for home cooks of all skill levels and is quickly becoming a favorite for busy families everywhere.

    Cooking should be enjoyable, not stressful. You want delicious, reliable results, which is why we perfected this simple dinner recipe to turn everyday ingredients into a memorable meal. Say goodbye to complex instructions and dry, crumbly meatloaf—our method focuses on clear steps and incredible flavor.

    Here’s what makes this the best meatloaf recipe you’ll ever try:

    • Unbeatable Juiciness: Our special technique locks in moisture, ensuring a tender, juicy meatloaf every single time. No more dry, disappointing results.
    • Rich, Savory Flavor: A perfect blend of seasonings creates deep, comforting flavors. The savory meat is perfectly balanced for a meal that’s both simple and delicious.
    • Perfectly Tangy Glaze: Our simple, sweet, and tangy glaze elevates the entire dish. It bakes right onto the loaf, adding a beautiful finish and an irresistible taste.
    • Beginner-Friendly Approach: With clear, step-by-step instructions, even new cooks can feel confident in the kitchen. This is a truly approachable home cooking experience.
    • Quick & Easy Preparation: We know your time is valuable. This recipe uses simple techniques so you can get a delicious meal on the table without feeling overwhelmed.
    • Reliable Results: This recipe is tested to work every time. You can count on this classic meatloaf to turn out perfectly, making it a dependable choice for family-friendly meals.
    • Versatile & Adaptable: We include practical tips and substitutions, so you can easily adjust the recipe to fit your family’s preferences. It’s a great base for your own culinary creativity.

    This meatloaf isn’t just a meal—it’s an invitation to enjoy cooking again and build confidence in the kitchen. Get ready to impress your family with an outstanding dish they will request again and again.

    What Ingredients Do You Need for a Classic Meatloaf?

    An overhead view of classic meatloaf ingredients, including ground beef, eggs, breadcrumbs, and vegetables, neatly arranged on a wooden board.
    A visually appealing flat lay of all classic meatloaf ingredients arranged on a rustic wooden cutting board or light-colored kitchen counter. Includes fresh ground beef in a small bowl, eggs, breadcrumbs, finely chopped onion and garlic, milk, Worcestershire sauce, ketchup, mustard, and a sprig of fresh parsley. Ingredients are clean, vibrant, and neatly presented, with good separation. Photorealistic, professional food photography, high-quality food magazine photo, bright, natural lighting, overhead shot.

    Ready to make a delicious meatloaf that will become a family favorite? The secret to the best meatloaf recipe is using simple, fresh ingredients—many of which you likely already have on hand. This makes preparing a flavorful and stress-free meal easier than ever.

    We’ve broken down the ingredients into two main parts: the juicy meatloaf mixture and the irresistible tangy glaze. With this simple guide, you’ll have everything you need to cook with confidence.

    For the Meatloaf Mixture

    The foundation of any great meatloaf is a well-seasoned, balanced mixture. These ingredients work together to ensure your meatloaf is moist, flavorful, and holds its shape perfectly.

    • 1 ½ pounds ground beef (80/20 lean): This is our star ingredient! The 80/20 blend is perfect, offering enough fat for moisture and flavor without being greasy. For a leaner option, you can use 90/10 ground beef.
    • 1 small yellow onion, finely diced: Onion adds a wonderful savory depth. Dicing it finely ensures it blends seamlessly into the meatloaf.
    • 2 cloves garlic, minced: Fresh garlic brings a warm, aromatic touch that elevates the overall flavor.
    • ¾ cup plain breadcrumbs: Breadcrumbs act as a binder, helping absorb moisture and keeping the meatloaf tender. For a gluten-free option, use gluten-free breadcrumbs or crushed crackers.
    • 1 large egg: As another essential binder, the egg helps hold everything together and prevents your meatloaf from crumbling.
    • ½ cup milk (whole or low-fat): Milk adds essential moisture, which is key for a juicy texture. You can use any type you prefer.
    • 2 tablespoons Worcestershire sauce: This ingredient adds a fantastic umami kick that deepens the meat’s savory flavor.
    • 1 tablespoon ketchup: A little ketchup in the mixture adds a hint of sweetness and tang for that classic meatloaf flavor.
    • 1 teaspoon Dijon mustard: Dijon mustard offers a subtle, sharp flavor that beautifully complements the other savory ingredients.
    • 1 teaspoon salt: Essential for seasoning your meatloaf just right.
    • ½ teaspoon black pepper: Adds a touch of warmth and spice.
    • ½ teaspoon dried Italian seasoning (or a mix of dried parsley, oregano, and basil): These herbs add aromatic notes that tie all the flavors together for a classic, comforting taste.

    For the tangy meatloaf glaze

    A classic meatloaf isn’t complete without its tangy and slightly sweet glaze. This simple topping adds a beautiful finish and an extra layer of flavor, making the final dish irresistible.

    • ½ cup ketchup: This forms the base of the glaze, providing a rich, tomatoey flavor.
    • ¼ cup packed light brown sugar: Brown sugar adds sweetness to balance the tang and gives the glaze a lovely caramelization.
    • 1 tablespoon apple cider vinegar: The vinegar brings a bright, tangy note that cuts through the richness of the meatloaf.
    • 1 tablespoon Worcestershire sauce: As in the meatloaf mixture, this sauce adds a savory, complex depth to the glaze.
    • 1 teaspoon Dijon mustard: A touch of mustard enhances the tang and gives the glaze an extra zing.

    How Do You Make Meatloaf from Scratch?

    A home cook's hands gently mixing ground beef and other ingredients for meatloaf in a large bowl.
    A warm, inviting close-up action shot of a real human home cook’s hands gently mixing the meatloaf ingredients in a large, clean stainless steel or ceramic mixing bowl. The ingredients, including ground beef, chopped vegetables, and binder, are clearly visible and well-combined, showcasing the rich texture. The kitchen background is slightly blurred, suggesting a cozy, approachable home cooking environment with good counter space. Photorealistic, professional food photography, high-quality food magazine photo, natural, soft lighting, focus on the hands and ingredients, conveying ease and engagement.

    Step 1: Prepare the Meatloaf Mixture

    A great meatloaf starts with the right mixture. Follow these steps to create a flavorful foundation, remembering to mix gently for the best texture.

    1. Sauté the Aromatics: Melt olive oil in a skillet over medium heat. Add the chopped onion, bell pepper, and garlic, then cook for 5–7 minutes until soft and fragrant. Let the vegetables cool slightly before adding them to the meat.
    2. Combine Wet Ingredients: In a large mixing bowl, whisk together the milk, eggs, Worcestershire sauce, ketchup, Dijon mustard, salt, and black pepper until well combined.
    3. Add Dry Binders: Stir the breadcrumbs and fresh parsley into the wet mixture. This step helps the breadcrumbs absorb moisture, which will bind the meatloaf together.
    4. Introduce the Meat and Veggies: Add the ground beef and the cooled sautéed vegetables to the bowl with the wet ingredients.
    5. Mix Gently: Use your hands to gently combine all the ingredients. Be careful not to overmix, as this can result in a tough meatloaf. Mix only until everything is incorporated.

    Step 2: Shape the Loaf

    Properly shaping the meatloaf ensures it cooks evenly and holds its form. Follow these steps for a perfect loaf.

    1. Choose Your Pan: Use a standard loaf pan for a classic shape, or form the loaf freehand on a parchment-lined baking sheet. A baking sheet will yield a crustier exterior.
    2. Transfer the Mixture: Carefully move the meat mixture to your chosen pan or baking sheet.
    3. Shape and Compact: If using a loaf pan, gently press the mixture down to eliminate air pockets. If shaping freehand, form it into an oval about 9 inches long and 4–5 inches wide. Slope the sides slightly to help the loaf hold its shape while baking.

    Step 3: Make the Glaze

    This tangy glaze is the secret to an exceptional meatloaf, adding a final layer of moisture and flavor. Making it is quick and simple.

    1. Gather Ingredients: In a small bowl, combine the ketchup, brown sugar, apple cider vinegar, and a dash of ground mustard.
    2. Whisk Together: Whisk the ingredients until the brown sugar has completely dissolved and the glaze is smooth.
    3. Set Aside: Set the glaze aside to use later in the baking process.

    Step 4: Bake and Glaze the Meatloaf

    The key to a perfectly caramelized finish is adding the glaze at the right time during baking. Follow these steps for a straightforward cooking process.

    1. Preheat Your Oven: Preheat your oven to 350°F (175°C). This moderate temperature ensures the meatloaf cooks evenly.
    2. Initial Bake: Place the meatloaf in the preheated oven and bake for 45 minutes. This initial bake, without the glaze, helps the loaf set.
    3. Apply the Glaze: After 45 minutes, carefully remove the meatloaf from the oven and spread about two-thirds of the glaze evenly over the top and sides.
    4. Continue Baking: Return the meatloaf to the oven and bake for an additional 15-20 minutes, or until the glaze is bubbly and lightly caramelized.
    5. Check for Doneness: To ensure the meatloaf is cooked through, insert an instant-read thermometer into the center. It is safe to eat when the internal temperature reaches 160°F (71°C) [source: https://www.fsis.usda.gov/food-safety/safe-food-handling-and-preparation/food-safety-basics/safe-temperature-chart].

    Step 5: Rest and Serve

    Don’t skip this final step. Resting the meatloaf is crucial for locking in juices, which makes it more flavorful and easier to slice.

    1. Rest the Meatloaf: Remove the meatloaf from the oven and let it rest for at least 10–15 minutes before slicing. This crucial step allows the juices to redistribute, ensuring every slice is moist and tender.
    2. Slice and Serve: After resting, transfer the meatloaf to a cutting board and slice it into thick portions.
    3. Garnish: For extra flavor and a touch of color, drizzle with the remaining glaze and garnish with fresh parsley.
    4. Enjoy Your Creation: Serve the meatloaf hot and enjoy this classic comfort food with your family.

    Expert Tips for the Juiciest, Most Flavorful Meatloaf

    Crafting the perfect meatloaf is easier than you think. With a few simple tricks, you can elevate your classic recipe from good to absolutely incredible. These expert tips focus on maximizing juiciness and flavor, helping you achieve a truly memorable meal every time.

    Recipesmondial is here to guide you. Say goodbye to dry, bland meatloaf and get ready for a delicious, family-friendly meal that everyone will love!

    Choosing Your Meat for Ultimate Flavor and Juiciness

    • Embrace a Meat Blend: For the most flavorful and juicy meatloaf, use a mix of ground meats. An 80/20 ground beef provides richness, while ground pork or veal boosts moisture and complex flavor. This combination is the key to a tender result.
    • Fat Content Matters: Opt for ground beef with an 80% lean to 20% fat ratio. The fat renders during baking, which adds incredible flavor and keeps the meatloaf from drying out. Using leaner meats can result in a drier loaf.

    The Secret to a Tender and Moist Loaf

    • Don’t Overmix: This is a crucial step for a tender meatloaf. Gently mix the ingredients with your hands just until they are combined. Overworking the meat develops proteins that will make your final loaf tough and dense.
    • Boost Moisture with Liquids: Incorporate a liquid like milk, beef broth, or tomato juice into your mixture. This adds essential moisture that keeps the meatloaf tender and prevents it from drying out as it bakes.
    • Sauté Your Aromatics: Always sauté aromatics like onions, garlic, and bell peppers before adding them to the mix. This process softens them and deepens their flavor, adding complexity and preventing any raw, crunchy bits in your finished meatloaf.
    • Use the Right Binder: Breadcrumbs and eggs are essential binders. They not only hold the loaf together but also absorb moisture, which contributes to a tender texture. For the best results, use fresh breadcrumbs whenever possible.

    Baking and Glazing for Perfection

    • Shape Your Loaf Properly: For a better crust, form your meatloaf into a free-form loaf on a baking sheet instead of pressing it into a pan. This allows heat to circulate more evenly, creating a delicious crust on all sides.
    • The Magic of Glaze: A tangy glaze adds a burst of flavor and creates a beautiful, caramelized exterior. For the best results, apply half of the glaze at the start of baking and the remaining half about 15-20 minutes before it’s done cooking.
    • Bake to the Right Temperature: Use a meat thermometer to guarantee your meatloaf is cooked perfectly. Remove it from the oven when the internal temperature reaches 160°F (71°C) [1]. This ensures it is safe to eat and prevents the meat from overcooking.

    The Essential Resting Period

    • Rest Your Meatloaf: Once baked, let your meatloaf rest for at least 10-15 minutes before slicing. This vital step allows the juices to redistribute throughout the loaf, ensuring every slice is incredibly moist. Cutting it too soon will cause those flavorful juices to run out.

    Following these simple tips will transform your meatloaf into a juicy, flavorful, and truly satisfying dish. Enjoy cooking this easy, family-friendly meal with confidence!

    What Should You Serve With Meatloaf?

    A delicious, juicy meatloaf is the star of any dinner plate, but pairing it with the right side dishes turns it into a complete and comforting meal. For busy home cooks, choosing easy and flavorful sides is the key to success.

    At Recipesmondial, we love helping you create amazing family-friendly meals without the stress. Here are some of our favorite simple side dish ideas to serve with your classic meatloaf for a delightful and balanced dinner.

    Classic Comfort Sides

    These go-to choices are simple, heartwarming recipes that bring a sense of satisfaction to the dinner table.

    • Creamy Mashed Potatoes: There’s a reason this pairing is timeless! Fluffy, buttery mashed potatoes are perfect for soaking up extra meatloaf glaze. You can easily make them ahead of time for quick meal prep.
    • Cheesy Macaroni and Cheese: For a truly indulgent and family-friendly meal, creamy mac and cheese is a winner. Its comforting flavor beautifully balances the savory meatloaf.
    • Warm Dinner Rolls or Crusty Bread: Don’t underestimate the power of a good roll. They are wonderful for sopping up every last bit of glaze or gravy. Serve them warm for an extra touch of coziness.

    Fresh & Flavorful Vegetable Sides

    Adding a vegetable is the easiest way to create a healthy, balanced meal. These quick and beginner-friendly options add both freshness and flavor.

    • Garlic Green Beans: Lightly steamed or sautéed green beans with a hint of garlic are crisp and refreshing, providing a lovely contrast to the richness of the meatloaf.
    • Roasted Asparagus: Toss fresh asparagus with olive oil, salt, and pepper, then roast until tender-crisp. This elegant side is surprisingly simple and adds a pop of color.
    • Sweet Glazed Carrots: Carrots cooked until tender and lightly glazed with butter and a touch of brown sugar offer a sweet complement. It’s a simple side dish loved by all ages.
    • Steamed Broccoli: A classic for good reason, steamed broccoli is quick, healthy, and versatile. A squeeze of lemon or a sprinkle of cheese can easily elevate it.
    • Creamed Corn or Corn on the Cob: Sweet corn, whether creamed for a rich texture or served simply on the cob, is a delightful addition. This simple side dish always pleases.

    Hearty Starchy Alternatives

    Looking for an alternative to mashed potatoes? These satisfying options are just as delicious and easy to prepare.

    • Crispy Roasted Potatoes: Cubed potatoes roasted until golden and tender make a fantastic side. Season them with herbs like rosemary or thyme for extra flavor.
    • Baked Sweet Potatoes: A healthier and naturally sweet alternative. Simply bake them until tender and serve with a dollop of butter or a sprinkle of cinnamon for a different flavor profile that pairs wonderfully.
    • Rice Pilaf: For a lighter grain option, a fluffy rice pilaf is an excellent choice. It’s flavorful without being too heavy, making it an ideal side for a hearty main like meatloaf.

    Tips for Perfect Pairings

    To create the perfect meal, focus on balance. Since meatloaf is a rich dish, it benefits from sides that offer contrasting textures and flavors.

    • Balance Richness: Pair the savory meatloaf with lighter, fresher vegetables to prevent the meal from feeling too heavy.
    • Mix Textures: Combine creamy sides, crunchy vegetables, and soft bread. A variety of textures makes the meal more enjoyable.
    • Add Color: A vibrant plate is more appealing. Green beans, bright carrots, or other colorful vegetables can make your dinner visually exciting.

    With these simple side dish ideas, you can easily create a flavorful meatloaf dinner that’s a joy to both cook and eat. Enjoy!

    Recipe Variations and Substitutions

    Meat Variations

    While our classic meatloaf recipe shines with ground beef, you can easily switch things up with other meats. Each type brings a unique flavor and texture, allowing you to tailor the meatloaf to your family’s preferences. It’s a great way to make family-friendly meals even more special.

    • Ground Beef (Lean or Medium): This is the traditional choice for a juicy, flavorful meatloaf recipe. We recommend an 80/20 lean-to-fat ratio for the best meatloaf recipe, as it ensures moisture without being too greasy.
    • Pork: Adding ground pork provides extra moisture and richness. For a deeper flavor, try combining half ground beef with half ground pork. This blend, common in many easy meatloaf recipe variations, also helps keep the meatloaf tender.
    • Veal: Ground veal offers a very tender and mild flavor. It’s often combined with beef and pork to create a “meatloaf mix” that’s incredibly succulent. This blend is truly a flavorful meal made easy.
    • Ground Turkey or Chicken: For a lighter option, use ground turkey or chicken. Keep in mind that these leaner meats can dry out more easily. To maintain moisture, add a bit more liquid to the mixture, such as extra broth, milk (or a dairy-free alternative), or even a touch of olive oil. For the best results, choose dark meat ground turkey for more flavor and moisture.
    • Custom Blends: Feel free to experiment with your own combinations. A popular choice is a mix of beef, pork, and veal, which yields the ultimate rich and juicy meatloaf. You can also blend leaner meats with a small amount of fattier meat to help maintain tenderness and flavor.

    How to Make it Gluten-Free

    Making our easy meatloaf recipe gluten-free is simple. The main ingredient to replace is the breadcrumbs, which bind the meatloaf and add moisture. Luckily, with so many great gluten-free substitutes available, you can still enjoy a delicious, beginner-friendly recipe that fits your dietary needs.

    • Gluten-Free Breadcrumbs: For the easiest swap, simply use an equal amount of your favorite gluten-free breadcrumbs. They work just like the regular kind.
    • Rolled Oats (Gluten-Free Certified): Old-fashioned rolled oats are an excellent binder and add a lovely texture. Use them in place of breadcrumbs, but be sure to choose a certified gluten-free brand to prevent cross-contamination.
    • Crushed Gluten-Free Crackers: Crushed plain gluten-free crackers also work well as a replacement for regular breadcrumbs and add a savory touch.
    • Cooked Quinoa or Rice: For a different approach, try using about 1/2 to 3/4 cup of cooked and cooled quinoa or rice per pound of meat. These options add moisture and bind the meatloaf effectively.

    Always double-check the labels of all your ingredients to ensure the entire meatloaf recipe remains gluten-free.

    Making Meatloaf Without Milk

    Prefer to make meatloaf without milk? No problem. While milk adds moisture and helps tenderize the meat, several easy substitutions work perfectly. With these simple swaps, you can still achieve a wonderfully juicy and flavorful result, ensuring your approachable home cooking always meets your needs.

    • Water: Plain water is the simplest substitute. Use the same amount called for in the recipe to add moisture without changing the flavor.
    • Beef or Chicken Broth: Broth not only keeps the meatloaf moist but also adds an extra layer of savory flavor. To control the saltiness, opt for a low-sodium version. This is a fantastic choice for a flavorful meal made easy.
    • Vegetable Broth: For a non-meat option, vegetable broth works well, providing moisture and a subtle savory depth.
    • Non-Dairy Milk: Unsweetened non-dairy milks like almond, soy, or oat milk are also great alternatives. They function just like regular milk to maintain moisture and tenderness, but be sure they’re unsweetened to avoid altering the taste.

    These simple changes ensure everyone can enjoy this best meatloaf recipe. It’s all about making cooking enjoyable and stress-free.

    How to Store and Reheat Leftovers

    Storing Your Delicious Meatloaf Leftovers

    Enjoyed your meatloaf and have leftovers? Great! Proper storage will keep it fresh and flavorful for another easy meal. Follow these simple steps to preserve your meatloaf perfectly.

    Refrigeration for Short-Term Storage

    Cooked meatloaf can be safely stored in the refrigerator for a few days. This is perfect for quick lunches or a second dinner.

    • Cool Down Quickly: First, allow the meatloaf to cool completely at room temperature. To prevent bacterial growth, this should take no more than two hours [2].
    • Portion and Pack: For convenience, slice the meatloaf into individual servings. Transfer the slices or the whole loaf into an airtight container.
    • Seal and Store: Ensure the container is sealed tightly before placing it in the refrigerator.
    • Enjoy Within: Your meatloaf will stay fresh for 3 to 4 days when stored this way.

    Freezing for Longer-Term Meal Prep

    For longer storage, freezing is an excellent option. It’s a great way to plan future meals, allowing you to enjoy your meatloaf weeks later.

    • Cool Completely: As with refrigeration, let the meatloaf cool entirely before freezing.
    • Wrap Well: Wrap individual slices or smaller portions tightly in plastic wrap, then add a layer of aluminum foil. This double layer protects against freezer burn.
    • Use Freezer-Safe Containers: Alternatively, place wrapped portions into a freezer-safe bag or airtight container, removing as much air as possible.
    • Label Clearly: Always label the container with the date so you know how long it’s been stored.
    • Freeze Duration: Frozen meatloaf maintains its best quality for up to 3 months.
    • Thaw Safely: When you’re ready to eat, thaw the frozen meatloaf in the refrigerator overnight. For a quicker option, use the defrost setting on your microwave.

    Reheating Your Leftover Meatloaf

    When it’s time to eat your leftovers, reheating them properly will keep the meatloaf juicy and delicious. Here are a few simple methods that work for any schedule.

    Oven Reheating for Best Results

    The oven is the best method for reheating meatloaf because it helps preserve the original texture and flavor.

    • Preheat Oven: Set your oven to a low temperature, around 250°F (120°C), to prevent drying out the meat.
    • Add Moisture: Place meatloaf slices in an oven-safe dish and add a tablespoon or two of beef broth or water. This creates steam and keeps the meatloaf moist.
    • Cover and Heat: Cover the dish tightly with aluminum foil to trap moisture.
    • Reheat Time: Heat for 20-30 minutes, or until an instant-read thermometer shows the internal temperature has reached 165°F (74°C) [3].

    Microwave for Quick Servings

    For speedy individual portions, the microwave is your best bet. It’s perfect for a quick lunch or for busy families.

    • Portion Out: Place a slice or two of meatloaf on a microwave-safe plate.
    • Add Moisture: Drizzle a small amount of water or broth over the meatloaf. Cover it loosely with a damp paper towel or a microwave-safe lid.
    • Heat in Bursts: Microwave on medium power for 1-2 minutes. Check and rearrange the meatloaf, then continue heating in 30-second intervals until it’s hot throughout.
    • Check Temperature: For food safety, make sure the meatloaf reaches an internal temperature of 165°F (74°C).

    Pan-Frying for Crispy Edges

    If you love crispy edges, pan-frying individual slices is a fantastic option. This method adds a delicious new texture to your leftovers.

    • Heat Skillet: Warm a small amount of oil or butter in a non-stick skillet over medium heat.
    • Sear Slices: Carefully place the meatloaf slices in the hot skillet.
    • Cook Until Crispy: Cook for 3-5 minutes per side, until a delicious caramelized crust forms.
    • Ensure Warmth: Make sure the center of each slice is heated through before serving.

    With these simple tips, your leftover meatloaf will be just as delicious as when it was first baked. Enjoy cooking confidently with Recipesmondial!

    Frequently Asked Questions

    What are the main ingredients in a traditional meatloaf?

    A classic meatloaf is a comforting, family-friendly dish that combines simple, everyday ingredients to create a rich, savory flavor. It’s a longtime favorite for many home cooks.

    Here are the core components you’ll typically find:

    • Ground Meat: Ground beef is the most common choice, but a mix of beef, pork, and veal also creates a delicious taste and texture.
    • Binder: To help hold the loaf together, breadcrumbs or crushed crackers are common binders.
    • Liquid: Milk, broth, or tomato juice adds moisture, which keeps your meatloaf from drying out.
    • Eggs: Acting as an additional binder, eggs are crucial for preventing the meatloaf from crumbling.
    • Aromatics: Finely chopped onion and garlic are essential for providing a deep, savory base flavor.
    • Seasonings: Standard seasonings include salt, pepper, and herbs like parsley, while a touch of Worcestershire sauce can add extra richness.
    • Glaze: A traditional meatloaf is often finished with a sweet and tangy topping. Ketchup-based glazes are the most popular [4].

    Together, these simple ingredients create a truly satisfying and flavorful meal, making it an approachable home cooking staple.

    What is the secret to keeping meatloaf from falling apart?

    Nobody wants a crumbly meatloaf. Fortunately, keeping it intact is easy with a few simple techniques. Following these tips will help you get a perfect slice every time.

    Follow these expert tips for a sturdy meatloaf:

    • Use a Good Binder: Breadcrumbs and eggs are your best friends for creating a strong structure. They also absorb moisture, which prevents a soggy, loose texture.
    • Don’t Overmix: Mix the ingredients just until they are combined. Overmixing not only makes the meat tough but also breaks down the binding proteins, making your loaf more likely to fall apart.
    • Shape It Firmly: When shaping the mixture, be gentle but firm. Compacting it into an even loaf removes air pockets, which can weaken the structure during baking.
    • Choose the Right Fat Content: Using ground meat with a moderate fat content, such as 80/20 ground beef, is ideal. The fat helps bind the loaf while also adding essential flavor and moisture.
    • Rest Before Slicing: This step is crucial for clean slices. Always let your meatloaf rest for 10-15 minutes after baking. This allows the juices to redistribute and gives the loaf time to firm up [5].

    By following these straightforward steps, you can confidently create a beautiful meatloaf that won’t crumble.

    How do you make an easy meatloaf with few ingredients?

    When life gets busy, a delicious dinner doesn’t have to be complicated. This easy meatloaf recipe is perfect for a quick, family-friendly meal, as it uses just a few basic ingredients.

    Here’s how to simplify your meatloaf:

    • Essential Ingredients:
      • 1.5 lbs ground beef (80/20 is ideal)
      • 1 large egg
      • 1/2 cup plain breadcrumbs
      • 1/4 cup milk or water
      • 1/2 cup finely chopped onion (optional, but adds great flavor)
      • Salt and black pepper to taste
      • 1/2 cup ketchup for the glaze
    • Simple Steps:
      1. Preheat your oven to 350°F (175°C).
      2. In a large bowl, use your hands to gently combine the ground beef, egg, breadcrumbs, milk, onion (if using), salt, and pepper. Be careful not to overmix.
      3. Shape the mixture into an even loaf on a baking sheet.
      4. Spread the ketchup evenly over the top of the loaf.
      5. Bake for 55-65 minutes, or until an instant-read thermometer confirms the internal temperature has reached 160°F (71°C) [6].
      6. Let it rest for 10 minutes before slicing and serving.

    This beginner-friendly recipe is a quick and reliable solution for a flavorful meal any night of the week.

    What can I use if I don’t have breadcrumbs for meatloaf?

    Running out of breadcrumbs shouldn’t stop you from making a delicious meatloaf. While they are a popular binder, many other ingredients work just as well, offering flexibility for your home cooking.

    Here are excellent breadcrumb alternatives to keep your meatloaf juicy and cohesive:

    • Crushed Crackers: Finely crushed saltines, Ritz, or other plain crackers can be used in an equal amount. They provide a similar texture and binding power.
    • Rolled Oats: Quick-cooking or old-fashioned oats work wonderfully, adding a slightly chewier texture. Use about 3/4 cup of oats for every 1 cup of breadcrumbs.
    • Crushed Cereal: Crushed plain cornflakes or rice cereal offer a neutral flavor and serve as a good binder.
    • Cooked Rice: Leftover cooked rice is a great binder that adds a unique texture. As a rule of thumb, use about 1 cup of cooked rice per pound of meat.
    • Flour or Cornstarch: For a gluten-free option, a few tablespoons of all-purpose flour or cornstarch can thicken the mixture. Use a smaller amount—about 2-3 tablespoons per pound of meat—and add extra liquid if the mixture seems too dry.
    • Panko Breadcrumbs: Panko is a fantastic substitute that creates a lighter, airier texture in the finished loaf.

    Each of these alternatives helps absorb moisture and prevent the meatloaf from falling apart. This flexibility makes dinner planning stress-free, allowing you to create simple, delicious dishes with the ingredients you have on hand.


    Sources

    1. https://www.fsis.usda.gov/food-safety/safe-food-handling-and-preparation/meat-poultry-and-egg-products/ground-beef-and-food-safety
    2. https://www.fsis.usda.gov/food-safety/safe-food-handling-and-preparation/food-safety-basics/how-chill-food
    3. https://www.fsis.usda.gov/food-safety/safe-temperature-chart-food
    4. https://www.foodnetwork.com/recipes/articles/history-of-meatloaf
    5. https://www.seriouseats.com/the-food-lab-how-to-make-the-best-meatloaf
    6. https://www.foodsafety.gov/food-safety-charts/safe-minimum-cooking-temperatures