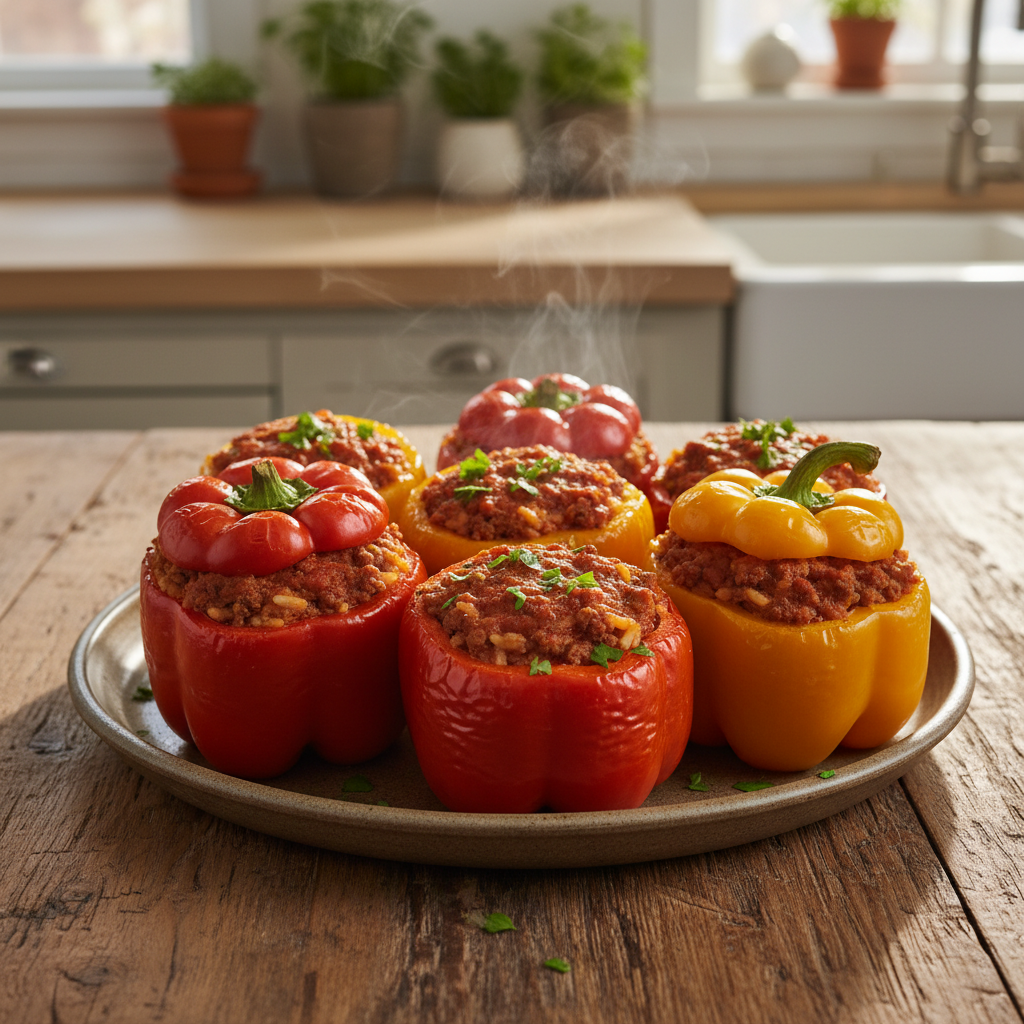
A classic stuffed peppers recipe involves hollowing out bell peppers and filling them with a savory mixture of cooked ground beef, rice, onions, and seasonings. The peppers are then typically topped with a simple tomato sauce and cheese and baked in the oven until the peppers are tender and the filling is heated through, creating a delicious and complete meal.
Are you looking for a hearty dinner that’s comforting but not complicated? Planning family-friendly meals everyone will enjoy is a common challenge, especially on busy weeknights. The good news is that an impressive meal can be surprisingly simple, even for beginner cooks. Get ready to rediscover a true classic: stuffed peppers, a perfect example of flavorful meals made easy.
At Recipesmondial, we believe cooking should be a stress-free and enjoyable experience. That’s why we created this ultimate guide to classic stuffed bell peppers. Our simple recipe walks you through each step, ensuring great results whether you’re building confidence or just looking for approachable home cooking. We want to help you cook confidently and turn basic ingredients into a truly special meal.
In this step-by-step guide, you’ll learn everything from choosing the perfect bell peppers to mastering a savory filling and baking it to perfection. We also share clever variations, including vegetarian options and meal prep tips, to help this dish become a staple in your rotation. Say goodbye to complicated recipes and hello to a simple, satisfying dinner guaranteed to please.
Why You’ll Love This Easy Stuffed Peppers Recipe
Looking for a reliable, delicious dinner that impresses without the stress? This classic stuffed peppers recipe is a true crowd-pleaser, perfect for busy weeknights or a cozy family meal. Our step-by-step guide is designed for home cooks, making the entire process enjoyable and straightforward.
Here’s why you’ll fall in love with this easy stuffed peppers recipe:
- Simple Dinner Solution: This recipe simplifies mealtime by offering a complete, flavorful meal in just one dish. It’s the perfect go-to for an easy weeknight dinner.
- Beginner-Friendly Cooking: Forget overwhelming instructions. Our clear, approachable guide builds your confidence in the kitchen, helping you master this classic dish with ease.
- Unforgettable Flavor: Every bite is a perfect blend of tender bell peppers, savory meat, and a rich tomato sauce. It’s a satisfying and flavorful meal, made easy.
- Perfect for Families: This is a classic family-friendly meal. Both kids and adults love the colorful presentation and comforting taste, making it a great way to serve more vegetables.
- Customizable and Versatile: Easily adapt this recipe to suit your tastes or what’s in your pantry. Try a vegetarian filling, use a different grain, or add your favorite spices. Our meal prep tips also help you plan.
- Stress-Free Prep: We guide you through each step, removing the guesswork from planning and cooking. You can relax and enjoy the process from start to finish.
- Nourishing and Wholesome: Enjoy a balanced dish packed with protein and fresh vegetables. It’s a satisfying and hearty meal for any day of the week.
This stuffed peppers recipe is a perfect example of our commitment at Recipesmondial: providing simple, delicious recipes for every home cook. Get ready to turn everyday ingredients into a memorable meal!
What Ingredients Do You Need for Classic Stuffed Peppers?
Choosing the Right Bell Peppers
The first step to making classic stuffed peppers is choosing the right bell peppers, as they are the star of this easy recipe.
You can use any color you prefer. Green bell peppers have a traditional, slightly bitter taste, while red, yellow, and orange varieties are sweeter and soften beautifully during baking.
When selecting peppers for stuffing, look for large, firm ones with a flat bottom. This shape helps them stand upright, which makes them easier to fill and ensures they hold their savory contents in the oven.
- Green Bell Peppers: These are the classic choice. They have a robust, earthy flavor.
- Red, Yellow, or Orange Bell Peppers: Opt for these if you prefer a sweeter taste. They also add a vibrant pop of color.
- Size Matters: Select larger peppers, as they are easier to stuff and provide a more satisfying portion.
- Stability: Pick peppers with a flat bottom. This helps them stay stable in your baking dish.
Pro Tip: Remove the core and seeds carefully, then give the peppers a quick rinse to prepare them for stuffing.
For the Savory Filling
This hearty and flavorful filling is the heart of the dish, creating a satisfying meal the whole family will enjoy.
Seasoned Ground Beef and fluffy rice create the base, while aromatics and tomato add depth and moisture. This simple combination results in a balanced and delicious stuffing.
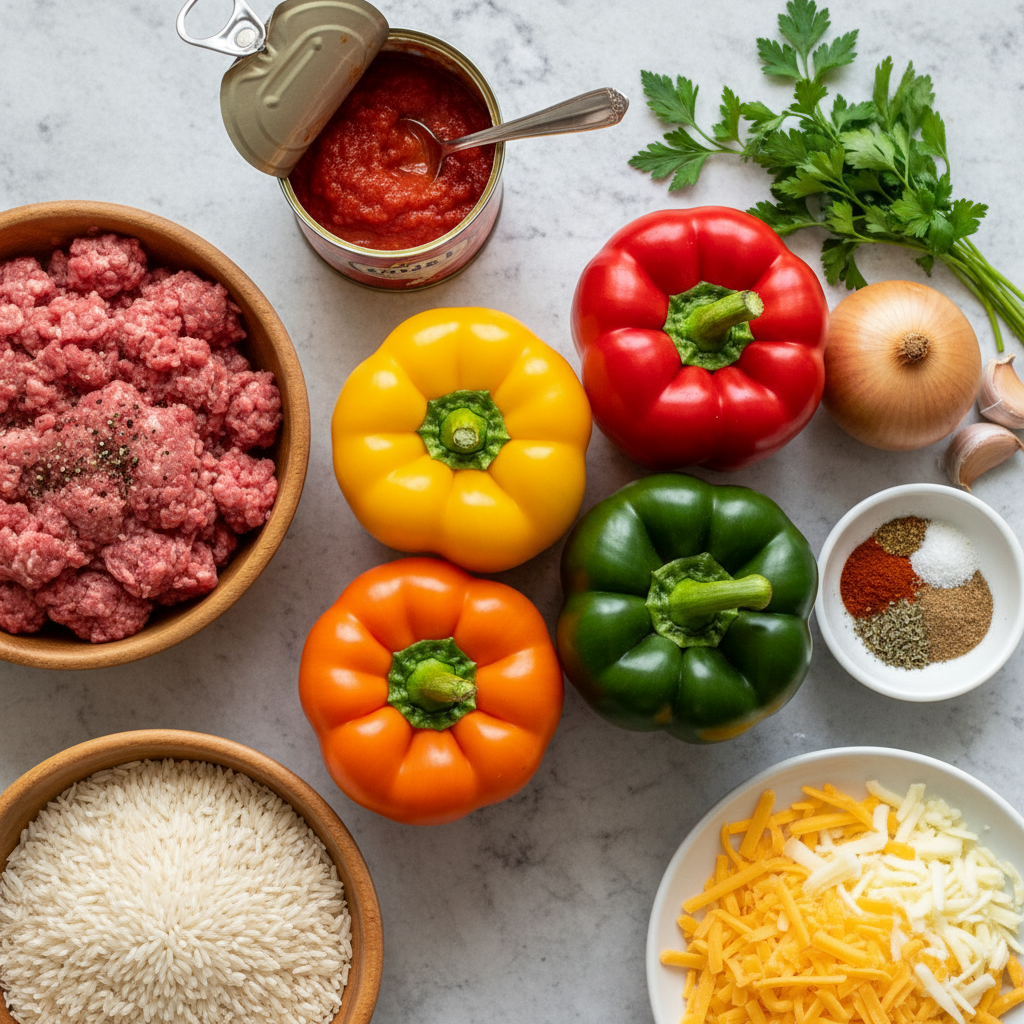
- Ground Beef: 1 pound (450g) lean ground beef. This forms the delicious base.
- Rice: 1 cup (185g) uncooked white rice. Long-grain or medium-grain works well. We cook it partially first.
- Onion: 1 medium onion, finely chopped. It adds a lovely sweetness and depth.
- Garlic: 2 cloves garlic, minced. Garlic is essential for rich flavor.
- Canned Diced Tomatoes: 1 (14.5 ounce / 411g) can, undrained. These add moisture and a tangy element.
- Tomato Paste: 2 tablespoons. It intensifies the tomato flavor.
- Beef Broth: 1/2 cup (120ml). This adds savory liquid to the filling.
- Worcestershire Sauce: 1 tablespoon. It brings a umami punch.
- Dried Oregano: 1 teaspoon. A classic herb for Italian-inspired dishes.
- Salt: 1/2 teaspoon, or to taste.
- Black Pepper: 1/4 teaspoon, or to taste. Freshly ground is always best.
Substitution Idea: For a lighter version, feel free to swap ground beef for ground turkey or chicken. You can also use pre-cooked rice to save time.
For the Simple Tomato Sauce and Topping
A simple tomato sauce is poured around the peppers before baking. It keeps them moist, adds extra flavor, and comes together in minutes. To finish, a generous layer of melted cheese creates the perfect golden, bubbly topping.
- Tomato Sauce: 1 (15 ounce / 425g) can. This forms the base of our savory sauce.
- Water or Beef Broth: 1/2 cup (120ml). This thins the sauce slightly.
- Brown Sugar: 1 tablespoon. It balances the acidity of the tomatoes.
- Shredded Mozzarella Cheese: 1 cup (113g). This creates a gooey, golden topping.
Variation Tip: Experiment with different cheeses! Cheddar, Monterey Jack, or a blend of Italian cheeses all work beautifully. You can also add a pinch of red pepper flakes to the sauce for a subtle kick.
Gathering these simple ingredients is the first step toward a delicious, easy-to-make dinner!
How to Make Stuffed Peppers: A Step-by-Step Guide
Step 1: Prepare the Bell Peppers
First, get the bell peppers ready. This essential prep work ensures your stuffed peppers cook evenly and become perfectly tender.
- Choose Your Peppers: Select 6 medium-sized bell peppers. Any color works, but red, yellow, and orange varieties are typically sweeter.
- Wash and Halve: Rinse the peppers under cool water, then carefully slice each one in half lengthwise.
- Remove Seeds and Core: Use a small spoon to scoop out the seeds and white membrane from each half, creating a clean cavity for the filling.
- Optional: Blanch for Softer Peppers: To ensure an extra-tender texture, you can blanch the peppers. Bring a large pot of salted water to a boil, add the pepper halves, and cook for 3–5 minutes. This pre-cook step prevents them from being too firm after baking. Drain them well and set aside. This is a great tip if you’re new to cooking!
Step 2: Cook the Beef and Rice Filling
Next, create the savory filling. This is the key to a successful stuffed bell pepper recipe, and it will make your kitchen smell amazing.
- Brown the Beef: In a large skillet, heat 1 tablespoon of olive oil over medium-high heat. Add 1 pound of lean ground beef and break it apart with a spoon as it cooks. Continue cooking until the beef is fully browned with no pink remaining.
- Drain Excess Fat: Carefully drain the excess fat from the skillet. This step makes the filling lighter.
- Sauté Aromatics: Add 1 diced onion and 2 cloves of minced garlic to the beef. Sauté for 5–7 minutes, until the onion is soft and translucent.
- Combine Ingredients: Stir in 1 cup of cooked white rice (leftover or freshly cooked), 1 (14.5-ounce) can of undrained diced tomatoes, 1 teaspoon of dried oregano, 1 teaspoon of dried basil, 1/2 teaspoon of salt, and 1/4 teaspoon of black pepper.
- Simmer to Blend Flavors: Mix all ingredients thoroughly and let the filling simmer for 5 minutes. This allows the flavors to meld together perfectly.
Chef’s Tip for Beginner Cooks: Pre-cooking the rice ensures it’s tender. If you use uncooked rice, you will need to add more liquid and increase the baking time. Using cooked rice is the best way to get consistent results for this easy recipe.
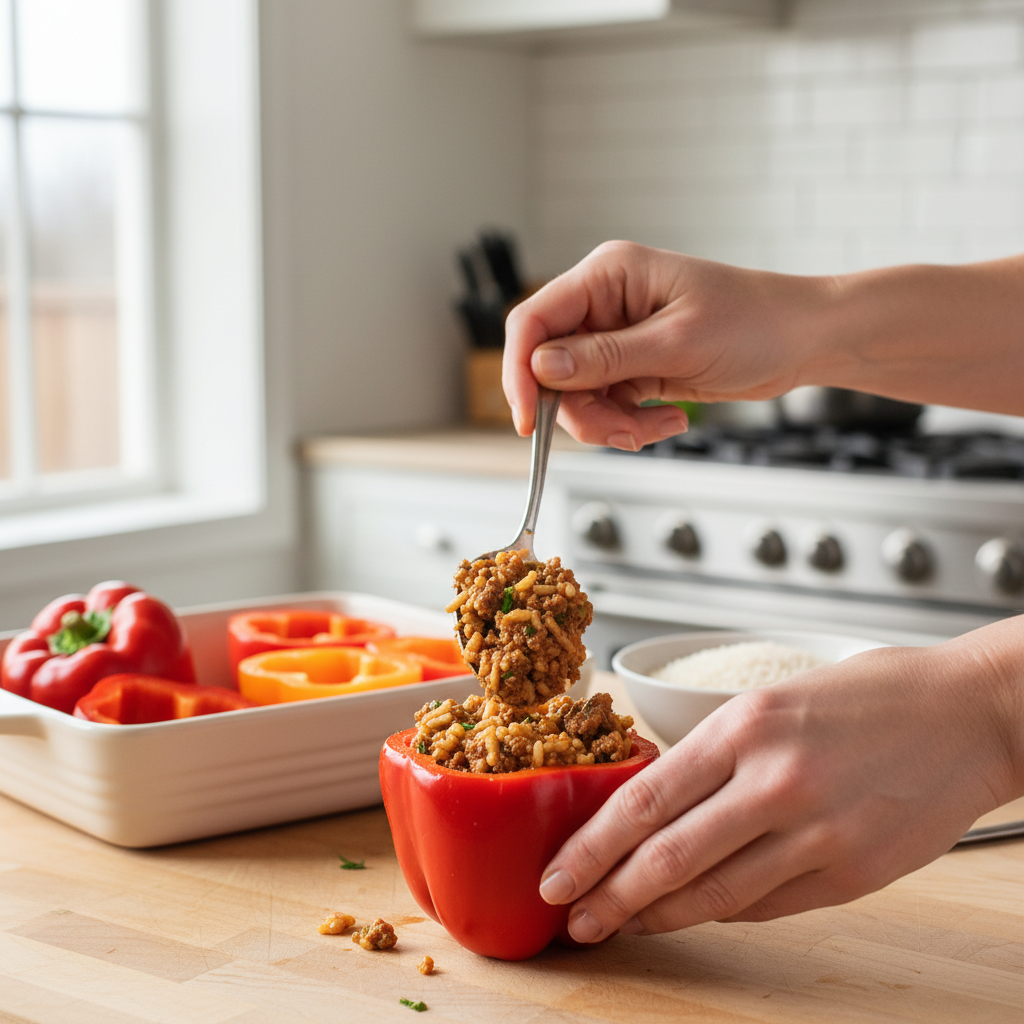
Step 3: Assemble the Stuffed Peppers
Now it’s time to assemble the peppers. This is a simple process that gets your family-friendly meal ready for the oven.
- Prepare the Baking Dish: Pour 1/2 cup of tomato or marinara sauce into the bottom of a 9×13-inch baking dish. This adds moisture and prevents sticking.
- Fill Each Pepper Half: Spoon the beef and rice mixture generously into each pepper half. Avoid packing the filling too tightly.
- Arrange in the Dish: Place the filled pepper halves cut-side up in the prepared baking dish. Arrange them snugly to help them stay upright.
- Top with More Sauce: Spoon a little more tomato sauce over the top of the filling in each pepper to keep them moist during baking.
Quick Idea: Have extra filling? Save it for a quick lunch or serve it as a side dish. It’s delicious on its own!
Step 4: Bake the Peppers
Finally, it’s time to bake. This last step melds the flavors and makes your stuffed bell peppers wonderfully tender.
- Preheat Oven: Set your oven to 375°F (190°C). A properly preheated oven ensures everything cooks evenly.
- First Bake (Covered): Cover the baking dish tightly with aluminum foil and bake for 30 minutes. This initial step steams the peppers, making them tender.
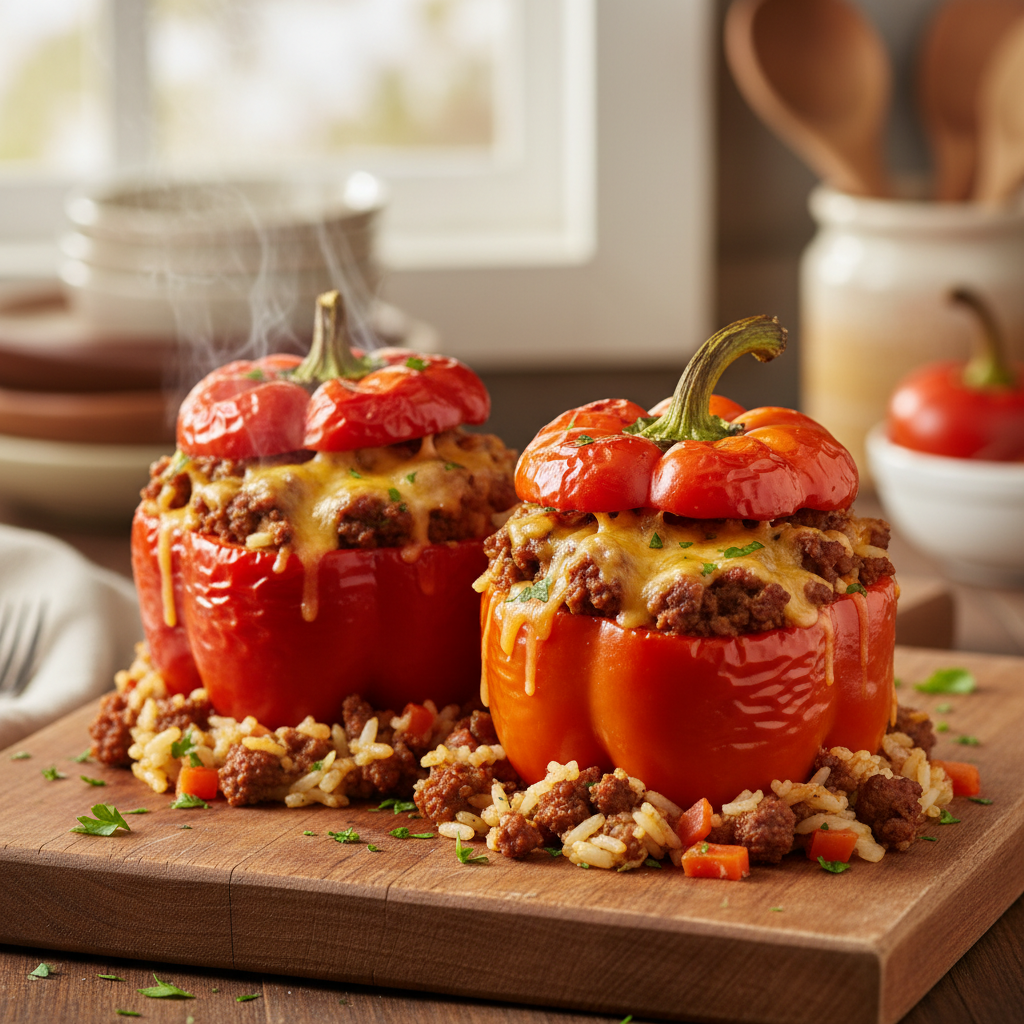
- Add Cheese (Optional): Carefully remove the foil and sprinkle about 1 cup of shredded mozzarella or cheddar cheese over the tops.
- Second Bake (Uncovered): Return the dish to the oven and bake uncovered for another 15–20 minutes. The peppers are done when they are fork-tender and the cheese is melted and bubbly.
- Rest Before Serving: Let the peppers rest for 5–10 minutes after baking. This allows the juices to settle, making them easier to serve.
Pro-Tip for Flavorful Meals: For a golden, bubbly topping, place the peppers under the broiler for 1–2 minutes after baking. Watch them closely to prevent burning. This adds a beautiful finish to your flavorful meal!
What to put in stuffed peppers?
Easy Recipe Variations
Stuffed peppers are a versatile dish, perfect for culinary creativity. You can adapt this classic recipe to suit your tastes, use ingredients you have on hand, or create a fun meal the whole family will enjoy. These straightforward swaps simplify meal planning without the need for complex recipes.
- Switch Your Protein: While ground beef is classic, feel free to use other ground meats.
- Ground Turkey or Chicken: For a lighter option, these are excellent choices. They cook quickly and absorb flavors beautifully.
- Ground Pork or Sausage: For a richer flavor, try ground pork or sausage. Italian sausage works wonderfully for a different twist.
- Add More Veggies: Boost the nutrition and texture of your filling.
- Mushrooms: Sautéed diced mushrooms add an earthy depth.
- Zucchini or Spinach: Finely diced zucchini or wilted spinach blend seamlessly into the filling.
- Corn or Peas: Introduce a touch of sweetness and color.
- Spice it Up: Experiment with different herbs and spices to change the flavor profile.
- Italian Herbs: Add oregano, basil, and a pinch of fennel for an Italian flair.
- Smoked Paprika: A smoky note pairs well with the beef and tomato.
- Garlic Powder and Onion Powder: These staple seasonings always enhance flavor.
Vegetarian Stuffed Peppers
Creating delicious vegetarian stuffed peppers is surprisingly simple. It’s a fantastic option for a healthy, balanced meal that’s also perfect for family dinners. With fillings this flavorful, you won’t miss the meat.
Here are some simple, hearty bases to make your stuffed peppers vegetarian:
- Lentil Love: Packed with protein, cooked brown or green lentils provide a wonderful texture. Mix them with diced vegetables and a tomato base for a satisfying filling [1].
- Quinoa Power: As a complete protein, cooked quinoa offers a light, fluffy texture. Combine it with black beans, corn, and your favorite seasonings.
- Mushroom Magic: Finely chopped mushrooms, sautéed until deeply browned, mimic the texture of ground meat. Mix them with breadcrumbs and herbs for a savory filling.
- Bean Blast: A mix of black beans, kidney beans, and corn creates a robust filling. Add some salsa and spices for a zesty flavor.
Remember to adjust seasonings to your taste. A little extra cheese or breadcrumbs can help bind your vegetarian fillings.
Stuffed Peppers Without Rice
If you’re looking for rice alternatives, you have plenty of great choices. These options offer dietary flexibility and can introduce new textures and flavors to your classic stuffed bell peppers, making it easy to customize your meal.
Consider these simple and delicious rice substitutes:
- Quinoa: Cooked quinoa offers a protein boost and a texture similar to rice, making it a great choice for a healthy, balanced meal.
- Cauliflower Rice: For a low-carb option, use riced cauliflower. Sauté it lightly before mixing with your other filling ingredients to help remove excess moisture.
- Couscous: This tiny pasta cooks very quickly and provides a soft, delightful texture, making it a simple addition to your savory filling.
- Breadcrumbs or Crushed Crackers: Use these to bind your filling. They add a comforting texture and are perfect for budget-friendly cooking.
- Lentils: As mentioned, lentils are an excellent substitute that adds heartiness and protein.
- Barley: A nutritious grain, cooked pearl barley offers a chewy texture that holds up well in baked dishes.
When swapping ingredients, taste your filling before baking and adjust seasonings as needed to ensure a flavorful result.
Mexican-Style Stuffed Peppers
Transform your classic stuffed peppers into a vibrant, Mexican-inspired dish that brings global comfort food right to your kitchen. The bold and satisfying flavors are sure to make this a new family favorite.
To create Mexican-style stuffed peppers, simply adjust your filling ingredients:
- Spices: Add generous amounts of chili powder, cumin, and a pinch of cayenne pepper. A dash of smoked paprika enhances the flavor.
- Beans: Include black beans or kidney beans. Rinse them well before adding them to your filling.
- Corn: Fresh, frozen, or canned corn adds sweetness and texture.
- Salsa or Diced Tomatoes with Chilies: Use these in place of plain tomato sauce in your filling for a zesty kick.
- Cheese: Top your peppers with Monterey Jack, cheddar, or a Mexican blend cheese.
- Garnish: Finish with fresh cilantro, a dollop of sour cream or Greek yogurt, and a squeeze of lime juice after baking.
These variations prove just how versatile stuffed peppers can be, allowing you to create a quick and flavorful meal every time!
Tips for the Perfect Stuffed Bell Peppers
How to Prevent Soggy Peppers
Nobody wants a soggy bell pepper! Achieving that perfect tender-crisp texture for your stuffed bell peppers is easier than you think. Here are our top tips to ensure your stuffed peppers hold their shape and flavor beautifully.
- Pre-Cook Your Peppers: A quick par-cook softens the peppers slightly before you stuff them, which helps them cook evenly with the filling. You can either boil them for 3-5 minutes or bake them empty for 10-15 minutes.
- Don’t Overfill: Avoid overstuffing the peppers, as this can make them collapse and prevent the filling from cooking thoroughly. Be sure to leave a small gap at the top.
- Drain Your Filling: Excess liquid in the filling, especially from meat, will make the peppers mushy. Be sure to drain it well before stuffing to prevent the pepper walls from getting soggy.
- Control Baking Time: Follow the recipe’s baking time closely to avoid soft, overcooked peppers. For a nicely browned and caramelized top, bake them uncovered for the last 10-15 minutes.
Meal Prep and Storage Instructions
Our classic stuffed peppers recipe is perfect for meal prep, saving you precious time on busy weeknights. You can easily prepare these flavorful, family-friendly dishes ahead of time.
- Assemble Ahead: To save time, you can fully assemble the stuffed peppers, cover them tightly, and refrigerate for up to 2 days before baking. Just add an extra 15-20 minutes to the baking time to account for the cold temperature.
- Freezing Cooked Peppers: Once cooked, stuffed bell peppers freeze beautifully. First, let them cool completely. Then, wrap each pepper individually in plastic wrap and store them in a freezer-safe bag or container for up to 3 months.
- Reheating from Frozen: To reheat, remove the wrapping and place the frozen peppers in a baking dish. Cover with foil and bake at 350°F (175°C) for 45-60 minutes, or until heated through. You can also microwave individual peppers on high for 5-7 minutes.
- Refrigerating Leftovers: Store leftover cooked stuffed peppers in an airtight container in the refrigerator for 3-4 days. Reheat them in the oven or microwave.
What to Serve with Stuffed Peppers
While stuffed peppers are a satisfying meal on their own, pairing them with a simple side dish can elevate your dinner. These suggestions will help you create a balanced and delicious experience for any family meal.
- Fresh Green Salad: A crisp green salad with a light vinaigrette provides a refreshing contrast and is a healthy, quick addition to your meal.
- Crusty Bread: A warm, crusty baguette or Italian bread is perfect for soaking up any delicious sauce, making the meal extra comforting.
- Steamed or Roasted Vegetables: Simply seasoned vegetables like broccoli, green beans, or asparagus add extra nutrients and a pleasant texture that complements the rich flavors of the peppers.
- Simple Grains: If your stuffed peppers don’t contain rice, a side of quinoa or couscous works wonderfully to absorb the savory sauce.
Frequently Asked Questions
How do you make a simple stuffed peppers recipe?
Making stuffed peppers is wonderfully straightforward. At Recipesmondial, we specialize in easy recipes, and this classic dish is no exception. It’s a perfect beginner-friendly meal that the whole family will enjoy.
Here is a quick overview of the steps:
- Prepare the Peppers: First, wash your bell peppers. Slice them in half lengthwise, then remove the seeds and membranes. This creates the perfect little bowls for your filling.
- Make the Filling: Next, cook ground meat (like beef or turkey) with onions and garlic until browned. Stir in cooked rice, tomato sauce, and your favorite seasonings. This savory mixture is the heart of the dish.
- Stuff and Sauce: Fill each pepper half generously with the meat and rice mixture and place them in a baking dish. Pour a little tomato sauce around the peppers and sprinkle cheese on top for extra flavor.
- Bake to Perfection: Finally, bake the stuffed peppers until they are tender and the filling is heated through. The result is a delicious and easy meal every time.
Can you make stuffed peppers ahead of time?
Yes, absolutely! Stuffed peppers are an excellent choice for meal prep. Preparing them in advance saves time during the week and makes it easier to serve a delicious, stress-free dinner.
You have a couple of great options for making them in advance:
- Prepare the Filling Only: Cook the meat and rice filling, let it cool completely, and store it in an airtight container in the refrigerator for up to 3 days. When you’re ready, simply stuff fresh peppers and bake as directed. This method helps keep the peppers crisp.
- Assemble Fully: For a grab-and-bake option, you can assemble the peppers completely. Stuff them, place them in a baking dish, and cover tightly with plastic wrap or foil. Refrigerate for up to 24 hours. Just add a few extra minutes to the baking time when cooking straight from the refrigerator.
- Freeze for Later: For longer storage, freeze unbaked stuffed peppers. Place the fully assembled peppers on a baking sheet and freeze until solid. Then, transfer them to a freezer-safe bag or container. They will last for up to 3 months. Thaw them overnight in the refrigerator before baking, or bake from frozen by adding significant extra cooking time.
These practical tips from Recipesmondial make home cooking even more convenient and approachable.
Do you have to cook the meat before stuffing the peppers?
Yes, for the best results, you should always pre-cook ground meat before stuffing the peppers. This simple step is crucial for several key reasons, ensuring your dish is both flavorful and well-cooked.
- Enhances Flavor: Browning the meat develops a rich, savory flavor that creates a delicious foundation for the filling. Raw meat cooked inside the pepper will not be as flavorful.
- Removes Excess Fat: Pre-cooking allows you to drain off excess grease from the meat. This important step prevents the final dish from becoming oily or soggy.
- Ensures Even Cooking: Fully cooking the ground meat beforehand guarantees the filling is safe to eat. It also ensures the peppers don’t get overcooked while you wait for raw meat to reach a safe temperature. This way, the filling and peppers are perfectly done at the same time.
- Better Texture: Sautéing ground meat creates a pleasant, crumbly texture. If you use raw meat, it can sometimes clump together or turn rubbery when baked inside the pepper.
Following this simple, beginner-friendly tip helps you get delicious and reliable results every time.
How do I make a healthy stuffed peppers recipe?
It’s easy to make a healthy stuffed peppers recipe with a few simple substitutions. While stuffed peppers are already quite wholesome, you can boost their nutritional value to create a delicious and balanced meal.
Consider these simple swaps and tips:
- Choose Leaner Protein: Instead of ground beef, use lean ground turkey or chicken to reduce saturated fat. Plant-based crumbles are also a great vegetarian alternative.
- Boost Veggies: Finely dice extra vegetables like carrots, zucchini, mushrooms, or spinach and add them to the filling to increase vitamins, minerals, and fiber.
- Opt for Whole Grains: Swap white rice for a higher-fiber option like brown rice, quinoa, or lentils. Whole grains keep you feeling full longer, and quinoa also adds extra protein.
- Control Sodium: Use low-sodium broth and tomato sauce. Build flavor with herbs and spices like garlic powder, oregano, and basil instead of relying only on salt.
- Lighten the Cheese: If you’re adding cheese, choose a reduced-fat variety or simply use less. A small sprinkle on top is often all you need for great flavor.
- Add Beans: Incorporate black beans or kidney beans into the filling for an easy and budget-friendly boost of plant-based protein and fiber.
These simple adjustments help you create a flavorful meal that aligns with your health goals and makes home cooking work for your lifestyle.