
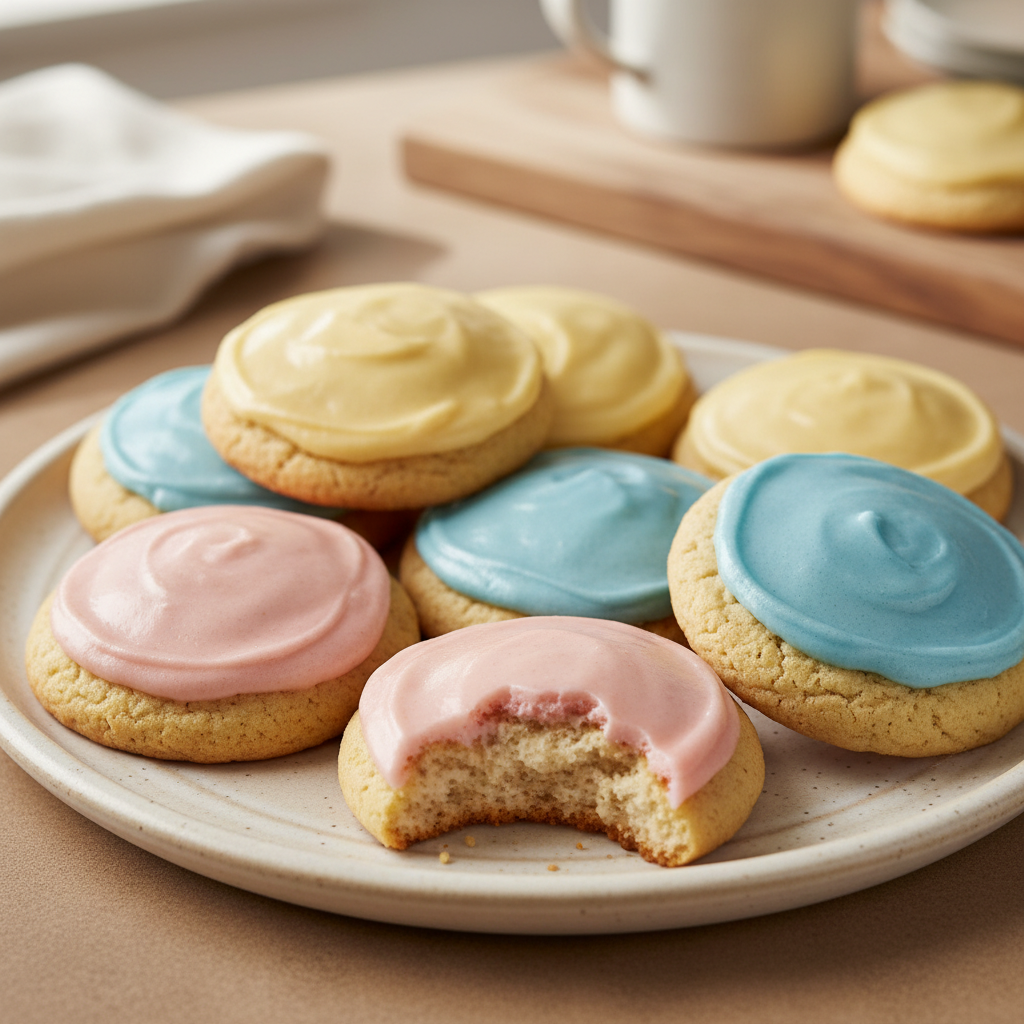
A Crumble cookie, inspired by the popular bakery brand, is a large, thick, and incredibly soft gourmet cookie, often served warm with unique frosting and toppings. This simple, approachable recipe shows home cooks how to recreate that signature soft-baked, decadent cookie experience using everyday ingredients found in your kitchen.
Do you dream of warm, gooey, bakery-style cookies with the perfect soft texture? The kind that can instantly brighten your day? Perhaps you’ve admired famous crumble cookies but thought they were too complicated to make at home. We understand wanting a delicious treat without the hassle of a complex recipe.
At Recipesmondial, we believe everyone deserves the magic of homemade treats, and we’re here to show you just how simple it can be. Our mission is to provide approachable home cooking for everyone, so you can forget about intricate techniques. This easy copycat crumble cookie recipe offers clear, step-by-step guidance to help you create truly flavorful cookies right in your own kitchen.
Get ready to turn simple ingredients into a batch of incredible, bakery-quality cookies that will impress your family and friends. We’ll guide you through every step, from the essential ingredients and clear instructions to helpful tips and fun flavor variations. You’ll gain confidence in the kitchen and enjoy stress-free baking as you make your own delicious crumble cookies. Let’s get started!
Why Will You Love This Copycat Crumble Cookie Recipe?
Are you ready to bring the magic of those famous, oversized cookies into your own kitchen? Our easy copycat Crumbl cookie recipe makes it simple, and you’ll love baking these incredible treats at home.
Perfect for home cooks of all skill levels, this recipe transforms your kitchen into a delightful bakery. Say goodbye to complicated instructions and hello to simple baking success!
Here’s why this copycat Crumbl cookie recipe will become your new favorite:
- Effortless Baking Success: This is one of our best beginner-friendly recipes because we break down every step into simple, actionable instructions. You’ll feel confident from start to finish.
- Save Money, Enjoy More: Bake these delicious cookies at home for a fraction of the cost of store-bought. You get to enjoy more incredible treats while staying on budget.
- Unmistakable Flavor and Texture: This recipe delivers that signature soft, chewy center and perfectly crisp edges. The result is a melt-in-your-mouth cookie you’ll crave.
- Fresh from Your Oven: There’s nothing like the aroma of warm, homemade cookies filling your home. Plus, they taste absolutely divine served fresh from the oven.
- Perfect for Any Occasion: These cookies are ideal for special gatherings, family desserts, or even just as a fantastic treat for yourself.
- Customize Your Crumbl Cookies: Our recipe is the perfect base for your creativity. Feel free to add your favorite mix-ins or try different frosting variations to make them uniquely yours.
Our goal is to help you enjoy stress-free cooking and build confidence in the kitchen. With simple recipes like this one, you can discover just how rewarding baking can be. Get ready to bake a batch of joy with Recipesmondial!
What Ingredients Do You Need for Homemade Crumble Cookies?
For the Cookies
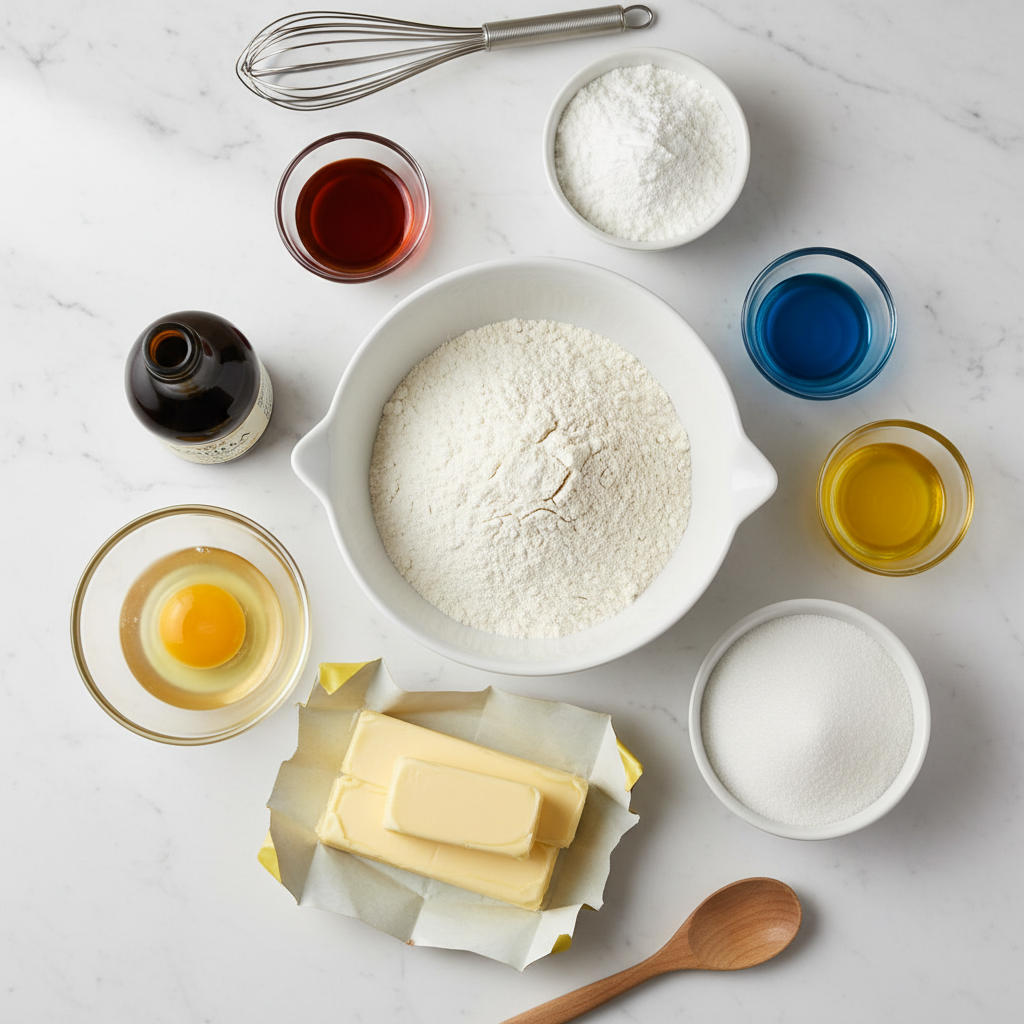
These delicious homemade crumble cookies start with simple ingredients you likely already have in your pantry. We focus on everyday items that come together for a truly flavorful treat made easy. Here’s what you will need for the soft, chewy cookie base:
- 2 ¼ cups All-Purpose Flour: This forms the foundation of the cookies. Using the correct amount is key for achieving the perfect texture.
- 1 teaspoon Baking Powder: This helps your cookies rise beautifully.
- ½ teaspoon Baking Soda: This works with the baking powder to give the cookies their signature soft crumb.
- ½ teaspoon Salt: A little salt balances the sweetness and enhances all the other flavors.
- 1 cup (2 sticks) Unsalted Butter, softened: Ensure your butter is truly softened—you should be able to indent it easily with your finger.
- ¾ cup Granulated Sugar: This provides the classic sweetness and helps create crisp edges.
- ¾ cup Light Brown Sugar, packed: Brown sugar adds moisture and a wonderful, chewy texture.
- 2 Large Eggs: These act as a binder and add richness to the dough.
- 1 teaspoon Vanilla Extract: Use good quality vanilla for the best possible flavor.
Quick Tip: Using room temperature eggs and softened butter is essential. These ingredients cream together more smoothly with the sugars, creating a uniform dough—a fundamental step for many beginner-friendly recipes!
For the Frosting
The creamy, dreamy frosting is what truly elevates these copycat crumble cookies. You’ll love how quickly this simple vanilla buttercream comes together!
- ½ cup (1 stick) Unsalted Butter, softened: Just like with the cookies, softened butter is key for a smooth frosting.
- 3 cups Powdered Sugar (Confectioners’ Sugar): This creates the sweet and smooth base for the frosting.
- 1 teaspoon Vanilla Extract: This enhances the classic vanilla flavor.
- 2-3 tablespoons Milk (or Heavy Cream): Start with 2 tablespoons and add more as needed until you reach your desired consistency.
- Pinch of Salt: A tiny pinch cuts the sweetness and brightens the overall flavor.
Helpful Hint: For an incredibly smooth result, sift your powdered sugar. This simple approachable home cooking trick prevents lumps and makes decorating your cookies much easier and more enjoyable.
How to Make Copycat Crumble Cookies Step-by-Step

Step 1: Mix Your Dry Ingredients
In a large bowl, whisk together your dry ingredients. This simple step is key for achieving a consistent cookie texture and ensures the leavening agents are distributed evenly.
- Add 2 ½ cups all-purpose flour to the bowl.
- Next, add 1 teaspoon baking soda.
- Then, mix in ½ teaspoon salt.
- Whisk everything together until thoroughly combined.
Pro Tip: Whisking thoroughly prevents pockets of baking soda or salt in the finished cookies. This is crucial for getting the best flavor and texture in every bite.
Step 2: Cream the Butter and Sugars
Next, cream the butter and sugars together. This process creates a light, fluffy base, which is essential for a soft and tender cookie.
- In a separate large mixing bowl, combine 1 cup (2 sticks) of softened, room-temperature unsalted butter with ¾ cup granulated sugar and ½ cup packed light brown sugar.
- Using an electric mixer, beat the ingredients on medium speed for 2-3 minutes.
- Continue until the mixture becomes light, fluffy, and pale in color. This step incorporates air, which helps make the cookies wonderfully soft.
Friendly Advice: Using properly softened butter is essential. If the butter is too cold, it won’t cream correctly. If it’s melted, the cookies will spread too much. Room-temperature butter is the key to achieving the perfect texture.
Step 3: Combine to Form the Dough
Now it’s time to form the cookie dough by combining the wet and dry ingredients. Work gently to avoid overmixing.
- Beat 2 large eggs into the creamed butter and sugar mixture, adding them one at a time and mixing well after each addition.
- Stir in 1 teaspoon vanilla extract until just combined.
- Gradually add the dry ingredients to the wet ingredients in two or three parts.
- Mix on low speed only until no streaks of flour remain. Be careful not to overmix, as this can result in tough cookies.
Quick Tip: Periodically use a rubber spatula to scrape down the sides and bottom of the bowl. This ensures all ingredients are evenly incorporated into the dough.
Step 4: Shape and Chill the Cookie Dough
Chilling the dough is a crucial step for thick, bakery-style cookies. It solidifies the butter, which prevents the dough from spreading too much while baking.
- Portion the dough using a large cookie scoop (about ¼ cup per cookie).
- Roll each portion into a smooth ball.
- Place the dough balls on a baking sheet lined with parchment paper.
- Gently flatten each ball into a thick disc. This helps the cookies bake evenly and creates their signature shape.
- Cover the baking sheet with plastic wrap.
- Refrigerate for at least 30 minutes, or up to 2 hours, to allow the dough to firm up.
Why Chill? This essential step prevents the cookies from spreading too thin in the oven and also deepens their flavor. For a shortcut, you can freeze the portioned dough balls for future quick breakfast ideas!
Step 5: Bake to Perfection
It’s time to bake your chilled cookies until they are perfectly golden brown. Keep a close eye on them to prevent overbaking.
- Preheat your oven to 375°F (190°C).
- Arrange the chilled dough discs on a baking sheet, leaving at least 2 inches of space between them to allow for spreading.
- Bake for 10-12 minutes.
- The cookies are done when the edges are lightly golden brown, but the centers still look soft and slightly underdone.
- Let the cookies cool on the baking sheet for 5-10 minutes. This allows them to set so they don’t break.
- Carefully transfer the cookies to a wire rack to cool completely.
Avoid Overbaking! Cookies continue to bake on the hot pan after leaving the oven. Pulling them out when the centers look slightly soft is the key to a perfectly chewy final texture.
Step 6: Prepare the Frosting and Decorate
While the cookies cool, prepare a simple and delicious frosting to complete your homemade treats.
- In a medium bowl, combine 1 cup (2 sticks) softened unsalted butter, 4 cups powdered sugar, and 1 teaspoon vanilla extract.
- Add 2-3 tablespoons of milk or heavy cream, starting with the smaller amount.
- Beat with an electric mixer on low speed, gradually increasing to medium, until the frosting is smooth and creamy.
- If the frosting is too thick, add another splash of milk until you reach a spreadable consistency.
- Once the cookies have cooled completely, spread or pipe the frosting generously on top.
- Add your favorite sprinkles or other decorations for a fun finish!
Creative Spin: Feel free to experiment with the frosting flavor. A small amount of almond extract, citrus zest, or even a pinch of cinnamon can add a unique and delicious twist.
Your homemade copycat crumble cookies are now ready. Enjoy every delightful bite!
What Are Some Tips for Perfect, Bakery-Style Cookies?
Don’t Skip the Chilling Step
While it’s tempting to bake right away, chilling your cookie dough is a secret weapon for achieving bakery-style results. This simple step makes a surprisingly big difference.
Chilling the dough does two important things. First, it solidifies the butter. Cold butter prevents your cookies from spreading too much in the oven, resulting in thicker, chewier cookies.
Second, chilling allows the flour to fully absorb the liquid ingredients, which hydrates the dough. This process deepens the flavors and makes the dough much easier to handle.
Aim for at least 30 minutes of chilling, but for even better flavor and texture, chill for 1 to 2 hours. You can even chill it overnight. It’s a simple trick for perfectly soft and flavorful cookies.
Measure Flour Correctly
Accurate measuring is crucial for perfect cookies, especially when it comes to flour. Too much flour will make your cookies dry and crumbly, while too little will cause them to spread excessively.
A common mistake is scooping flour directly from the bag. This action compacts the flour, which can add up to 25% more than the recipe calls for [1]. For reliable results, use the “spoon and level” method instead.
- First, gently fluff the flour in its container with a spoon.
- Next, use the spoon to lightly place flour into your measuring cup.
- Then, use the straight edge of a knife or spatula to level off the top until it’s flat across the rim.
This technique ensures you use the exact amount of flour needed, giving your cookies the ideal texture every time.
Avoid Overbaking
Knowing when to pull cookies from the oven is a crucial skill. A common mistake is overbaking, which turns potentially soft, chewy cookies into hard, dry pucks.
To avoid this, start checking your cookies a minute or two before the recipe’s recommended bake time. Look for edges that are set and lightly golden. The centers should still look slightly soft and puffy—they might even seem a little underdone.
Cookies continue to bake on the hot sheet after you remove them from the oven, a process called “carryover baking.” Because of this, they will firm up as they cool. For a perfectly soft and chewy texture, pull them from the oven at this slightly underbaked stage. Let them sit on the baking sheet for a few minutes before transferring them to a wire rack to finish cooling.
What Are Some Fun Flavor Variations to Try?
Making delicious cookies at home is a joyful experience, and our copycat crumble cookie recipe provides the perfect base. This versatile dough lets you unleash your creativity, making it easy to switch up flavors for any craving or occasion. It’s a fun way to experiment in the kitchen and discover new favorite treats.
Transform your baking with these simple variations. You’ll quickly create delicious cookies everyone will love. These beginner-friendly ideas are perfect for anyone seeking approachable home baking.
Chocolate Chip
Who doesn’t love a classic chocolate chip cookie? This variation adds the familiar favorite to your crumble cookie base for an easy boost of incredible flavor and texture. It’s a perfect family-friendly treat.
- Add Chocolate Chips: Once your cookie dough is ready, gently fold in about 1 cup of your favorite chocolate chips. Milk, dark, or white chocolate chips all work wonderfully. You can even use mini chips for a more even distribution.
- Bake and Cool: Bake your cookies as directed in the main recipe. Allow them to cool completely.
- Frosting Fun: Top your warm chocolate chip cookies with a simple vanilla buttercream. Alternatively, a drizzle of melted chocolate ganache makes them extra special.
This simple twist turns your cookies into an indulgent new delight. It proves that even quick desserts can feel special.
Cookies and Cream
Get ready for a flavor explosion with this cookies and cream variation. This popular combination is incredibly simple to achieve, making it a delightful treat for any home baker.
- Crush the Cookies: Take about 8 to 10 sandwich cream cookies. Crush them roughly using a food processor or a Ziploc bag and a rolling pin.
- Mix into Dough: Gently fold most of the crushed cookies into your prepared cookie dough. Save a few for decorating later.
- Make the Frosting: Prepare your vanilla buttercream. Then, mix in the remaining crushed cookies. This creates a delicious cookies and cream frosting.
- Decorate: Spread the cookies and cream frosting generously over your cooled cookies. Top with extra crushed cookie pieces for a beautiful finish.
This variation makes your dessert exciting and visually appealing. It’s an approachable way to elevate your baking skills.
Festive Sprinkles
Add a pop of color and celebratory flair with sprinkles! This variation is perfect for birthdays, holidays, or any time you want a more festive treat. It’s an easy way to turn a simple cookie into a delightful dessert.
- Choose Your Sprinkles: Select sprinkles that match your theme. Jimmies, nonpareils, or shaped sprinkles are all great choices.
- Mix into Dough (Optional): For an extra festive look, you can gently fold about ½ cup of sprinkles into your cookie dough before baking.
- Decorate Before Baking: Press some sprinkles onto the tops of your shaped cookie dough balls before baking. This helps the sprinkles stick well.
- Frosting Finish: Once your cookies are cool, spread them with your favorite frosting. Vanilla buttercream works perfectly. Immediately cover the frosted tops with more sprinkles for maximum impact.
This easy recipe variation brings joy to any occasion. It’s a wonderful example of simple, step-by-step baking guidance. Enjoy baking without stress and create something beautiful!
How Should You Store Your Homemade Cookies?
At Room Temperature
There’s nothing quite like a freshly baked crumble cookie. But with proper storage, you can enjoy these delicious treats for days to come.
- Cool Completely: First, always let your cookies cool completely. Storing them while still warm creates condensation, which makes them soggy and shortens their shelf life.
- Airtight Container: Next, place the cooled cookies in an airtight container. This step is crucial because air exposure makes cookies stale and hard.
- Keep Them Soft: To maintain extra softness, add a slice of plain white bread to the container. The bread releases moisture, which helps keep the cookies chewy. Just be sure to replace the slice every day or two.
- Location and Time: Store the container on your kitchen counter, away from direct sunlight or other warm spots. When stored this way, your cookies will stay fresh and soft for 3 to 5 days—perfect for quick snacks all week!
Freezing Baked Cookies
Freezing baked cookies is a fantastic way to prepare ahead. This method, which is also great for busy families, ensures you can enjoy a flavorful treat whenever a craving hits.
- Ensure Full Cooling: As with room-temperature storage, let your baked cookies cool entirely. This is a crucial first step for successful freezing.
- Individual Wrapping: Individually wrap each cookie in plastic wrap or aluminum foil. This important step prevents freezer burn and keeps their flavors distinct.
- Airtight Storage: Place the individually wrapped cookies into a freezer-safe bag or an airtight container. Before sealing, remove as much air as possible to protect them.
- Label Clearly: Clearly label the bag or container with the date so you can easily track freshness.
- Freezer Duration: Your cookies can be frozen for up to 3 months, making future dessert planning a breeze [2].
- Thawing: When you’re ready to enjoy them, simply remove the cookies from the freezer and let them thaw at room temperature for a few hours.
Freezing Cookie Dough
Freezing cookie dough is a brilliant, beginner-friendly hack that lets you bake warm, fresh cookies with minimal effort. It’s the ideal solution for spontaneous baking cravings!
- Portion the Dough: First, scoop the cookie dough into individual balls, using the same size you normally would for baking.
- Flash Freeze: Arrange the dough balls on a parchment-lined baking sheet, making sure they don’t touch. Flash freeze them for 1 to 2 hours, or until they are firm. This step is key to preventing them from sticking together later.
- Transfer to Storage: Once the dough balls are firm, transfer them to a freezer-safe bag and press out as much air as possible before sealing.
- Label for Convenience: Label the bag with the date and the specific baking instructions (temperature and time). This simple note will make baking them later even easier.
- Storage Time: Cookie dough can be stored in the freezer for up to 2 months, so you’ll always have delicious homemade treats on hand.
- Baking from Frozen: There’s no need to thaw the dough. Simply place the frozen dough balls on a baking sheet and add 2 to 4 minutes to the original baking time. You’ll have perfectly baked, warm crumble cookies fresh from the oven!
Frequently Asked Questions
What makes Crumbl-style cookies so soft?
Achieving the signature soft and tender texture of a Crumbl-style cookie comes down to the right ingredients and technique. It’s a common goal for home bakers, and these tips make it easy to master.
- High Fat Content: More butter, sometimes combined with shortening, creates a tender crumb by inhibiting gluten development.
- Brown Sugar Power: Brown sugar adds moisture and chewiness, contributing more to a soft texture than granulated sugar alone.
- Careful Mixing: Avoid overmixing the dough. Too much mixing develops excess gluten, which can lead to tough cookies.
- Underbaking Slightly: Pull the cookies from the oven when the centers still look slightly underdone. They will finish baking on the hot sheet, which prevents them from becoming dry and ensures a perfectly gooey center.
- Right Temperature: Baking at the correct oven temperature ensures the cookies cook evenly and set properly without drying out.
Following these key principles will help you create incredibly soft, bakery-quality cookies in your own kitchen.
Why is it important to chill the cookie dough?
Chilling cookie dough is a crucial step for achieving bakery-style results. While it requires a little patience, the wait is worth it for a superior cookie.
- Prevents Spreading: The cold fat in the dough melts more slowly in the oven, which helps the cookies hold their shape and prevents them from spreading too thin.
- Concentrates Flavor: As the dough rests, the flour hydrates fully and the flavors have time to meld, resulting in a richer, more complex taste.
- Better Texture: Chilling makes the dough firmer and less sticky, so it’s easier to handle. This also contributes to a chewier final texture with crisp edges and a soft center.
- Uniform Baking: Chilled dough bakes more evenly, which helps prevent burnt edges while the centers are still raw.
Many baking experts agree that chilling dough significantly improves cookie quality [3]. This simple step is the key to making cookies that taste as incredible as they look.
Can I make these cookies smaller?
Absolutely! While Crumbl-style cookies are famous for their giant size, you can easily adjust the recipe to make smaller, more conventional cookies.
- Scoop Size: Instead of using a 1/4 cup scoop, try a 1.5 to 2-tablespoon cookie scoop.
- Baking Time: Reduce the baking time significantly, as smaller cookies bake much faster. Start checking them at 8-10 minutes, looking for lightly golden edges and a set center.
- Yield: You’ll get more cookies out of a single batch, which means more delicious treats to share!
This simple adjustment makes the recipe more versatile, perfect for parties, bake sales, or anytime you want more cookies to go around.
How do I get my cookies perfectly round?
You don’t need to be a professional baker to make perfectly round cookies. With a few simple tricks, your homemade cookies will look like they came from a bakery.
- Use a Cookie Scoop: A cookie scoop portions the dough evenly, ensuring your cookies are a consistent size and shape before they even go in the oven.
- Chill the Dough: As mentioned above, chilled dough spreads less, which is essential for maintaining a round shape during baking.
- The “Cookie Scoot”: Immediately after taking the cookies out of the oven, use a round cookie cutter or glass that’s slightly larger than the cookie. Place it over the warm cookie and gently “scoot” it in a circle to nudge the edges into a perfect round shape.
- No Overcrowding: Give your cookies plenty of space on the baking sheet to prevent them from running into each other and losing their shape.
Using these techniques will transform your cookies from homemade to picture-perfect, giving you beautiful and delicious results every time.