Chow mein is a classic Chinese-American dish featuring stir-fried noodles combined with vegetables and a protein like chicken, beef, or tofu. The defining characteristic is the noodles, which are typically par-boiled and then pan-fried to achieve a slightly crispy texture. It’s all brought together with a savory soy-based sauce for a quick and flavorful meal.
Tired of ordering takeout every time you crave savory chicken chow mein? Many home cooks assume their favorite restaurant dishes are too complicated to make at home. The good news is that a delicious, better-than-takeout version is not only possible but also surprisingly easy—even on your busiest weeknights.
At Recipesmondial, we believe enjoying flavorful, family-friendly meals shouldn’t be stressful. That’s why we created this simple dinner recipe for chicken chow mein, designed for beginners and busy households. Our step-by-step guide helps you build confidence and whip up quick meals everyone will love. Get ready to transform everyday ingredients into a truly satisfying dish.
In this guide, we’ll walk you through everything needed to master this easy chicken chow mein recipe. We’ll cover the difference between chow mein and lo mein, share practical tips for perfect results, and suggest simple substitutions. You’ll discover how to create flavorful meals made easy. Say goodbye to takeout menus and hello to stress-free cooking, starting with what makes this the easiest chow mein recipe you’ll ever find.
Why Is This The Easiest Chow Mein Recipe?
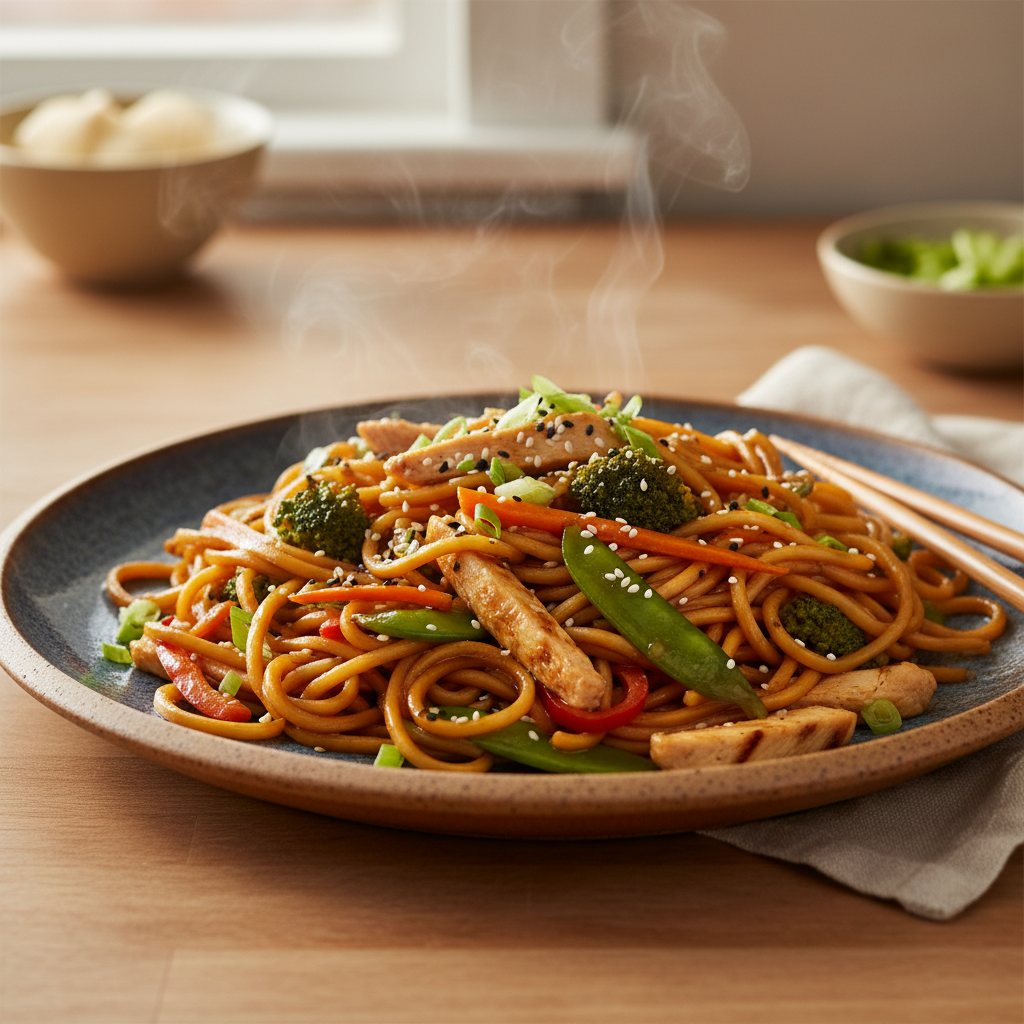
A professional food photography shot of a generous serving of freshly cooked Chicken Chow Mein in a rustic ceramic bowl, garnished with chopped green onions and a sprinkle of sesame seeds. The noodles are perfectly coated in a savory sauce, intertwined with tender chicken pieces and crisp-tender vegetables (julienned carrots, sliced cabbage, bell peppers). The dish looks incredibly appetizing, steamy, and inviting, placed on a simple wooden table with a soft, warm background, hinting at a cozy home kitchen setting. Photorealistic, high-quality food magazine photo, focus on texture, vibrancy, and deliciousness.
Are you looking for an incredibly easy way to make delicious chicken chow mein? You’ve found it! This chow mein recipe is designed for home cooks, making the entire process enjoyable and stress-free.
Complex recipes can be overwhelming, especially when you want to cook a healthy, tasty meal without losing confidence in the kitchen. Our chicken chow mein recipe solves these challenges by bringing authentic Asian flavors to your table with minimal effort. Get ready to cook with confidence!
Why This Recipe Is So Easy To Follow
Simple Ingredients: Our recipe calls for items you likely already have, with no obscure ingredients required. This makes our chow mein recipe accessible to everyone.
Clear Step-by-Step Guidance: We provide simple, broken-down instructions for clarity. With no guesswork involved, you’ll build your kitchen confidence one easy step at a time.
Fast Cooking Time: Ready in under 30 minutes, this chicken chow mein is perfect for a quick family-friendly meal. Say goodbye to stressful meal prep on busy weeknights!
Guaranteed Flavorful Results: Achieve that amazing takeaway taste right at home. Our balanced sauce ensures rich, authentic flavor every single time, making it easy to enjoy a professional-quality meal.
Beginner-Friendly Techniques: We skip the complicated methods, so you don’t need any special skills or fancy equipment. It’s an approachable home cooking experience for cooks of all levels.
Practical Tips and Substitutions: Find suggestions to fit your preferences and dietary needs. This allows you to easily adapt the chow mein recipe based on the pantry staples you have on hand.
At Recipesmondial, we believe cooking should be fun and rewarding. This easy chicken chow mein recipe embodies that philosophy, delivering big on taste without the complexity. Discover more simple dishes with us and transform your mealtime!
Chow mein vs lo mein: What’s the Difference?
When you hear “chow mein” and “lo mein,” you might think they’re the same dish. However, these two classic noodle dishes are actually quite distinct. The main difference comes down to one key thing: how the noodles are prepared. Understanding this will help you appreciate each one even more!
The Noodles: A Tale of Two Textures
The biggest difference between the two dishes starts with the noodles and the way they’re cooked.
Chow Mein Noodles: These are typically thinner egg noodles, either round or flat. They are par-boiled and then stir-fried to create a delightfully crispy texture. The name “chow mein” fittingly translates to “fried noodles” [1].
Lo Mein Noodles: In contrast, lo mein uses thicker, chewier egg noodles. These noodles are boiled until fully cooked and tender—they are never fried. This method gives them a softer texture, perfect for absorbing sauce. The term “lo mein” means “tossed noodles” [1].
Cooking Method and Final Dish
Beyond the noodles, the cooking process for the final dish also sets them apart.
Chow Mein: To make chow mein, the par-boiled noodles are stir-fried in a hot wok until they become crispy, often separately from the other ingredients. This process results in a drier dish where the noodles provide a key textural component and the sauce is typically lighter.
Lo Mein: With lo mein, the fully boiled noodles are added to the wok near the end of cooking. They are simply tossed with the sauce and other ingredients, allowing the soft noodles to soak up all the flavor. The result is a saucier dish where the noodles themselves are the star.
Quick Comparison
Here is a simple breakdown to help you remember the key differences:
Feature
Chow Mein
Lo Mein
Noodle Type
Thinner, often par-boiled
Thicker, chewier
Cooking Method
Stir-fried, often pan-fried for crispiness
Boiled, then tossed with sauce
Texture
Drier, sometimes crispy, firmer
Softer, chewier, saucier
Sauce Amount
Lighter coating on ingredients
Heavier coating on noodles
Our easy chicken chow mein recipe celebrates this distinction, focusing on creating that satisfying, slightly crispy noodle texture. It delivers a truly flavorful meal that’s much better than takeout, letting you master a beloved global comfort food right in your own kitchen.
What Ingredients Do You Need for Chicken Chow Mein?
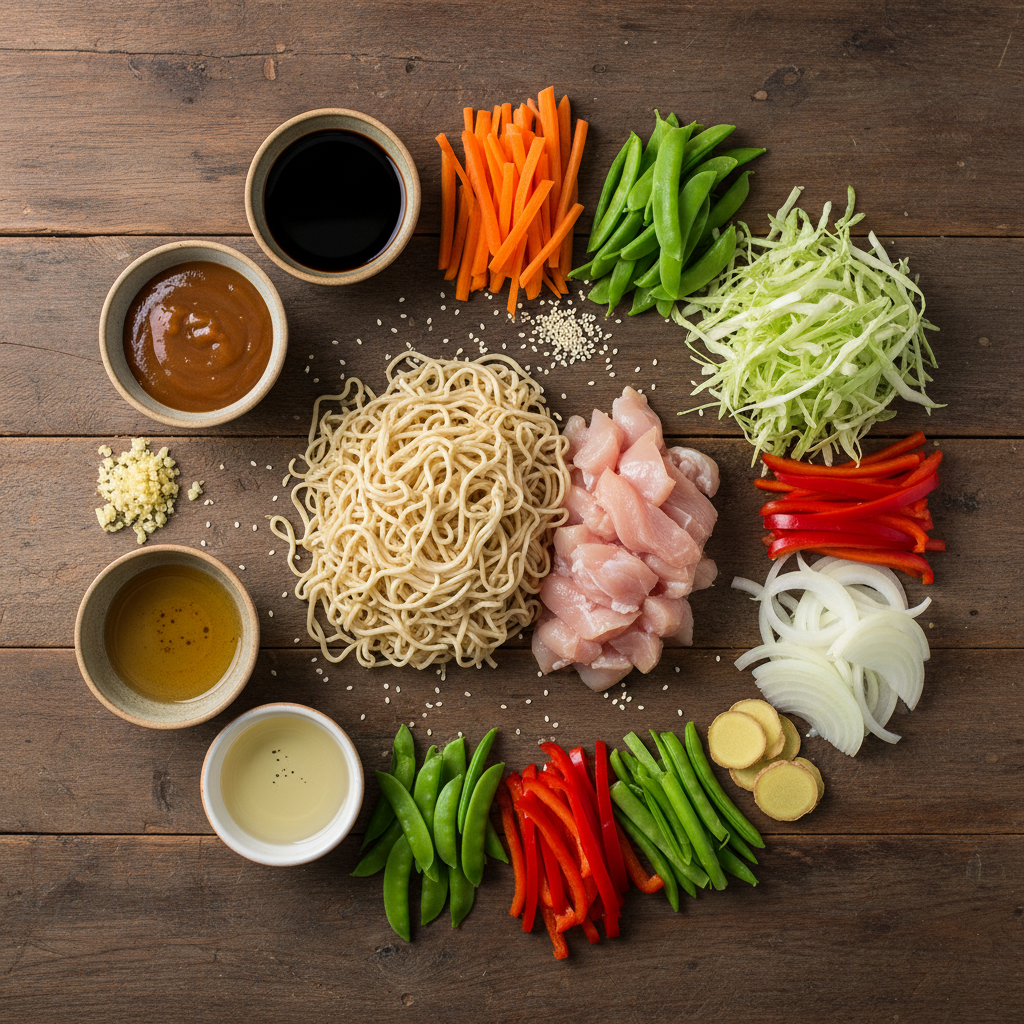
A beautifully arranged flat lay, overhead shot of all fresh ingredients for Chicken Chow Mein on a rustic wooden or clean white kitchen counter. Include raw chicken breast slices, chow mein noodles (dry or par-cooked), fresh vibrant vegetables like julienned carrots, sliced cabbage, snap peas, red bell peppers, sliced yellow onion, minced garlic, and sliced fresh ginger. Also show small, elegant bowls of sauces like soy sauce, oyster sauce, sesame oil, and a light cooking oil. Lighting should be natural, bright, and even, emphasizing freshness, organization, and readiness to cook. Professional food photography, photorealistic, high-quality food magazine photo.
For the Chicken Marinade
Perfectly tender chicken is the key to delicious chicken chow mein, and a quick marinade makes all the difference. This simple step infuses the chicken with flavor and ensures it stays wonderfully juicy.
Chicken Breast: 1 pound (about 2 large breasts), cut into thin strips.
Soy Sauce: 1 tablespoon. This adds savory depth.
Sesame Oil: 1 teaspoon. It provides a lovely nutty aroma.
Cornstarch: 1 tablespoon. This is our secret to tender, velvety chicken. It also helps the sauce cling.
White Pepper: 1/4 teaspoon. A classic touch for Asian cooking.
For the Chow Mein Sauce
The sauce gives this chow mein recipe its signature flavor. This blend balances savory, sweet, and umami to give your homemade chicken chow mein that classic takeaway taste. To save time, whisk these ingredients together in a small bowl before you start stir-frying.
Soy Sauce: 2 tablespoons. This is the base of our savory sauce.
Dark Soy Sauce: 1 tablespoon. It adds rich color and a subtle sweetness. This is optional but highly recommended for authentic look and flavor.
Oyster Sauce: 2 tablespoons. This provides a rich, complex umami flavor.
Granulated Sugar: 1 teaspoon. Just a touch to balance the savory notes.
Sesame Oil: 1 teaspoon. More aromatic richness for the final dish.
Chicken Broth or Water: 1/4 cup. This helps create the perfect sauce consistency.
Cornstarch: 1 teaspoon. It thickens the sauce beautifully.
For the Stir-Fry
Now for the main event! These core components come together quickly for a vibrant and flavorful chow mein. Feel free to swap the vegetables based on what you have on hand to customize your chicken chow mein recipe.
Chow Mein Noodles: 12 ounces, fresh or dried. Look for thin, egg noodles. Cook them according to package directions until al dente.
Marinated Chicken: From the marinade section above.
Cooking Oil: 2 tablespoons, such as vegetable or canola oil. A neutral oil with a high smoke point is best.
Fresh Ginger: 1 tablespoon, grated or minced. It provides a warm, spicy kick.
Yellow Onion: 1/2 medium, thinly sliced.
Carrots: 1 medium, julienned or thinly sliced.
Green Cabbage: 2 cups, shredded. This adds great texture and sweetness.
Bean Sprouts: 1 cup. Add these at the very end for crispness.
Green Onions: 3, chopped. Use some for cooking and some for garnish.
How to Make Chicken Chow Mein Step-by-Step
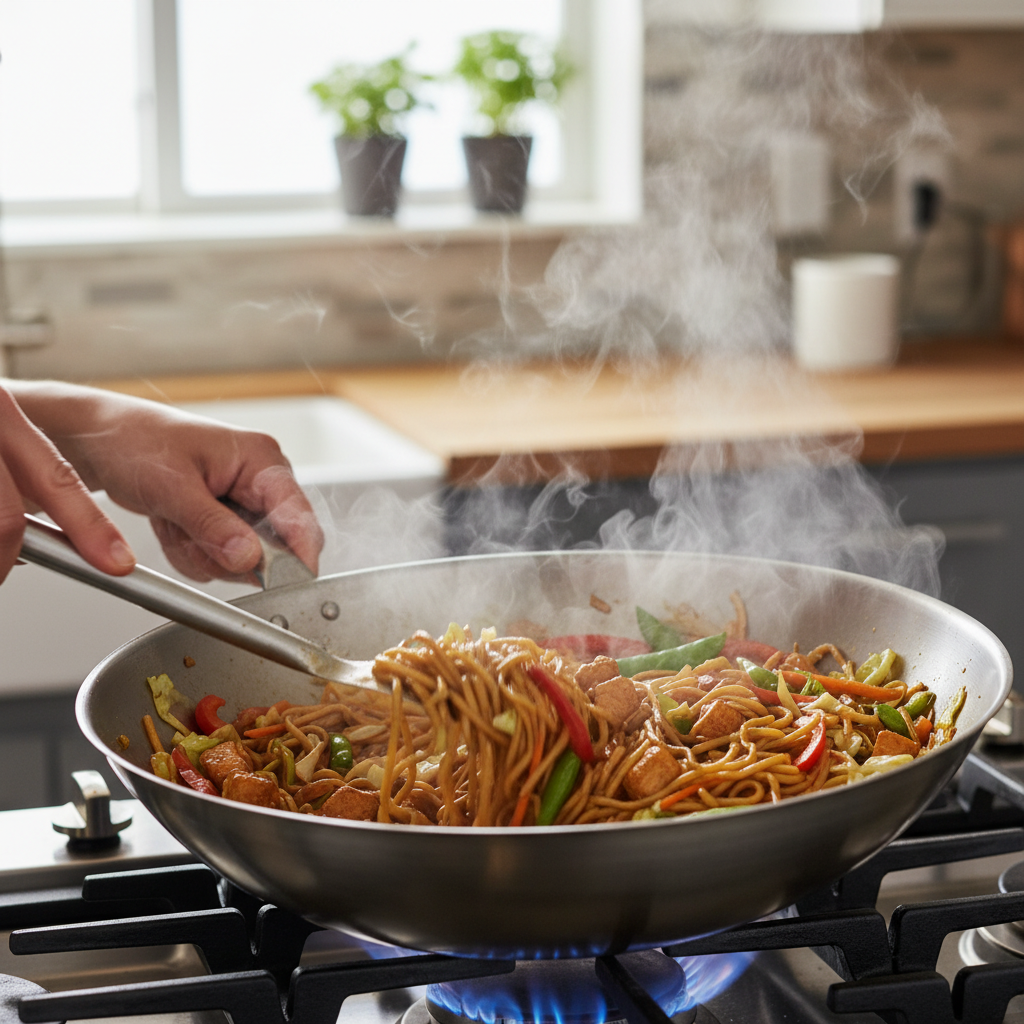
A dynamic, close-up shot of a home cook (real human, warm and encouraging expression, mid-shot showing hands and torso) stir-frying Chicken Chow Mein in a large, hot wok on a gas stovetop. Steam should be visibly rising from the wok, and the noodles, chicken, and colorful vegetables are being actively tossed with a metal wok spatula. The kitchen background is warm, clean, and inviting, with soft, natural lighting. Emphasize motion, vibrant colors, the delicious aroma implied by the steam, and the approachable nature of home cooking. Professional food photography, photorealistic, high-quality food magazine photo.
Making homemade chicken chow mein is incredibly rewarding, and you’ll love how simple it is to create this flavorful, family-friendly meal in your own kitchen. Forget complicated cooking—our step-by-step cooking guidance helps you confidently create a dish that tastes better than takeaway. This easy recipe is perfect for anyone who enjoys beginner-friendly recipes.
Here’s how to cook your delicious chicken chow mein recipe:
Prep Work: Marinating & Sauce
Marinate the Chicken:
First, cut the chicken breast into thin, bite-sized strips to ensure it cooks quickly and evenly. In a medium bowl, combine the chicken strips with the marinade ingredients:
1 tablespoon soy sauce
1 teaspoon cornstarch
1 teaspoon sesame oil
Toss until the chicken is well coated. Let it marinate for at least 15 minutes, or up to 30 minutes for a deeper flavor. This step is key to getting tender, juicy chicken in your chow mein!
Whisk the Chow Mein Sauce:
While the chicken marinates, prepare the chow mein sauce. In a small bowl or measuring cup, whisk all the sauce ingredients together until smooth:
Set the sauce aside. Preparing it now will make the final stir-fry process quick and easy.
Prepare the Noodles:
Cook the chow mein noodles according to package directions, which usually takes 3-5 minutes. Once done, drain the noodles well and briefly rinse them under cold water to stop the cooking process and prevent sticking. To keep them from clumping, toss them with a quick drizzle of sesame oil.
The Stir-Fry Magic
Cook the Chicken:
Heat 1 tablespoon of vegetable oil in a large wok or skillet over high heat. Carefully add the marinated chicken in a single layer. Cook for 2-3 minutes per side until golden brown and cooked through. Remove the chicken from the wok and set it aside; this keeps it juicy.
Sauté the Veggies:
Add another tablespoon of oil to the hot wok. Sauté the chopped garlic and ginger for about 30 seconds until fragrant. Add the harder vegetables, like carrots and cabbage, and stir-fry for 2-3 minutes. Follow with the softer vegetables, such as bell peppers and bean sprouts, and cook for another 1-2 minutes until they are tender-crisp and vibrant.
Bringing It All Together
Combine Everything:
Return the cooked chicken to the wok along with the sautéed vegetables. Add the prepared noodles, then pour the chow mein sauce over everything. Using tongs or two spatulas, toss gently but thoroughly to coat all the ingredients evenly. Continue to cook for 1-2 minutes, just until the sauce thickens slightly and infuses every bite with flavor.
Serve Your Masterpiece:
Transfer the chicken chow mein to serving plates. Garnish with chopped green onions, if desired, and serve immediately. Enjoy this simple dinner recipe—a flavorful meal made easy that’s sure to impress!
Helpful Tips for Perfect, Takeaway-Style Results
Making delicious chicken chow mein at home is entirely achievable. With a few simple tricks, you can replicate that irresistible, authentic takeaway flavor and texture. Follow these helpful tips for truly perfect results!
Master High Heat: This is crucial for authentic chow mein, so use a wok or a large, heavy-bottomed skillet. Get the pan screaming hot before adding oil. This intense heat quickly sears your ingredients, preventing them from steaming and getting soggy. It also helps create “wok hei,” the signature smoky flavor found in great stir-fries. This effect is achieved through the Maillard reaction, which caramelizes the food and adds deep, complex flavor [source: https://www.seriouseats.com/what-is-wok-hei-flavor-why-how-to-do-it-at-home].
Prep Everything First (Mise en Place): Because stir-frying happens so quickly, you won’t have time to chop or measure once you start. Prepare all your ingredients ahead of time: slice the chicken, chop your vegetables, and mix the chow mein sauce. Having all components ready and within reach ensures the cooking process is smooth and stress-free.
Don’t Overcrowd Your Pan: Avoid dumping everything into the pan at once, as overcrowding will cause the temperature to drop significantly. When this happens, your ingredients will steam instead of sear. To prevent this, cook the chicken in a single layer first, removing it once browned. Then, stir-fry the vegetables in batches if necessary, combining everything at the very end.
Perfectly Cooked Noodles: Whether using fresh or dried chow mein noodles, cook them until they are just al dente, meaning they still have a slight bite. Immediately rinse them under cold water to stop the cooking process and prevent them from sticking. Finally, be sure to drain them thoroughly, as any excess water can make the final dish watery.
Marinate Your Chicken: Don’t skip the marinade—even a short one makes a big difference. A simple mixture of soy sauce, cornstarch, and sesame oil will both tenderize the chicken and add significant flavor. The cornstarch is particularly important for creating a silky texture, a common technique in Chinese cooking.
The Secret’s in the Sauce (Premixed!): For a perfectly balanced flavor, never add sauce ingredients to the wok individually. Instead, mix your chow mein sauce in a separate bowl beforehand to ensure all the flavors are well blended. Add the premixed sauce all at once near the end of cooking and toss quickly to coat everything. This method guarantees a glossy, flavorful finish without overcooking the other ingredients.
Taste and Adjust: Before serving, always give your chicken chow mein a final taste. Does it need more salt, a splash more soy sauce, or a dash of white pepper? Adjust the seasoning to your liking—your own taste buds are the ultimate guide to achieving the perfect flavor.
Simple Recipe Variations and Substitutions
Vegetable Chow Mein
Craving a vibrant, plant-based twist on chow mein? This vegetable-packed version is incredibly simple and makes a quick, healthy, and flavorful meal. You can easily adapt our main recipe to be meat-free.
Here’s how to make this variation:
Omit the Protein: Simply leave the chicken out of the main recipe.
Load Up on Veggies: Increase the amount and variety of vegetables. We recommend a colorful mix of bell peppers, broccoli florets, sliced carrots, snap peas, mushrooms, and baby bok choy. Feel free to use any vegetables you have on hand.
Cooking Method: Stir-fry your vegetables until tender-crisp to retain a slight bite. Start with harder vegetables like carrots and broccoli, then add softer ones like mushrooms and bok choy later.
Add Plant-Based Protein (Optional): To make it more filling, add cubed firm tofu. Be sure to press the tofu first to remove excess water, then pan-fry it until golden before adding it to the stir-fry.
This versatile dish makes meal planning easy and is a great way to add more vegetables to your diet.
Beef or Shrimp Chow Mein
Our chow mein recipe is wonderfully versatile. Simply swap the chicken for beef or shrimp to create a new and satisfying family meal.
Here’s how to switch your protein:
For Beef Chow Mein:
Choose Your Cut: Thinly sliced sirloin, flank steak, or even lean ground beef work well.
Marinade is Key: For tender, flavorful beef, don’t skip the marinade. Use the same marinade from the main recipe to coat your beef slices before cooking.
Cooking Method: Sear the beef quickly in a hot wok or skillet, working in batches to avoid overcrowding the pan. Once browned, remove the beef and set it aside. Add it back into the wok with the noodles and sauce at the end.
For Shrimp Chow Mein:
Prepare the Shrimp: Use peeled and deveined shrimp for this variation. Keep in mind that shrimp cooks very quickly.
Add Towards the End: Add the shrimp to the wok near the end of the cooking process, after the vegetables are tender-crisp. Stir-fry for just 2-3 minutes, or until they turn pink and opaque.
Avoid Overcooking: Be careful not to overcook the shrimp, as it can become tough and rubbery.
These simple protein swaps are an easy way to keep dinner exciting without needing a whole new recipe.
Gluten-Free Chow Mein
You can easily adapt this chow mein recipe to be gluten-free. With just a few simple ingredient swaps, it’s a perfect dish for anyone with dietary restrictions or sensitivities.
Here are the key substitutions for a gluten-free version:
Gluten-Free Noodles: Swap traditional chow mein noodles for a gluten-free alternative.
Rice Noodles: Wide, flat rice noodles (often used in Pad See Ew) are a popular choice.
Sweet Potato Noodles: Also known as “glass noodles,” these are naturally gluten-free.
Certified Gluten-Free Ramen or Spaghetti: Many brands offer certified GF versions. Always check the packaging.
Tamari for Soy Sauce: Use tamari instead of regular soy sauce. Tamari is a gluten-free alternative that provides the same rich, savory flavor without any wheat.
Check Other Ingredients: Double-check the labels on all your sauce ingredients, such as oyster sauce or chili garlic sauce, to ensure they are certified gluten-free.
With these easy adjustments, everyone at your table can enjoy this amazing dish.
How to Store and Reheat Leftovers
Love having leftovers from our easy chicken chow mein recipe? Proper storage and reheating are essential to keep your meal delicious and safe. Follow these tips to enjoy your chow mein for days, even when you’re busy.
Storing Your Chicken Chow Mein Safely
To keep your chow mein fresh, follow these simple storage steps.
Cool Down Quickly: After cooking, let the chow mein cool down. To prevent bacteria growth, don’t leave it at room temperature for more than two hours.
Airtight Containers are Key: Transfer the cooled chow mein into airtight containers. This locks in moisture and prevents it from absorbing odors from other foods.
Refrigeration: Store the sealed containers in the refrigerator. Your chow mein will stay fresh for 3 to 4 days [2].
Reheating Your Leftover Chow Mein for Best Flavor
The right reheating method is the secret to leftovers that taste just as good the next day. To get tender noodles and juicy chicken, try one of these two simple approaches.
Stovetop Method (Recommended for Best Texture)
For the best texture, we recommend using the stovetop. This method helps prevent the noodles from becoming mushy.
Warm a Pan: Heat a large non-stick skillet or wok over medium heat. Add about a teaspoon of oil.
Add Chow Mein: Place your leftover chow mein into the hot pan.
Add Moisture: If the chow mein looks dry, add 1-2 tablespoons of water or chicken broth to rehydrate the noodles and sauce.
Stir and Heat: Stir-fry for 5–7 minutes, breaking up any clumps of noodles. Continue heating until the chicken is hot all the way through and the noodles are tender.
Microwave Method (Quick & Easy)
When you’re short on time, the microwave is a great option. The texture will be a bit softer, but it’s fast and convenient.
Portion Out: Place a single serving of chow mein in a microwave-safe dish.
Add Moisture: Sprinkle 1-2 tablespoons of water or chicken broth over the top to help it steam.
Cover and Heat: Cover the dish with a microwave-safe lid or a damp paper towel to trap moisture.
Reheat in Intervals: Microwave on high for 1-2 minutes, then stir. Continue heating in 30-second bursts until it’s piping hot.
Tips for Perfectly Reheated Chow Mein
No matter which method you choose, keep these tips in mind for the best results.
Don’t Overheat: Heating for too long can make the noodles mushy and the chicken tough. Heat just until it’s warmed through.
Add Fresh Veggies: To add a fresh crunch, toss in a handful of spinach or bean sprouts during the last minute of stovetop reheating.
Stir Frequently: Stirring is key for even heating, both on the stovetop and in the microwave.
Check Temperature: For safety, make sure your leftovers reach an internal temperature of 165°F (74°C).
By following these simple storage and reheating tips, you can enjoy your delicious chicken chow mein for days. Recipesmondial is here to help you make flavorful meals with confidence.
Frequently Asked Questions About Chow Mein
How to make chicken chow mein like the takeaway?
Creating authentic, takeaway-style chicken chow mein at home is simpler than you think! The secret to achieving that wonderful balance of flavor and texture lies in a few key steps. While many home cooks feel overwhelmed by complex recipes, this approach makes it an easy and enjoyable process.
Use a Wok or Large Skillet: High heat is crucial for a proper stir-fry. A wok distributes heat evenly, cooking ingredients quickly and ensuring your vegetables stay crisp.
High Heat Stir-Frying: To prevent the pan from overcrowding and lowering the temperature, cook your ingredients in batches. This ensures everything stir-fries properly instead of steaming. Remember to work quickly!
Perfectly Cooked Noodles: For that signature chewy texture, par-boil your noodles until just tender. Immediately drain and rinse them under cold water to stop the cooking process and prevent them from sticking together.
Flavorful Sauce: A well-balanced sauce that coats every ingredient is essential. Our chow mein recipe offers a simple, step-by-step guide to ensure a rich flavor without being overly complicated.
Fresh Ingredients: Using fresh chicken and crisp vegetables makes a significant difference in the final taste. This is a foundational part of creating flavorful meals made easy.
By focusing on these elements, you can master a delicious, family-friendly meal without the stress. This approachable home cooking method will have you cooking with confidence in no time.
What is in chow mein sauce?
The magic of a great chow mein lies in its savory, balanced sauce. Our chicken chow mein recipe uses common pantry staples, making it a perfect beginner-friendly recipe. Here are the key components of a classic chow mein sauce:
Soy Sauce: This provides the fundamental salty and umami base. We recommend using both light soy sauce for saltiness and dark soy sauce for a richer color and subtle sweetness.
Oyster Sauce: This ingredient adds depth, sweetness, and a lovely glossy finish. For a vegetarian option, a mushroom-based oyster sauce is an excellent substitution.
Sesame Oil: Add a drizzle of toasted sesame oil near the end of cooking for its unmistakable nutty aroma and distinctive flavor.
Sugar: A small amount of sugar balances the saltiness of the soy sauce and enhances the overall flavor profile for a harmonious taste.
Cornstarch Slurry: A simple mixture of cornstarch and water thickens the sauce, helping it cling to the noodles and other ingredients for a flavorful bite every time.
Shaoxing Wine (Optional): A secret ingredient in many authentic Chinese dishes, this rice wine adds a unique aromatic depth. If you don’t have it, you can omit it or substitute a dry sherry.
Combining these ingredients creates a quick and reliable sauce for delicious family-friendly meals. You’ll find all the inspiration you need for creative, flavorful meals right here.
What kind of noodles are best for chow mein?
For a truly authentic chow mein experience, selecting the right noodles is important. We recommend using fresh or dried Chinese egg noodles, as their classic chewy texture is ideal for the stir-frying technique and a core part of approachable home cooking.
Fresh Chinese Egg Noodles: Often found in the refrigerated section of Asian grocery stores, these thin, chewy noodles cook quickly and are excellent for stir-frying.
Dried Egg Noodles: If you can’t find fresh ones, dried egg noodles are a great alternative. Look for thin or medium-thin varieties, sometimes labeled as “chow mein noodles” or “Hong Kong style noodles.”
Pre-cooked Chow Mein Noodles: For maximum convenience, some stores offer pre-cooked, vacuum-sealed noodles. They require minimal preparation, making them perfect for quick meals and easy lunches.
No matter which you choose, the key is to par-boil them until just al dente. They will finish cooking in the wok with the sauce, allowing them to absorb all the delicious flavors. This step-by-step guidance helps you achieve perfect results every time.
Can I use a chow mein packet sauce?
Yes, you can certainly use a chow mein packet sauce for convenience. These packets are a quick meal solution designed to simplify the cooking process, and they can be a lifesaver when you need a fast dinner.
However, for the best flavor and control, we encourage making your own sauce. Our easy chicken chow mein recipe features a homemade sauce with simple ingredients, which ensures a fresh, vibrant taste. Making it yourself also allows you to adjust the sweetness, saltiness, and spice to your liking—a level of customization packet sauces often lack.
Preparing your own sauce is a beginner-friendly step that builds cooking confidence, and you’ll be surprised how easy it is. Plus, you’ll avoid the artificial additives often found in pre-made products. You’ll enjoy cooking without stress and truly taste the difference. At Recipesmondial, we aim to make flavorful meals easy, and our homemade sauce recipe aligns perfectly with that goal.
A classic stuffed peppers recipe involves hollowing out bell peppers and filling them with a savory mixture of cooked ground beef, rice, onions, and seasonings. The peppers are then typically topped with a simple tomato sauce and cheese and baked in the oven until the peppers are tender and the filling is heated through, creating a delicious and complete meal.
Are you looking for a hearty dinner that’s comforting but not complicated? Planning family-friendly meals everyone will enjoy is a common challenge, especially on busy weeknights. The good news is that an impressive meal can be surprisingly simple, even for beginner cooks. Get ready to rediscover a true classic: stuffed peppers, a perfect example of flavorful meals made easy.
At Recipesmondial, we believe cooking should be a stress-free and enjoyable experience. That’s why we created this ultimate guide to classic stuffed bell peppers. Our simple recipe walks you through each step, ensuring great results whether you’re building confidence or just looking for approachable home cooking. We want to help you cook confidently and turn basic ingredients into a truly special meal.
In this step-by-step guide, you’ll learn everything from choosing the perfect bell peppers to mastering a savory filling and baking it to perfection. We also share clever variations, including vegetarian options and meal prep tips, to help this dish become a staple in your rotation. Say goodbye to complicated recipes and hello to a simple, satisfying dinner guaranteed to please.
Why You’ll Love This Easy Stuffed Peppers Recipe
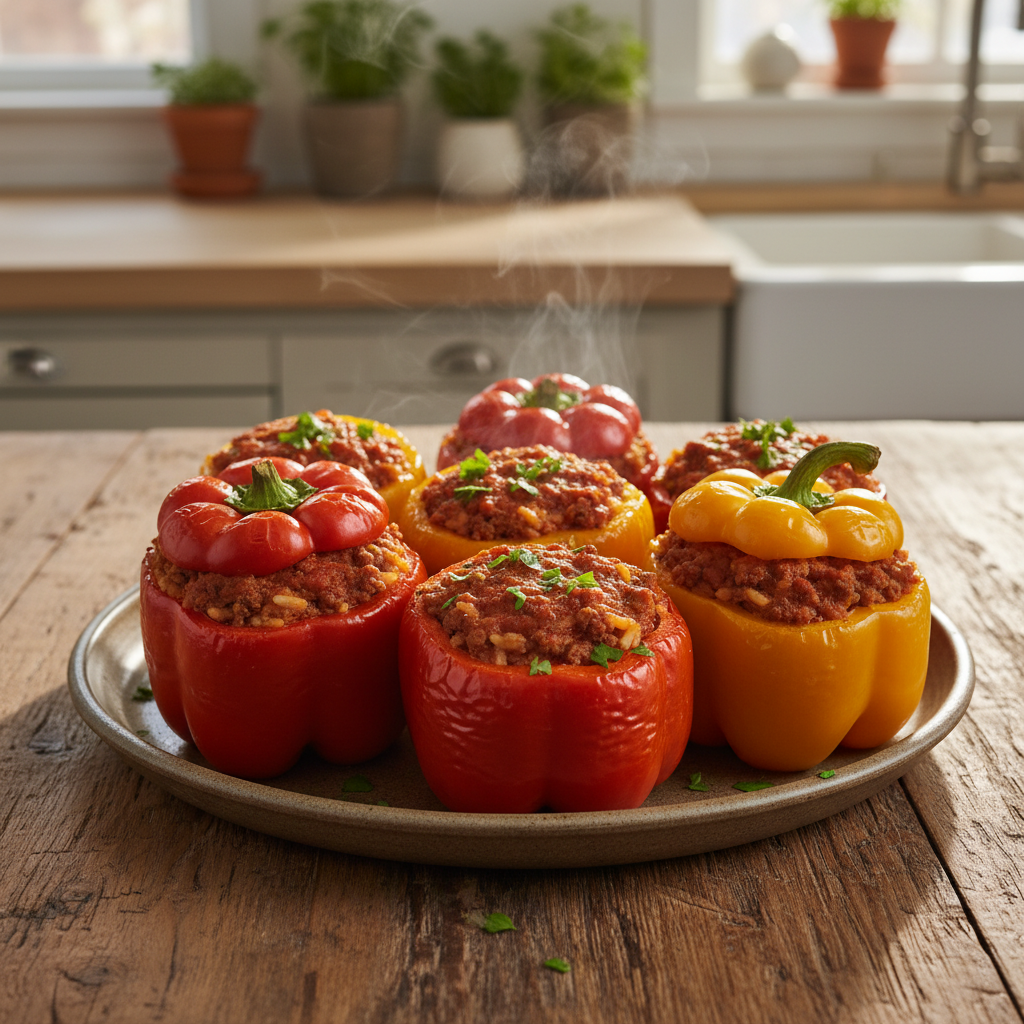
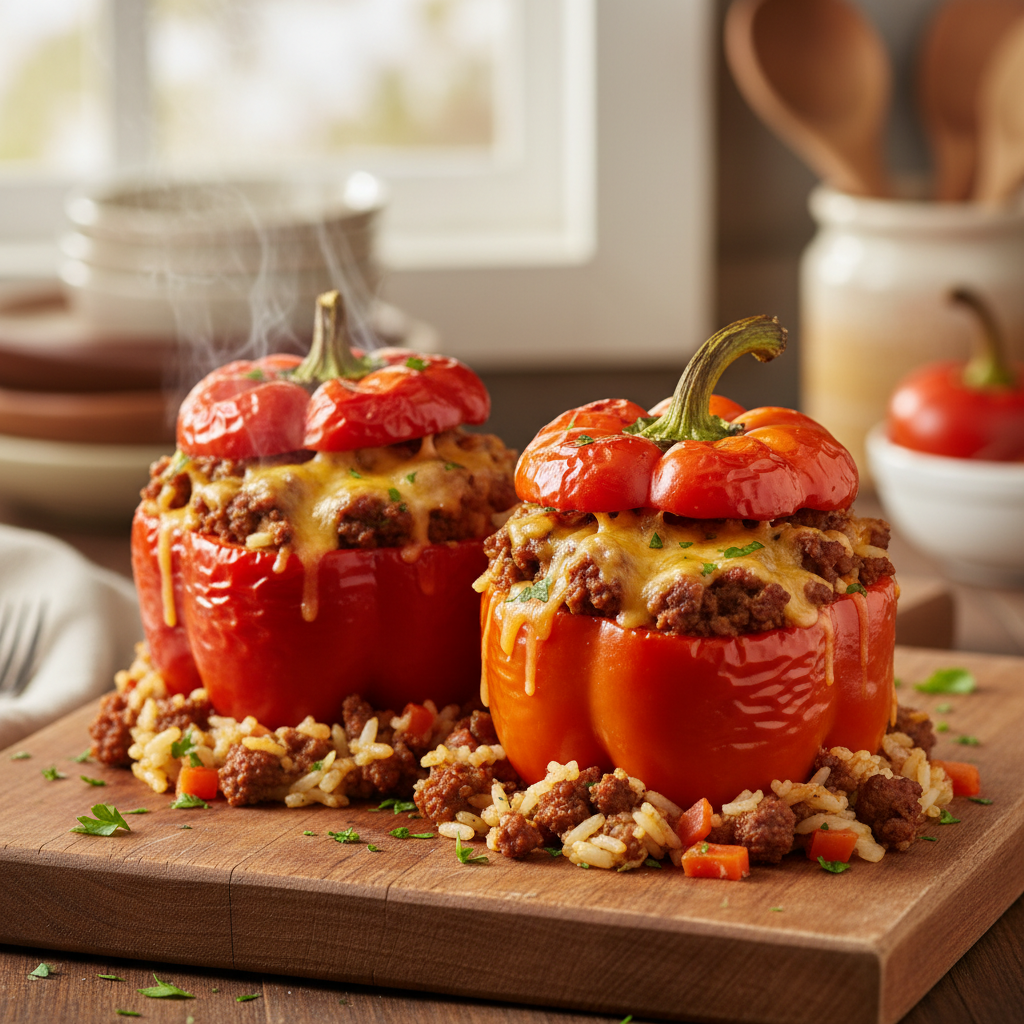
A professional food photography shot, photorealistic, high-quality food magazine photo, featuring two perfectly baked classic stuffed bell peppers arranged on a rustic wooden cutting board. The peppers are vibrant, glossy, and slightly browned on top, overflowing with a rich, savory filling of seasoned ground meat and rice, topped with melted cheese and fresh chopped parsley. A hint of steam rises gently from one pepper. The background is a softly blurred, warm kitchen setting, emphasizing an inviting and comforting meal. Natural, warm overhead lighting. Shot at eye level, making the dish appear approachable and delicious.
Looking for a reliable, delicious dinner that impresses without the stress? This classic stuffed peppers recipe is a true crowd-pleaser, perfect for busy weeknights or a cozy family meal. Our step-by-step guide is designed for home cooks, making the entire process enjoyable and straightforward.
Here’s why you’ll fall in love with this easy stuffed peppers recipe:
Simple Dinner Solution: This recipe simplifies mealtime by offering a complete, flavorful meal in just one dish. It’s the perfect go-to for an easy weeknight dinner.
Beginner-Friendly Cooking: Forget overwhelming instructions. Our clear, approachable guide builds your confidence in the kitchen, helping you master this classic dish with ease.
Unforgettable Flavor: Every bite is a perfect blend of tender bell peppers, savory meat, and a rich tomato sauce. It’s a satisfying and flavorful meal, made easy.
Perfect for Families: This is a classic family-friendly meal. Both kids and adults love the colorful presentation and comforting taste, making it a great way to serve more vegetables.
Customizable and Versatile: Easily adapt this recipe to suit your tastes or what’s in your pantry. Try a vegetarian filling, use a different grain, or add your favorite spices. Our meal prep tips also help you plan.
Stress-Free Prep: We guide you through each step, removing the guesswork from planning and cooking. You can relax and enjoy the process from start to finish.
Nourishing and Wholesome: Enjoy a balanced dish packed with protein and fresh vegetables. It’s a satisfying and hearty meal for any day of the week.
This stuffed peppers recipe is a perfect example of our commitment at Recipesmondial: providing simple, delicious recipes for every home cook. Get ready to turn everyday ingredients into a memorable meal!
What Ingredients Do You Need for Classic Stuffed Peppers?
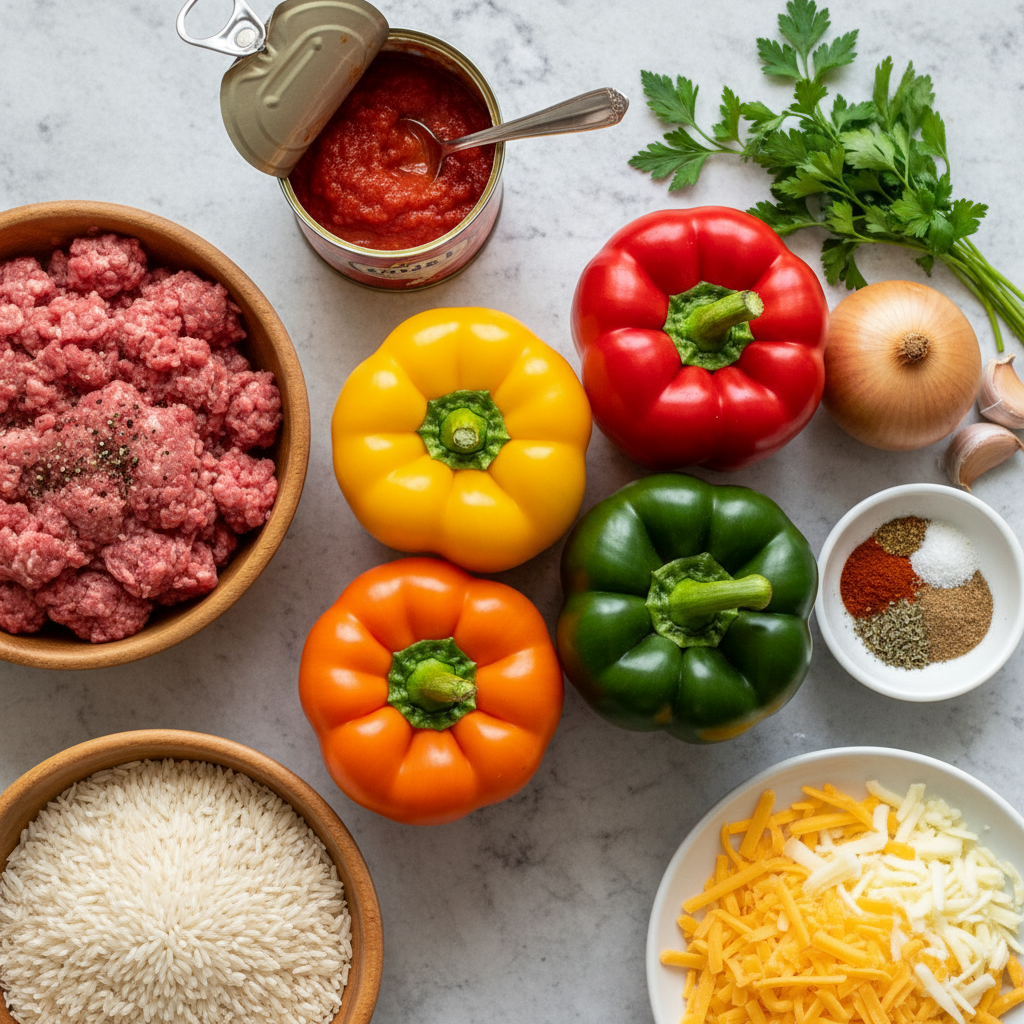
A professional food photography shot, photorealistic, high-quality food magazine photo, featuring a beautiful flat lay of all the fresh ingredients for classic stuffed peppers. The layout is clean and organized on a light, neutral-toned countertop. Components include whole, vibrant bell peppers (red, yellow, orange, green), a bowl of uncooked ground beef, a bowl of uncooked rice, a can of crushed tomatoes, a head of garlic, a whole onion, fresh parsley and basil, shredded cheese, and a small dish of spices. Each ingredient is clearly visible, fresh, and appealing. Bright, even overhead lighting.
Choosing the Right Bell Peppers
The first step to making classic stuffed peppers is choosing the right bell peppers, as they are the star of this easy recipe.
You can use any color you prefer. Green bell peppers have a traditional, slightly bitter taste, while red, yellow, and orange varieties are sweeter and soften beautifully during baking.
When selecting peppers for stuffing, look for large, firm ones with a flat bottom. This shape helps them stand upright, which makes them easier to fill and ensures they hold their savory contents in the oven.
Green Bell Peppers: These are the classic choice. They have a robust, earthy flavor.
Red, Yellow, or Orange Bell Peppers: Opt for these if you prefer a sweeter taste. They also add a vibrant pop of color.
Size Matters: Select larger peppers, as they are easier to stuff and provide a more satisfying portion.
Stability: Pick peppers with a flat bottom. This helps them stay stable in your baking dish.
Pro Tip: Remove the core and seeds carefully, then give the peppers a quick rinse to prepare them for stuffing.
For the Savory Filling
This hearty and flavorful filling is the heart of the dish, creating a satisfying meal the whole family will enjoy.
Seasoned Ground Beef and fluffy rice create the base, while aromatics and tomato add depth and moisture. This simple combination results in a balanced and delicious stuffing.
Ground Beef: 1 pound (450g) lean ground beef. This forms the delicious base.
Rice: 1 cup (185g) uncooked white rice. Long-grain or medium-grain works well. We cook it partially first.
Onion: 1 medium onion, finely chopped. It adds a lovely sweetness and depth.
Garlic: 2 cloves garlic, minced. Garlic is essential for rich flavor.
Canned Diced Tomatoes: 1 (14.5 ounce / 411g) can, undrained. These add moisture and a tangy element.
Tomato Paste: 2 tablespoons. It intensifies the tomato flavor.
Beef Broth: 1/2 cup (120ml). This adds savory liquid to the filling.
Worcestershire Sauce: 1 tablespoon. It brings a umami punch.
Dried Oregano: 1 teaspoon. A classic herb for Italian-inspired dishes.
Salt: 1/2 teaspoon, or to taste.
Black Pepper: 1/4 teaspoon, or to taste. Freshly ground is always best.
Substitution Idea: For a lighter version, feel free to swap ground beef for ground turkey or chicken. You can also use pre-cooked rice to save time.
For the Simple Tomato Sauce and Topping
A simple tomato sauce is poured around the peppers before baking. It keeps them moist, adds extra flavor, and comes together in minutes. To finish, a generous layer of melted cheese creates the perfect golden, bubbly topping.
Tomato Sauce: 1 (15 ounce / 425g) can. This forms the base of our savory sauce.
Water or Beef Broth: 1/2 cup (120ml). This thins the sauce slightly.
Brown Sugar: 1 tablespoon. It balances the acidity of the tomatoes.
Shredded Mozzarella Cheese: 1 cup (113g). This creates a gooey, golden topping.
Variation Tip: Experiment with different cheeses! Cheddar, Monterey Jack, or a blend of Italian cheeses all work beautifully. You can also add a pinch of red pepper flakes to the sauce for a subtle kick.
Gathering these simple ingredients is the first step toward a delicious, easy-to-make dinner!
How to Make Stuffed Peppers: A Step-by-Step Guide
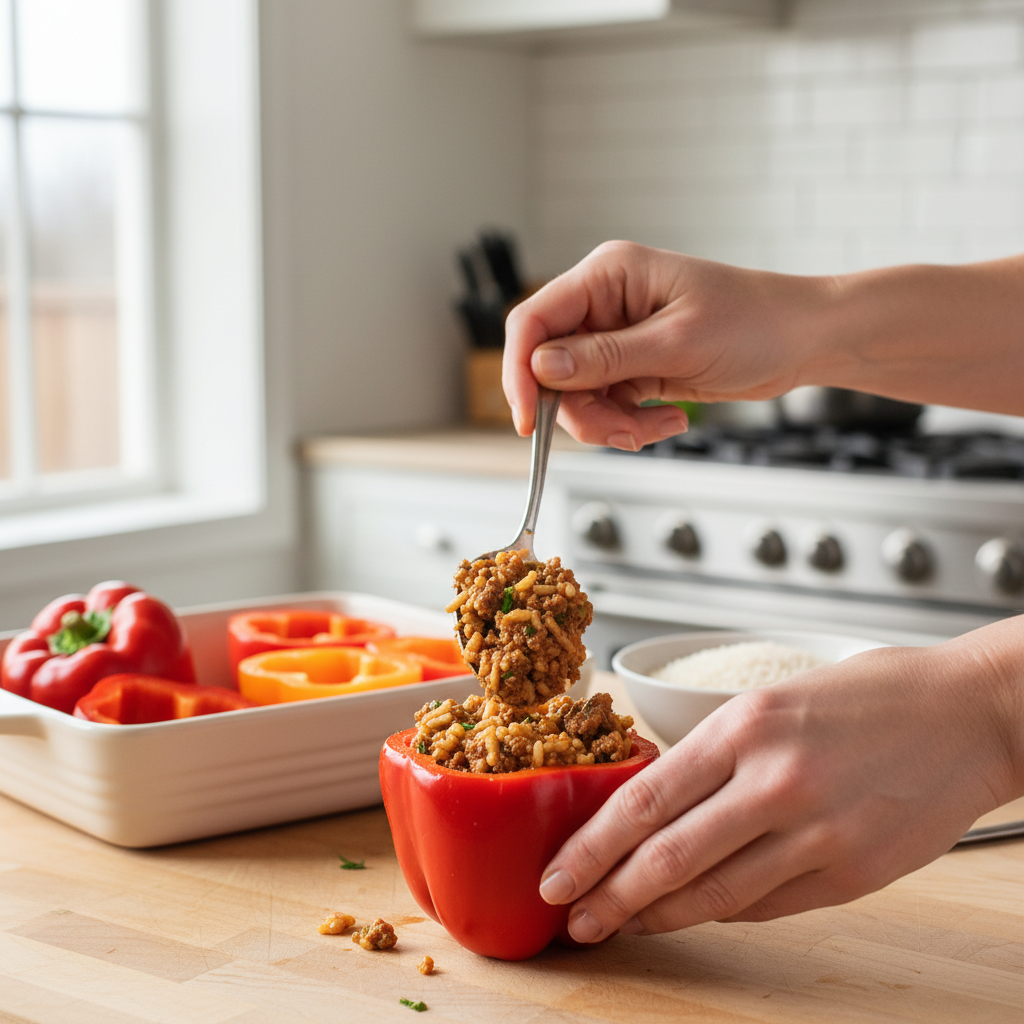
A professional food photography shot, photorealistic, high-quality food magazine photo, capturing a home cook’s hands actively stuffing a vibrant red bell pepper with the prepared savory meat and rice filling. The scene is set in a clean, bright, and inviting home kitchen with warm, natural light. The cook’s hands are visible, demonstrating the approachable nature of the task. Other prepped ingredients, like a baking dish and more empty bell pepper halves, are softly blurred in the background, keeping the focus on the hands and the stuffing process. The filling looks moist and rich. Eye-level shot.
Step 1: Prepare the Bell Peppers
First, get the bell peppers ready. This essential prep work ensures your stuffed peppers cook evenly and become perfectly tender.
Choose Your Peppers: Select 6 medium-sized bell peppers. Any color works, but red, yellow, and orange varieties are typically sweeter.
Wash and Halve: Rinse the peppers under cool water, then carefully slice each one in half lengthwise.
Remove Seeds and Core: Use a small spoon to scoop out the seeds and white membrane from each half, creating a clean cavity for the filling.
Optional: Blanch for Softer Peppers: To ensure an extra-tender texture, you can blanch the peppers. Bring a large pot of salted water to a boil, add the pepper halves, and cook for 3–5 minutes. This pre-cook step prevents them from being too firm after baking. Drain them well and set aside. This is a great tip if you’re new to cooking!
Step 2: Cook the Beef and Rice Filling
Next, create the savory filling. This is the key to a successful stuffed bell pepper recipe, and it will make your kitchen smell amazing.
Brown the Beef: In a large skillet, heat 1 tablespoon of olive oil over medium-high heat. Add 1 pound of lean ground beef and break it apart with a spoon as it cooks. Continue cooking until the beef is fully browned with no pink remaining.
Drain Excess Fat: Carefully drain the excess fat from the skillet. This step makes the filling lighter.
Sauté Aromatics: Add 1 diced onion and 2 cloves of minced garlic to the beef. Sauté for 5–7 minutes, until the onion is soft and translucent.
Combine Ingredients: Stir in 1 cup of cooked white rice (leftover or freshly cooked), 1 (14.5-ounce) can of undrained diced tomatoes, 1 teaspoon of dried oregano, 1 teaspoon of dried basil, 1/2 teaspoon of salt, and 1/4 teaspoon of black pepper.
Simmer to Blend Flavors: Mix all ingredients thoroughly and let the filling simmer for 5 minutes. This allows the flavors to meld together perfectly.
Chef’s Tip for Beginner Cooks: Pre-cooking the rice ensures it’s tender. If you use uncooked rice, you will need to add more liquid and increase the baking time. Using cooked rice is the best way to get consistent results for this easy recipe.
Step 3: Assemble the Stuffed Peppers
Now it’s time to assemble the peppers. This is a simple process that gets your family-friendly meal ready for the oven.
Prepare the Baking Dish: Pour 1/2 cup of tomato or marinara sauce into the bottom of a 9×13-inch baking dish. This adds moisture and prevents sticking.
Fill Each Pepper Half: Spoon the beef and rice mixture generously into each pepper half. Avoid packing the filling too tightly.
Arrange in the Dish: Place the filled pepper halves cut-side up in the prepared baking dish. Arrange them snugly to help them stay upright.
Top with More Sauce: Spoon a little more tomato sauce over the top of the filling in each pepper to keep them moist during baking.
Quick Idea: Have extra filling? Save it for a quick lunch or serve it as a side dish. It’s delicious on its own!
Step 4: Bake the Peppers
Finally, it’s time to bake. This last step melds the flavors and makes your stuffed bell peppers wonderfully tender.
Preheat Oven: Set your oven to 375°F (190°C). A properly preheated oven ensures everything cooks evenly.
First Bake (Covered): Cover the baking dish tightly with aluminum foil and bake for 30 minutes. This initial step steams the peppers, making them tender.
Add Cheese (Optional): Carefully remove the foil and sprinkle about 1 cup of shredded mozzarella or cheddar cheese over the tops.
Second Bake (Uncovered): Return the dish to the oven and bake uncovered for another 15–20 minutes. The peppers are done when they are fork-tender and the cheese is melted and bubbly.
Rest Before Serving: Let the peppers rest for 5–10 minutes after baking. This allows the juices to settle, making them easier to serve.
Pro-Tip for Flavorful Meals: For a golden, bubbly topping, place the peppers under the broiler for 1–2 minutes after baking. Watch them closely to prevent burning. This adds a beautiful finish to your flavorful meal!
What to put in stuffed peppers?
Easy Recipe Variations
Stuffed peppers are a versatile dish, perfect for culinary creativity. You can adapt this classic recipe to suit your tastes, use ingredients you have on hand, or create a fun meal the whole family will enjoy. These straightforward swaps simplify meal planning without the need for complex recipes.
Switch Your Protein: While ground beef is classic, feel free to use other ground meats.
Ground Turkey or Chicken: For a lighter option, these are excellent choices. They cook quickly and absorb flavors beautifully.
Ground Pork or Sausage: For a richer flavor, try ground pork or sausage. Italian sausage works wonderfully for a different twist.
Add More Veggies: Boost the nutrition and texture of your filling.
Mushrooms: Sautéed diced mushrooms add an earthy depth.
Zucchini or Spinach: Finely diced zucchini or wilted spinach blend seamlessly into the filling.
Corn or Peas: Introduce a touch of sweetness and color.
Spice it Up: Experiment with different herbs and spices to change the flavor profile.
Italian Herbs: Add oregano, basil, and a pinch of fennel for an Italian flair.
Smoked Paprika: A smoky note pairs well with the beef and tomato.
Garlic Powder and Onion Powder: These staple seasonings always enhance flavor.
Vegetarian Stuffed Peppers
Creating delicious vegetarian stuffed peppers is surprisingly simple. It’s a fantastic option for a healthy, balanced meal that’s also perfect for family dinners. With fillings this flavorful, you won’t miss the meat.
Here are some simple, hearty bases to make your stuffed peppers vegetarian:
Lentil Love: Packed with protein, cooked brown or green lentils provide a wonderful texture. Mix them with diced vegetables and a tomato base for a satisfying filling [1].
Quinoa Power: As a complete protein, cooked quinoa offers a light, fluffy texture. Combine it with black beans, corn, and your favorite seasonings.
Mushroom Magic: Finely chopped mushrooms, sautéed until deeply browned, mimic the texture of ground meat. Mix them with breadcrumbs and herbs for a savory filling.
Bean Blast: A mix of black beans, kidney beans, and corn creates a robust filling. Add some salsa and spices for a zesty flavor.
Remember to adjust seasonings to your taste. A little extra cheese or breadcrumbs can help bind your vegetarian fillings.
Stuffed Peppers Without Rice
If you’re looking for rice alternatives, you have plenty of great choices. These options offer dietary flexibility and can introduce new textures and flavors to your classic stuffed bell peppers, making it easy to customize your meal.
Consider these simple and delicious rice substitutes:
Quinoa: Cooked quinoa offers a protein boost and a texture similar to rice, making it a great choice for a healthy, balanced meal.
Cauliflower Rice: For a low-carb option, use riced cauliflower. Sauté it lightly before mixing with your other filling ingredients to help remove excess moisture.
Couscous: This tiny pasta cooks very quickly and provides a soft, delightful texture, making it a simple addition to your savory filling.
Breadcrumbs or Crushed Crackers: Use these to bind your filling. They add a comforting texture and are perfect for budget-friendly cooking.
Lentils: As mentioned, lentils are an excellent substitute that adds heartiness and protein.
Barley: A nutritious grain, cooked pearl barley offers a chewy texture that holds up well in baked dishes.
When swapping ingredients, taste your filling before baking and adjust seasonings as needed to ensure a flavorful result.
Mexican-Style Stuffed Peppers
Transform your classic stuffed peppers into a vibrant, Mexican-inspired dish that brings global comfort food right to your kitchen. The bold and satisfying flavors are sure to make this a new family favorite.
To create Mexican-style stuffed peppers, simply adjust your filling ingredients:
Spices: Add generous amounts of chili powder, cumin, and a pinch of cayenne pepper. A dash of smoked paprika enhances the flavor.
Beans: Include black beans or kidney beans. Rinse them well before adding them to your filling.
Corn: Fresh, frozen, or canned corn adds sweetness and texture.
Salsa or Diced Tomatoes with Chilies: Use these in place of plain tomato sauce in your filling for a zesty kick.
Cheese: Top your peppers with Monterey Jack, cheddar, or a Mexican blend cheese.
Garnish: Finish with fresh cilantro, a dollop of sour cream or Greek yogurt, and a squeeze of lime juice after baking.
These variations prove just how versatile stuffed peppers can be, allowing you to create a quick and flavorful meal every time!
Tips for the Perfect Stuffed Bell Peppers
How to Prevent Soggy Peppers
Nobody wants a soggy bell pepper! Achieving that perfect tender-crisp texture for your stuffed bell peppers is easier than you think. Here are our top tips to ensure your stuffed peppers hold their shape and flavor beautifully.
Pre-Cook Your Peppers: A quick par-cook softens the peppers slightly before you stuff them, which helps them cook evenly with the filling. You can either boil them for 3-5 minutes or bake them empty for 10-15 minutes.
Don’t Overfill: Avoid overstuffing the peppers, as this can make them collapse and prevent the filling from cooking thoroughly. Be sure to leave a small gap at the top.
Drain Your Filling: Excess liquid in the filling, especially from meat, will make the peppers mushy. Be sure to drain it well before stuffing to prevent the pepper walls from getting soggy.
Control Baking Time: Follow the recipe’s baking time closely to avoid soft, overcooked peppers. For a nicely browned and caramelized top, bake them uncovered for the last 10-15 minutes.
Meal Prep and Storage Instructions
Our classic stuffed peppers recipe is perfect for meal prep, saving you precious time on busy weeknights. You can easily prepare these flavorful, family-friendly dishes ahead of time.
Assemble Ahead: To save time, you can fully assemble the stuffed peppers, cover them tightly, and refrigerate for up to 2 days before baking. Just add an extra 15-20 minutes to the baking time to account for the cold temperature.
Freezing Cooked Peppers: Once cooked, stuffed bell peppers freeze beautifully. First, let them cool completely. Then, wrap each pepper individually in plastic wrap and store them in a freezer-safe bag or container for up to 3 months.
Reheating from Frozen: To reheat, remove the wrapping and place the frozen peppers in a baking dish. Cover with foil and bake at 350°F (175°C) for 45-60 minutes, or until heated through. You can also microwave individual peppers on high for 5-7 minutes.
Refrigerating Leftovers: Store leftover cooked stuffed peppers in an airtight container in the refrigerator for 3-4 days. Reheat them in the oven or microwave.
What to Serve with Stuffed Peppers
While stuffed peppers are a satisfying meal on their own, pairing them with a simple side dish can elevate your dinner. These suggestions will help you create a balanced and delicious experience for any family meal.
Fresh Green Salad: A crisp green salad with a light vinaigrette provides a refreshing contrast and is a healthy, quick addition to your meal.
Crusty Bread: A warm, crusty baguette or Italian bread is perfect for soaking up any delicious sauce, making the meal extra comforting.
Steamed or Roasted Vegetables: Simply seasoned vegetables like broccoli, green beans, or asparagus add extra nutrients and a pleasant texture that complements the rich flavors of the peppers.
Simple Grains: If your stuffed peppers don’t contain rice, a side of quinoa or couscous works wonderfully to absorb the savory sauce.
Frequently Asked Questions
How do you make a simple stuffed peppers recipe?
Making stuffed peppers is wonderfully straightforward. At Recipesmondial, we specialize in easy recipes, and this classic dish is no exception. It’s a perfect beginner-friendly meal that the whole family will enjoy.
Here is a quick overview of the steps:
Prepare the Peppers: First, wash your bell peppers. Slice them in half lengthwise, then remove the seeds and membranes. This creates the perfect little bowls for your filling.
Make the Filling: Next, cook ground meat (like beef or turkey) with onions and garlic until browned. Stir in cooked rice, tomato sauce, and your favorite seasonings. This savory mixture is the heart of the dish.
Stuff and Sauce: Fill each pepper half generously with the meat and rice mixture and place them in a baking dish. Pour a little tomato sauce around the peppers and sprinkle cheese on top for extra flavor.
Bake to Perfection: Finally, bake the stuffed peppers until they are tender and the filling is heated through. The result is a delicious and easy meal every time.
Can you make stuffed peppers ahead of time?
Yes, absolutely! Stuffed peppers are an excellent choice for meal prep. Preparing them in advance saves time during the week and makes it easier to serve a delicious, stress-free dinner.
You have a couple of great options for making them in advance:
Prepare the Filling Only: Cook the meat and rice filling, let it cool completely, and store it in an airtight container in the refrigerator for up to 3 days. When you’re ready, simply stuff fresh peppers and bake as directed. This method helps keep the peppers crisp.
Assemble Fully: For a grab-and-bake option, you can assemble the peppers completely. Stuff them, place them in a baking dish, and cover tightly with plastic wrap or foil. Refrigerate for up to 24 hours. Just add a few extra minutes to the baking time when cooking straight from the refrigerator.
Freeze for Later: For longer storage, freeze unbaked stuffed peppers. Place the fully assembled peppers on a baking sheet and freeze until solid. Then, transfer them to a freezer-safe bag or container. They will last for up to 3 months. Thaw them overnight in the refrigerator before baking, or bake from frozen by adding significant extra cooking time.
These practical tips from Recipesmondial make home cooking even more convenient and approachable.
Do you have to cook the meat before stuffing the peppers?
Yes, for the best results, you should always pre-cook ground meat before stuffing the peppers. This simple step is crucial for several key reasons, ensuring your dish is both flavorful and well-cooked.
Enhances Flavor: Browning the meat develops a rich, savory flavor that creates a delicious foundation for the filling. Raw meat cooked inside the pepper will not be as flavorful.
Removes Excess Fat: Pre-cooking allows you to drain off excess grease from the meat. This important step prevents the final dish from becoming oily or soggy.
Ensures Even Cooking: Fully cooking the ground meat beforehand guarantees the filling is safe to eat. It also ensures the peppers don’t get overcooked while you wait for raw meat to reach a safe temperature. This way, the filling and peppers are perfectly done at the same time.
Better Texture: Sautéing ground meat creates a pleasant, crumbly texture. If you use raw meat, it can sometimes clump together or turn rubbery when baked inside the pepper.
Following this simple, beginner-friendly tip helps you get delicious and reliable results every time.
How do I make a healthy stuffed peppers recipe?
It’s easy to make a healthy stuffed peppers recipe with a few simple substitutions. While stuffed peppers are already quite wholesome, you can boost their nutritional value to create a delicious and balanced meal.
Consider these simple swaps and tips:
Choose Leaner Protein: Instead of ground beef, use lean ground turkey or chicken to reduce saturated fat. Plant-based crumbles are also a great vegetarian alternative.
Boost Veggies: Finely dice extra vegetables like carrots, zucchini, mushrooms, or spinach and add them to the filling to increase vitamins, minerals, and fiber.
Opt for Whole Grains: Swap white rice for a higher-fiber option like brown rice, quinoa, or lentils. Whole grains keep you feeling full longer, and quinoa also adds extra protein.
Control Sodium: Use low-sodium broth and tomato sauce. Build flavor with herbs and spices like garlic powder, oregano, and basil instead of relying only on salt.
Lighten the Cheese: If you’re adding cheese, choose a reduced-fat variety or simply use less. A small sprinkle on top is often all you need for great flavor.
Add Beans: Incorporate black beans or kidney beans into the filling for an easy and budget-friendly boost of plant-based protein and fiber.
These simple adjustments help you create a flavorful meal that aligns with your health goals and makes home cooking work for your lifestyle.
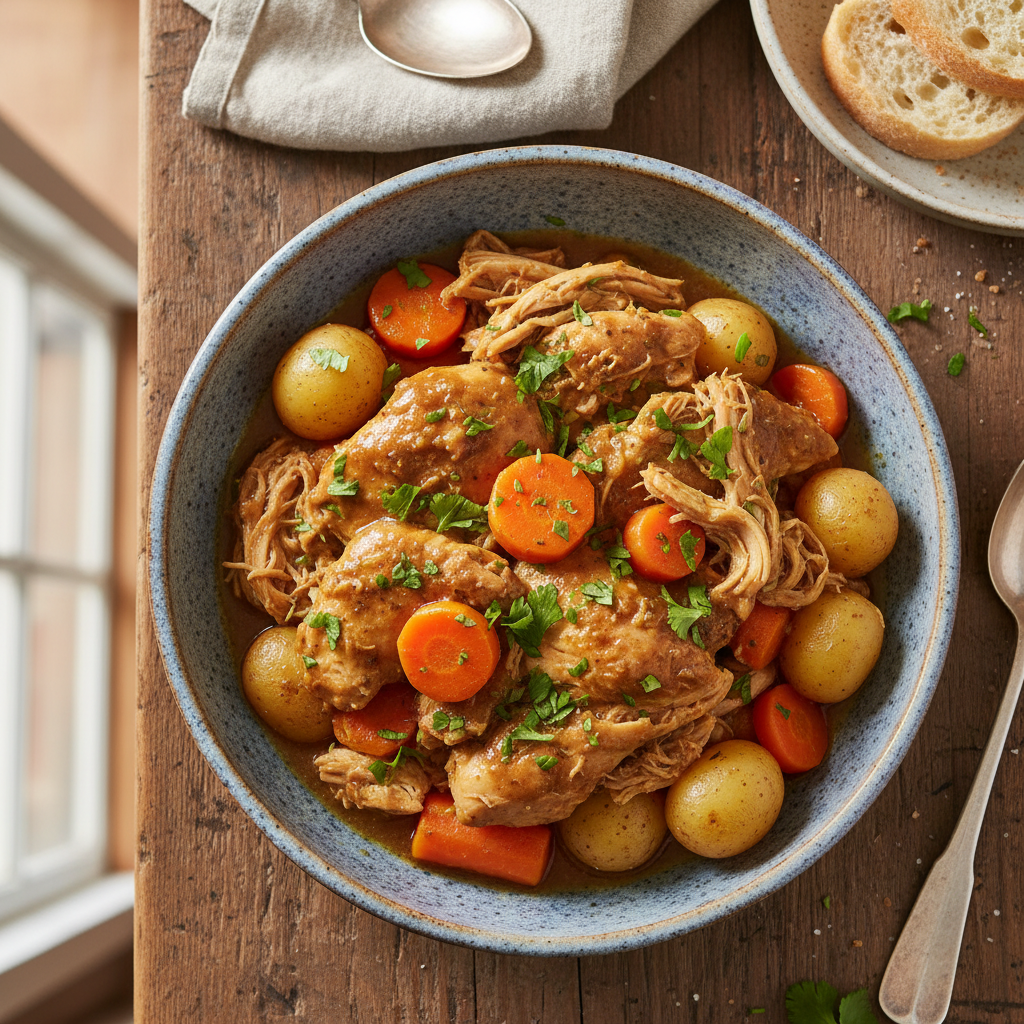
The best crockpot chicken recipes involve cooking chicken slowly over several hours, resulting in incredibly tender and flavorful meat with minimal effort. These simple recipes often use common pantry ingredients and are perfect for busy families, allowing you to ‘set it and forget it’ while the slow cooker does all the work for a delicious, stress-free meal.
Do you ever stare into the fridge, wondering what to make for dinner? Or maybe you feel overwhelmed by complex recipes and struggle to plan meals the whole family will love. We’ve all been there. Life gets busy, and preparing a delicious, healthy dinner can feel like an impossible task. But what if there was a kitchen hero ready to make your meal prep wonderfully simple? Enter the humble crockpot!
At Recipesmondial, we believe cooking should be enjoyable, not a chore. That’s why we’ve gathered the best crockpot chicken recipes to make your life easier and your meals more flavorful. These slow cooker chicken recipes are perfect for anyone, from beginner cooks who need step-by-step guidance to busy parents seeking easy weeknight dinners. Our collection covers everything from comforting classics and healthy options to quick 3-ingredient wonders. Get ready to discover approachable home cooking that delivers delicious results every time.
Get ready to reclaim your evenings and fill your home with the inviting aromas of a perfectly cooked meal. We’ll show you how to master the art of slow cooking, ensuring your chicken turns out tender and juicy every time. You’ll find delicious slow cooker chicken breast recipes and options for other cuts, too. Let’s explore why the crockpot is about to become your favorite kitchen companion and dive into our top picks for simple, healthy meals.
Why is a Crockpot Perfect for Cooking Chicken?
Are you searching for easy recipes that deliver big flavor without the fuss? Your trusty crockpot is the answer, especially when it comes to chicken. If you feel overwhelmed by complex recipes or struggle to plan family-friendly meals, the slow cooker solves these common challenges by transforming simple ingredients into something special.
Here’s why a crockpot is perfectly suited for delicious, stress-free crockpot chicken recipes:
Effortless Cooking: This is the ultimate “set it and forget it” method. Simply add your ingredients, turn it on, and let the crockpot work its magic. This frees up hours in your day, making busy weeknights much smoother.
Unbeatable Tenderness: The slow cooking process develops incredible tenderness. Even lean cuts, like those used in slow cooker chicken breast recipes, stay wonderfully juicy. Say goodbye to dry, bland chicken!
Flavor Infusion: Long cooking times allow flavors to deepen and meld together beautifully. Your spices, herbs, and sauces truly penetrate the chicken, making every bite burst with taste.
Healthy Meal Solutions: Crockpots require minimal added oils or fats, as the chicken cooks in its own natural juices or a light broth. This helps you create healthy and balanced meals for your family.
Budget-Friendly Meals: You can use less expensive cuts of chicken because the slow cooking process tenderizes them perfectly. It makes simple dinner recipes feel luxurious without the high cost.
Versatility for Any Dish: From shreddable chicken for tacos to whole pieces for comforting stews, a crockpot handles it all. You can easily adapt recipes to suit any craving or dietary need.
Fantastic for Meal Prep: Cook a large batch of crockpot chicken at once to save time later in the week. It’s perfect for easy lunches or as a quick component for weeknight dinners.
Ultimately, cooking chicken in a crockpot helps you create delicious, family-friendly meals with confidence and without the stress. Recipesmondial is here to provide easy, step-by-step guidance for every recipe.
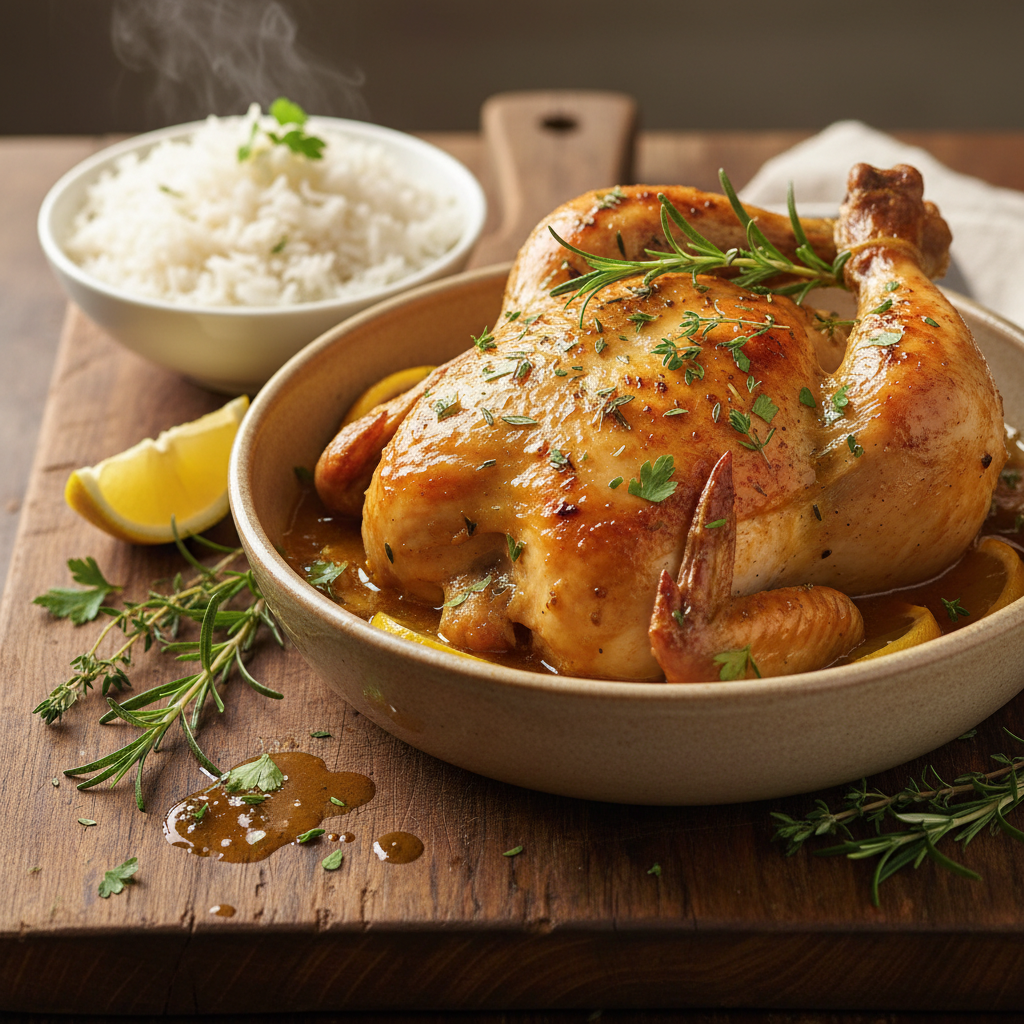
Our Top 15 Foolproof Crockpot Chicken Recipes
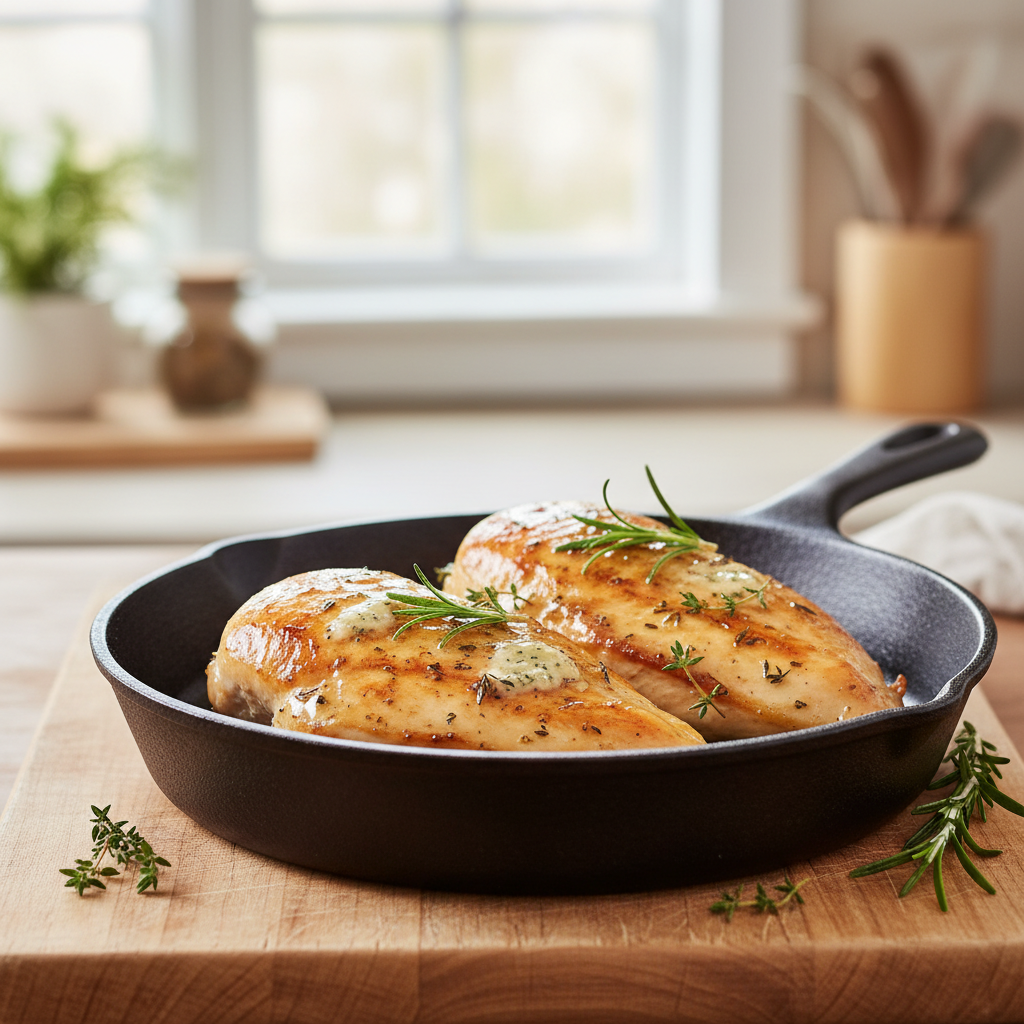
Professional food photography, photorealistic, high-quality food magazine photo of a hearty, perfectly cooked Crockpot Lemon Herb Chicken. The chicken is tender, golden-brown, with fresh herbs like rosemary and thyme scattered on top, resting in a rich, flavorful sauce. It’s served in a rustic ceramic bowl on a wooden cutting board, with a side of fluffy white rice and a sprig of fresh lemon. The lighting is warm and natural, creating an inviting and delicious visual. Shallow depth of field, focus on the chicken.
Creamy & Comforting Crockpot Chicken Dinners
There’s nothing quite like a warm, hearty meal that practically cooks itself. That’s why our collection of creamy crockpot chicken recipes is perfect for those busy weeknights.
These simple dinner recipes deliver incredible, fuss-free flavor and are fantastic for feeding the whole family. Discover how easy it is to create satisfying dishes that taste like they took hours to prepare.
Creamy Tuscan Chicken: This dish combines tender chicken breasts with sun-dried tomatoes, spinach, and a rich, creamy sauce. Ideal served over pasta or rice, it’s a fantastic family-friendly meal.
Creamy Ranch Chicken & Potatoes: With just a few ingredients—chicken, potatoes, cream of chicken soup, and ranch seasoning—you can have a comforting meal ready. This easy recipe delivers a flavorful combination every time.
Slow Cooker Chicken & Dumplings: Enjoy a classic comfort food updated for your crockpot. This recipe features succulent chicken and fluffy dumplings in a savory broth. It’s a truly heartwarming dish.
Creamy Italian Chicken: Chicken breasts simmer in a creamy Italian dressing and Parmesan cheese sauce. Serve it with a side of steamed vegetables for a complete meal. This approachable recipe is a crowd-pleaser.
Chicken Pot Pie Filling: Get all the flavors of chicken pot pie without the pastry work. This creamy filling is perfect over biscuits, toast, or even on its own. It’s a wonderful solution for busy families.
Pro Tip: For extra richness, stir in a block of cream cheese during the last 30 minutes of cooking. This simple step adds an irresistible velvety texture.
Healthy & Light Slow Cooker Chicken Recipes
Eating well doesn’t have to be complicated or time-consuming, and these healthy, balanced meals are proof. Our selection of slow cooker chicken breast recipes is designed for both ease and nutrition.
These dishes are packed with flavor, not guilt, so you can enjoy delicious meals that support your wellness goals. As a versatile and lean protein, chicken is an excellent choice for a healthy diet, providing essential amino acids and nutrients [1].
Lemon Herb Chicken & Veggies: Chicken breasts cook with a medley of colorful vegetables and fresh herbs. A zesty lemon marinade keeps everything moist and flavorful. It’s a complete meal in one pot.
Slow Cooker Salsa Chicken: This incredibly simple dish is perfect for meal prep. Combine chicken breasts with your favorite salsa, then shred the cooked chicken for tacos, burrito bowls, or salads to make weeknight dinners easy.
Chicken & Vegetable Soup: A nourishing and light soup, perfect for any season. Load it with tender chicken, carrots, celery, and potatoes. It’s a comforting yet healthy option.
Mediterranean Chicken: Chicken thighs (or breasts) simmer with olives, artichoke hearts, sun-dried tomatoes, and a light herb sauce. This flavorful, easy meal will transport you to the Mediterranean.
Honey Garlic Chicken with Broccoli: A sweet and savory delight that’s lighter than takeout. Chicken cooks in a homemade honey-garlic sauce. Add fresh broccoli florets during the last hour.
Substitution Idea: Swap chicken breast for boneless, skinless chicken thighs for extra moisture and flavor. Both are great options for healthy eating.
Quick & Easy 3-Ingredient Crockpot Chicken
Feeling overwhelmed by complex recipes? Our 3-ingredient crockpot chicken recipes are the ultimate solution for quick meals and beginner-friendly cooking.
These simple dinner recipes require minimal effort yet deliver fantastic taste. You’ll find that cooking tasty meals quickly is absolutely achievable, and you’ll build confidence in your cooking skills along the way.
BBQ Crockpot Chicken: Combine chicken breasts or thighs with your favorite barbecue sauce. Cook until shreddable. Serve on buns for easy sandwiches. It’s a family-friendly meal.
Italian Dressing Chicken: Place chicken in the slow cooker with a bottle of Italian dressing. This creates a flavorful, tender chicken that can be shredded or sliced. It’s fantastic over pasta or in salads.
Salsa Chicken (again!): This versatile recipe is so good, it deserves another mention. Chicken and salsa: that’s it! It’s perfect for meal prep. Use it in countless ways throughout the week.
Cream of Mushroom Chicken: Chicken breasts and a can of cream of mushroom soup create a rich, savory dish. This is a classic for a reason. Serve over rice or egg noodles.
Grape Jelly Meatballs (with chicken!): A surprisingly delicious combination! Chicken meatballs cook in a sauce made from grape jelly and chili sauce. It’s a unique and easy appetizer or main dish.
Common Mistake to Avoid: Do not lift the lid during cooking! Every peek adds at least 20 minutes to your cooking time. Trust your crockpot to do its magic.
Family-Favorite Global Flavors
Spice up your weeknight routine with global comfort foods! These crockpot chicken recipes introduce exciting flavors from around the world while remaining incredibly easy for home cooks.
Discover simple new dishes your whole family will love. These recipes offer approachable inspiration for culinary adventures, taking the struggle out of planning family-friendly meals.
Slow Cooker Teriyaki Chicken: Chicken pieces simmer in a homemade or store-bought teriyaki sauce. Serve this flavorful, easy meal over sticky rice with steamed green beans. It’s a popular takeout dish, simplified.
Mild Chicken Curry: Enjoy the warmth of curry without excessive spice. Chicken, coconut milk, curry paste, and vegetables create a rich, aromatic dish. Adjust the curry paste to your family’s preference.
Chicken Fajitas: Skip the sizzling skillet and use your slow cooker! Chicken strips, bell peppers, and onions cook in fajita seasoning. Serve with warm tortillas and your favorite toppings.
Honey Sesame Chicken: A sweet and nutty chicken dish that’s incredibly easy to make. Chicken cooks in a sauce of honey, soy sauce, and sesame oil. Garnish with sesame seeds and green onions.
Hawaiian Pineapple Chicken: Bring a taste of the tropics to your table. Chicken, pineapple chunks, bell peppers, and a sweet and sour sauce create a vibrant dish. It’s a delightful change of pace.
Variation Idea: For the curry, you can add potatoes or chickpeas for extra bulk and nutrition. This makes it a heartier, more budget-friendly cooking option.
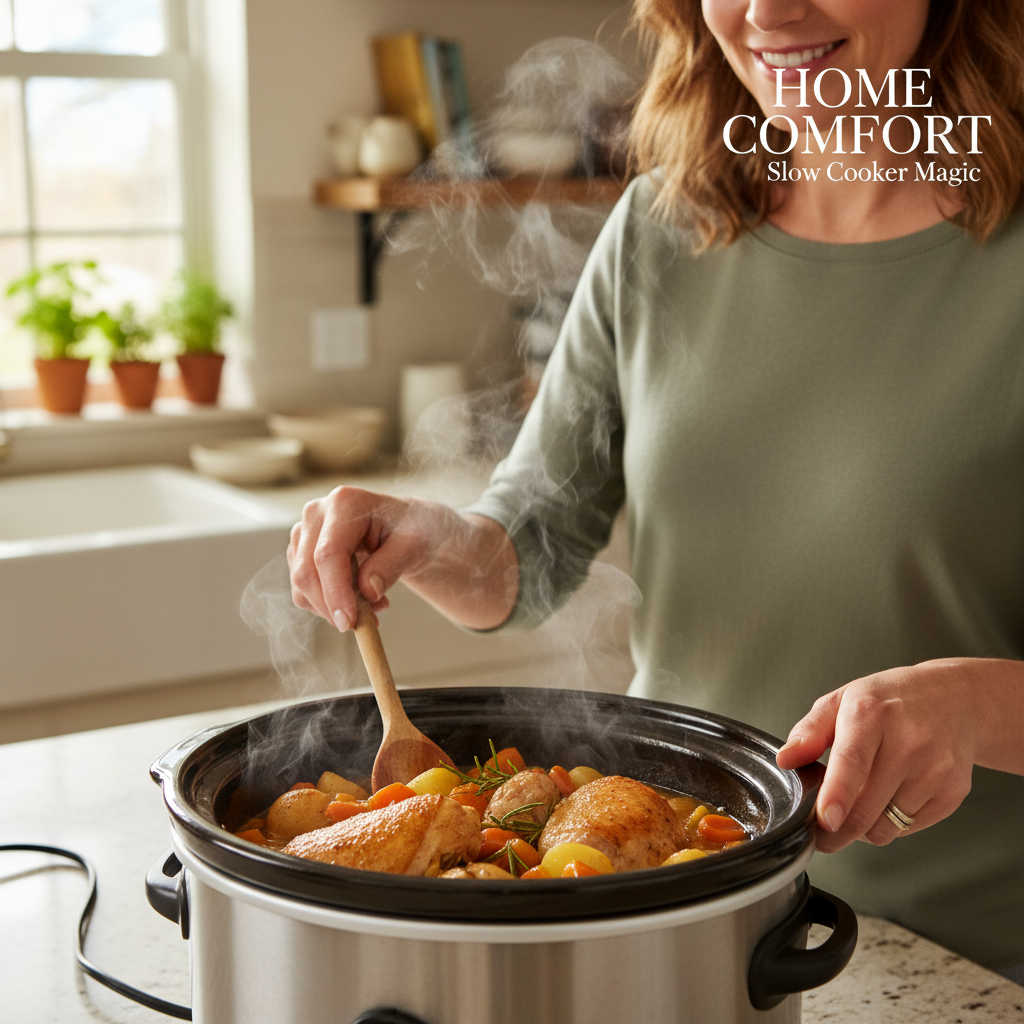
How Do You Get The Best Results From Your Slow Cooker?
Professional food photography, photorealistic, high-quality food magazine photo capturing a warm and inviting kitchen scene. A real human home cook, smiling and approachable, is gently stirring a delicious-looking chicken dish inside a working slow cooker on a clean countertop. Steam is subtly rising, suggesting warmth and freshness. The background is a slightly blurred, cozy kitchen setting with natural light coming from a window. The focus is on the cook’s hands and the slow cooker, conveying ease and a successful cooking process.
Choosing the Right Cut: Chicken Breast vs. Thighs
Choosing the right cut of chicken is key to delicious slow cooker results. While both chicken breasts and thighs work wonderfully, they each offer unique qualities for your crockpot chicken recipes. Understanding these differences will help you achieve the best outcome for your meal.
Chicken Breast for Slow Cooker Success
Leaner Choice: Chicken breast is a healthy choice because it’s naturally low in fat.
Best for Shredding: This cut is perfect for dishes where you want tender, shredded chicken, such as tacos, sandwiches, or creamy pasta sauces.
Watch the Time: Because chicken breasts can become dry if overcooked, it’s crucial to monitor cooking times carefully.
Cooking Temperature: Cook until it reaches an internal temperature of 165°F (74°C).
Flavorful Chicken Thighs in Your Crockpot
Juicier Results: Chicken thighs have a higher fat content, which keeps them incredibly moist and tender during long cooks.
Forgiving: They are much harder to overcook, making them ideal for longer slow cooker times and great for beginner-friendly recipes.
Richer Flavor: Thighs offer a deeper, more robust chicken flavor.
Versatile: Use them in stews, curries, or any dish that calls for a rich, deep flavor. They are excellent for family-friendly meals.
For easy recipes, thighs are often a more foolproof choice because they forgive small timing mistakes. However, both cuts can create amazing family-friendly meals in your slow cooker. Your choice simply depends on the final texture and richness you desire.
The Secret to Preventing Dry Chicken
No one wants dry, rubbery chicken. This is a common concern with slow cooker chicken breast recipes in particular. Fortunately, keeping your chicken juicy is simple. A few key steps can ensure you achieve flavorful meals made easy every time.
Use Enough Liquid: Always cook chicken in a liquid like broth, sauce, or even moisture-releasing vegetables. The liquid creates steam, which is essential for keeping the chicken tender.
Don’t Overcook: This is the most crucial tip. Chicken is done when it reaches an internal temperature of 165°F (74°C) [2]. Use a meat thermometer to check, as overcooking strips the chicken of its moisture.
Add a Little Fat: Incorporate ingredients like cream cheese, coconut milk, or a touch of olive oil. These fats add moisture and richness, which is especially helpful for crockpot chicken breast recipes.
Consider Bone-In, Skin-On: Bone-in, skin-on chicken pieces are another great option. The bone helps distribute heat evenly, while the skin provides a protective layer of fat that bastes the meat as it cooks.
Keep the Lid On: Resist the urge to peek! Every time you lift the lid, heat and moisture escape, which can extend the cooking time and dry out the chicken.
Shredding Wisdom: If you plan to shred the chicken, do it right before serving. Shredding it while hot helps the meat absorb the cooking liquid, boosting both flavor and tenderness.
It’s a common question for busy cooks looking for quick meals and meal prep ideas: Can you toss frozen chicken directly into your slow cooker? The short answer is no. Food safety experts advise against it [3].
Why Not to Cook Frozen Chicken in a Slow Cooker
Temperature Danger Zone: A slow cooker heats up gradually. This means frozen chicken spends too much time in the “danger zone” (40°F to 140°F or 4°C to 60°C) as it thaws. In this range, harmful bacteria can multiply rapidly.
Uneven Cooking: The chicken may not cook evenly. Its outside could be overcooked while the inside remains at an unsafe temperature.
For safe and delicious family-friendly meals, it is always best to start with thawed chicken. This simple step protects against foodborne illness and ensures your chicken cooks properly, making your beginner-friendly recipes more reliable.
Safe Alternatives for Busy Cooks
Don’t worry, there are still easy ways to prepare chicken when time is short:
Thaw in the Fridge: The safest method is to plan ahead. Move frozen chicken to the refrigerator 24-48 hours before you plan to cook it.
Cold Water Thaw: For a faster option, place the chicken in a sealed, leak-proof bag and submerge it in cold water. Be sure to change the water every 30 minutes until thawed.
Microwave Thaw: If you’re very short on time, use your microwave’s defrost setting. It’s important to cook the chicken immediately after thawing this way.
These methods ensure your chicken reaches a safe temperature quickly, helping you prepare simple dinner recipes with confidence. At Recipesmondial, our focus on approachable home cooking means we want you to enjoy the process without stress, knowing your food is both safe and delicious.
Frequently Asked Questions About Crockpot Chicken
What are the best simple crockpot chicken recipes?
If you’re looking for easy and flavorful meals, the crockpot is the perfect solution. Simple crockpot chicken recipes are ideal for beginners and busy home cooks because they require minimal prep. Just set it, forget it, and let your slow cooker do all the work.
Here are some of our top picks for simple crockpot chicken recipes:
Shredded Chicken Tacos or Sandwiches: Cook chicken breasts with taco seasoning and a little broth, then shred and serve. It’s a fantastic, family-friendly meal.
Creamy Italian Chicken: Combine chicken with a packet of Italian dressing mix, cream cheese, and a can of cream of chicken soup for a comforting and flavorful dish.
Lemon Herb Chicken: Place chicken breasts or thighs with lemon slices, fresh herbs like rosemary and thyme, and a splash of broth. It’s a healthy and balanced meal.
BBQ Pulled Chicken: Simply toss chicken with your favorite BBQ sauce. Once cooked, shred it for amazing sandwiches or wraps. This is an approachable home cooking staple.
Salsa Chicken: All you need is chicken and a jar of salsa. This quick recipe is incredibly versatile for bowls, burritos, or salads.
Each of these recipes proves that you don’t need complicated steps to create a delicious meal. They are designed to be straightforward, helping you turn simple ingredients into a dinner you can be proud of.
How do you keep chicken breast from drying out in a slow cooker?
It’s a common concern—nobody wants dry chicken! Thankfully, slow-cooking chicken breast to juicy perfection is achievable with a few simple techniques.
Here’s how to ensure your slow cooker chicken breast stays moist and tender:
Don’t Overcook It: Chicken breast cooks faster than you might think. Boneless, skinless breasts typically need just 2-3 hours on high or 3-4 hours on low. Use a meat thermometer to confirm an internal temperature of 165°F (74°C) [4].
Add Plenty of Liquid: Chicken needs moisture to stay juicy. Be sure to include a good amount of broth, sauce, or diced tomatoes in your crockpot. This creates a steamy environment that prevents the meat from drying out.
Consider Chicken Thighs: While the goal is moist chicken breast, mixing in a few boneless, skinless chicken thighs can help. Thighs are more forgiving and release more natural fat, keeping the entire dish juicy.
Sear First (Optional): A quick sear in a hot pan before slow cooking helps develop a rich flavor and can help seal in juices. While not required for most easy recipes, it’s a helpful step.
Don’t Peek: Every time you lift the lid, heat and steam escape. This can extend the cooking time and dry out your food. Trust the process and let your slow cooker work uninterrupted.
By following these simple tips, you’ll get perfectly tender slow cooker chicken every time. Say goodbye to dry, tough meat for good!
What can I make with 3 ingredients in a slow cooker with chicken?
You don’t need a long list of ingredients to make a great meal. Three-ingredient crockpot chicken recipes are the ultimate in simple, budget-friendly cooking. They are proof that a delicious, family-friendly dinner can be incredibly easy to prepare.
Here are some super simple 3-ingredient crockpot chicken ideas:
Chicken & Salsa:
Boneless, skinless chicken breasts or thighs
One jar of your favorite salsa
One packet of taco seasoning
This creates flavorful shredded chicken for tacos, burritos, or salads. It’s an ideal beginner-friendly recipe.
BBQ Pulled Chicken:
Boneless, skinless chicken breasts or thighs
One bottle of your preferred BBQ sauce
One small chopped onion
Perfect for sandwiches or sliders, this recipe makes mealtime decisions a breeze.
Creamy Italian Chicken:
Boneless, skinless chicken breasts
One packet of Italian salad dressing mix
One 8-ounce block of cream cheese
Serve this rich sauce over pasta or rice for a comforting and simple dinner. It’s a go-to for many busy families.
These simple recipes show how a few key ingredients can create a meal packed with flavor. They are designed for stress-free cooking and are perfect for any busy weeknight.
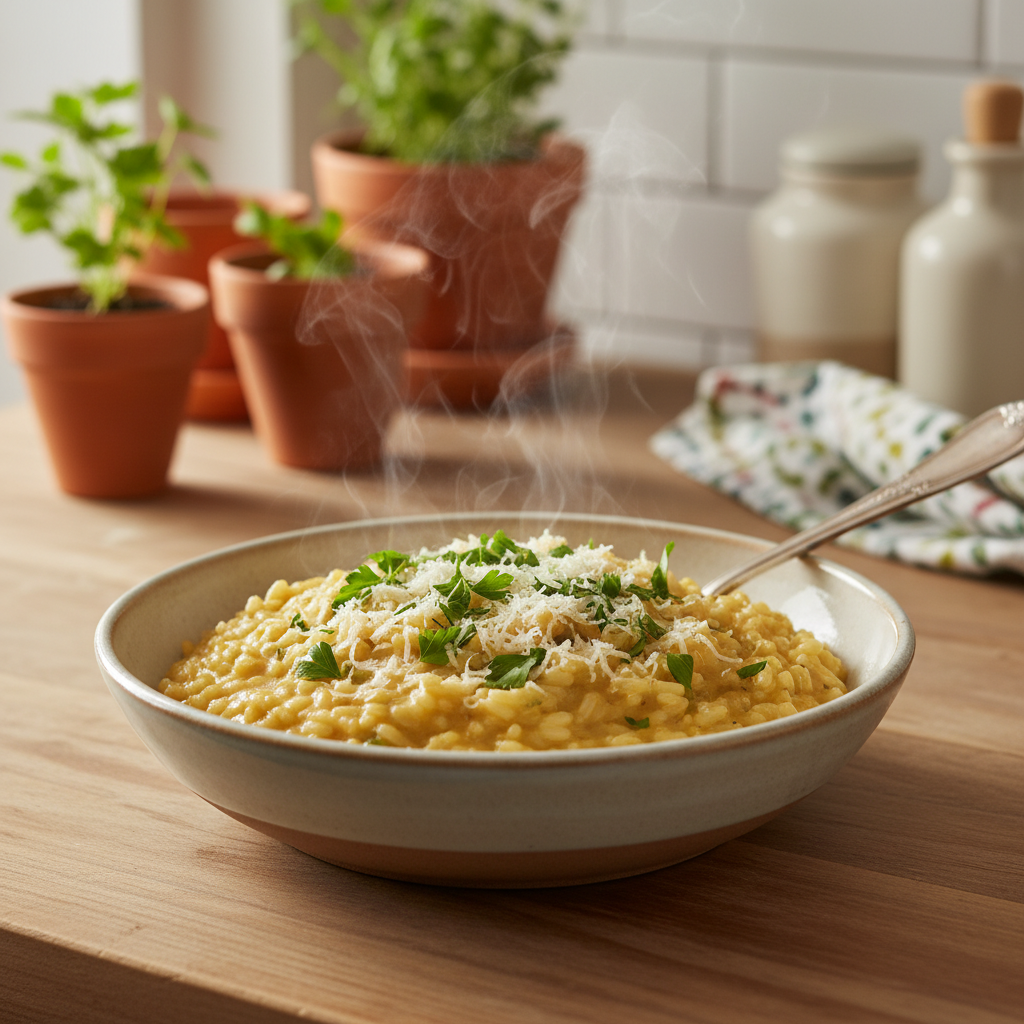
Risotto is a classic Northern Italian rice dish cooked slowly with broth until it becomes creamy and velvety. Its signature creamy texture comes not from cream, but from the starch released by short-grain, high-starch rice varieties like Arborio or Carnaroli as they are stirred during cooking.
Imagine a rich, creamy bowl of risotto, with each spoonful melting in your mouth. That’s the magic of this classic Italian dish. For many home cooks, however, risotto can feel intimidating. It has a reputation for requiring constant stirring and precise timing. Perhaps you’ve been overwhelmed by complex recipes or unsure how to create healthy, tasty meals that impress. But what if we told you that making a delicious risotto is far simpler than you think, even for beginners?
At Recipesmondial, we believe amazing food shouldn’t require culinary school. Our mission is to make approachable home cooking a joyful experience, turning simple dinner recipes into triumphs. This guide will empower you with step-by-step guidance to build your confidence and skills. You will discover how easy it is to create flavorful, family-friendly meals, transforming meal prep from a chore into a fun kitchen adventure.
We’ll skip the complicated jargon and get straight to what works. This guide covers everything you need to know, from selecting the right risotto rice to mastering the techniques for that signature creamy texture. Soon, you’ll be impressing yourself and your loved ones with flavorful meals made easy. Let’s dive in and start with the heart of the dish.
What Makes a Perfect Risotto?
Imagine a dish that’s wonderfully creamy, incredibly flavorful, and deeply comforting. That’s the magic of a perfect risotto! This classic Italian rice dish feels both elegant and incredibly homey.
Achieving this perfection isn’t complicated, even for beginners. The secret lies in two things: patient cooking and the right ingredients. The process involves gently stirring a special, starchy rice with warm broth. This slow stirring releases the rice’s natural starches, which is what creates that signature luxurious texture.
So, what truly sets a perfect risotto apart? Here are the key elements you’ll want to achieve with our easy recipes:
Creamy Texture: The hallmark of great risotto is its unbelievably creamy texture. It should flow softly, almost like a thick soup, yet still hold its shape on a plate. This creaminess comes from the rice’s starch, which naturally thickens the broth and other liquids.
Al Dente Rice: While incredibly creamy, the individual rice grains should remain distinct. Each one needs a slight, pleasant chew at its very center. This texture is called ‘al dente,’ which means ‘to the tooth’ in Italian, offering a satisfying bite without being hard.
Rich, Balanced Flavor: A perfect risotto bursts with deep, savory flavors. These come from high-quality broth, a splash of white wine, and fresh aromatics like onion and garlic. Each ingredient should blend together to create one harmonious taste.
Just the Right Consistency (All’onda): It should never be too soupy or too stiff. Instead, it should flow like a gentle wave when you tilt the plate. This ideal consistency is known as *all’onda*, which means ‘on the wave’ in Italian—the true sign of a perfectly cooked risotto.
Freshness: Risotto is best enjoyed the moment it’s made. Its delicate texture and comforting warmth are at their absolute peak when served immediately.
Once you master these key elements, you can create delicious risotto for your family with confidence. This approachable dish is a fantastic way to build your skills and feel more at home in the kitchen!
What kind of rice is used in risotto?
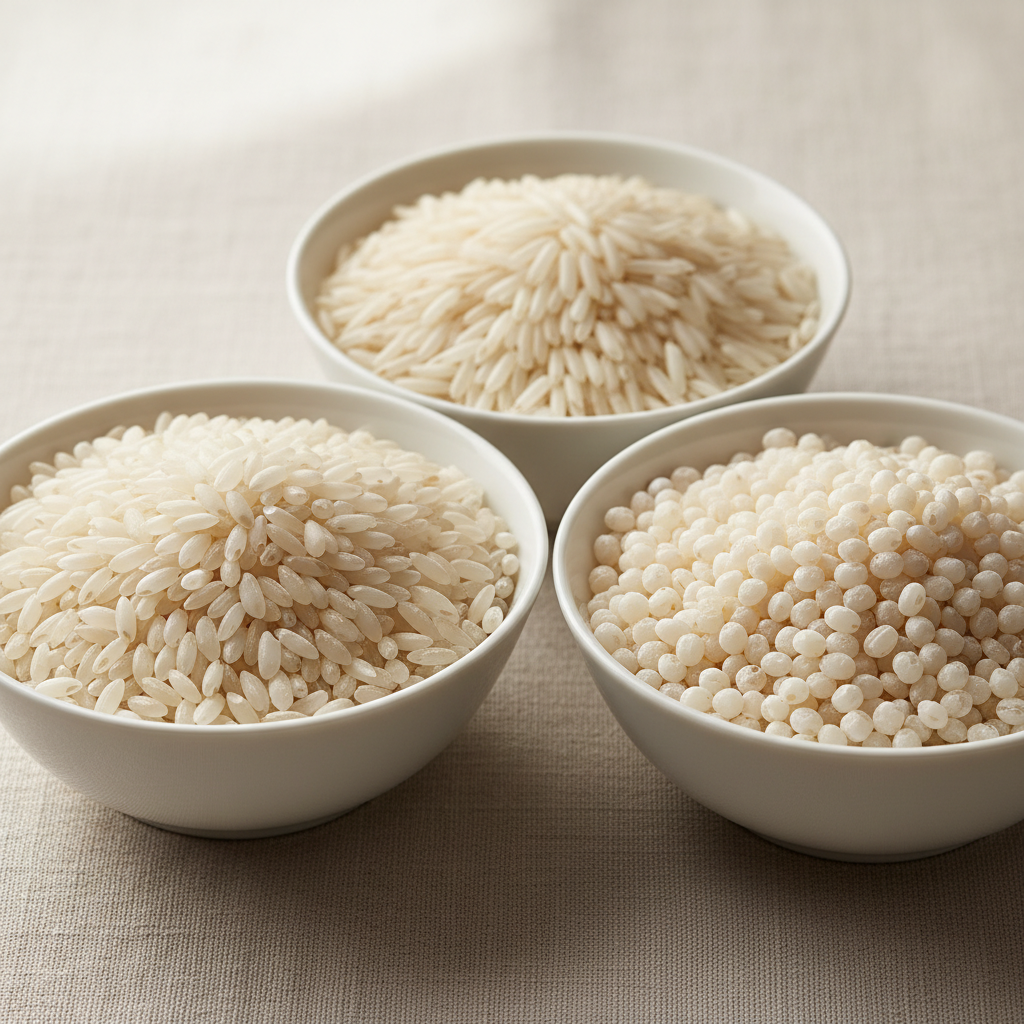
Professional food photography, photorealistic, high-quality food magazine photo. A clear and precise close-up shot showcasing three distinct types of risotto rice: Arborio, Carnaroli, and Vialone Nano. Each type of uncooked rice is neatly presented in a small, simple, and elegant white ceramic or glass bowl. The bowls are arranged in a row or slight triangle on a clean, neutral-toned surface, allowing the viewer to clearly discern the shape, size, and texture of each rice grain. The lighting is bright and even, highlighting the unique characteristics of each rice variety.
Arborio: The Go-To Risotto Rice
When you first make risotto, you’ll most likely encounter Arborio rice. It’s the go-to choice for many home cooks for a few key reasons.
Easy to find: Arborio is available in most grocery stores, making it a perfect starting point for beginner-friendly recipes.
Creamy texture: This plump, oval-shaped short-grain rice is packed with a starch called amylopectin. As you stir the risotto, this starch is released, creating the classic creamy consistency.
Absorbs flavor well: Arborio soaks up broth and seasonings effectively, delivering a rich and flavorful meal.
Because of these qualities, Arborio is a reliable choice for successful, flavorful risotto and other simple dinner recipes.
Carnaroli: The ‘King’ of Risotto Rice
If you’re ready to elevate your risotto, consider Carnaroli. Many professional chefs refer to it as the “King of Risotto Rice.”
Superior texture: As a medium-grain rice, Carnaroli has a higher amylose content than Arborio. This structure helps the grains hold their shape well during cooking, resulting in a distinct al dente bite.
Extra creamy: Despite its firmness, Carnaroli releases plenty of starch, which creates a very creamy risotto without becoming mushy.
Rich flavor absorption: This rice excels at absorbing liquids and flavors, making every bite exceptionally rich.
While it can be pricier and harder to find, Carnaroli is worth the effort for a restaurant-quality dish at home [1].
Vialone Nano: For a Softer Texture
Vialone Nano is another excellent but lesser-known option for risotto. It offers a different texture that is just as appealing.
Smaller grain: A short-grain variety, Vialone Nano is noticeably smaller and rounder than Arborio or Carnaroli.
Quick absorption: Its grains absorb liquid more quickly than other varieties, which can shorten the overall cooking time.
Softer, creamier result: The final dish is very creamy with a softer, almost soupy consistency. This texture makes it a preferred choice for delicate seafood risottos and vegetable dishes.
Choose Vialone Nano if you want a risotto with a lighter, looser texture, which is ideal for exploring different flavors and cooking styles.
Can I Make Risotto with Normal Rice?
A common question, especially for those budget cooking, is whether regular rice can be used for risotto. The short answer is no—at least not if you want an authentic, creamy result.
Lack of starch: Standard long-grain rice, such as jasmine or basmati, has much less surface starch, which is essential for creating risotto’s signature creamy sauce.
Mushy texture: Instead of absorbing liquid gradually, these grains tend to become mushy and lose their individual shape.
Different cooking properties: The unique starch in risotto rice allows it to release creaminess while the grain itself remains firm in the center (al dente). Regular rice cannot do this.
For the best risotto experience, it is essential to use a specialized Italian rice variety. Using the correct type ensures a creamy texture and reliable results, helping you avoid the frustration of a dish that doesn’t turn out as expected, which can feel like an overly complex recipe.
Essential Ingredients for a Basic Risotto Recipe
Professional food photography, photorealistic, high-quality food magazine photo. A warm, inviting flat lay arrangement of fresh, high-quality essential ingredients for a basic risotto recipe. Include a small bowl of uncooked Arborio rice, a wedge of Parmesan cheese with a grater nearby, a fresh shallot or small onion, a few cloves of garlic, a clear glass pitcher filled with golden chicken or vegetable broth, a small bottle of dry white wine, a stick of butter, and a bunch of vibrant fresh parsley. All items are artfully arranged on a clean, light-colored wooden or marble kitchen counter, highlighting their freshness and readiness for cooking. The lighting is soft and natural.
The Rice
The star of any amazing risotto is the rice. Choosing the right grain is crucial for achieving that signature creamy texture, making it a key step in creating truly flavorful meals made easy.
Arborio Rice: As the most common choice, this is perfect for beginner-friendly recipes. Arborio grains are plump, absorb liquid beautifully, and release starch as they cook to create a lovely creamy sauce.
Carnaroli Rice: Often called the “king of risotto rice,” Carnaroli offers an even creamier result while holding its shape wonderfully.
Vialone Nano Rice: This smaller grain cooks a bit faster and yields a slightly softer, very creamy risotto.
Avoid using long-grain white rice for risotto, as it won’t release enough starch for the desired creaminess. For the best outcome, stick to these specific risotto rice varieties.
The Broth
Broth is more than just liquid in risotto; it’s a primary source of flavor. For the best taste, always use a good-quality broth. It’s what transforms your simple dinner recipes into something special.
Chicken Broth: A classic choice, chicken broth adds a rich, savory depth that pairs well with many ingredients.
Vegetable Broth: For a vegetarian or vegan risotto, vegetable broth is essential. Choose a low-sodium option to better control the saltiness.
Pro Tip: Always keep your broth warm in a separate pot on the stove. Adding cold broth to the hot rice can shock it, which slows the cooking process and prevents the grains from absorbing liquid evenly. This simple trick ensures a consistently creamy finish.
The Aromatics (Onion & Garlic)
These humble ingredients form the aromatic foundation of your risotto, providing the initial burst of flavor. They are vital for adding depth to any easy recipe. A classic risotto starts with finely diced onion and sometimes garlic.
Onion: Finely chop half a medium onion. You want it to almost disappear into the rice as it cooks, adding a subtle sweetness and depth.
Garlic: One or two cloves of minced garlic can enhance the flavor. Be sure to add it after the onion softens to prevent it from burning.
Sautéing these ingredients gently until translucent releases their wonderful aromas and creates a welcoming base for the rice. This step-by-step cooking guidance ensures you build flavor from the very beginning.
The Fat (Butter & Olive Oil)
Fat plays a dual role in risotto: it’s used for both sautéing and for richness. Butter and olive oil each bring unique qualities to the dish.
Olive Oil: Start with a good-quality extra virgin olive oil. It’s perfect for sautéing the aromatics and toasting the rice, providing a light, fruity base.
Unsalted Butter: Butter is added later for richness and creaminess, contributing to the dish’s luxurious final texture. Using unsalted butter also lets you control the seasoning.
Together, they create a silky, smooth mouthfeel that makes your risotto feel truly indulgent. This small detail makes a big difference in approachable home cooking.
The Wine (Optional but Recommended)
Adding wine is a traditional step that enhances the risotto’s complexity and elevates family-friendly meals. However, this step is optional. If you prefer not to use wine, simply use a little more broth instead.
Dry White Wine: A dry white wine, like Pinot Grigio or Sauvignon Blanc, is ideal. It adds a bright acidity that helps deglaze the pan and balances the richness of the butter and cheese.
The alcohol cooks off completely, leaving behind a wonderful, nuanced flavor that makes the dish more sophisticated. It’s a great way to discover new simple dishes and build confidence in the kitchen.
The Finishers (Parmesan & Butter)
The final touches, stirred in right at the end, make all the difference in achieving a perfectly creamy risotto. This process, called “mantecatura,” is essential for a truly flavorful meal made easy.
Freshly Grated Parmesan Cheese: Use high-quality Parmesan or Pecorino Romano. The cheese melts into the rice, adding a salty, umami depth and incredible creaminess. Avoid pre-grated cheese, which often contains anti-caking agents that can ruin the texture.
Cold Unsalted Butter: Stirring in a final knob of cold butter off the heat allows it to emulsify with the rice’s starches and the broth. This is the key to a glossy, velvety-smooth finish.
These finishers are the secret to a dreamy, restaurant-quality risotto, helping to transform simple ingredients into delicious, visually appealing meals at home.
How to Make Simple & Creamy Risotto: A Step-by-Step Guide
Professional food photography, photorealistic, high-quality food magazine photo. A close-up, top-down shot of a perfectly cooked, golden-hued, and visibly creamy risotto served in an elegant, rustic ceramic bowl. The risotto is generously garnished with a sprinkle of freshly grated Parmesan cheese and a few bright green chopped parsley leaves. Soft steam is gently rising from the dish, emphasizing its warmth and freshness. The background is softly blurred, suggesting a cozy, inviting kitchen environment. The texture of the risotto should look rich, comforting, and perfectly al dente.
Step 1: Prepare Your Ingredients (Mise en Place)
Preparing all your ingredients before you start is a game-changer. This practice, known by the French term “Mise en Place” (everything in its place), helps you cook with confidence and makes the process more enjoyable.
Gathering and prepping everything beforehand prevents any last-minute scrambling. This is a fantastic habit for beginner-friendly recipes and a key part of our meal prep tips.
Warm the broth: Pour the chicken or vegetable broth into a saucepan and gently heat it over low heat. It should be hot but not boiling. Keeping the broth warm helps the risotto cook evenly.
Dice the onion: Finely chop one small to medium onion.
Mince the garlic: Peel and finely mince 2-3 cloves of garlic.
Measure the rice: You’ll need 1 cup (180-200g) of Arborio or Carnaroli rice.
Grate the cheese: Grate ½ cup of fresh Parmesan and set it aside.
Prepare the butter: Cut 2 tablespoons of unsalted butter into small cubes.
Measure the wine (optional): Pour ½ cup of dry white wine, such as Pinot Grigio or Sauvignon Blanc.
Step 2: Sauté the Aromatics
This step builds the first layer of flavor for your risotto. Your kitchen is about to start smelling amazing!
Place a large, heavy-bottomed pot or a Dutch oven over medium heat.
Add 1 tablespoon of olive oil and 1 tablespoon of butter.
Once the butter has melted and the oil shimmers, add the finely diced onion.
Sauté the onion for 5-7 minutes, stirring occasionally, until it becomes soft and translucent. Be careful not to let it brown.
Stir in the minced garlic and cook for one more minute until fragrant. Watch it closely, as burnt garlic tastes bitter.
Step 3: Toast the Rice (Tostatura)
Next is “Tostatura,” the Italian term for toasting the rice. This is a crucial step for achieving the perfect risotto texture. Toasting helps each grain absorb liquid more slowly, which prevents it from becoming mushy and ensures a wonderful ‘al dente’ bite.
Add the risotto rice to the pot with the onions and garlic.
Stir constantly for 2-3 minutes to coat each grain.
You’ll know it’s ready when the edges of the rice grains look translucent, but the centers remain white and opaque.
Toasting also brings out a pleasant, nutty flavor. It’s a simple technique that makes a big difference.
Step 4: Deglaze with Wine
Deglazing with wine adds a rich depth of flavor and helps lift any tasty bits of food stuck to the bottom of the pot. This little trick is a secret to flavorful meals made easy.
Pour the white wine into the pot.
Stir continuously as the wine bubbles and evaporates, which should happen quickly.
Continue stirring until the wine is fully absorbed and no liquid pools at the bottom of the pot.
Quick Tip: If you prefer not to use wine, you can skip this step. Just add an extra ½ cup of warm broth in the next step instead.
Step 5: Gradually Add Warm Broth
This step is the heart of making risotto, and patience is key. By adding broth slowly, you are coaxing the starches out of the rice, which creates its signature creamy texture. This is a fundamental technique in basic cooking skills.
Add one ladleful (about ½ cup) of the warm broth to the rice.
Stir gently but constantly until the broth is almost completely absorbed by the rice.
Once the liquid is absorbed, add another ladleful of broth.
Repeat this process—adding one ladleful of broth at a time and stirring until it’s absorbed—for about 18-25 minutes.
Taste the rice periodically. It’s ready when it’s creamy but still has a slight bite in the center (known as “al dente”).
You may not use all the broth, or you might need a bit more. The goal is a creamy consistency, not a soupy one.
Step 6: The Final Stir (Mantecatura)
The final step, “Mantecatura,” is how you achieve an incredibly rich and creamy finish. This technique brings all the flavors together and gives the risotto its classic velvety texture.
Once the risotto is al dente, remove the pot from the heat.
Add the remaining 1 tablespoon of cubed butter.
Stir in the grated Parmesan cheese.
Stir vigorously for about 30 seconds. This action emulsifies the butter and cheese with the starch from the rice, creating a beautiful, velvety sauce.
Cover the pot and let it rest for 2-3 minutes. This allows the flavors to meld and makes the risotto even creamier.
Serve the risotto immediately. Garnish with extra Parmesan and fresh parsley, if desired.
Top Tips for Foolproof Risotto
Always Use Warm Broth
One of the most important secrets to a truly creamy risotto is using warm broth. This simple step makes a huge difference. Adding cold broth to hot rice instantly drops the pan’s temperature, which shocks the rice kernels. As a result, the cooking process slows down and becomes uneven.
In contrast, warm broth helps the rice cook consistently and encourages a smooth release of starches. This process is what creates that lovely, velvety texture. Keep your broth at a gentle simmer in a separate pot, and ladle it in gradually as needed. This technique ensures your risotto cooks beautifully every time.
Stir Constantly, but Gently
Consistent, gentle stirring is essential for a great risotto. The constant movement causes the rice grains to rub against each other, which releases their natural starches. These starches create the creamy, luscious texture of an authentic risotto. Without enough stirring, your dish might end up sticky or less creamy.
However, avoid stirring too aggressively. Too much force can break down the delicate rice grains, resulting in a mushy texture instead of a perfectly al dente bite. Think of it as a gentle, continuous motion. Mastering this simple technique will help you achieve perfect results and boost your confidence in the kitchen.
Don’t Rush the Process
Patience is essential when making risotto. While it isn’t a quick meal, the results are incredibly satisfying. Rushing can lead to an undercooked or unevenly textured dish. The gradual addition of warm broth is key, as it allows the rice to slowly absorb the liquid, building flavor and creaminess layer by layer.
Plan on about 20-30 minutes for the cooking stage, and try to enjoy the process. By taking your time to stir and add the broth ladle by ladle, you ensure each grain is cooked perfectly to the ideal al dente texture. Remember, good things come to those who wait—especially a delicious risotto.
Taste As You Go
Tasting your risotto throughout the cooking process is crucial for achieving the best results. This simple tip allows you to adjust flavors and monitor the texture for perfect doneness. Start tasting the rice about 15 minutes after you begin adding broth. You’re looking for a tender bite with a slight firmness in the center, also known as ‘al dente’.
This is also your chance to check the seasoning. Since your broth likely contains salt, add any extra salt and pepper carefully. You can also add more cheese at the end if you like. Adjust as you go to create a balanced, flavorful dish. This final step is key to making a perfect risotto every time.
Easy Risotto Recipe Variations to Try Next
Mushroom Risotto
Once you master the basic risotto, an easy mushroom risotto recipe is a popular next step. It’s a classic for a reason, offering an incredible depth of flavor and an earthy aroma that elevates any simple dinner.
Here’s how to create this delightful variation:
Key Ingredients: Use fresh mushrooms like cremini, shiitake, or a mix of wild varieties. A little garlic and fresh thyme will also enhance the flavor.
Preparation: Start by sautéing sliced mushrooms in a separate pan until golden brown. This crucial step concentrates their flavor. Remove them from the pan and set aside.
Cooking Adjustments: Follow the basic risotto steps: sauté your aromatics, toast the rice, deglaze with white wine, and then gradually add warm broth.
Adding the Mushrooms: Stir the sautéed mushrooms back into the risotto during the last 5 minutes of cooking to prevent them from becoming rubbery.
Flavor Boost: For extra richness, use mushroom broth instead of chicken or vegetable broth. A sprinkle of fresh parsley at the end adds a bright finish.
Chicken Risotto
For a hearty, protein-packed meal, chicken risotto is a fantastic choice. This family-friendly dish is both comforting and satisfying. It’s also perfect for using leftover chicken, making it a quick weeknight meal.
Here’s how to make a delicious chicken risotto:
Key Ingredients: You’ll need cooked chicken—shredded rotisserie chicken is a great shortcut. Fresh or frozen peas and a touch of lemon zest are also excellent additions.
Preparation: If using raw chicken, cut it into small, bite-sized pieces. Sauté the pieces in olive oil until cooked through, then set the chicken aside.
Cooking Adjustments: Follow the standard risotto cooking method. Make sure your broth is warm before you begin.
Incorporating Chicken and Peas: Stir in the cooked chicken and peas during the last 5-7 minutes of cooking. This gives them enough time to warm through completely.
Serving Tip: A squeeze of fresh lemon juice at the end brightens all the flavors and cuts through the richness of the dish beautifully.
Vegetarian Risotto with Spring Vegetables
A vibrant vegetarian risotto is the perfect way to enjoy the freshness of the season. This healthy and balanced dish is ideal for lighter dining, offering a beautiful mix of colors and textures.
Here’s how to bring spring to your plate:
Key Ingredients: Choose tender spring vegetables like asparagus, peas, and fresh spinach. Lemon zest and fresh mint or basil add a wonderful aroma.
Preparation: To prepare the vegetables, blanch the asparagus and peas in boiling water, then plunge them into an ice bath. This preserves their vibrant color and crisp texture. Chop the asparagus into small pieces.
Cooking Adjustments: Use vegetable broth for this recipe and follow the standard risotto method.
Adding Vegetables: Stir in the blanched asparagus and peas during the final 3-5 minutes of cooking. Add fresh spinach at the very end, as the residual heat will wilt it perfectly.
Finishing Touch: A generous amount of lemon zest and a handful of chopped fresh herbs elevate this dish, making it truly taste like spring.
Seafood Risotto
For a touch of elegance, try a seafood risotto. This impressive dish might seem fancy, but it’s surprisingly simple to prepare. It’s a wonderful option for a special occasion or any time you want an extraordinary meal.
Here’s how to create a stunning seafood risotto:
Key Ingredients: Select your favorite seafood, such as shrimp, scallops, calamari, or mussels. A good dry white wine and fresh parsley are also essential.
Preparation: Gently sauté the seafood in a separate pan with a little olive oil. Cook just until opaque (or until mussels open) to avoid overcooking. Remove the seafood and set it aside.
Cooking Adjustments: Use fish stock or a light vegetable broth if possible. Follow the basic risotto steps, including deglazing the pan with white wine.
Integrating Seafood: Stir the cooked seafood into the risotto during the last 2-3 minutes of cooking. This gently warms it through without overcooking, ensuring it remains tender.
Pro Tip: Garnish with plenty of fresh, chopped parsley. This adds a burst of fresh flavor and creates a beautiful presentation.
Frequently Asked Questions About Risotto
Is risotto more healthy than rice?
Risotto generally contains more calories and fat than plain steamed rice. This is because it’s enriched with ingredients like butter, broth, and cheese, while plain rice is typically just cooked with water.
Here’s a simple comparison:
Plain Rice: Consists of rice and water, offering simple carbohydrates for energy.
Risotto: Starts with rice but adds butter, wine, broth, and Parmesan cheese. These ingredients are what create its famously rich flavor and creamy texture.
However, you can easily make a healthier risotto. Try reducing the amount of butter and cheese, and boost its nutritional value by adding plenty of vegetables like mushrooms, spinach, or asparagus. This can turn it into a well-rounded and flavorful meal.
At Recipesmondial, we believe enjoyment is key to home cooking. So while plain rice is lower in calories, a homemade risotto packed with vegetables can be a wonderful part of a balanced diet. It’s all about preparation and balance.
Can I make risotto with normal rice?
While you can technically use regular long-grain rice, it won’t produce the classic creamy texture of a true risotto. The type of rice you use is critical for getting the right result.
Here’s why:
High Starch Content: Risotto rice like Arborio and Carnaroli has a high content of a starch called amylopectin. As you stir the rice and add liquid, this starch releases and creates the signature creamy, velvety sauce.
Slow Absorption: The grains are also great at absorbing liquid slowly without becoming mushy. This allows them to cook to a perfect al dente texture.
Regular long-grain rice, like basmati or jasmine, has much less of this starch. It will absorb the broth but won’t create that creamy consistency. Instead, you’ll end up with a dish that’s more like a pilaf. For authentic results, using proper risotto rice makes all the difference.
What is traditional risotto rice?
To make an authentic, creamy risotto, you need to use a specific type of short- to medium-grain rice. These varieties have the high starch content required for a creamy texture and the ability to absorb liquids while remaining firm, or “al dente.”
Here are the top traditional risotto rice types:
Arborio: The most widely available risotto rice, making it a popular choice for beginner-friendly recipes. Its large, plump grains release a lot of starch, producing a very creamy risotto. It’s a great starting point for anyone new to making the dish.
Carnaroli: Often called the “king of risotto rice,” Carnaroli has longer grains and an even higher starch content than Arborio. It creates an exceptionally creamy texture while the grains hold their shape beautifully. Many chefs prefer it for its reliable results.
Vialone Nano: With shorter, plumper grains, Vialone Nano cooks a bit faster than the others. It produces a very creamy risotto with a slightly softer finish and is a favorite for seafood dishes.
Choosing the right rice is the most important step for achieving that signature creamy texture. It ensures your risotto will turn out perfectly every time.
What wine is best to use in risotto?
A dry white wine is a classic ingredient in risotto for a reason. It adds a fantastic depth of flavor and a touch of acidity that cuts through the richness of the dish.
Here’s what you should look for:
Dry White Wine: Opt for a crisp, unoaked wine. Good choices include Pinot Grigio, Sauvignon Blanc, or a dry Vermouth. The alcohol cooks off during cooking, leaving behind a subtle flavor that enhances the dish.
Pro Tip: Follow the golden rule of cooking with wine: if you wouldn’t drink it, don’t cook with it. A low-quality wine will not improve with cooking.
And here’s what to avoid:
Sweet Wines: Avoid sweet wines like Moscato or a sweet Riesling, as they will make your risotto taste sugary.
Red Wines: Unless a specific recipe calls for it (like a Barolo risotto), it’s best to avoid red wine. It will dramatically change the dish’s color and intended flavor.
If you prefer to cook without alcohol, you can easily skip the wine. Simply substitute it with an equal amount of warm broth. Your risotto will still be delicious and full of flavor.
Chicken breast is a versatile protein perfect for quick and easy meals. Popular recipes include simple baked chicken breast seasoned with herbs, juicy air fryer chicken breast for a healthy option, and pan-seared chicken with a flavorful sauce for a fast weeknight dinner. For best results, always cook chicken breast to an internal temperature of 165°F (74°C).
Struggling with what to make for dinner? It’s a common challenge to find quick, healthy, and delicious meals without feeling overwhelmed by complex recipes. Juggling busy schedules and trying to plan family-friendly meals can make you long for an easy win in the kitchen. Thankfully, there’s a culinary hero that comes to the rescue: the humble chicken breast. As a versatile and lean protein, it’s the ultimate foundation for countless easy, flavorful meals that truly satisfy.
Here at Recipesmondial, we want you to enjoy stress-free cooking, build confidence, and bring exciting flavors to your table. That’s why we’ve gathered over 50 easy chicken breast recipes designed with you in mind. Whether you’re searching for simple dinner recipes, quick breakfast ideas, or a hearty lunch, this collection has you covered. From perfectly baked chicken to crispy air fryer chicken breast and savory pan-seared options, each recipe offers approachable home cooking with clear, step-by-step guidance.
Say goodbye to uninspiring meals and hello to a world of simple, delicious possibilities. Get ready to transform everyday ingredients into extraordinary dishes that your whole family will love. Let’s dive in and discover why chicken breast is your go-to for effortless, flavorful meals.
Why Is Chicken Breast a Go-To for Easy Dinners?
Chicken breast is a superstar in the kitchen, especially when you need easy dinner ideas. At Recipesmondial, we know that busy lives call for simple, reliable, and delicious solutions. This versatile ingredient consistently delivers on all fronts, making it a beloved choice for home cooks of all skill levels.
So, why does chicken breast earn such a prominent spot in our recipe collection? It effortlessly solves many common mealtime dilemmas. For those nights when you’re overwhelmed by complex instructions or unsure how to prepare a healthy meal quickly, chicken breast provides a straightforward solution.
Incredible Versatility for Flavorful Meals
One of the biggest advantages of boneless skinless chicken breast is its incredible versatility. It acts as a blank canvas, ready to absorb any flavor you pair it with. This adaptability opens up endless possibilities for creative meals, no matter what your taste buds crave.
Because it suits so many cooking methods, you’ll find it easy to discover new and simple dishes.
Grilling: Adds a smoky char, ideal for warmer weather.
Stir-Frying: Cuts easily into strips for quick, vibrant stir-fries.
A Lean Protein Powerhouse for Healthy Eating
Chicken breast is an excellent choice for healthy meals because it’s naturally low in fat and packed with lean protein. This combination makes it a fantastic foundation for balanced and nourishing dishes.
By providing essential nutrients without excessive calories, chicken breast helps keep you feeling full and satisfied. In fact, a 3.5-ounce serving of cooked chicken breast contains about 31 grams of protein [1], making it a smart choice for anyone focusing on wellness.
Quick and Easy Cooking for Busy Schedules
Time is precious on weeknights, and this is where chicken breast truly shines. Because it cooks so quickly, you can get a delicious, stress-free meal on the table in 30 minutes or less. This speed is essential for easy weeknight dinners.
Our simple chicken breast recipes are designed with your busy schedule in mind, helping you solve the “what’s for dinner?” question without any hassle.
Family-Friendly and Budget-Smart
Chicken breast is a universal crowd-pleaser, which is perfect when planning meals everyone will enjoy. Its mild flavor appeals to both adults and children, making dinnertime stress-free and enjoyable for the whole family.
Furthermore, chicken breast is widely available and often budget-friendly. This makes it an economical choice for feeding your family delicious and wholesome meals without breaking the bank.
Ideal for Efficient Meal Prep
For those who like to plan ahead, chicken breast is a meal prep essential. Cooking a larger batch over the weekend can save you a significant amount of time during the week, simplifying your meal plan.
Cooked chicken breast also reheats beautifully and can be used in salads, sandwiches, pasta dishes, or grain bowls. This versatility makes it effortless to enjoy healthy, delicious meals all week long.
At Recipesmondial, we believe cooking should be enjoyable, not a chore. With boneless skinless chicken breast in your kitchen, you are always just a few steps away from a satisfying, flavorful, and easy dinner. It’s a reliable, go-to ingredient that builds confidence and makes mealtime a pleasure.
Quick and Easy Chicken Breast Recipes (Ready in 30 Minutes!)
Professional food photography, photorealistic, high-quality food magazine photo. A vibrant, pan-seared chicken breast, expertly sliced into thick pieces, served on a modern ceramic plate. The chicken is golden-brown and juicy. It’s accompanied by brightly colored, fresh side vegetables such as tender-crisp green beans and glistening cherry tomatoes, artfully arranged. Subtle steam rises from the dish, indicating freshness. A real home cook’s hands are visible in the background, out of focus, reaching to add a final sprig of fresh parsley, conveying speed and ease. The scene is lit with warm, inviting natural light, set on a clean, light-colored kitchen counter. Shallow depth of field, focused on the chicken. Bright, appetizing colors.
Simple Pan-Seared Chicken Breast
Discover how easy it is to make a perfect weeknight dinner with this simple pan-seared chicken breast recipe. Ideal for beginners, this method builds kitchen confidence by creating tender, juicy chicken with a lovely golden crust every time.
Pan-searing is a quick and straightforward cooking technique that delivers delicious results without any fuss. This easy chicken recipe is sure to become a regular in your meal rotation.
Ingredients:
2 boneless, skinless chicken breasts (about 6-8 oz each)
1 tablespoon olive oil
1/2 teaspoon salt
1/4 teaspoon black pepper
1/2 teaspoon garlic powder (optional)
1/2 teaspoon onion powder (optional)
Instructions:
Prepare the Chicken: Place each chicken breast between two pieces of plastic wrap. Use a meat mallet or a heavy pan to pound them to an even 1/2-inch thickness. This step ensures even cooking.
Season Generously: Season both sides of the chicken breasts with salt, pepper, garlic powder, and onion powder. Gently pat the seasoning onto the meat.
Heat the Pan: In a large skillet, heat the olive oil over medium-high heat. Allow the pan to get hot, but not to the point of smoking.
Sear the Chicken: Carefully place the seasoned chicken breasts in the hot skillet. Cook for 5-7 minutes per side, or until a golden-brown crust forms.
Check for Doneness: The chicken is fully cooked when its internal temperature reaches 165°F (74°C) [2]. Use an instant-read thermometer for the most accurate reading.
Rest the Chicken: Remove the chicken from the pan and let it rest on a cutting board for 5 minutes before slicing. This helps the juices redistribute, keeping the chicken moist.
Tips and Variations:
Add Fresh Herbs: For extra aroma, toss a sprig of rosemary or thyme into the pan during the last few minutes of cooking.
Deglaze for Sauce: After removing the chicken, add a splash of chicken broth or white wine to the hot pan. Scrape up any browned bits to create a quick, flavorful pan sauce.
Spice It Up: Add a pinch of paprika or cayenne pepper to your seasoning mix for a subtle kick of heat.
Serve With: This chicken pairs well with a side of steamed vegetables or a fresh salad.
5-Ingredient Honey Garlic Chicken
This 5-ingredient honey garlic chicken is a game-changer for busy weeknights, proving a delicious, family-friendly meal can be both quick and simple. It’s a satisfying dish that transforms a few pantry staples into something special.
Forget feeling overwhelmed by complex instructions. This recipe comes together effortlessly, allowing you to create a restaurant-worthy meal in your own kitchen.
Ingredients:
1 lb boneless, skinless chicken breasts, cut into 1-inch pieces
1 tablespoon olive oil
1/2 cup honey
1/4 cup soy sauce (low-sodium recommended)
2 cloves garlic, minced
Instructions:
Cook the Chicken: Heat the olive oil in a large skillet over medium-high heat. Add the chicken pieces and cook for 5-7 minutes, stirring occasionally, until browned and cooked through. Remove the chicken from the pan and set it aside.
Make the Sauce: In the same skillet, reduce the heat to medium. Add the honey, soy sauce, and minced garlic, whisking well to combine.
Simmer the Sauce: Bring the sauce to a gentle simmer and cook for 2-3 minutes, stirring constantly, until it thickens slightly.
Combine Chicken and Sauce: Return the cooked chicken to the skillet. Gently toss the chicken to coat it completely with the honey garlic sauce.
Serve Immediately: Serve the honey garlic chicken while hot. It pairs wonderfully with rice or noodles.
Tips and Variations:
Thicken the Sauce: For a thicker sauce, mix 1 teaspoon of cornstarch with 1 tablespoon of water to create a slurry. Stir it into the simmering sauce and cook for another minute until thickened.
Add Veggies: Stir in steamed broccoli florets or sliced bell peppers during the last minute of cooking for a complete stir-fry.
Meal Prep Idea: Cook a larger batch and portion it out for quick and easy lunches throughout the week.
Spice it Up: A pinch of red pepper flakes will add a nice touch of heat to the sauce.
Quick Lemon Herb Chicken Cutlets
Brighten your dinner plate with these quick lemon herb chicken cutlets. As a simple and healthy option, this vibrant, fresh dish is incredibly fast to prepare, making it a perfect solution for an easy weeknight meal.
Even if you’re new to cooking, this recipe is for you. The thin cutlets cook quickly and evenly, making this a forgiving and delightful dish to master without any stress.
Ingredients:
1 lb boneless, skinless chicken breasts
1 tablespoon olive oil
1/2 teaspoon salt
1/4 teaspoon black pepper
1/2 teaspoon dried Italian seasoning or mixed herbs (like dried thyme, oregano, parsley)
Juice of 1/2 lemon
Fresh parsley, chopped, for garnish (optional)
Instructions:
Prepare Cutlets: Slice each chicken breast horizontally to create two thinner cutlets. Alternatively, pound whole chicken breasts to an even 1/2-inch thickness.
Season the Chicken: Pat both sides of the chicken cutlets dry, then season with salt, pepper, and dried herbs.
Cook the Cutlets: Heat the olive oil in a large skillet over medium-high heat. Add the chicken cutlets in a single layer, being careful not to overcrowd the pan.
Sear Quickly: Cook for 3-4 minutes per side until golden brown and cooked through. Because the cutlets are thin, they will cook very quickly.
Finish with Lemon: Remove the skillet from the heat and squeeze the fresh lemon juice over the cooked chicken.
Garnish and Serve: Garnish with fresh chopped parsley, if using, and serve immediately.
Tips and Variations:
Fresh Herbs are Best: If available, use finely chopped fresh herbs like rosemary, thyme, or oregano instead of dried.
Add Garlic: For extra flavor, stir one minced clove of garlic into the pan during the last minute of cooking.
Serve with Asparagus: Pan-sear asparagus spears in the same pan after removing the chicken for a wonderful, complete meal.
Creamy Sauce: After cooking the chicken, add a splash of chicken broth and a tablespoon of cream to the pan. Reduce slightly for a quick, luxurious sauce.
Chicken Stir-Fry with Vegetables
Whip up a vibrant, healthy, and family-friendly chicken stir-fry in minutes. This easy recipe is perfect for using up leftover vegetables and provides a delicious solution for a speedy weeknight dinner.
This guide simplifies the stir-fry process, giving you the confidence to cook a healthy and tasty meal without stress. Get ready to enjoy a quick and flavorful dish tonight.
Ingredients:
1 lb boneless, skinless chicken breasts, cut into thin strips
Prepare Chicken and Veggies: Cut the chicken into thin strips against the grain to ensure it’s tender. Wash and chop all your vegetables so they are ready for the skillet.
Cook the Chicken: Heat the oil in a large skillet or wok over medium-high heat. Add the chicken strips and cook for 4-6 minutes, stirring frequently, until no longer pink. Remove the chicken from the pan and set aside.
Stir-Fry Vegetables: Add the mixed vegetables to the same skillet. Cook for 3-5 minutes, stirring often, until the vegetables are tender-crisp.
Make the Sauce: While the vegetables cook, whisk together the soy sauce, honey or brown sugar, grated ginger, and minced garlic in a small bowl.
Combine and Coat: Return the cooked chicken to the skillet with the vegetables. Pour the prepared sauce over everything and toss well to coat.
Simmer Briefly: Cook for another 1-2 minutes to allow the sauce to thicken slightly and coat all the ingredients.
Serve: Serve the chicken stir-fry immediately over hot cooked rice or noodles.
Tips and Variations:
Don’t Overcrowd: To ensure proper browning, cook the chicken and vegetables in batches if your pan isn’t large enough.
Add Crunch: Garnish with sesame seeds or chopped peanuts for extra texture.
Spice Level: For a spicy kick, add a pinch of red pepper flakes along with the sauce.
Vegetable Swaps: Use any quick-cooking vegetables you have on hand. Mushrooms, cabbage, or baby corn are great additions.
Meal Prep Friendly: Cook the stir-fry and portion it into containers for easy lunches or dinners throughout the week.
Flavorful Oven Baked Chicken Breast Recipes
Professional food photography, photorealistic, high-quality food magazine photo. A close-up shot of two perfectly golden-brown and succulent oven-baked chicken breasts, glistening with a light herb butter glaze. Fresh sprigs of rosemary and thyme are artfully placed on and around the chicken. The chicken is served in a rustic cast iron skillet, placed on a light wooden cutting board. The background features a subtly blurred, warm-toned kitchen with natural light streaming in from a window. The focus is sharp on the texture and appealing color of the chicken. The atmosphere is warm, inviting, and comforting.
Baking chicken breast in the oven is a home cook’s secret weapon because it’s incredibly simple. With minimal effort, this method transforms plain chicken into tender, flavorful meals, making it perfect for busy families and anyone seeking stress-free cooking.
You can achieve amazing results with just a few ingredients, and cleanup is often a breeze. Let Recipesmondial guide you through these delicious oven-baked chicken breast recipes. You’re sure to enjoy every bite!
The Juiciest Herb-Roasted Chicken Breast
Say goodbye to dry chicken forever! This beginner-friendly recipe shows you how to bake chicken breast that is incredibly moist and flavorful. As a healthy and satisfying dinner choice, this herb-roasted chicken promises delicious results every time.
Ingredients:
2 boneless, skinless chicken breasts (about 6-8 oz each)
1 tablespoon olive oil
1 teaspoon dried Italian seasoning (or a mix of dried rosemary, thyme, and oregano)
1/2 teaspoon garlic powder
1/4 teaspoon salt
1/8 teaspoon black pepper
Instructions:
Preheat your oven to 400°F (200°C). Lightly grease a baking dish or line a baking sheet with parchment paper.
Pat the chicken breasts dry with paper towels to help achieve a nice crust.
Place the chicken breasts in the prepared dish.
Drizzle the olive oil evenly over the chicken.
In a small bowl, mix together the Italian seasoning, garlic powder, salt, and pepper.
Sprinkle this herb mixture generously over both sides of the chicken breasts.
Bake for 20-25 minutes, or until the internal temperature reaches 165°F (74°C) at the thickest part [3].
Let the chicken rest for 5 minutes before slicing. This step is crucial for locking in the juices.
Tips for Success:
Pound it Flat: For more even cooking, pound the chicken breasts to a uniform thickness.
Don’t Overcook: A meat thermometer is the best way to prevent dry chicken.
Rest Time: Always let your chicken rest after cooking so the juices can redistribute, making it much juicier.
Variations & Substitutions:
Fresh Herbs: Use 1 tablespoon of chopped fresh herbs instead of 1 teaspoon of dried herbs.
Spicy Kick: Add a pinch of red pepper flakes to the seasoning mix for a little heat.
Lemon Zest: Grate some fresh lemon zest over the chicken before baking for a bright, citrusy flavor.
Baked Chicken Breast with Sauce (BBQ & Honey Mustard)
Dress up your chicken dinner with an incredible sauce! Baking chicken with a delicious glaze adds a huge boost of flavor, making this method perfect for family-friendly meals. You can achieve restaurant-quality taste right at home with these simple recipes that are sure to impress.
Ingredients for Base Chicken:
2 boneless, skinless chicken breasts
1/2 tablespoon olive oil
Salt and pepper to taste
Sauce Options:
BBQ Sauce: 1/2 cup of your favorite BBQ sauce.
Honey Mustard Sauce: Mix 1/4 cup Dijon mustard, 2 tablespoons honey, 1 tablespoon olive oil, and 1 teaspoon apple cider vinegar.
Instructions:
Preheat your oven to 400°F (200°C). Lightly grease a baking dish or line a baking sheet with parchment paper.
Pat the chicken breasts dry and season them with salt and pepper.
Drizzle the chicken with olive oil and place it in the prepared baking dish.
Bake for 15 minutes to give the chicken a head start.
Carefully remove the dish from the oven and brush your chosen sauce generously over the chicken.
Return the dish to the oven and bake for another 8-10 minutes, or until the sauce is slightly caramelized and the chicken’s internal temperature reaches 165°F (74°C).
Let the chicken rest for a few minutes before serving.
Tips for Flavorful Glazing:
Timing is Key: Add the sauce towards the end of baking to prevent the sugars from burning.
Homemade vs. Store-Bought: Both work great! Use your favorite brand or whip up a simple homemade sauce for a personal touch.
Even Coating: Make sure the sauce covers the chicken well for maximum flavor in every bite.
Cheesy Baked Chicken Breast Casserole
Feeling overwhelmed by complex recipes? This cheesy chicken casserole is the simple answer. A hearty and family-friendly meal, it delivers pure comfort and makes mealtime decisions easy. Our cheesy baked chicken breast casserole is a complete dinner in one dish and a true time-saver for meal prep.
Ingredients:
2 cups cooked, shredded chicken breast (use leftover chicken or quickly boil/bake 2 breasts)
1 can (10.5 oz) cream of mushroom soup (or cream of chicken)
1/2 cup milk
1/2 cup sour cream (optional, for extra creaminess)
1 cup frozen mixed vegetables (such as peas, carrots, and corn)
1/2 cup cooked rice or small pasta (optional, for a fuller meal)
1 cup shredded cheddar cheese, plus more for topping
1/4 teaspoon garlic powder
Salt and pepper to taste
Instructions:
Preheat your oven to 375°F (190°C). Lightly grease an 8×8 inch baking dish.
In a large bowl, combine the cooked chicken, cream of mushroom soup, milk, and sour cream (if using).
Stir in the frozen mixed vegetables, cooked rice or pasta (if using), 1 cup of cheddar cheese, and garlic powder.
Season with salt and pepper, then mix well until all ingredients are evenly coated.
Pour the mixture into the prepared baking dish and spread it evenly.
Sprinkle extra shredded cheese generously over the top.
Bake for 25-30 minutes, until the casserole is bubbly and the cheese is melted and golden brown.
Let the casserole stand for 5 minutes before serving to allow it to set.
Meal Prep & Customization Tips:
Cook Ahead: Assemble the casserole the day before. Just cover and refrigerate, then bake when you’re ready to eat.
Veggie Swap: Feel free to use fresh steamed broccoli florets or spinach instead of frozen mixed vegetables.
Spice It Up: Add a dash of paprika or a pinch of cayenne pepper for a little extra kick.
Crunchy Topping: For added texture, sprinkle crushed butter crackers or breadcrumbs over the cheese before baking.
Oven Baked Chicken with Onions and Potatoes
This incredible sheet pan meal is a complete dinner on one pan, making meal planning easier than ever. One-pan meals are a proven way to simplify dinner routines [4]. Tender chicken, soft potatoes, and sweet onions roast together for a flavorful and healthy meal that’s a true lifesaver on busy weeknights.
Ingredients:
2 boneless, skinless chicken breasts, cut into 1-inch pieces
1 pound small potatoes, quartered (e.g., Yukon Gold or red potatoes)
1 large onion, cut into wedges
2 tablespoons olive oil
1 teaspoon dried rosemary
1/2 teaspoon garlic powder
1/2 teaspoon salt
1/4 teaspoon black pepper
Optional: 1/2 cup chopped bell peppers or cherry tomatoes for extra color and nutrition.
Instructions:
Preheat your oven to 400°F (200°C). Line a large baking sheet with parchment paper for easy cleanup.
In a large bowl, combine the quartered potatoes and onion wedges. Toss with 1 tablespoon of olive oil, rosemary, garlic powder, salt, and pepper.
Spread the seasoned vegetables in a single layer on the prepared baking sheet.
Bake the vegetables for 15 minutes first to give the potatoes a head start.
While the vegetables bake, toss the chicken pieces in the same bowl with the remaining 1 tablespoon of olive oil and a pinch of salt and pepper.
After 15 minutes, remove the baking sheet from the oven. Add the seasoned chicken and any optional vegetables to the empty side of the sheet.
Return the baking sheet to the oven and bake for another 20-25 minutes.
The dish is ready when the chicken is cooked through to 165°F (74°C) and the potatoes are tender and golden.
Serve hot and enjoy.
Helpful Tips:
Even Cut: Cut the vegetables and chicken into similar-sized pieces to ensure they cook evenly.
Don’t Crowd the Pan: Give everything space to allow it to roast, not steam. Use two pans if necessary.
Flavor Boost: For extra freshness, add a squeeze of fresh lemon juice over the dish just before serving.
Simple Variations:
Different Veggies: Swap potatoes for sweet potatoes, or add other sturdy vegetables like broccoli and carrots.
Spice Profile: Try using smoked paprika, chili powder, or your favorite all-purpose seasoning blend instead of rosemary.
Mediterranean Twist: For a different flavor, add Kalamata olives and cherry tomatoes to the pan with the chicken.
Crispy & Healthy Air Fryer Chicken Breast Recipes
Professional food photography, photorealistic, high-quality food magazine photo. A mouth-watering, perfectly crispy, golden-brown air-fried chicken breast, sliced diagonally to showcase its tender, juicy interior. It’s elegantly plated on a simple white dish, alongside a vibrant and fresh mixed green salad with a light, glistening vinaigrette. The texture of the crispy exterior is clearly visible and enticing. The setting is a clean, bright, modern kitchen counter. Overhead natural light illuminates the dish, highlighting its fresh and healthy appeal. The composition is clean, simple, and focused on the deliciousness.
The air fryer is a popular kitchen tool for a reason: it delivers incredibly crispy food using far less oil. That means you can enjoy crunchy, delicious chicken breast dishes that are also healthier. If you find most recipes too complex, these simple air fryer options are a reliable way to transform boneless, skinless chicken breast into a flavorful meal the whole family will love.
Recipesmondial is here to help. We’ll show you how to master the air fryer for quick and satisfying chicken dinners. Get ready to cook with confidence and enjoy stress-free meal prep!
Perfectly Seasoned Air Fryer Chicken Breast
Cooking chicken breast in the air fryer is one of the best ways to prepare it. This simple method locks in moisture for juicy results while creating a perfectly crisp exterior. It’s an ideal starting point for anyone new to air frying or looking for a fast, healthy chicken recipe.
How to Make It:
Prep Your Chicken: Pat 1 pound boneless, skinless chicken breasts dry with paper towels. If they are very thick, slice them in half lengthwise to create cutlets. This ensures even cooking.
Season Generously: Drizzle the chicken with 1 tablespoon olive oil. Then, sprinkle generously with your favorite seasoning blend. A simple mix of 1 teaspoon paprika, 1 teaspoon garlic powder, ½ teaspoon onion powder, ½ teaspoon dried Italian herbs, salt, and black pepper is a great option.
Air Fry: Place the seasoned chicken in a single layer in your air fryer basket. Do not overcrowd it. Air fry at 375°F (190°C) for 15-20 minutes, flipping halfway.
Check Doneness: The chicken is done when it reaches an internal temperature of 165°F (74°C) [5]. A meat thermometer is your best friend here!
Rest: Let the chicken rest for 5 minutes before slicing. This keeps it extra juicy.
Quick Tips for Success:
Don’t Skip the Pat Dry: Removing excess moisture helps the chicken get a crispier crust.
Seasoning Variations: Try lemon pepper, taco seasoning, or a simple garlic salt blend.
Meal Prep Idea: Cook extra chicken for salads or sandwiches throughout the week.
Crispy Air Fryer Chicken Strips
Enjoy the satisfying crunch of fried chicken without the extra grease. These air fryer chicken strips are a family-friendly meal that uses significantly less oil. This easy recipe turns a classic comfort food into a healthier main dish or snack.
Coat Chicken: Dip each chicken strip first into the flour mixture, shaking off excess. Next, dip into the egg, letting excess drip off. Finally, coat thoroughly in the panko breadcrumbs. Press gently to ensure crumbs stick.
Arrange in Air Fryer: Lightly spray the air fryer basket with cooking spray. Place the coated chicken strips in a single layer, leaving space between each. Work in batches if necessary to avoid overcrowding.
Air Fry: Cook at 400°F (200°C) for 10-15 minutes, flipping halfway. The strips should be golden brown and cooked through.
Tips for Extra Crispiness:
Don’t Overcrowd: Air needs to circulate for maximum crispiness. Cook in batches.
Lightly Spray: A quick spritz of cooking oil on the strips before frying helps them brown beautifully.
Serve with Dipping Sauces: Try honey mustard, BBQ sauce, or a simple ranch.
Air Fryer Chicken and Vegetables
For a simple all-in-one dinner, try cooking your main course and side dish together in the air fryer. This recipe for chicken and vegetables is a great way to create a healthy, balanced meal with minimal fuss. This single-basket approach saves time on both cooking and cleanup, making it perfect for busy weeknights.
What You’ll Need:
1 pound boneless, skinless chicken breast, cut into 1-inch cubes
3 cups mixed vegetables, cut into bite-sized pieces (broccoli florets, bell peppers, zucchini, red onion, cherry tomatoes work well)
2 tablespoons olive oil
1 teaspoon garlic powder
½ teaspoon dried oregano
Salt and black pepper to taste
Easy Cooking Steps:
Prepare Ingredients: In a large bowl, combine the chicken cubes and chopped vegetables.
Season: Drizzle with olive oil. Sprinkle with garlic powder, oregano, salt, and pepper. Toss everything together until well coated.
Air Fry: Place the chicken and vegetable mixture in your air fryer basket in a single layer. If your basket is small, cook in two batches.
Cook: Air fry at 380°F (195°C) for 18-22 minutes. Shake the basket well every 7-8 minutes to ensure even cooking and browning.
Check for Doneness: The chicken should be cooked through, and the vegetables tender-crisp.
Flavor Variations & Substitutions:
Spice it Up: Add a pinch of red pepper flakes or smoked paprika.
Different Veggies: Sweet potatoes (cut small), asparagus, or mushrooms are great additions. Note that harder vegetables like potatoes or carrots may require a longer cooking time. For best results, add them to the air fryer for 5-10 minutes before adding the chicken and softer veggies.
Herb Swaps: Try rosemary, thyme, or a pre-made Italian seasoning blend.
Spicy Cajun Air Fryer Chicken
Bring bold, zesty flavor to your table with this spicy Cajun air fryer chicken. This easy recipe delivers a satisfying kick without being complicated, making it a perfect way to add some excitement to your dinner routine. It’s another great example of how the air fryer can produce flavorful meals with minimal effort.
Simple Ingredients:
1 pound boneless, skinless chicken breast, cut into 1-inch thick pieces or whole cutlets
1 tablespoon olive oil
1½ tablespoons Cajun seasoning blend (store-bought or homemade)
Directions for a Flavorful Meal:
Prepare Chicken: Pat chicken pieces dry. Place them in a bowl.
Season: Drizzle the chicken with olive oil. Sprinkle generously with the Cajun seasoning. Use your hands to rub the seasoning all over each piece of chicken, ensuring it’s evenly coated.
Arrange: Place the seasoned chicken in a single layer in your air fryer basket. Do not overcrowd.
Air Fry: Cook at 380°F (195°C) for 15-20 minutes, flipping halfway through. Adjust cooking time based on the thickness of your chicken.
Verify Doneness: Ensure the internal temperature reaches 165°F (74°C).
Adjusting the Spice & Serving Ideas:
Less Heat: Use a mild Cajun seasoning or reduce the amount used.
More Heat: Choose a hot Cajun blend or add a pinch of extra cayenne pepper to your seasoning mix.
Serving Suggestions: This spicy chicken is wonderful with rice, a simple side salad, or steamed green beans.
Leftovers: Shred any leftover chicken. It makes a fantastic addition to wraps or quesadillas.
What Are Some Healthy Chicken Breast Dinner Ideas?
Chicken Breast with Roasted Vegetables
Making a delicious and healthy chicken dinner is easier than you think. This sheet pan meal with chicken and roasted vegetables is a simple, flavorful, and nutritious option perfect for busy weeknights. You will love how simple this recipe is to prepare.
With this method, you can skip complex steps and still get a tasty, family-friendly meal with minimal cleanup. It’s the perfect solution for a quick and healthy dinner.
How to Make It:
Prep your chicken: Pat boneless, skinless chicken breast dry. Slice it into thinner cutlets or cubes for faster cooking. Season with salt, pepper, garlic powder, and paprika.
Chop your veggies: Choose sturdy vegetables like broccoli florets, bell peppers, zucchini, red onion, carrots, or Brussels sprouts. Cut them into similar-sized pieces for even roasting.
Season and roast: Toss the vegetables with olive oil, herbs (like dried oregano or thyme), salt, and pepper. Spread them on a baking sheet with the seasoned chicken. Bake at 400°F (200°C) until the chicken is cooked through and the vegetables are tender and slightly caramelized, about 20-25 minutes.
Tips for Success:
Don’t overcrowd the pan: Give everything space to roast, not steam. Use two baking sheets if needed.
Add flavor: A squeeze of fresh lemon juice or a sprinkle of fresh parsley after roasting brightens the dish.
Meal prep friendly: Prepare your vegetables and chicken ahead of time and store them separately in the fridge. This makes weeknight dinners even faster.
Simple Chicken Salad with Greek Yogurt
Looking for a light and easy lunch or dinner? This simple chicken salad is a fantastic choice. It replaces traditional mayonnaise with Greek yogurt, a healthier, protein-packed alternative, making it a great low-calorie option.
This recipe is perfect for meal prep, helping you stay on track with healthy eating. Prepare a big batch on Sunday to enjoy in sandwiches, wraps, or lettuce cups all week long.
What You’ll Need:
Cooked chicken breast (shredded or diced)
Plain Greek yogurt (full-fat or low-fat)
Celery (finely diced)
Red onion (finely diced, optional)
Fresh herbs (dill, chives, or parsley work well)
Salt, black pepper, and a pinch of garlic powder
A squeeze of fresh lemon juice
How to Make It:
In a medium bowl, combine the cooked chicken, Greek yogurt, diced celery, and red onion.
Stir in the fresh herbs, salt, pepper, and garlic powder.
Add a squeeze of fresh lemon juice for brightness.
Mix everything until well combined.
Taste and adjust seasonings as needed.
Serving Suggestions:
Serve on whole-wheat bread or in a pita.
Stuff into lettuce cups for a low-carb option.
Enjoy with crackers or sliced cucumber.
Low-Calorie Lemon Rosemary Chicken
This low-calorie lemon rosemary chicken is proof that healthy eating can be incredibly flavorful. Using just a few simple ingredients, this recipe creates a bright, aromatic dish perfect for a quick and wholesome meal.
Lemon and rosemary are a classic pairing that infuses the chicken with a wonderful aroma and taste. Light yet satisfying, this simple dinner is an excellent choice for a creative and flavorful meal.
Ingredients You’ll Need:
Boneless, skinless chicken breast
Fresh lemon juice and zest
Fresh rosemary sprigs (or dried rosemary)
Garlic (minced)
Olive oil (just a touch)
Salt and black pepper
Simple Steps for Deliciousness:
Prepare the chicken: Pat the chicken breasts dry. You can butterfly them or slice them in half horizontally to create thinner cutlets, which helps them cook faster and more evenly.
Make the marinade: In a shallow dish, whisk together the lemon juice, lemon zest, minced garlic, a tablespoon of olive oil, chopped rosemary, salt, and pepper.
Marinate: Add the chicken breasts to the marinade, turning to coat them completely. Marinate for at least 15-30 minutes, or for up to 2 hours in the refrigerator for more flavor.
Cook the chicken: You can pan-sear, grill, or bake this chicken.
Pan-searing: Heat a skillet over medium-high heat with a small amount of olive oil. Cook the chicken for 4-6 minutes per side, or until golden brown and cooked through.
Baking: Place marinated chicken on a baking sheet. Bake at 400°F (200°C) for 15-20 minutes, or until the internal temperature reaches 165°F (74°C) [5].
Serve: Garnish with extra fresh rosemary and a lemon wedge.
Quick Tip:
To boost the flavor, add a sprinkle of red pepper flakes to the marinade for a subtle kick. Serve with a side of quinoa or steamed green beans for a complete meal.
Chicken and Rice Skillet
A chicken and rice skillet is a classic one-pan dinner. This comforting, family-friendly meal means less cleanup and more time to enjoy your evening, making it an ideal solution for busy households.
Hearty and satisfying, this dish combines lean protein with wholesome grains and vegetables, offering a quick and reliable meal solution for any night of the week.
What You’ll Need:
Boneless, skinless chicken breast (diced)
White or brown rice
Chicken broth
Onion and garlic (diced)
Mixed vegetables (frozen peas, carrots, and corn work wonderfully)
Olive oil
Dried herbs (e.g., thyme, oregano)
Salt and pepper
How to Create Your One-Pan Wonder:
Brown the chicken: Heat a large, oven-safe skillet over medium-high heat with a splash of olive oil. Sear the diced chicken until lightly browned on all sides. Remove the chicken and set aside.
Sauté aromatics: In the same skillet, add a little more oil if needed. Sauté diced onion and minced garlic until softened and fragrant.
Add rice and broth: Stir in the uncooked rice, chicken broth, and dried herbs. Bring the mixture to a simmer.
Combine and cook: Return the chicken to the skillet and stir in the mixed vegetables. Cover the skillet tightly with a lid or foil.
Simmer: Reduce heat to low and let it simmer for about 18-20 minutes for white rice or 35-40 minutes for brown rice. Do not lift the lid while it cooks.
Rest and serve: Once the liquid is absorbed and the rice is tender, remove the skillet from the heat. Let it rest, covered, for 5 minutes. Fluff with a fork and serve immediately.
Customization Ideas:
Spice it up: Add a pinch of chili powder or cayenne pepper for a little heat.
Cheese please: Stir in some shredded cheddar or Monterey Jack cheese at the end for extra creaminess.
Different veggies: Feel free to use fresh bell peppers, spinach, or mushrooms. Add them at different stages based on their cooking time. Spinach can be stirred in right at the end.
How long do you cook chicken breast in the air fryer?
The air fryer is a game-changer for cooking chicken breast, delivering perfectly cooked, juicy results with minimal effort. This makes it ideal for easy chicken breast recipes and quick meals. However, cooking times can vary depending on your air fryer model and the thickness of the chicken.
For food safety, the most important rule is to cook chicken to an internal temperature of 165°F (74°C). This guarantees your air fryer chicken breast is both safe to eat and delicious. To help you get it right every time, let’s explore the best cooking times.
Cooking Time at 375°F (190°C)
Cooking chicken breast at 375°F (190°C) is a great option because the slightly longer cooking window often results in exceptionally tender meat. This makes it a fantastic, forgiving temperature for beginner-friendly recipes.
For boneless, skinless chicken breasts (about 6-8 ounces or 170-225 grams each), follow these guidelines:
Total Time: Cook for 15-20 minutes.
Flipping: Remember to flip the chicken halfway through to ensure even browning and thorough cooking.
Thickness Matters: Thicker breasts will require more time, while thinner ones will cook faster.
To eliminate guesswork, always use a meat thermometer to confirm doneness. This simple step helps you serve perfectly cooked, flavorful meals made easy.
Cooking Time at 400°F (200°C)
For a crispier exterior and a faster cooking time, 400°F (200°C) is your go-to temperature. The higher heat is perfect for achieving a golden-brown finish, making it excellent for simple dinner recipes when you’re short on time.
For boneless, skinless chicken breasts (about 6-8 ounces or 170-225 grams each), use these guidelines:
Total Time: Cook for 12-16 minutes.
Flipping: Just as with the lower temperature, flip the chicken at the halfway mark to promote uniform cooking.
Watch Closely: Because chicken cooks quickly at this temperature, keep a close eye on it to prevent it from drying out.
This method is ideal for air fryer chicken recipes that promise a crispy, delicious result—perfect for family-friendly meals everyone will love.
Tips for Checking Doneness
Properly cooked chicken is a matter of both food safety and flavor. To ensure your chicken is juicy and tender—not dry and rubbery—follow these essential tips for approachable home cooking.
Use these simple methods to confirm your chicken breast in air fryer is perfectly done:
Use a Meat Thermometer: The most reliable method is to insert an instant-read meat thermometer into the thickest part of the breast, avoiding bone. The internal temperature must reach 165°F (74°C) [6].
Check Juices: If you don’t have a thermometer, make a small cut into the thickest part. The juices should run clear, not pink. This is a good visual indicator.
Texture Test: Cooked chicken feels firm to the touch, whereas raw chicken is soft and squishy.
Don’t Overcook: Overcooking is the number one cause of dry chicken. Remove it from the air fryer as soon as it reaches 165°F (74°C).
Rest the Chicken: After cooking, let the chicken breast rest for 5-10 minutes. This crucial step allows the juices to redistribute, resulting in incredibly moist and tender meat.
These tips will help you confidently cook delicious and safe healthy chicken breast recipes. Mastering these basics means you’ll be making simple chicken breast recipes like a pro!
How long to cook chicken breast in oven?
Baking Time at 350°F (175°C)
Baking chicken at 350°F (175°C) is a fantastic, forgiving method for achieving tender, juicy results. While the cooking time is a bit longer, this lower temperature is perfect for beginner cooks and helps prevent overcooking.
For an average 6-8 ounce (170-225 gram) boneless, skinless chicken breast, plan for a baking time of 25-35 minutes. Remember, the exact time depends on a few key factors:
Thickness: Thicker chicken breasts will naturally require more time in the oven.
Starting Temperature: Chicken straight from the fridge will cook slower, while chicken closer to room temperature will cook faster.
Oven Calibration: Every oven is different. Yours might run hotter or cooler than the set temperature.
Always use a meat thermometer to guarantee your chicken is cooked perfectly. This tool is your best friend for consistent results. Chicken is safely cooked when it reaches an internal temperature of 165°F (74°C) in the thickest part [5]. This simple step helps you avoid both undercooked and dry chicken, boosting your confidence in the kitchen.
Baking Time at 400°F (200°C)
For a quicker cooking method that creates a lovely golden-brown exterior, increasing the temperature to 400°F (200°C) is an excellent choice. The higher heat cooks the chicken more rapidly, making it perfect for simple dinner recipes when time is tight.
At 400°F (200°C), the same 6-8 ounce boneless, skinless chicken breasts will typically cook in 18-25 minutes. Keep a close eye on them, as thinner pieces will cook even faster. This temperature is fantastic for getting flavorful meals on the table in less time.
As always, the most reliable way to ensure your chicken is safe and perfectly cooked is by checking its internal temperature. Once your meat thermometer reads 165°F (74°C), your chicken is ready to enjoy. This step removes guesswork, helping you cook with stress-free confidence.
How to Avoid Dry Chicken
Dry chicken is a common concern, but achieving juicy, tender results is simple. At Recipesmondial, we want you to enjoy cooking stress-free. Here are our top tips to ensure your oven-baked chicken is perfect every time:
Don’t Overcook It: This is the golden rule. Remove your chicken from the oven as soon as it reaches 165°F (74°C). Even a few extra minutes can lead to tough, dry meat.
Pound it Evenly: Chicken breasts are often thicker on one end. To ensure they cook evenly, use a meat mallet or heavy pan to gently pound them to a uniform thickness. This prevents thinner parts from drying out.
Marinate or Brine: Soaking chicken in a flavorful marinade or a simple saltwater brine before cooking is an easy technique that adds significant moisture and flavor to your chicken breast recipes.
Rest Your Chicken: After baking, let the chicken rest for 5-10 minutes on a cutting board, tented loosely with foil. This allows the juices to redistribute throughout the meat, keeping it moist and tender.
Add Moisture During Cooking: Placing a small amount of liquid, like chicken broth or a simple sauce, in the bottom of the baking dish helps keep the chicken moist as it cooks.
Use a Reliable Meat Thermometer: We can’t say it enough! This essential kitchen tool takes the guesswork out of cooking and is crucial for achieving consistent results.
By following this simple guidance, you’ll transform basic ingredients into a delicious meal. Say goodbye to dry chicken and hello to confident, enjoyable cooking!
What Are Some Global Flavors to Try?
Ready to take your chicken breast dinners on a global adventure? Exploring international flavors is a fantastic way to spice up your weekly menu and discover exciting new tastes. You don’t need a passport to enjoy these delicious dishes—Recipesmondial makes it simple to bring the world’s most vibrant flavors right into your kitchen. We focus on approachable home cooking, creating easy recipes that use everyday ingredients. Perfect for beginner cooks and busy families alike, these meals will have you cooking confidently in no time!
Easy Indian-Spiced Chicken Breast
Indian cuisine is famous for its rich, aromatic spices, and this easy recipe brings those complex flavors home with simple steps. It’s a wonderful way to introduce your family to global comfort food. Get ready to enjoy a flavorful meal that’s surprisingly simple to make.
Here’s how to make your own delicious, easy Indian-Spiced Chicken Breast:
Gather Your Ingredients: You will need boneless, skinless chicken breasts, plain yogurt, ginger-garlic paste (or minced ginger and garlic), turmeric, cumin, coriander, and garam masala. A pinch of chili powder is optional for extra heat.
Marinate for Flavor: Cut the chicken into bite-sized pieces. In a bowl, combine the yogurt, ginger-garlic paste, and all the spices. Add the chicken to the mixture and stir until it’s thoroughly coated. Let it marinate for at least 30 minutes, or overnight in the fridge for a deeper flavor.
Cook It Up: Heat a little oil in a skillet over medium-high heat. Add the marinated chicken and cook, stirring occasionally, for 5-7 minutes, or until browned and cooked through. The yogurt helps create a wonderfully tender texture.
Serve and Enjoy: Serve your Indian-spiced chicken with warm naan bread or fluffy rice. A side of cucumber raita (yogurt with cucumber) adds a refreshing touch. This is one of our favorite family-friendly meals.
Recipesmondial Tip: If you don’t have all the individual spices, a good quality curry powder is a convenient shortcut. For a richer sauce, try adding a can of diced tomatoes or a splash of coconut milk. This variation creates another simple dinner that’s ready in no time.
Sweet and Sour Chicken
A beloved classic worldwide, sweet and sour chicken wins everyone over with its irresistible balance of tangy and savory flavors. This takeout-style version is surprisingly easy to make at home with fresh ingredients, making it an excellent choice for a quick weeknight meal.
Follow these simple steps for a perfect Sweet and Sour Chicken:
Prepare Your Chicken: Cut boneless, skinless chicken breasts into 1-inch pieces and toss them with a little cornstarch to help them get crispy.
Sauté the Chicken: Heat a bit of oil in a large skillet or wok over medium-high heat. Add the chicken pieces and cook until golden brown and cooked through. Remove the chicken from the pan and set it aside.
Whip Up the Sauce: In the same pan, add sliced bell peppers (red and green work well) and chopped onion. Sauté for a few minutes until slightly softened. While the vegetables cook, whisk the sauce ingredients in a small bowl: combine ketchup, rice vinegar, soy sauce, a little sugar or honey, and a teaspoon of cornstarch mixed with water.
Combine and Serve: Pour the sauce over the vegetables and cook, stirring, until it thickens. Return the cooked chicken to the pan along with some pineapple chunks for extra sweetness. Toss everything to coat evenly and serve immediately over steamed white rice.
Recipesmondial Tip: For extra crunch, you can lightly bread the chicken before frying. Simply dip the pieces in egg, then in a mix of flour and seasoning. You can also add other vegetables like snap peas or carrots to make it an even healthier chicken breast recipe.
Simple Mexican Chicken Fajitas
Fajitas are a vibrant and interactive meal perfect for a fun family dinner or for entertaining friends. This easy recipe delivers bold, satisfying flavors and is quick to prepare. Best of all, it’s highly customizable—everyone at the table can build their own perfect fajita!
Here’s how to create your own Simple Mexican Chicken Fajitas:
Slice and Season Chicken: Slice boneless, skinless chicken breasts into thin strips and place them in a bowl. Add a generous amount of store-bought fajita seasoning, or make your own simple mix of chili powder, cumin, paprika, garlic powder, and onion powder. Toss to coat the chicken thoroughly.
Chop Your Veggies: Slice bell peppers of various colors (red, yellow, green) and an onion into thin strips. This will add fantastic flavor and color to your dish.
Sauté to Perfection: Heat a tablespoon of oil in a large skillet or cast-iron pan over medium-high heat. Add the seasoned chicken strips and cook for 5-7 minutes, stirring, until they are mostly cooked through. Add the sliced peppers and onions to the pan and continue to cook for another 5-8 minutes, stirring often, until the vegetables are tender-crisp.
Assemble Your Fajitas: Warm some tortillas (corn or flour) in a dry skillet, the microwave, or the oven. Serve the sizzling chicken and vegetable mixture immediately with a variety of toppings, such as salsa, guacamole, sour cream, shredded cheese, and lime wedges.
Recipesmondial Tip: If you don’t have a large enough skillet, cook the chicken and vegetables in batches to prevent overcrowding the pan, which can steam the ingredients instead of searing them. For an even quicker meal, use pre-cut chicken or vegetables—a great meal prep tip to reduce cooking time.
Frequently Asked Questions About Cooking Chicken Breast
Can I put raw chicken in an air fryer?
Yes, you absolutely can. An air fryer is a fantastic tool that uses hot air circulation to cook raw chicken evenly and quickly. This method results in tender, juicy chicken with a lovely, crisp exterior.
It’s one of the easiest ways to get a healthy chicken dinner on the table fast. For the best results, just follow these simple steps.
Preheat your air fryer: Always preheat your air fryer to the recommended temperature to ensure the chicken cooks evenly.
Don’t overcrowd the basket: Arrange the chicken in a single layer. Overlapping pieces will steam instead of crisping, so giving them space ensures they cook consistently.
Season well: Season your boneless, skinless chicken breast with your favorite spices.
Check doneness: Always use a meat thermometer. To be safe to eat, chicken breast must reach an internal temperature of 165°F (74°C) [5].
How do you cook chicken breast in the oven without drying it out?
Nobody wants dry chicken, but achieving a juicy, oven-baked breast can be tricky. Luckily, several simple methods can help you lock in moisture for perfectly tender results every time.
Brine your chicken: Soaking chicken in a simple brine (a saltwater solution) adds moisture and significantly enhances flavor. Even a quick 15-30 minute brine makes a difference.
Marinate for flavor and tenderness: Marinades with acids (like lemon juice or vinegar) and oils help break down tough fibers to keep the meat moist and flavorful.
Pound it thin: Pound thicker chicken breasts to an even thickness to ensure they cook uniformly.
Use a meat thermometer: Overcooking is the primary cause of dryness. Use a meat thermometer and remove the chicken from the oven as soon as it reaches an internal temperature of 165°F (74°C) [6].
Cover with foil: Loosely tent the chicken with foil for part of the baking time to trap steam and moisture. Remove the foil at the end to allow the chicken to brown.
Lower heat, longer time: Baking at a slightly lower temperature for a longer period allows the chicken to cook more gently, which can help it retain moisture.
Rest the chicken: Always let the chicken rest for 5-10 minutes after taking it out of the oven. This allows the juices to redistribute throughout the meat, making it extra juicy.
How do you cook chicken breast in a pan?
Pan-searing is a quick method that creates a beautiful golden crust while keeping the inside tender, making it perfect for weeknight dinners. Follow this step-by-step guide for delicious results.
Prepare the chicken: Pat the boneless, skinless chicken breast dry with paper towels, as excess moisture prevents a good sear. Season generously with salt, pepper, and your favorite spices.
Heat the pan: Heat a large skillet (cast iron or stainless steel works best) over medium-high heat. Add 1-2 tablespoons of oil with a high smoke point, such as avocado, grapeseed, or canola oil [7].
Sear the chicken: Once the oil shimmers, carefully place the chicken in the hot pan. To ensure a good crust, do not overcrowd it. Cook in batches if needed.
Cook without moving: Sear the first side for 5-7 minutes without moving the chicken. This is crucial for developing a deep golden-brown crust.
Flip and finish: Flip the chicken and continue cooking for another 5-7 minutes. The exact time will depend on the thickness of the meat.
Check for doneness: Use a meat thermometer to confirm the internal temperature has reached 165°F (74°C) in the thickest part.
Rest: Transfer the chicken to a cutting board and let it rest for 5 minutes before slicing. This step is essential for keeping the chicken juicy.
What temperature should chicken breast be cooked to?
For food safety, chicken breast must be cooked to an internal temperature of 165°F (74°C) [5]. Reaching this temperature ensures that harmful bacteria like Salmonella are destroyed.
The only way to accurately check for doneness is with a reliable meat thermometer. Insert the probe into the thickest part of the breast, making sure to avoid touching any bone.
Cooking to the correct temperature not only keeps your food safe but also helps you avoid the common pitfalls of undercooked or dry, overcooked chicken. It’s the key to delicious and safe results every time.
A birria tacos recipe involves slow-cooking meat, typically beef chuck roast or goat, in a rich broth made from rehydrated dried chiles, onions, garlic, and aromatic spices. The tender meat is shredded and served in corn tortillas that have been dipped in the top layer of fat from the broth (consommé) and pan-fried until crispy. The flavorful broth is served on the side for dipping.
Imagine tender, succulent shredded meat, slow-cooked to perfection in a rich, deeply flavored chile broth, then tucked into crispy, cheesy tortillas and dipped into that incredible consommé. This is the magic of authentic birria tacos! While birria often seems like a culinary masterpiece best enjoyed from food trucks or specialty restaurants, making it at home can feel intimidating. Complex recipes can leave home cooks feeling overwhelmed and unsure where to begin. But what if we told you that creating this iconic dish is not only achievable but also genuinely enjoyable, right in your own kitchen?
At Recipesmondial, our mission is to empower every home cook, from beginners to experts, to create flavorful and inspiring meals. We believe cooking should be stress-free, so we develop reliable, easy-to-follow recipes that deliver fantastic results. That’s why we crafted this step-by-step birria tacos recipe to make the process approachable and fun. We skip the technical terms and obscure ingredients, focusing instead on clear, practical guidance. Our goal is to build your confidence and ensure you get tender, flavorful birria every single time.
Get ready to transform simple ingredients into a show-stopping feast that will impress everyone at your table. This beginner-friendly recipe walks you through each step, helping you discover new flavors and achieve delicious results. We cover everything from preparing the meat to assembling the perfect dipping tacos. Let’s dive in and start cooking!
What Are Birria Tacos?
Professional food photography, photorealistic, high-quality food magazine photo. A close-up, mouth-watering shot of three fully assembled, crispy Birria Tacos with rich, red-stained tortillas, generously filled with tender shredded beef. Each taco is garnished with finely diced white onion, fresh cilantro, and a vibrant squeeze of lime. A small bowl of rich, steaming consommé for dipping is placed next to the tacos on a rustic wooden board. The background is softly blurred, evoking a warm, inviting kitchen atmosphere. Excellent lighting highlighting textures and vibrant colors. Focus on deliciousness and approachability.
Have you heard the buzz about birria tacos? These incredible tacos offer a truly unique and deeply flavorful experience. At Recipesmondial, we love helping you discover exciting global comfort foods, and this birria recipe is a perfect example.
Simply put, birria is a vibrant, savory Mexican stew featuring slow-cooked, tender, shredded meat—typically beef or goat. The meat is braised in a rich, aromatic chile broth called consommé, which is packed with layers of flavor from dried chiles, spices, and aromatics. This traditional stew originates from Jalisco, Mexico, where it has been a beloved dish for generations [1].
What Makes Birria Tacos So Special?
The magic of birria tacos lies in several key elements that combine to create an unforgettable meal. And while it might sound complex, our guide makes this flavorful dish easy and approachable.
Tender, Flavorful Meat: The heart of the dish is succulent meat, slow-cooked until it practically melts in your mouth.
Rich Consommé: The flavorful broth from cooking the meat, this consommé is perfect for dipping your tacos or sipping on the side.
Cheesy Goodness: Birria tacos are often served “quesabirria” style, where the tortilla is dipped in the consommé, then fried with cheese and shredded meat to create a wonderfully crispy and gooey shell.
Crispy Tortillas: Dipping the tortillas in the rich consommé before frying gives them an incredible, slightly crisp texture and deepens their flavor.
Fresh Garnishes: A sprinkle of fresh cilantro and diced white onion adds brightness, while a squeeze of lime completes the experience.
While making birria tacos at home might seem daunting, our simple dinner recipes approach makes it totally achievable. Our step-by-step guidance will help you transform simple ingredients into a show-stopping, family-friendly meal that everyone will adore. Get ready to build your confidence and enjoy a stress-free cooking experience.
Why You’ll Love This Easy Birria Tacos Recipe
Ready to create restaurant-quality birria tacos in your own kitchen? This special recipe simplifies the traditional process, so you can enjoy these amazing, stress-free flavors at home.
Here’s why you’ll love this easy birria recipe:
Effortlessly Delicious: This recipe transforms a seemingly complex dish into an easy recipe. Our simple, step-by-step guidance helps you cook with confidence, even if you’re a beginner.
Rich, Authentic Flavor: Experience the deep, savory taste of true birria with slow-cooked meat that melts in your mouth. It’s the secret to incredibly flavorful meals made easy.
Perfect for Families: A guaranteed crowd-pleaser, these birria tacos make a fantastic family-friendly meal. Everyone will be asking for seconds!
Weekend Cook, Weekday Eat: This recipe is ideal for meal prep. Make a big batch on the weekend and enjoy delicious birria tacos all week long.
Boost Your Cooking Confidence: Say goodbye to overwhelming recipes. This simple dish will empower you to master new skills and feel proud of your culinary creations.
Versatile and Fun: The birria meat is incredibly versatile. Use it in tacos, quesadillas, or even burritos to add creative inspiration to your approachable home cooking.
All the Tips You Need: We provide practical tips and substitutions to ensure your success every time, so you can enjoy stress-free cooking.
This birria recipe brings rich, global comfort food to your table using everyday ingredients and simple techniques. Get ready for a rewarding cooking experience and truly impressive results!
What ingredients do you need for Birria Tacos?
Professional food photography, photorealistic, high-quality food magazine photo. A beautifully arranged flat lay of all fresh ingredients for Birria Tacos. Include various cuts of beef (like chuck roast or oxtail), dried chiles (guajillo, ancho, arbol), fresh garlic cloves, half an onion, tomatoes, bay leaves, Mexican oregano, cumin, cloves, apple cider vinegar, and fresh corn tortillas. All ingredients are clean, vibrant, and artfully laid out on a clean, light wooden surface or a rustic, neutral-toned tablecloth. Excellent natural lighting, showing off the freshness and quality of each component. Focus on clarity, simplicity, and inviting presentation for a home cook.
For the Birria Meat and Broth (Consommé)
Making rich, flavorful birria and its signature consommé is easier than it looks. This recipe uses accessible ingredients, many of which you might already have in your pantry. We’ve broken down the list to make preparation simple and get you started on a delicious, family-friendly meal.
Beef Chuck Roast: About 3-4 pounds. This cut becomes incredibly tender and easy to shred when slow-cooked. Bone-in beef short ribs or beef shank also work well for extra flavor.
Dried Guajillo Chiles: 6-8 large. These mild chiles provide the classic red color and foundational flavor of birria.
Dried Ancho Chiles: 3-4 large. Anchos contribute a deep, smoky, and slightly fruity flavor.
Dried Chile de Árbol: 2-4 (optional, for heat). Add these if you prefer a spicy kick.
White Onion: 1 large, roughly chopped. Builds a sweet, aromatic base for the broth.
Roma Tomatoes: 2-3 medium, quartered. Adds a touch of acidity and sweetness to balance the broth.
Apple Cider Vinegar: 2 tablespoons. Helps tenderize the meat and brightens the overall flavor.
Beef Broth or Water: 6-8 cups. Forms the liquid base for the rich consommé.
Bay Leaves: 3-4. Infuses the broth with a subtle herbaceous aroma.
Cumin: 1 teaspoon, ground. Adds a warm, earthy flavor.
Mexican Oregano: 1 teaspoon, dried. Provides an authentic, savory herb flavor.
Whole Cloves: 4-6. Lends a subtle, fragrant warmth to the consommé.
Cinnamon Stick: 1 (about 2 inches). Adds a hint of warm, savory sweetness.
Salt and Black Pepper: To taste. Season generously for the best results.
Vegetable Oil or Lard: 2 tablespoons. For searing the beef to build a flavorful crust.
For Assembling the Tacos
Once the birria is cooked, it’s time for the fun part: assembling the tacos. This is where you’ll create those irresistibly crispy, cheesy shells and add fresh toppings to balance the richness. This final step transforms a simple recipe into a true feast.
Corn Tortillas: 12-18, good quality. Dipping them in the consommé before frying is key.
Oaxaca Cheese: 1.5 cups, shredded. This traditional Mexican cheese melts beautifully for the perfect cheese pull. Monterey Jack is a great substitute.
Fresh Cilantro: 1/2 cup, chopped. For a burst of fresh, herbal flavor.
White Onion: 1/2 cup, finely diced. For a sharp, crunchy contrast.
Limes: 2-3, cut into wedges. A final squeeze of lime juice brightens all the flavors.
Consommé: Reserved from cooking the meat. This rich broth for dipping is essential!
How to Make Birria Tacos: A Step-by-Step Guide
Professional food photography, photorealistic, high-quality food magazine photo. A dynamic shot of a real home cook’s hands, in a clean, inviting home kitchen setting, dipping a corn tortilla into rich, red birria consommé before placing it on a hot, sizzling cast-iron skillet. The tortilla is glistening with consommé. The skillet shows a few other tacos already crisping up, filled with tender shredded beef and melted cheese. Soft, warm kitchen lighting. Focus on the action, ease of preparation, and the inviting textures of the cooking process.
Step 1: Prepare the Chiles
The foundation of incredible birria tacos is the chiles, which form the heart of the flavorful adobo sauce. This quick first step sets the stage for a deep, complex taste.
Clean the Chiles: Remove the stems from the dried chiles, then split them open and shake out most of the seeds to prevent bitterness.
Toast for Flavor: Toast the cleaned chiles in a dry skillet over medium heat for 1-2 minutes, flipping frequently until fragrant but not burnt. This crucial step unlocks their full flavor potential.
Rehydrate: Transfer the toasted chiles to a heatproof bowl and cover them completely with boiling water. Let them soak for 15-20 minutes until they become soft and pliable.
Chef’s Tip: For an extra layer of flavor, also toast your garlic cloves and onion wedges until slightly softened and fragrant. Add them to the blender with the chiles.
Step 2: Sear the Meat
Searing the beef is essential for adding depth and richness to the birria. This step creates a flavorful crust and locks in the juices, so don’t skip it.
Pat Dry and Season: Pat the beef chuck roast and short ribs completely dry with paper towels to ensure a good sear. Then, generously season all sides of the meat with salt and black pepper.
Heat the Pot: Add 1-2 tablespoons of olive oil or vegetable oil to a large Dutch oven or heavy-bottomed pot. Heat it over medium-high heat until shimmering.
Sear in Batches: Working in batches to avoid overcrowding the pot, sear the meat for 3-5 minutes per side, until a deep golden-brown crust forms.
Remove and Repeat: As each batch is browned, transfer the meat to a plate and set it aside. Add more oil to the pot if necessary and continue searing until all the meat is browned on all sides.
Step 3: Create the Adobo Sauce
The adobo sauce is the vibrant, aromatic backbone of the birria, infusing the meat with incredible flavor as it slow-cooks. Making it is surprisingly simple.
Blend the Chiles: First, drain the rehydrated chiles, but reserve about 1 cup of the soaking liquid. Transfer the drained chiles to a high-speed blender.
Add Aromatics and Spices: To the blender, add the garlic cloves, chopped onion, fire-roasted diced tomatoes, apple cider vinegar, ground cumin, dried oregano, and a pinch of ground cloves.
Add Liquids: Pour in the beef broth along with the reserved chile soaking liquid. Start with about 1/2 cup of the soaking liquid, adding more as needed to help the blender create a smooth consistency.
Blend Until Smooth: Blend on high for 2-3 minutes, or until the sauce is completely smooth. For an extra-silky consommé, you can strain the sauce through a fine-mesh sieve, but this step is optional.
Step 4: Slow-Cook the Birria
Now for the magic. Slow cooking is the key to transforming tough cuts of beef into tender, fall-apart perfection. This hands-off process makes for an easy, family-friendly meal.
Combine Ingredients: Return all the seared meat to your Dutch oven or heavy pot. Pour the smooth adobo sauce over the meat.
Add Remaining Aromatics: Tuck in the bay leaves and dried Mexican oregano.
Add More Broth: Add enough beef broth to ensure the meat is fully submerged. This will create plenty of liquid for the consommé.
Cook on the Stovetop: Bring the mixture to a simmer over medium-high heat, then reduce the heat to low. Cover the pot tightly and cook for 3-4 hours, or until the meat is fork-tender.
Alternative Cooking Methods:
Slow Cooker: Transfer all ingredients to a slow cooker. Cook on high for 4-5 hours or on low for 7-8 hours.
Instant Pot: Place all ingredients in the Instant Pot. Cook on high pressure for 45-60 minutes, then allow a natural pressure release for 10-15 minutes.
Step 5: Shred the Meat
After slow cooking, the meat will be incredibly tender and ready to shred. In this step, you will shred the meat and prepare the consommé for dipping.
Remove the Meat: Carefully transfer the tender pieces of beef from the pot to a large cutting board or shallow dish.
Shred with Forks: Using two forks, shred the meat into bite-sized pieces. It should fall apart easily. Discard any large pieces of fat or gristle.
Prepare the Consommé: The rich cooking liquid left in the pot is the consommé.
Skim the Fat: Use a ladle to skim the reddish fat from the surface of the consommé. Set this fat aside in a small bowl; you will use it to fry the tortillas.
Season and Taste: Taste the consommé and adjust the seasoning with salt if needed. Keep it warm.
Step 6: Assemble and Fry the Tacos
This final step brings everything together. Get ready to assemble and fry the tacos for a crispy, cheesy, and juicy result.
Heat the Griddle: Place a large non-stick skillet or griddle over medium-high heat.
Dip Tortillas: Briefly dip both sides of a corn tortilla into the warm consommé, making sure to coat it in the reserved red fat for extra color and flavor.
Place on Griddle: Lay the dipped tortilla onto the hot griddle.
Add Fillings: Quickly sprinkle a generous amount of shredded Oaxaca or Monterey Jack cheese over one half of the tortilla, then top the cheese with a portion of the shredded birria meat.
Fold and Fry: Once the cheese starts to melt, fold the empty half of the tortilla over the filling. Press down gently with a spatula.
Cook Until Golden: Fry for 2-3 minutes per side, until the tortilla is golden brown and crispy and the cheese is fully melted.
Repeat: Remove the cooked taco and set aside. Repeat the process with the remaining tortillas and filling.
Serve Immediately: Serve the crispy birria tacos immediately with small bowls of warm consommé for dipping. Garnish with chopped fresh cilantro, diced white onion, and lime wedges on the side.
What is the best meat for birria tacos?
Choosing the right meat is the first step toward authentic, flavorful birria tacos. The secret lies in selecting cuts that thrive with slow cooking, as they become meltingly tender over several hours while releasing rich flavors into the consommé.
Traditional and Best Beef Cuts for Birria Tacos
For the best results, we recommend a few specific beef cuts. These options will ensure your birria is tender and packed with deep, complex flavor, perfect for a rich birria tacos recipe.
Beef Chuck Roast: This is our top recommendation for home cooks because it’s affordable and widely available. Its generous marbling and connective tissue break down beautifully during slow cooking, resulting in fall-apart tender meat.
Boneless Short Ribs: For a richer, more decadent flavor, boneless short ribs are an excellent choice. Naturally fatty and full of collagen, they contribute a profound depth to the birria. While a more premium option, their flavor is well worth it.
Oxtail: To achieve a truly authentic and gelatinous consommé, add oxtail. It provides a unique richness and body to the broth, which is why it’s a staple in many traditional recipes. For a balanced result, try combining it with chuck roast.
Beef Shank: This cut is another wonderful option. It often includes the bone, which adds even more flavor to the broth. With long, slow cooking, the meat becomes exceptionally tender.
For the most complex flavor, consider using a combination of cuts. For instance, using mostly chuck roast with some short ribs or oxtail will create a more balanced and deeply flavored birria.
What to Look for When Choosing Your Birria Meat
Selecting the right piece of meat makes a big difference. Here’s what to keep in mind:
Good Marbling: Look for fine streaks of fat running through the muscle. This marbling melts during cooking, keeping the meat moist while adding significant flavor.
Connective Tissue: Don’t shy away from cuts with visible connective tissue. During slow cooking, this tissue breaks down into rich gelatin, which creates a silky, fork-tender texture in the meat and naturally thickens the consommé.
Freshness: Always choose fresh meat from a reliable source, as fresh ingredients are key to any flavorful meal.
Tips for Preparing Your Birria Meat
Properly preparing the meat is just as important as choosing the right cut. Follow these simple tips for the best results:
Don’t Trim Too Much Fat: Fat is essential for a rich, moist birria, so don’t trim too much. Only remove any large, excessive pieces of the fat cap.
Pat the Meat Dry: Before searing, pat the meat completely dry with paper towels. A dry surface is essential for achieving a deep brown crust, which builds a crucial foundation of flavor for the entire dish.
Cut into Large Chunks: Cut the meat into large, 2- to 3-inch chunks. This size allows the pieces to brown evenly without drying out during the long cooking process.
By selecting the right cuts and preparing them properly, you’ll be well on your way to creating rich, tender birria tacos that are full of authentic flavor. This approach makes it easy for any home cook to master this beloved dish.
Tips for the Most Flavorful Results
It’s easier than you think to unlock incredible flavor in your Birria Tacos. With a few simple tricks, you can elevate your dish from delicious to unforgettable. Use our top tips to get the most flavorful results and cook with confidence every time.
Mastering the Birria Base
Properly Prepare Your Dried Chiles: This step is crucial. To enhance their smoky flavor, briefly toast the dried chiles in a dry skillet over medium heat for about 30 seconds per side. Afterward, soak them in hot water until softened, which makes them easy to blend into a smooth, rich sauce.
Sear Your Meat Thoroughly: Before you begin slow cooking, sear the meat on all sides until it’s deeply browned. This process, known as the Maillard reaction, creates a flavorful crust that adds incredible depth to your birria. Don’t rush this step—it’s the foundation for a rich taste.
Low and Slow is the Way to Go: Birria isn’t a quick meal, and that’s its secret. Cooking the meat slowly allows tough cuts to become incredibly tender and delicious. This long simmering time also lets the flavors from the chiles and spices meld together, creating a rich consommé. This process is key for braising perfection.
Don’t Skimp on Spices: A blend of spices like cumin and oregano creates birria’s signature warmth and complexity. Using fresh spices will make a huge difference in the final taste. Be sure to taste the adobo sauce and adjust seasonings as needed before adding it to the meat.
Enhancing Your Tacos
Chill Overnight for Deeper Flavor: If time allows, prepare your birria a day ahead. Simply let it cool after cooking, then refrigerate it overnight. This rest period allows the flavors to deepen and meld even further. It’s also a fantastic meal prep tip for busy families!
Embrace the Consommé: The rich, savory broth (consommé) is an essential part of the birria experience. While it’s perfect for dipping, don’t stop there. Dip your tortillas in the consommé before frying them. This simple step adds an extra layer of flavor and creates those iconic, crispy, red-tinted tortillas.
Choose the Right Cheese: For quesabirria tacos, a good melting cheese is vital. Oaxaca cheese is traditional and melts beautifully, but Monterey Jack or a mild cheddar are also great options. The goal is gooey, melted perfection to complement the savory meat.
Fresh Toppings Make a Difference: Balance the richness of the birria with a sprinkle of fresh cilantro, diced white onion, and a squeeze of lime. These simple toppings brighten every bite and add a delightful contrast in texture and flavor. This makes for vibrant and flavorful meals made easy.
Follow these tips to create a birria taco experience that rivals your favorite taqueria. You’ll build confidence in the kitchen and enjoy stress-free, approachable home cooking that tastes truly special.
How to Store and Reheat Leftover Birria
One of the best things about making birria is having leftovers, which often taste even better the next day! Knowing how to properly store and reheat your birria means you can enjoy flavorful tacos or a comforting bowl anytime. Follow these tips to keep your birria fresh, safe, and ready to eat.
Storing Birria Safely
Proper storage is key to enjoying your birria for days to come. Before storing, always let the birria cool completely to room temperature to prevent bacterial growth.
Separate Components: For optimal texture and flavor, store the shredded birria meat and the consommé (broth) in separate airtight containers.
Refrigeration: Cooked birria can be safely kept in the refrigerator for 3 to 4 days [2]. Ensure your containers are sealed tightly.
Freezing for Longer Storage: For longer storage, freeze your birria. It maintains the best quality for up to 2-3 months in the freezer [3]. To keep track, label your containers with the date.
Airtight Containers: Using quality airtight containers is crucial. This prevents freezer burn and keeps unwanted odors out.
Reheating Birria for Best Flavor
When reheating birria, the goal is to keep it juicy and delicious. The best method depends on how much time you have, but regardless of the option you choose, always heat the birria until it is steaming hot throughout.
Reheating Birria Meat
The key to reheating the meat is to warm it gently without drying it out. Adding a splash of consommé is the best way to keep it moist.
Stovetop Method: Place the shredded birria in a saucepan over medium-low heat. Add a splash of consommé or water and stir occasionally until heated through. This method is excellent for keeping the meat moist and flavorful.
Microwave Method: For a quick option, place the meat in a microwave-safe dish with a tablespoon of consommé or water. Cover the dish and heat in 30-second intervals, stirring between each, until hot.
Oven Method (For Larger Batches): Ideal for larger quantities, preheat your oven to 300°F (150°C). Place the birria in an oven-safe dish, add a little consommé, and cover tightly with foil. Heat for 15-20 minutes or until warmed through.
Reheating Birria Consommé
The consommé is essential for dipping your tacos and also makes a wonderful, comforting broth on its own.
Stovetop Method: Pour the consommé into a small saucepan. Heat over medium heat, stirring occasionally, until it reaches a gentle simmer.
Microwave Method: Transfer the consommé to a microwave-safe bowl. Heat in 1-minute intervals, stirring after each, until it’s hot and ready for serving.
With these simple tips, you can confidently store and reheat your birria, ensuring every leftover meal is just as tasty as the first. Enjoy quick, flavorful tacos and more any day of the week!
Frequently Asked Questions
Can I make this birria recipe in a slow cooker?
Absolutely! The slow cooker is a fantastic tool for making flavorful birria, especially for a busy home cook. It’s one of our favorite methods because it delivers tender, fall-apart meat with minimal fuss, making this an incredibly easy recipe.
Here’s how to adapt this birria recipe for your slow cooker:
Sear the Meat: First, sear your beef or goat in a hot pan on the stovetop. This step is key for developing rich flavor.
Prepare the Sauce: Blend the adobo sauce ingredients as directed in the recipe.
Combine in Slow Cooker: Transfer the seared meat to your slow cooker and pour the adobo sauce over it. Add any remaining broth or water needed.
Cook Low and Slow: Cook on low for 6-8 hours or on high for 3-4 hours. The goal is for the meat to be so tender that it shreds easily.
Shred and Enjoy: Once cooked, remove the meat and shred it. Return it to the rich consommé to keep it moist and infuse it with more flavor.
Using a slow cooker is a great, stress-free way to enjoy this comforting dish. You can count on reliable, delicious results every time.
What is the difference between birria and quesabirria?
It’s a common question, and the answer is quite simple! Think of quesabirria as a delicious twist on traditional birria tacos.
Birria: This is the flavorful, slow-cooked meat stew itself. It’s typically made from goat or beef braised in a rich, spicy adobo broth. Traditional birria tacos feature this tender meat in a warm tortilla, often served with a side of the flavorful consommé (broth) for dipping.
Quesabirria: This version takes a birria taco up a notch with cheese. For quesabirria, a corn tortilla is dipped in the red fat from the consommé and grilled until crisp. Cheese is melted onto the tortilla, followed by the shredded birria meat. The result is a crispy, cheesy taco served with consommé for dipping [4].
In short, quesabirria is a birria taco with the delicious additions of melted cheese and a crispy, griddled tortilla. Both are incredibly tasty options worth trying.
Can I use chicken for birria tacos?
While traditional birria is made with goat or beef, you can definitely use chicken. Adapting recipes to suit your personal tastes and dietary needs is a great way to experiment in the kitchen.
Here are a few things to keep in mind when using chicken:
Cooking Time: Chicken cooks much faster than beef or goat, so adjust your simmering time to prevent it from drying out. Bone-in, skin-on chicken thighs work best as they stay moist and tender.
Flavor Profile: The flavor will naturally be lighter than beef birria. However, the rich adobo sauce will still infuse the chicken with incredible taste.
Texture: While the texture will be different, shredded chicken will be incredibly delicious when soaked in the robust birria broth.
Using chicken is a fantastic option for a quicker, lighter meal or simply a different flavor experience. Don’t be afraid to try new things!
What do you serve with birria tacos?
Birria tacos are a satisfying meal on their own, but the right side dishes can turn them into a true feast. Here are some classic and delicious ideas for what to serve with your tacos:
Fresh Cilantro and Diced Onions: These classic toppings add a fresh, bright crunch.
Lime Wedges: A squeeze of fresh lime juice cuts through the richness of the birria.
Pico de Gallo or Salsa Verde: A simple, fresh salsa provides a vibrant contrast to the hearty meat.
Guacamole or Sliced Avocado: The creamy texture of avocado is a perfect complement to tacos.
Mexican Rice: A classic side dish that’s perfect for soaking up any extra consommé.
Refried Beans: Another traditional and comforting side that pairs perfectly with the tacos.
Radishes: Thinly sliced radishes add a crisp, peppery bite that cleanses the palate.
Agua Fresca: A refreshing drink like horchata or jamaica (hibiscus tea) balances the meal’s rich flavors.
These simple additions will round out your meal and make your birria taco experience even more enjoyable for everyone.
The best hamburger recipes start with quality 80/20 ground beef for the perfect balance of flavor and juiciness. To ensure a tender patty, handle the meat as little as possible and season simply with salt and pepper right before cooking. For a perfect sear, cook on a hot grill or pan until a deep brown crust forms.
There’s a special joy in biting into a perfectly cooked, juicy burger. But recreating that magic at home can feel challenging. Have you ever felt overwhelmed by complex recipes or lacked confidence in your cooking skills? You’re not alone. Many home cooks struggle to achieve the ideal balance of taste and texture, wondering how to make standout burgers. We believe crafting the ultimate burger should be a fun and rewarding experience, not a stressful task.
At Recipesmondial, we specialize in easy recipes and approachable home cooking. We’re here to turn your burger ambitions into a delicious reality with our handpicked list of the 10 Best Hamburger Recipes. This collection is designed to guide you every step of the way, making flavorful meals easy. You’ll find everything from timeless classics to the crispy ultimate smash burger recipe, plus other simple dinner recipes the whole family will love. Packed with beginner-friendly recipes and practical tips, this guide helps you say goodbye to guesswork. Get ready for amazing burger recipes and successful family-friendly meals every time!
Ready to unlock the secrets to an unforgettable burger? Before we dive into our mouthwatering hamburger recipes, let’s cover the fundamentals. We’ll explore everything from choosing the right ground beef to mastering seasoning and cooking techniques. With these tips, you’ll be ready to cook confidently and create stellar burgers in your own kitchen.
What is the secret to a good hamburger?
Choosing the Right Ground Beef (80/20 is Key)
A truly delicious hamburger starts with the right foundation: the ground beef. For juicy, flavorful results every time, we highly recommend using an 80/20 lean-to-fat ratio.
This ratio means the meat is 80% lean and 20% fat—the perfect balance for a great burger. As the burger cooks, that 20% fat melts, keeping the patty moist and tender while infusing it with incredible flavor. Many culinary experts agree that 80/20 is the sweet spot for burgers [1].
While leaner options like 90/10 might seem healthier, they often result in dry, crumbly burgers. Sticking with 80/20 is a simple step that makes a huge difference, taking the guesswork out of crafting the perfect burger at home.
The Importance of Gentle Handling
Once you have the right ground beef, the next step is handling it properly. A common mistake that leads to tough burgers is overworking the meat. The key is to be gentle.
Here’s why gentle handling is crucial for tender burgers:
Avoids Compression: Pressing the meat too firmly compacts its protein fibers, which squeezes out juices during cooking.
Keeps It Loose: A loosely formed patty traps fat and moisture inside, ensuring a tender, juicy bite.
Prevents a Rubbery Texture: Overworking the meat develops tough protein strands, leading to a chewy burger instead of a tender one.
When forming patties, use a light touch. Mix the meat just enough to combine seasonings, then gently shape it without pressing or squeezing tightly. This simple technique is an easy way to guarantee delicious results for any burger recipe, including smash burgers.
Simple Seasoning for Maximum Flavor
While it’s tempting to use complex seasonings, the secret to a great burger is often simplicity. High-quality 80/20 ground beef is already packed with flavor; your goal is to enhance it, not hide it.
When it comes to seasoning, less is more. Many experts agree that salt and pepper are all you need to bring out the natural, beefy taste of the meat [2]. These simple seasonings work beautifully.
Here’s how to season your burgers for the best taste:
Salt is Key: Use a quality coarse salt, like kosher salt, to generously season both sides of the patty just before cooking. Salt not only tenderizes the meat but also amplifies its natural flavor.
Freshly Ground Pepper: Freshly cracked black pepper adds a pungent, aromatic kick that perfectly complements the rich beef.
Optional Additions: For a little extra depth, add a pinch of garlic or onion powder. These additions are flavorful without being overwhelming.
To avoid overworking the meat, don’t mix seasonings into the ground beef. Instead, season the outside of the patties right before they hit the heat. This simple approach ensures maximum flavor without sacrificing the tender texture.
Our Top 10 Easy Hamburger Recipes
Professional food photography, photorealistic, high-quality food magazine photo. A vibrant and diverse spread of five beautifully crafted gourmet hamburgers, each with unique, enticing toppings (e.g., classic cheddar and bacon, avocado and pepper jack, caramelized onions and blue cheese, mushroom Swiss, fresh tomato and lettuce). The burgers are perfectly cooked, juicy, and artfully arranged on a rustic wooden table or cutting board, with a soft, warm lighting setup. Background slightly blurred, showcasing a friendly home kitchen ambiance, clean and inviting. No people in the shot, focusing solely on the delicious food.
Welcome to the heart of burger bliss! We believe cooking delicious meals shouldn’t be stressful. If you’re tired of complex recipes or struggle with meal planning, you’re in the right place. At Recipesmondial, our mission is to build confidence in every home cook. That’s why we’ve gathered our top 10 easy hamburger recipes. Each one is packed with flavor and designed for quick, reliable results, so you can enjoy stress-free cooking and discover new family-friendly dishes everyone will love.
1. The Classic All-American Burger Recipe
Nothing beats a timeless favorite, and our Classic All-American Burger recipe delivers pure comfort. Perfect for beginners, this simple recipe brings restaurant-quality results to your table using everyday ingredients. It’s an approachable staple for learning basic cooking skills and a guaranteed crowd-pleaser for any family-friendly meal. Get ready to cook with confidence!
2. The Ultimate Smash Burger Recipe
Craving that irresistible diner-style taste with deliciously crispy edges? The Ultimate Smash Burger is your answer. This incredibly quick recipe is one of our most popular, delivering amazing flavor with minimal effort. It’s a fantastic way to impress guests or serve up a speedy family dinner. You’ll master this technique in no time.
3. Easy Stovetop Burger Recipe (Pan-Fried)
No grill? No problem! Our Easy Stovetop Burger recipe lets you cook juicy burgers indoors. This super simple, pan-fried method is ideal for a quick meal any night of the week. Instead of worrying about outdoor cooking, this approachable technique delivers perfect results every time. Enjoy flavorful meals made easy, right on your stove.
4. The Best Juicy Burger Recipe for the Grill
Fire up the grill with confidence and make the best juicy burger every time. Our step-by-step guidance makes grilling simple, helping you achieve a perfectly charred exterior with a tender, juicy interior. An essential for any summer cookout, this recipe is a truly flavorful meal made easy. Get ready to become a grill master!
5. Simple Old-Fashioned Hamburger Recipe
Go back to basics with our Simple Old-Fashioned Hamburger, a delightful recipe full of nostalgic flavor. This beginner-friendly dish uses minimal ingredients yet delivers maximum taste, reminding you of a classic diner meal. It’s a comforting, family-friendly option for anyone who enjoys simple, delicious cooking.
6. Gourmet Burger Recipe with Caramelized Onions
Elevate your burger night with our Gourmet Burger featuring sweet caramelized onions. While this recipe feels fancy, it’s incredibly easy to follow and transforms simple ingredients into something special. It’s the perfect way to discover a new favorite dish for a weekend treat and impress everyone with your approachable home cooking skills.
7. Quick Hamburger Patty Recipe (Few Ingredients)
Short on time and ingredients? This Quick Hamburger Patty recipe is a lifesaver for busy families. It focuses on achieving maximum flavor using only a few pantry staples, helping you build cooking confidence instantly. This easy recipe is also ideal for meal prepping, so you can enjoy delicious burgers without any fuss.
8. Family-Friendly Cheeseburger Recipe
Who doesn’t love a classic cheeseburger? Our Family-Friendly Cheeseburger recipe is a guaranteed winner for all ages. This simple dinner comes together fast, helping you say goodbye to mealtime struggles. It’s a reliable favorite for learning basic cooking skills and a truly flavorful meal made easy that will make everyone happy.
9. Flavorful Burger Seasoning Blend
Unlock incredible burger flavor with our best seasoning blend. A great seasoning is the key to making any hamburger recipe shine, and this one uses everyday spices to create amazing depth and deliciousness. These practical tips will boost your cooking confidence and make a huge difference. You’ll never have to settle for a bland burger again!
10. Tips for Freezing Hamburger Patties
Want to save time? Learn our best tips for freezing hamburger patties. This meal prep strategy is excellent for busy families, ensuring a quick meal is always ready. Simply prepare patties in advance and cook them straight from the freezer when you need them. This guide helps you enjoy stress-free meal planning and cook with confidence.
How to Cook Burgers Perfectly Every Time
Professional food photography, photorealistic, high-quality food magazine photo. A close-up shot of a perfectly seared, thick hamburger patty sizzling on a cast-iron skillet or an outdoor grill. The patty has a beautiful brown crust and visible grill marks. Steam is gently rising. A human hand, belonging to a home cook, is holding a spatula, about to flip the burger. The kitchen environment is warm, clean, and inviting, with natural light. Focus on the texture and juiciness of the burger. The cook’s hands are clean and well-groomed, reflecting an approachable cooking companion style.
Cooking Burgers in a Pan
Cooking burgers in a pan is an incredibly easy way to get a delicious meal on the table fast. With this method, you can achieve a beautiful sear and a juicy interior, making it perfect for any home cook, especially when grilling isn’t an option. It’s a go-to technique for quick, family-friendly meals.
Choosing Your Pan and Heat
Use a heavy-bottomed skillet. A cast iron pan is ideal because it provides even heat.
Alternatively, a good non-stick pan is a great choice.
Place your pan over medium-high heat until it’s hot.
Add about one tablespoon of olive or vegetable oil to the pan.
For extra flavor, you can add a pat of butter along with the oil.
Simple Steps for Pan-Frying Burgers
Once the pan is hot, carefully place your seasoned burger patties inside, making sure not to overcrowd them. If needed, cook in batches.
Press down gently on each patty once with a spatula to create a good sear. Avoid pressing repeatedly, as this squeezes out the juices.
Cook for 3-5 minutes per side, depending on patty thickness and your desired doneness.
A delicious brown crust will form on the bottom as the burger cooks.
To help them cook evenly and develop a perfect crust, flip the burgers only once.
If adding cheese, place a slice on each patty during the last minute of cooking. Cover the pan with a lid to help it melt.
Pro Tips for Pan-Fried Perfection
Don’t Overcrowd: Give your burgers enough space in the pan. This ensures they sear properly instead of steaming.
Keep Patties Cold: Placing patties directly from the fridge into the hot pan helps them stay together and promotes a more even cook.
Rest Your Burger: Let your cooked burger rest for a minute or two before serving. This allows the juices to redistribute, ensuring a tender, flavorful bite.
You’ll love this simple and satisfying method. It’s a reliable technique for flavorful burgers, perfect for any busy weeknight.
Grilling Burgers to Perfection
Grilling burgers adds a smoky flavor and an irresistible char. Getting perfectly grilled burgers is easier than you think; just follow these steps for a memorable, juicy result. This is approachable home cooking at its best.
Prepping Your Grill for Success
First, thoroughly clean your grill grates with a sturdy grill brush.
Next, lightly oil the grates to prevent the burgers from sticking.
Preheat your grill to medium-high heat, aiming for 400-450°F (200-230°C).
Let the grill preheat for 10-15 minutes to ensure the grates are evenly heated.
Grilling Your Patties Step-by-Step
Place your seasoned burger patties directly over the heat source.
If your grill has a lid, close it to retain heat and cook the burgers more evenly.
Cook on the first side for 3-5 minutes, or until a good sear and grill marks form.
Gently lift and flip the burgers with a spatula. To keep them juicy, flip only once.
Cook for another 3-5 minutes, adjusting the time based on patty thickness and desired doneness.
If adding cheese, do so during the last minute of grilling. Close the lid again to help it melt quickly.
Essential Tips for Juicy Grilled Burgers
Don’t Press: Never press down on burgers with your spatula. This pushes out the flavorful juices, resulting in a dry patty.
Manage Flare-Ups: If flames flare up, move the burgers to a cooler part of the grill. This prevents them from burning on the outside before the inside is cooked.
Resting is Key: Always let your burgers rest for 5 minutes after grilling. Place them on a plate and tent loosely with foil. This step allows the juices to redistribute, making them incredibly tender.
With these grilling techniques, you’ll feel confident serving amazing, flavorful burgers. It’s an easy and reliable method for great home-cooked meals.
Checking for Doneness
Knowing when your burger is perfectly cooked is crucial for both taste and food safety. A few simple methods can help you avoid over- or undercooking, building your confidence in the kitchen.
The Best Method: Instant-Read Thermometer
For the most accurate results, use an instant-read meat thermometer. Insert the thermometer horizontally into the side of the burger, aiming for the thickest part. For an accurate reading, ensure the tip doesn’t touch the pan or grill grate.
Rare: 125-130°F (52-54°C) – Very red, cool center.
Well-Done: 155°F (68°C) and above – No pink, cooked through.
For food safety, the USDA recommends cooking ground beef to a minimum internal temperature of 160°F (71°C) [3]. This ensures that harmful bacteria are eliminated. Always prioritize food safety.
Other Helpful Cues for Doneness
Color: The internal color changes as the burger cooks. To check without a thermometer, cut a small slit into the thickest part of a patty to see the center.
Firmness: Gently press the center of the patty. A rare burger will feel soft, while a well-done burger will feel firm. Note that this method takes practice to master.
Juices: Observe the juices that seep from the patty. Reddish or pink juices indicate a rarer cook, while clear juices suggest it is closer to well-done.
Remember that burgers continue to cook slightly after being removed from the heat due to carryover cooking. For best results, remove them from the pan or grill when they are a few degrees below your target temperature. With these tips, you’ll master the art of perfectly cooked burgers.
What Are the Best Toppings for a Homemade Burger?
Professional food photography, photorealistic, high-quality food magazine photo. A visually appealing, artfully arranged display of fresh, vibrant hamburger toppings on a large, light-colored wooden cutting board or marble countertop. Include a variety of colorful ingredients: crisp green lettuce leaves, bright red tomato slices, thinly sliced red onion rings, shiny dill pickle slices, creamy avocado slices, a bowl of melted cheese sauce, crispy bacon strips, and a selection of gourmet sauces in small, elegant bowls. The scene is well-lit with soft, even light, emphasizing the freshness and texture of each ingredient. The background shows a clean, modern home kitchen, slightly out of focus.
Classic Toppings
Crafting the ultimate homemade burger is fun, and the right toppings are key to elevating your juicy patty. Let’s start with the time-honored classics—ingredients loved by everyone. These simple-to-find and easy-to-prepare toppings make any burger a satisfying, family-friendly meal you can always count on.
Crisp Lettuce: Fresh iceberg or romaine adds a satisfying, refreshing crunch.
Ripe Tomato Slices: Juicy, flavorful tomato slices provide a burst of freshness.
Onion (Red or White): Thinly sliced raw onion offers a sharp bite. For a milder taste, try grilled onions.
Dill Pickles: The tangy, briny contrast of dill pickles cuts through the richness of the meat.
Classic Cheeses: American, cheddar, or Swiss are perfect melters that add creamy goodness to any burger.
Ketchup and Mustard: These essential, iconic condiments provide the perfect balance of sweet and tangy notes.
Mayonnaise: This creamy spread adds richness and helps bind all the flavors together.
These classic toppings are a fantastic starting point, ensuring a delicious and foolproof burger every time. They are perfect for beginners.
Gourmet Topping Ideas
Ready to get creative? Elevate your homemade burger with gourmet toppings that take it from great to extraordinary. These additions can transform a simple dinner into something special by introducing new flavors with approachable home cooking ideas.
Caramelized Onions: Slow-cooked until sweet and savory, these add incredible depth to any burger.
Crispy Bacon: Cooked to perfection, bacon offers a smoky, salty crunch that’s a favorite on any great burger.
Creamy Avocado or Guacamole: Add richness and a smooth, healthy texture with sliced avocado or a dollop of guacamole.
Sautéed Mushrooms: Earthy mushrooms cooked with garlic provide a delicious umami boost.
Fried Egg: A runny yolk creates a luxurious, rich sauce for a truly indulgent experience.
Unique Cheeses: Try blue cheese, brie, or smoked gouda to add a more sophisticated flavor profile.
Specialty Sauces: Create a signature taste with aioli, sriracha mayo, or a homemade barbecue sauce.
Jalapeños: For those who love heat, fresh or pickled jalapeños offer a spicy kick.
Don’t be afraid to experiment with these options to discover amazing new flavor combinations. It’s a wonderful way to add excitement to your weekly meals and enjoy stress-free cooking.
Choosing the Right Bun
The bun is more than just a holder—it’s a crucial part of the burger experience. A great bun complements your patty and toppings, holding everything together without getting soggy. This choice can truly make or break your burger.
Brioche Buns: Soft, slightly sweet, and buttery, these are a popular choice for gourmet burgers. Their richness pairs well with bold toppings.
Potato Buns: Light and tender with a subtle sweetness, potato buns are sturdy enough to hold juicy patties, making them an excellent choice for classic smash burgers.
Sesame Seed Buns: A timeless classic, these soft buns feature sesame seeds that add a pleasant texture and nutty flavor, working well with almost any burger.
Artisan Buns (e.g., Ciabatta, Pretzel): For something different, try artisan breads. Ciabatta offers a chewier texture, while pretzel buns add a unique, savory flavor.
Lettuce Wraps: For a lighter, low-carb option, use large lettuce leaves. They provide a refreshing crunch and make for a simple, healthy meal.
Pro Tip: Always toast your buns! Lightly butter and toast them on a grill or in a pan. This creates a barrier that prevents sogginess and adds a lovely crispness. It’s a small effort with a big reward, ensuring reliable results every time.
Frequently Asked Questions About Hamburger Recipes
What does Gordon Ramsay put in his burger patty?
Famous for his delicious burgers, Chef Gordon Ramsay focuses on high-quality ingredients and simple preparations. For his burger patties, Ramsay uses a blend of prime beef, often preferring a mix of chuck and brisket [4]. This combination provides a rich flavor and an ideal fat-to-meat ratio.
He keeps the seasonings minimal to let the beef’s quality shine. His patties usually contain:
High-quality ground beef: A blend like 80/20 chuck and brisket is ideal for juiciness.
Salt: Essential for enhancing the natural flavor.
Freshly ground black pepper: Adds a touch of spice.
Ramsay believes in letting the quality of the beef speak for itself, so he avoids adding fillers like breadcrumbs or eggs to his patty mixture. This technique ensures a pure, meaty burger experience. It’s a straightforward method focused on fantastic flavor, making it easy to replicate at home.
What is the secret ingredient in a good burger?
The “secret” to a great burger isn’t a single ingredient but rather a combination of simple techniques and high-quality basics. These fundamentals help home cooks create juicy, flavorful results with ease. Here are the key principles we swear by at Recipesmondial:
Excellent Ground Beef: Start with an 80/20 ground chuck. The 20% fat content is crucial for a moist and flavorful burger, as leaner meat often results in dry patties.
Gentle Handling: Overworking the meat creates tough burgers. Mix your ingredients lightly and form patties without compacting them too much.
Simple Seasoning: Good beef needs only salt and freshly ground black pepper. For the best flavor, season generously right before cooking.
The Thumbprint Trick: Press a shallow indentation into the center of each patty. This simple step prevents the burger from bulging as it cooks, helping it stay flat and even.
Perfect Cook: Avoid overcooking your burgers. A perfectly juicy burger is often cooked to medium, which allows it to remain tender.
These simple tips will help you transform everyday ingredients into an exceptional burger and build your confidence in the kitchen.
What is the 5-6-7 rule for burgers?
The 5-6-7 rule is a helpful guide for cooking burgers on a grill or in a pan. It refers to the cooking time in minutes per side needed to achieve different levels of doneness. This rule helps you get perfectly cooked burgers every time [5].
Note that these times are for burgers that are about 1/2-inch thick and cooked over medium-high heat. For the most accurate results, always use a meat thermometer.
5 Minutes per side (10 minutes total): This typically results in a medium-rare burger with an internal temperature of 130-135°F (54-57°C). The center will be warm and red.
6 Minutes per side (12 minutes total): This usually yields a medium burger with an internal temperature of 135-140°F (57-60°C). The center will be pink, a popular choice for many.
7 Minutes per side (14 minutes total): This will give you a medium-well burger with an internal temperature of 140-145°F (60-63°C). The center will have just a hint of pink.
These guidelines are wonderful for beginner cooks seeking delicious results. Be sure to adjust the cooking times based on your burger’s thickness and your grill or stove’s specific heat.
How to cook burgers in a pan?
Cooking burgers in a pan is a fantastic way to create a beautiful sear while keeping them wonderfully juicy. This method is perfect for a quick and easy meal. Here’s a step-by-step guide:
Prepare Your Patties: Gently form your hamburger patties, being careful not to press them too firmly. Make a small indentation in the center of each patty with your thumb to prevent them from bulging while cooking. Season both sides generously with salt and pepper.
Heat the Pan: Place a heavy-bottomed skillet, such as cast iron, over medium-high heat. Once the pan is hot, add a tablespoon of a high-smoke-point oil, like canola or vegetable oil. You can also add a small amount of butter for extra flavor.
Sear the Burgers: When the oil begins to shimmer, carefully place the patties in the hot pan. Do not overcrowd the pan; cook in batches if necessary.
Cook the First Side: Let the patties cook for 3 to 5 minutes on the first side without moving them. This will create a nice, golden-brown crust.
Flip and Cook the Second Side: Flip the burgers only once. Continue cooking for another 3 to 7 minutes on the second side, depending on your desired doneness.
Add Cheese (Optional): If making cheeseburgers, place a slice of cheese on top of each patty during the last minute of cooking. Cover the pan with a lid for about 30 seconds to help the cheese melt perfectly.
Rest Your Burgers: Remove the burgers from the pan and place them on a clean plate. Cover them loosely with foil and let them rest for 5 minutes. This allows the juices to redistribute, ensuring a tender and flavorful burger.
This simple pan-searing method helps ensure a delicious, perfectly cooked burger every time, making it a reliable technique for any home cook.