Tag: Easy recipe

  • How to Make Authentic Pad Thai at Home: An Easy Recipe

    How to Make Authentic Pad Thai at Home: An Easy Recipe

    Pad Thai is a popular Thai stir-fried noodle dish made with rice noodles, a protein such as shrimp or chicken, tofu, scrambled eggs, and vegetables like bean sprouts and garlic chives. The dish is known for its sweet, sour, and savory sauce, typically made from tamarind paste, fish sauce, palm sugar, and chili.

    Craving a perfect plate of Pad Thai, with its vibrant mix of savory, sweet, and tangy flavors? If the thought of making it from scratch feels overwhelming, you’re not alone. Many home cooks assume this beloved Thai noodle dish requires complex ingredients and tricky techniques best left to restaurant chefs. But at Recipesmondial, we believe enjoying authentic, flavorful meals at home should be simple. We’re here to show you that making a delicious, genuine Pad Thai in your own kitchen is not only achievable but also incredibly rewarding.

    This article is your friendly guide to mastering homemade Pad Thai with confidence. We’ve developed an easy recipe that breaks down every part of the process. You’ll learn how to prepare the ideal rice noodles, whip up a rich and authentic sauce, and perfectly stir-fry your ingredients—including a popular chicken Pad Thai variation. Forget getting lost in technical jargon. Our step-by-step instructions focus on clarity and simplicity, ensuring great results even if you’re new to Asian cuisine. Get ready to fill your kitchen with incredible aromas and enjoy a satisfying meal that proves approachable home cooking can be both authentic and stress-free.

    Why Is This the Best Beginner-Friendly Pad Thai Recipe?

    Feeling intimidated by the idea of making authentic Pad Thai? We get it—many home cooks feel overwhelmed by complex recipes. At Recipesmondial, we believe cooking delicious, authentic food should be stress-free and enjoyable. That’s why we’ve created the perfect beginner-friendly Pad Thai recipe.

    Our goal is to remove the guesswork so you can cook with confidence. This simplified recipe makes traditional Pad Thai approachable, delivering incredible flavor without requiring advanced skills or hard-to-find ingredients. It’s all about bringing gourmet taste to your family table.

    Here’s what makes this your go-to recipe for mastering Pad Thai:

    • Clear, Step-by-Step Guidance: We break down the entire process into easy-to-follow instructions. Our clear guidance helps you build confidence from start to finish.
    • Everyday, Accessible Ingredients: Forget searching for obscure items. This recipe uses common ingredients you can find at your local grocery store, making preparation simple and fast.
    • Authentic Yet Achievable Flavor: Enjoy the classic sweet, sour, salty, and umami balance of real Pad Thai. We’ve designed this recipe to deliver a rich, flavorful experience without any complex techniques.
    • Perfect for Busy Schedules: As a quick meal solution, this recipe is ideal for anyone seeking simple dinner recipes that are both satisfying and fast.
    • Boost Your Cooking Confidence: Master a famous international dish with ease. Our approachable method will transform your kitchen experience, turning uncertainty into culinary success.
    • Customizable for Everyone: Whether you prefer classic chicken Pad Thai or a vegetarian version, this recipe is easily adaptable. You can make simple variations to suit different tastes and dietary needs.

    This Pad Thai recipe is more than just a meal—it’s an opportunity to enjoy cooking without stress. Get ready to discover how easy it is to create authentic, flavorful dishes right in your own kitchen!

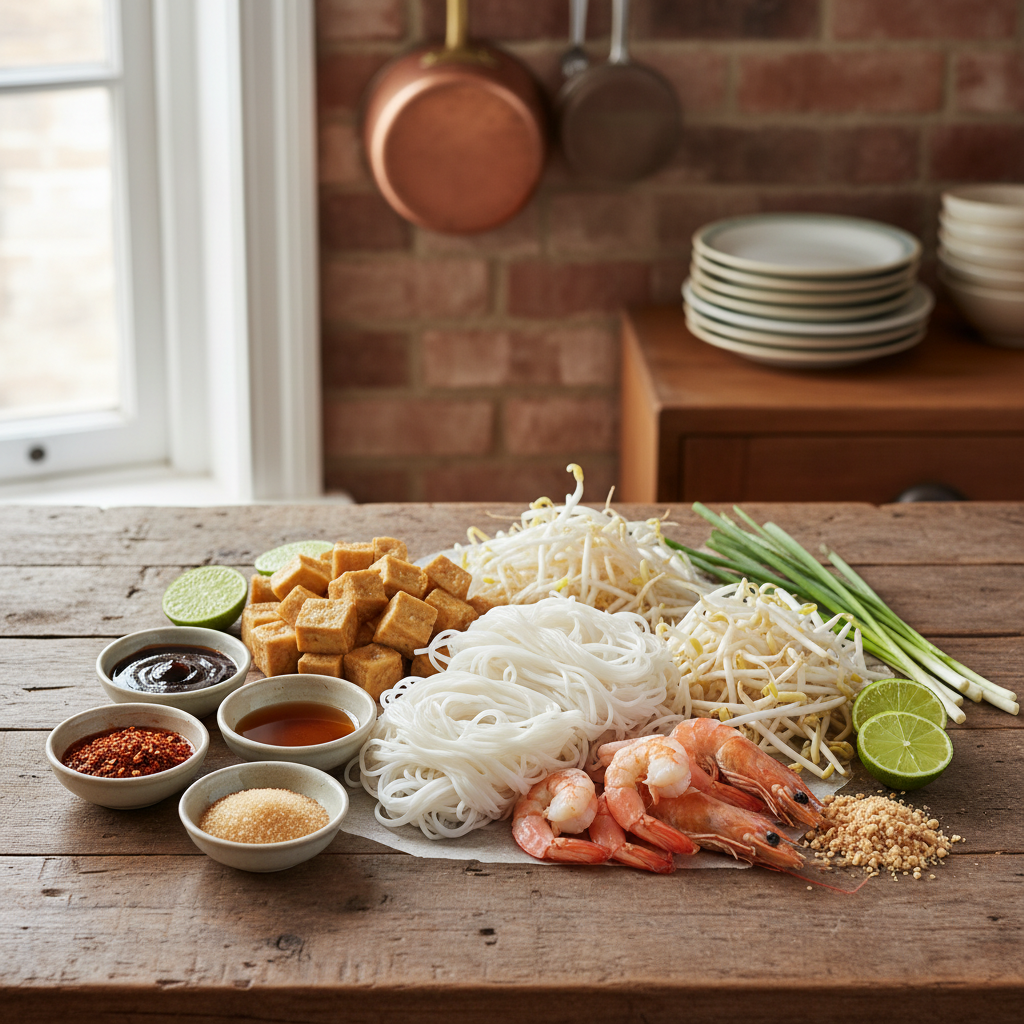
    What Ingredients Do You Need for Pad Thai?

    An overhead shot of fresh Pad Thai ingredients, including noodles, shrimp, tofu, and sauce components, neatly arranged on a wooden table.
    Professional food photography, photorealistic, high-quality food magazine photo of a vibrant, meticulously arranged flat lay of all fresh Pad Thai ingredients. Displayed on a rustic wooden table with a warm, inviting kitchen background, capturing natural light. Ingredients include uncooked rice noodles (rehydrated), fresh raw shrimp, firm tofu cubes, bean sprouts, garlic chives, crushed peanuts, quartered lime, and small bowls containing ingredients for the sauce: tamarind paste, fish sauce, palm sugar, and dried chili flakes. Emphasize crisp freshness, bright colors, and clean presentation. No artistic interpretations, no illustrations.

    For the Authentic Pad Thai Sauce

    The secret to perfect Pad Thai is an incredible sauce. This blend masterfully balances sweet, sour, and salty flavors with a hint of spice, transforming simple ingredients into a rich, aromatic experience. Here’s what you’ll need to create a genuinely delicious sauce:

    • Tamarind Paste (2 tablespoons): As the heart of Pad Thai, this paste provides the dish’s signature tangy, sweet-and-sour flavor. Look for a seedless, concentrated variety for the best results.
    • Fish Sauce (2 tablespoons): Essential for authentic flavor, fish sauce adds a crucial savory, umami depth. It’s a staple in Thai cuisine.
    • Palm Sugar (2 tablespoons): With its rich, caramel-like sweetness, palm sugar is softer than white sugar. If you can’t find it, brown sugar is an excellent substitute.
    • Rice Vinegar (1 tablespoon, optional): A splash of rice vinegar brightens the sauce, helping to balance the sweet and salty notes for a perfect finish.
    • Sriracha or Red Chili Flakes (1 teaspoon or to taste, optional): For a touch of heat, add sriracha or red chili flakes. Adjust the amount to suit your family’s preference.

    Simply whisk these ingredients together to create your balanced sauce. This key step makes it easy for any home cook to master this classic comfort food and achieve an authentic taste right at home.

    For the Noodles and Stir-Fry

    With the sauce ready, it’s time for the noodles and fresh stir-fry ingredients that bring this dish to life. These components provide texture and flavor, forming the foundation of a wonderful, family-friendly meal. Having them prepped and ready will make the cooking process much smoother.

    Noodles and Protein:

    • Flat Rice Noodles (8 ounces, dried): The classic choice for Pad Thai, these are typically medium-width. Soak them according to package directions before cooking to ensure they become tender while retaining a pleasant chew.
    • Shrimp, Chicken, or Tofu (8 ounces): Choose your favorite protein. For a classic chicken Pad Thai, cut chicken breast or thigh into bite-sized pieces. If using shrimp, remember they cook very quickly. For a simple vegetarian variation, firm or extra-firm tofu works wonderfully.
    • Eggs (2 large): A traditional addition, scrambled eggs add richness and a lovely texture to the dish.
    • Firm Tofu (4 ounces, pressed and cubed, optional): Even when using another protein, small cubes of fried tofu add a wonderful texture and soak up the sauce beautifully.

    Aromatics and Vegetables:

    Fresh aromatics create the fragrant foundation of the stir-fry, while crisp vegetables add essential flavor and freshness. Together, they help make this a healthy and balanced meal.

    • Garlic (2 cloves, minced): Forms the essential fragrant base for the stir-fry.
    • Shallots (1 small, minced): These offer a milder, sweeter flavor than regular onions. A red onion is an easy substitution if needed.
    • Bean Sprouts (1 cup): Add a fantastic crunch by stirring these in at the very end of cooking to keep them crisp.
    • Garlic Chives (½ cup, chopped into 1-inch pieces): These lend a delicate onion-garlic flavor. If you can’t find them, regular chives work well too.

    Finishing Touches and Oil:

    • Vegetable Oil (2 tablespoons): Use a neutral oil with a high smoke point for stir-frying. Canola or peanut oil are good choices.
    • Roasted Peanuts (¼ cup, crushed): A sprinkle of crushed peanuts provides a delightful nutty crunch and is a signature garnish for authentic Pad Thai.
    • Fresh Lime Wedges (1-2 limes): A squeeze of fresh lime juice just before serving is a must-have, as it brightens all the flavors in the dish.

    With these ingredients prepped and ready, you’re well on your way to creating a delicious Pad Thai at home. This simple, approachable recipe ensures a flavorful meal and success for any home cook.

    How to Make Pad Thai: A Step-by-Step Guide

    A smiling home cook stir-frying vibrant Pad Thai noodles, shrimp, and vegetables in a large wok on a stovetop.
    Photorealistic, professional food photography, high-quality food magazine photo of a smiling, engaged real human home cook (female, mid-30s, warm expression) actively stir-frying vibrant Pad Thai in a large wok on a gas stovetop in a clean, inviting home kitchen. Steam is gently rising from the wok, highlighting the freshness. The wok is filled with rice noodles, cooked shrimp, scrambled egg, bean sprouts, and chives, all coated in a rich, glossy Pad Thai sauce. Focus on the dynamic action, the enticing colors, and the joyful expression of the cook. The background shows a warm, well-lit kitchen counter. No artistic interpretations, no illustrations.

    Prepare the Noodles

    Perfectly cooked rice noodles are the foundation of great Pad Thai, as mushy noodles can ruin the dish. Follow these simple steps to get a tender, chewy texture, even if you’re a beginner.

    1. Soak the Noodles: Place the dried flat rice noodles (usually about ¼-inch wide) in a large heatproof bowl.
    2. Cover with Warm Water: Pour warm tap water over the noodles, ensuring they are fully submerged.
    3. Let Them Soften: Allow the noodles to soak for 20-30 minutes. Thicker noodles may need a bit longer.
    4. Check for Doneness: The noodles should be pliable and bend easily but still feel firm to the touch. You want them “al dente,” ready for their final cook in the wok.
    5. Drain and Rinse: Once ready, drain the noodles thoroughly in a colander and rinse them briefly with cool water to stop the cooking and prevent sticking.
    6. Set Aside: Keep the noodles in the colander until needed.

    Quick Tip: Soaking time varies by noodle thickness and brand, so always check the package directions first. Getting this step right ensures your noodles cook evenly in the wok.

    Mix the Sauce

    The secret to incredible Pad Thai is a balanced sauce that hits all the key flavors: sweet, sour, salty, and umami. Mixing it ahead of time is a simple trick that saves you from scrambling while the wok is hot.

    1. Gather Your Ingredients: You will need fish sauce, tamarind paste, brown sugar, and rice vinegar.
    2. Combine in a Bowl: In a small bowl, whisk together 3 tablespoons fish sauce, 2 tablespoons tamarind paste, 3 tablespoons brown sugar, and 1 tablespoon rice vinegar.
    3. Stir Until Smooth: Continue mixing until the brown sugar has completely dissolved.
    4. Taste and Adjust: Take a tiny taste. Does it need more sweetness or more tang? Adjust the seasonings to your preference to perfect the flavor profile.
    5. Set Aside: Your Pad Thai sauce is now ready.

    Why Pre-Mix? Having the sauce ready makes the final stir-fry process much quicker and more enjoyable. You won’t be scrambling for ingredients while your wok is hot!

    Cook the Protein and Aromatics

    In this step, we’ll build the first layer of flavor by cooking your protein and aromatics. The technique is similar whether you’re using chicken, shrimp, or tofu.

    1. Heat Your Wok: Add 2 tablespoons of vegetable oil to a large wok or a wide, non-stick skillet over medium-high heat. Heat until the oil is shimmering.
    2. Cook the Protein:
      • For Chicken: Add 8 ounces of thinly sliced chicken breast or thigh. Stir-fry for 3-5 minutes until cooked through and lightly browned. Remove the chicken from the wok and set aside.
      • For Shrimp: Add 8 ounces of peeled and deveined shrimp. Cook for 2-3 minutes per side until pink and opaque. Remove and set aside.
      • For Tofu: Add 8 ounces of firm or extra-firm tofu (pressed and cubed). Cook until golden brown and crispy on all sides, about 5-7 minutes. Remove and set aside.
    3. Add Aromatics: If needed, add another teaspoon of oil to the wok. Add 2 minced garlic cloves and 1 finely chopped shallot. Stir-fry for about 1 minute until fragrant. Do not let them burn.
    4. Scramble the Egg: Push the aromatics to one side of the wok. Crack 2 large eggs into the empty space and scramble them gently for 1-2 minutes until just set. Break the cooked egg into smaller pieces.

    Helpful Tip: Avoid overcrowding the pan, which causes food to steam instead of brown. If you’re making a larger batch, cook the protein in two separate batches to ensure it gets a delicious, seared texture.

    Combine Everything in the Wok

    Now it’s time to bring all the components together. This final stage happens quickly, so have all your ingredients ready and close to the stove.

    1. Return Protein to Wok: Add the cooked chicken, shrimp, or tofu back into the wok with the scrambled egg and aromatics.
    2. Add Noodles: Gently add the soaked and drained rice noodles to the wok.
    3. Pour in Sauce: Drizzle the pre-mixed Pad Thai sauce evenly over the noodles and other ingredients.
    4. Toss and Cook: Using tongs or two spatulas, toss everything together quickly. Stir-fry for 2-3 minutes, ensuring the noodles are evenly coated and heated through.
    5. Add Vegetables (Optional): If adding fresh bean sprouts or chives, stir them in during the last 30 seconds of cooking to keep them crisp.
    6. Final Touches: Remove the wok from the heat.

    Serving Suggestion: Serve Pad Thai immediately, garnished with chopped peanuts, a wedge of lime, and extra bean sprouts, if desired.

    Tips for Perfecting Your Pad Thai

    A beautifully plated bowl of homemade Pad Thai, garnished with lime, chopped peanuts, and fresh cilantro, on a wooden table.
    Photorealistic, professional food photography, high-quality food magazine photo of a beautifully plated, mouth-watering bowl of authentic homemade Pad Thai, presented from a slightly elevated angle. The noodles are glossy, coated in a rich, savory-sweet sauce, perfectly mixed with tender shrimp, scrambled egg, and bean sprouts. It’s garnished generously with fresh lime wedges, finely chopped roasted peanuts, a sprig of fresh cilantro, and a sprinkle of fresh bean sprouts. Subtly visible steam hints at its warmth. The dish is on a rustic, warm-toned ceramic bowl placed on a textured wooden table, with soft, natural light creating inviting shadows. Focus on texture, color, and visual appeal. No artistic interpretations, no illustrations.

    Ready to transform your Pad Thai recipe from good to absolutely amazing? Even if you’re a beginner, these simple tips will help you master this delicious dish and build your confidence in the kitchen.

    • Prep Everything First (Mise en Place): This is the golden rule for any stir-fry, especially Pad Thai. Chop your vegetables, slice your protein, mix your sauce, and have your soaked noodles ready before turning on the stove. With everything prepared, the cooking process will be smooth, quick, and stress-free.
    • Master Your Noodles: To avoid mushy noodles, do not over-soak them. They should be pliable but still feel firm to the touch, as they will finish cooking in the wok. Soaking them correctly is the key to achieving the perfect texture.
    • High Heat is Your Friend: Always use a very hot wok or large skillet. High heat is essential for creating the signature “wok hei” (breath of the wok) flavor and ensures your ingredients sear quickly instead of stewing. This is the secret to achieving a restaurant-quality texture and taste.
    • Don’t Overcrowd the Wok: It’s essential to cook in batches. Adding too many ingredients at once causes the temperature to drop, which steams your food instead of stir-frying it. For best results, cook your protein first and set it aside, then continue with the remaining ingredients before combining everything at the end.
    • Taste and Adjust Your Sauce: The sauce is the heart of the dish, so taste it before you start cooking. Does it need more tang from lime, sweetness from sugar, or savory depth from fish sauce? Adjust the flavors until they are perfect for your preference. This is your chance to customize the dish completely.
    • The Egg Technique: For perfect ribbons of egg, push the noodles and other ingredients to one side of the wok. Pour the beaten egg into the empty space, let it set for a moment, and then gently scramble. Once cooked, mix it all together. This method distributes the egg beautifully throughout your chicken Pad Thai.
    • Fresh Garnishes Make a Difference: Don’t skip the final garnishes—they truly elevate the dish. Crushed peanuts add crunch, fresh lime wedges provide a burst of zest, bean sprouts give a refreshing crispness, and cilantro adds aroma. These finishing touches are essential for a truly incredible Pad Thai.
    • Cook with Confidence: Don’t be afraid to experiment with your Pad Thai. Try adjusting the spice level or adding different vegetables. Every time you cook, you’ll learn something new. The most important part is to have fun and enjoy the creative process of making a delicious meal.

    How Can You Customize Your Pad Thai?

    Easy Chicken Pad Thai Variation

    Adding chicken to classic Pad Thai is a simple way to create a hearty, protein-packed meal the whole family will love. This variation takes the stress out of meal planning and is an easy recipe to master.

    Here’s how to incorporate chicken into your Pad Thai:

    • Choose Your Cut: Opt for boneless, skinless chicken breast or thighs. Thighs tend to be juicier.
    • Prep the Chicken: Slice the chicken into thin, bite-sized pieces. Aim for a uniform size to ensure even cooking.
    • Marinate (Optional but Recommended): For extra flavor, marinate the chicken for 15-30 minutes in a mix of soy sauce, a pinch of sugar, and a dash of white pepper.
    • Cook the Chicken: Heat a tablespoon of oil in a wok or large skillet over medium-high heat. Add the chicken and stir-fry for 3-5 minutes until cooked through and lightly golden. Remove it from the wok and set it aside to add back in later.

    Follow these simple steps for a flavorful chicken Pad Thai that’s perfect for any weeknight dinner.

    Simple Vegetarian Pad Thai Variation

    Making a delicious and flavorful vegetarian Pad Thai is surprisingly simple. This customizable, plant-based version is a great way to enjoy a healthy meal and practice basic cooking skills.

    Here are a few ways to make your Pad Thai vegetarian or vegan-friendly:

    • Choose Your Protein:
      • Tofu: Use extra-firm tofu. Press it well to remove excess water, then cut it into cubes. Pan-fry or air-fry until golden and crispy before adding to the dish.
      • Eggs: Whisk 1-2 eggs and scramble them directly in the wok, then break them into smaller pieces.
      • Edamame or Tempeh: These are excellent protein choices. Cook tempeh like tofu, or add shelled edamame during the final stir-fry stage.
    • Load Up on Veggies: For more nutrition and crunch, add fresh vegetables like:
      • Broccoli florets
      • Sliced carrots
      • Bell peppers
      • Mushrooms
      • Snow peas
    • Make it Vegan: To make the sauce vegan, simply replace the fish sauce. Use a vegan fish sauce alternative or a mix of soy sauce and a squeeze of lime juice for umami flavor.
    • Cooking Order: Cook your protein (like tofu) first and set it aside. Next, sauté aromatics like garlic and shallots with any harder vegetables. Finally, add your noodles and sauce, returning the cooked protein and softer vegetables to the wok for the final toss.

    This simple recipe is a great starting point for anyone, ensuring a vibrant and flavorful meal without the fuss.

    Frequently Asked Questions About Pad Thai

    What is in an authentic Pad Thai recipe?

    An authentic Pad Thai recipe features a delicious balance of sweet, sour, salty, and savory flavors. It’s a classic Thai stir-fried noodle dish, famous worldwide [1], that is surprisingly simple to make at home.

    Here are the core ingredients of a traditional Pad Thai:

    • Rice Stick Noodles: These flat, thin noodles form the hearty base of the dish.
    • Protein: Typically shrimp, chicken, or tofu, providing a satisfying bite.
    • Eggs: Scrambled into the dish to add richness and texture.
    • Aromatics: Fresh garlic and shallots create a fragrant foundation.
    • Pad Thai Sauce: This is the heart of the dish, made from a balanced mix of tamarind paste, fish sauce, and palm sugar.
    • Vegetables: Crisp bean sprouts and fresh garlic chives are stirred in at the end for freshness and crunch.
    • Garnishes: A sprinkle of crushed peanuts, a wedge of lime, and a dash of chili flakes complete the experience.

    Together, these ingredients create the dish’s signature delicious and balanced taste.

    How do you make Pad Thai sauce from scratch?

    Making Pad Thai sauce from scratch is simple and the best way to elevate the flavor of your dish.

    Here’s what you’ll need for your homemade sauce:

    • 3 tablespoons tamarind paste (the unsweetened kind)
    • 3 tablespoons fish sauce
    • 2-3 tablespoons palm sugar (or brown sugar for an easy substitute)
    • 1-2 tablespoons water (to help dissolve the sugar)
    • A squeeze of fresh lime juice (optional, for extra brightness)

    Follow these simple steps:

    1. Combine the tamarind paste, fish sauce, palm sugar, and water in a small bowl.
    2. Whisk until the palm sugar dissolves completely. If needed, you can gently warm the mixture in a small saucepan over low heat. Stir constantly and do not let it boil.
    3. Taste the sauce and adjust it to your preference. Add more palm sugar for sweetness, or a bit more tamarind paste for a tangier flavor.

    This homemade sauce is the key to an authentic-tasting Pad Thai.

    What are the main ingredients in chicken Pad Thai?

    Chicken Pad Thai is a popular variation that builds on the classic recipe, using tender chicken as the main protein.

    The main ingredients for chicken Pad Thai include:

    • Thin Rice Stick Noodles: The essential base.
    • Boneless, Skinless Chicken Breast or Thigh: Cut into small, bite-sized pieces for quick cooking.
    • Homemade Pad Thai Sauce: The sweet, sour, and savory blend discussed earlier.
    • Eggs: Scrambled right in the wok.
    • Garlic and Shallots: For aromatic depth.
    • Fresh Bean Sprouts and Garlic Chives: Added at the end for crunch and fresh flavor.
    • Oil: For stir-frying everything to perfection.
    • Garnishes: Crushed peanuts, fresh lime wedges, and chili flakes for serving.

    These components come together to create a quick, satisfying, and flavorful meal.

    What kind of noodles are best for Pad Thai?

    For truly authentic Pad Thai, you should use flat rice stick noodles. They are designed for stir-frying and are perfect for soaking up the rich sauce.

    Here’s why they are the best choice:

    • Texture: When properly prepared, they become tender with a pleasant chew.
    • Absorbency: They readily absorb the sauce, ensuring every bite is full of flavor.
    • Authenticity: They are the traditional noodle used in Thailand for this dish.

    You can find them in most Asian grocery stores or the international aisle of larger supermarkets. They come in various widths; a medium width (about 3-5mm) is ideal for Pad Thai.

    Preparing the noodles:

    Always follow package directions, but the general method is to soak them in warm water for 20-30 minutes until they are pliable but still firm. Avoid boiling the noodles, as they will finish cooking in the wok. This crucial step ensures they don’t become mushy.


    Sources

    1. https://thaifoodmaster.com/history-of-pad-thai-noodles-the-recipe-of-phibunsongkhram/

  • How to Make The Best Homemade Meatballs (An Easy Recipe)

    How to Make The Best Homemade Meatballs (An Easy Recipe)

    A classic homemade meatball recipe involves combining ground meat, such as beef and pork, with binders like breadcrumbs and egg. Key flavorings include grated Parmesan cheese, minced garlic, parsley, and seasoning. The mixture is gently formed into balls and then baked or pan-fried until golden brown before being simmered in tomato sauce.

    Imagine serving a plate of perfectly tender, flavorful homemade meatballs—so juicy they practically melt in your mouth. While this might sound like a dish only an experienced chef can master, we’re here to prove otherwise. We know that complex recipes can feel overwhelming, but creating the perfect meatball from scratch is simpler and more satisfying than you think.

    Here at Recipesmondial, we believe every home cook deserves to feel confident in the kitchen. That’s why we’re sharing our ultimate easy meatball recipe. This guide will walk you through every step, whether you’re a beginner or just seeking simple dinner recipes. You’ll learn how to transform basic ingredients into succulent Italian meatballs perfect for any family-friendly meals—all without intimidating jargon.

    It’s time to say goodbye to bland, dry meatballs and hello to a culinary triumph. This recipe does more than just teach you to cook; it builds confidence and makes mealtime stress-free. You’ll discover all the tips for making perfect meatballs every time, whether you’re pairing them with spaghetti, stuffing them into a sub, or serving them as a delicious appetizer. Let’s start cooking some amazing homemade meatballs together!

    Why Is This the Best Homemade Meatball Recipe for Beginners?

    This isn’t just another meatball recipe—it’s designed with you in mind. We created it for anyone new to making homemade meals or searching for truly easy recipes. We know cooking can feel overwhelming, which is why we focus on beginner-friendly recipes. Our goal is to deliver incredible flavor without the stress.

    Here’s why this homemade meatball recipe stands out as the best for beginners:

    • Simple, Everyday Ingredients: Forget hunting for special items. This recipe uses common, affordable ingredients from any grocery store, making it perfect for budget cooking and family-friendly meals.
    • Clear, Step-by-Step Instructions: Our directions provide clear step-by-step cooking guidance in plain language. We break down each action into a manageable task to eliminate guesswork and build your confidence.
    • No Special Equipment Needed: You don’t need a stand mixer or any fancy gadgets. Your hands and a simple mixing bowl are all it takes to make perfect meatballs, which makes approachable home cooking a reality.
    • Foolproof Method for Juicy Results: Our recipe includes specific tips to prevent common mistakes, like overmixing. This method ensures your homemade meatballs are tender and juicy every single time.
    • Quick to Prepare: We designed this recipe to be fast, so you can get flavorful meals made easy. It’s the perfect solution for busy weeknights when you need quick meals that still taste incredible.
    • Confidence Booster: Making these meatballs from scratch is a fantastic way to feel more empowered in the kitchen. It’s the perfect recipe for building your skills for future culinary adventures.

    We believe everyone deserves to enjoy sharing delicious food. This best meatball recipe is part of our commitment to making cooking stress-free, enjoyable, and rewarding. Say goodbye to being overwhelmed by complex recipes and hello to confident cooking!

    What Ingredients Do You Need for Italian Meatballs?

    Making delicious Italian meatballs starts with the right ingredients—and don’t worry, you won’t need anything fancy. Recipesmondial focuses on easy recipes that use everyday items you likely already have. Our goal is to help you create flavorful meals made easy without the stress of complex instructions.

    Here’s a breakdown of what you’ll need for this simple dinner recipe. Each ingredient works to create juicy, tender, and incredibly tasty homemade meatballs that your family will love.

    The Heart of Your Meatballs: The Meat Blend

    The foundation of any great meatball is the meat itself. We suggest a classic blend for the best possible texture and flavor, ensuring rich and tender results.

    • 1 pound (450g) Ground Beef: Choose an 80/20 lean-to-fat ratio for the juiciest meatballs.
    • ½ pound (225g) Ground Pork: Pork adds extra moisture and a wonderful savory flavor.
    • Optional: ½ pound (225g) Ground Veal: For an even more authentic and tender Italian meatball, add veal to create the classic “meatball trifecta.”

    Essential Binders and Moisture

    These next ingredients are crucial for holding your meatballs together and keeping them incredibly moist. Don’t skip this step—it’s the secret to truly tender results.

    • ¾ cup Panko Breadcrumbs: Panko creates a lighter, airier texture than traditional breadcrumbs. You can also use fresh breadcrumbs.
    • ½ cup Whole Milk (or water): Soaking the breadcrumbs in milk makes the meatballs super tender and prevents them from drying out [1].
    • 1 Large Egg: The egg acts as a binder, helping all your ingredients stick together beautifully.

    Flavor Powerhouses: Herbs, Cheese, and Aromatics

    This is where the classic, aromatic flavors come from. These key additions are what truly elevate your Italian meatballs, making this a standout beginner-friendly recipe.

    • ½ cup Grated Parmesan Cheese: Use freshly grated for the best flavor. It adds a salty, umami depth.
    • ¼ cup Fresh Parsley: Finely chopped, flat-leaf parsley adds freshness and a hint of peppery flavor.
    • 2 cloves Garlic: Minced finely, garlic provides that authentic Italian taste.
    • ¼ cup Finely Chopped Onion (or shallot): A little onion adds a touch of sweetness and aromatic depth.

    Seasoning and Cooking Essentials

    Finally, a few simple seasonings will bring all the flavors together, enhancing the natural taste of the meat and other ingredients. You’ll also need oil for cooking.

    • 1 teaspoon Salt: Adjust to your personal taste.
    • ½ teaspoon Black Pepper: Freshly ground pepper is always best.
    • 2 tablespoons Olive Oil: For browning your meatballs if you choose to pan-fry them.

    Ingredient Tips and Swaps for Your Perfect Meatballs

    Cooking should be accessible, so feel free to adapt these ingredients to your preferences or what you have on hand. Use these tips to customize your recipe and build confidence in the kitchen.

    • Meat Variations: You can use all ground beef if you prefer. For a leaner option, try ground turkey or chicken, but be aware they may be less juicy.
    • Breadcrumb Choices: If you don’t have panko, regular dried breadcrumbs work well. Simply reduce the amount slightly, as they absorb less liquid. You can also use fresh breadcrumbs from stale bread.
    • Cheese Alternatives: Pecorino Romano cheese makes a great substitute for Parmesan, offering a sharper, saltier flavor.
    • Herb Swaps: While parsley is traditional, feel free to add a pinch of dried oregano or basil for extra herbal notes. Use fresh herbs whenever possible for the best taste.
    • Dairy-Free Option: To avoid dairy, simply use water instead of milk for soaking the breadcrumbs. The meatballs will still be tender.

    With these simple ingredients in hand, you’re ready to make delicious, family-friendly meals. This straightforward approach ensures your Italian meatball recipe is not only easy to make but also incredibly satisfying.

    How to Make Meatballs from Scratch: A Step-by-Step Guide

    A close-up of a home cook's hands gently mixing ground meat and other ingredients for meatballs in a large ceramic bowl.
    Professional food photography, photorealistic, high-quality food magazine photo. A close-up, dynamic shot focusing on a home cook’s hands (natural, not overly manicured) gently but confidently mixing the meatball ingredients in a large, rustic ceramic mixing bowl. The mixture, containing ground meats, breadcrumbs, cheese, and herbs, is perfectly combined but not overmixed, showing a pleasant texture. The lighting is soft and warm, highlighting the texture of the mixture and the hands. The background is a softly blurred, inviting home kitchen setting with natural light, reinforcing a friendly and approachable cooking environment.

    Step 1: Combine the Binders and Seasonings

    A powerful seasoning base is the secret to flavorful, juicy meatballs. This first step not only infuses every bite with taste but also helps bind the ingredients, so your meatballs won’t fall apart while cooking.

    To prepare your flavor foundation:

    • In a large mixing bowl, combine the fresh breadcrumbs and milk.
    • Add a large egg, which acts as a natural binder to hold the mixture together.
    • Next, add the seasonings: grated Parmesan cheese, finely chopped fresh parsley, minced garlic, red pepper flakes (for a little kick), and salt and black pepper to taste.
    • Mix everything thoroughly until it forms a moist, paste-like consistency.
    • Let the mixture sit for about five minutes. This allows the breadcrumbs to absorb the liquid, which is key for tender meatballs.

    Tip for Success: Don’t be afraid to taste a tiny bit of this binder mixture (before adding meat!) to adjust seasonings. This ensures your Italian meatballs will be perfectly seasoned.

    Step 2: Gently Mix in the Ground Meat

    Now it’s time to add the ground meat. The secret to tender, melt-in-your-mouth meatballs is to mix gently. Overworking the meat will make it tough and dense, so a light touch is essential.

    Follow these simple steps for perfectly mixed meat:

    • Add your ground meat to the seasoning mixture in the bowl. For the richest flavor, use a combination of ground beef, pork, and veal.
    • Using your hands, gently fold the meat into the other ingredients until just combined. The goal is to incorporate, not to knead.
    • Stop mixing as soon as you no longer see streaks of plain ground meat.
    • Avoid compacting the mixture. A light touch ensures a light meatball texture.

    Beginner-Friendly Tip: If you’re unsure, it’s always better to under-mix slightly than to over-mix. This simple technique is crucial for making delicious, juicy homemade meatballs every time.

    Step 3: Roll the Meatballs

    With the mixture ready, it’s time to roll the meatballs. Making them a uniform size is important because it ensures they cook evenly for consistent, reliable results.

    Here’s how to roll perfect meatballs:

    • Line a baking sheet or large plate with parchment paper to prevent sticking.
    • Lightly moisten your hands with water to keep the meat from sticking to them.
    • Scoop the mixture using a standard ice cream scoop to create uniform 1.5- to 2-inch meatballs (about the size of a golf ball).
    • Gently roll each portion between your palms to form a smooth, round ball without pressing too hard.
    • Place the finished meatballs on the prepared baking sheet.
    • Repeat until all the meat mixture has been rolled.

    Pro-Home Cook Hint: If you’re short on time, you can roll these meatballs ahead and chill them. This is a great meal prep tip for busy families!

    Step 4: Choose Your Cooking Method (Bake or Pan-Fry)

    It’s time to cook your meatballs. You have two excellent, beginner-friendly options: baking in the oven or pan-frying on the stovetop. Both methods produce delicious results.

    Baking Your Meatballs (Oven Method)

    Baking is a great hands-off option that creates less mess, making it ideal for cooking large batches.

    • Preheat your oven to 400°F (200°C).
    • Arrange your rolled meatballs in a single layer on a baking sheet lined with parchment paper. Make sure they aren’t touching each other.
    • Bake for 18-22 minutes, or until the meatballs are golden brown and cooked through.
    • To ensure they are fully cooked and safe, the internal temperature should reach 160°F (71°C) [2].

    Outcome: Baked meatballs are exceptionally juicy and are a lighter option. They are perfect for simmering directly in your favorite tomato sauce.

    Pan-Frying Your Meatballs (Stovetop Method)

    Pan-frying creates a delicious, crispy exterior and is a quick cooking method, especially if you plan to serve the meatballs right away.

    • Heat a large skillet over medium-high heat. Add a tablespoon or two of olive oil.
    • Once the oil is shimmering, carefully add the meatballs to the hot skillet. Do not overcrowd the pan; cook in batches if necessary.
    • Sear the meatballs for 2-3 minutes per side, turning occasionally, until all sides are nicely browned.
    • Reduce the heat to medium-low. Cover the skillet and let the meatballs cook for another 8-10 minutes, or until they are cooked through.
    • Again, verify the internal temperature reaches 160°F (71°C) for food safety.

    Outcome: Pan-fried meatballs have a rich, seared crust. They are excellent on their own, with a dipping sauce, or tossed into a pasta dish.

    No matter which method you choose, you’re on your way to enjoying perfect homemade meatballs!

    What Are Some Tips for Making Perfect, Juicy Meatballs?

    Crafting perfect, juicy meatballs is an art, but it’s one that’s easy to master. With these simple, beginner-friendly tips, you’ll make delicious homemade meatballs every time. Impress your family and friends with flavorful, easy-to-make meals.

    • Do Not Overmix the Meat: This is the most crucial tip for tender meatballs. Overmixing compresses the meat proteins, which can make your meatballs tough and dense. Gently combine the ingredients until they are just incorporated to prevent a rubbery texture.
    • Choose the Right Meat Blend: For the best flavor and texture, use a mix of ground beef and ground pork. Beef provides a rich taste, while pork adds essential fat for moisture. This balance is key to a juicy result. An 80/20 lean-to-fat ratio is ideal for tenderness [3].
    • Embrace the Panade: A panade—a mixture of bread or breadcrumbs soaked in milk—is the secret to moist meatballs. The bread absorbs the liquid and slowly releases it during cooking, keeping the meatballs tender. It also acts as a binder for the ingredients.
    • Roll Evenly Sized Meatballs: For even cooking, consistency is key. Use a small ice cream scoop or your hands to form meatballs of a similar size. This ensures they all cook at the same rate, preventing some from being overcooked while others are undercooked.
    • Do Not Overcrowd the Pan: When browning your meatballs, work in batches to avoid overcrowding the pan. A crowded pan lowers the temperature, causing the meatballs to steam instead of brown. Giving them enough space is essential for developing a flavorful crust that adds depth to the dish.
    • Cook Gently and Do Not Overcook: Whether you’re baking or pan-frying, be careful not to cook your meatballs for too long, as overcooked meat dries out quickly. Cook them until they are just done. You can finish them with a gentle simmer in your favorite sauce, which will keep them extra moist and flavorful.

    By following these simple tips, you can confidently create perfect, juicy meatballs every time. At Recipesmondial, we’re here to help you enjoy cooking and make mealtime stress-free. Get ready to serve delicious, family-friendly meals!

    What Are the Best Ways to Serve Homemade Meatballs?

    Delicious homemade Italian meatballs simmering in a rich red marinara sauce, garnished with fresh basil, in a rustic pot.
    Professional food photography, photorealistic, high-quality food magazine photo. A mouth-watering, close-up, high-angle hero shot of perfectly cooked, glistening homemade Italian meatballs simmering in a rich, vibrant red marinara sauce in a rustic cast-iron pot or an elegant, shallow serving dish. Several fresh basil leaves are artfully scattered on top, adding a pop of green. A hint of steam is gently rising from the hot sauce. The background is softly blurred, suggesting a cozy, inviting dining table setting with warm lighting, emphasizing the deliciousness and comfort of the meal.

    Once you’ve mastered our easy meatball recipe, the fun truly begins. Because they are so versatile, homemade meatballs can transform simple ingredients into flavorful meals for any occasion, from a quick family dinner to an impressive appetizer. To help you get started, here are some of our favorite serving ideas that make mealtime decisions delicious and stress-free.

    Classic & Comforting Combinations

    There’s a reason some pairings are timeless. Perfect for family-friendly meals, these classic options highlight the rich flavors of your Italian meatballs.

    • Spaghetti and Meatballs: Arguably the most famous way to enjoy them, simply toss your juicy meatballs with your favorite marinara sauce. Serve over al dente spaghetti for a satisfying and simple dinner that everyone loves.
    • Meatball Subs: Pile warm homemade meatballs onto a crusty hoagie roll. Add plenty of melted provolone or mozzarella cheese and a generous spoonful of marinara, then bake until golden and bubbly for a hearty lunch or casual dinner.
    • Meatball Parmesan: Similar to a sub but served as a main dish, place meatballs in an oven-safe dish and cover them with marinara, mozzarella, and a sprinkle of Parmesan. Bake until the cheese is melted and serve with a side salad or crusty bread.

    Creative & Quick Meal Ideas

    Looking to switch things up? Your homemade meatballs are perfect for exploring new dishes that are both delicious and easy to prepare.

    • Meatball Pizza Topping: Cut or crumble your meatballs and sprinkle them over a homemade or store-bought pizza crust with sauce and cheese. This adds incredible flavor to any pizza night.
    • Meatball Skewers: For a fun appetizer or light meal, thread cooked meatballs onto skewers with cherry tomatoes, bell pepper pieces, and onion. Grill or broil until the veggies are tender and serve with a dipping sauce.
    • Stir-Fry with Meatballs: Add sliced homemade meatballs to your favorite vegetable stir-fry with a savory sauce like teriyaki or peanut. This transforms a classic stir-fry into a heartier, protein-packed dish and is a great way to use leftovers.

    Appetizers & Party Pleasers

    Homemade meatballs are excellent, crowd-pleasing appetizers that are incredibly easy to prepare for gatherings. Try these simple ideas for your next event.

    • Cocktail Meatballs: To create a sweet and tangy glaze, simmer your meatballs in a slow cooker with a simple sauce like grape jelly and BBQ sauce or chili sauce and cranberry sauce. They are perfect for parties and potlucks.
    • Mini Meatball Sliders: Place smaller meatballs on slider buns with a dollop of marinara and a slice of cheese. Serve them as bite-sized appetizers or a fun party food.
    • Meatball & Dip Platter: Arrange cooked meatballs on a platter with various dips, such as marinara, pesto, or a creamy ranch. Add some toothpicks for easy serving.

    Low-Carb & Healthy Alternatives

    If you’re looking for healthier options, your homemade meatballs can easily fit into a low-carb or balanced meal plan, making it simple to enjoy flavorful meals while sticking to your dietary goals.

    • Zucchini Noodles (Zoodles): Instead of pasta, serve your Italian meatballs over a bed of fresh zucchini noodles topped with your favorite marinara. This significantly reduces carbs while still providing a satisfying meal.
    • Cauliflower Rice Bowl: Create a delicious and healthy bowl with cauliflower rice, homemade meatballs, and a vibrant vegetable medley. Add a light sauce to complete the dish.
    • Lettuce Wraps: Crumble or slice meatballs and serve them in crisp lettuce cups with a flavorful sauce and fresh herbs for a refreshing and light meal option.

    No matter how you serve them, your homemade meatballs are sure to be a hit. Our recipe is designed for versatility, allowing you to easily adapt it to your family’s tastes and mealtime needs. Enjoy creating delicious, stress-free meals with Recipesmondial!

    How to Store and Freeze Leftover Meatballs

    How to Store and Freeze Leftover Meatballs

    Making a big batch of homemade meatballs is a great way to prepare for future meals. When you know how to store and freeze them properly, you’ll always have a delicious, easy dinner option on hand.

    Storing in the Refrigerator

    Proper refrigeration is key to keeping your meatballs fresh for a few days. Follow these simple steps to ensure they stay delicious and safe to eat.

    • Cool Them Completely: First, let your cooked meatballs cool to room temperature, which usually takes 30-60 minutes. Storing hot food can create condensation and encourage bacterial growth.
    • Use an Airtight Container: Transfer the cooled meatballs to a clean, airtight container. If they are in a sauce, make sure the lid seals tightly to prevent spills.
    • Refrigerate Promptly: Place the container in the refrigerator within two hours of cooking to keep them safe.
    • Shelf Life: Your homemade meatballs will stay fresh in the refrigerator for 3 to 4 days, making them perfect for lunches or quick weeknight dinners.
    • Reheating Tips: To reheat, gently warm the meatballs in their sauce on the stovetop over low heat. For a quicker option, you can also use the microwave.

    This simple method helps you enjoy your leftovers for days, making mealtime less stressful.

    Freezing for Later

    Freezing meatballs is a game-changer for meal prep. Whether you freeze them cooked or uncooked, you’ll always have a quick, comforting meal ready to go.

    Freezing Cooked Meatballs:

    This method is ideal if you like to cook in bulk and want meals that are ready to heat and serve.

    • Cool Thoroughly: As with refrigerating, ensure your cooked meatballs are completely cool before freezing. This simple step helps prevent ice crystals and maintains their texture.
    • Flash Freeze (Recommended for Best Results): To stop the meatballs from clumping together, arrange them in a single layer on a parchment-lined baking sheet. Freeze for 1 to 2 hours, or until they are firm.
    • Package Them Well: Transfer the flash-frozen meatballs into heavy-duty freezer bags or airtight, freezer-safe containers. Squeeze out as much air as possible to prevent freezer burn.
    • Label and Date: Always label your bags or containers with the contents and date. This helps you keep your freezer organized and use food at its best.
    • Freezer Life: For the best quality, use cooked meatballs within 3 to 4 months. While they are safe to eat beyond this, their flavor and texture may decline.

    Freezing Uncooked Meatballs:

    Choose this option if you prefer to cook your meatballs fresh or want to prepare a large batch of the mixture ahead of time.

    • Form and Flash Freeze: Shape your meatball mixture and arrange the raw meatballs in a single layer on a parchment-lined baking sheet. Freeze for 1 to 2 hours until solid.
    • Store Securely: Once solid, transfer the uncooked meatballs to freezer bags or airtight containers, removing any excess air before sealing.
    • Cook from Frozen: There’s no need to thaw before cooking. Simply bake them or simmer them in sauce straight from the freezer. Just add a few extra minutes to the cooking time.

    Thawing and Reheating Frozen Meatballs:

    When you’re ready to enjoy your frozen meatballs, follow these simple steps for thawing and reheating.

    • Thawing Options: For the best results, thaw cooked meatballs overnight in the refrigerator before reheating. If you’re short on time, you can also reheat them directly from frozen.
    • Reheating Cooked Meatballs: To reheat thawed meatballs, warm them gently in sauce on the stovetop or bake at 350°F (175°C) for 15-20 minutes. To reheat from frozen, simmer them in sauce or bake at a lower temperature, like 300°F (150°C), until they reach an internal temperature of 165°F (74°C).
    • Cooking Uncooked Meatballs: Cook uncooked meatballs directly from frozen by simmering them in sauce or baking them in the oven. Ensure they are browned and fully cooked to an internal temperature of 160°F (71°C).

    With these simple storage tips, you can master meal prep and always have homemade meatballs on hand for quick, family-friendly dinners. It’s all about making home cooking more enjoyable and stress-free!

    Frequently Asked Questions

    How to make meatballs from mince?

    Turning simple mince (ground meat) into delicious homemade meatballs is a breeze! Our easy recipes help you create tender, flavorful meatballs every time.

    Here’s a quick step-by-step guide to help you create fantastic meatballs:

    • Choose Your Mince: You can use ground beef, pork, chicken, turkey, or a mix. For the best flavor and juiciness, a combination of beef and pork is often recommended.
    • Add Binders: Mix in ingredients like breadcrumbs (or stale bread soaked in milk) and an egg. These ingredients hold the meatballs together and keep them moist.
    • Season Well: This is where the flavor comes from. Include grated Parmesan cheese, minced garlic, finely chopped fresh parsley, salt, black pepper, and perhaps a pinch of red pepper flakes for a little kick.
    • Mix Gently: Use your hands to combine all the ingredients. Be careful not to overmix, as this can make your meatballs tough. Mix just until everything is evenly distributed.
    • Roll Evenly: Roll the mixture into meatballs of a consistent size, about as big as a golf ball. This helps them cook evenly.
    • Cook Them Up: You can bake your meatballs in the oven for a hands-off approach or pan-fry them until beautifully browned. After that, simply simmer them in your favorite sauce!

    This beginner-friendly process ensures a fantastic outcome every time. You’ll build confidence in the kitchen and enjoy cooking without stress!

    What is the best meatball recipe for spaghetti?

    For spaghetti, the best meatballs are incredibly tender, packed with savory flavor, and perfect for soaking up a rich tomato sauce. A great recipe focuses on achieving classic flavor and ultimate juiciness.

    Here’s what makes for truly great spaghetti meatballs:

    • Meat Blend is Key: A mix of ground beef and ground pork provides the best texture and depth of flavor. Some recipes also include ground veal for extra tenderness.
    • Rich Flavorings: Be generous with fresh garlic, finely chopped parsley, and grated Parmesan cheese. A touch of onion powder or finely minced onion also adds a savory, aromatic flavor.
    • Moisture & Tenderness: A combination of milk-soaked breadcrumbs and an egg is crucial. This technique keeps the meatballs moist and prevents them from becoming dense.
    • Gentle Hand: Overmixing is the enemy of tender meatballs. Mix just until the ingredients are combined. This simple tip makes a huge difference.
    • Cooking Method: Pan-fry the meatballs first to get a nice crust, then simmer them directly in your marinara sauce. This allows them to absorb the rich flavor of the sauce as they finish cooking.

    This simple and satisfying recipe is perfect for dinner and is sure to become a family favorite!

    What are authentic Italian meatballs made of?

    When we talk about “authentic Italian meatballs” (known as polpette in Italy), it’s important to know that traditions vary widely by region. However, there are several common themes that set them apart from the Italian-American versions many are familiar with.

    Traditionally, authentic Italian meatballs often feature:

    • Mixed Meats: You’ll frequently find a blend of ground beef, pork, and sometimes veal. In some regions, lamb or sausage meat may be included.
    • Stale Bread, Not Dry Crumbs: Instead of dry breadcrumbs, many traditional recipes use stale bread soaked in milk or water, which is then squeezed dry. This creates a much lighter and softer texture.
    • Cheese: Grated Parmesan or Pecorino Romano cheese is a staple, adding a salty, savory depth.
    • Eggs: An egg acts as a binder, helping to hold the mixture together.
    • Fresh Herbs: Finely chopped fresh parsley is almost always included. While other herbs like basil or oregano might be used, parsley is the most common choice.
    • Aromatics: Minced garlic is common, and sometimes finely grated or sautéed onion is added.
    • Simple Seasoning: Salt and freshly ground black pepper are often all that’s needed, allowing the quality of the ingredients to shine.
    • Smaller Size: Authentic Italian polpette are often smaller than their Italian-American counterparts, sometimes just bite-sized.
    • Cooking Method: They are frequently cooked in a simple tomato sauce or fried briefly before being added to a stew or soup. They are rarely served with spaghetti; instead, they are enjoyed as a small appetizer or part of a larger meal. [4]

    Understanding these elements helps home cooks appreciate the nuances of different meatball traditions. At Recipesmondial, we celebrate global comfort foods by making their diverse flavors accessible for every home cook.


    Sources

    1. https://www.seriouseats.com/the-food-lab-best-meatball-recipe-italian-american-new-york-cooking-tips
    2. https://www.fsis.usda.gov/food-safety/safe-food-handling-and-preparation/meat/ground-beef-and-food-safety
    3. https://www.usda.gov/media/blog/2019/04/24/ground-meat-whats-lean-and-whats-fatty
    4. https://www.academiabarilla.com/italian-recipes/meatballs-polpette

  • How to Make the Perfect Cheesecake: An Easy, Step-by-Step Recipe Guide

    How to Make the Perfect Cheesecake: An Easy, Step-by-Step Recipe Guide

    A classic cheesecake is a rich, creamy dessert made with a buttery biscuit base and a smooth filling of cream cheese, sugar, eggs, and sour cream. To achieve the perfect texture, it is typically baked slowly in a water bath, which prevents cracks and ensures it sets evenly. This method creates the decadent, dense dessert that is loved worldwide.

    Is there anything more satisfying than a perfectly creamy slice of cheesecake? With its rich, velvety texture and sweet, tangy flavor, this dessert often feels like a luxurious restaurant treat. While many home cooks dream of baking a stunning cheesecake, the idea of tackling such a classic can feel daunting. You might worry about cracks, a soggy crust, or achieving that signature smooth finish.

    Here at Recipesmondial, we believe every home cook deserves to experience the joy of baking impressive desserts without the stress. That’s why we’re excited to share our ultimate cheesecake recipe, designed to guide you through every step. Our method isn’t just easy; it’s reliable, ensuring you get a gloriously smooth, crack-free result every time. Forget complex techniques or intimidating jargon. We’re here to build your confidence and make approachable home cooking a delicious reality.

    Get ready to transform simple ingredients into a show-stopping dessert. In this guide, we’ll walk you through the entire process, from selecting the right components to mastering the baking technique. We’ll also share crucial tips for that perfect finish. Let’s dive into what truly makes a great cheesecake irresistible!

    What Makes a Great Cheesecake Recipe?

    Making a truly amazing cheesecake might seem challenging, but it’s very achievable for any home cook. At Recipesmondial, we believe the best recipes transform simple ingredients into a show-stopping dessert without stress or complicated steps. It all comes down to a few key elements that make a cheesecake recipe shine.

    The Hallmarks of a Fantastic Cheesecake

    What sets a great cheesecake recipe apart? It comes down to clarity, flavor, and a perfect texture every time. A great recipe should also build your confidence, not leave you feeling overwhelmed by complex steps.

    • Simple, Quality Ingredients: A great cheesecake relies on fresh, everyday ingredients like full-fat cream cheese, fresh eggs, and quality sugar. These items are easy to find and form the backbone of your delicious dessert. For instance, using high-quality cream cheese makes a huge difference in the final texture and taste.
    • Clear, Step-by-Step Instructions: The best recipes guide you effortlessly through each stage with clear, actionable steps. They avoid technical jargon, which is crucial for beginners. From preparing the crust to cooling the final cheesecake, you’ll know exactly what to do, preventing any uncertainty in the kitchen.
    • Velvety Smooth Texture: A superior cheesecake should have an incredibly creamy, smooth texture that melts in your mouth with no graininess. Achieving this perfect consistency involves gentle mixing and correct baking temperatures—details our best cheesecake recipe focuses on.
    • Balanced Flavor Profile: A great cheesecake is never overly sweet. Instead, it features a lovely tang from the cream cheese that balances beautifully with the sugar. Subtle hints of vanilla or lemon zest can further enhance the flavor, creating a rich and satisfying taste.
    • A Sturdy, Flavorful Crust: As the foundation of your cheesecake, the crust should be buttery, slightly crumbly, and a perfect complement to the creamy filling. A classic graham cracker crust is a favorite for a reason: it adds a wonderful textural contrast to every bite.
    • Reliable Results and Troubleshooting Tips: A superior recipe anticipates common questions and offers helpful solutions, such as how to prevent cracks or achieve a perfect golden crust. These practical tips make the process more enjoyable and less stressful, helping you build confidence in your skills.

    At Recipesmondial, our goal is simple: to provide easy recipes that deliver fantastic results. We ensure every cheesecake recipe is simple to follow and incredibly flavorful, helping you move from uncertainty to confidence in the kitchen. Get ready to create delicious, visually appealing meals and discover new simple dishes you can enjoy making without stress!

    Our Best Cheesecake Recipe for Beginners

    A whole New York-style cheesecake on a wooden board with a slice on a plate, garnished with raspberries and powdered sugar.
    A stunning, perfectly baked classic New York-style cheesecake, presented whole on a rustic wooden cutting board, with one perfect slice carefully cut and placed on a white ceramic plate. The cheesecake has a smooth, golden-brown top and a visibly creamy, dense interior. It’s garnished simply with a sprinkle of fresh vibrant red raspberries and a light, delicate dusting of powdered sugar. The background is a soft-focus, warm, inviting home kitchen counter, bathed in natural daylight, with a subtle hint of a marble countertop. The overall mood is approachable and elegant. Professional food photography, photorealistic, high-quality food magazine photo, showcasing texture and inviting presentation. No artistic interpretations, no illustrations, no vector graphics, no abstract art.

    Ready to bake a show-stopping dessert without the fuss? This beginner-friendly cheesecake recipe is your ticket to a creamy, dreamy masterpiece. At Recipesmondial, we believe baking should be enjoyable, not stressful. That’s why we’ve designed this guide to make a perfect cheesecake achievable for anyone.

    Say goodbye to feeling overwhelmed by complex instructions. We’ve broken down every step to help you gain confidence in the kitchen. This recipe promises a delicious dessert made easy, perfect for family gatherings or impressing guests.

    Cheesecake Ingredients You’ll Need

    Gathering your ingredients is the first exciting step. This recipe uses common, everyday items you can find easily. For the creamiest texture and richest flavor, be sure to use full-fat dairy products as listed below.

    For the Graham Cracker Crust:

    • 1 ½ cups (180g) graham cracker crumbs: About 10-12 full graham cracker sheets, finely crushed.
    • ¼ cup (50g) granulated sugar: Adds a touch of sweetness.
    • 6 tablespoons (85g) unsalted butter: Melted. This binds the crumbs together.
    • Pinch of salt: Enhances the flavor.

    For the Cheesecake Filling:

    • 32 ounces (4 blocks) full-fat cream cheese: Softened to room temperature. This is crucial for a smooth batter.
    • 1 ½ cups (300g) granulated sugar: For sweetness.
    • ¼ cup (60ml) heavy cream (or sour cream): Adds richness and tang.
    • 2 teaspoons vanilla extract: Pure vanilla is best for flavor.
    • 4 large eggs: Room temperature. Also important for a smooth, uniform batter.
    • 1 tablespoon all-purpose flour: Helps prevent cracking.

    Step-by-Step Baking Instructions

    Now, let’s get baking! Follow these simple instructions carefully to ensure a perfect, stress-free result every time.

    Prepare the Crust:

    1. Preheat your oven: Set it to 350°F (175°C).
    2. Prepare your pan: Use a 9-inch springform pan. Wrap the outside tightly with two layers of heavy-duty aluminum foil to prevent water from seeping in during the water bath.
    3. Combine crust ingredients: In a medium bowl, mix the graham cracker crumbs, sugar, and salt. Pour in the melted butter and stir until all crumbs are evenly moistened.
    4. Press into pan: Press the mixture firmly and evenly into the bottom of the prepared springform pan. The bottom of a measuring cup works well for this.
    5. Bake the crust: Bake for 8-10 minutes to help it set. Remove it from the oven and let it cool slightly while you prepare the filling. Reduce the oven temperature to 325°F (160°C).

    Make the Cheesecake Filling:

    1. Beat cream cheese: In a large bowl using an electric mixer, beat the softened cream cheese on medium speed for 2-3 minutes until completely smooth and creamy.
    2. Add sugar: Gradually add the granulated sugar and beat until just combined. Scrape down the sides of the bowl to ensure everything is mixed in. Do not overmix.
    3. Mix in cream and vanilla: Add the heavy cream (or sour cream) and vanilla extract. Beat on low speed until well incorporated.
    4. Incorporate eggs: Add the eggs one at a time, beating on low speed just until each yolk disappears. Overmixing at this stage can introduce too much air, which leads to cracks.
    5. Add flour: Sprinkle in the flour and mix on low speed just until combined.

    Bake Your Cheesecake:

    1. Pour filling: Pour the cheesecake batter over the cooled crust in the springform pan.
    2. Prepare water bath: Place the foil-wrapped springform pan inside a larger roasting pan. Carefully pour hot water into the roasting pan until it comes about halfway up the sides of the springform pan. The water bath is key for even baking and a crack-free surface. [1]
    3. Bake: Carefully transfer the roasting pan to the preheated 325°F (160°C) oven. Bake for 60-75 minutes. The edges of the cheesecake should be set, but the center will still be slightly jiggly.
    4. Cool gradually: Turn off the oven and prop the door open slightly with a wooden spoon. Let the cheesecake cool slowly in the water bath inside the oven for 1 hour. This prevents sudden temperature changes that cause cracks.
    5. Chill: Remove the cheesecake from the water bath and roasting pan. Carefully remove the foil. Let it cool completely on a wire rack. Once at room temperature, cover it lightly and refrigerate for at least 6 hours, or preferably overnight, to allow it to set and develop its full flavor.

    Tips for a Perfect, Crack-Free Cheesecake

    Achieving a perfectly smooth top is easier than you think. Follow these key tips to prevent cracks and ensure a flawless result.

    • Room Temperature Ingredients are Key: Using room temperature cream cheese and eggs is essential. They combine more easily, preventing lumps and reducing the need for overmixing.
    • Don’t Overmix the Batter: Overmixing adds air bubbles that can expand and burst during baking, leading to cracks. Mix on low speed and stop as soon as the ingredients are just combined.
    • Use a Water Bath: The steam from a water bath creates a moist, humid environment. This promotes gentle, even baking and prevents the top from drying out and cracking.
    • Cool Slowly: Sudden temperature changes are a cheesecake’s enemy. To avoid cracks, cool it gradually: first in the turned-off oven, then on a wire rack at room temperature, and finally in the refrigerator.
    • Avoid Opening the Oven Door: Resist the urge to peek while the cheesecake is baking. Opening the door causes the oven temperature to drop dramatically, which can disrupt the baking process and cause cracks.
    • Run a Knife Around the Edges: Before refrigerating, gently run a thin knife around the edge of the pan. As the cheesecake chills and shrinks slightly, this step prevents it from sticking to the sides and cracking.

    What Are the Different Types of Cheesecake?

    A flat lay of three cheesecake slices: classic baked, no-bake berry, and fluffy Japanese cotton.
    A visually appealing flat lay arrangement featuring three distinct types of cheesecake slices, each on a unique, elegant dessert plate. The first is a dense, golden-brown classic baked cheesecake slice, perfectly smooth. The second is a vibrant, no-bake fruit cheesecake slice with a visible swirl of mixed berries and topped with fresh mint leaves. The third is a tall, incredibly fluffy and airy Japanese cotton cheesecake slice, showcasing its unique texture. All are presented on a polished light wood table, gently illuminated by soft, natural window light, creating subtle highlights. The composition is clean and inviting. Professional food photography, photorealistic, high-quality food magazine photo, emphasizing the variety in texture and style. No artistic interpretations, no illustrations, no vector graphics, no abstract art.

    The Classic Baked New York Cheesecake

    When you think of a traditional cheesecake, the iconic New York style often comes to mind. This classic is beloved for its incredible richness, wonderful density, and a creamy texture that melts in your mouth.

    A true New York cheesecake recipe relies on a few key ingredients, including a generous amount of full-fat cream cheese, eggs, and sugar. A touch of sour cream is often added to the filling, which makes the cheesecake extra smooth and tangy. The crust is typically a simple, buttery, and firm graham cracker base. Arnold Reuben is widely credited with creating the New York style cheesecake in the early 20th century [2].

    The secret to its signature texture is gentle, slow baking. To achieve perfect results, many home cooks use a water bath. This method helps the cheesecake bake evenly and prevents cracks from forming on top. Mastering this baked cheesecake recipe is a rewarding experience for any home cook, as it creates a truly luxurious dessert and builds confidence in the kitchen.

    Recipesmondial offers a reliable, step-by-step guide for this indulgent treat. Our best cheesecake recipe is simple to follow and ensures a creamy, crack-free masterpiece every time.

    Easy No-Bake Cheesecake Variations

    If you’re short on time or prefer a lighter dessert, no-bake cheesecakes are an excellent choice. Perfect for busy families, these easy recipes come together quickly and effortlessly, with no oven required.

    Instead of baking, no-bake cheesecakes firm up in the refrigerator. While their texture is typically lighter and airier than their baked counterparts, they still offer that beloved tangy and sweet flavor. This makes them a fantastic option for a refreshing afternoon treat or even for quick breakfast ideas.

    The beauty of a no-bake cheesecake recipe lies in its simplicity:

    • Simple Ingredients: They often use cream cheese, whipped cream or Cool Whip, and a sweetener.
    • Quick Assembly: You simply mix the ingredients and pour the mixture over your chosen crust.
    • Versatile Bases: Common crusts include crushed graham crackers or crumbled cookies.
    • Minimal Effort: Just chill it for a few hours, and your delicious dessert is ready to enjoy.

    These beginner-friendly recipes are ideal for anyone new to baking. They prove that creating delicious, easy meals is truly possible and help you enjoy cooking without stress.

    Popular Flavor Ideas (Strawberry, Lemon)

    Once you master the basic cheesecake recipe, a world of flavors opens up. It’s easy to customize your creation by adding different fruits, zests, or extracts to transform your dessert. Let’s explore some popular and simple flavor ideas that are always a hit.

    Strawberry Cheesecake

    Strawberry cheesecake is a beloved classic, irresistible for its vibrant color and sweet-tart flavor. You have several options to incorporate the strawberries:

    • Fresh Berry Topping: Simply arrange fresh, sliced strawberries over the finished cheesecake.
    • Strawberry Compote: Cook down fresh or frozen strawberries with a little sugar to create a rich, spoonable topping.
    • Swirl Design: Gently swirl strawberry sauce or compote into the cheesecake batter before chilling or baking for a beautiful marbled effect.

    This variation makes a stunning centerpiece for any gathering. When loaded with fresh fruit, it can even serve as a healthier snack option.

    Lemon Cheesecake

    For a wonderfully refreshing dessert, lemon cheesecake offers a bright, zesty counterpoint to the richness. The citrus notes awaken your palate. Here’s how to infuse that sunny lemon flavor:

    • Lemon Zest: Grate fresh lemon zest directly into the cream cheese filling for an intense lemon oil flavor.
    • Lemon Juice: Add a splash of fresh lemon juice to the filling to brighten the flavor and add a subtle tang.
    • Lemon Curd Topping: Spread a layer of store-bought or homemade lemon curd over the chilled cheesecake for an extra layer of zing.

    These simple additions turn a basic cheesecake into an exciting, flavorful treat, perfect for family-friendly meals or special occasions. Recipesmondial encourages you to experiment and discover your favorite combinations. You can easily adapt these ideas for other fruit flavors, like raspberry or blueberry. It’s all about approachable home cooking and creative meal prep tips!

    How to Properly Store Your Cheesecake

    Cooling Your Cheesecake Correctly

    You’ve baked a magnificent cheesecake! Proper storage is key to keeping it fresh and delicious for every slice. Following this guidance will also make your meal prep easier for future indulgence. These simple steps will help you keep your dessert at its best.

    The first and most important step after baking is cooling. Do not rush this process, as haste can lead to cracks and a poor texture.

    • First, let your cheesecake cool on a wire rack at room temperature for at least 1 to 2 hours.
    • Allowing it to cool completely is crucial. This step prevents condensation from forming when you move it to the refrigerator, which can make the crust soggy.
    • Once the pan is cool to the touch, you can move on to refrigeration.

    Refrigerating Your Cheesecake

    For short-term storage, the refrigerator is the best place to keep your cheesecake fresh and safe to eat for a few days.

    • Cover It Well: After it has completely cooled, wrap your cheesecake tightly in plastic wrap, followed by a layer of aluminum foil. A dedicated cheesecake carrier is an even better option for protection.
    • Keep Odors Away: Cheesecake easily absorbs flavors from other foods, so ensure it is sealed well to prevent this.
    • Storage Duration: A properly stored baked cheesecake will last for 3 to 4 days in the refrigerator [3]. No-bake varieties may last up to 5 days. Always check for freshness before serving.
    • Sliced vs. Whole: If you’ve already cut the cheesecake, wrap each slice individually to prevent the edges from drying out and to keep them flavorful.

    Freezing Your Cheesecake for Longer Enjoyment

    For long-term storage, freezing is an excellent option. It allows you to enjoy your homemade cheesecake weeks later, which is perfect for meal prepping or making a dessert ahead of a special occasion.

    Freezing a Whole Cheesecake:

    1. First, ensure the cheesecake is completely cool to prevent ice crystals from forming.
    2. Place the uncovered cheesecake in the freezer for about one hour to let it firm up.
    3. Once firm, remove it and wrap it tightly in several layers of plastic wrap.
    4. Add a final, protective layer of aluminum foil. This helps prevent freezer burn and shields its delicate flavor.
    5. Return the fully wrapped cheesecake to the freezer for storage.

    Freezing Individual Slices:

    1. Start by cutting the cooled cheesecake into individual portions.
    2. Arrange the slices on a parchment-lined baking sheet and freeze for 1-2 hours, or until they are firm.
    3. Wrap each firm slice individually, first in plastic wrap and then in aluminum foil for extra protection.
    4. Place the wrapped slices in an airtight freezer-safe container or a freezer bag.

    Thawing Frozen Cheesecake:

    • Transfer the frozen cheesecake or slices from the freezer to the refrigerator.
    • Thaw it slowly in the refrigerator overnight. This method is best for maintaining the original texture and preventing sogginess.
    • Avoid thawing it at room temperature, as this can create condensation and result in a soggy crust.
    • For best results, enjoy your thawed cheesecake within 2-3 days.

    A properly frozen cheesecake can be stored for 1 to 2 months. For the best quality and flavor, try to enjoy it within this period. This way, you’ll always have an easy dessert ready to go!

    Tips for the Best Cheesecake Experience

    Here are a few final tips to ensure your cheesecake is always perfect, from the first slice to the last.

    • Avoid Strong Odors: Since cheesecake easily absorbs smells, always store it away from pungent foods like onions, garlic, or leftover savory dishes.
    • Freeze Toppings Separately: If your cheesecake has toppings like fresh fruit, ganache, or whipped cream, it’s best to freeze it plain. Add fresh toppings just before serving for the best taste and appearance.
    • Label and Date: Always label your frozen cheesecake with the date it was frozen. This helps you keep track of its freshness and use it while it’s at its prime.

    Following these simple storage steps will ensure your homemade cheesecake remains a delicious delight. Whether you’ve made a classic baked cheesecake or an easy no-bake version, proper care guarantees more enjoyable moments. Recipesmondial helps you with approachable home cooking every step of the way.

    Frequently Asked Questions About Cheesecake

    What is in the original cheesecake recipe?

    The concept of cheesecake is surprisingly ancient, with roots tracing back to Greece. Early versions were made with fresh cheese, honey, and flour and were even served to athletes at the Olympic Games [4].

    However, the “original” cheesecake most people know today is the classic New York style. Made famous in the United States, this version is known for its rich, dense, and creamy texture, all supported by a simple graham cracker crust.

    The core ingredients for this beloved classic are quite simple:

    • Cream Cheese: High-quality, full-fat cream cheese is key for that signature tang and richness.
    • Eggs: These act as a binder, giving the cheesecake its structure and smooth texture.
    • Sugar: Just enough to sweeten without overpowering the cheese flavor.
    • Sour Cream or Heavy Cream: Often added to create an extra creamy consistency and a slight tang.
    • Vanilla Extract: A touch of vanilla enhances all the other flavors beautifully.
    • Crust: Typically made from crushed graham crackers mixed with melted butter and a little sugar.

    Our step-by-step recipe on Recipesmondial builds on this classic foundation to help you create a perfect, flavorful cheesecake every time.

    Can you make a cheesecake recipe without eggs?

    Yes, you can absolutely make a delicious cheesecake without eggs! It’s a popular option for those with egg allergies or anyone who prefers a different texture.

    Egg-free cheesecakes typically come in two main forms:

    • No-Bake Cheesecakes: The easiest and most popular egg-free option, these cheesecakes set without baking. Instead of eggs, they rely on binders like gelatin, whipped cream, or condensed milk to create structure. The filling is often light, airy, and quick to prepare.
    • Baked Cheesecakes (Egg Substitutes): Though more challenging, you can adapt baked recipes using egg substitutes. Options range from commercial egg replacers to pureed silken tofu or a cornstarch mixture [5]. Be aware that the final texture may be less custardy and slightly firmer than a traditional cheesecake.

    For a beginner-friendly, egg-free option, a no-bake cheesecake is a fantastic starting point. It delivers delicious results with minimal fuss.

    What is the best Philadelphia cheesecake recipe?

    When you hear “Philadelphia cheesecake,” it generally refers to a classic New York-style cheesecake made using Philadelphia brand cream cheese. Many home cooks and chefs prefer this brand for its consistent quality and rich, tangy flavor, making it an ideal choice for a delicious cheesecake.

    The “best” Philadelphia cheesecake recipe emphasizes a few key elements to achieve that iconic rich, smooth, and crack-free result:

    • Full-Fat Philadelphia Cream Cheese: Always opt for the full-fat block cream cheese, not the whipped or spreadable versions. It provides essential richness and structure.
    • Room Temperature Ingredients: This is a golden rule! Using room temperature cream cheese, eggs, and sour cream helps them blend smoothly and prevents lumps.
    • Gentle Mixing: Overmixing adds too much air, which can cause cracks as the cheesecake bakes and cools. Mix just until the ingredients are combined.
    • Water Bath Baking: This technique is crucial for a creamy, even bake. Surrounding the pan with steam prevents cracking and ensures the cheesecake cooks slowly and gently.
    • Slow Cooling: Don’t rush the cooling process. Let the cheesecake cool gradually in the turned-off oven with the door ajar, then on the counter, before chilling it in the refrigerator. This prevents cracks caused by sudden temperature changes.

    Our baked cheesecake recipe on Recipesmondial incorporates all these crucial tips. We guide you step-by-step to help you achieve that perfect “Philadelphia-style” result for any occasion.

    How do you make an easy baked cheesecake?

    Making a great baked cheesecake is easier than you think. With a few smart techniques, you can achieve a creamy, crack-free result without feeling overwhelmed. At Recipesmondial, our goal is to make sophisticated desserts accessible to everyone.

    Here is how to simplify the process:

    • Choose a Reliable Recipe: Start with a trusted recipe that offers clear, step-by-step guidance. A good guide removes the guesswork and helps you cook with confidence.
    • Room Temperature is Key: Always bring your cream cheese, eggs, and dairy to room temperature. This simple step makes a huge difference in creating a smooth, lump-free batter.
    • Prepare Your Pan Properly: Use a springform pan and wrap the bottom tightly with heavy-duty foil to prevent water from seeping in during the water bath.
    • Mix Gently: Use a mixer on low speed and mix just until the ingredients are combined and smooth. Overmixing creates air bubbles that lead to cracks.
    • Bake in a Water Bath: This is a game-changer for preventing cracks. Place your wrapped pan in a larger pan and add hot water. The steam creates a moist environment for even baking.
    • Don’t Overbake: The cheesecake is done when it still has a slight wobble in the center. It will continue to set as it cools.
    • Cool Slowly: First, let the cheesecake cool in the turned-off oven with the door cracked for one hour. Then, cool it completely on a wire rack before refrigerating.
    • Chill Thoroughly: For the best flavor and texture, chill the cheesecake for at least 4-6 hours, but preferably overnight. This also makes it much easier to slice.

    By following these simple tips, you can create a stunning and delicious baked cheesecake without the stress.


    Sources

    1. https://www.seriouseats.com/why-use-a-water-bath-for-cheesecake
    2. https://whatscookingamerica.net/History/CheesecakeHistory.htm
    3. https://www.foodsafety.gov/food-safety-by-events/holiday-or-party-food-safety
    4. https://www.smithsonianmag.com/arts-culture/a-brief-history-of-cheesecake-11910609/
    5. https://www.masterclass.com/articles/egg-substitutes
  • How to Make the Best Mashed Potatoes: An Easy Step-by-Step Recipe

    How to Make the Best Mashed Potatoes: An Easy Step-by-Step Recipe

    To make the best mashed potatoes, start by boiling peeled, evenly-cut potatoes like Russets or Yukon Golds in salted water until fork-tender. Drain them thoroughly, then mash with warmed butter, milk, or cream. Season generously with salt and pepper until you reach a smooth, creamy, and flavorful consistency.

    Few dishes bring comfort to the table quite like a steaming bowl of perfectly creamy mashed potatoes. It’s a classic star side dish for a holiday feast and a simple addition to any weeknight meal. But have you ever felt overwhelmed by complicated recipes? At Recipesmondial, we believe finding reliable and easy recipes for family-friendly meals is key to making cooking enjoyable, not stressful. That’s why we are sharing our ultimate mashed potatoes recipe, designed to take the guesswork out of this beloved side.

    You can forget about dry, lumpy, or gummy results for good. Our best mashed potatoes recipe offers clear, step-by-step cooking guidance that even beginners can follow with confidence. We’ll show you everything, from selecting the right potatoes to the simple techniques for achieving that incredible, melt-in-your-mouth creaminess. With our approachable home cooking tips, you’ll master the best mashed potatoes and serve delicious homemade mashed potatoes everyone will love. Get ready to transform everyday ingredients into truly flavorful meals made easy and build your confidence in the kitchen.

    Why You’ll Love This Easy Homemade Mashed Potatoes Recipe

    Simple, Everyday Ingredients

    You don’t need a pantry full of specialty items to make these incredible homemade mashed potatoes. Our recipe prioritizes common ingredients you likely already have, like humble potatoes, fresh milk, rich butter, and simple seasonings. This budget-friendly approach makes cooking accessible and stress-free, allowing you to create a flavorful meal without extra trips to the store.

    Foolproof for Beginners

    If you’re often overwhelmed by complex recipes or lack confidence in the kitchen, this mashed potato recipe is for you. It’s truly foolproof and designed for beginners. We provide clear, step-by-step guidance to support you through each stage, ensuring you get perfect results every time. This recipe will help you build confidence and make preparing delicious, family-friendly meals an enjoyable experience.

    The Perfect Creamy Texture

    Our recipe delivers wonderfully light, fluffy, and incredibly smooth mashed potatoes—never gummy or lumpy. Each bite offers a rich, comforting experience. The secret lies in a few simple techniques and the perfect ratio of ingredients, allowing you to achieve a restaurant-quality texture right at home. It’s a classic, flavorful dish your family will adore.

    What ingredients to put in mashed potatoes?

    An inviting flat lay of fresh ingredients for mashed potatoes: whole potatoes, butter, milk, salt, pepper, and chives.
    A professional food photography shot, 100 percent photorealistic, high-quality food magazine photo. A clean, organized flat lay composition of fresh, high-quality mashed potato ingredients on a light-colored wooden cutting board or marble countertop. The arrangement includes whole, unpeeled golden Yukon Gold potatoes, a stick of unsalted butter, a small glass pitcher of whole milk or heavy cream, a small ceramic bowl containing a pinch of coarse sea salt and freshly ground black pepper, and a small bunch of fresh green chives. Each ingredient is perfectly lit with soft, natural light, emphasizing freshness and quality, set against a clean, uncluttered background that evokes a bright home kitchen.

    Creating delicious homemade mashed potatoes is simpler than you think—it all starts with choosing the right ingredients. We’ll focus on everyday staples that combine to make a side dish that is both comforting and full of flavor. Selecting the best components will help you build kitchen confidence and achieve perfect results every time.

    The Best Potatoes for Mashing

    The type of potato you choose is crucial for the final texture of your dish. To achieve a light, fluffy, and creamy mash, select a variety that is high in starch. Starchy potatoes break down easily during cooking and absorb dairy without becoming gummy.

    • Russet Potatoes (Idaho Potatoes): Often considered the champions of mashed potatoes, Russets have a high starch content and a fluffy texture. This makes them ideal for absorbing butter and milk, resulting in a wonderfully airy mash. They are excellent for family-friendly meals.
    • Yukon Gold Potatoes: If you prefer a denser, creamier mash with a naturally buttery flavor, Yukon Golds are a fantastic choice. With their medium starch content and lovely golden hue, many home cooks love them for their rich taste, making them perfect for flavorful meals made easy.

    Quick Tip: Avoid waxy potatoes like red bliss or new potatoes. They have less starch and more moisture, which will make them gluey and dense—not light and fluffy—when mashed [1].

    Essential Dairy: Butter, Milk, or Cream

    Dairy is what transforms cooked potatoes into a rich, decadent side dish. For best results, warm your dairy before adding it. This key step keeps the potatoes from cooling down and helps them absorb the liquid more effectively.

    • Unsalted Butter: Using unsalted butter gives you complete control over the saltiness of your dish. It also adds incredible richness and flavor, so don’t be shy.
    • Whole Milk: For a smooth consistency that isn’t overly heavy, whole milk is a reliable choice. It provides a perfect balance of creaminess for your beginner-friendly mashed potatoes.
    • Heavy Cream or Half-and-Half: To create an extra luxurious and ultra-creamy texture, use heavy cream or half-and-half. These additions make your mashed potatoes incredibly indulgent and are wonderful for elevating simple dinner recipes.

    Substitution Idea: For a dairy-free version, you can use a dairy-free milk alternative (like unsweetened almond or oat milk) and plant-based butter. This makes it an adaptable easy recipe for various dietary needs.

    Simple Seasonings for Maximum Flavor

    Proper seasoning is crucial for bringing out the full flavor of your best mashed potatoes recipe. Don’t be afraid to taste as you go and adjust accordingly.

    • Salt: Kosher salt is ideal. Add it to the potato boiling water and again while mashing to layer the flavor beautifully.
    • Black Pepper: Freshly ground black pepper adds a subtle kick and aroma that perfectly complements the creamy potatoes.
    • Optional Flavor Boosters:
      • Garlic Powder or Roasted Garlic: A pinch of garlic powder or a few cloves of mashed roasted garlic offers a wonderful savory depth.
      • Fresh Herbs: Add a bright, fresh note with finely chopped chives, parsley, or thyme. Stir them in just before serving.
      • Onion Powder: Similar to garlic powder, a little onion powder can add another layer of savory taste without being overpowering.

    Start with these basic yet high-quality ingredients, and you’ll be on your way to mastering homemade mashed potatoes. Recipesmondial is here to help you turn simple components into something truly special, making your time in the kitchen enjoyable and stress-free.

    How to Make the Best Mashed Potatoes: Step-by-Step

    A home cook's hands mashing steaming potatoes in a large pot with a potato masher.
    A professional food photography shot, 100 percent photorealistic, high-quality food magazine photo. A close-up, action shot in a real, brightly lit home kitchen. A home cook’s hands are actively using a sturdy, silver potato masher to mash freshly boiled, steaming potatoes in a large, stainless steel heavy-bottomed pot. The potatoes are visibly soft, fluffy, and perfectly cooked, with subtle steam rising from the pot. The cook’s hands are natural and confident, conveying ease and approachability. The background is softly blurred, showing hints of a clean, warm kitchen counter and possibly a window, maintaining a focus on the mashing process.

    Step 1: Peel and Boil the Potatoes

    Properly preparing your potatoes is the cornerstone of creamy mashed potatoes. This first step ensures they cook evenly, setting the stage for a perfectly smooth final texture.

    • Peel your potatoes: Use a vegetable peeler to remove all the skin. A sturdy Y-peeler works best for quick peeling.
    • Cut into equal pieces: Slice the peeled potatoes into uniform 1.5 to 2-inch chunks. This ensures every piece cooks at the same rate, preventing hard spots or overcooked edges.
    • Rinse them well: Place the cut potatoes in a colander and rinse them under cold water. This washes away excess starch, which helps prevent a gummy texture.
    • Place in a pot: Transfer the rinsed potatoes to a large pot and cover them with cold water by about one inch.
    • Add salt: Generously salt the water with about 1 tablespoon of salt per gallon, similar to how you would for pasta. Salting the water seasons the potatoes from the inside out, making a huge difference in the final flavor [2].
    • Boil until tender: Bring the water to a boil, then reduce the heat to a simmer. Cook for 15-20 minutes, or until a fork slides easily into a potato chunk.

    Step 2: Drain and Steam Dry

    Do not overlook this crucial step. Draining and steam-drying the potatoes is the secret to a light, fluffy texture, preventing them from becoming watery or dense.

    • Drain thoroughly: Carefully pour the potatoes into a colander and shake gently to let all the hot water drain away.
    • Return to the hot pot: Return the drained potatoes directly to the still-warm pot. The residual heat will help steam them dry.
    • Steam for a few minutes: Let the potatoes sit for 3-5 minutes, allowing the steam to evaporate any excess moisture. This creates a drier potato, which is essential for a fluffy result.

    Step 3: Warm Your Butter and Milk

    Warming your butter and milk is essential for a smooth, lump-free texture. Cold dairy can cool the potatoes, preventing them from absorbing the fat evenly and resulting in a less silky finish. This quick step ensures creamy results.

    • Combine dairy: Combine the butter and milk (or cream) in a small saucepan or a microwave-safe bowl.
    • Gently heat: Warm the mixture over low heat, stirring occasionally, until the butter is melted and the milk is warm to the touch. Be careful not to let it boil.
    • Keep it ready: Set the warm dairy mixture aside so it’s ready to add to the potatoes.

    Step 4: Mash to Creamy Perfection

    Now it’s time to mash. The key to a perfect creamy texture is to work gently and avoid overmixing, which can make the potatoes gummy.

    • Return potatoes to pot: Ensure the steam-dried potatoes are in the pot you used for boiling.
    • Mash them well: Use a potato ricer or a hand masher to break down the potatoes until they are mostly smooth. A ricer will create the lightest, fluffiest texture.
    • Add warm dairy: Gradually pour in about two-thirds of the warm butter and milk mixture. It’s best to start with less, as you can always add more.
    • Mix gently: Using a sturdy spoon or spatula, fold the dairy into the potatoes until just combined and creamy. Do not overmix! Overmixing develops the starch and leads to gluey potatoes.
    • Season to taste: Season with salt and freshly ground black pepper. Taste and adjust as needed, adding more warm milk for a creamier consistency if desired.
    • Serve immediately: For the best taste and texture, serve your mashed potatoes immediately while they are warm.

    What is the secret to really good mashed potatoes?

    Tip 1: Use the Right Kind of Potato

    Excellent mashed potatoes start with the right type of potato. Starchy potatoes are your best friend here because they break down easily and absorb butter and milk beautifully. This creates the light, fluffy texture everyone loves.

    Waxy potatoes, on the other hand, have less starch and hold their shape well, which is great for salads. However, when mashed, they can become gluey and dense, resulting in a less enjoyable texture.

    For the ultimate creamy, fluffy mashed potatoes, reach for these varieties:

    • Russet Potatoes: Also known as Idaho potatoes, these are high in starch and low in moisture. They cook up light and fluffy, perfect for absorbing all the delicious dairy you add.
    • Yukon Gold Potatoes: These have a naturally buttery flavor and creamy texture. While slightly less starchy than Russets, they still mash wonderfully and give your dish a lovely yellow hue.

    Choosing the right potato from the start makes the entire process easier and helps you avoid common mistakes. [3]

    Tip 2: Always Use Warm Milk and Butter

    This tip is a game-changer for homemade mashed potatoes. Adding cold ingredients to hot potatoes cools them down, which prevents them from fully absorbing the dairy. This can lead to a lumpy or uneven consistency.

    Instead, gently warm your milk (or cream) and butter together in a small saucepan over low heat until the butter is melted. The mixture should be warm, not boiling. Warm ingredients incorporate more smoothly into hot potatoes, creating a silky and perfectly consistent texture. This simple step elevates your mashed potatoes, making them reliably smooth and flavorful.

    Tip 3: Don’t Overwork or Over-mix

    Overworking potatoes is the most common cause of a gummy, gluey texture. When potatoes are mashed too aggressively, their starch cells break down and release excess starch, which creates that unappetizing stickiness.

    To achieve the best results, be gentle. Mash your cooked potatoes until they are mostly broken down. Then, add your warm milk and butter mixture and mix just until everything is combined and creamy. A potato ricer or a hand masher works best for this. Avoid using a food processor or an electric mixer, as these tools are too aggressive and will quickly overwork the potatoes. Remember, stopping at the right moment is the key to a perfectly fluffy result.

    Tip 4: Salt Your Cooking Water

    Building flavor should start early in the cooking process. Salting the cooking water is essential because as the potatoes boil, they absorb the salt, seasoning them from the inside out. Since potatoes are bland on their own, they need this foundation of seasoning.

    Think of it like cooking pasta—you want the water to be well-seasoned. A good guideline is to add 1-2 tablespoons of salt per gallon of water before adding your potatoes. This initial salting makes a huge difference, ensuring every bite of your mashed potatoes is flavorful and well-balanced. It’s a small step that guarantees a delicious result.

    What is a common mistake when making mashed potatoes?

    Mistake 1: Using the Wrong Tool to Mash

    The secret to perfectly creamy mashed potatoes is using the right tool. Many beginners reach for a food processor or an electric mixer, but these high-speed gadgets can actually ruin the texture.

    Here’s why:

    • Overworks the Starch: High-speed blades and beaters break down the potato cells too aggressively. This process releases an excessive amount of starch.
    • Creates a Gummy Texture: All that extra starch is what turns fluffy potatoes into a sticky, glue-like mess.

    For the best results, use a hand-held potato masher or a potato ricer. These tools gently break down the potatoes without overworking the starches, giving you the light and fluffy texture you want.

    Mistake 2: Adding Cold Ingredients

    Adding cold ingredients to hot potatoes can ruin their texture and flavor. This common oversight prevents the potatoes from becoming perfectly smooth and creamy.

    Here’s the impact:

    • Cools the Potatoes Down: Cold dairy instantly lowers the temperature of your potatoes, which makes them more difficult to mash into a smooth consistency.
    • Prevents Proper Absorption: Warm potatoes absorb liquids much more effectively. Adding cold ingredients prevents them from blending seamlessly, resulting in a lumpy, less creamy texture.

    The fix is simple: gently warm your butter, milk, or cream before adding them. This small step ensures all the ingredients combine smoothly for the richest, creamiest result.

    Mistake 3: Not Draining the Potatoes Properly

    Watery mashed potatoes are a common disappointment, usually caused by one simple mistake: not draining them properly. Getting rid of excess moisture is a crucial step for great results.

    Here’s how it affects your dish:

    • Dilutes the Flavor: Excess water dilutes the taste of the potatoes and any seasonings you add, making your final dish bland.
    • Creates a Soupy Texture: Instead of being thick and fluffy, potatoes with too much water will turn thin and runny.
    • Inhibits Creaminess: The presence of water makes it difficult for potatoes to absorb the butter and cream, preventing a rich, creamy result.

    After boiling, drain the potatoes thoroughly in a colander. For an extra step, return them to the hot, empty pot and place it over low heat for a minute. This allows any remaining moisture to steam off, leaving your potatoes perfectly dry and ready to absorb the butter and cream.

    Easy Variations for Your Mashed Potatoes

    Creamy Garlic Mashed Potatoes

    Ready for a simple twist on classic mashed potatoes? Adding garlic creates a wonderful depth of flavor that will impress everyone. This easy variation is perfect for simple dinner recipes and a fantastic way to elevate family-friendly meals.

    Here’s how to make your mashed potatoes deliciously garlicky:

    • Prepare the Garlic: You have two easy options.
      • Sautéed Garlic: Mince 3-4 cloves of garlic, then sauté them gently in a tablespoon of butter or olive oil for 1-2 minutes until fragrant. Be careful not to let the garlic brown, as it can become bitter.
      • Roasted Garlic: For a milder, sweeter flavor, slice the top off a head of garlic. Drizzle it with olive oil, wrap it in foil, and roast at 400°F (200°C) for 30-40 minutes until soft. Simply squeeze the soft cloves out of the peel.
    • Mix It In: After mashing your potatoes, it’s time to add the garlic. For sautéed garlic, stir it in with the warm milk and butter. For roasted garlic, mash the soft cloves directly into the potatoes until well combined.
    • Taste and Adjust: Finally, taste your homemade mashed potatoes and add more salt or pepper if needed. Enjoy this flavorful meal made easy!

    Cheesy Mashed Potatoes

    Who doesn’t love cheese? Turning your best mashed potatoes recipe into a cheesy delight is incredibly simple. This variation adds a comforting flavor and is a guaranteed hit for all your family-friendly meals.

    Follow these quick steps to create a cheesy masterpiece:

    • Choose Your Cheese: Medium or sharp cheddar is a popular choice, but Monterey Jack, Gruyere, or a blend of cheeses also work wonderfully. For a standard batch (about 2 pounds of potatoes), you’ll need about 1 cup of shredded cheese.
    • Add the Cheese: The key is to add the shredded cheese right after you’ve mashed the potatoes and mixed in the warm milk and butter. The residual heat will melt it beautifully.
    • Stir and Serve: Gently stir until the cheese is fully melted and incorporated, creating lovely, gooey strings. For the best texture, serve immediately. This easy recipe adds big flavor!

    Mashed Potatoes Recipe Without Milk (Dairy-Free)

    Need a dairy-free option? You can still enjoy creamy, delicious mashed potatoes without milk or butter. This fantastic beginner-friendly recipe proves that approachable home cooking can cater to everyone’s dietary needs.

    Here are some simple substitutions to make your mashed potatoes dairy-free:

    • Plant-Based Milk: Swap regular milk or cream for an unsweetened, plain variety like almond, oat, or soy milk. Start with a smaller amount and add more as needed, since some plant-based milks are thinner than dairy milk.
    • Dairy-Free Fat: To get that silky texture, replace butter with a high-quality olive oil or your favorite vegan butter alternative. This will add the necessary richness.
    • Flavor Boosters: For a deeper, savory flavor, consider using vegetable broth instead of plant-based milk. You can also add nutritional yeast for a cheesy, umami note.
    • Preparation: Simply follow the main recipe steps, but substitute the dairy ingredients with their plant-based counterparts. Be sure to warm your chosen plant-based milk and dairy-free fat together before adding them to the mashed potatoes.

    Your mashed potatoes recipe without milk will be just as comforting and delicious!

    Herbed Mashed Potatoes

    Adding fresh herbs is an easy way to bring a vibrant, earthy flavor to your homemade mashed potatoes. This simple variation makes a big impact and is a wonderful way to boost your confidence in the kitchen.

    Here’s how to infuse your potatoes with wonderful herbal notes:

    • Choose Your Herbs: Fresh chives, parsley, rosemary, and thyme are all excellent choices. Feel free to use a single herb or create a combination. For a standard batch, aim for 2-3 tablespoons of finely chopped fresh herbs.
    • Prep the Herbs: Thoroughly wash your chosen herbs, pat them completely dry, and then finely chop them.
    • Add at the End: For the best flavor and color, stir the fresh herbs into your mashed potatoes just before serving. Adding them too early can dull both their taste and appearance.
    • Seasoning Tip: Before adding extra salt, taste your herbed mashed potatoes. Some herbs, like chives, have a natural savory note that may be enough.

    Enjoy this delightful and flavorful meal made easy with the simple addition of fresh herbs!

    How to Store and Reheat Leftovers

    Making a big batch of your favorite homemade mashed potatoes is a smart move, as they’re perfect for holiday meals or as a comforting side dish any night of the week. Knowing how to store and reheat them properly turns them into delicious, stress-free leftovers. This also makes them a fantastic option for meal prep ideas that can save you time later.

    Storing Mashed Potatoes Safely

    Proper storage is key to keeping your mashed potatoes fresh, delicious, and safe to eat. Following food safety guidelines is especially important when preparing family-friendly meals.

    • Cool Down Quickly: Let your mashed potatoes cool to room temperature within two hours of cooking. This crucial step prevents harmful bacteria growth [4].
    • Airtight Container: Once cooled, transfer the mashed potatoes to an airtight container. This will prevent them from drying out or absorbing other odors from the fridge.
    • Refrigerate Promptly: Stored in the refrigerator, mashed potatoes will last for 3-4 days, making them perfect for planning quick meals to enjoy throughout the week.

    Can You Freeze Mashed Potatoes?

    Absolutely! Freezing homemade mashed potatoes is a brilliant way to extend their shelf life. This meal-prep hack ensures you always have a delicious side dish ready for future easy recipes.

    Here’s how to freeze your best mashed potatoes:

    1. Cool Completely: Ensure your mashed potatoes are completely cool before freezing to prevent ice crystals from forming.
    2. Portion Out: Divide the mashed potatoes into single-serving or family-sized portions to make thawing and reheating much easier later.
    3. Wrap Well: Place portions in freezer-safe bags or airtight containers. If using bags, press out all excess air to help prevent freezer burn. For extra protection, you can cover the surface of the potatoes with a thin layer of melted butter.
    4. Label and Freeze: Label each container or bag with the date. Your mashed potatoes will keep well in the freezer for up to two months, ensuring they taste great when you’re ready to enjoy them.

    Reheating Mashed Potatoes for the Best Flavor

    Reheating can sometimes dry out mashed potatoes, but a few simple tricks can bring them back to their original creamy glory. This ensures your leftovers contribute to flavorful meals made easy.

    The key to perfect reheating is restoring moisture. No matter which method you choose, plan to stir in a splash of warm milk, cream, or broth and a pat of butter. This will bring back their signature creamy texture.

    Reheating in the Oven (Recommended for Large Batches)

    The oven is the best method for reheating large quantities, especially if you want to create a slightly crisp top. It evenly warms the potatoes, restoring their delicious texture.

    1. Preheat Oven: Set your oven to 350°F (175°C).
    2. Prepare Dish: Spread the mashed potatoes in an oven-safe dish and add a tablespoon or two of milk or broth over the top.
    3. Cover and Heat: Cover the dish tightly with foil to prevent the potatoes from drying out.
    4. Bake: Bake for 20-30 minutes, or until heated through. For the most even heating, give them a stir halfway through the cooking time.

    Reheating on the Stovetop (Quick and Easy)

    The stovetop method is fast, efficient, and perfect for reheating smaller or individual portions of homemade mashed potatoes.

    1. Use a Pot: Transfer the mashed potatoes to a saucepan or pot.
    2. Add Liquid: Add a splash of milk, cream, or broth, using about 1-2 tablespoons per cup of potatoes.
    3. Heat Gently: Heat over medium-low, stirring constantly to prevent sticking and ensure the potatoes warm up evenly.
    4. Serve When Ready: Continue stirring until the potatoes are hot, smooth, and ready to serve.

    Reheating in the Microwave (Fastest Method)

    When speed is your top priority, the microwave is the fastest reheating method. It’s ideal for a quick meal on a busy day.

    1. Microwave-Safe Dish: Place the mashed potatoes in a microwave-safe bowl.
    2. Add Liquid: Stir in a small amount of milk or broth to add moisture.
    3. Cover and Heat: Cover the bowl with a microwave-safe lid or plastic wrap, leaving a corner vented to allow steam to escape.
    4. Heat in Intervals: Heat on medium power for 1-2 minutes, then stir well. Continue heating in 30-second intervals, stirring each time, until the potatoes are hot throughout. This frequent stirring is key to preventing hot spots.

    With these simple tips, your leftover mashed potatoes will be just as comforting and delicious as when they were freshly made. Enjoy confident, approachable home cooking with Recipesmondial!

    Frequently Asked Questions About Mashed Potatoes

    How do you make mashed potatoes creamy and not gummy?

    Gummy mashed potatoes are a common problem caused by overworking the starch. To achieve a perfectly creamy and smooth consistency instead, follow a few key techniques.

    • Choose the Right Potatoes: Select starchy varieties like Russets or Yukon Golds. These are perfect for a fluffy mash because they break down easily and absorb butter and milk beautifully. [5]
    • Cook Evenly: Cut potatoes into uniform pieces to ensure they cook at the same rate. Unevenly cooked potatoes can result in a lumpy or inconsistent mash.
    • Drain and Steam Dry: After cooking, drain the potatoes thoroughly. Return them to the hot pot for a minute or two to steam dry. Removing this excess water is a crucial step to prevent a watery, gummy mash.
    • Warm Your Dairy: Gently warm your milk, cream, and butter before adding them. Cold ingredients cool the potatoes down, making them difficult to mash and preventing the butter from emulsifying properly.
    • Use the Right Tool: For the best texture, use a potato ricer or a handheld masher. Avoid a food processor or blender, as these tools overwork the starch quickly and will make your potatoes gluey.
    • Mash Gently: Be careful not to over-mix. Mash the potatoes gently and stop as soon as they are smooth and combined. Overworking them develops too much starch, which creates a gummy consistency.

    Can I make mashed potatoes ahead of time?

    Yes, you can absolutely make mashed potatoes ahead of time. This is a fantastic time-saver for holiday meal prep or busy weeknights, helping you get a delicious side dish on the table with less stress.

    1. Prepare your homemade mashed potatoes as directed in your recipe, making sure they are perfectly seasoned.
    2. After mashing, allow them to cool completely. This step is important for safe storage.
    3. Transfer the cooled mashed potatoes to an airtight container. Store them in the refrigerator for up to 3-4 days or freeze them for up to one month.

    When you’re ready to serve, reheating is simple. Adding a splash of warm milk or cream while reheating will help restore the potatoes’ original creamy texture and flavor.

    • Oven: Place mashed potatoes in an oven-safe dish with a splash of warm milk or cream. Cover with foil and bake at 350°F (175°C) for 20-30 minutes, stirring occasionally until heated through.
    • Stovetop: Transfer potatoes to a saucepan over low heat. Add a little warm milk or butter and stir frequently until warmed through and creamy.
    • Slow Cooker: For a large batch, place the potatoes in a slow cooker on low. Add a bit of liquid and stir often. This keeps them warm for hours, which is perfect for gatherings.
    • Microwave: For a single serving, place potatoes in a microwave-safe bowl with a tablespoon of milk. Heat in 1-minute increments, stirring between each, until hot.

    Should you peel potatoes for mashed potatoes?

    Traditionally, potatoes are peeled to create the smoothest, most refined texture. Removing the skin ensures your mash is consistently creamy and gives it a classic, elegant look.

    However, for a more rustic and flavorful result, you can leave the skins on. This method works especially well with thin-skinned varieties like Yukon Golds or red potatoes. Just be sure to scrub them thoroughly before boiling.

    Leaving the skins on adds extra fiber and nutrients [6]. It also provides a rustic visual appeal, saves on prep time, and adds more character to the dish.

    The choice really depends on your personal preference. Do you prefer a silky smooth texture or a slightly more wholesome, textured mash? Both are delicious, and Recipesmondial supports your culinary adventure!


    Sources

    1. https://www.idahopotato.com/recipes/mashed-potatoes-faq
    2. https://www.seriouseats.com/the-best-mashed-potatoes-recipe
    3. https://www.potatogoodness.com/potato-fun-facts/potato-types-and-varieties/
    4. https://www.foodsafety.gov/food-safety-charts/cold-food-storage-charts
    5. https://www.idahopotato.com/recipes/how-to-make-mashed-potatoes
    6. https://www.potatogoodness.com/potato-nutrition-facts/
  • The Only Deviled Eggs Recipe You’ll Ever Need (Classic & Easy)

    The Only Deviled Eggs Recipe You’ll Ever Need (Classic & Easy)

    A classic deviled eggs recipe involves boiling eggs until hard, peeling them, and slicing them in half. The yolks are then removed and mashed with mayonnaise, Dijon mustard, vinegar, and seasonings to create a smooth, creamy filling. This mixture is then piped or spooned back into the hollowed egg whites and garnished with paprika.

    Picture the perfect party spread: vibrant, delicious, and utterly irresistible. A platter of creamy, dreamy deviled eggs is likely front and center. This timeless appetizer is a crowd-pleaser for a reason, but achieving the perfect balance of flavor and texture can be tricky. If you’ve ever felt unsure in the kitchen, whether making appetizers or planning family-friendly meals, you’re in the right place.

    At Recipesmondial, we want you to enjoy cooking without stress. Our focus is on new simple dishes that deliver reliable results, and our ultimate classic deviled eggs recipe is a perfect example. With our step-by-step guidance, you’ll go from feeling unsure to cooking with confidence, creating flavorful meals made easy.

    This isn’t just any deviled eggs recipe; it’s a comprehensive guide perfect for busy home cooks and anyone looking for beginner-friendly recipes. We’ll share all our secrets for perfectly cooked eggs, a velvety smooth filling, and even creative variations to inspire your next gathering. Get ready to add this amazing deviled eggs recipe to your repertoire and delight everyone with your newfound confidence!

    Why You’ll Love This Classic Deviled Eggs Recipe

    A beautiful platter of classic deviled eggs, garnished with paprika and chives, ready for serving.
    100 percent photorealistic, professional food photography style, high-quality food magazine photo. A visually stunning platter of perfectly prepared classic deviled eggs, garnished with a sprinkle of vibrant paprika and fresh, finely chopped chives. The eggs are arranged artfully on a light-colored, rustic serving platter, set against a softly blurred, warm home kitchen background that suggests comfort and approachability. Natural, inviting daylight illuminates the scene, highlighting the creamy texture of the filling and the pristine whites. The overall impression is one of deliciousness, ease, and culinary satisfaction. NO artistic interpretations, NO illustrations, NO vector graphics, NO abstract art.

    Welcome to your new favorite deviled eggs recipe! At Recipesmondial, we believe cooking should be enjoyable, not stressful. We crafted this classic, easy-to-follow guide with that philosophy in mind. Get ready to see why this recipe will become a go-to in your kitchen.

    This recipe transforms a simple ingredient into a delightful bite perfect for any occasion. Best of all, it promises consistent, delicious results every single time.

    Why Our Deviled Eggs Recipe Stands Out

    We know home cooks want reliable guidance and easy recipes without complex steps. To solve common kitchen frustrations, we designed this deviled eggs recipe to be as straightforward as possible.

    • Effortlessly Simple: Tired of overwhelming recipes? We keep things straightforward with simple ingredients and clear instructions, so you can create this classic dish without any fuss.
    • Beginner-Friendly Approach: Lacking confidence in the kitchen? This recipe is for you. With step-by-step guidance that breaks down each part, you’ll build basic cooking skills as you go.
    • Irresistibly Delicious Flavor: Our recipe delivers the perfect creamy, tangy, and savory taste that makes deviled eggs a crowd-pleaser. They are an ideal family-friendly meal addition or party appetizer. In fact, deviled eggs are consistently a top favorite appetizer for holidays and gatherings [1].
    • Quick to Prepare: Need a fast snack or appetizer? This recipe comes together quickly, making it a fantastic solution for busy schedules.
    • Reliable Results: Say goodbye to cooking uncertainty. Our method ensures perfectly boiled eggs and a smooth, creamy filling, so you can cook confidently and achieve delicious results every time.
    • Versatile for Any Occasion: Whether it’s a potluck, a picnic, or a simple family dinner, these deviled eggs fit right in. They’re a classic for a reason!
    • Inspiring Creativity: Go beyond the classic with our fun variations. We encourage you to customize your deviled eggs and explore your culinary creativity.

    At Recipesmondial, our goal is to make mealtime stress-free so you can truly enjoy cooking. This deviled eggs recipe is a perfect example of that philosophy, turning simple ingredients into something special. Move from uncertainty to confidence in the kitchen and get ready to impress everyone with your delicious creations!

    What Ingredients Do You Need for Perfect Deviled Eggs?

    A flat lay photo showing all the fresh ingredients for deviled eggs, including whole eggs, halved egg whites, mayonnaise, mustard, and seasonings.
    100 percent photorealistic, professional food photography style, high-quality food magazine photo. A bright, clean flat lay composition showcasing all the fresh, simple ingredients required for classic deviled eggs. Featured items include several whole, perfectly hard-boiled eggs, some halved hard-boiled eggs with the yolks removed, a small bowl of creamy mayonnaise, a dollop of Dijon mustard, a splash of white vinegar, a pinch of salt and pepper, and a small, vibrant bunch of fresh dill or chives. The ingredients are neatly arranged on a pristine white marble or light wooden kitchen counter, bathed in soft, natural window light. The scene is uncluttered, inviting, and easy for a home cook to follow. NO artistic interpretations, NO illustrations, NO vector graphics, NO abstract art.

    You don’t need a long list of fancy ingredients to make perfect deviled eggs. In fact, the most delicious recipes use simple components you probably already have at home.

    At Recipesmondial, we’ll show you how to turn those everyday items into a flavorful, crowd-pleasing snack. Our guide makes crafting this classic deviled eggs recipe surprisingly easy.

    Essential Ingredients for Classic Deviled Eggs

    To create a batch of classic, creamy devilled eggs, you only need a few basic items. Here’s how these simple components come together for the perfect flavor.

    • Large Eggs (6-8): These are the star of your deviled eggs. Using slightly older eggs, about 7-10 days old, often makes them much easier to peel after boiling [2].
    • Mayonnaise (1/4 cup): This provides the creamy base for your yolk filling. Use your favorite brand for the best taste.
    • Dijon Mustard (1 teaspoon): Dijon adds a lovely tang and a hint of sophisticated flavor. If you prefer, classic yellow mustard also works wonderfully for a more traditional taste.
    • White Vinegar or Pickle Juice (1 teaspoon): A touch of acid brightens the filling. Pickle juice adds a unique, zesty twist.
    • Salt (1/4 teaspoon, or to taste): Seasoning is key to bringing out all the other flavors. Start with a little and add more if needed.
    • Black Pepper (1/8 teaspoon, or to taste): Freshly ground black pepper provides a subtle kick.
    • Smoked Paprika (for garnish): This vibrant spice adds color and a delicate smoky note, making it the perfect finishing touch for your deviled eggs.

    Tips for Ingredient Selection

    While the classic ingredients work well, a few smart choices can elevate your easy deviled eggs recipe. Use these tips to maximize flavor.

    • Egg Quality Matters: Start with high-quality eggs, as they form the foundation of your dish.
    • Mayonnaise Choice: Experiment with different mayonnaise brands—some are tangier, while others are sweeter. Finding your favorite is a simple way to customize beginner-friendly recipes.
    • Mustard Variety: Don’t be afraid to try other mustards, like spicy brown or honey mustard, for a fun variation. This simple swap shows how versatile flavorful meals made easy can be.
    • Fresh Herbs (Optional): For extra flair and freshness, add a sprinkle of fresh chives or dill as a garnish.

    With these basic ingredients, you’re ready to create delightful deviled eggs perfect for any occasion. This recipe shows how simple dinner recipes can also be adapted into amazing appetizers or healthy snacks!

    How to Make Deviled Eggs: A Step-by-Step Guide

    A close-up of hands piping creamy deviled egg yolk mixture into halved hard-boiled egg whites on a cutting board.
    100 percent photorealistic, professional food photography style, high-quality food magazine photo. A close-up, dynamic shot of a friendly, encouraging home cook’s hands (a real human cook) expertly piping the creamy, golden deviled egg filling back into the hollowed-out halves of the hard-boiled egg whites. The piping bag is held with a steady hand, creating a perfect swirl. The eggs are neatly arranged on a light-colored cutting board or serving tray, set within a bright, clean, and inviting home kitchen environment. Soft, overhead lighting emphasizes the texture and precision of the action, making the process look simple and achievable. NO artistic interpretations, NO illustrations, NO vector graphics, NO abstract art.

    Step 1: Boil the Eggs Perfectly

    The secret to delicious deviled eggs starts with a perfectly boiled egg. This crucial first step ensures they peel smoothly every time. Follow our simple, stress-free method and say goodbye to struggling with eggshells.

    Here’s how to get it right:

    1. Place Eggs in a Pot: Gently place your eggs in a single layer in a large pot.
    2. Cover with Water: Add enough cold water to cover the eggs by at least one inch.
    3. Bring to a Rolling Boil: Over high heat, bring the water to a full, rolling boil.
    4. Turn Off Heat & Cover: As soon as it boils, remove the pot from the heat and cover it tightly with a lid.
    5. Let Them Sit: Allow the eggs to sit in the hot water for 12-14 minutes. Do not skip this resting time.
    6. Prepare an Ice Bath: While the eggs rest, fill a large bowl with ice and cold water.
    7. Chill Immediately: Using a slotted spoon, carefully transfer the cooked eggs to the ice bath. Let them chill for at least 5 minutes to stop the cooking process and make them easier to peel [3].
    8. Peel with Ease: Once completely cool, gently crack and peel the eggs under cool running water.

    Pro Tip: Older eggs tend to peel more easily than very fresh ones. If you have very fresh eggs, steaming them can also help with peeling!

    Step 2: Prepare the Creamy Yolk Filling

    Next, it’s time to create the irresistible, creamy filling. You’ll be surprised how simple it is to achieve a perfectly smooth and flavorful mixture.

    1. Separate Yolks: Carefully slice each peeled egg in half lengthwise. Gently scoop the yolks into a medium-sized bowl and arrange the egg white halves on a serving platter.
    2. Mash the Yolks: Use a fork to mash the yolks until they are completely smooth and free of lumps.
    3. Add Creamy Ingredients: Add the mayonnaise, Dijon mustard, and a splash of white vinegar to the mashed yolks for a rich and tangy base.
    4. Season Well: Sprinkle in salt and black pepper to taste.
    5. Mix Until Smooth: Stir all the ingredients together with a fork or small whisk until the filling is perfectly smooth and creamy.

    Chef’s Secret for Creaminess: Don’t be shy with the mashing! The smoother your yolks are before adding other ingredients, the creamier your final filling will be. A touch of vinegar also brightens the flavor beautifully.

    Step 3: Fill the Egg Whites

    You’re almost done! Now for the fun part: filling the egg whites. With a few simple techniques, you can make your deviled eggs look professional and inviting.

    1. Choose Your Method: You have two main options for filling the egg whites:
      • Spoon Method (Easy & Quick): Use a small spoon to carefully scoop the yolk filling into each egg white half, creating a small mound.
      • Piping Bag Method (Elegant): For a more polished look, transfer the filling to a piping bag fitted with a star tip. Pipe an attractive swirl into each egg white half.
    2. Garnish (Optional but Recommended!): Lightly sprinkle the tops with a pinch of paprika. For an extra pop of color and flavor, add a tiny sprig of fresh parsley or dill.
    3. Arrange and Serve: Arrange your beautifully filled deviled eggs on your serving platter, and they are ready to be enjoyed!

    Quick Tip: If you don’t have a piping bag, you can snip off a corner of a sturdy Ziploc bag. This works wonderfully as a makeshift piping bag.

    Tips and Tricks for the Best Deviled Eggs Ever

    Want to take your deviled eggs from good to absolutely unforgettable? We’re sharing our favorite tips and tricks to help you master this classic appetizer. These simple techniques ensure every bite is creamy, flavorful, and perfect. Get ready to cook with confidence and impress everyone with your easy deviled eggs recipe!

    Achieving Perfectly Boiled Eggs

    The foundation of amazing deviled eggs starts with perfectly cooked, easy-to-peel eggs. Avoid dreaded green yolks and tricky shells with these simple steps.

    • Start Cold: Place your eggs in a saucepan and cover them with cold water by about an inch. This gradual heating helps prevent the shells from cracking.
    • Gentle Boil, Then Rest: Bring the water to a rolling boil over medium-high heat. Once it boils, immediately turn off the heat, cover the pot, and let the eggs sit for 12-14 minutes. This method cooks the eggs gently, resulting in creamy, evenly cooked yolks.
    • Ice Bath is Key: As soon as the eggs are done, transfer them to a bowl of ice water for at least 5 minutes. This step is crucial because it stops the cooking process and makes the shells much easier to peel.
    • Prevent Green Yolks: The green ring around the yolk is caused by a reaction between sulfur and iron, which happens when eggs are overcooked. Following the precise cooking time and using an ice bath will prevent this [4].

    Creamy, Dreamy Filling Every Time

    The secret to irresistible deviled eggs is a smooth, luscious filling. Follow these pointers for a filling that melts in your mouth.

    • Mash Thoroughly: Use a fork or a potato masher to break down the cooked yolks until they are completely smooth. For the creamiest possible texture, make sure there are no lumps.
    • Room Temperature Ingredients: Mayonnaise and mustard blend more easily when they aren’t cold. Using room temperature ingredients helps create a smoother, more cohesive filling.
    • Balance Flavors: Taste the filling as you mix it. Don’t be afraid to adjust the mustard, vinegar, and salt to your preference. A small splash of vinegar can significantly brighten the flavor.
    • Sieve for Silkiness (Optional): For a truly restaurant-quality filling, push the yolk mixture through a fine-mesh sieve with a spoon. This extra step removes any remaining small lumps, resulting in an exceptionally smooth and silky texture.

    Elevate Your Flavor

    While the classic recipe is wonderful, a few simple additions can take your deviled eggs to the next level. Get creative with these flavor boosters!

    • A Pinch of Heat: Add a dash of cayenne pepper, a tiny bit of hot sauce, or a sprinkle of smoked paprika for a subtle kick.
    • Herby Freshness: Finely chopped fresh chives, dill, or parsley can add a vibrant, fresh note and beautiful color.
    • Umami Boost: A tiny splash of Worcestershire sauce or a pinch of garlic powder can add a deeper, savory dimension.
    • Tangy Twist: A squeeze of fresh lemon juice brightens the overall flavor profile.

    Picture-Perfect Presentation

    Deviled eggs are as much about presentation as they are about taste. Make your deviled eggs visually appealing with these simple finishing touches.

    • Use a Piping Bag: For an elegant look, spoon the filling into a piping bag fitted with a star tip. This creates beautiful, uniform swirls. If you don’t have a piping bag, a ziptop bag with one corner snipped off works just as well.
    • Garnish Generously: A sprinkle of paprika is traditional and adds a pop of color. Also consider fresh herbs, a single caper, a small piece of cooked bacon, or even a tiny shrimp for a gourmet touch.
    • Clean Whites: Before filling, ensure the egg white halves are clean and dry. Gently wipe away any stray yolk to create a neat appearance.

    Prep Ahead for Stress-Free Serving

    Deviled eggs are a fantastic party appetizer because much of the work can be done in advance. Prepping the components separately helps you avoid stress on the day of your event.

    • Separate Components: You can boil and peel the eggs up to two days ahead of time. To maintain freshness, store the egg whites and the mashed yolk filling in separate airtight containers in the refrigerator.
    • Fill Just Before Serving: For the best texture and appearance, fill the egg whites no more than 2-4 hours before you plan to serve them. This prevents the whites from drying out and keeps the filling fresh.
    • Transport Safely: If you’re bringing deviled eggs to a gathering, use a deviled egg platter with indentations to keep them from sliding. Alternatively, place them in a single layer in a container lined with a paper towel.

    Fun Variations on the Classic Recipe

    Once you’ve mastered our classic deviled eggs recipe, it’s time for a kitchen adventure! These fun variations are simple to make and let you explore new flavors with minimal effort. You can easily adapt your trusted recipe to suit any craving or occasion. Get ready to impress your family and friends with these creative twists!

    Southern-Style Deviled Eggs

    Embrace the comfort and flavor of the South with this beloved twist. Often featuring a hint of sweetness and a tangy crunch, Southern-style deviled eggs are a staple at potlucks and family gatherings. These simple additions are an easy way to elevate your appetizer game.

    • Sweet Pickle Relish: Add 1-2 tablespoons of sweet pickle relish to your yolk mixture for a lovely sweetness and texture.
    • Dijon Mustard: Swap some of the classic yellow mustard for 1 teaspoon of Dijon, which offers a sharper, more complex flavor.
    • Apple Cider Vinegar: A tiny splash (about 1/2 teaspoon) can brighten up the entire filling.
    • Garnish: Sprinkle with a generous amount of smoked paprika. For an authentic touch, add a tiny sliver of candied jalapeño.

    With just a few simple changes, you’ll have a deviled egg that tastes wonderfully homemade and is a true crowd-pleaser at any gathering.

    Spicy Deviled Eggs

    If you love a little kick, these spicy deviled eggs are for you. Adding heat is simple and completely customizable, allowing you to make them as fiery or as mild as you like. This variation is a perfect, beginner-friendly way for spice lovers to add a punch to a classic appetizer.

    • Hot Sauce: Mix 1-2 teaspoons of your favorite hot sauce into the yolk filling. Start with a small amount and taste as you go.
    • Jalapeño: Finely mince 1-2 teaspoons of fresh or pickled jalapeño and fold it into the yolk mixture. Remember to remove the seeds for less heat.
    • Cayenne Pepper: Add 1/4 to 1/2 teaspoon of cayenne pepper for an even distribution of heat.
    • Garnish: Top with a sprinkle of red pepper flakes or a thin slice of fresh jalapeño.

    This spicy twist is a quick and reliable way to add excitement to your deviled eggs, helping you serve a memorable appetizer with confidence.

    Million Dollar Deviled Eggs

    Feeling a bit fancy? “Million Dollar” deviled eggs use luxurious ingredients to turn a simple snack into a gourmet treat. This variation is all about rich flavors and textures, and it’s surprisingly easy to make this impressive appetizer.

    • Crispy Bacon: Cook 2-3 slices of bacon until crispy. Crumble it finely, mixing most of it into the yolk filling while saving some for garnish.
    • Cream Cheese or Sour Cream: Add 1-2 tablespoons of softened cream cheese or sour cream to the yolk mixture. This makes the filling extra creamy and rich.
    • Fresh Chives: Finely chop 1 tablespoon of fresh chives and stir them into the filling for a mild oniony flavor.
    • Garnish: Top each deviled egg with a sprinkle of the reserved bacon crumbles and a few extra chives for an elegant look.

    Truly indulgent, these deviled eggs prove that simple ingredients can create a delicious and visually appealing appetizer. You’ll feel like a pro chef without the stress!

    How to Store Leftover Deviled Eggs Safely

    So, you’ve mastered our classic deviled eggs recipe. What’s the best way to keep those delicious leftovers safe and fresh? Storing deviled eggs correctly is crucial for both taste and food safety.

    At Recipesmondial, we want your cooking to be enjoyable and stress-free, from prep to storage. Follow these simple steps to store your deviled eggs with confidence.

    The Golden Rule: Keep Them Cold

    Because they contain mayonnaise and eggs, deviled eggs are highly perishable and require constant refrigeration. If left at room temperature for too long, harmful bacteria can grow quickly. Always follow the two-hour rule: never leave deviled eggs out for more than two hours [source: USDA FSIS], especially on a warm day.

    Best Way to Store Assembled Deviled Eggs

    Once your deviled eggs are assembled, follow these guidelines:

    • Use an Airtight Container: This is your best defense against spoilage and dryness. A shallow, airtight container prevents air from drying out the filling and egg whites.
    • Arrange in a Single Layer: Place the deviled eggs neatly in one layer. Stacking them can crush the delicate filling and toppings.
    • Seal Out Strong Odors: Eggs easily absorb smells from other foods in the refrigerator. Make sure your container is sealed tightly to prevent this.
    • Refrigerate Promptly: Don’t wait. Transfer the deviled eggs to the fridge as soon as you’re done serving. The sooner they are chilled, the safer they’ll be.

    Storing Unassembled Components (Meal Prep Tip!)

    Want to get a head start? Preparing the components of your deviled eggs separately is a fantastic meal prep trick that also extends their freshness.

    • Store Egg Whites: Place the hollowed-out egg white halves in an airtight container lined with a damp paper towel to keep them from drying out.
    • Store Yolk Filling: Keep the yolk mixture in a separate airtight container or a sealed piping bag. Using a piping bag makes assembly quick and clean later on.
    • Keep Separated and Chilled: Store both containers in the refrigerator. For the freshest taste and best texture, assemble the deviled eggs just before you plan to serve them.

    How Long Do Deviled Eggs Last?

    Even when stored properly, deviled eggs don’t last long. For the best quality, enjoy them within 1 to 2 days [source: FoodSafety.gov]. After that, the egg whites may become rubbery and the filling can lose its flavor.

    • Assembled Deviled Eggs: 1 to 2 days in the refrigerator.
    • Separated Components: The boiled egg whites and yolk filling can last up to 2-3 days when stored separately.

    Signs Your Deviled Eggs Have Gone Bad

    When it comes to food safety, trust your senses. You should discard your deviled eggs immediately if you notice any of these signs:

    • Off Smell: A sour, sulfurous, or otherwise unpleasant odor is a clear sign of spoilage.
    • Slimy Texture: The egg whites should be firm, not slimy or sticky.
    • Discoloration: Look for any changes in color on the whites or the filling that weren’t there before.
    • Mold: Any visible mold means the eggs are unsafe to eat and must be thrown away.

    With these tips, you can enjoy your homemade deviled eggs with confidence. At Recipesmondial, we provide easy recipes and practical advice to help you create delicious and safe family-friendly meals every day.

    Frequently Asked Questions About Deviled Eggs

    What is the secret to making good deviled eggs?

    The secret to truly delicious deviled eggs isn’t complicated; it’s all about focusing on a few key elements. These simple steps will help you create the perfect appetizer.

    • Perfectly Cooked Eggs: Start with perfectly boiled eggs that are easy to peel. This foundational step ensures smooth whites and vibrant, creamy yolks.
    • Quality Ingredients: Use fresh, high-quality mayonnaise and fresh herbs like chives or dill. These simple ingredients make a big difference in flavor.
    • Balanced Seasoning: Aim for a balance of tangy, savory, and a hint of spice. Mustard, vinegar or pickle juice, salt, and pepper are essential, while a dash of paprika adds color and mild flavor.
    • Creamy Texture: For a lump-free filling, mash the yolks until they are very fine. We cover this technique in more detail below.
    • Gentle Handling: Be careful when peeling the eggs and mixing the filling to keep the egg whites intact and looking their best.

    By focusing on these fundamentals, you’ll make delicious deviled eggs every time and enjoy the process!

    How do you make the filling so creamy?

    Achieving an irresistibly smooth deviled egg filling is simpler than you might think. Here’s how to get it perfectly creamy:

    • Finely Mash Yolks: First, mash the cooked egg yolks with a fork until they are completely smooth. For an extra-velvety texture, press the yolks through a fine-mesh sieve.
    • Choose Your Mayo Wisely: Full-fat mayonnaise yields the richest, creamiest result. While plain Greek yogurt can be a lighter substitute, it may alter the taste slightly.
    • Add a Touch of Tang: A splash of pickle juice, white vinegar, or apple cider vinegar not only brightens the flavor but also helps create a smoother consistency.
    • Include Mustard: Dijon or classic yellow mustard adds a tangy flavor and contributes to the filling’s silky texture.
    • Mix Thoroughly: Combine all your ingredients and mix well until no lumps remain. This ensures every component is fully incorporated for the best flavor and texture.

    Follow these tips, and you’ll love how easy it is to achieve a luxuriously smooth filling!

    Can you make deviled eggs the day before a party?

    Absolutely! Deviled eggs are a fantastic make-ahead appetizer. To ensure they stay fresh and look their best, it’s best to prepare the components separately.

    Here’s the best method for stress-free prep:

    1. Separate Components: Prepare the egg white halves and the yolk filling, but keep them separate for now.
    2. Store Properly: Place the egg whites in an airtight container. Keep the filling in a separate airtight container or a zip-top bag. Refrigerate both immediately.
    3. Cover the Filling: To prevent a dry crust from forming on the filling, press a piece of plastic wrap directly onto its surface before sealing the container.
    4. Assemble Just Before Serving: When you’re ready to serve, or up to an hour beforehand, pipe or spoon the filling into the egg whites. Garnish right before they go on the table to keep them looking fresh.

    This make-ahead method removes the last-minute rush, making your party planning much more enjoyable.

    What does ‘deviled’ mean in deviled eggs?

    The term ‘deviled’ is a culinary one that refers to food prepared with spicy or zesty seasonings. Despite the name, it has no religious connotation.

    The term first appeared in print in the late 18th century [5] to describe dishes with bold, piquant flavors. Common “deviling” ingredients include:

    • Mustard
    • Cayenne pepper
    • Red pepper flakes
    • Hot sauce
    • Paprika

    In deviled eggs, these ingredients add a delightful kick that elevates the classic recipe. So, when you see ‘deviled’ on a menu, simply think ‘spicy and flavorful.’


    Sources

    1. https://www.instacart.com/company/grocery-trends/thanksgiving-trends-2023/
    2. https://food.unl.edu/article/how-peel-hard-boiled-eggs
    3. https://www.nal.usda.gov/blogs/ask-experts/how-cook-hard-boiled-eggs
    4. https://food.unl.edu/food-safety-qa-eggs
    5. https://www.merriam-webster.com/word/deviled
  • How to Make Perfect Overnight Oats: The Easiest Recipe for Beginners

    How to Make Perfect Overnight Oats: The Easiest Recipe for Beginners

    Overnight oats are a no-cook breakfast made by soaking rolled oats in a liquid, typically milk, yogurt, or water, overnight in the refrigerator. The basic formula is a 1:1 ratio of oats to liquid, plus any desired mix-ins like chia seeds, sweeteners, or fruit. This process softens the oats, creating a creamy, pudding-like texture for a ready-to-eat meal in the morning.

    Are your mornings a whirlwind of activity? Do you struggle to find time for a nutritious, satisfying breakfast? It can be overwhelming to plan family-friendly meals that are both healthy and quick, especially when you lack the confidence to try new recipes. But what if there was a delicious, effortless solution to transform your busy mornings into a calm, flavorful start?

    Enter overnight oats. This simple, versatile dish is the ultimate quick breakfast for anyone seeking easy recipes and a stress-free start to their day. Our beginner-friendly recipe is designed to make cooking enjoyable. We’ll guide you with clear, step-by-step instructions to create a wholesome meal that practically makes itself while you sleep. Whether you need healthy snacks or more quick breakfast ideas, this is a fantastic way to build your kitchen confidence without the stress.

    Get ready to say goodbye to rushed mornings and hello to a delicious, ready-to-eat breakfast. In this guide, you will discover the magic of overnight oats, from the basic formula to exciting variations and practical meal prep tips. Let’s explore why this is the perfect quick breakfast, whether you’re a complete beginner or just looking for new inspiration.

    Why Are Overnight Oats the Perfect Quick Breakfast?

    Are your mornings a whirlwind? Do you struggle to find time for a nutritious meal before heading out the door? If so, overnight oats are the secret weapon you need for quick breakfast ideas.

    Because busy lives demand simple solutions, this easy recipe is designed to transform your morning routine. Overnight oats offer a perfect blend of convenience, nutrition, and flavor, making them the ideal solution for a stress-free start to your day.

    Let’s explore why this beginner-friendly recipe is a game-changer for home cooks everywhere:

    • Ultimate Time-Saver: The biggest advantage of overnight oats is their convenience. Simply prepare them the night before, which means zero cooking is required in the morning. Just grab your jar from the fridge and enjoy! It’s an ideal meal prep tip for hectic schedules.
    • Effortless Preparation: Forget complex cooking steps or intimidating kitchen gadgets. Making overnight oats involves just a few simple stirs. No heat is required, making this a fantastic option for anyone who feels overwhelmed by complex recipes.
    • Endless Customization: Overnight oats are incredibly versatile. You can tailor them to your exact taste preferences and dietary needs. Add your favorite fruits, nuts, seeds, spices, or sweeteners—every day can bring a new flavor adventure!
    • Packed with Nutrition: Oats are a whole grain rich in fiber, which helps you feel full and satisfied. By supporting stable energy levels throughout your morning, overnight oats are a healthy and delicious way to fuel your body [source: https://www.hsph.harvard.edu/nutritionsource/food-features/oats/].
    • Budget-Friendly: Because they’re made with inexpensive pantry staples like rolled oats and milk, this breakfast is very economical. You’ll save money compared to buying breakfast on the go.
    • Family-Friendly Favorite: Kids love the creamy texture and sweet toppings, making overnight oats an easy way to add healthy grains to their diet. You can even involve them in choosing mix-ins, turning it into a family-friendly meal.

    With overnight oats, you can trade mealtime stress for an enjoyable, organized morning. Start your day confidently, knowing a delicious meal is ready and waiting. Recipesmondial is here to help you discover how simple ingredients can lead to fantastic flavors with approachable home cooking.

    What is the basic formula for overnight oats?

    Core Ingredients You’ll Need

    Crafting delicious overnight oats is wonderfully simple, requiring only a few basic pantry staples. These ingredients come together to create a wholesome and satisfying breakfast that’s perfect for busy mornings and friendly for beginners.

    • Rolled Oats (Old-Fashioned Oats): These are the foundation of your recipe. Rolled oats soak up liquid beautifully, creating the perfect chewy texture. Avoid using instant or quick oats, as they can become mushy, and steel-cut oats won’t soften enough with this method.
    • Milk (or Dairy-Free Alternative): The liquid is what softens and transforms the oats. Cow’s milk, almond milk, soy milk, oat milk, or your favorite dairy-free alternative will all work wonderfully to create a creamy base.
    • Chia Seeds: While optional, these tiny powerhouses are highly recommended. They absorb liquid to create a thicker, pudding-like consistency and also add healthy fats and fiber, making your breakfast even more satisfying.
    • Sweetener (Optional): A touch of sweetness enhances the flavor. Maple syrup, honey, agave nectar, or a mashed banana are all great choices. Feel free to adjust the amount to your personal taste.
    • Flavor Boosters (Optional Mix-ins): This is where you can get creative. A pinch of cinnamon, a splash of vanilla extract, or a spoonful of cocoa powder can add wonderful depth of flavor and make your breakfast feel extra special.

    With these core ingredients on hand, you’re ready to create a delicious and convenient breakfast. This simple method saves time on busy mornings and will have you prepping with confidence.

    The Perfect Liquid-to-Oat Ratio

    Getting the right balance of oats to liquid is the key to achieving the perfect consistency—creamy, but not too watery or thick. Following a simple ratio guarantees reliable results every time, removing any guesswork.

    The standard starting point is a simple 1-to-1 ratio, meaning one part oats to one part liquid. If you add chia seeds to make your oats thicker and more nutritious, you will need to increase the amount of liquid.

    Here is a basic formula for a single serving:

    • 1/2 cup Rolled Oats
    • 1/2 cup Milk (or Dairy-Free Alternative)
    • 1 tablespoon Chia Seeds (This is optional, but highly recommended for creaminess and nutrition.)

    When using the optional chia seeds from the recipe above, you may want to increase the liquid to 3/4 cup to achieve that ideal creamy texture. Don’t be afraid to experiment to find what you like best!

    Remember, this is a flexible formula. If you prefer thicker oats, use slightly less liquid. If you like them thinner, add a bit more. Adjusting the ratio to your liking is part of the fun!

    How do you make overnight oats?

    A glass jar of overnight oats topped with fresh strawberries, blueberries, and almonds on a wooden table, with ingredients in the background.
    A photorealistic, professional food photography style image of a clear glass jar filled with classic overnight oats, topped with fresh berries (strawberries, blueberries) and a sprinkle of chopped almonds. The oats are perfectly creamy and inviting. The jar is placed on a light wooden surface, with a soft, warm light coming from the side. In the background, slightly out of focus, are a small bowl of rolled oats, a carton of milk, and a measuring spoon, suggesting the simple ingredients. High-quality food magazine photo, focus on freshness and appealing texture. No people. No artistic interpretations, no illustrations, no vector graphics, no abstract art.

    Step 1: Choose Your Jar and Add Oats

    Overnight oats are one of the easiest make-ahead breakfasts. To start, you’ll need the right container. We recommend a glass jar with a lid, as it lets you see the delicious layers. Mason jars, old jam jars, or even small food storage containers work perfectly.

    Next, add your oats. We suggest using rolled oats (also known as old-fashioned oats) for the best texture. Instant oats can become too mushy, while steel-cut oats won’t soften enough overnight. For a single serving, you will need:

    • ½ cup (45g) rolled oats

    This simple step is the foundation for your breakfast.

    Step 2: Pour in Your Liquid and Add Mix-ins

    Now it’s time to add your liquid, which is the key to creamy results. You can use any milk you prefer—dairy, almond, soy, and oat milk are all great choices. Using the right liquid-to-oat ratio ensures a creamy, not watery, consistency.

    Next, add your mix-ins for flavor and nutrients. Here’s a basic recipe:

    • ¾ cup (180ml) milk (or non-dairy alternative)
    • 1-2 teaspoons sweetener (like maple syrup, honey, or stevia)
    • 1 tablespoon chia seeds (these help thicken the oats and add healthy omega-3s [1])
    • Optional: ½ teaspoon vanilla extract for extra flavor
    • Optional: ¼ teaspoon cinnamon for warmth

    Don’t feel overwhelmed by the choices. Start with these basics, and you’ll see how easy it is to customize your meal.

    Step 3: Stir, Seal, and Refrigerate

    Give everything a good stir in the jar, making sure the oats and mix-ins are fully combined with the liquid. This prevents dry patches and helps the oats soften evenly. A fork or a small spoon works well for this.

    Once stirred:

    • Place the lid tightly on your jar. An airtight seal keeps your oats fresh and prevents them from absorbing other odors from the fridge.
    • Refrigerate for at least 4 hours. For the best texture, leave the jar in the fridge overnight (which is how they get their name!).

    That’s it! You’ve just prepared a delicious breakfast for a stress-free morning.

    Step 4: Add Toppings and Serve

    In the morning, your breakfast is ready to go—no cooking required. Just grab the jar from the fridge. Now for the fun part: toppings. This is where you can get creative and add more flavor, texture, and nutrition.

    Some of our favorite topping ideas include:

    • Fresh berries: blueberries, raspberries, sliced strawberries
    • Sliced banana or other fruits: apples, peaches
    • Nuts: almonds, walnuts, pecans
    • Seeds: flax seeds, pumpkin seeds, sunflower seeds
    • Nut butters: almond butter, peanut butter
    • A sprinkle of granola for crunch
    • A drizzle of honey or maple syrup for extra sweetness

    Enjoy your oats cold, straight from the fridge, or warm them in the microwave for 30-60 seconds if you prefer. Enjoy your delicious, homemade breakfast!

    What are the best recipe variations?

    Three clear glass jars of overnight oats in different flavors: chocolate peanut butter, tropical, and apple cinnamon, topped with various garnishes.
    A high-quality food magazine photo, professional food photography style, showcasing three distinct variations of overnight oats beautifully arranged on a light-colored kitchen counter. The first clear glass jar features chocolate peanut butter overnight oats, topped with a drizzle of melted chocolate and chopped peanuts. The second clear glass jar contains tropical overnight oats, garnished with sliced mango, shredded coconut, and a lime wedge. The third clear glass jar displays apple cinnamon overnight oats, topped with thinly sliced apples and a sprinkle of cinnamon. All jars are clear glass, displaying layers. The lighting is bright and natural, creating a warm and inviting atmosphere. Photorealistic. No people. No artistic interpretations, no illustrations, no vector graphics, no abstract art.

    High-Protein Overnight Oats

    Do you often feel hungry before lunch? If so, this high-protein version is your perfect answer. It helps you stay full and energized all morning, making it an excellent choice for a hearty and quick breakfast. Protein also supports muscle growth and recovery [2]. It’s a fantastic way to boost your morning meal.

    This recipe is incredibly simple, even for beginners. You just add a few key ingredients to our basic overnight oats base.

    Key Ingredients for High-Protein Oats:

    • Rolled Oats: Your base for fiber and slow-release energy.
    • Milk or Plant-Based Milk: Almond, soy, or dairy milk all work wonderfully.
    • Protein Powder: Use vanilla or unflavored whey, casein, or a plant-based option.
    • Chia Seeds: These add omega-3s, fiber, and even more protein.
    • Greek Yogurt (Optional): For an extra creamy texture and a protein boost.

    How to Make Them:

    1. In a jar, combine ½ cup rolled oats and 1 tablespoon chia seeds.
    2. Add 1 scoop of your favorite protein powder.
    3. Pour in ¾ cup milk or plant-based milk.
    4. If using, add ¼ cup plain Greek yogurt for extra creaminess.
    5. Stir thoroughly until the protein powder dissolves completely.
    6. Cover your jar and refrigerate overnight, or for at least 4 hours.
    7. In the morning, top with fresh berries, sliced almonds, or a drizzle of nut butter.

    Recipesmondial Tip: Always choose a protein powder flavor you enjoy. This ensures your breakfast is both nutritious and delicious, solving the struggle to find healthy, tasty meals on busy mornings.

    Overnight Oats with Yogurt

    Adding yogurt to overnight oats transforms them into an incredibly creamy and satisfying treat. This variation offers a delightful texture and a boost of probiotics, which are great for gut health. It also adds a tangy freshness that perfectly complements fruit toppings, resulting in a flavorful, easy-to-make breakfast.

    Why Add Yogurt?

    • Creamier Texture: Yogurt makes your oats rich and luxurious.
    • Probiotic Benefits: Supports a healthy digestive system.
    • Extra Protein: Greek yogurt, in particular, increases the protein content.
    • Tangy Flavor: Adds a lovely counterpoint to sweet fruits.

    Core Ingredients for Yogurt Overnight Oats:

    • Rolled Oats: The foundation of your breakfast.
    • Milk or Plant-Based Milk: Choose your favorite type.
    • Plain or Vanilla Yogurt: Greek yogurt is recommended for its thickness and protein.
    • Sweetener (Optional): A touch of maple syrup or honey works well.

    Making Your Creamy Creation:

    1. In a jar, combine ½ cup rolled oats and ⅓ cup plain or vanilla yogurt.
    2. Add ½ cup milk or plant-based milk.
    3. Stir in 1 tablespoon of your preferred sweetener, if using.
    4. Mix all ingredients thoroughly until well combined.
    5. Cover the jar and refrigerate for at least 4 hours, or overnight.
    6. Serve with toppings like sliced bananas, toasted coconut, or a sprinkle of cinnamon.

    Recipesmondial Tip: For a fruit-flavored version, use a fruit-on-the-bottom yogurt or stir in a spoonful of fruit jam before chilling. It’s a simple way to customize your breakfast with minimal effort.

    Overnight Oats for Weight Loss

    If you’re looking for a healthy, satisfying meal to support your weight loss goals, this overnight oats variation is ideal. It focuses on nutrient-dense ingredients that keep you feeling full without excess calories. Perfect for breakfast (or even a light dinner!), this recipe supports healthy habits without the stress of complex meal prep.

    Key Principles for Weight Loss Oats:

    • High Fiber: Promotes fullness and aids digestion.
    • Lean Protein: Helps maintain muscle mass and keeps you satisfied.
    • Low in Added Sugars: Relies on the natural sweetness from fruit.
    • Portion Control: Mindful serving sizes are essential.

    Ingredients for a Lighter Start:

    • Rolled Oats: Provides sustained energy.
    • Unsweetened Almond Milk: Low in calories and adds creaminess.
    • Chia Seeds: An excellent source of fiber and omega-3s.
    • Fresh Berries: Naturally sweet and packed with antioxidants.
    • A Touch of Sweetener (Optional): Such as stevia or a tiny bit of maple syrup.

    Your Simple Weight Loss Recipe:

    1. In a jar, combine ½ cup rolled oats and 1 tablespoon chia seeds.
    2. Pour in ¾ cup unsweetened almond milk.
    3. Add a pinch of cinnamon for flavor, if desired.
    4. Stir well to combine all ingredients.
    5. Cover and refrigerate overnight.
    6. In the morning, top with ¼ cup fresh berries, like blueberries or raspberries.

    Recipesmondial Tip: Avoid high-calorie add-ins like excessive nuts, chocolate chips, or sugary syrups. Instead, focus on fresh fruits and a sprinkle of spices for flavor. This approach keeps your meal prep simple and aligned with your health goals.

    Simple Overnight Oats for Kids

    Getting kids to eat a healthy breakfast can be a challenge. Simple overnight oats make mornings easy and fun for the whole family! This recipe is designed to appeal to kids with its mild flavor and fun, customizable toppings. It’s a perfect family-friendly solution for busy mornings.

    Making Oats Kid-Friendly:

    • Mild Flavors: Not too strong or spicy.
    • Light Sweetness: Just enough to be tasty, not overly sugary.
    • Fun Toppings: Letting kids choose makes breakfast exciting.
    • Safe Ingredients: Avoid common allergens or choking hazards for very young children.

    Kid-Approved Ingredients:

    • Rolled Oats: The wholesome base.
    • Whole Milk or Vanilla Plant Milk: For a slightly sweeter, richer taste.
    • A Hint of Sweetener: Maple syrup or honey.
    • Fun Toppings: Sprinkles, mini chocolate chips, sliced fruit, or even animal crackers.

    The Easiest Recipe for Little Ones:

    1. In a small jar or container, combine ½ cup rolled oats.
    2. Add ¾ cup whole milk or vanilla plant milk.
    3. Stir in 1 teaspoon maple syrup or honey.
    4. Mix well until everything is combined.
    5. Cover and refrigerate overnight.
    6. In the morning, let your child pick their favorite fun toppings! Ideas include:
      • Sliced strawberries or bananas
      • A few mini chocolate chips
      • A sprinkle of colored sprinkles (in moderation!)
      • A spoonful of applesauce

    Recipesmondial Tip: Involve your kids in choosing their toppings! This helps them feel excited about their healthy breakfast. This simple recipe makes breakfast a fun and stress-free activity for the whole family.

    Tips for Meal Prepping and Storing Overnight Oats

    Four clear glass jars of prepped overnight oats lined up on a kitchen counter, with a person's hands placing a lid on one jar.
    A photorealistic, professional food photography image depicting a set of four identical clear glass jars, neatly lined up on a clean, light-colored kitchen counter. Each jar is filled with classic overnight oats, prepped and ready for storage, with lids placed loosely or on the side. A real human’s hands are gently placing a lid on one of the jars in the foreground, demonstrating meal prep. The kitchen background is bright, warm, and tidy, with soft focus on a fruit bowl or a plant. The scene emphasizes organization, simplicity, and ease of meal prepping. High-quality food magazine photo. No artistic interpretations, no illustrations, no vector graphics, no abstract art.

    Meal prepping overnight oats is a true game-changer, offering a fantastic solution for busy mornings. This approach allows you to enjoy a delicious and quick breakfast idea without any fuss. It not only saves valuable time but also ensures you start your day feeling well-nourished. With a little planning, you can have a week’s worth of easy, flavorful meals made easy. Let’s dive into the best tips for preparing and storing your overnight oats recipe.

    Choosing the Right Containers for Storage

    Selecting the proper container is crucial for keeping overnight oats fresh and tasty. An airtight seal is key, as it keeps your oats from drying out and prevents them from absorbing unwanted fridge odors.

    • Glass Jars: Mason jars (8oz or 12oz are ideal) are a perfect choice. They are durable, visually appealing, reusable, and eco-friendly. Plus, you can easily see your delicious creation inside.
    • Food Prep Containers: Any container with a tight-fitting lid will work. For convenience, look for portion-sized, BPA-free plastic or glass options.
    • Airtight is Best: Always use containers that seal tightly to stop air from getting in. This simple step preserves the texture and flavor of your oats for much longer.

    How Long Do Overnight Oats Last?

    One of the best features of overnight oats is their impressive shelf life. Because you can prepare them well ahead of time, they are ideal for meal prep tips.

    • General Rule: Prepared overnight oats typically last for 3 to 5 days in the refrigerator, though this can depend on the freshness of your ingredients. [3]
    • Ingredient Impact: If you use very ripe fruit, the oats might spoil sooner. For best results, always use fresh milk or milk alternatives.
    • Smell and Sight: Trust your senses. If the oats smell off or look discolored, it’s best to discard them.
    • Freezing: While possible, freezing overnight oats is generally not recommended. The texture can become mushy upon thawing, so it’s better to enjoy them fresh from the fridge.

    Batch Prepping for Effortless Mornings

    Batch prepping overnight oats is a smart move that transforms stressful mornings into enjoyable, organized starts to your day. You’ll thank yourself later!

    • Assembly Line Method: Line up your containers and add the oats to each one. Then, pour in your liquid and add core mix-ins like chia seeds or protein powder. Stir, seal, and refrigerate.
    • Vary Your Flavors: To keep your breakfasts exciting, avoid making the same flavor for every day. Instead, consider different additions for each jar, such as berry, banana-nut, or apple-cinnamon.
    • Label and Date: Use a small label or a marker on your containers to note the date you prepared them. This will help you keep track of freshness.

    When to Add Your Toppings

    Toppings add fantastic flavor, texture, and nutrition to your easy recipes. However, adding them at the right moment is crucial for ensuring the best results.

    • Add Just Before Serving:
      • Fresh Fruit: Items like berries, sliced bananas, diced apples, or mango can get mushy or discolored if added too early.
      • Crunchy Toppings: Granola, nuts, seeds, and shredded coconut will lose their crispness if left to soak overnight.
      • Drizzles: Honey, maple syrup, nut butter, or chocolate sauce are best added last for a fresh finish.
    • Add During Prep (Optional):
      • Spices: Cinnamon, nutmeg, or pumpkin pie spice will meld well with the other ingredients overnight.
      • Protein Powder: This should be mixed in with the oats and liquid so it can dissolve properly and help thicken the mixture.
      • Dried Fruit: Raisins, cranberries, or chopped dates can be added at night, which allows them to soften and plump up.

    Common Mistakes to Avoid

    Even with a recipe as simple as overnight oats, a few common errors can occur. Being aware of them will help you make perfect oats every time.

    • Not Using an Airtight Container: This is a big one. An open container allows air to get in, which can lead to dry oats or the absorption of unwanted fridge flavors.
    • Adding All Toppings Too Early: We discussed this, but it’s worth repeating. Soggy granola or discolored fruit can ruin the experience. Keep those crunchy and fresh items separate until morning.
    • Incorrect Liquid-to-Oat Ratio: Too much liquid makes the oats soupy, while too little makes them thick and dry. For best results, stick to the recommended ratio in the main recipe.
    • Forgetting the Chill Time: Overnight oats need adequate time to thicken and soften. Rushing this step will result in a watery breakfast. Give them at least 4 hours, but ideally a full night, to set.

    Following these simple meal prep tips will help you master the art of making overnight oats. You’ll be able to plan your weekly breakfasts efficiently, ensuring you always have a delicious meal ready to go. Enjoy cooking and eating well with Recipesmondial!

    Frequently Asked Questions About Overnight Oats

    Is overnight oats actually healthy?

    Yes, overnight oats are a healthy choice for a quick breakfast or snack. This simple dish is full of nutritional benefits.

    First, oats are packed with soluble fiber, which helps lower cholesterol and supports digestive health. This fiber also keeps you feeling full for longer, making you less likely to snack before your next meal [source: https://www.hsph.harvard.edu/nutritionsource/food-features/oats/].

    In addition, oats provide complex carbohydrates for sustained energy throughout your morning, helping you avoid a mid-morning slump. They also contain important vitamins and minerals, including manganese, phosphorus, magnesium, and B vitamins.

    The overall healthiness of your overnight oats depends on what you add. With the right mix-ins, you can easily create a nutrient-dense meal:

    • Fresh or frozen fruit for vitamins and natural sweetness.
    • Nuts or seeds for healthy fats and extra protein.
    • A scoop of protein powder for high-protein overnight oats.
    • A dollop of Greek yogurt for added probiotics and creaminess.

    However, be mindful of added sugars from toppings or sweetened milks, as these can increase the calorie count. By making smart choices, overnight oats can be a cornerstone of a healthy, balanced diet.

    What if I eat overnight oats every day?

    Eating overnight oats every day can be a great habit for a healthy lifestyle, especially if you need quick breakfast ideas. You’ll consistently get a good dose of fiber, vitamins, and minerals, which can improve digestion and provide steady energy levels.

    However, variety is key to a healthy diet. To ensure you get a full range of nutrients, switch up your mix-ins. For example, try different fruits each day—use berries one day and sliced bananas or diced apples the next. This introduces a wider range of vitamins and antioxidants.

    Furthermore, alternate your protein and healthy fat sources, such as switching between chia seeds, flax seeds, and almonds. You can also experiment with different types of milk. This strategy prevents dietary boredom and ensures a broader nutrient intake, keeping your daily overnight oats both beneficial and flavorful.

    What not to add to overnight oats?

    While overnight oats are versatile, some additions can detract from their health benefits or ruin the texture. To keep your breakfast delicious and wholesome, here are a few ingredients to avoid or limit:

    • Excessive Added Sugar: While many recipes call for maple syrup or honey, use them sparingly. Too much added sugar can turn a healthy breakfast into a dessert. Instead, opt for the natural sweetness from fruit.
    • Sugary Cereals or Candies: These toppings may add a sweet crunch, but they also add empty calories and refined sugars with little nutritional value.
    • Large Chunks of Hard Fruit: Hard fruits like whole grapes or large apple pieces might not soften enough overnight, leading to an unpleasant texture. For best results, always chop them into small, bite-sized pieces.
    • Too Many High-Calorie Toppings: Although nuts, seeds, and nut butters are healthy, they are also calorie-dense. Be sure to measure your portions, as too much can significantly increase the overall calorie count.
    • Carbonated Liquids: Never use soda or sparkling water, as they will create an unappetizing texture. Stick with milk, water, or plant-based milk alternatives.

    By focusing on simple, fresh ingredients, you can enhance both the flavor and nutritional value of your meal.

    Can I make overnight oats with water instead of milk?

    Yes, you can absolutely make overnight oats with water instead of milk. This is a great option if you are avoiding dairy, want a lighter breakfast, or are looking for a budget-friendly choice.

    Keep in mind that using water will affect the taste and texture. Milk and plant-based milks create a creamier, richer consistency and add more flavor and protein. Oats made with water will have a plainer, less creamy base.

    To enhance the flavor and texture when using water, consider these tips:

    • Add More Fruit: Berries, bananas, or mango naturally sweeten and add creaminess.
    • Include Seeds: Chia seeds or ground flax seeds thicken the mixture while providing healthy fats and fiber.
    • Sweeten Naturally: A touch of maple syrup, honey, or a mashed date can add sweetness.
    • Boost Flavor: A pinch of cinnamon, vanilla extract, or a swirl of nut butter can transform the taste.
    • Add Yogurt: For extra creaminess and protein, stir in a spoonful of yogurt just before serving.

    Using water is a practical and beginner-friendly choice that allows for easy customization. With a few simple additions, you can still enjoy delicious and healthy overnight oats.


    Sources

    1. https://www.hsph.harvard.edu/nutritionsource/food-features/chia-seeds/
    2. https://www.ncbi.nlm.nih.gov/pmc/articles/PMC8308892/
    3. https://food.unl.edu/food-preparation-and-storage

  • How to Make The Best Carne Asada: An Easy Recipe for Beginners

    How to Make The Best Carne Asada: An Easy Recipe for Beginners

    Carne asada, which translates to ‘grilled meat,’ is a popular Mexican dish made from marinated and grilled steak, typically skirt or flank steak. The key to delicious carne asada is a flavorful marinade, usually featuring citrus juices, garlic, cilantro, and spices, which tenderizes the meat before it’s seared over high heat for a juicy, savory result.

    Dreaming of a tender, juicy steak bursting with smoky flavor? You can create that restaurant-quality experience right in your own kitchen. While many home cooks feel overwhelmed by complex recipes, we believe amazing food like carne asada should be accessible to everyone, regardless of skill level.

    That’s why we at Recipesmondial created the ultimate carne asada recipe designed for beginners. Forget intimidating techniques and long ingredient lists. Our simple yet authentic marinade infuses the steak with incredible flavor, turning a good cut of meat into a truly memorable meal. We will guide you step-by-step, helping you cook confidently and enjoy making a dish that’s perfect for family dinners or fun gatherings.

    Get ready to grill perfectly tender carne asada that will impress everyone, including yourself. We’re here to prove that making mouthwatering meals doesn’t have to be stressful or difficult. Let’s explore what makes this recipe so ideal for beginners, helping you build confidence and cook without stress.

    What Makes This Carne Asada Recipe Perfect for Beginners?

    Welcome to the world of delicious, easy-to-make meals! At Recipesmondial, we know cooking can feel overwhelming. That’s why this carne asada recipe is designed to turn a restaurant favorite into an approachable, beginner-friendly recipe.

    Our clear guidance helps you cook without stress. We break down every step to ensure a successful and flavorful result, building your confidence in the kitchen along the way.

    What Makes This Recipe So Easy?

    • Everyday Ingredients: We focus on widely available ingredients, so you won’t have to search for obscure items. Most are likely in your pantry already, which makes shopping simple and budget-friendly.
    • Simplified Marinade: Our carne asada marinade uses a balanced blend of common spices and citrus. It’s easy to mix but delivers maximum flavor to your steak.
    • Clear, Step-by-Step Instructions: Each part of the process is broken down into simple directions. We provide precise guidance from preparing the marinade to grilling the meat, using no confusing culinary terms.
    • Focus on Core Techniques: This carne asada recipe helps you master fundamental skills like marinating and grilling. These are valuable techniques for many simple dinner recipes.
    • Reliable Results: We’ve tested this recipe extensively to guarantee juicy, tender, and perfectly seasoned carne asada every time. This consistency is perfect for approachable home cooking.
    • Helpful Tips and Tricks: We include advice for avoiding common pitfalls, such as how to choose the right cut of meat and our best tips for achieving perfect tenderness.

    Our approach is designed to empower you, helping you move from being unsure in the kitchen to cooking with confidence. Get ready for truly flavorful meals made easy with this incredible carne asada recipe!

    What Ingredients Do You Need for Carne Asada?

    An overhead shot of fresh carne asada ingredients, including raw steak, whole limes, a bunch of cilantro, garlic, chilies, onions, and various spices arranged neatly on a rustic wooden surface.
    A vibrant, well-organized flat lay of fresh, high-quality ingredients for carne asada. The centerpiece is a raw, perfectly marbled flank or skirt steak. Around it, arrange fresh limes, a bunch of vibrant green cilantro, whole garlic cloves, various chilies such as poblano and jalapeño, sliced white onions, and a selection of ground spices (cumin, chili powder, oregano) in small, rustic ceramic bowls. Everything should appear pristine, clean, and ready for cooking, set against a rustic wooden cutting board or tabletop background. Use soft, natural overhead lighting to highlight textures and colors. This must be professional food photography, 100 percent photorealistic, high-quality food magazine photo style, no artistic interpretations or illustrations.

    Crafting the best carne asada starts with the right ingredients. But don’t worry—this recipe is simple and approachable, our specialty at Recipesmondial. To help you cook with confidence, we’ve broken down exactly what you’ll need for this flavorful meal made easy.

    You’ll likely find most of these items are everyday staples at your local grocery store. Let’s gather your essentials for a truly delicious experience!

    For the Carne Asada Marinade

    The marinade is the heart of this easy carne asada recipe. It tenderizes the meat while infusing it with incredible, bright flavors. This beginner-friendly recipe uses common ingredients to deliver maximum impact.

    • 1/2 cup fresh orange juice: Freshly squeezed is best for that vibrant citrus note. It helps tenderize the meat, too!
    • 1/4 cup fresh lime juice: Adds a zesty tang and works alongside the orange juice for tenderizing.
    • 1/4 cup soy sauce: Provides umami depth and a hint of saltiness, rounding out the overall flavor.
    • 2 tablespoons olive oil: Helps carry flavors and keeps the meat moist.
    • 3 cloves garlic, minced: Essential for a robust, aromatic foundation.
    • 1/2 white onion, roughly chopped: Adds a subtle sweetness and aromatic base.
    • 1/2 cup fresh cilantro, chopped: Offers a fresh, herbaceous burst. (See variations if you prefer a carne asada marinade without cilantro.)
    • 1 teaspoon ground cumin: A warming spice that brings authentic Mexican flavor.
    • 1/2 teaspoon black pepper: Adds a gentle warmth and spiciness.
    • 1/4 teaspoon red pepper flakes (optional): For a little kick if you like some heat!

    Pro Tip: Using fresh citrus juice is key. The natural acids in the orange and lime juice break down tough meat fibers, which is the secret to incredibly tender and juicy carne asada [1]. This simple step makes all the difference.

    For the Steak

    Choosing the right cut of beef is crucial for the best carne asada. Our recipe makes it simple to pick the perfect one.

    • 2 pounds flank steak or skirt steak: These cuts are ideal for grilling, known for their rich beefy flavor and ability to absorb marinade beautifully. Flank steak is leaner, while skirt steak offers a slightly more intense flavor.

    A Note on Steak Selection: Both flank and skirt steak are thin, allowing them to cook quickly and absorb the marinade efficiently. This makes them excellent choices for a beginner-friendly recipe. Either option is easy to work with and will give you fantastic results for your family-friendly meals.

    How to Make Carne Asada (Step-by-Step Guide)

    A close-up of a juicy flank steak sizzling with char marks on an outdoor charcoal grill, being flipped by a home cook's hand with tongs.
    A dynamic, mouth-watering close-up shot of a seasoned and marinated flank steak grilling on a hot outdoor charcoal grill. Capture visible, appetizing char marks and gentle smoke rising from the steak. A real human hand, belonging to an approachable home cook, is using stainless steel tongs to carefully flip the steak, showing its juicy interior. The background should be softly blurred, hinting at an inviting backyard patio setting. Emphasize the rich, cooked color of the meat and the appealing sizzle. This must be professional food photography, 100 percent photorealistic, high-quality food magazine photo style, no artistic interpretations or illustrations.

    Step 1: Prepare the Authentic Carne Asada Marinade

    A fantastic marinade is the key to delicious carne asada. This simple recipe combines fresh citrus, herbs, and spices to infuse your steak with amazing flavor. You’ll be surprised at how easy it is to whip up.

    To create the marinade, combine the following ingredients in a large bowl or a resealable plastic bag:

    • 1/2 cup fresh orange juice (about 1-2 oranges)
    • 1/4 cup fresh lime juice (about 2-3 limes)
    • 1/4 cup olive oil
    • 1/4 cup finely chopped fresh cilantro
    • 4 cloves garlic, minced
    • 1 tablespoon chili powder
    • 1 teaspoon ground cumin
    • 1 teaspoon dried oregano
    • 1 teaspoon salt
    • 1/2 teaspoon black pepper
    • A pinch of cayenne pepper (optional, for a little kick)

    Whisk everything together until well combined. Your flavorful carne asada marinade is now ready for the steak. This mix is crucial for achieving that signature taste.

    Step 2: Marinate the Steak for Maximum Flavor

    With the marinade ready, it’s time to let the steak soak. Marinating not only tenderizes the meat but also infuses every bite with incredible flavor, transforming your carne asada from good to spectacular.

    1. Place your steak (about 1.5-2 pounds flank or skirt steak) into the bowl or bag with the marinade.
    2. Ensure the steak is fully coated by turning it a few times and gently massaging the marinade into the meat.
    3. Seal the bag or cover the bowl tightly.
    4. Refrigerate for at least 2 hours. For the best flavor, marinate for 4-6 hours. If you have time, marinating overnight (up to 12 hours) is fantastic.

    Pro Tip: Do not marinate for more than 12 hours, as the citrus juices can start to “cook” the meat and make it mushy. The goal is a tender steak, not an over-marinated one. This beginner-friendly recipe ensures perfect results every time.

    Step 3: Grill the Carne Asada to Perfection

    Grilling is what gives carne asada its signature char and smoky flavor. But don’t worry if you don’t have a grill—a cast-iron skillet works well too.

    1. Prepare your grill: Preheat your gas grill to high heat, or prepare a charcoal grill for direct high heat. Aim for a temperature around 450-500°F (230-260°C).
    2. Remove from marinade: Take the steak out of the marinade and let any excess drip off. Do not wipe it completely dry.
    3. Grill the steak: Place the steak directly on the hot grill grates and grill for 3-5 minutes per side for medium-rare to medium doneness. Adjust the time based on steak thickness.
    4. Check for doneness: Use a meat thermometer for accuracy. Aim for an internal temperature of 130-135°F (54-57°C) for medium-rare, or 135-140°F (57-60°C) for medium [2]. You’ll see a nice sear and char develop.
    5. Alternative cooking method: No grill? No problem. Heat a large cast-iron skillet over medium-high heat with a tablespoon of olive oil. Sear the steak for 4-6 minutes per side.

    This simple dinner recipe makes grilling fun. You’ll quickly gain confidence in your approachable home cooking skills!

    Step 4: Rest and Slice the Meat Correctly

    Don’t skip this final step—it’s vital for juicy, tender carne asada. Resting the meat allows the juices to redistribute throughout, ensuring every slice is incredibly flavorful and moist.

    1. Rest the steak: Once cooked, transfer the carne asada to a cutting board and cover it loosely with aluminum foil.
    2. Allow it to rest: Let the steak rest for at least 5-10 minutes. Resisting the urge to slice it too soon is key to a tender result.
    3. Slice against the grain: After resting, thinly slice the steak against the grain. Look for the direction of the muscle fibers and cut perpendicular to them. This simple technique shortens the fibers, making each bite much more tender.
    4. Serve immediately: Your perfectly cooked and sliced carne asada is ready! Enjoy this truly flavorful meal made easy.

    Following these step-by-step cooking guidance tips will lead to a delicious outcome. You’ll be amazed at your culinary success!

    What Are the Best Tips for Juicy, Flavorful Carne Asada?

    Making truly juicy and flavorful carne asada is easier than you might think. With a few simple tricks, you can elevate your home cooking and create a delicious, memorable meal that will impress your family and friends.

    • Choose the Right Cut: Flank steak or skirt steak are fantastic choices for carne asada because they absorb marinade exceptionally well. These cuts are known for their rich flavor and become incredibly tender when cooked correctly.
    • Marinate Generously: Don’t rush this crucial step. A good marinade needs time to work its magic, tenderizing the meat and infusing it with flavor. Marinate your steak for at least 2 hours, but for the best results, aim for 4-12 hours.
    • Bring Steak to Room Temperature: Before grilling, remove the marinated steak from the fridge and let it sit on the counter for about 30 minutes. This helps the meat cook evenly from edge to center, preventing dry spots.
    • Heat Your Grill High: A blazing hot grill is essential for a perfect sear. High heat not only locks in the steak’s juices but also creates a delicious, caramelized crust that adds a deep layer of flavor.
    • Don’t Overcrowd the Grill: If necessary, cook your steak in batches. Placing too much meat on the grill at once lowers its temperature, which prevents a good sear and can cause the meat to steam instead. Give each piece enough space to achieve that desirable char.
    • Cook to Medium-Rare/Medium: To ensure your carne asada is as tender and juicy as possible, avoid overcooking it. Aim for a medium-rare to medium doneness, using a meat thermometer for accuracy. For perfect results, the internal temperature should be around 130-135°F (54-57°C).
    • Rest Your Meat: This is a critical step for a juicy steak. Once grilled, transfer the carne asada to a cutting board and cover it loosely with foil. Letting it rest for 5-10 minutes allows the juices to redistribute throughout the meat, resulting in a much more flavorful bite.
    • Slice Against the Grain: Before serving, identify the direction of the muscle fibers in the steak and slice perpendicular to them. This technique shortens the fibers, making each bite significantly more tender and easier to chew—an essential step for cuts like skirt and flank steak.

    Following these simple steps will ensure you make a fantastic, beginner-friendly carne asada every time. Enjoy your delicious, home-cooked meal with confidence!

    How Can You Serve Carne Asada?

    You’ve mastered grilling delicious carne asada, so now let’s transform it into amazing meals. This flavorful, versatile steak makes it easy to create quick weeknight dinners and family-friendly dishes. Recipesmondial is here to help you serve it creatively.

    From simple dinners to exciting meal prep, these approachable ideas ensure you get the most out of your perfectly cooked carne asada.

    Classic Carne Asada Tacos

    Tacos are a go-to choice for carne asada because they are simple to assemble, packed with incredible flavor, and loved by everyone. As a fantastic way to enjoy your juicy steak, this is the perfect beginner-friendly recipe.

    How to Assemble Your Tacos:

    • Warm Tortillas: First, gently warm corn or flour tortillas in a dry skillet, in the microwave, or on the grill.
    • Add Carne Asada: Next, spoon a generous amount of your sliced carne asada onto each tortilla.
    • Choose Your Toppings: Then, pile on your favorite fresh toppings.
    • Drizzle with Sauce: Finally, add a touch of salsa or crema for extra flavor.

    Popular Toppings to Consider:

    • Fresh Cilantro: Chopped for a burst of freshness.
    • Diced Onions: White or red onions add a nice bite.
    • Salsa Roja or Verde: A must-have for authentic flavor.
    • Guacamole or Sliced Avocado: Adds creamy richness.
    • Cotija Cheese: Crumbly, salty goodness.
    • Lime Wedges: A squeeze of fresh lime brightens everything.

    Burritos and Bowls

    For a heartier meal, carne asada shines in burritos and bowls. These options are fantastic for meal prep and busy weeknights because they offer endless customization and are perfect for using up leftovers.

    For a Flavorful Carne Asada Burrito:

    • Large Flour Tortilla: Start with a burrito-sized tortilla.
    • Layer Ingredients: Spread on a thin layer of refried beans or rice.
    • Add Carne Asada: Place your sliced steak down the center.
    • Include Fillings: Incorporate cheese, salsa, and guacamole.
    • Roll Tightly: Fold in the sides, then roll from the bottom up to create a snug burrito.

    Building a Delicious Carne Asada Bowl:

    • Start with a Base: Use fluffy rice (white or brown) or a bed of crisp lettuce.
    • Add Protein: Top generously with your tender carne asada.
    • Include Veggies: Add corn, black beans, bell peppers, or sautéed onions.
    • Finishing Touches: Garnish with avocado, a dollop of sour cream, and a drizzle of your favorite hot sauce.

    With Rice and Beans

    Sometimes, simple is best. Serving carne asada with rice and beans is a comforting, classic combination that makes for a satisfying and easy family meal. This simple pairing truly allows the delicious steak flavor to shine.

    Pairing Perfection:

    • Rice Options:
      • Cilantro Lime Rice: A fragrant and zesty choice.
      • Mexican Red Rice: Savory and deeply flavorful.
      • Simple White Rice: A perfect canvas for the steak.
    • Bean Options:
      • Black Beans: Often seasoned with garlic and cumin.
      • Pinto Beans: Creamy and mild, perfect refried or whole.
      • Frijoles Charros: Hearty “cowboy beans” with bacon and chorizo.
    • Optional Garnishes:
      • Chopped avocado
      • Fresh cilantro
      • A sprinkle of cheese
      • A squeeze of lime

    No matter how you serve it, your homemade carne asada is sure to be the highlight of the meal. Recipesmondial is here to help you create easy, flavorful dishes. Enjoy your cooking, discover new recipes, and make mealtime stress-free!

    Variations and Substitutions

    Can I Make Carne Asada in the Oven?

    Absolutely! While grilling gives carne asada its classic smoky char, you can make a delicious version right in your oven. This method is perfect for beginners and ideal for busy weeknights or when bad weather keeps you from cooking outdoors.

    Here’s how to adapt your carne asada recipe for the oven:

    • Preheat your oven: Get it nice and hot, around 400°F (200°C).
    • Use an oven-safe skillet: A cast-iron skillet is ideal because it retains heat so well. Place it in the oven to preheat for about 10-15 minutes.
    • Sear on the stovetop: Carefully remove the hot skillet from the oven. Add a tablespoon of oil and sear your marinated steak over medium-high heat for 2-3 minutes per side. This step creates a wonderful crust and locks in flavor.
    • Finish in the oven: Transfer the skillet to the preheated oven and cook for another 5-10 minutes, depending on your steak’s thickness and desired doneness. For medium-rare, aim for an internal temperature of 130-135°F (54-57°C). A meat thermometer will give you the most accurate results.
    • Rest the meat: Just as you would with grilling, always let your carne asada rest for 5-10 minutes before slicing. This step is crucial for keeping it juicy.

    Making carne asada in the oven is an easy recipe that proves you don’t need special equipment to enjoy flavorful, homemade meals.

    Carne Asada Marinade Without Cilantro

    Cilantro isn’t for everyone. For some people, its flavor is polarizing and can even taste like soap [3]. If you’re looking for a delicious carne asada marinade without cilantro, rest assured you can easily adjust the recipe to create a fantastic, flavorful steak.

    Here are some simple substitutions and variations:

    • Simply omit it: The marinade will still be incredibly flavorful thanks to the other ingredients like garlic, onion, and spices.
    • Fresh parsley: Flat-leaf parsley offers a fresh, herbaceous note without cilantro’s distinct flavor. Use it in the same amount.
    • Chives or green onions: For a milder, oniony freshness, add finely chopped chives or the green parts of scallions.
    • More citrus zest: Amp up the lime or orange zest for an extra-bright flavor kick.

    With these adjustments, this beginner-friendly recipe becomes even more versatile, ensuring everyone at the table can enjoy a delicious, family-friendly meal.

    Carne Asada Marinade Without Orange Juice

    In a traditional carne asada marinade, orange juice plays a key role. It adds acidity and a hint of sweetness that helps tenderize the meat and build flavor. However, if you don’t have orange juice or simply prefer a different taste, several excellent substitutions work just as well.

    Here are some practical alternatives for your marinade:

    • Lime juice: A classic substitute, lime juice provides a brighter, zesty acidity that beautifully complements the other Mexican-inspired flavors. Use an equal amount in place of orange juice.
    • Lemon juice: Similar to lime, lemon juice offers strong acidity and a fresh taste, making it a reliable alternative.
    • Pineapple juice: Because of its enzymes, a small amount of pineapple juice is great for tenderizing. Be careful not to marinate the meat for too long (more than 4-6 hours), as it can become mushy.
    • Vinegar: White wine vinegar, apple cider vinegar, or distilled white vinegar can provide the necessary acidity. Start with about half the amount you would use for citrus juice and adjust to taste.

    Choosing the right substitute ensures your homemade carne asada is always perfectly seasoned and tender, making this delicious meal easy to prepare with ingredients you already have on hand.

    Frequently Asked Questions About Carne Asada

    What is the best cut of meat for carne asada?

    For the most flavorful carne asada, choose either skirt steak or flank steak. Both cuts have an excellent texture and are known for absorbing marinades well. [4]

    • Skirt Steak: A popular choice from the cow’s diaphragm muscle, skirt steak has a rich, beefy flavor and a loose grain that makes it perfect for soaking up a delicious carne asada marinade.
    • Flank Steak: This is another excellent, leaner option from the abdominal muscles. While it has less fat than skirt steak, it still boasts great flavor and a distinct grain.

    Regardless of which cut you choose, look for good marbling—the small streaks of fat that add moisture and flavor. After cooking, it’s crucial to slice the meat thinly against the grain. This simple step ensures every bite is tender, a key tip for any beginner-friendly recipes using these cuts.

    How do you make carne asada for tacos?

    Making carne asada for tacos is simple because it follows the main carne asada recipe. The key difference for tacos is how you slice and serve the meat. Here’s an overview of the process:

    1. Marinate Well: Begin with a quality carne asada marinade. Allow your steak to soak for at least 2 hours, or overnight for the deepest flavor.
    2. Grill to Perfection: Cook the steak over high heat to achieve a beautiful sear on both sides. Cook to your preferred doneness, typically medium-rare to medium.
    3. Rest the Meat: This crucial step ensures juicy tacos. Let the cooked steak rest for 5-10 minutes to allow the juices to redistribute throughout the meat.
    4. Slice Against the Grain: Using a sharp knife, slice the carne asada thinly against the grain. This technique guarantees each piece is exceptionally tender.
    5. Assemble Your Tacos: Warm your favorite tortillas, then pile on the sliced carne asada and add toppings like chopped onions, cilantro, salsa, and a squeeze of lime. These easy recipes quickly become family-friendly meals!

    This method ensures every taco is bursting with flavor and tender meat, making it perfect for quick meals or a fun dinner party.

    What is in an authentic carne asada marinade?

    An authentic carne asada marinade is key for both flavoring and tenderizing the steak. It’s a vibrant blend of fresh ingredients and aromatic spices. While recipes vary, the following are core components:

    • Citrus Juices: Fresh orange juice and lime juice are essential. They add bright flavor, and the acidity helps break down muscle fibers, which tenderizes the meat.
    • Garlic: A generous amount of freshly minced garlic provides a pungent, savory base.
    • Cilantro: Freshly chopped cilantro contributes a distinct, herbaceous note.
    • Onion: Thinly sliced white onion is often included for sweetness and a subtle bite.
    • Oil: A quality olive oil or vegetable oil helps distribute the flavors and prevents the meat from sticking to the grill.
    • Spices: A typical spice blend includes:
      • Cumin (earthy, warm)
      • Chili powder (mild heat, depth of flavor)
      • Dried oregano (aromatic, slightly bitter)
      • Salt and black pepper (to season)

    This combination creates a complex marinade that will make your carne asada recipe stand out, delivering the deep flavors essential for flavorful meals made easy.

    How do you prepare juicy carne asada?

    To get juicy carne asada every time, follow a few simple, beginner-friendly techniques. Here’s how to avoid dry meat and ensure your steak is cooked perfectly:

    • Marinate Adequately: Let the steak marinate for at least two hours, or overnight for maximum flavor and tenderness. The acidic components in the carne asada marinade are essential for this process.
    • Start with Room Temperature Meat: Take your steak out of the fridge 30 minutes before grilling to help it cook more evenly.
    • Use High Heat: A very hot grill or cast-iron pan is essential. High heat quickly sears the outside of the steak, creating a flavorful crust that locks in the juices.
    • Don’t Overcook: Skirt and flank steak cook quickly. Aim for medium-rare to medium (130-135°F or 54-57°C for medium-rare). Use an instant-read thermometer for accuracy. [5]
    • Rest Your Meat: This step is non-negotiable for juicy steak. Once cooked, transfer the steak to a cutting board, cover it loosely with foil, and let it rest for 5-10 minutes. This resting period allows the juices to redistribute, making every slice tender and moist.
    • Slice Against the Grain: Finally, always slice the meat thinly against the grain. This shortens the muscle fibers, resulting in a much more tender bite.

    By following this step-by-step cooking guidance, you will master juicy carne asada with confidence and make your meal prep more enjoyable.


    Sources

    1. https://www.exploratorium.edu/cooking/meat/activity-marinate.html
    2. https://www.foodsafety.gov/food-safety-charts/safe-minimum-internal-temperature-chart
    3. https://www.britannica.com/story/why-does-cilantro-taste-like-soap-to-some-people
    4. https://www.usda.gov/media/blog/2013/01/22/meat-cut-carne-asada-mexican-steak-fajitas-or-grilling
    5. https://www.foodsafety.gov/food-safety-charts/safe-minimum-cooking-temperatures

  • How to Make The Best Green Bean Casserole (Easy Step-by-Step Recipe)

    How to Make The Best Green Bean Casserole (Easy Step-by-Step Recipe)

    Green bean casserole is a classic American baked side dish perfect for holidays like Thanksgiving. It combines tender green beans and a creamy sauce made from cream of mushroom soup, which is then topped with crispy fried onions. This simple, comforting dish is baked until golden and bubbly, making it a family-friendly favorite.

    Are you dreaming of that classic, creamy, and crispy green bean casserole? It’s a beloved staple for holiday tables and a comforting side dish for any family dinner, but making it can feel daunting. Perhaps you’ve been overwhelmed by complex recipes or are simply looking for a foolproof method for perfect results. We believe cooking should be an enjoyable experience, not a source of stress.

    Here at Recipesmondial, we make home cooking simple, flavorful, and inspiring. That’s why we perfected this easy, step-by-step green bean casserole recipe—it delivers the best results without any fuss. This guide is perfect for beginner cooks building confidence and for busy home cooks seeking reliable meal solutions. You’ll learn how to transform simple ingredients into a memorable dish, ensuring your table is always set for success.

    Get ready to impress your family and friends with an exceptional green bean casserole. We’re confident this method will become your go-to for the timeless classic. So, what makes this recipe stand out? Let’s dive in and discover exactly why this is the best green bean casserole recipe you’ll ever make.

    Why Is This the Best Green Bean Casserole Recipe?

    Are you searching for the ultimate green bean casserole recipe? You’ve found it. This isn’t just another recipe—it’s your new go-to for a dish that consistently shines. At Recipesmondial, we specialize in reliable and delicious recipes with easy-to-follow instructions.

    Our goal is to make cooking enjoyable and stress-free, and this green bean casserole is a perfect example. It delivers incredible flavor without complicated steps or hard-to-find ingredients. Say goodbye to guesswork and hello to confidence in the kitchen!

    Here’s why this recipe stands out as the best:

    • Uncomplicated Steps: We provide simple, step-by-step guidance. You won’t be overwhelmed by confusing instructions or technical terms.
    • Everyday Ingredients: This recipe uses accessible, common ingredients you likely already have. No special shopping trips are needed.
    • Reliably Delicious: Enjoy a creamy, savory, and perfectly crispy green bean casserole every time. It’s a family-friendly dish that’s guaranteed to be a hit.
    • Flavorful Simplicity: We focus on maximizing classic, comforting flavor with minimal fuss. You can get rich taste without endless effort.
    • Quick to Prepare: Designed for busy schedules, this recipe helps you get a delicious side dish on the table fast.
    • Versatile & Adaptable: This recipe works beautifully with fresh, frozen, or canned green beans. We also include simple variations to suit different tastes and dietary needs.
    • Boosts Your Confidence: Our clear instructions help you build skills in the kitchen, so you can create flavorful meals like a pro.

    At Recipesmondial, we believe in stress-free cooking. This green bean casserole is the perfect example of how simple ingredients can create truly delicious results. Get ready to impress your family and friends with this foolproof dish!

    What Ingredients Do You Need for Green Bean Casserole?

    Choosing Your Green Beans: Canned, Frozen, or Fresh?

    Your green bean casserole journey begins with choosing the right beans. Each option—canned, frozen, or fresh—offers unique benefits, so let’s explore which is best for you.

    • Canned Green Beans: Super convenient and pre-cooked, canned beans are ready to use, making them perfect for quick meals and simple dinner recipes. Be sure to drain them well before mixing.
    • Frozen Green Beans: Frozen beans often taste fresher than canned and still save on prep time. Simply thaw them or blanch them quickly to help maintain their bright color. They are a great middle-ground choice.
    • Fresh Green Beans: For the best flavor and crisp-tender texture, choose fresh green beans. You will need to trim the ends and blanch them briefly to ensure they are perfectly tender, but fresh beans elevate the casserole with a vibrant, garden-fresh taste.

    Tip: No matter which type you choose, ensure your green beans are tender-crisp, not mushy, to create the best possible texture for your casserole.

    For the Creamy Mushroom Sauce

    The rich, creamy sauce is the heart of any classic green bean casserole, bringing all the ingredients together with incredible savory depth. Making it is straightforward with these key ingredients.

    • Canned Cream of Mushroom Soup (10.5 ounces): This traditional base provides instant creaminess and a savory, earthy mushroom flavor. Using canned soup is a significant time-saver, perfect for a family-friendly meal.
    • Milk (1/2 cup): Any type of milk works, though whole milk makes the sauce extra rich. Milk helps thin the soup slightly to create a smoother, more pourable consistency.
    • Soy Sauce (1 teaspoon): This secret ingredient adds a boost of umami! It deepens the savory notes and balances the flavors beautifully, so don’t skip this small but mighty addition.
    • Black Pepper (1/4 teaspoon): A pinch of pepper adds a little kick and enhances all the other flavors. Freshly ground pepper is always best.

    Substitution Tip: If you prefer a homemade approach, you can make your own mushroom sauce for a fresher taste. While we cover this variation later, canned soup is a winner for an easy, stress-free recipe.

    For the Crispy Onion Topping

    The iconic crispy onion topping is a must-have, providing a delightful crunch that makes this casserole truly special. It’s the perfect finishing touch.

    • Canned Crispy Fried Onions (2.8 ounces): These are the classic choice, offering a golden, crunchy texture and savory flavor that perfectly complements the creamy beans. For the best result, divide the onions: use some in the casserole and save the rest for the top to ensure a final crunch.

    Variation Idea: Feel free to get creative with your topping. Crushed crackers, panko breadcrumbs, or even homemade crispy fried onions are all excellent alternatives. Trying these variations is a fun way to create personalized, flavorful meals and discover new simple dishes.

    How to Make Green Bean Casserole From Scratch

    Step 1: Prepare Your Green Beans

    The first step is preparing the green beans. Whether you use fresh, frozen, or canned, follow these simple instructions.

    For Canned Green Beans:

    • Thoroughly drain two (14.5-ounce) cans of cut green beans.
    • Pat them dry with a paper towel to prevent a watery casserole.

    For Frozen Green Beans:

    • Cook two (10-ounce) packages of frozen cut green beans according to package directions until tender-crisp.
    • Drain thoroughly to remove all excess water.

    For Fresh Green Beans:

    • Wash and trim one pound of fresh green beans.
    • Blanch in boiling, salted water for 5-7 minutes or steam until tender-crisp.
    • Immediately plunge into an ice bath to stop the cooking and preserve their vibrant green color.
    • Drain completely before using.

    Tip: Draining the green beans properly is the key to a creamy, not soupy, casserole.

    Step 2: Mix the Casserole Base

    Now it’s time to mix the creamy casserole base. This step comes together in just a few minutes.

    1. Preheat the oven to 375°F (190°C) and lightly grease a 1½-quart baking dish.
    2. In a large bowl, whisk together the cream of mushroom soup, milk, black pepper, and garlic powder until smooth.
    3. Gently fold in the prepared green beans until they are evenly coated.
    4. Pour the mixture into the prepared baking dish and spread evenly.

    Beginner-Friendly Tip: Feel free to taste the sauce before adding the green beans and adjust the seasonings to your liking.

    Step 3: Bake to Bubbly Perfection

    The first bake heats the casserole through, creating a warm, bubbly base for the crispy topping.

    1. Place the baking dish in the preheated oven.
    2. Bake for 25-30 minutes, until the sauce is bubbly around the edges and the beans are tender.

    Watch Out For: Avoid overbaking at this stage. You are simply heating the casserole before adding the topping in the final step.

    Step 4: Add the Final Crispy Topping

    The final step adds the classic crunchy texture that makes this dish a favorite.

    1. Carefully remove the casserole from the oven.
    2. Sprinkle the crispy fried onions evenly over the top.
    3. Return the casserole to the oven and bake for an additional 5-10 minutes, until the onions are golden brown and crisp.

    Serving Suggestion: Let the casserole rest for a few minutes before serving. This allows the sauce to set slightly.

    Enjoy your homemade green bean casserole! Recipesmondial is here to help you discover more approachable recipes that build confidence in the kitchen.

    What are some variations on the green bean casserole recipe?

    Cheesy Green Bean Casserole

    Want to elevate your classic green bean casserole? Adding cheese is a fantastic and easy way to make it richer and more comforting. This family-friendly variation introduces new textures and flavors that everyone will love.

    For a cheesy twist, simply mix shredded cheese into the green bean and mushroom sauce mixture before baking. You can also sprinkle extra cheese on top during the last few minutes in the oven to create a gorgeous, melted crust.

    • Cheese Options:
      • Cheddar: Sharp or mild, it adds a familiar, savory tang.
      • Monterey Jack: This cheese melts beautifully and offers a milder flavor.
      • Parmesan: Sprinkle this on top for a salty, umami kick.
      • Swiss: This brings a slightly nutty note to the casserole.
    • When to Add: Stir about 1 cup of shredded cheese into the green bean mixture before transferring it to the baking dish. For a bubbly, golden-brown top, sprinkle an additional 1/2 cup over the casserole during the last 10-15 minutes of baking.
    • Pro Tip: For an extra-crispy topping, mix the shredded cheese with panko breadcrumbs before sprinkling it over the casserole. This creates a wonderful textural contrast.

    Homemade Mushroom Sauce (No Canned Soup)

    Prefer cooking from scratch and avoiding canned ingredients? Making your own mushroom sauce is a surprisingly simple, beginner-friendly way to elevate your green bean casserole. A homemade sauce delivers a fresh, vibrant flavor that canned soup can’t match, and it’s often a healthier choice for family-friendly meals.

    Here’s how to create a rich, creamy sauce without any canned soup:

    • Ingredients You’ll Need:
      • 2 tablespoons unsalted butter
      • 8 ounces fresh mushrooms (cremini or button), sliced
      • 1/2 cup finely diced yellow onion
      • 2 cloves garlic, minced
      • 1/4 cup all-purpose flour
      • 2 cups chicken or vegetable broth
      • 1/2 cup heavy cream (or milk for a lighter version)
      • Salt and black pepper to taste
    • Step-by-Step Instructions:
      1. Sauté Aromatics: Melt butter in a medium saucepan over medium heat. Add the mushrooms and onion, cooking until the mushrooms release their liquid and brown, about 5-7 minutes. Stir in the garlic and cook for one more minute until fragrant.
      2. Make a Roux: Sprinkle the flour over the mushroom mixture and cook, stirring constantly, for 1-2 minutes to cook out the raw flour taste.
      3. Whisk in Liquid: Slowly whisk in the broth a little at a time to keep the mixture smooth. Continue whisking as the sauce thickens and comes to a gentle boil.
      4. Finish with Cream: Reduce the heat to low and stir in the heavy cream or milk. Season with salt and pepper, then simmer for a few minutes until the sauce is creamy and heated through.
    • Why You’ll Love It: This homemade sauce offers a deeper, more natural mushroom flavor and gives you complete control over the ingredients. Knowing exactly what’s in your food is a great confidence booster. Furthermore, homemade sauces often contain less sodium than their canned counterparts [1].

    Adding Bacon for Extra Flavor

    For a smoky, savory kick, add bacon to your green bean casserole. This simple addition is a game-changer, bringing incredible texture and a new depth of flavor that makes this family-friendly dish even more exciting.

    You can mix crumbled bacon into the casserole, sprinkle it on top with the crispy onions, or do both for maximum flavor.

    • How to Prepare Bacon:
      1. Cook Bacon: Cook 6-8 slices of bacon in a skillet over medium heat until crispy.
      2. Drain & Crumble: Transfer the bacon to a paper towel-lined plate to drain the grease. Once cool enough to handle, crumble it into small pieces.
    • When to Add Bacon:
      • Into the Mix: Stir half of the crumbled bacon into the green bean and sauce mixture before baking to infuse the entire casserole with smoky flavor.
      • As a Topping: Sprinkle the remaining bacon over the casserole along with the crispy fried onions during the last few minutes of baking. This adds a delightful crunch and visual appeal.
    • Chef’s Tip: Save a tablespoon or two of the rendered bacon fat and use it in your homemade mushroom sauce instead of butter. This simple trick creates an even richer, smokier flavor profile, adding a whole new dimension to the dish.

    Tips for the Perfect Casserole Every Time

    A friendly home cook proudly holding a perfectly baked green bean casserole with a golden, crispy topping.
    A professional food photography scene of a home cook, a friendly and encouraging woman in her 40s, smiling warmly while holding a freshly baked, perfectly golden green bean casserole. She is in a clean, inviting kitchen with warm lighting. Her hands are gently supporting the casserole dish, which is steaming slightly. The casserole top is beautifully browned with abundant crispy fried onions. The image conveys success, ease, and the joy of home cooking. Photorealistic, high-quality food magazine photo.

    How to Avoid a Watery Casserole

    A watery green bean casserole is a common and frustrating problem. Luckily, you can prevent it with a few simple tricks. Follow these tips to ensure a perfectly creamy and delicious result every time.

    • Drain Green Beans Thoroughly: This is the most crucial step to prevent a soupy casserole. Whether you&#39re using canned or frozen green beans, drain them well in a colander. For the best results, gently press on the beans to remove any remaining water.
    • Thicken Your Sauce: If you&#39re making a homemade sauce, ensure it’s properly thickened. A roux (a simple butter and flour mixture) is perfect for this. Cook it into a smooth paste before adding your liquids to create a rich, creamy base.
    • Don’t Overcrowd the Dish: Give your casserole ingredients room to breathe in the baking dish. An overcrowded dish traps steam, which creates excess moisture. If your ingredients seem too packed, simply switch to a larger dish.
    • Bake at the Right Temperature: A hot, properly preheated oven helps excess moisture evaporate as the casserole bakes. This ensures a consistent texture and prevents a watery bottom.

    Make-Ahead and Storage Instructions

    Preparing your green bean casserole in advance can save so much time, making it a perfect dish for holidays or busy weeknights. Here’s how to make it ahead and store any leftovers.

    Make-Ahead Instructions:

    • Assemble Without Topping: Mix the green beans and creamy sauce, then pour the mixture into your baking dish. Cover it tightly with plastic wrap or foil.
    • Refrigerate: You can store the unbaked casserole in the refrigerator for up to 2 days.
    • Before Baking: Let the casserole sit at room temperature for about 30 minutes to help it bake more evenly. Add the crispy onion topping just before baking as directed. You may need to add 5-10 minutes to the total baking time.

    Storing Leftovers:

    • Cool Completely: Let the casserole cool to room temperature before storing.
    • Refrigerate: Transfer leftovers to an airtight container and store them in the refrigerator for up to 3-4 days.
    • Freezing (Optional): For longer storage, place cooled leftovers in a freezer-safe container. The casserole will keep well for up to 2-3 months. Thaw it overnight in the refrigerator before reheating.
    • Reheating: Reheat individual portions in the microwave or warm larger amounts in a 300°F (150°C) oven until heated through. If it seems dry, add a splash of milk or broth.

    What to Serve with Green Bean Casserole

    A beloved classic, green bean casserole pairs wonderfully with many main courses, from holiday feasts to simple weeknight dinners. Here are some family-friendly and delicious pairings to consider.

    • Roasted Turkey or Chicken: This is a classic combination, as the savory flavors complement each other perfectly.
    • Ham: A glazed ham is another fantastic partner. The sweetness of the ham balances the richness of the casserole.
    • Pot Roast: For a comforting dinner, serve it alongside a tender pot roast for a hearty and satisfying meal.
    • Pork Loin: A juicy pork loin is a lighter, yet equally delicious, option.
    • Mashed Potatoes: You can never go wrong with another comforting side. Mashed potatoes create a truly indulgent plate.
    • Cranberry Sauce: The tartness of cranberry sauce cuts through the richness and provides a lovely contrast in flavors.
    • Simple Salad: A fresh, crisp green salad adds brightness and a healthy balance to the creamy casserole.
    • Dinner Rolls: Warm dinner rolls are perfect for soaking up any delicious sauce.

    Frequently Asked Questions

    Can you make green bean casserole with fresh green beans?

    Yes, you absolutely can! Using fresh green beans is a wonderful way to bring a vibrant, garden-fresh flavor to this classic comfort food.

    Fresh beans offer a crisp-tender texture that contrasts beautifully with the creamy sauce, giving the casserole a more gourmet touch.

    Here’s how to adapt your recipe for fresh green beans:

    • Prepare the Beans: Wash and trim about 1 1/2 pounds of fresh green beans, snapping off both ends.
    • Blanch Them: Bring a pot of salted water to a boil. Add the green beans and cook for 5-7 minutes until they are bright green and tender-crisp.
    • Shock Them: Immediately transfer the blanched beans to an ice bath. This stops the cooking process, helping them retain their bright color and snap.
    • Drain Well: Drain the beans thoroughly and pat them dry with a paper towel. Excess water can make your casserole watery.
    • Proceed with Recipe: Use these prepared beans in place of canned or frozen ones, then follow the rest of your green bean casserole recipe as written.

    This simple switch results in a truly flavorful meal and is a perfect step up for home cooks wanting to impress!

    How do you make a 3 ingredient green bean casserole?

    Making a green bean casserole with just three ingredients is incredibly easy, making it a perfect quick meal for busy families or beginner cooks. This recipe proves that delicious dishes don’t need to be complex.

    Here’s what you need and how to do it:

    • Ingredients:
      • 2 (14.5 ounce) cans green beans, drained (or 1 pound frozen green beans, thawed and drained)
      • 1 (10.5 ounce) can condensed cream of mushroom soup
      • 1 (6 ounce) can crispy fried onions
    • Instructions:
      1. Preheat Oven: Set your oven to 350°F (175°C).
      2. Combine: In a medium mixing bowl, gently stir together the drained green beans and cream of mushroom soup.
      3. Pour: Transfer the mixture into an 8×8 inch baking dish.
      4. Bake: Bake for 20-25 minutes, or until the casserole is hot and bubbly.
      5. Add Topping: Remove from the oven and sprinkle the crispy fried onions evenly over the top.
      6. Finish Baking: Return to the oven for another 5 minutes, until the onions are golden brown and extra crispy.
      7. Serve: Let it cool for a few minutes before serving warm.

    This easy recipe is a true time-saver and a fantastic option for a stress-free meal.

    What is in a classic old fashioned green bean casserole recipe?

    A beloved side dish, the classic old-fashioned green bean casserole has been a staple on dinner tables for decades, especially during holidays. This simple yet satisfying recipe was invented in 1955 by Dorcas Reilly at Campbell’s Soup Company [2].

    Famous for its creamy texture and crispy topping, this iconic dish relies on just a few key ingredients that blend together to create a comforting, flavorful experience. It’s an approachable home cooking classic.

    The essential ingredients for a classic green bean casserole recipe are:

    • Canned Green Beans: Usually cut or French-style, they provide the tender vegetable base.
    • Condensed Cream of Mushroom Soup: This is the secret to the signature creamy sauce, adding a rich, savory flavor.
    • Milk: A splash of milk thins the soup slightly to ensure a smooth consistency.
    • Black Pepper: This simple seasoning enhances the overall taste.
    • Crispy Fried Onions: Sprinkled on top, these provide a delightful crunchy texture and savory kick.

    These straightforward components combine to create a timeless and delicious side—a true taste of tradition.

    Can you make green bean casserole in a slow cooker?

    Absolutely! Making green bean casserole in a slow cooker is a fantastic and convenient option, especially during busy holidays. This method frees up valuable oven space and allows you to prepare the side dish with minimal effort, making it perfect for any home cook.

    Using a slow cooker is simple and results in a wonderfully creamy and flavorful dish, making it a great choice for a family-friendly meal.

    Here’s how you can adapt your favorite green bean casserole recipe for the slow cooker:

    • Grease the Slow Cooker: Lightly grease the inside of your slow cooker insert to prevent sticking.
    • Combine Ingredients: In a large bowl, mix together the green beans (drained canned or thawed frozen), cream of mushroom soup, milk, and any seasonings like black pepper or garlic powder.
    • Transfer: Pour the mixture into your prepared slow cooker.
    • Cook Time:
      • Cook on LOW for 3-4 hours.
      • Alternatively, cook on HIGH for 1.5-2 hours.

      The casserole should be heated through and bubbling around the edges.

    • Add Topping: About 15-20 minutes before serving, stir in about half of the crispy fried onions and sprinkle the remaining onions on top.
    • Finish: Continue cooking until the onions are warm. For extra crispiness, you can then transfer the casserole to a baking dish and broil for a few minutes. Watch carefully to prevent burning!

    This flexible method is a reliable way to make a comforting side dish without stress.


    Sources

    1. https://www.heart.org/en/healthy-living/healthy-eating/eat-smart/sodium/sodium-and-your-health
    2. https://news.campbells.com/how-the-green-bean-casserole-became-an-american-classic/

  • How to Make The Best Homemade Mac and Cheese Recipe (Easy & Creamy!)

    The best mac and cheese recipe starts with a classic béchamel sauce made from a butter and flour roux, whole milk, and plenty of sharp cheddar cheese. Cooked macaroni is folded into the creamy sauce and can be served immediately for a stovetop version or topped with breadcrumbs and baked until golden for a classic baked mac and cheese.

    Imagine a dish so rich, so cheesy, and so utterly comforting it brings a smile to everyone’s face. That’s the magic of a truly incredible homemade mac and cheese recipe. Perhaps you’ve felt overwhelmed by complex recipes, or maybe you’re just struggling to plan family-friendly meals that everyone will love. At Recipesmondial, we believe cooking should be a joy, not a chore. We’ll show you that achieving the perfect, creamy mac and cheese is easier than you think.

    At Recipesmondial, we understand you want to enjoy cooking without stress. Our goal is to turn kitchen uncertainty into confident culinary success. This easy mac and cheese recipe is your go-to solution for a quick, reliable, and flavorful meal. We’ve broken down every step into simple, approachable home cooking guidance. This ensures that even beginner cooks can achieve a delightfully creamy, perfectly cheesy result.

    Get ready to transform simple ingredients into the best homemade mac and cheese your family has ever tasted. We’ll share our secrets for the creamiest sauce and tips for choosing the perfect cheeses. We’ll also offer variations to fit your busy life, like an easy baked mac and cheese or a quick instant pot mac and cheese. Say goodbye to uninspiring dinners and hello to a truly satisfying recipe that will become a staple in your home. Let’s make some magic in the kitchen!

    What Makes This The Best Homemade Mac and Cheese Recipe?

    A close-up of a bubbling, golden-brown baked mac and cheese with a scoop taken out, showing creamy cheese sauce and macaroni noodles.
    A close-up, mouth-watering, eye-level shot of a golden-brown baked mac and cheese casserole, still bubbling slightly, with a generous scoop freshly taken out of the dish. The scoop reveals incredibly creamy, rich, velvety cheese sauce coating every macaroni noodle, stretching slightly. Soft, natural light highlights the texture and steam gently rising. Garnished with a sprinkle of fresh chopped parsley. Photorealistic, professional food photography, high-quality food magazine photo.

    Welcome to your new favorite homemade mac and cheese! At Recipesmondial, we know you want delicious food without the fuss. That’s why we created this go-to easy mac and cheese solution. It delivers incredible flavor with minimal stress, making it more than just another recipe.

    We crafted this mac and cheese recipe with home cooks like you in mind. If you feel overwhelmed by complex recipes or struggle to plan family-friendly meals, this dish is for you. We focus on clarity and simplicity so you can cook with confidence. Consider this recipe your secret weapon for a satisfying meal.

    Uncomplicated and Beginner-Friendly Steps

    Our approach removes all the guesswork from cooking. You don’t need to be a gourmet chef to succeed, as this recipe uses the best principles of simple dinner recipes. We break down each step so clearly that anyone can make this amazing dish. Our guidance is designed to help you build confidence in the kitchen.

    • Clear Instructions: We provide step-by-step cooking guidance. This makes the process incredibly straightforward.
    • Everyday Ingredients: You will use common items found in any grocery store. No special trips are needed.
    • Quick Preparation: This recipe is designed for those seeking quick meals. You will have dinner on the table in no time.

    Irresistibly Creamy and Flavorful Results

    The hallmark of great mac and cheese is its texture and taste, and our recipe delivers on both. We’ll show you how to achieve maximum creaminess and rich, cheesy goodness in every bite—all without any fuss. The result is a stunningly delicious dish that truly shines.

    • Perfectly Smooth Sauce: Say goodbye to grainy sauces. Our method ensures a silky, luscious cheese sauce.
    • Rich Cheese Blend: We recommend a blend that maximizes flavor. This creates a deep, comforting taste.
    • Consistent Excellence: Each batch will be as delicious as the last. This recipe is reliably flavorful.

    Family-Friendly and Versatile

    Perfect for any occasion, this homemade mac and cheese is a guaranteed crowd-pleaser that busy families will love. It’s also incredibly easy to customize to your liking. We offer delightful variations, including options for a baked mac and cheese recipe or a simple crockpot mac and cheese.

    • Kid-Approved: Even picky eaters will ask for seconds. This is a true family favorite.
    • Customizable: Add your favorite proteins or vegetables. Make it your own special dish.
    • Multiple Methods: Explore options like instant pot mac and cheese. You can even try smoked mac and cheese for a twist.

    Reliable and Rewarding Cooking Experience

    At Recipesmondial, our goal is to help you enjoy cooking without stress. This macaroni and cheese recipe is a prime example of that philosophy, offering a foolproof way to prepare a beloved classic. You’ll not only love the delicious outcome but also gain confidence with every plate you serve.

    • Guaranteed Success: Follow our simple steps for perfect results. You will feel proud of your creation.
    • Stress-Free Meals: Our approachable home cooking philosophy shines through. Dinner becomes an enjoyable event.
    • Inspiring Creativity: Learn the basics, then get creative. Discover new flavors and techniques easily.

    This best mac and cheese recipe will truly transform your mealtime. It guides you from uncertainty to confidence, turning simple ingredients into a delicious, visually appealing meal. Get ready to enjoy the ultimate comfort food!

    What are the ingredients for mac and cheese?

    An overhead view of all fresh ingredients for mac and cheese laid out: uncooked macaroni, cheddar cheese, milk, butter, flour, and spices.
    An overhead shot (flat lay) of all the fresh, high-quality ingredients for homemade mac and cheese artfully arranged on a light-colored marble or rustic wooden countertop. Ingredients include uncooked elbow macaroni in a small bowl, a solid block of sharp cheddar cheese, a glass measuring cup of whole milk, sticks of unsalted butter, a small pile of all-purpose flour, small bowls with mustard powder, paprika, salt, and black pepper. Everything is clean, fresh, and visually appealing, with bright, natural light. Photorealistic, professional food photography, high-quality food magazine photo.

    For the Pasta

    Every fantastic mac and cheese recipe starts with the perfect pasta. We choose elbow macaroni for our classic homemade version—it’s the traditional shape everyone loves!

    Elbow macaroni is the ideal choice. Its small, curved shape captures the creamy cheese sauce beautifully, ensuring a delicious bite every time. Cooking your pasta properly is a simple but crucial step for success.

    • Elbow Macaroni: 1 pound (about 450g) is perfect. It’s the classic choice for a reason.
    • Water: Enough to boil your pasta.
    • Salt: 1-2 teaspoons for the boiling water. Seasoning the water adds flavor directly to the pasta.

    Quick Tip: While elbow macaroni is a staple, feel free to use other small pasta shapes. Shells, cavatappi, or even penne work wonderfully because they also hold onto that rich, creamy sauce well. This helps you create a truly satisfying macaroni and cheese dish.

    For the Creamy Cheese Sauce

    The heart of any truly amazing mac n cheese recipe is its luscious, velvety cheese sauce. Better yet, this sauce is surprisingly simple to make from scratch using everyday ingredients to create a rich, flavorful base.

    Our approach ensures a smooth, non-grainy sauce that melts perfectly over every piece of pasta. Get ready for the best homemade mac and cheese!

    • Unsalted Butter: 1/2 cup (113g). Butter creates the base of our roux and adds incredible richness.
    • All-Purpose Flour: 1/2 cup (60g). This combines with butter to form a roux, which thickens the sauce beautifully.
    • Whole Milk: 4 cups (about 960ml). Whole milk provides the creamiest texture. While 2% milk works, whole milk gives the best results.
    • Sharp Cheddar Cheese: 3 cups (about 340g), freshly shredded. Cheddar offers that iconic tangy flavor. Always shred your own cheese for the smoothest melt.
    • Gruyère Cheese: 1 cup (about 115g), freshly shredded. Gruyère adds a nutty, complex flavor and melts beautifully into the sauce.
    • Monterey Jack Cheese: 1 cup (about 115g), freshly shredded. This cheese brings extra creaminess with a mild, buttery taste.
    • Dijon Mustard: 1 teaspoon. A tiny bit of Dijon enhances the cheese flavor without making the sauce taste like mustard.
    • Salt: 1 teaspoon, or to taste.
    • Black Pepper: 1/2 teaspoon, freshly ground, or to taste.
    • Pinch of Nutmeg: This optional secret ingredient adds a warm, subtle complexity that complements cheese perfectly.

    Pro Tip for Success: Always shred your own cheese. Pre-shredded cheeses contain anti-caking agents that can make your sauce gritty, while fresh-shredded cheese melts much more smoothly. This is a vital step for a truly creamy sauce and makes all the difference in your macaroni cheese.

    Substitution Idea: For a lighter sauce, you can use 2% milk, but remember that whole milk delivers the richest flavor and texture. Feel free to experiment with your favorite cheese combinations too. Colby, fontina, or even a smoked gouda can add wonderful new twists!

    How to Make Our Step-by-Step Macaroni and Cheese Recipe

    A home cook's hand scooping a generous portion of hot, creamy mac and cheese from a baking dish into a white bowl.
    A warm, inviting scene in a home kitchen. A friendly and approachable home cook, with neatly rolled-up sleeves and clean hands, is using a large serving spoon to scoop a generous portion of hot, creamy homemade mac and cheese from a rustic ceramic baking dish into a modern white serving bowl. The mac and cheese is perfectly golden and slightly crisp on top, with a rich, bubbling interior, and steam gently rising, highlighting its warmth and freshness. The background is a softly blurred, cozy kitchen countertop with hints of kitchen utensils. Photorealistic, professional food photography, high-quality food magazine photo.

    Step 1: Cook the Macaroni

    First, let’s cook the heart of your mac and cheese: the macaroni. This simple step sets the stage for a truly comforting dish.

    Here’s how to do it perfectly:

    1. Boil Water: Fill a large pot with about 6 quarts of water. Bring it to a rolling boil over high heat.
    2. Season Well: Add a generous tablespoon of salt to the boiling water. This flavors the pasta from the inside out and is a key secret for a truly delicious macaroni and cheese.
    3. Add Pasta: Pour in 1 pound (about 450g) of elbow macaroni. Stir immediately to prevent sticking.
    4. Cook to Al Dente: Cook the pasta according to package directions, usually 7 to 9 minutes. Aim for “al dente,” meaning it’s still slightly firm to the bite. Remember, it will finish cooking in the hot cheese sauce, so avoid overcooking.
    5. Drain: Drain the cooked macaroni in a colander. Do not rinse it. The starch left on the pasta helps the sauce stick beautifully.

    Quick Tip: Cooking your pasta al dente is key for the best texture in your mac and cheese recipe. It prevents a mushy outcome.

    Step 2: Create the Roux

    A roux is the foundation for our creamy cheese sauce. It’s a simple mixture of butter and flour. Don’t be intimidated—this is an easy skill to master and a building block for many beginner-friendly recipes.

    Follow these simple steps:

    1. Melt Butter: In a large, heavy-bottomed pot or Dutch oven, melt 1/2 cup (113g) of unsalted butter over medium heat.
    2. Whisk in Flour: Once the butter is melted and bubbly, add 1/2 cup (60g) of all-purpose flour.
    3. Cook the Roux: Whisk continuously for 1 to 2 minutes until the mixture forms a thick paste. This step cooks out the raw flour taste. The roux should be pale yellow, not browned, for our homemade mac and cheese.

    Why it Matters: A properly made roux ensures a smooth, lump-free sauce. It’s essential for that rich, velvety texture we crave.

    Step 3: Make the Béchamel Sauce

    Now, we’ll turn the roux into a luscious béchamel sauce—the perfect canvas for our cheese. Follow this step-by-step cooking guidance to create a truly comforting meal.

    Here’s how to build your sauce:

    1. Warm Milk: Gently warm 4 cups (about 1 liter) of whole milk in a separate saucepan. Do not boil it. Using warm milk helps prevent lumps when added to the roux.
    2. Add Milk Gradually: Slowly pour the warm milk into the roux, about 1/2 cup at a time, whisking constantly as you add.
    3. Continue Whisking: Keep whisking until each addition of milk is fully incorporated and the sauce is perfectly smooth.
    4. Thicken the Sauce: Bring the sauce to a gentle simmer over medium heat, still whisking. Let it cook for 5 to 7 minutes, or until it thickens enough to coat the back of a spoon. It will be silky and rich.
    5. Season: Remove the pot from the heat. Stir in 1 teaspoon of salt, 1/2 teaspoon of black pepper, and 1/4 teaspoon of nutmeg. Nutmeg adds a lovely warmth that complements cheese sauces.

    Troubleshooting Tip: If your sauce has a few lumps, don’t worry. A quick pass with an immersion blender or pushing it through a fine-mesh sieve will make it perfectly smooth. It’s a great trick for approachable home cooking.

    Step 4: Melt the Cheeses

    This is where the magic happens! Adding cheese to your warm béchamel creates the gooey, irresistible heart of your mac n cheese recipe. Using high-quality, freshly grated cheese makes all the difference.

    Let’s get cheesy:

    1. Remove from Heat: Ensure your béchamel sauce is off the direct heat. This prevents the cheese from separating or becoming oily.
    2. Add Cheeses in Batches: Gradually add your shredded cheeses (4 cups total, e.g., 2 cups sharp cheddar, 1 cup Gruyère, 1 cup Monterey Jack) to the warm sauce, about one-third at a time.
    3. Stir Until Smooth: Stir constantly with a wooden spoon or whisk until the cheese is completely melted. Your sauce will become incredibly creamy and smooth.
    4. Taste and Adjust: Taste the cheese sauce and add more salt, pepper, or a pinch of cayenne pepper if you like a little kick. This makes it your best mac and cheese recipe.

    Expert Advice: Always grate your own cheese. Pre-shredded cheeses often contain anti-caking agents that can make your sauce gritty. Freshly grated cheese melts much more smoothly, leading to the creamiest macaroni cheese imaginable.

    Step 5: Combine and Serve

    The moment you’ve been waiting for! Let’s combine the cooked macaroni and rich cheese sauce to complete this easy mac and cheese masterpiece. It’s a flavorful meal made easy that your whole family will love.

    Finish your dish with these steps:

    1. Add Pasta to Sauce: Pour the drained, cooked macaroni directly into the pot with the warm cheese sauce.
    2. Gently Combine: Use a large spoon or spatula to gently fold the macaroni into the cheese sauce. Make sure every piece of pasta is coated in that luscious goodness.
    3. Serve Immediately: Transfer your glorious macaroni and cheese to serving bowls. It’s best enjoyed fresh and warm.
    4. Optional Garnish: If desired, sprinkle with fresh parsley or chives. A dash of paprika also adds a pop of color and subtle flavor.

    Mealtime Made Easy: This family-friendly meal comes together quickly, proving that simple dinner recipes can be incredibly satisfying. Stop wondering “how to cook tasty meals quickly” and start enjoying them stress-free with Recipesmondial!

    How Can You Customize This Recipe?

    Our classic homemade mac and cheese is wonderfully delicious as is. However, we love helping you make dishes your own! Customizing this recipe is a fantastic way to discover new flavors and tailor it to your family’s preferences. Here are some popular variations to try.

    Classic Baked Mac and Cheese Variation

    Transforming your stovetop mac and cheese into a bubbling, golden-brown baked version is incredibly easy. This variation adds a delightful crispy topping and a richer, more comforting texture. It’s perfect for a family-friendly meal or a potluck dish.

    To make a baked mac and cheese:

    • Prepare your base: Follow our step-by-step guidance for the stovetop mac and cheese as described in the main recipe.
    • Preheat oven: Set your oven to 375°F (190°C).
    • Choose your dish: Lightly butter a 9×13-inch baking dish.
    • Add a little liquid: Stir an extra 1/4 cup of milk into your prepared mac and cheese. This helps keep it moist during baking.
    • Transfer: Pour the macaroni and cheese mixture into the prepared baking dish and spread it evenly.
    • Create the topping: In a small bowl, combine 1 cup of panko breadcrumbs with 2 tablespoons of melted butter. You can also add 1/2 cup of shredded cheddar or Parmesan for extra flavor.
    • Bake: Sprinkle the breadcrumb mixture evenly over the top. Bake for 20-25 minutes, or until the topping is golden brown and the cheese is bubbly.
    • Serve: Let it rest for a few minutes before serving. This allows the sauce to set.

    This baked macaroni and cheese is a true crowd-pleaser. It’s also a simple dinner recipe that feels extra special.

    Easy Crockpot Mac and Cheese Method

    For days when you need a simple mac and cheese without the fuss, your Crockpot is your best friend. This hands-off method delivers a creamy dish that’s ideal for busy families. It’s also an excellent option for meal prep!

    Here’s how to make Crockpot mac and cheese:

    • Combine ingredients: In your slow cooker, mix 1 pound of uncooked elbow macaroni, 4 cups of whole milk, 1 teaspoon of salt, 1/2 teaspoon of black pepper, and 1/4 cup of unsalted butter (cut into pieces).
    • Stir well: Ensure the pasta is mostly submerged in the liquid.
    • Cook: Cover and cook on LOW for 2-3 hours, or on HIGH for 1-1.5 hours.
    • Stir during cooking: Stir the mixture gently halfway through to prevent sticking and ensure even cooking. The pasta should be tender.
    • Add cheese: Once the pasta is cooked, stir in 8 ounces of shredded sharp cheddar and 4 ounces of shredded Gruyère or Monterey Jack until completely melted and smooth.
    • Serve warm: Enjoy your delicious, creamy crockpot mac and cheese!

    This method saves you from boiling pasta separately. It also keeps your kitchen clean, making it a perfect quick meal solution.

    Quick Instant Pot Mac and Cheese Guide

    When time is short, the Instant Pot is a game-changer for making quick mac and cheese. You can have a creamy, flavorful dish on the table in minutes. It’s the perfect solution for a simple dinner after a long day.

    Follow these steps for Instant Pot mac and cheese:

    • Add pasta and liquid: Pour 1 pound of elbow macaroni, 4 cups of water or chicken broth, and 1 tablespoon of unsalted butter into your Instant Pot. Add 1/2 teaspoon of salt.
    • Cook: Close the lid and set the valve to sealing. Cook on HIGH pressure for 4 minutes.
    • Release pressure: Once cooking is complete, perform a quick pressure release by carefully turning the valve to venting.
    • Stir in dairy: Open the lid and stir in 1/2 cup of whole milk or evaporated milk and 1/4 teaspoon of black pepper.
    • Melt cheese: Add 8 ounces of shredded sharp cheddar and 4 ounces of shredded Monterey Jack or Colby. Stir continuously until the cheese is melted and the sauce is smooth.
    • Serve immediately: This easy mac and cheese is best enjoyed fresh from the pot.

    The Instant Pot creates a gourmet-tasting mac and cheese with minimal effort. It’s one of the best easy recipes for busy weeknights.

    Smoked Mac and Cheese for Extra Flavor

    Ready to elevate your homemade mac and cheese? Adding a smoky twist introduces an incredible depth of flavor. This variation is fantastic for barbecues and other gatherings. It brings a uniquely flavorful meal to your table.

    There are two main ways to achieve a delicious smoked mac and cheese:

    Method 1: Smoking the Assembled Dish

    • Prepare the base: Make our stovetop mac and cheese recipe up to the point of combining the pasta and sauce.
    • Transfer: Pour the creamy mac and cheese into an aluminum foil pan or a cast-iron skillet.
    • Preheat smoker: Set your smoker to 225-250°F (107-121°C). Use wood chips like apple, cherry, or pecan for a mild, sweet smoke. [1]
    • Smoke: Place the dish in the smoker for 1.5-2 hours. Stir occasionally to ensure even smoke distribution.
    • Add topping (optional): For the last 30 minutes, you can top it with extra shredded cheese and breadcrumbs for a crispy crust.
    • Serve: The result is a delightfully smoky, comforting dish.

    Method 2: Incorporating Smoked Ingredients

    • Use smoked cheese: Swap some of the cheddar or Gruyère for a smoked gouda or smoked cheddar. This adds a subtle smoky note directly into the sauce.
    • Add smoked paprika: Stir 1/2 to 1 teaspoon of smoked paprika into your cheese sauce for an earthy, smoky flavor without needing a smoker.
    • Cook with bacon: Crispy bacon bits, or rendered bacon fat used in the roux, also imparts a fantastic smoky essence.

    Smoked mac and cheese is an adventurous yet approachable option. It proves that an easy-to-make meal can also be incredibly unique.

    What Are the Secrets to the Creamiest Mac and Cheese?

    Choosing the Best Cheeses for Your Sauce

    Crafting the perfect mac and cheese starts with amazing cheese. The right blend makes all the difference. You want a creamy, smooth sauce that’s full of flavor. Luckily, you don’t need fancy cheeses for an outstanding result.

    Here’s what to look for when choosing your cheeses:

    • Good Melting Properties: Some cheeses melt beautifully into a silky sauce, while others can become clumpy or oily. Always pick cheeses known for melting smoothly.
    • Flavor Balance: A mix of sharp, mild, and nutty cheeses creates depth. This ensures your mac and cheese is neither bland nor overwhelming.

    These are some of our favorite cheeses for the creamiest mac and cheese:

    • Sharp Cheddar: A classic for a reason. It offers that signature tangy, rich flavor.
    • Gouda: Known for its mild, nutty, and slightly sweet notes. Gouda melts incredibly well, adding to the silkiness.
    • Gruyère: This Swiss cheese brings a sophisticated, savory, and complex flavor. It melts like a dream.
    • Fontina: This Italian cheese is buttery and nutty. It provides an amazing stretch and creaminess to your sauce.
    • Monterey Jack: Mild and very easy to melt. It’s fantastic for balancing stronger flavors and ensuring a smooth texture.

    Here’s a helpful tip for the best homemade mac and cheese: always shred your own cheese. Pre-shredded packages contain anti-caking agents that can make your sauce grainy or less smooth. Taking a few extra minutes to grate it fresh is well worth the effort for a perfect texture.

    Tips to Avoid a Grainy Cheese Sauce

    A grainy cheese sauce can be disappointing after all your effort. The secret to the best mac and cheese is a smooth, velvety sauce that elevates your family-friendly meal. Thankfully, achieving this perfect texture is easy. Avoid common mistakes with these simple tips:

    • Start with a Good Roux: This is the foundation of your cheese sauce. Melt butter, then whisk in an equal amount of flour. Cook it for a minute or two until it forms a paste, which cooks out the raw flour taste.
    • Use Warm Milk: When adding milk to your roux, make sure it’s at least room temperature, or even slightly warm. Adding cold milk to a hot roux can cause clumps.
    • Add Cheese Gradually: Don’t dump all your cheese in at once. Add a handful at a time, whisking each addition until fully melted before adding more.
    • Keep the Heat Low: Cheese melts best over low to medium-low heat. High heat can cause the proteins in cheese to seize, separating the fat and resulting in a grainy or oily texture.
    • Don’t Overcook: As soon as the cheese is fully melted and incorporated, remove the sauce from the heat. Continued cooking can ruin the texture as proteins tighten and fat separates.
    • Consider Room Temperature Cheese: Let your shredded cheese sit at room temperature for 15-20 minutes before you add it. This simple step helps it melt more smoothly and evenly into the sauce.

    Following these steps will help you create a wonderfully creamy and smooth sauce every time. Your easy mac and cheese will be perfectly luxurious.

    Storing and Reheating Leftover Macaroni and Cheese

    Delicious mac and cheese rarely leaves leftovers. But if you have some, you’ll want to keep it tasting great. Properly storing and reheating your homemade mac and cheese ensures it’s still a delightful treat the next day. This also works as a great meal prep tip for busy families.

    Here’s how to handle your leftovers:

    Storing Your Mac and Cheese

    • Cool Quickly: Let your mac and cheese cool down to room temperature within two hours of cooking. This prevents bacterial growth [2].
    • Airtight Container: Transfer the cooled mac and cheese to an airtight container. This keeps it fresh and prevents it from drying out in the fridge.
    • Refrigeration: Store in the refrigerator for up to 3-4 days. For longer storage, you can freeze it, but the texture may change slightly upon thawing.

    Reheating Leftover Macaroni and Cheese

    Reheating can sometimes make mac and cheese dry, but you can bring it back to life. The secret is adding a splash of liquid.

    • Stovetop Method (Best for Creaminess):
      1. Place your mac and cheese in a saucepan over low heat.
      2. Add a splash of milk, cream, or even water. Start with a tablespoon or two.
      3. Stir gently and continuously.
      4. Heat until warmed through and creamy again. Add more liquid if needed.
    • Oven Method (Good for Baked Varieties):
      1. Preheat your oven to 325°F (160°C).
      2. Place mac and cheese in an oven-safe dish.
      3. Add a few tablespoons of milk or cream over the top. Cover the dish loosely with foil.
      4. Bake for 15-25 minutes, or until heated through.
    • Microwave Method (Quickest Option):
      1. Put a single serving in a microwave-safe dish.
      2. Add a small amount of milk or cream (about 1-2 teaspoons).
      3. Cover and heat on medium power for 1-2 minutes.
      4. Stir well, then continue heating in 30-second intervals until warmed.

    With these simple tips, your leftover mac and cheese can be almost as good as fresh. This makes for easy lunches or quick dinners on busy days. Recipesmondial aims to make your family-friendly meals enjoyable and stress-free, even with leftovers!

    Frequently Asked Questions About Homemade Mac and Cheese

    What is a simple mac and cheese recipe?

    Making a delicious, simple mac and cheese is easier than you think. It’s a perfect beginner-friendly recipe for a comforting meal. Our approach focuses on minimal steps and everyday ingredients.

    Here’s a simplified breakdown of how to make a creamy, quick mac and cheese:

    • Cook your pasta: Start by boiling your favorite macaroni until it’s al dente. Drain it well, but save a little pasta water. This water adds a wonderful richness to your sauce.
    • Make a quick roux: In the same pot, melt some butter. Then, whisk in an equal amount of flour. Cook this mixture for about a minute. This creates the base for your creamy sauce.
    • Whisk in milk: Slowly pour in warm milk, whisking constantly. Continue to stir until the sauce thickens. This forms a smooth béchamel.
    • Melt the cheese: Remove the pot from the heat. Stir in your shredded cheeses until they are completely melted and smooth. A pinch of salt and pepper enhances the flavor.
    • Combine and enjoy: Add your cooked macaroni back into the cheese sauce. Stir everything together until it is perfectly coated. Serve your homemade mac and cheese immediately for the best taste!

    This easy mac and cheese method delivers a flavorful, family-friendly meal with little fuss. It’s perfect for those busy weeknights.

    What is the best cheese for mac and cheese?

    Choosing the best cheese for mac and cheese is key to getting incredible flavor and creaminess. For the best results, use a blend of cheeses. This combination creates a rich, complex taste. It’s also important to know that some cheeses melt better than others—generally, younger cheeses melt smoother than aged ones [3].

    Consider these popular options for your ultimate homemade mac and cheese:

    • Sharp Cheddar: This is a classic for a reason. It provides that iconic, tangy mac n cheese flavor.
    • Gruyère: For a nutty, sophisticated depth, Gruyère is an excellent choice. It melts beautifully into a silky sauce.
    • Fontina: This Italian cheese offers a wonderfully mild, buttery flavor. It adds incredible meltiness to your sauce.
    • Monterey Jack: A mild, semi-hard cheese that melts exceptionally well. It contributes to a super smooth texture.
    • Smoked Gouda: If you love a hint of smoky flavor, add some smoked Gouda. It makes for a unique twist on the traditional.

    Pro Tip: Always grate your own cheese from a block. Pre-shredded cheeses often contain anti-caking agents. These can make your cheese sauce grainy or prevent it from melting smoothly. Freshly grated cheese melts like a dream, giving you the creamiest mac and cheese every time.

    How do you make old fashioned baked macaroni and cheese?

    An old fashioned baked macaroni and cheese takes comfort food to another level with its delightful crispy topping and deeper flavors. This baked mac and cheese recipe is ideal for feeding a crowd or a special family dinner.

    Here’s how to elevate your stovetop mac and cheese into a classic baked dish:

    • Prepare your basic mac and cheese: Follow the steps for our creamy stovetop macaroni and cheese recipe. Make sure your cheese sauce is well-seasoned and perfectly smooth.
    • Preheat and prep: Preheat your oven to 375°F (190°C). Lightly grease a 9×13 inch baking dish. This prevents sticking.
    • Add a topping: For that signature crunch, combine breadcrumbs with a little melted butter. You can also mix in some grated Parmesan cheese for extra flavor.
    • Layer in the dish: Pour your prepared macaroni and cheese into the greased baking dish. Spread it evenly.
    • Sprinkle and bake: Generously sprinkle the breadcrumb mixture over the top of the macaroni and cheese. Bake for 20-25 minutes. Look for a bubbly sauce and a golden-brown, crispy topping.
    • Rest and serve: Let the baked macaroni and cheese rest for 5-10 minutes after baking. This allows the sauce to set slightly. Then, scoop out generous portions and enjoy!

    This method transforms simple dinner recipes into an approachable home cooking masterpiece. It’s a truly satisfying and family-friendly meal that everyone will love.


    Sources

    1. https://www.traeger.com/recipes/smoked-mac-and-cheese
    2. https://www.fsis.usda.gov/food-safety/safe-food-handling-and-preparation/food-safety-basics/danger-zone-40f-140f
    3. https://www.seriouseats.com/the-science-of-melted-cheese-what-makes-a-cheese-melt-nicely

  • The Best Classic Meatloaf Recipe (Easy, Juicy, and Flavorful!)

    The Best Classic Meatloaf Recipe (Easy, Juicy, and Flavorful!)

    This classic meatloaf recipe creates a perfectly moist and flavorful dinner using simple ingredients like ground beef, breadcrumbs, onion, milk, and a sweet, tangy ketchup-based glaze. The key to a juicy result is not overmixing the ingredients and allowing the loaf to rest after baking. This easy, step-by-step guide is perfect for a comforting family-friendly meal.

    A classic meatloaf is more than just a meal—it’s a comforting memory that brings families together. But creating that perfect, juicy loaf can feel like a challenge. Many home cooks worry about dry results or get frustrated by overly complex recipes. We understand, and we believe enjoying this timeless dish should be simple and stress-free.

    That’s where Recipesmondial comes in. We’re here to help you cook with confidence, starting with beloved dishes like this one. Our best classic meatloaf recipe is designed to be an incredibly easy meatloaf recipe. It’s perfect for beginner cooks and guarantees a juicy, tender result every time. Say goodbye to complicated steps. It’s time for approachable home cooking that delivers on taste and makes preparing family-friendly meals a joy.

    This meatloaf recipe isn’t just simple; it’s also packed with incredible flavor. It’s a true family favorite that will have everyone asking for seconds. We’ll walk you through every step, from choosing the right ingredients to forming the perfect loaf and creating that irresistible tangy glaze. Get ready to discover why this will become your go-to meatloaf. Flavorful meals made easy are truly within reach.

    Why Is This the Best Meatloaf Recipe?

    A thick slice of glazed meatloaf on a plate, revealing its juicy interior, served with mashed potatoes and green beans.
    A single, generous slice of classic meatloaf, showcasing a perfectly moist and tender interior, rich brown crust, and glistening glaze, artfully arranged on a rustic white ceramic plate with a small side of creamy mashed potatoes and green beans. The meatloaf has a slight sheen from the glaze. The background is a blurred, warm, inviting home kitchen. Photorealistic, professional food photography, high-quality food magazine photo, warm, soft lighting, focus on deliciousness and texture.

    If you’re looking for a meatloaf recipe that’s easy to make, incredibly juicy, and packed with flavor, you’ve found it. This classic recipe from Recipesmondial is perfect for home cooks of all skill levels and is quickly becoming a favorite for busy families everywhere.

    Cooking should be enjoyable, not stressful. You want delicious, reliable results, which is why we perfected this simple dinner recipe to turn everyday ingredients into a memorable meal. Say goodbye to complex instructions and dry, crumbly meatloaf—our method focuses on clear steps and incredible flavor.

    Here’s what makes this the best meatloaf recipe you’ll ever try:

    • Unbeatable Juiciness: Our special technique locks in moisture, ensuring a tender, juicy meatloaf every single time. No more dry, disappointing results.
    • Rich, Savory Flavor: A perfect blend of seasonings creates deep, comforting flavors. The savory meat is perfectly balanced for a meal that’s both simple and delicious.
    • Perfectly Tangy Glaze: Our simple, sweet, and tangy glaze elevates the entire dish. It bakes right onto the loaf, adding a beautiful finish and an irresistible taste.
    • Beginner-Friendly Approach: With clear, step-by-step instructions, even new cooks can feel confident in the kitchen. This is a truly approachable home cooking experience.
    • Quick & Easy Preparation: We know your time is valuable. This recipe uses simple techniques so you can get a delicious meal on the table without feeling overwhelmed.
    • Reliable Results: This recipe is tested to work every time. You can count on this classic meatloaf to turn out perfectly, making it a dependable choice for family-friendly meals.
    • Versatile & Adaptable: We include practical tips and substitutions, so you can easily adjust the recipe to fit your family’s preferences. It’s a great base for your own culinary creativity.

    This meatloaf isn’t just a meal—it’s an invitation to enjoy cooking again and build confidence in the kitchen. Get ready to impress your family with an outstanding dish they will request again and again.

    What Ingredients Do You Need for a Classic Meatloaf?

    An overhead view of classic meatloaf ingredients, including ground beef, eggs, breadcrumbs, and vegetables, neatly arranged on a wooden board.
    A visually appealing flat lay of all classic meatloaf ingredients arranged on a rustic wooden cutting board or light-colored kitchen counter. Includes fresh ground beef in a small bowl, eggs, breadcrumbs, finely chopped onion and garlic, milk, Worcestershire sauce, ketchup, mustard, and a sprig of fresh parsley. Ingredients are clean, vibrant, and neatly presented, with good separation. Photorealistic, professional food photography, high-quality food magazine photo, bright, natural lighting, overhead shot.

    Ready to make a delicious meatloaf that will become a family favorite? The secret to the best meatloaf recipe is using simple, fresh ingredients—many of which you likely already have on hand. This makes preparing a flavorful and stress-free meal easier than ever.

    We’ve broken down the ingredients into two main parts: the juicy meatloaf mixture and the irresistible tangy glaze. With this simple guide, you’ll have everything you need to cook with confidence.

    For the Meatloaf Mixture

    The foundation of any great meatloaf is a well-seasoned, balanced mixture. These ingredients work together to ensure your meatloaf is moist, flavorful, and holds its shape perfectly.

    • 1 ½ pounds ground beef (80/20 lean): This is our star ingredient! The 80/20 blend is perfect, offering enough fat for moisture and flavor without being greasy. For a leaner option, you can use 90/10 ground beef.
    • 1 small yellow onion, finely diced: Onion adds a wonderful savory depth. Dicing it finely ensures it blends seamlessly into the meatloaf.
    • 2 cloves garlic, minced: Fresh garlic brings a warm, aromatic touch that elevates the overall flavor.
    • ¾ cup plain breadcrumbs: Breadcrumbs act as a binder, helping absorb moisture and keeping the meatloaf tender. For a gluten-free option, use gluten-free breadcrumbs or crushed crackers.
    • 1 large egg: As another essential binder, the egg helps hold everything together and prevents your meatloaf from crumbling.
    • ½ cup milk (whole or low-fat): Milk adds essential moisture, which is key for a juicy texture. You can use any type you prefer.
    • 2 tablespoons Worcestershire sauce: This ingredient adds a fantastic umami kick that deepens the meat’s savory flavor.
    • 1 tablespoon ketchup: A little ketchup in the mixture adds a hint of sweetness and tang for that classic meatloaf flavor.
    • 1 teaspoon Dijon mustard: Dijon mustard offers a subtle, sharp flavor that beautifully complements the other savory ingredients.
    • 1 teaspoon salt: Essential for seasoning your meatloaf just right.
    • ½ teaspoon black pepper: Adds a touch of warmth and spice.
    • ½ teaspoon dried Italian seasoning (or a mix of dried parsley, oregano, and basil): These herbs add aromatic notes that tie all the flavors together for a classic, comforting taste.

    For the tangy meatloaf glaze

    A classic meatloaf isn’t complete without its tangy and slightly sweet glaze. This simple topping adds a beautiful finish and an extra layer of flavor, making the final dish irresistible.

    • ½ cup ketchup: This forms the base of the glaze, providing a rich, tomatoey flavor.
    • ¼ cup packed light brown sugar: Brown sugar adds sweetness to balance the tang and gives the glaze a lovely caramelization.
    • 1 tablespoon apple cider vinegar: The vinegar brings a bright, tangy note that cuts through the richness of the meatloaf.
    • 1 tablespoon Worcestershire sauce: As in the meatloaf mixture, this sauce adds a savory, complex depth to the glaze.
    • 1 teaspoon Dijon mustard: A touch of mustard enhances the tang and gives the glaze an extra zing.

    How Do You Make Meatloaf from Scratch?

    A home cook's hands gently mixing ground beef and other ingredients for meatloaf in a large bowl.
    A warm, inviting close-up action shot of a real human home cook’s hands gently mixing the meatloaf ingredients in a large, clean stainless steel or ceramic mixing bowl. The ingredients, including ground beef, chopped vegetables, and binder, are clearly visible and well-combined, showcasing the rich texture. The kitchen background is slightly blurred, suggesting a cozy, approachable home cooking environment with good counter space. Photorealistic, professional food photography, high-quality food magazine photo, natural, soft lighting, focus on the hands and ingredients, conveying ease and engagement.

    Step 1: Prepare the Meatloaf Mixture

    A great meatloaf starts with the right mixture. Follow these steps to create a flavorful foundation, remembering to mix gently for the best texture.

    1. Sauté the Aromatics: Melt olive oil in a skillet over medium heat. Add the chopped onion, bell pepper, and garlic, then cook for 5–7 minutes until soft and fragrant. Let the vegetables cool slightly before adding them to the meat.
    2. Combine Wet Ingredients: In a large mixing bowl, whisk together the milk, eggs, Worcestershire sauce, ketchup, Dijon mustard, salt, and black pepper until well combined.
    3. Add Dry Binders: Stir the breadcrumbs and fresh parsley into the wet mixture. This step helps the breadcrumbs absorb moisture, which will bind the meatloaf together.
    4. Introduce the Meat and Veggies: Add the ground beef and the cooled sautéed vegetables to the bowl with the wet ingredients.
    5. Mix Gently: Use your hands to gently combine all the ingredients. Be careful not to overmix, as this can result in a tough meatloaf. Mix only until everything is incorporated.

    Step 2: Shape the Loaf

    Properly shaping the meatloaf ensures it cooks evenly and holds its form. Follow these steps for a perfect loaf.

    1. Choose Your Pan: Use a standard loaf pan for a classic shape, or form the loaf freehand on a parchment-lined baking sheet. A baking sheet will yield a crustier exterior.
    2. Transfer the Mixture: Carefully move the meat mixture to your chosen pan or baking sheet.
    3. Shape and Compact: If using a loaf pan, gently press the mixture down to eliminate air pockets. If shaping freehand, form it into an oval about 9 inches long and 4–5 inches wide. Slope the sides slightly to help the loaf hold its shape while baking.

    Step 3: Make the Glaze

    This tangy glaze is the secret to an exceptional meatloaf, adding a final layer of moisture and flavor. Making it is quick and simple.

    1. Gather Ingredients: In a small bowl, combine the ketchup, brown sugar, apple cider vinegar, and a dash of ground mustard.
    2. Whisk Together: Whisk the ingredients until the brown sugar has completely dissolved and the glaze is smooth.
    3. Set Aside: Set the glaze aside to use later in the baking process.

    Step 4: Bake and Glaze the Meatloaf

    The key to a perfectly caramelized finish is adding the glaze at the right time during baking. Follow these steps for a straightforward cooking process.

    1. Preheat Your Oven: Preheat your oven to 350°F (175°C). This moderate temperature ensures the meatloaf cooks evenly.
    2. Initial Bake: Place the meatloaf in the preheated oven and bake for 45 minutes. This initial bake, without the glaze, helps the loaf set.
    3. Apply the Glaze: After 45 minutes, carefully remove the meatloaf from the oven and spread about two-thirds of the glaze evenly over the top and sides.
    4. Continue Baking: Return the meatloaf to the oven and bake for an additional 15-20 minutes, or until the glaze is bubbly and lightly caramelized.
    5. Check for Doneness: To ensure the meatloaf is cooked through, insert an instant-read thermometer into the center. It is safe to eat when the internal temperature reaches 160°F (71°C) [source: https://www.fsis.usda.gov/food-safety/safe-food-handling-and-preparation/food-safety-basics/safe-temperature-chart].

    Step 5: Rest and Serve

    Don’t skip this final step. Resting the meatloaf is crucial for locking in juices, which makes it more flavorful and easier to slice.

    1. Rest the Meatloaf: Remove the meatloaf from the oven and let it rest for at least 10–15 minutes before slicing. This crucial step allows the juices to redistribute, ensuring every slice is moist and tender.
    2. Slice and Serve: After resting, transfer the meatloaf to a cutting board and slice it into thick portions.
    3. Garnish: For extra flavor and a touch of color, drizzle with the remaining glaze and garnish with fresh parsley.
    4. Enjoy Your Creation: Serve the meatloaf hot and enjoy this classic comfort food with your family.

    Expert Tips for the Juiciest, Most Flavorful Meatloaf

    Crafting the perfect meatloaf is easier than you think. With a few simple tricks, you can elevate your classic recipe from good to absolutely incredible. These expert tips focus on maximizing juiciness and flavor, helping you achieve a truly memorable meal every time.

    Recipesmondial is here to guide you. Say goodbye to dry, bland meatloaf and get ready for a delicious, family-friendly meal that everyone will love!

    Choosing Your Meat for Ultimate Flavor and Juiciness

    • Embrace a Meat Blend: For the most flavorful and juicy meatloaf, use a mix of ground meats. An 80/20 ground beef provides richness, while ground pork or veal boosts moisture and complex flavor. This combination is the key to a tender result.
    • Fat Content Matters: Opt for ground beef with an 80% lean to 20% fat ratio. The fat renders during baking, which adds incredible flavor and keeps the meatloaf from drying out. Using leaner meats can result in a drier loaf.

    The Secret to a Tender and Moist Loaf

    • Don’t Overmix: This is a crucial step for a tender meatloaf. Gently mix the ingredients with your hands just until they are combined. Overworking the meat develops proteins that will make your final loaf tough and dense.
    • Boost Moisture with Liquids: Incorporate a liquid like milk, beef broth, or tomato juice into your mixture. This adds essential moisture that keeps the meatloaf tender and prevents it from drying out as it bakes.
    • Sauté Your Aromatics: Always sauté aromatics like onions, garlic, and bell peppers before adding them to the mix. This process softens them and deepens their flavor, adding complexity and preventing any raw, crunchy bits in your finished meatloaf.
    • Use the Right Binder: Breadcrumbs and eggs are essential binders. They not only hold the loaf together but also absorb moisture, which contributes to a tender texture. For the best results, use fresh breadcrumbs whenever possible.

    Baking and Glazing for Perfection

    • Shape Your Loaf Properly: For a better crust, form your meatloaf into a free-form loaf on a baking sheet instead of pressing it into a pan. This allows heat to circulate more evenly, creating a delicious crust on all sides.
    • The Magic of Glaze: A tangy glaze adds a burst of flavor and creates a beautiful, caramelized exterior. For the best results, apply half of the glaze at the start of baking and the remaining half about 15-20 minutes before it’s done cooking.
    • Bake to the Right Temperature: Use a meat thermometer to guarantee your meatloaf is cooked perfectly. Remove it from the oven when the internal temperature reaches 160°F (71°C) [1]. This ensures it is safe to eat and prevents the meat from overcooking.

    The Essential Resting Period

    • Rest Your Meatloaf: Once baked, let your meatloaf rest for at least 10-15 minutes before slicing. This vital step allows the juices to redistribute throughout the loaf, ensuring every slice is incredibly moist. Cutting it too soon will cause those flavorful juices to run out.

    Following these simple tips will transform your meatloaf into a juicy, flavorful, and truly satisfying dish. Enjoy cooking this easy, family-friendly meal with confidence!

    What Should You Serve With Meatloaf?

    A delicious, juicy meatloaf is the star of any dinner plate, but pairing it with the right side dishes turns it into a complete and comforting meal. For busy home cooks, choosing easy and flavorful sides is the key to success.

    At Recipesmondial, we love helping you create amazing family-friendly meals without the stress. Here are some of our favorite simple side dish ideas to serve with your classic meatloaf for a delightful and balanced dinner.

    Classic Comfort Sides

    These go-to choices are simple, heartwarming recipes that bring a sense of satisfaction to the dinner table.

    • Creamy Mashed Potatoes: There’s a reason this pairing is timeless! Fluffy, buttery mashed potatoes are perfect for soaking up extra meatloaf glaze. You can easily make them ahead of time for quick meal prep.
    • Cheesy Macaroni and Cheese: For a truly indulgent and family-friendly meal, creamy mac and cheese is a winner. Its comforting flavor beautifully balances the savory meatloaf.
    • Warm Dinner Rolls or Crusty Bread: Don’t underestimate the power of a good roll. They are wonderful for sopping up every last bit of glaze or gravy. Serve them warm for an extra touch of coziness.

    Fresh & Flavorful Vegetable Sides

    Adding a vegetable is the easiest way to create a healthy, balanced meal. These quick and beginner-friendly options add both freshness and flavor.

    • Garlic Green Beans: Lightly steamed or sautéed green beans with a hint of garlic are crisp and refreshing, providing a lovely contrast to the richness of the meatloaf.
    • Roasted Asparagus: Toss fresh asparagus with olive oil, salt, and pepper, then roast until tender-crisp. This elegant side is surprisingly simple and adds a pop of color.
    • Sweet Glazed Carrots: Carrots cooked until tender and lightly glazed with butter and a touch of brown sugar offer a sweet complement. It’s a simple side dish loved by all ages.
    • Steamed Broccoli: A classic for good reason, steamed broccoli is quick, healthy, and versatile. A squeeze of lemon or a sprinkle of cheese can easily elevate it.
    • Creamed Corn or Corn on the Cob: Sweet corn, whether creamed for a rich texture or served simply on the cob, is a delightful addition. This simple side dish always pleases.

    Hearty Starchy Alternatives

    Looking for an alternative to mashed potatoes? These satisfying options are just as delicious and easy to prepare.

    • Crispy Roasted Potatoes: Cubed potatoes roasted until golden and tender make a fantastic side. Season them with herbs like rosemary or thyme for extra flavor.
    • Baked Sweet Potatoes: A healthier and naturally sweet alternative. Simply bake them until tender and serve with a dollop of butter or a sprinkle of cinnamon for a different flavor profile that pairs wonderfully.
    • Rice Pilaf: For a lighter grain option, a fluffy rice pilaf is an excellent choice. It’s flavorful without being too heavy, making it an ideal side for a hearty main like meatloaf.

    Tips for Perfect Pairings

    To create the perfect meal, focus on balance. Since meatloaf is a rich dish, it benefits from sides that offer contrasting textures and flavors.

    • Balance Richness: Pair the savory meatloaf with lighter, fresher vegetables to prevent the meal from feeling too heavy.
    • Mix Textures: Combine creamy sides, crunchy vegetables, and soft bread. A variety of textures makes the meal more enjoyable.
    • Add Color: A vibrant plate is more appealing. Green beans, bright carrots, or other colorful vegetables can make your dinner visually exciting.

    With these simple side dish ideas, you can easily create a flavorful meatloaf dinner that’s a joy to both cook and eat. Enjoy!

    Recipe Variations and Substitutions

    Meat Variations

    While our classic meatloaf recipe shines with ground beef, you can easily switch things up with other meats. Each type brings a unique flavor and texture, allowing you to tailor the meatloaf to your family’s preferences. It’s a great way to make family-friendly meals even more special.

    • Ground Beef (Lean or Medium): This is the traditional choice for a juicy, flavorful meatloaf recipe. We recommend an 80/20 lean-to-fat ratio for the best meatloaf recipe, as it ensures moisture without being too greasy.
    • Pork: Adding ground pork provides extra moisture and richness. For a deeper flavor, try combining half ground beef with half ground pork. This blend, common in many easy meatloaf recipe variations, also helps keep the meatloaf tender.
    • Veal: Ground veal offers a very tender and mild flavor. It’s often combined with beef and pork to create a “meatloaf mix” that’s incredibly succulent. This blend is truly a flavorful meal made easy.
    • Ground Turkey or Chicken: For a lighter option, use ground turkey or chicken. Keep in mind that these leaner meats can dry out more easily. To maintain moisture, add a bit more liquid to the mixture, such as extra broth, milk (or a dairy-free alternative), or even a touch of olive oil. For the best results, choose dark meat ground turkey for more flavor and moisture.
    • Custom Blends: Feel free to experiment with your own combinations. A popular choice is a mix of beef, pork, and veal, which yields the ultimate rich and juicy meatloaf. You can also blend leaner meats with a small amount of fattier meat to help maintain tenderness and flavor.

    How to Make it Gluten-Free

    Making our easy meatloaf recipe gluten-free is simple. The main ingredient to replace is the breadcrumbs, which bind the meatloaf and add moisture. Luckily, with so many great gluten-free substitutes available, you can still enjoy a delicious, beginner-friendly recipe that fits your dietary needs.

    • Gluten-Free Breadcrumbs: For the easiest swap, simply use an equal amount of your favorite gluten-free breadcrumbs. They work just like the regular kind.
    • Rolled Oats (Gluten-Free Certified): Old-fashioned rolled oats are an excellent binder and add a lovely texture. Use them in place of breadcrumbs, but be sure to choose a certified gluten-free brand to prevent cross-contamination.
    • Crushed Gluten-Free Crackers: Crushed plain gluten-free crackers also work well as a replacement for regular breadcrumbs and add a savory touch.
    • Cooked Quinoa or Rice: For a different approach, try using about 1/2 to 3/4 cup of cooked and cooled quinoa or rice per pound of meat. These options add moisture and bind the meatloaf effectively.

    Always double-check the labels of all your ingredients to ensure the entire meatloaf recipe remains gluten-free.

    Making Meatloaf Without Milk

    Prefer to make meatloaf without milk? No problem. While milk adds moisture and helps tenderize the meat, several easy substitutions work perfectly. With these simple swaps, you can still achieve a wonderfully juicy and flavorful result, ensuring your approachable home cooking always meets your needs.

    • Water: Plain water is the simplest substitute. Use the same amount called for in the recipe to add moisture without changing the flavor.
    • Beef or Chicken Broth: Broth not only keeps the meatloaf moist but also adds an extra layer of savory flavor. To control the saltiness, opt for a low-sodium version. This is a fantastic choice for a flavorful meal made easy.
    • Vegetable Broth: For a non-meat option, vegetable broth works well, providing moisture and a subtle savory depth.
    • Non-Dairy Milk: Unsweetened non-dairy milks like almond, soy, or oat milk are also great alternatives. They function just like regular milk to maintain moisture and tenderness, but be sure they’re unsweetened to avoid altering the taste.

    These simple changes ensure everyone can enjoy this best meatloaf recipe. It’s all about making cooking enjoyable and stress-free.

    How to Store and Reheat Leftovers

    Storing Your Delicious Meatloaf Leftovers

    Enjoyed your meatloaf and have leftovers? Great! Proper storage will keep it fresh and flavorful for another easy meal. Follow these simple steps to preserve your meatloaf perfectly.

    Refrigeration for Short-Term Storage

    Cooked meatloaf can be safely stored in the refrigerator for a few days. This is perfect for quick lunches or a second dinner.

    • Cool Down Quickly: First, allow the meatloaf to cool completely at room temperature. To prevent bacterial growth, this should take no more than two hours [2].
    • Portion and Pack: For convenience, slice the meatloaf into individual servings. Transfer the slices or the whole loaf into an airtight container.
    • Seal and Store: Ensure the container is sealed tightly before placing it in the refrigerator.
    • Enjoy Within: Your meatloaf will stay fresh for 3 to 4 days when stored this way.

    Freezing for Longer-Term Meal Prep

    For longer storage, freezing is an excellent option. It’s a great way to plan future meals, allowing you to enjoy your meatloaf weeks later.

    • Cool Completely: As with refrigeration, let the meatloaf cool entirely before freezing.
    • Wrap Well: Wrap individual slices or smaller portions tightly in plastic wrap, then add a layer of aluminum foil. This double layer protects against freezer burn.
    • Use Freezer-Safe Containers: Alternatively, place wrapped portions into a freezer-safe bag or airtight container, removing as much air as possible.
    • Label Clearly: Always label the container with the date so you know how long it’s been stored.
    • Freeze Duration: Frozen meatloaf maintains its best quality for up to 3 months.
    • Thaw Safely: When you’re ready to eat, thaw the frozen meatloaf in the refrigerator overnight. For a quicker option, use the defrost setting on your microwave.

    Reheating Your Leftover Meatloaf

    When it’s time to eat your leftovers, reheating them properly will keep the meatloaf juicy and delicious. Here are a few simple methods that work for any schedule.

    Oven Reheating for Best Results

    The oven is the best method for reheating meatloaf because it helps preserve the original texture and flavor.

    • Preheat Oven: Set your oven to a low temperature, around 250°F (120°C), to prevent drying out the meat.
    • Add Moisture: Place meatloaf slices in an oven-safe dish and add a tablespoon or two of beef broth or water. This creates steam and keeps the meatloaf moist.
    • Cover and Heat: Cover the dish tightly with aluminum foil to trap moisture.
    • Reheat Time: Heat for 20-30 minutes, or until an instant-read thermometer shows the internal temperature has reached 165°F (74°C) [3].

    Microwave for Quick Servings

    For speedy individual portions, the microwave is your best bet. It’s perfect for a quick lunch or for busy families.

    • Portion Out: Place a slice or two of meatloaf on a microwave-safe plate.
    • Add Moisture: Drizzle a small amount of water or broth over the meatloaf. Cover it loosely with a damp paper towel or a microwave-safe lid.
    • Heat in Bursts: Microwave on medium power for 1-2 minutes. Check and rearrange the meatloaf, then continue heating in 30-second intervals until it’s hot throughout.
    • Check Temperature: For food safety, make sure the meatloaf reaches an internal temperature of 165°F (74°C).

    Pan-Frying for Crispy Edges

    If you love crispy edges, pan-frying individual slices is a fantastic option. This method adds a delicious new texture to your leftovers.

    • Heat Skillet: Warm a small amount of oil or butter in a non-stick skillet over medium heat.
    • Sear Slices: Carefully place the meatloaf slices in the hot skillet.
    • Cook Until Crispy: Cook for 3-5 minutes per side, until a delicious caramelized crust forms.
    • Ensure Warmth: Make sure the center of each slice is heated through before serving.

    With these simple tips, your leftover meatloaf will be just as delicious as when it was first baked. Enjoy cooking confidently with Recipesmondial!

    Frequently Asked Questions

    What are the main ingredients in a traditional meatloaf?

    A classic meatloaf is a comforting, family-friendly dish that combines simple, everyday ingredients to create a rich, savory flavor. It’s a longtime favorite for many home cooks.

    Here are the core components you’ll typically find:

    • Ground Meat: Ground beef is the most common choice, but a mix of beef, pork, and veal also creates a delicious taste and texture.
    • Binder: To help hold the loaf together, breadcrumbs or crushed crackers are common binders.
    • Liquid: Milk, broth, or tomato juice adds moisture, which keeps your meatloaf from drying out.
    • Eggs: Acting as an additional binder, eggs are crucial for preventing the meatloaf from crumbling.
    • Aromatics: Finely chopped onion and garlic are essential for providing a deep, savory base flavor.
    • Seasonings: Standard seasonings include salt, pepper, and herbs like parsley, while a touch of Worcestershire sauce can add extra richness.
    • Glaze: A traditional meatloaf is often finished with a sweet and tangy topping. Ketchup-based glazes are the most popular [4].

    Together, these simple ingredients create a truly satisfying and flavorful meal, making it an approachable home cooking staple.

    What is the secret to keeping meatloaf from falling apart?

    Nobody wants a crumbly meatloaf. Fortunately, keeping it intact is easy with a few simple techniques. Following these tips will help you get a perfect slice every time.

    Follow these expert tips for a sturdy meatloaf:

    • Use a Good Binder: Breadcrumbs and eggs are your best friends for creating a strong structure. They also absorb moisture, which prevents a soggy, loose texture.
    • Don’t Overmix: Mix the ingredients just until they are combined. Overmixing not only makes the meat tough but also breaks down the binding proteins, making your loaf more likely to fall apart.
    • Shape It Firmly: When shaping the mixture, be gentle but firm. Compacting it into an even loaf removes air pockets, which can weaken the structure during baking.
    • Choose the Right Fat Content: Using ground meat with a moderate fat content, such as 80/20 ground beef, is ideal. The fat helps bind the loaf while also adding essential flavor and moisture.
    • Rest Before Slicing: This step is crucial for clean slices. Always let your meatloaf rest for 10-15 minutes after baking. This allows the juices to redistribute and gives the loaf time to firm up [5].

    By following these straightforward steps, you can confidently create a beautiful meatloaf that won’t crumble.

    How do you make an easy meatloaf with few ingredients?

    When life gets busy, a delicious dinner doesn’t have to be complicated. This easy meatloaf recipe is perfect for a quick, family-friendly meal, as it uses just a few basic ingredients.

    Here’s how to simplify your meatloaf:

    • Essential Ingredients:
      • 1.5 lbs ground beef (80/20 is ideal)
      • 1 large egg
      • 1/2 cup plain breadcrumbs
      • 1/4 cup milk or water
      • 1/2 cup finely chopped onion (optional, but adds great flavor)
      • Salt and black pepper to taste
      • 1/2 cup ketchup for the glaze
    • Simple Steps:
      1. Preheat your oven to 350°F (175°C).
      2. In a large bowl, use your hands to gently combine the ground beef, egg, breadcrumbs, milk, onion (if using), salt, and pepper. Be careful not to overmix.
      3. Shape the mixture into an even loaf on a baking sheet.
      4. Spread the ketchup evenly over the top of the loaf.
      5. Bake for 55-65 minutes, or until an instant-read thermometer confirms the internal temperature has reached 160°F (71°C) [6].
      6. Let it rest for 10 minutes before slicing and serving.

    This beginner-friendly recipe is a quick and reliable solution for a flavorful meal any night of the week.

    What can I use if I don’t have breadcrumbs for meatloaf?

    Running out of breadcrumbs shouldn’t stop you from making a delicious meatloaf. While they are a popular binder, many other ingredients work just as well, offering flexibility for your home cooking.

    Here are excellent breadcrumb alternatives to keep your meatloaf juicy and cohesive:

    • Crushed Crackers: Finely crushed saltines, Ritz, or other plain crackers can be used in an equal amount. They provide a similar texture and binding power.
    • Rolled Oats: Quick-cooking or old-fashioned oats work wonderfully, adding a slightly chewier texture. Use about 3/4 cup of oats for every 1 cup of breadcrumbs.
    • Crushed Cereal: Crushed plain cornflakes or rice cereal offer a neutral flavor and serve as a good binder.
    • Cooked Rice: Leftover cooked rice is a great binder that adds a unique texture. As a rule of thumb, use about 1 cup of cooked rice per pound of meat.
    • Flour or Cornstarch: For a gluten-free option, a few tablespoons of all-purpose flour or cornstarch can thicken the mixture. Use a smaller amount—about 2-3 tablespoons per pound of meat—and add extra liquid if the mixture seems too dry.
    • Panko Breadcrumbs: Panko is a fantastic substitute that creates a lighter, airier texture in the finished loaf.

    Each of these alternatives helps absorb moisture and prevent the meatloaf from falling apart. This flexibility makes dinner planning stress-free, allowing you to create simple, delicious dishes with the ingredients you have on hand.


    Sources

    1. https://www.fsis.usda.gov/food-safety/safe-food-handling-and-preparation/meat-poultry-and-egg-products/ground-beef-and-food-safety
    2. https://www.fsis.usda.gov/food-safety/safe-food-handling-and-preparation/food-safety-basics/how-chill-food
    3. https://www.fsis.usda.gov/food-safety/safe-temperature-chart-food
    4. https://www.foodnetwork.com/recipes/articles/history-of-meatloaf
    5. https://www.seriouseats.com/the-food-lab-how-to-make-the-best-meatloaf
    6. https://www.foodsafety.gov/food-safety-charts/safe-minimum-cooking-temperatures