Tortellini are small, ring-shaped pasta traditionally stuffed with a mix of meat, cheese, or vegetables. Originating from Italy’s Emilia-Romagna region, this versatile pasta is often served in a simple broth (tortellini in brodo) or with a variety of sauces, making it a popular choice for quick and flavorful meals.
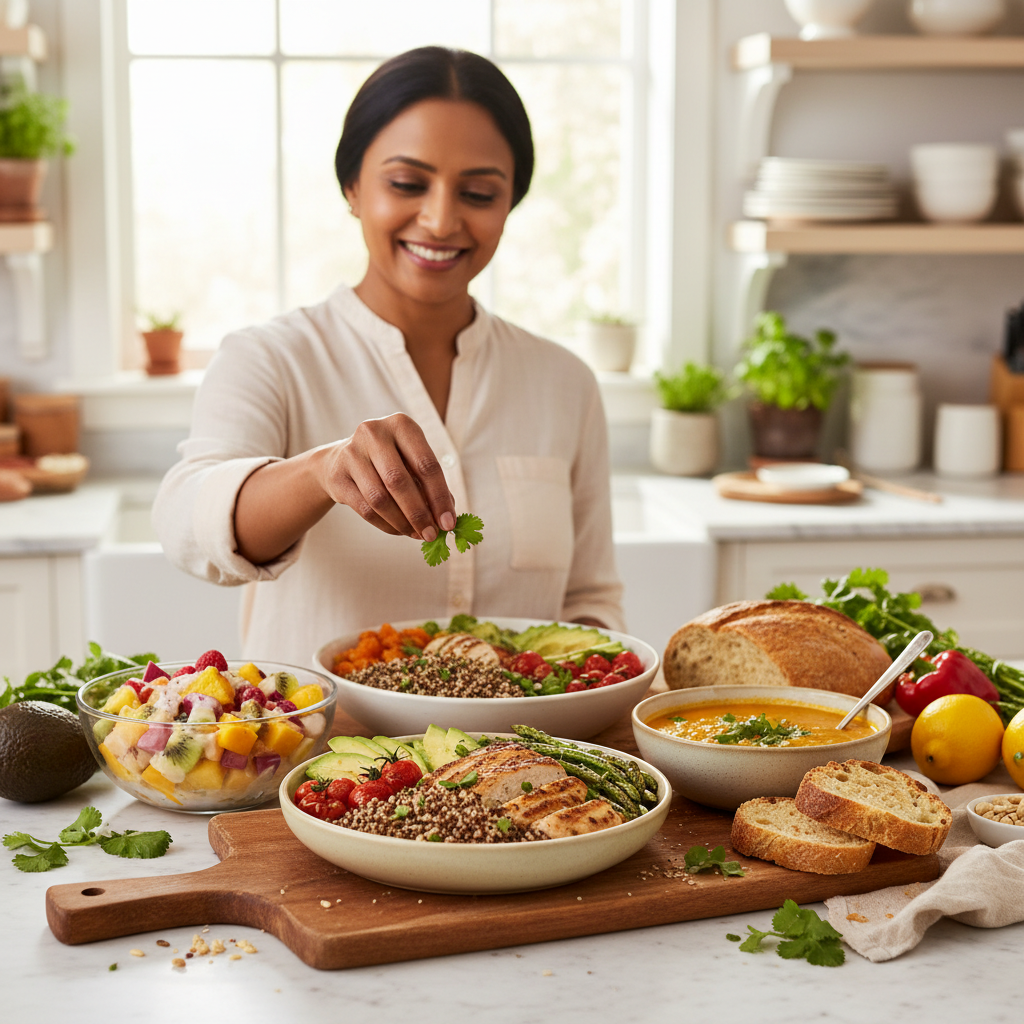
Are you searching for perfect weeknight dinners that are both satisfying and simple to prepare? As home cooks, we’ve all been there: staring into the fridge, wishing for a delicious meal that doesn’t require hours of prep. If you’re tired of complex recipes and struggling to plan family-friendly meals everyone will love, you’re in the right place. Enter tortellini—delightful, ring-shaped pasta pockets that are a game-changer for quick dinner ideas. Recipesmondial is here to show you how this humble pasta can transform your mealtime into a stress-free, flavorful experience.
This article is your ultimate guide, featuring more than 10 easy tortellini recipes perfect for busy lives. We’ll explore a variety of simple dinner recipes, from creamy indulgences to hearty family meals that even beginners can master. You’ll find step-by-step guidance, practical tips, and plenty of inspiration to build your confidence in the kitchen. Get ready to discover just how versatile tortellini can be, turning everyday ingredients into extraordinary dishes.
Before we get to the mouth-watering recipes, let’s start with the basics. If you’ve ever wondered what tortellini is or how to cook it perfectly, we’ve got you covered.
What Exactly Is Tortellini?
Welcome to the wonderful world of tortellini! As your friendly cooking companion at Recipesmondial, we’re here to demystify this delightful pasta. Many home cooks feel overwhelmed by complex recipes or unsure about different pasta shapes. But don’t worry—we make cooking flavorful meals easy!
Tortellini are small, ring-shaped pasta originating from the Emilia-Romagna region of Italy, particularly Modena and Bologna. Traditionally, they are stuffed with a mix of meat—often pork loin, prosciutto, and mortadella—along with Parmigiano-Reggiano cheese and nutmeg [1]. Due to their unique shape, they are often compared to a “navel” or “belly button.” These tiny, filled pasta pockets are a fantastic base for simple dinner recipes and family-friendly meals.
Because they cook quickly, tortellini are perfect for quick meals. You can use them to create countless easy tortellini recipes, from a hearty soup to a creamy pasta dish. It’s all about making home cooking approachable!
What’s the Difference Between Tortellini and Tortelloni?
Tortellini and tortelloni may look alike, but they have key differences. Knowing what sets them apart will help you choose the best pasta for your next meal. Don’t let the similar names fool you!
Here’s a simple breakdown:
Size: This is the most noticeable difference. Tortellini are smaller, bite-sized rings, while tortelloni are significantly larger.
Fillings: Traditionally, tortellini are filled with a savory meat mixture of pork, prosciutto, and cheese. Tortelloni, on the other hand, typically feature vegetarian fillings, such as ricotta cheese, spinach, or pumpkin.
Serving: Due to their larger size and lighter fillings, tortelloni are often served with simple sauces like butter and sage. Tortellini are commonly enjoyed in broth or with richer sauces.
Think of it this way: if you want a lighter, veggie-filled option for a healthy and balanced meal, tortelloni is your best pick. If you’re craving a rich, meaty indulgence, go for tortellini!
Feature
Tortellini
Tortelloni
Size
Small, bite-sized
Larger, often twice the size
Traditional Filling
Meat (pork, prosciutto, mortadella, cheese)
Vegetarian (ricotta, spinach, pumpkin)
Common Serving
In broth or with cream/tomato sauces
With lighter sauces like butter and sage
What Is the Difference Between Tortellini and Ravioli?
As you explore filled pasta, you’ll also encounter ravioli. While it’s another popular choice, ravioli differs quite a bit from tortellini. Understanding these differences will help you select the perfect pasta for your beginner-friendly recipes.
Here’s how they compare:
Shape: Tortellini are ring-shaped and pinched to resemble a navel. Ravioli are typically square or round with crimped, sealed edges.
Sealing: Tortellini are formed from a single piece of pasta that is folded and twisted. Ravioli are made by placing a filling between two sheets of pasta, then cutting and sealing them.
Filling Variety: While both have diverse fillings, ravioli tend to offer an even wider variety of textures and ingredients, ranging from meat and cheese to seafood, vegetables, and even fruit.
Versatility: Both are incredibly versatile for approachable home cooking. You can use either for family-friendly meals and adapt them to many different sauces.
Whether you choose tortellini or ravioli, Recipesmondial provides step-by-step cooking guidance to help you create a fantastic meal. You don’t need to be an expert to enjoy delicious filled pasta!
Feature
Tortellini
Ravioli
Shape
Small, ring-shaped, pinched
Typically square or round, with crimped edges
Construction
Single pasta sheet, folded and twisted
Filling between two pasta sheets, sealed
Filling Range
Traditionally meat and cheese (can vary)
Very wide range: meat, cheese, seafood, vegetables, fruits
Serving Style
Often in broth, or with cream/tomato sauces
Paired with various sauces, from simple to complex
How Do You Cook Tortellini Perfectly?
Boiling Instructions for Perfect Tortellini
Cooking tortellini perfectly is simple, making it a quick meal solution for busy evenings. Following these easy steps will ensure you achieve wonderfully tender and flavorful pasta every time.
Here’s how to boil tortellini to create a fantastic base for your favorite dishes:
Gather Your Tools: You will need a large pot, a colander, and your tortellini. A large pot is essential, as it allows the tortellini to move freely and cook evenly.
Fill and Salt the Pot: Fill the pot with cold water and add a generous pinch of salt. Salting the water seasons the tortellini from the inside out. As a general rule, use about 1 teaspoon of salt per quart of water.
Bring to a Rolling Boil: Place the pot on high heat and bring the water to a vigorous, rolling boil to ensure the pasta cooks evenly.
Add the Tortellini: Carefully add the tortellini to the boiling water, stirring gently to prevent sticking. There is no need to thaw frozen tortellini first.
Cook According to Package Directions: Cooking times vary by type: fresh tortellini takes 2-4 minutes, frozen takes 3-5, and dry takes 8-10. Always check the package for the most accurate cooking time.
Test for Doneness: The best way to check for doneness is to taste a piece. It should be tender with a slight bite (al dente). You’ll also notice the tortellini will float to the surface when cooked.
Drain Promptly: Once cooked, immediately drain the tortellini in a colander. Do not rinse the pasta, as the starch helps your sauce cling. Before draining, you can reserve a small cup of the starchy pasta water to use in your sauce later.
Serve Immediately: Toss the hot tortellini with your favorite sauce right away. This helps the pasta absorb the sauce’s flavor.
Tips for Not Overcooking Your Tortellini
Overcooked tortellini can become mushy, but it’s a common mistake that is easy to avoid. Use these simple tips for perfectly cooked pasta every time.
Follow these guidelines to prevent overcooking:
Read the Package Instructions: This is your most reliable guide. Different types of tortellini (fresh, frozen, and dry) have different cooking times, so always check the package first.
Set a Timer: Once the water returns to a boil after adding the tortellini, set a timer for the shortest recommended cooking time. This helps prevent accidental overcooking.
Taste, Don’t Guess: Start tasting the tortellini a minute or two before the timer goes off. You’re looking for an “al dente” texture, which means it’s firm to the bite but not hard or mushy.
Do Not Overcrowd the Pot: Use a large enough pot so the tortellini has space to move freely. Overcrowding lowers the water temperature and can lead to uneven, sticky pasta.
Keep an Eye on It: Tortellini cooks very quickly, especially fresh or frozen varieties. Do not walk away from the stove, as it can go from perfect to overcooked in a flash.
Cook Just Before Serving: Cook the tortellini just as your sauce is finishing. This ensures the pasta is hot and fresh when you serve it.
Reserve Pasta Water: Before draining all the water, scoop out about half a cup. This starchy water is excellent for thinning a sauce that is too thick and helps it cling better to the pasta.
Immediately Add to Sauce: Transfer the drained tortellini directly into your warm sauce. Tossing it right away prevents clumping and helps the pasta absorb the sauce’s flavors.
What Are the Best Easy Tortellini Recipes?
Tortellini turns simple ingredients into a flavorful meal in minutes, making it a perfect weeknight solution. If you’re looking for easy recipes that are both fast and delicious, tortellini is the answer. Whether you’re a beginner cook or just need simple dinner recipes for a busy family, Recipesmondial provides approachable, step-by-step guidance.
From creamy sauces to hearty, meat-filled dishes and even plant-based options, tortellini adapts beautifully to any style. These ideas focus on everyday ingredients and straightforward techniques, so you can forget about feeling overwhelmed. This helps you build confidence in the kitchen and enjoy cooking without stress.
Creamy Tortellini Recipes
Nothing says comfort like a rich, creamy tortellini dish. These creamy tortellini recipes are perfect for a satisfying meal that’s easy to make, appealing to even the pickiest eaters. They are excellent family-friendly meals that come together quickly.
Here are some simple, delicious ideas:
Creamy Tomato Tortellini: Combine cooked tortellini with a jar of your favorite marinara sauce and a splash of heavy cream or half-and-half. Stir in some fresh basil and Parmesan cheese for an irresistible finish.
Garlic Parmesan Cream Tortellini: Sauté minced garlic in butter, then whisk in heavy cream and Parmesan until thickened. Toss with tortellini and a sprinkle of parsley. This is a classic for a reason!
Spinach and Artichoke Tortellini: Stir cooked tortellini into a simple cream sauce (like the garlic Parmesan base) with chopped spinach and canned artichoke hearts. It adds a lovely texture and extra veggies.
Tip: For an even quicker meal, use store-bought refrigerated tortellini. It cooks in just a few minutes, making these recipes genuine quick meals.
Simple Tortellini Recipes with Chicken
Adding chicken to tortellini transforms it into a more substantial, protein-packed dinner. These simple tortellini recipes with chicken are ideal for creating healthy and balanced meals that are also satisfying.
Consider these straightforward combinations:
Chicken Pesto Tortellini: Toss cooked tortellini with pesto sauce and shredded rotisserie chicken. Add cherry tomatoes and a handful of fresh mozzarella balls for a burst of flavor and color.
Lemon Herb Chicken Tortellini: Sauté diced chicken breast with lemon zest, garlic, and your favorite herbs like oregano or thyme. Combine with cooked tortellini, a light broth, and a squeeze of fresh lemon juice.
Chicken and Vegetable Tortellini Soup: Stir cooked tortellini and shredded chicken into a comforting broth-based soup with plenty of chopped vegetables like carrots, celery, and peas. This is a wonderfully hearty option.
Substitution Idea: If you don’t have time to cook chicken, use pre-cooked grilled chicken strips or leftover roast chicken. This helps you get dinner on the table even faster!
Hearty Tortellini Recipes with Sausage or Ground Beef
For nights when you need a comforting and filling dinner, pairing tortellini with sausage or ground beef is an excellent choice. These hearty tortellini recipes make perfect family-friendly meals that satisfy everyone at the table.
Explore these robust options:
Sausage and Bell Pepper Tortellini: Brown Italian sausage (mild or hot, your choice!) with sliced bell peppers and onions. Add your favorite tomato sauce and cooked tortellini.
Ground Beef Bolognese Tortellini: Make a quick meat sauce by browning ground beef with garlic and onion, then simmering it in crushed tomatoes. Serve over hot tortellini for a simplified bolognese.
Cheesy Sausage Bake with Tortellini: Combine cooked tortellini with browned sausage, marinara sauce, and plenty of shredded mozzarella and Parmesan cheese. Bake until bubbly and golden for an easy casserole.
Meal Prep Tip: Brown your sausage or ground beef ahead of time and store it in the fridge. This makes assembly even faster on a busy weeknight.
Classic Cheese Tortellini Recipes
Sometimes, the simplest approach is the most delicious. Classic cheese tortellini recipes let the pasta shine, making them fantastic beginner-friendly recipes and reliable favorites for any home cook.
Here are some fuss-free ways to enjoy them:
Marinara and Cheese Tortellini: Toss cooked cheese tortellini with your favorite jarred marinara sauce. Sprinkle generously with fresh Parmesan cheese and a dash of red pepper flakes for a little kick.
Butter and Sage Tortellini: Melt butter in a pan until it turns a light golden brown (be careful not to burn it!). Add fresh sage leaves and cook for a minute, then toss with cooked tortellini. This is an elegant yet incredibly simple dish.
Pesto Tortellini with Cherry Tomatoes: Simply mix cooked tortellini with store-bought pesto. Halved cherry tomatoes add a burst of freshness and color. This is a vibrant and quick lunch or dinner.
Fun Fact: Italy consumes approximately 23 kilograms (about 51 pounds) of pasta per person each year, far more than most countries, demonstrating its staple status [2].
Simple Vegan Tortellini Dishes
For those seeking plant-based options, these simple vegan tortellini dishes offer all the flavor and satisfaction without meat or dairy. As more vegan products become available, it’s easier than ever to create delicious and healthy meals.
Try these fantastic vegan ideas:
Roasted Vegetable and Vegan Tortellini: Roast a medley of vegetables like zucchini, bell peppers, red onion, and cherry tomatoes with olive oil and herbs. Toss with cooked vegan tortellini and a light balsamic glaze.
Creamy Vegan Mushroom Tortellini: Sauté mushrooms and garlic, then add a plant-based cream sauce (made with cashews or coconut milk) and nutritional yeast for a cheesy flavor. Stir in cooked vegan tortellini.
Spinach and Garlic Vegan Tortellini: Sauté fresh spinach with plenty of garlic in olive oil. Add cooked vegan tortellini and a squeeze of lemon juice. A light and flavorful option that’s ready in minutes.
Ingredient Tip: Look for vegan tortellini in the refrigerated or frozen pasta aisle of your grocery store. Many brands now offer delicious plant-based versions!
What Is a Good Sauce for Tortellini?
Professional food photography, photorealistic, high-quality food magazine photo. A beautifully composed shot of cooked tortellini tossed with a vibrant, homemade basil pesto sauce, served in a shallow white pasta bowl. The tortellini are coated evenly with the bright green pesto, and the dish is sprinkled with toasted pine nuts and extra Parmesan cheese. A few fresh basil leaves are scattered on top. The background is a gently blurred, rustic kitchen scene with subtle hints of a wooden table and soft, natural light, creating an inviting and wholesome atmosphere. The image emphasizes the fresh ingredients and appetizing texture. NO artistic interpretations, NO illustrations, NO vector graphics, NO abstract art.
Choosing the right sauce can elevate your tortellini from a simple meal to a memorable one. At Recipesmondial, we believe cooking should be enjoyable, not overwhelming. That’s why we’ve gathered four straightforward sauce recipes that deliver impressive flavor without the fuss. Perfect for busy families and quick dinners, these options are simple to prepare and incredibly versatile.
Whether you crave something light and fresh or rich and creamy, you’ll find the perfect pairing for your favorite tortellini. These approachable recipes will help you build confidence in the kitchen. Get ready to see how a few simple ingredients can create truly delicious results!
Classic Tomato and Basil Sauce
A timeless choice, this classic tomato and basil sauce has fresh, bright flavors that beautifully complement tortellini. It’s a family-friendly option loved by all ages, and this beginner-friendly recipe is a staple for a reason.
Ingredients:
1 tablespoon olive oil
2 cloves garlic, minced
1 (28-ounce) can crushed tomatoes
1/2 teaspoon dried oregano (optional)
Salt and black pepper to taste
1/2 cup fresh basil leaves, chopped
Simple Steps:
Heat the olive oil in a medium saucepan over medium heat.
Add the minced garlic and cook for about 1 minute until fragrant. Do not let it brown.
Pour in the crushed tomatoes and add the oregano, if using.
Bring the sauce to a gentle simmer.
Reduce the heat to low and let it cook for 15-20 minutes, stirring occasionally to allow the flavors to meld.
Season with salt and pepper to your liking.
Stir in the fresh basil just before serving with your cooked tortellini.
Chef’s Tips: For the best flavor, use high-quality canned tomatoes. Fresh basil is key, as its aroma truly elevates the dish. This simple sauce tastes gourmet.
Rich Cream and Parmesan Sauce
Indulgent and comforting, this rich cream and Parmesan sauce is a perfect match for cheesy tortellini. The recipe is incredibly satisfying, comes together quickly, and is ideal for busy weeknights.
Ingredients:
2 tablespoons unsalted butter
2 cloves garlic, minced (optional, but highly recommended)
1 1/2 cups heavy cream
1 cup grated Parmesan cheese, plus more for serving
1/4 teaspoon ground nutmeg (optional)
Salt and white pepper to taste
Simple Steps:
Melt the butter in a large skillet over medium-low heat.
If using, add the minced garlic and cook for 1 minute until fragrant.
Pour in the heavy cream and bring it to a gentle simmer, but do not boil.
Reduce the heat to low. Gradually stir in the Parmesan cheese.
Continue stirring until the cheese is fully melted and the sauce is smooth.
Add the nutmeg, if desired, and season with salt and white pepper.
Toss the cooked tortellini directly in the sauce and serve immediately.
Chef’s Tips: Always grate your own Parmesan cheese for the smoothest texture and best flavor; pre-grated varieties can make the sauce grainy. Remember, low heat is your friend here, as it prevents the cream from curdling. This quick sauce makes any weeknight meal feel special.
Simple Pesto Sauce
Pesto offers a vibrant, fresh, and incredibly quick option for tortellini. Whether you make it from scratch or use a high-quality store-bought version, it’s perfect for a delicious meal in minutes. Its robust flavor comes from just a handful of simple ingredients.
Ingredients:
2 cups fresh basil leaves
1/2 cup grated Parmesan cheese
1/2 cup extra virgin olive oil
1/4 cup pine nuts, lightly toasted (optional)
2 cloves garlic
Salt and black pepper to taste
Simple Steps (Homemade Pesto):
Combine the basil, Parmesan, pine nuts (if using), and garlic in a food processor.
Pulse until all ingredients are finely chopped.
With the food processor running, slowly drizzle in the olive oil until a smooth paste forms.
Season with salt and pepper.
Toss with hot, cooked tortellini to serve.
Simple Steps (Store-Bought Pesto):
Gently warm your favorite store-bought pesto in a saucepan over low heat.
Alternatively, simply toss the pesto with freshly cooked, hot tortellini; the heat from the pasta will warm it through.
If the sauce is too thick, loosen it with a splash of the pasta cooking water.
Chef’s Tips: Toasting the pine nuts adds a wonderful depth to homemade pesto. You can easily adjust the amount of garlic to your preference. Pesto is a truly versatile sauce, perfect for a quick and simple dinner.
Brown Butter and Sage Sauce
For an elegant yet simple sauce, brown butter and sage is an excellent choice. This combination offers a nutty, aromatic flavor that pairs beautifully with many tortellini fillings. It is a beginner-friendly recipe that feels sophisticated, making it ideal for a stress-free meal.
Ingredients:
1/2 cup unsalted butter
15-20 fresh sage leaves
Salt and black pepper to taste
Pinch of red pepper flakes (optional)
Simple Steps:
Melt the butter in a large skillet over medium heat.
Continue to cook, watching closely as the butter foams, then turns clear.
The milk solids at the bottom of the pan will begin to turn golden brown. Swirl the pan occasionally for even cooking.
Once the butter smells fragrant and nutty, immediately add the fresh sage leaves.
Cook the sage for 30 to 60 seconds, until the leaves are crispy.
Remove the skillet from the heat to prevent burning.
Season with salt, pepper, and red pepper flakes, if using.
Pour the sauce over your cooked tortellini and serve right away.
Chef’s Tips: Browning butter requires your full attention, as it can go from perfect to burnt very quickly. Using a light-colored pan will help you monitor the color change more easily. This sauce proves that an elegant, flavorful meal doesn’t have to be complicated.
Frequently Asked Questions
Tortellini or tortelloni?
While both are types of delicious filled pasta, tortellini and tortelloni have distinct characteristics. The main differences are their size and filling, which influences the best way to serve them.
Here’s a quick guide to tell them apart:
Feature
Tortellini
Tortelloni
Size
Smaller, bite-sized (about 1-inch)
Larger, about twice the size of tortellini
Shape
Often folded into a ring or navel shape
Also folded, but generally more pouch-like due to size
Fillings
Traditionally meat-filled (pork, prosciutto) in Emilia-Romagna [3]
Typically filled with vegetarian options like ricotta cheese and spinach, or other vegetables
Best Uses
Perfect for lighter broths, cream sauces, or simple butter and sage sauces. Their small size makes them great for quick meals.
Ideal for heartier sauces, like rich tomato sauces or robust butter sauces. Their larger size stands up well to bolder flavors.
Ultimately, you can’t go wrong with either choice. Both tortellini and tortelloni are fantastic for creating simple, flavorful meals. Don’t be afraid to experiment!
Tortellini vs ravioli?
Ravioli is another popular stuffed pasta you’ll find alongside tortellini. Although both are filled, they have key differences in shape, size, and origin. Understanding these distinctions will help you choose the perfect pasta for your dish.
Let’s compare them:
Feature
Tortellini
Ravioli
Shape
Small, ring-shaped pasta, often compared to a “belly button” or navel [4]. The pasta disc is folded and the ends are joined to create a ring.
Typically square or round, with crimped edges. Two sheets of pasta are used, with filling sandwiched between.
Size
Generally small, bite-sized (tortelloni are larger).
Can vary greatly in size, from small squares to very large rounds.
Origin
Hails from the Emilia-Romagna region of Italy, especially Modena and Bologna.
Has a broader origin across Italy, with variations found in many regions [5].
Fillings
Traditionally meat-based (pork, prosciutto), but also cheese and vegetable options.
Offers a wider range of fillings, including cheese (ricotta, Parmesan), meat, seafood, and various vegetables (spinach, mushroom).
Cooking Style
Often served in broth or with lighter cream or tomato sauces.
Versatile with many sauces, from simple butter and sage to hearty meat sauces.
Both pastas are wonderfully versatile and can be the star of many simple recipes. Don’t feel overwhelmed by the choice—just pick the one that sounds best for the meal you have in mind!
How do you pronounce tortellini?
Italian pronunciations can be tricky, but this one is easy to master. You’ll be saying “tortellini” like a pro in no time.
The correct pronunciation is: tor-tuh-LEE-nee.
The key is to stress the “LEE” syllable in the middle. A confident pronunciation makes exploring new recipes even more fun!
What is the meaning of tortellini?
The name “tortellini” has a charming origin. In Italian, “tortellino” is the diminutive form of “tortello,” which translates to “little cake” or “small pie.”
The pasta’s unique shape also plays a role in its identity. Its distinctive ring is said to resemble a navel, earning it a special nickname. According to folklore, the shape was inspired by the navel of the goddess Venus [6].
This bit of history adds to the enjoyment of cooking and eating this classic pasta.
A classic stuffed peppers recipe involves hollowing out bell peppers and filling them with a savory mixture of cooked ground beef, rice, onions, and seasonings. The peppers are then typically topped with a simple tomato sauce and cheese and baked in the oven until the peppers are tender and the filling is heated through, creating a delicious and complete meal.
Are you looking for a hearty dinner that’s comforting but not complicated? Planning family-friendly meals everyone will enjoy is a common challenge, especially on busy weeknights. The good news is that an impressive meal can be surprisingly simple, even for beginner cooks. Get ready to rediscover a true classic: stuffed peppers, a perfect example of flavorful meals made easy.
At Recipesmondial, we believe cooking should be a stress-free and enjoyable experience. That’s why we created this ultimate guide to classic stuffed bell peppers. Our simple recipe walks you through each step, ensuring great results whether you’re building confidence or just looking for approachable home cooking. We want to help you cook confidently and turn basic ingredients into a truly special meal.
In this step-by-step guide, you’ll learn everything from choosing the perfect bell peppers to mastering a savory filling and baking it to perfection. We also share clever variations, including vegetarian options and meal prep tips, to help this dish become a staple in your rotation. Say goodbye to complicated recipes and hello to a simple, satisfying dinner guaranteed to please.
Why You’ll Love This Easy Stuffed Peppers Recipe
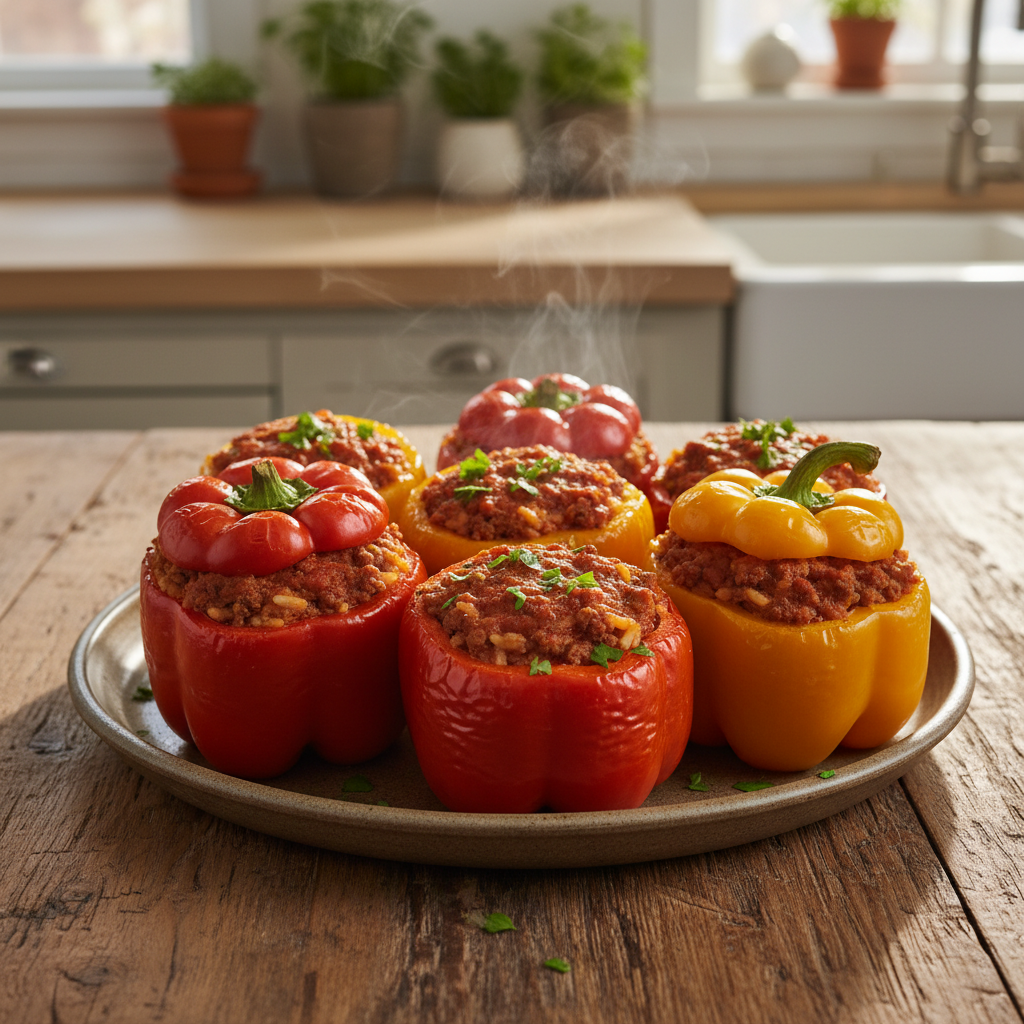
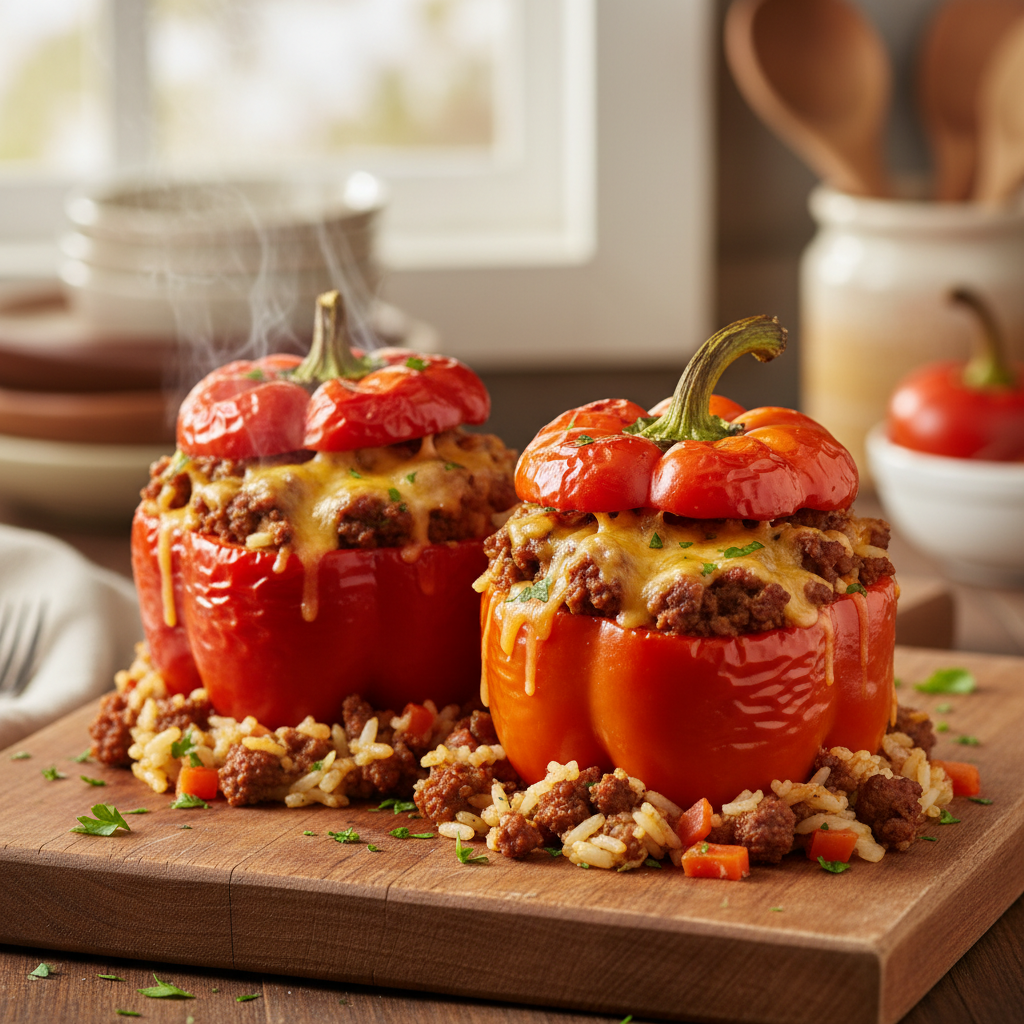
A professional food photography shot, photorealistic, high-quality food magazine photo, featuring two perfectly baked classic stuffed bell peppers arranged on a rustic wooden cutting board. The peppers are vibrant, glossy, and slightly browned on top, overflowing with a rich, savory filling of seasoned ground meat and rice, topped with melted cheese and fresh chopped parsley. A hint of steam rises gently from one pepper. The background is a softly blurred, warm kitchen setting, emphasizing an inviting and comforting meal. Natural, warm overhead lighting. Shot at eye level, making the dish appear approachable and delicious.
Looking for a reliable, delicious dinner that impresses without the stress? This classic stuffed peppers recipe is a true crowd-pleaser, perfect for busy weeknights or a cozy family meal. Our step-by-step guide is designed for home cooks, making the entire process enjoyable and straightforward.
Here’s why you’ll fall in love with this easy stuffed peppers recipe:
Simple Dinner Solution: This recipe simplifies mealtime by offering a complete, flavorful meal in just one dish. It’s the perfect go-to for an easy weeknight dinner.
Beginner-Friendly Cooking: Forget overwhelming instructions. Our clear, approachable guide builds your confidence in the kitchen, helping you master this classic dish with ease.
Unforgettable Flavor: Every bite is a perfect blend of tender bell peppers, savory meat, and a rich tomato sauce. It’s a satisfying and flavorful meal, made easy.
Perfect for Families: This is a classic family-friendly meal. Both kids and adults love the colorful presentation and comforting taste, making it a great way to serve more vegetables.
Customizable and Versatile: Easily adapt this recipe to suit your tastes or what’s in your pantry. Try a vegetarian filling, use a different grain, or add your favorite spices. Our meal prep tips also help you plan.
Stress-Free Prep: We guide you through each step, removing the guesswork from planning and cooking. You can relax and enjoy the process from start to finish.
Nourishing and Wholesome: Enjoy a balanced dish packed with protein and fresh vegetables. It’s a satisfying and hearty meal for any day of the week.
This stuffed peppers recipe is a perfect example of our commitment at Recipesmondial: providing simple, delicious recipes for every home cook. Get ready to turn everyday ingredients into a memorable meal!
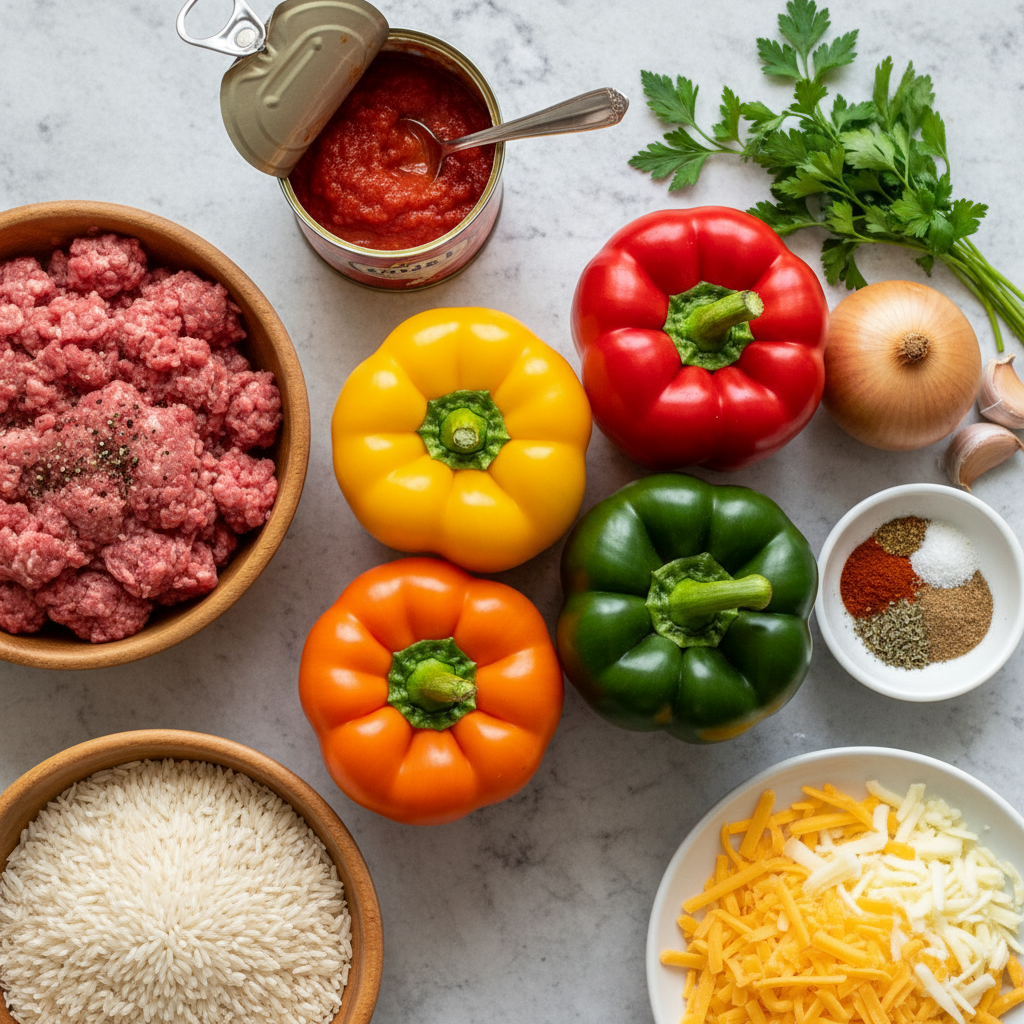
What Ingredients Do You Need for Classic Stuffed Peppers?
A professional food photography shot, photorealistic, high-quality food magazine photo, featuring a beautiful flat lay of all the fresh ingredients for classic stuffed peppers. The layout is clean and organized on a light, neutral-toned countertop. Components include whole, vibrant bell peppers (red, yellow, orange, green), a bowl of uncooked ground beef, a bowl of uncooked rice, a can of crushed tomatoes, a head of garlic, a whole onion, fresh parsley and basil, shredded cheese, and a small dish of spices. Each ingredient is clearly visible, fresh, and appealing. Bright, even overhead lighting.
Choosing the Right Bell Peppers
The first step to making classic stuffed peppers is choosing the right bell peppers, as they are the star of this easy recipe.
You can use any color you prefer. Green bell peppers have a traditional, slightly bitter taste, while red, yellow, and orange varieties are sweeter and soften beautifully during baking.
When selecting peppers for stuffing, look for large, firm ones with a flat bottom. This shape helps them stand upright, which makes them easier to fill and ensures they hold their savory contents in the oven.
Green Bell Peppers: These are the classic choice. They have a robust, earthy flavor.
Red, Yellow, or Orange Bell Peppers: Opt for these if you prefer a sweeter taste. They also add a vibrant pop of color.
Size Matters: Select larger peppers, as they are easier to stuff and provide a more satisfying portion.
Stability: Pick peppers with a flat bottom. This helps them stay stable in your baking dish.
Pro Tip: Remove the core and seeds carefully, then give the peppers a quick rinse to prepare them for stuffing.
For the Savory Filling
This hearty and flavorful filling is the heart of the dish, creating a satisfying meal the whole family will enjoy.
Seasoned Ground Beef and fluffy rice create the base, while aromatics and tomato add depth and moisture. This simple combination results in a balanced and delicious stuffing.
Ground Beef: 1 pound (450g) lean ground beef. This forms the delicious base.
Rice: 1 cup (185g) uncooked white rice. Long-grain or medium-grain works well. We cook it partially first.
Onion: 1 medium onion, finely chopped. It adds a lovely sweetness and depth.
Garlic: 2 cloves garlic, minced. Garlic is essential for rich flavor.
Canned Diced Tomatoes: 1 (14.5 ounce / 411g) can, undrained. These add moisture and a tangy element.
Tomato Paste: 2 tablespoons. It intensifies the tomato flavor.
Beef Broth: 1/2 cup (120ml). This adds savory liquid to the filling.
Worcestershire Sauce: 1 tablespoon. It brings a umami punch.
Dried Oregano: 1 teaspoon. A classic herb for Italian-inspired dishes.
Salt: 1/2 teaspoon, or to taste.
Black Pepper: 1/4 teaspoon, or to taste. Freshly ground is always best.
Substitution Idea: For a lighter version, feel free to swap ground beef for ground turkey or chicken. You can also use pre-cooked rice to save time.
For the Simple Tomato Sauce and Topping
A simple tomato sauce is poured around the peppers before baking. It keeps them moist, adds extra flavor, and comes together in minutes. To finish, a generous layer of melted cheese creates the perfect golden, bubbly topping.
Tomato Sauce: 1 (15 ounce / 425g) can. This forms the base of our savory sauce.
Water or Beef Broth: 1/2 cup (120ml). This thins the sauce slightly.
Brown Sugar: 1 tablespoon. It balances the acidity of the tomatoes.
Shredded Mozzarella Cheese: 1 cup (113g). This creates a gooey, golden topping.
Variation Tip: Experiment with different cheeses! Cheddar, Monterey Jack, or a blend of Italian cheeses all work beautifully. You can also add a pinch of red pepper flakes to the sauce for a subtle kick.
Gathering these simple ingredients is the first step toward a delicious, easy-to-make dinner!
How to Make Stuffed Peppers: A Step-by-Step Guide
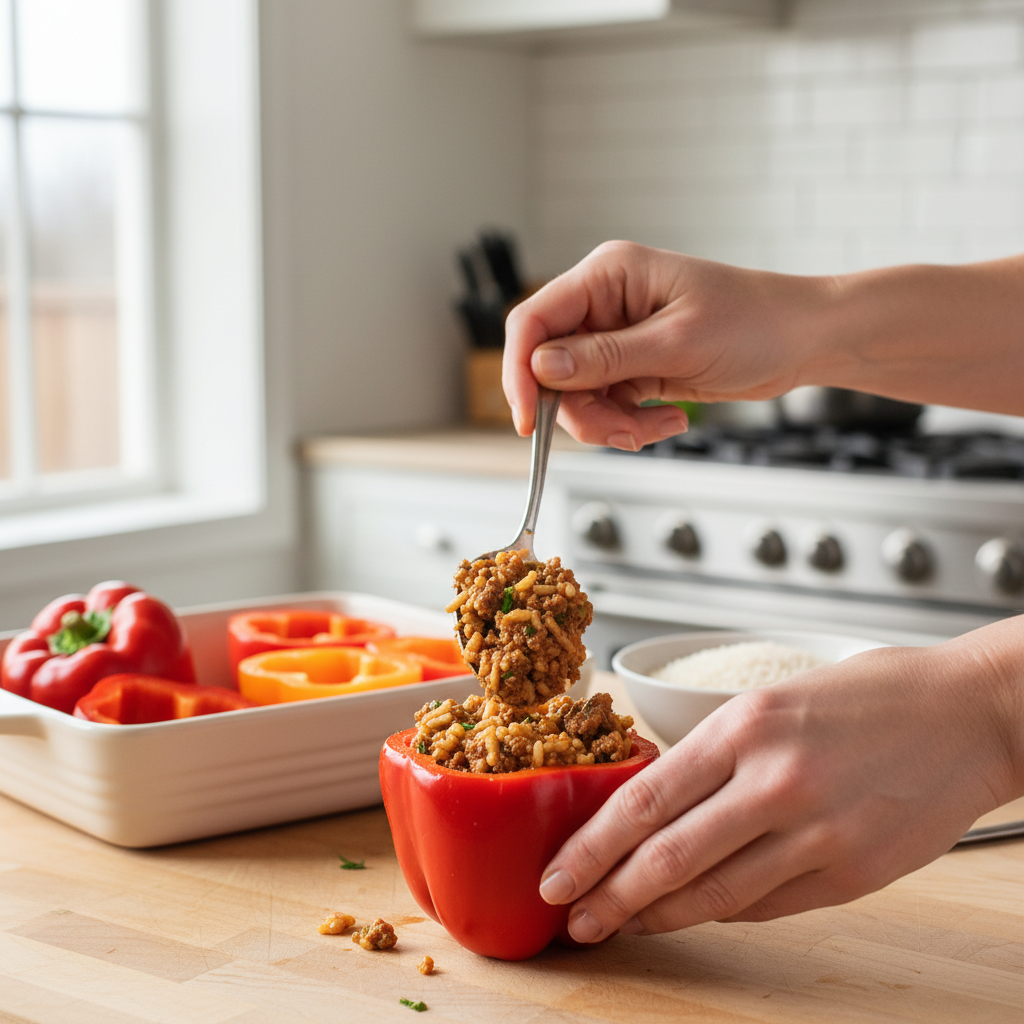
A professional food photography shot, photorealistic, high-quality food magazine photo, capturing a home cook’s hands actively stuffing a vibrant red bell pepper with the prepared savory meat and rice filling. The scene is set in a clean, bright, and inviting home kitchen with warm, natural light. The cook’s hands are visible, demonstrating the approachable nature of the task. Other prepped ingredients, like a baking dish and more empty bell pepper halves, are softly blurred in the background, keeping the focus on the hands and the stuffing process. The filling looks moist and rich. Eye-level shot.
Step 1: Prepare the Bell Peppers
First, get the bell peppers ready. This essential prep work ensures your stuffed peppers cook evenly and become perfectly tender.
Choose Your Peppers: Select 6 medium-sized bell peppers. Any color works, but red, yellow, and orange varieties are typically sweeter.
Wash and Halve: Rinse the peppers under cool water, then carefully slice each one in half lengthwise.
Remove Seeds and Core: Use a small spoon to scoop out the seeds and white membrane from each half, creating a clean cavity for the filling.
Optional: Blanch for Softer Peppers: To ensure an extra-tender texture, you can blanch the peppers. Bring a large pot of salted water to a boil, add the pepper halves, and cook for 3–5 minutes. This pre-cook step prevents them from being too firm after baking. Drain them well and set aside. This is a great tip if you’re new to cooking!
Step 2: Cook the Beef and Rice Filling
Next, create the savory filling. This is the key to a successful stuffed bell pepper recipe, and it will make your kitchen smell amazing.
Brown the Beef: In a large skillet, heat 1 tablespoon of olive oil over medium-high heat. Add 1 pound of lean ground beef and break it apart with a spoon as it cooks. Continue cooking until the beef is fully browned with no pink remaining.
Drain Excess Fat: Carefully drain the excess fat from the skillet. This step makes the filling lighter.
Sauté Aromatics: Add 1 diced onion and 2 cloves of minced garlic to the beef. Sauté for 5–7 minutes, until the onion is soft and translucent.
Combine Ingredients: Stir in 1 cup of cooked white rice (leftover or freshly cooked), 1 (14.5-ounce) can of undrained diced tomatoes, 1 teaspoon of dried oregano, 1 teaspoon of dried basil, 1/2 teaspoon of salt, and 1/4 teaspoon of black pepper.
Simmer to Blend Flavors: Mix all ingredients thoroughly and let the filling simmer for 5 minutes. This allows the flavors to meld together perfectly.
Chef’s Tip for Beginner Cooks: Pre-cooking the rice ensures it’s tender. If you use uncooked rice, you will need to add more liquid and increase the baking time. Using cooked rice is the best way to get consistent results for this easy recipe.
Step 3: Assemble the Stuffed Peppers
Now it’s time to assemble the peppers. This is a simple process that gets your family-friendly meal ready for the oven.
Prepare the Baking Dish: Pour 1/2 cup of tomato or marinara sauce into the bottom of a 9×13-inch baking dish. This adds moisture and prevents sticking.
Fill Each Pepper Half: Spoon the beef and rice mixture generously into each pepper half. Avoid packing the filling too tightly.
Arrange in the Dish: Place the filled pepper halves cut-side up in the prepared baking dish. Arrange them snugly to help them stay upright.
Top with More Sauce: Spoon a little more tomato sauce over the top of the filling in each pepper to keep them moist during baking.
Quick Idea: Have extra filling? Save it for a quick lunch or serve it as a side dish. It’s delicious on its own!
Step 4: Bake the Peppers
Finally, it’s time to bake. This last step melds the flavors and makes your stuffed bell peppers wonderfully tender.
Preheat Oven: Set your oven to 375°F (190°C). A properly preheated oven ensures everything cooks evenly.
First Bake (Covered): Cover the baking dish tightly with aluminum foil and bake for 30 minutes. This initial step steams the peppers, making them tender.
Add Cheese (Optional): Carefully remove the foil and sprinkle about 1 cup of shredded mozzarella or cheddar cheese over the tops.
Second Bake (Uncovered): Return the dish to the oven and bake uncovered for another 15–20 minutes. The peppers are done when they are fork-tender and the cheese is melted and bubbly.
Rest Before Serving: Let the peppers rest for 5–10 minutes after baking. This allows the juices to settle, making them easier to serve.
Pro-Tip for Flavorful Meals: For a golden, bubbly topping, place the peppers under the broiler for 1–2 minutes after baking. Watch them closely to prevent burning. This adds a beautiful finish to your flavorful meal!
What to put in stuffed peppers?
Easy Recipe Variations
Stuffed peppers are a versatile dish, perfect for culinary creativity. You can adapt this classic recipe to suit your tastes, use ingredients you have on hand, or create a fun meal the whole family will enjoy. These straightforward swaps simplify meal planning without the need for complex recipes.
Switch Your Protein: While ground beef is classic, feel free to use other ground meats.
Ground Turkey or Chicken: For a lighter option, these are excellent choices. They cook quickly and absorb flavors beautifully.
Ground Pork or Sausage: For a richer flavor, try ground pork or sausage. Italian sausage works wonderfully for a different twist.
Add More Veggies: Boost the nutrition and texture of your filling.
Mushrooms: Sautéed diced mushrooms add an earthy depth.
Zucchini or Spinach: Finely diced zucchini or wilted spinach blend seamlessly into the filling.
Corn or Peas: Introduce a touch of sweetness and color.
Spice it Up: Experiment with different herbs and spices to change the flavor profile.
Italian Herbs: Add oregano, basil, and a pinch of fennel for an Italian flair.
Smoked Paprika: A smoky note pairs well with the beef and tomato.
Garlic Powder and Onion Powder: These staple seasonings always enhance flavor.
Vegetarian Stuffed Peppers
Creating delicious vegetarian stuffed peppers is surprisingly simple. It’s a fantastic option for a healthy, balanced meal that’s also perfect for family dinners. With fillings this flavorful, you won’t miss the meat.
Here are some simple, hearty bases to make your stuffed peppers vegetarian:
Lentil Love: Packed with protein, cooked brown or green lentils provide a wonderful texture. Mix them with diced vegetables and a tomato base for a satisfying filling [1].
Quinoa Power: As a complete protein, cooked quinoa offers a light, fluffy texture. Combine it with black beans, corn, and your favorite seasonings.
Mushroom Magic: Finely chopped mushrooms, sautéed until deeply browned, mimic the texture of ground meat. Mix them with breadcrumbs and herbs for a savory filling.
Bean Blast: A mix of black beans, kidney beans, and corn creates a robust filling. Add some salsa and spices for a zesty flavor.
Remember to adjust seasonings to your taste. A little extra cheese or breadcrumbs can help bind your vegetarian fillings.
Stuffed Peppers Without Rice
If you’re looking for rice alternatives, you have plenty of great choices. These options offer dietary flexibility and can introduce new textures and flavors to your classic stuffed bell peppers, making it easy to customize your meal.
Consider these simple and delicious rice substitutes:
Quinoa: Cooked quinoa offers a protein boost and a texture similar to rice, making it a great choice for a healthy, balanced meal.
Cauliflower Rice: For a low-carb option, use riced cauliflower. Sauté it lightly before mixing with your other filling ingredients to help remove excess moisture.
Couscous: This tiny pasta cooks very quickly and provides a soft, delightful texture, making it a simple addition to your savory filling.
Breadcrumbs or Crushed Crackers: Use these to bind your filling. They add a comforting texture and are perfect for budget-friendly cooking.
Lentils: As mentioned, lentils are an excellent substitute that adds heartiness and protein.
Barley: A nutritious grain, cooked pearl barley offers a chewy texture that holds up well in baked dishes.
When swapping ingredients, taste your filling before baking and adjust seasonings as needed to ensure a flavorful result.
Mexican-Style Stuffed Peppers
Transform your classic stuffed peppers into a vibrant, Mexican-inspired dish that brings global comfort food right to your kitchen. The bold and satisfying flavors are sure to make this a new family favorite.
To create Mexican-style stuffed peppers, simply adjust your filling ingredients:
Spices: Add generous amounts of chili powder, cumin, and a pinch of cayenne pepper. A dash of smoked paprika enhances the flavor.
Beans: Include black beans or kidney beans. Rinse them well before adding them to your filling.
Corn: Fresh, frozen, or canned corn adds sweetness and texture.
Salsa or Diced Tomatoes with Chilies: Use these in place of plain tomato sauce in your filling for a zesty kick.
Cheese: Top your peppers with Monterey Jack, cheddar, or a Mexican blend cheese.
Garnish: Finish with fresh cilantro, a dollop of sour cream or Greek yogurt, and a squeeze of lime juice after baking.
These variations prove just how versatile stuffed peppers can be, allowing you to create a quick and flavorful meal every time!
Tips for the Perfect Stuffed Bell Peppers
How to Prevent Soggy Peppers
Nobody wants a soggy bell pepper! Achieving that perfect tender-crisp texture for your stuffed bell peppers is easier than you think. Here are our top tips to ensure your stuffed peppers hold their shape and flavor beautifully.
Pre-Cook Your Peppers: A quick par-cook softens the peppers slightly before you stuff them, which helps them cook evenly with the filling. You can either boil them for 3-5 minutes or bake them empty for 10-15 minutes.
Don’t Overfill: Avoid overstuffing the peppers, as this can make them collapse and prevent the filling from cooking thoroughly. Be sure to leave a small gap at the top.
Drain Your Filling: Excess liquid in the filling, especially from meat, will make the peppers mushy. Be sure to drain it well before stuffing to prevent the pepper walls from getting soggy.
Control Baking Time: Follow the recipe’s baking time closely to avoid soft, overcooked peppers. For a nicely browned and caramelized top, bake them uncovered for the last 10-15 minutes.
Meal Prep and Storage Instructions
Our classic stuffed peppers recipe is perfect for meal prep, saving you precious time on busy weeknights. You can easily prepare these flavorful, family-friendly dishes ahead of time.
Assemble Ahead: To save time, you can fully assemble the stuffed peppers, cover them tightly, and refrigerate for up to 2 days before baking. Just add an extra 15-20 minutes to the baking time to account for the cold temperature.
Freezing Cooked Peppers: Once cooked, stuffed bell peppers freeze beautifully. First, let them cool completely. Then, wrap each pepper individually in plastic wrap and store them in a freezer-safe bag or container for up to 3 months.
Reheating from Frozen: To reheat, remove the wrapping and place the frozen peppers in a baking dish. Cover with foil and bake at 350°F (175°C) for 45-60 minutes, or until heated through. You can also microwave individual peppers on high for 5-7 minutes.
Refrigerating Leftovers: Store leftover cooked stuffed peppers in an airtight container in the refrigerator for 3-4 days. Reheat them in the oven or microwave.
What to Serve with Stuffed Peppers
While stuffed peppers are a satisfying meal on their own, pairing them with a simple side dish can elevate your dinner. These suggestions will help you create a balanced and delicious experience for any family meal.
Fresh Green Salad: A crisp green salad with a light vinaigrette provides a refreshing contrast and is a healthy, quick addition to your meal.
Crusty Bread: A warm, crusty baguette or Italian bread is perfect for soaking up any delicious sauce, making the meal extra comforting.
Steamed or Roasted Vegetables: Simply seasoned vegetables like broccoli, green beans, or asparagus add extra nutrients and a pleasant texture that complements the rich flavors of the peppers.
Simple Grains: If your stuffed peppers don’t contain rice, a side of quinoa or couscous works wonderfully to absorb the savory sauce.
Frequently Asked Questions
How do you make a simple stuffed peppers recipe?
Making stuffed peppers is wonderfully straightforward. At Recipesmondial, we specialize in easy recipes, and this classic dish is no exception. It’s a perfect beginner-friendly meal that the whole family will enjoy.
Here is a quick overview of the steps:
Prepare the Peppers: First, wash your bell peppers. Slice them in half lengthwise, then remove the seeds and membranes. This creates the perfect little bowls for your filling.
Make the Filling: Next, cook ground meat (like beef or turkey) with onions and garlic until browned. Stir in cooked rice, tomato sauce, and your favorite seasonings. This savory mixture is the heart of the dish.
Stuff and Sauce: Fill each pepper half generously with the meat and rice mixture and place them in a baking dish. Pour a little tomato sauce around the peppers and sprinkle cheese on top for extra flavor.
Bake to Perfection: Finally, bake the stuffed peppers until they are tender and the filling is heated through. The result is a delicious and easy meal every time.
Can you make stuffed peppers ahead of time?
Yes, absolutely! Stuffed peppers are an excellent choice for meal prep. Preparing them in advance saves time during the week and makes it easier to serve a delicious, stress-free dinner.
You have a couple of great options for making them in advance:
Prepare the Filling Only: Cook the meat and rice filling, let it cool completely, and store it in an airtight container in the refrigerator for up to 3 days. When you’re ready, simply stuff fresh peppers and bake as directed. This method helps keep the peppers crisp.
Assemble Fully: For a grab-and-bake option, you can assemble the peppers completely. Stuff them, place them in a baking dish, and cover tightly with plastic wrap or foil. Refrigerate for up to 24 hours. Just add a few extra minutes to the baking time when cooking straight from the refrigerator.
Freeze for Later: For longer storage, freeze unbaked stuffed peppers. Place the fully assembled peppers on a baking sheet and freeze until solid. Then, transfer them to a freezer-safe bag or container. They will last for up to 3 months. Thaw them overnight in the refrigerator before baking, or bake from frozen by adding significant extra cooking time.
These practical tips from Recipesmondial make home cooking even more convenient and approachable.
Do you have to cook the meat before stuffing the peppers?
Yes, for the best results, you should always pre-cook ground meat before stuffing the peppers. This simple step is crucial for several key reasons, ensuring your dish is both flavorful and well-cooked.
Enhances Flavor: Browning the meat develops a rich, savory flavor that creates a delicious foundation for the filling. Raw meat cooked inside the pepper will not be as flavorful.
Removes Excess Fat: Pre-cooking allows you to drain off excess grease from the meat. This important step prevents the final dish from becoming oily or soggy.
Ensures Even Cooking: Fully cooking the ground meat beforehand guarantees the filling is safe to eat. It also ensures the peppers don’t get overcooked while you wait for raw meat to reach a safe temperature. This way, the filling and peppers are perfectly done at the same time.
Better Texture: Sautéing ground meat creates a pleasant, crumbly texture. If you use raw meat, it can sometimes clump together or turn rubbery when baked inside the pepper.
Following this simple, beginner-friendly tip helps you get delicious and reliable results every time.
How do I make a healthy stuffed peppers recipe?
It’s easy to make a healthy stuffed peppers recipe with a few simple substitutions. While stuffed peppers are already quite wholesome, you can boost their nutritional value to create a delicious and balanced meal.
Consider these simple swaps and tips:
Choose Leaner Protein: Instead of ground beef, use lean ground turkey or chicken to reduce saturated fat. Plant-based crumbles are also a great vegetarian alternative.
Boost Veggies: Finely dice extra vegetables like carrots, zucchini, mushrooms, or spinach and add them to the filling to increase vitamins, minerals, and fiber.
Opt for Whole Grains: Swap white rice for a higher-fiber option like brown rice, quinoa, or lentils. Whole grains keep you feeling full longer, and quinoa also adds extra protein.
Control Sodium: Use low-sodium broth and tomato sauce. Build flavor with herbs and spices like garlic powder, oregano, and basil instead of relying only on salt.
Lighten the Cheese: If you’re adding cheese, choose a reduced-fat variety or simply use less. A small sprinkle on top is often all you need for great flavor.
Add Beans: Incorporate black beans or kidney beans into the filling for an easy and budget-friendly boost of plant-based protein and fiber.
These simple adjustments help you create a flavorful meal that aligns with your health goals and makes home cooking work for your lifestyle.
Goulash is a comforting stew made with beef, onions, and paprika. This easy goulash recipe is an American-style version featuring ground beef and macaroni cooked in a rich, savory tomato sauce. It’s a one-pot, family-friendly meal that is perfect for a quick weeknight dinner and comes together in about 30 minutes.
Are you looking for a comforting, hearty meal that won’t keep you in the kitchen for hours? We understand. Planning family-friendly dinners can feel like a constant quest for easy, flavorful recipes. Many home cooks feel overwhelmed by complex instructions or lack confidence when trying a new dish. But what if we told you that a classic, deeply satisfying goulash is surprisingly simple to master?
At Recipesmondial, our mission is to make home cooking a joy, not a chore. That’s why we’ve crafted this ultimate easy goulash recipe. Forget the intimidating jargon; our step-by-step guide will walk you through creating a delicious beef goulash perfect for any weeknight. Whether you’re a beginner or an intermediate cook seeking new simple dinner recipes, you’ll learn to create flavorful meals with confidence and ease.
Get ready to transform simple ingredients into a rich, savory masterpiece. This beginner-friendly guide ensures you can cook without stress, creating a Hungarian goulash that tastes like it took hours to prepare. Let’s dive in and discover why this is the perfect goulash recipe for busy families!
Why Is This The Perfect Goulash Recipe for Busy Families?
For busy families, a delicious, satisfying dinner without the kitchen chaos can feel like a dream. This goulash recipe makes it a reality. More than just a meal, it offers a solution to common dinner dilemmas and is designed with your busy schedule in mind for a truly stress-free cooking experience.
At Recipesmondial, we believe cooking should be enjoyable, not a chore. This easy goulash recipe helps you put a flavorful, comforting classic on the table while also saving you precious time. It transforms simple ingredients into a meal your family will request again and again.
Why Our Goulash Recipe Stands Out for Busy Families
This beef goulash is the perfect weeknight solution for your bustling household because it seamlessly combines ease, flavor, and practicality. It’s a marvel of approachable home cooking.
Effortless Preparation: Forget complex instructions. This simple recipe features clear, step-by-step guidance, so even beginner cooks can feel confident in the kitchen. There are no overwhelming technical terms.
Family-Friendly Flavors: With a rich, savory taste that appeals to all ages, goulash is a true crowd-pleaser. Its comforting, hearty flavors make it a go-to meal the whole family will love.
Time-Saving Solution: Designed for your busy schedule, this meal comes together quickly. By minimizing active cooking time, it allows you to enjoy more precious moments with your family.
Budget-Friendly Ingredients: This goulash uses everyday pantry staples, which helps keep grocery costs down. It’s an excellent choice for budget-conscious cooking because eating well shouldn’t break the bank.
Versatile and Adaptable: This recipe is flexible, so you can easily make substitutions to suit your family’s tastes. It’s also perfect for meal prep—simply double the batch for quick lunches or dinners later in the week.
Confidence Booster: Mastering this flavorful meal will build your kitchen skills and confidence. You’ll discover that cooking delicious, simple dishes without stress can be your new reality.
This goulash recipe is a testament to the Recipesmondial promise: to provide delicious, reliable, and approachable recipes. It’s designed to help you move from uncertainty to confidence, so you can start enjoying your time in the kitchen again.
What Ingredients Do You Need for Easy Beef Goulash?
For the Goulash:
This comforting beef goulash recipe uses simple, everyday ingredients to create a meal packed with flavor. You likely have many of these staples in your pantry already. Here’s what you’ll need to get started.
2 tablespoons olive oil: For browning beef and sautéing vegetables.
1 large yellow onion: Chopped. It adds a sweet, aromatic base.
3 cloves garlic: Minced. Essential for deep, savory flavor.
2 tablespoons tomato paste: Adds a concentrated boost of tomato flavor.
1 (28-ounce) can crushed tomatoes: Forms the rich, flavorful base of the sauce.
2 cups beef broth: Enhances the meaty flavor and creates a perfect consistency.
1 tablespoon Worcestershire sauce: Adds a layer of umami and depth.
2 tablespoons sweet Hungarian paprika: The signature spice for authentic goulash.
1 teaspoon dried thyme: A classic herb that complements beef beautifully.
2 bay leaves: Infuses subtle, earthy notes as the goulash simmers.
1 teaspoon salt: Adjust to taste.
½ teaspoon black pepper: For a gentle warmth.
12 ounces egg noodles: Or your favorite short pasta, cooked separately for serving.
Optional: Fresh parsley: Chopped, for a bright garnish.
Optional: Sour cream: Adds a dollop of creamy richness when serving.
Ingredient Substitutions & Variations
Don’t be afraid to make this recipe your own. Feel free to adjust the ingredients based on what you have on hand or what your family prefers. Use these simple variations to accommodate different tastes and dietary needs.
Beef Alternatives:
Ground Beef: Use 1 ½ pounds of ground beef instead of chuck roast for a quick meal. Brown it well and drain any excess fat.
Pork Shoulder: Cubed pork shoulder also works wonderfully for a rich, tender stew.
Vegetable Boost:
Carrots and Celery: Add 1 cup of diced carrots and 1 cup of diced celery with the onion for extra flavor and nutrition.
Bell Peppers: For added sweetness and color, add sliced bell peppers (any color) during the last 30 minutes of simmering.
Mushrooms: Sliced mushrooms are a great addition for an earthy flavor. They can also be used as a meat substitute for a vegetarian option.
Pasta Choices:
Different Short Pasta: Instead of egg noodles, any short pasta like macaroni, penne, or rotini will work well.
Gluten-Free Pasta: Simply use your favorite gluten-free pasta to make this a gluten-friendly dish.
Spice it Up (or Down!):
Smoked Paprika: For a deeper, smoky flavor, try using a mix of sweet and smoked paprika.
A Touch of Heat: Add a pinch of cayenne pepper or a dash of hot sauce if you enjoy a little kick.
Broth Options:
Vegetable Broth: If you’re out of beef broth, a good quality vegetable broth is an excellent substitute.
Dairy-Free Creaminess:
Coconut Cream: For a dairy-free topping, a swirl of full-fat coconut cream can replace sour cream, adding a subtle richness.
How to Make Goulash: A Step-by-Step Guide
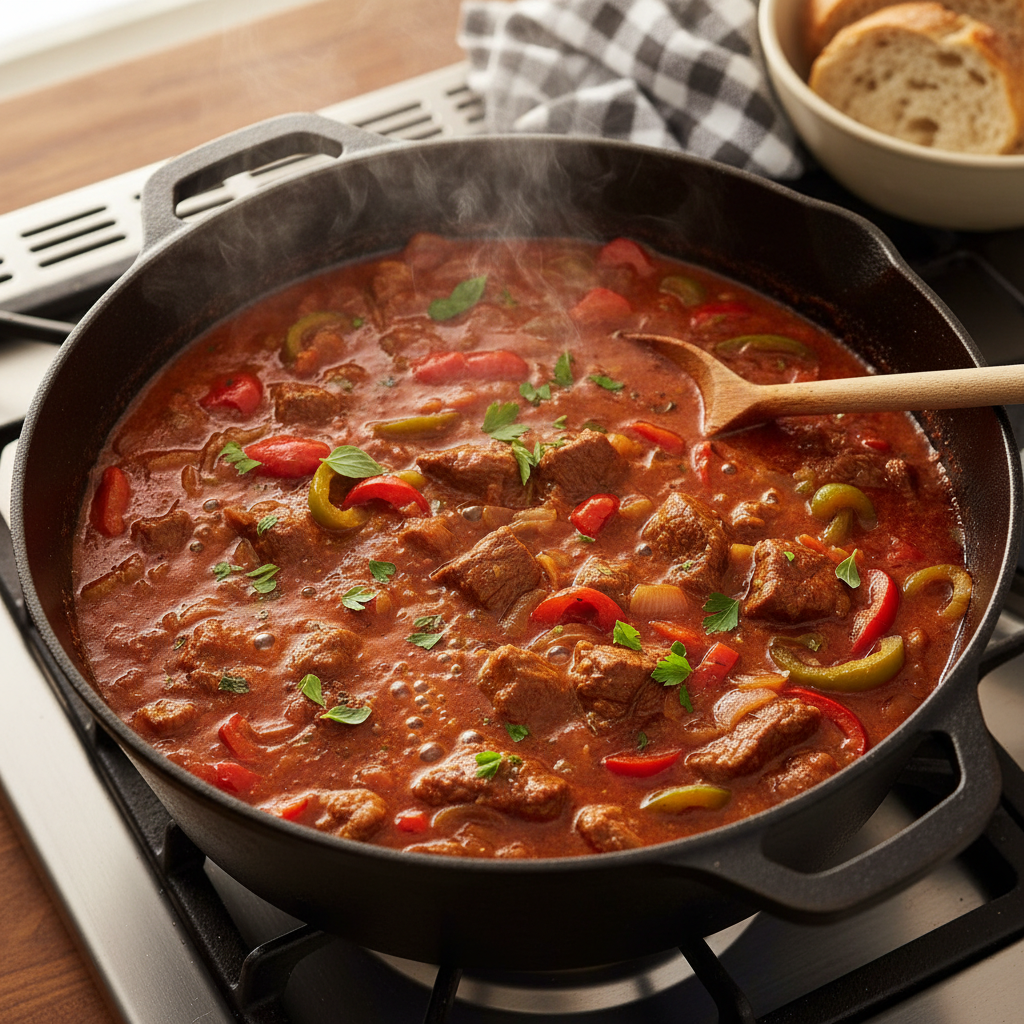
A professional food photography, photorealistic, high-quality food magazine photo of a large, rustic cast-iron pot of rich, simmering beef goulash on a stovetop. The goulash is bubbling gently, showcasing tender chunks of beef, colorful pieces of red and green bell peppers, and a thick, savory paprika-infused sauce. Soft, warm steam is subtly rising from the pot, indicating deliciousness. The lighting is warm and inviting, highlighting the deep, appetizing colors and textures of the dish, creating a comforting home-cooked feel.
Step 1: Brown the Beef and Sauté Aromatics
This first step builds a deep, savory base for your goulash. First, you’ll brown the beef to create a rich crust, and then you’ll sauté aromatics like onion and garlic to add warmth and complexity. Don’t rush this process—it’s the key to a flavorful result.
Prepare Your Pan: Place a large Dutch oven or heavy-bottomed pot over medium-high heat and add 1 tablespoon of olive oil. Allow the oil to become hot enough to shimmer, but not smoke.
Brown the Beef: Add 1.5 pounds of cubed beef chuck, stew meat, or ground beef to the hot pan in a single layer. To avoid overcrowding the pan and steaming the meat, work in batches if necessary. Cook for 5-7 minutes, turning occasionally, until the beef is well-browned on all sides. A dark crust equals more flavor. Transfer the browned beef to a plate and set it aside, leaving the drippings in the pot.
Sauté the Onions: Add the remaining 1 tablespoon of olive oil to the pot. Add 1 large chopped yellow onion and cook for 5-7 minutes, stirring often, until softened and translucent.
Add Garlic: Stir in 3 cloves of minced garlic and cook for 1 minute more until fragrant. Be careful not to burn the garlic, as it can quickly turn bitter.
Chef’s Tip: Properly browning meat triggers the Maillard reaction, a chemical process that creates hundreds of new flavor compounds. Don’t skip this step; it’s essential for the richest-tasting goulash.
Step 2: Create the Savory Sauce
Next, you’ll create the rich, savory sauce that forms the heart of the goulash. By combining spices and liquids in the same pot, you’ll capture all the flavor from the beef and aromatics, turning it into a cohesive and comforting sauce.
Toast the Spices: Reduce the heat to medium-low. Add 2 tablespoons of sweet paprika, 1 teaspoon of dried oregano, 1/2 teaspoon of salt, and 1/4 teaspoon of black pepper to the pot. Stir constantly for 1 minute to toast the spices and release their aroma.
Deglaze the Pan: Pour in 1/2 cup of beef broth. Use a wooden spoon to scrape up any flavorful browned bits stuck to the bottom of the pot.
Add Liquid Ingredients: Stir in 1 (14.5-ounce) can of diced tomatoes with their juice, 1 (8-ounce) can of tomato sauce, and 1 tablespoon of Worcestershire sauce. For a deeper tomato flavor, add 1 tablespoon of tomato paste as well.
Return the Beef: Add the browned beef back into the pot. Stir gently to ensure the beef is fully coated in the sauce.
Substitution Idea: For a richer, slightly smoky flavor, you can use smoked paprika instead of sweet paprika. This offers a lovely twist for those who enjoy a bolder taste.
Step 3: Simmer to Perfection
This step requires patience, but the reward is worth it. A long, gentle simmer makes the beef incredibly tender while allowing the flavors to meld into a rich, cohesive sauce. This slow cooking process is what creates that classic, comforting goulash taste.
Bring to a Simmer: Increase the heat to medium-high and bring the sauce to a gentle bubble.
Reduce Heat and Cover: Immediately reduce the heat to low to maintain a gentle simmer, not a boil. Cover the pot with a tight-fitting lid.
Cook Until Tender: Simmer the goulash for 1.5 to 2 hours, stirring occasionally to prevent sticking. The beef is ready when it is fork-tender and easily falls apart. This slow cooking time is essential for maximum tenderness.
Helpful Hint: If the sauce thickens too much during simmering, stir in a splash of beef broth or water until it reaches a rich, hearty consistency that can perfectly coat the pasta.
Step 4: Cook and Add the Pasta
In this final step, you’ll cook the pasta and combine it with the goulash. Cooking the pasta separately and adding it at the end is key to achieving the perfect texture. This method ensures the pasta is perfectly coated in sauce without becoming mushy.
Cook the Pasta: During the last 20 minutes of the goulash’s simmer time, bring a separate large pot of salted water to a rolling boil. Add 2 cups of elbow macaroni or another small pasta shape and cook according to package directions until al dente (tender but with a slight bite).
Drain the Pasta: Drain the cooked pasta well in a colander. Do not rinse it.
Combine Goulash and Pasta: Stir the drained pasta directly into the pot with the finished goulash. Mix gently until the pasta is fully coated in the sauce.
Serve Immediately: Ladle the goulash into bowls. If desired, garnish with fresh parsley. Serve hot and enjoy.
Meal Prep Tip: For the best leftovers, store the goulash sauce and cooked pasta in separate containers in the refrigerator. This prevents the pasta from absorbing too much liquid and becoming soft. Combine and reheat portions as needed for optimal texture.
Helpful Tips for Making the Best Goulash
Don’t Overcook the Pasta
Perfect timing is essential when cooking goulash, especially for the pasta. A common pitfall is overcooking it, which can turn a hearty goulash into a mushy disappointment. To avoid this, aim for al dente pasta—tender with a slight bite.
Overcooked pasta doesn’t just lose its texture; it also absorbs too much of the rich, savory sauce, leaving the final dish dry and less flavorful. To get it right, follow the recipe’s guidance carefully. Adding the pasta at the precise moment ensures it finishes cooking in the sauce to perfection. The goal is for every forkful to be a perfect blend of tender beef, flavorful sauce, and perfectly cooked pasta.
Let the Flavors Meld
Like many stews, goulash tastes even better with time. The key is allowing the flavors to “meld,” or fully combine, which creates a deeper and more complex taste. As the goulash rests, the spices and ingredients continue to infuse the sauce, enriching the entire dish.
While it’s tempting to eat it immediately, letting your goulash rest after cooking is worth the wait. Even just 30 minutes off the heat can make a noticeable difference. For the best possible flavor, prepare it a day in advance. Gently reheating it the next day allows the flavors to intensify even further, turning a great meal into an amazing one. This simple step is the secret to elevating your goulash.
How to Store and Reheat Goulash
Since goulash often tastes even better the next day, it’s a fantastic choice for meal prep. To enjoy it again safely, proper storage and reheating are key. Here’s how to do it right.
Refrigeration: Let the goulash cool at room temperature for no more than two hours before transferring it to an airtight container. It will keep in the refrigerator for up to 3-4 days [source: https://www.foodsafety.gov/food-safety-charts/cold-food-storage-chart], making it perfect for quick lunches or dinners.
Freezing: For longer storage, goulash freezes beautifully. Once cooled, pack it into freezer-safe containers or bags, removing as much air as possible to prevent freezer burn. It can be frozen for up to 2-3 months. For best results, thaw it overnight in the refrigerator before reheating.
Reheating on the Stovetop: Place the goulash in a saucepan over medium-low heat, stirring occasionally until it simmers gently. If the sauce has thickened, add a splash of beef broth or water to reach your desired consistency.
Reheating in the Microwave: For a single serving, place the goulash in a microwave-safe bowl. Heat it on medium power, stirring every minute or so until it is piping hot throughout. You can also add a little liquid to loosen the sauce.
Before serving, always ensure your leftovers reach an internal temperature of 165°F (74°C) for food safety. With these storage tips, you can enjoy your flavorful goulash more than once.
What Should You Serve With Goulash?
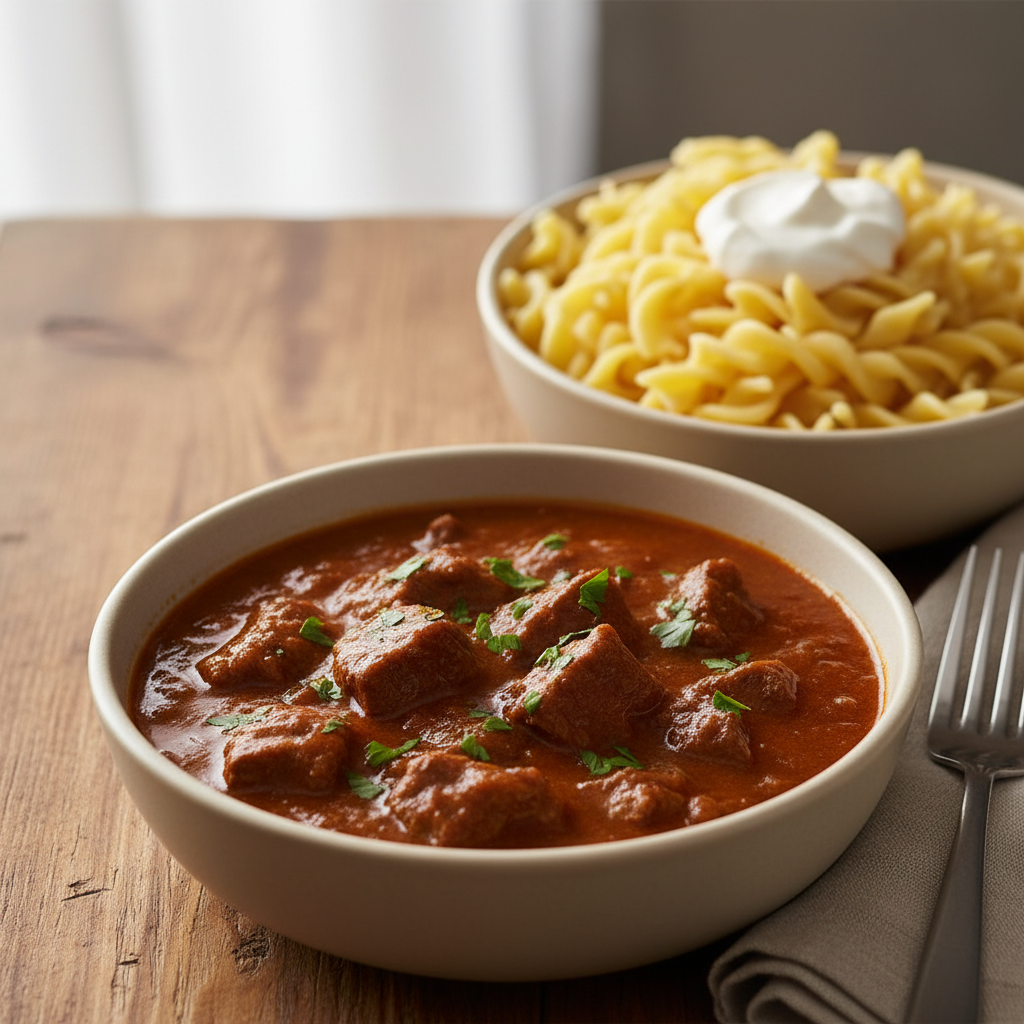
A professional food photography, photorealistic, high-quality food magazine photo of a perfectly plated bowl of hearty homemade beef goulash, garnished with a sprinkle of fresh chopped parsley. The goulash is served alongside a generous portion of fluffy, golden egg noodles and a dollop of sour cream on a warm, inviting wooden dining table. The setting is cozy and friendly, with soft, natural light illuminating the dish, making it look incredibly appetizing and comforting, ready for a family meal.
Our easy goulash recipe is a hearty, all-in-one meal featuring tender beef and pasta in a rich tomato sauce. To make your dinner even more special, consider adding a simple side dish. The right pairing creates a balanced, flavorful experience for your family, and these easy suggestions are perfect for any busy weeknight.
Complementary Sides for Your Beef Goulash
The best sides for goulash either offer a fresh, crisp contrast to its richness or help you soak up every drop of the delicious sauce. Here are a few fantastic, easy-to-prepare options:
Crusty Bread or Garlic Bread: A classic for a reason, warm crusty bread is perfect for soaking up the savory goulash sauce. Toasted garlic bread adds another layer of flavor, making this a simple and beloved addition to the meal.
Simple Green Salad: For a quick and healthy option, a crisp green salad provides a refreshing balance to the goulash’s richness. Simply toss mixed greens, cherry tomatoes, and cucumber slices with a light vinaigrette.
Cucumber Salad: Offering a cool, tangy counterpoint, this refreshing salad is easy to prepare. Just toss thinly sliced cucumbers with vinegar, dill, and a pinch of sugar for a bright side that cuts through the hearty sauce.
Steamed Green Beans or Broccoli: For a simple, nutritious side, quickly steam some green beans or broccoli. They add vibrant color to your plate, and a drizzle of olive oil with a sprinkle of salt is all they need to be delicious.
Roasted Root Vegetables: Roasting vegetables like carrots and parsnips with olive oil brings out their natural sweetness. This adds a more substantial, flavorful layer of texture to your meal.
Making Mealtime Easy and Enjoyable
Choosing the right side dish transforms a simple goulash into a complete and satisfying meal your family will love. At Recipesmondial, we believe cooking should be enjoyable, not stressful. Our goal is to help you gain confidence in the kitchen with approachable recipes and effortless meal-planning ideas so you can focus on sharing delicious food with your loved ones. Explore our platform for more quick meal solutions and beginner-friendly recipes.
Frequently Asked Questions About Goulash
What is the difference between Hungarian goulash and American goulash?
If you’ve ever wondered about the difference, you’re not alone! While both are comforting dishes, they come from distinct culinary traditions. As a result, they offer unique flavors and textures, making each one a great family-friendly meal.
Here’s a simple breakdown:
Feature
Hungarian Goulash
American Goulash
Origin
Hungary, a traditional stew or soup.
Developed in the United States, often called “American chop suey.”
Main Ingredients
Plenty of beef (or other meat), onions, and a generous amount of paprika. It often includes carrots, potatoes, and sometimes caraway seeds.
Ground beef, pasta (like elbow macaroni), canned tomatoes, onions, and often bell peppers.
Consistency
A hearty, rich, and thick stew or soup meant to be eaten with a spoon.
A saucy, casserole-like dish that is typically thicker than Hungarian goulash but not as stew-like.
Spice Profile
Deep, earthy, and aromatic from sweet Hungarian paprika, which provides a warm, rich flavor.
Savory and tomato-based, with milder seasonings like Italian seasoning or chili powder.
Serving
Often served on its own, with a slice of rustic bread, or with a dollop of sour cream.
Typically served as a one-pot meal, perfect for busy families looking for simple dinner recipes.
Our easy goulash recipe leans toward the American style, making it an approachable home cooking dish. By simplifying dinner prep, it delivers a flavorful meal with minimal fuss, which is perfect for beginners.
Can I make this goulash recipe in a slow cooker?
Absolutely! A slow cooker is a fantastic tool for making this recipe, as it creates tender, flavorful meals with minimal effort. It’s especially useful for busy families and for meal prep. Better yet, adapting our goulash recipe for your slow cooker is simple and transforms the cooking experience into an even more relaxed process.
Follow these easy steps:
Brown the Beef: First, brown the beef in a skillet on the stovetop and drain any excess fat. This step is vital for developing a deep, rich flavor, so don’t skip it!
Sauté Aromatics: Next, briefly sauté the onions and garlic in the same skillet until they soften and release their aroma.
Combine Ingredients: Transfer the browned beef, sautéed aromatics, tomatoes, broth, and seasonings to your slow cooker. Stir well to combine.
Cook Low and Slow: Cook on low for 6-8 hours or on high for 3-4 hours. During this time, the beef will become wonderfully tender as all the flavors meld together.
Add Pasta: About 30-45 minutes before serving, stir in the uncooked pasta. If the sauce seems too thick, add a little extra liquid. Continue cooking until the pasta is tender.
Using a slow cooker is a fantastic way to enjoy this hearty goulash. Because you can prepare it ahead, it helps reduce stress at mealtime and ensures a delicious, reliable result every time.
What is the best beef to use for beef goulash?
Choosing the right cut of beef is key to a delicious goulash. For this recipe, you’ll want a cut that becomes rich and tender after simmering, which is why meats designed for slow cooking are the best choice. These cuts offer the ideal flavor and texture for a hearty stew.
Here are our top recommendations for beef goulash:
Chuck Roast: Often called a “chuck eye roast” or “blade roast,” this cut is a fantastic choice. Its marbling (intramuscular fat) breaks down during slow cooking, making the meat incredibly tender and juicy.
Stew Beef/Stew Meat: Most grocery stores sell pre-cut “stew beef,” which usually comes from the chuck or round. It’s a convenient, budget-friendly option that’s perfect for beginner-friendly recipes.
Round Steak (Bottom Round, Top Round): While leaner than chuck, these cuts can also work well. Just be sure to cut them into smaller pieces and allow for a longer cooking time to ensure they become tender.
For the best results, we highly recommend chuck roast. Its marbling guarantees a melt-in-your-mouth texture that will elevate your goulash. Best of all, chuck roast is generally affordable, making it perfect for budget-friendly cooking without sacrificing taste.
What kind of pasta works best for goulash?
In American-style goulash, the right pasta can make all the difference. You’ll want a shape that can stand up to simmering in the sauce while being easy to eat. The best choices are pastas that absorb flavor and hold their shape, ensuring a comforting, balanced bite every time.
Here are the best pasta choices for goulash:
Elbow Macaroni: This is the classic choice. Its small, curved shape is perfect for scooping up the savory sauce and ground beef.
Ditalini: These tiny, tube-shaped pasta pieces are even smaller than elbow macaroni. They are excellent for blending seamlessly into the sauce.
Small Shells (Conchigliette): The hollows in small shell pasta are perfect for catching bits of meat and sauce, adding delightful texture to each spoonful.
Rotini or Spirals: These corkscrew shapes are also a great choice, as their nooks and crannies excel at holding the rich goulash sauce.
Penne or Ziti (cut short): If you prefer a slightly larger bite, short-cut penne or ziti can work well. Just make sure the pieces are small enough to be easily managed in one spoonful.
Regardless of the shape you choose, be careful not to overcook the pasta. Add it directly to the simmering sauce near the end of the cooking time. This method ensures it cooks to a perfect al dente texture without becoming mushy, leading to a more satisfying and reliable result.
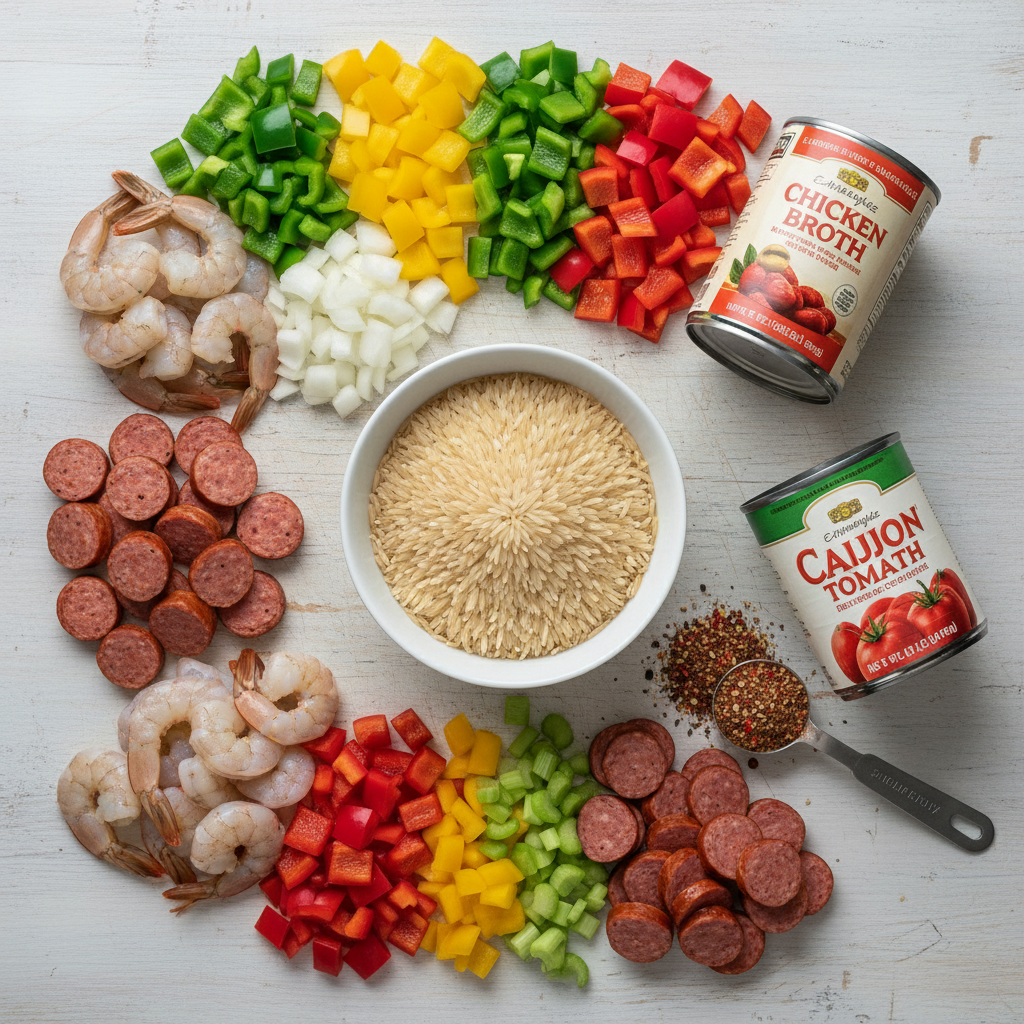
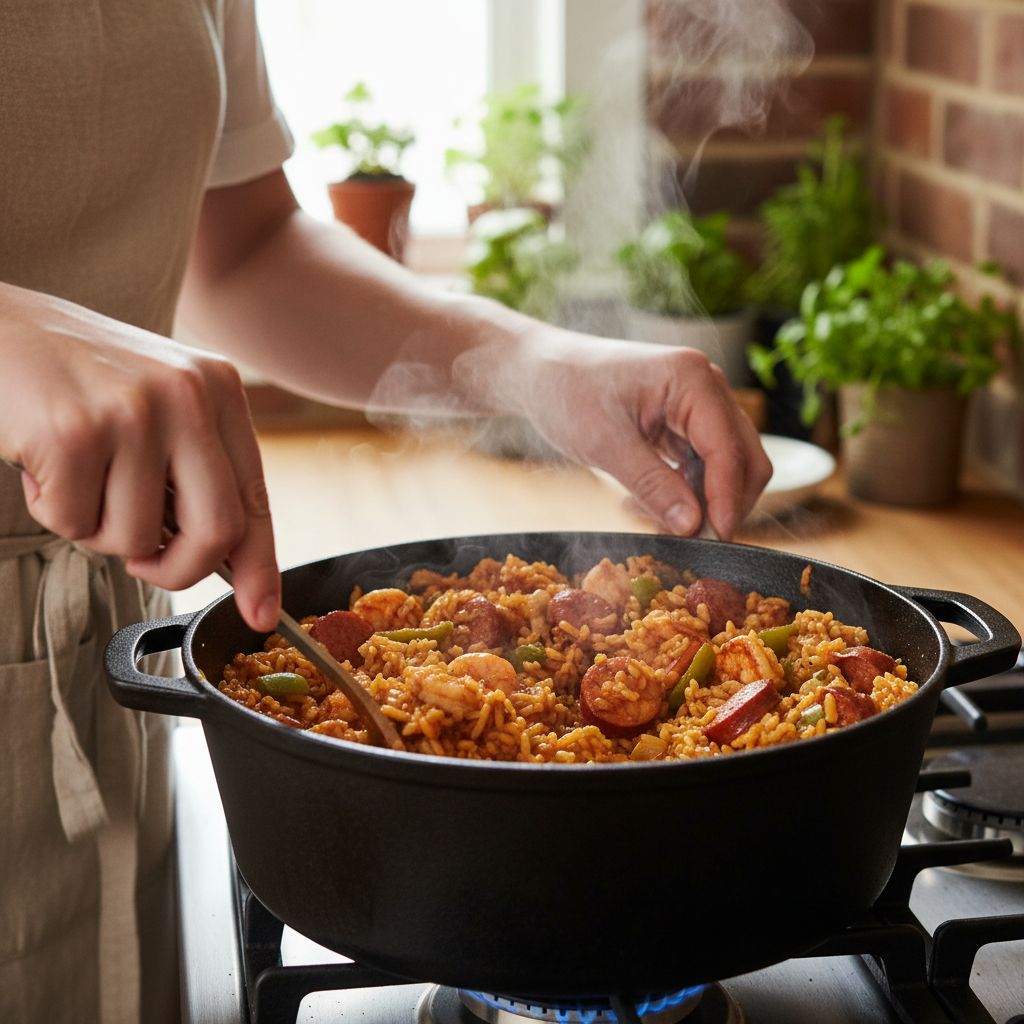
Jambalaya is a popular Louisiana comfort food dish with Spanish, French, and West African influences, consisting of meat, vegetables, and rice cooked together in one pot. The core ingredients typically include sausage (like andouille), chicken or pork, and seafood such as shrimp, all seasoned with a mix of onions, bell peppers, and celery known as the ‘holy trinity’.
Craving a hearty, flavorful meal for the whole family but feel overwhelmed by complex recipes? Imagine serving a vibrant, comforting dish that tastes like it took hours, yet comes together easily in just one pot. That’s the magic of a truly great jambalaya!
At Recipesmondial, we believe cooking should be stress-free and rewarding. Our easy jambalaya recipe is designed for beginners, offering clear, step-by-step guidance to build your confidence in the kitchen. We’ll show you how to combine everyday ingredients into an incredible meal, proving that delicious, family-friendly meals don’t have to be complicated.
Get ready to discover why this simple jambalaya recipe will become a new favorite in your kitchen. We’ll guide you through every step, from selecting the right ingredients to mastering the perfect simmer, so you can create an authentic, mouthwatering dish with amazing results every time.
Why You’ll Love This Simple Jambalaya Recipe
Ready to find your new favorite weeknight meal? This easy jambalaya recipe is your path to stress-free, delicious cooking. We believe cooking should be enjoyable, not a chore, and this dish is the perfect proof.
Here’s why you’ll absolutely love making this simple jambalaya:
It’s a One-Pot Wonder: Forget about a sink full of dishes! This flavorful meal comes together in a single pot, meaning less cleanup and more time to enjoy your dinner. It’s the ultimate easy recipe for busy evenings.
Perfect for Beginners: We’ve broken down the recipe into simple, clear instructions—without any intimidating culinary jargon. This approachable home cooking guide is designed to build your confidence in the kitchen.
Packed with Flavor: Get incredible taste without complicated techniques. Each bite of this jambalaya offers a satisfying blend of savory spices, tender meats, and perfectly cooked rice.
A Family Favorite: This hearty and comforting meal is sure to please everyone at the table. Kids and adults alike will devour this dish, putting an end to mealtime struggles.
Quick and Convenient: Get a delicious, homemade dinner on the table in no time. This recipe is perfect for anyone seeking quick meals without sacrificing flavor, making weeknight decisions easy.
Builds Your Cooking Skills: Our step-by-step guidance helps you master basic techniques while creating an impressive dish. You’ll grow your kitchen confidence and see just how simple cooking can be.
This simple jambalaya is more than just a recipe; it’s a way to cook confidently and eat well. It shows you how to transform basic ingredients into a delicious, memorable meal. Get ready to enjoy stress-free cooking and bring incredible flavor to your table!
What Ingredients Do You Need for Jambalaya?
A perfectly composed flat lay, professional food photography shot of all raw, fresh jambalaya ingredients neatly arranged on a light-colored, slightly textured kitchen countertop or wooden board. Ingredients include uncooked long-grain rice in a small bowl, raw peeled shrimp, sliced chicken andouille sausage, diced green bell peppers, red bell peppers, yellow bell peppers, diced celery, diced onion, a can of crushed tomatoes, a carton of chicken broth, and a small pile of Cajun seasoning with a measuring spoon. Each ingredient is pristine and clearly separated, with bright, natural overhead lighting. Photorealistic, high-quality food magazine photo style. No artistic interpretations, illustrations, vector graphics, or abstract art.
The ‘Holy Trinity’ of Cajun Cooking
Every authentic jambalaya starts with a foundational blend of vegetables known as the “Holy Trinity” in Cajun and Creole cooking. This trio builds the base flavor for countless dishes, including this easy jambalaya.
The Holy Trinity consists of three simple, yet powerful, ingredients:
Onion: Adds sweetness and depth to the dish.
Celery: Provides a subtle, earthy flavor and texture.
Green Bell Pepper: Brings a fresh, slightly bitter note that balances the richness.
These vegetables are diced and sautéed together, a process that builds a rich aroma and taste. This is the essential first step for developing that incredible jambalaya flavor. Best of all, you can find these common ingredients in any grocery store, making this a delicious and accessible meal.
Choosing Your Protein: Sausage, Chicken, and Shrimp
One of the best parts about jambalaya is its versatility. Feel free to use a combination of proteins or stick to just one, making it an adaptable dinner recipe. Our beginner-friendly version uses a classic mix for a truly satisfying meal.
Here are the proteins we recommend for a flavorful jambalaya:
Andouille Sausage: This traditional, smoked sausage adds a wonderful spicy and smoky depth. Look for a good quality brand at your local butcher or supermarket. If you cannot find Andouille, smoked kielbasa or a spicy Italian sausage makes a great substitute.
Chicken:Boneless, skinless chicken thighs are perfect because they stay moist and tender during cooking. Cut them into bite-sized pieces to ensure they cook evenly. While chicken breasts can also be used, be careful not to overcook them, as they can become dry. Chicken makes the dish extra hearty.
Shrimp: Add raw, peeled, and deveined shrimp near the end of cooking. This timing is key to ensuring they cook quickly and remain succulent. Both fresh and frozen shrimp work well; just be sure to thaw frozen shrimp completely before adding them to the pot. The shrimp provides a delicious seafood element that makes the jambalaya feel extra special.
Feel free to adjust the protein amounts to suit your budget or preferences. For a quicker meal, you can use just the sausage and omit the other proteins. This flexibility makes jambalaya a great, stress-free option for dinner.
The Best Rice and Spices for Authentic Flavor
The right rice and spice blend are crucial for transforming simple ingredients into a deeply flavorful jambalaya. Following these tips will help ensure your dish turns out perfectly every time.
Getting the Rice Right
Choosing the right rice is key to preventing a mushy jambalaya. Long-grain white rice is the standard choice because it absorbs the rich broth while still holding its shape, ensuring each grain remains separate and flavorful [1].
Long-Grain White Rice: This is the non-negotiable choice for authentic jambalaya. While varieties like Jasmine or Basmati can also work, the key is to always rinse your rice before cooking. Rinsing removes excess starch and helps prevent the final dish from becoming sticky.
Avoid short-grain or medium-grain rice varieties, as they release too much starch and can make your jambalaya sticky and clumpy.
Spices for that Signature Taste
The spice blend brings all the flavors together and gives jambalaya its characteristic warmth and zest. You can use a pre-made Cajun seasoning or create your own blend.
Essential spices and aromatics include:
Cajun Seasoning: A good quality blend is your shortcut to flavor. It typically contains paprika, garlic powder, onion powder, cayenne pepper, and dried herbs.
Garlic: Fresh minced garlic adds a pungent, aromatic base.
Dried Thyme: Earthy and slightly floral, it’s a classic Cajun herb.
Bay Leaves: These infuse the dish with a subtle, aromatic background flavor. Remember to remove them before serving.
Paprika: Sweet paprika adds color and a mild, peppery flavor. For a smokier taste, opt for smoked paprika.
Cayenne Pepper: For adjustable heat. Add more or less depending on your preference.
Salt and Black Pepper: Essential for seasoning the dish to perfection. Taste and adjust as you go.
Building these layers of flavor is what makes home-cooked jambalaya so rewarding. These spices are readily available in most grocery stores and are key to creating the dish’s signature taste. Mastering this blend will give you the confidence to tackle many other classic Cajun recipes.
How to Make Jambalaya Step-by-Step
A professional food photography shot capturing a close-up of a home cook’s hands, stirring a large, deep cast-iron Dutch oven filled with simmering jambalaya on a stovetop. Steam gently rises from the pot, indicating its warmth and freshness. The rich, savory mixture of rice, sausage, shrimp, and vegetables is clearly visible, glistening under bright, inviting kitchen lighting. The cook’s hands are natural and engaged in the cooking process. The focus is on the action within the pot, with the kitchen environment subtly blurred in the background. Photorealistic, high-quality food magazine photo style. No artistic interpretations, illustrations, vector graphics, or abstract art.
Step 1: Brown the Sausage and Chicken
To create a deep, savory foundation for your jambalaya, start by browning the sausage and chicken. This crucial first step unlocks rich flavors and builds complexity with minimal effort.
Don’t be intimidated; this simple technique is the secret to a flavorful base for any one-pot meal.
Heat a large, heavy-bottomed pot or Dutch oven over medium-high heat.
Add 1 tablespoon of olive oil (if needed, depending on your sausage).
Place the sliced smoked sausage (like Andouille) into the hot pot.
Cook for 5-7 minutes, stirring occasionally, until it’s nicely caramelized.
Remove the sausage with a slotted spoon and set it aside on a plate.
Add the diced chicken to the same pot.
Brown the chicken on all sides, which usually takes 5-8 minutes.
Ensure the chicken is cooked through with no pink remaining.
Remove the chicken and add it to the plate with the sausage.
Tip for Success: For the best flavor, don’t overcrowd the pot. Cook the meats in batches if needed to ensure they brown properly instead of steaming.
Step 2: Sauté the Vegetables
Next, build aromatic depth with the “Holy Trinity” of Cajun cooking: onion, bell pepper, and celery. This trio is a cornerstone of flavor in many authentic global comfort foods.
This straightforward step transforms simple ingredients into the heart of your jambalaya, making it a beginner-friendly way to build a delicious base.
Reduce the heat to medium.
Add the remaining 1 tablespoon of olive oil to the pot, if the pot is dry.
Stir in 1 large chopped onion, 1 large chopped green bell pepper, and 2 chopped celery stalks.
Cook for 8-10 minutes, until the vegetables soften and become translucent.
As you stir, scrape up any browned bits from the bottom of the pot. These bits add immense flavor.
Add 3 cloves of minced garlic during the last minute of cooking.
Stir constantly for that final minute to prevent the garlic from burning.
Substitution Idea: No green bell pepper? Red or yellow peppers work wonderfully, offering a slightly sweeter flavor that’s perfect for family-friendly meals.
Step 3: Toast the Spices and Add Liquids
Awaken the spices by toasting them directly in the pot. This simple technique deepens their flavor and makes your jambalaya incredibly fragrant.
Pouring in the liquids immediately after toasting allows all the flavors to meld perfectly, creating a well-balanced dish.
Sprinkle 2 teaspoons of Creole seasoning (or Cajun seasoning), 1 teaspoon of dried thyme, and ½ teaspoon of black pepper over the sautéed vegetables.
Stir for about 1 minute until the spices become fragrant.
Pour in 1 (14.5 ounce) can of diced tomatoes with their juices.
Add 4 cups of chicken broth to the pot.
Stir everything together, scraping any final bits from the bottom.
Bring the mixture to a gentle simmer.
Meal Prep Tip: To save time on a busy weeknight, chop your vegetables ahead of time and store them in an airtight container in the fridge.
Step 4: Cook the Rice
Now, it’s time to bring the dish together. By cooking the rice directly in the seasoned broth, you’ll infuse every single grain with flavor. Following these steps will ensure perfect results.
If you’re worried about sticky or undercooked rice, don’t be. These clear instructions are designed to guarantee a great texture.
Add 2 cups of uncooked long-grain white rice to the simmering liquid.
Stir gently just once to combine, ensuring the rice is fully submerged.
Return the browned sausage and chicken to the pot.
Bring the liquid back to a simmer.
Cover the pot with a tight-fitting lid.
Reduce the heat to low.
Cook for 20-25 minutes. Do not lift the lid during this time.
After 20-25 minutes, all the liquid should be absorbed by the rice.
Common Mistake to Avoid: Avoid stirring the rice as it cooks. Stirring releases starch, which can make the jambalaya gummy. For the best texture, let it simmer undisturbed.
Step 5: Add the Shrimp and Finish
In this final step, you’ll add shrimp for a burst of fresh seafood flavor. Since shrimp cooks very quickly, adding it at the end ensures it will be perfectly tender, not rubbery.
With this finishing touch, your delicious, family-friendly meal is just moments away from the table.
After the rice has cooked for 20-25 minutes, remove the pot from the heat.
Immediately stir in 1 pound of peeled and deveined raw shrimp.
Replace the lid securely.
Let the jambalaya stand, covered, for another 5-7 minutes.
The residual heat from the pot will cook the shrimp to pink perfection.
Uncover and gently fluff the jambalaya with a fork.
Garnish with fresh chopped parsley or green onions.
Serve your magnificent jambalaya immediately.
Flavorful Finish: For an extra kick, finish with a dash of your favorite hot sauce, like Tabasco or Crystal. It’s an optional but delicious addition for anyone who enjoys a bit of heat.
Expert Tips for the Perfect Jambalaya
Recipe Variations and Substitutions
Jambalaya is a wonderfully adaptable dish, making it a creative cooking experience. You can easily adjust the recipe to fit your pantry, preferences, or dietary needs. These simple tweaks will help you cook with confidence.
Protein Power: Experiment with your protein choices. For a lighter version, use diced boneless, skinless chicken breast. For a vegetarian option, replace the meat with kidney beans, black beans, or chickpeas. Plant-based sausages also work well, providing a similar texture and flavor.
Spice Level Swaps: Control the heat by adjusting the cayenne pepper to your liking. Reduce or omit it for a milder jambalaya. For those who like more spice, add a dash of hot sauce to individual servings.
Veggie Boosts: Feel free to add more vegetables to this recipe. Sliced bell peppers of different colors add sweetness and vibrant appeal. You can also stir in a handful of fresh spinach at the very end; it will wilt perfectly into the hot rice. [2]
Broth Choices: Opt for low-sodium chicken or vegetable broth to control the final saltiness. If you have homemade broth, use it for an even deeper flavor.
Dietary Friendly: This jambalaya recipe is naturally gluten-free, but always double-check your sausage and broth labels to ensure they are certified. This makes it an easy meal solution for those with gluten sensitivities.
How to Store and Reheat Leftovers
One of the best things about jambalaya is the leftovers—it often tastes even better the next day! This makes it perfect for meal prep and stress-free weekday lunches.
Refrigeration: For food safety, first allow the jambalaya to cool completely. Then, transfer it to an airtight container and refrigerate within two hours of cooking. It will stay fresh for 3 to 4 days.
Freezing for Later: Jambalaya freezes beautifully, making it a great option for meal planning. To freeze, portion the cooled jambalaya into freezer-safe bags or containers, labeling each with the date. It will keep for up to 3 months. Thaw it overnight in the refrigerator before reheating.
Reheating Methods:
Microwave: Place a single serving in a microwave-safe dish. To prevent it from drying out, add a splash of broth or water (1 to 2 tablespoons). Cover and heat on medium power for 2 to 3 minutes, stirring halfway through, until thoroughly hot.
Stovetop: For larger batches, transfer the leftovers to a pot or skillet. Add a little broth or water and heat over medium-low, stirring often until steaming and heated through.
Common Mistakes to Avoid
Even beginners can make perfect jambalaya by avoiding a few common pitfalls. Follow these simple tips for success in the kitchen.
Over-Stirring the Rice: Resist the urge to stir the rice constantly after adding it. Over-stirring releases starches that can make the final dish gummy or mushy. Stir only when the recipe directs you to.
Skipping the Browning Step: Don’t rush the browning step for the sausage and chicken. Searing the meat is a crucial step that builds a deep, caramelized flavor base for the entire dish.
Lifting the Lid Too Often: Once the rice and liquid are simmering, keep the lid on tightly. Lifting the lid releases steam, which is essential for cooking the rice properly. Keeping it covered ensures every grain becomes tender and fluffy.
Incorrect Liquid Ratio: Using the correct liquid-to-rice ratio is key. Too much liquid will make the jambalaya soupy, while too little will leave the rice hard and undercooked. Follow the recipe’s measurements carefully to achieve the perfect consistency.
Overcrowding the Pot: Use a wide, heavy-bottomed pot to avoid overcrowding. A cramped pot prevents ingredients from browning properly and leads to uneven cooking. If your pot isn’t large enough, brown the sausage and chicken in batches to ensure even heat and the best flavor.
Frequently Asked Questions About Jambalaya
What are the types of jambalaya?
There are two primary styles of jambalaya: Cajun and Creole. Both are delicious one-pot meals, perfect for feeding a crowd or enjoying as a hearty family dinner.
Cajun Jambalaya: Originating in rural Louisiana, this version is known for its brown color. It gets its deep flavor from browning meat in the pot and does not contain tomatoes.
Creole Jambalaya: Hailing from New Orleans, this style is often called “red jambalaya” because it includes tomatoes. It tends to have a more complex flavor from a wider variety of spices.
Both versions bring the signature taste of Louisiana to your kitchen and are surprisingly simple to prepare at home.
What is the difference between Cajun and Creole jambalaya?
While both jambalaya styles are delicious, their key differences lie in the ingredients and cooking methods. Understanding these distinctions will help you appreciate the unique culinary heritage of each dish.
Flavor comes from browning meat to create a fond. A dark roux is sometimes used.
A roux is less common, but a light one may be used for thickening.
Flavor Profile
Hearty, smoky, and meat-focused.
Slightly brighter, with a complex flavor from a wider array of spices.
Our easy jambalaya recipe is a Creole-style version with tomatoes, making it a vibrant and flavorful meal perfect for beginners.
What is the best rice for jambalaya?
The best choice for authentic jambalaya is a good quality long-grain white rice. This type of rice is ideal for several reasons:
Absorbs Flavor: Long-grain rice soaks up the spices and broth without becoming mushy, ensuring every bite is flavorful.
Maintains Texture: Unlike stickier varieties, long-grain kernels remain separate after cooking, which gives jambalaya its classic texture.
Provides Consistent Results: It’s a forgiving rice that’s easy to cook correctly, making it a reliable choice for cooks of all levels.
Avoid short-grain or medium-grain rice, as they can release too much starch and make the dish sticky. While Basmati or jasmine rice can work in a pinch, standard long-grain white rice will give you the best results.
What sausage is best for a jambalaya recipe?
For the most authentic flavor, Andouille sausage is the top choice. This smoked pork sausage brings a rich, spicy, and savory flavor that is essential to a classic jambalaya.
If you can’t find Andouille, several other types of sausage work well:
Smoked Sausage: A high-quality smoked sausage, such as Kielbasa, is an excellent alternative. Look for one with a robust, smoky flavor.
Spicy Italian Sausage: If you prefer extra heat, spicy Italian sausage adds a great kick. Be sure to brown it thoroughly to render the fat.
Spanish Chorizo: Not to be confused with Mexican chorizo, this firm, cured sausage lends a delicious smoky and spicy flavor.
The goal is to use a flavorful sausage that holds its shape during cooking. Any of these options will ensure your jambalaya is bursting with taste.
This classic chicken pot pie recipe features tender chunks of chicken and vegetables like carrots, peas, and potatoes in a rich, creamy sauce. The savory mixture is baked inside a flaky, golden-brown pie crust, creating the ultimate comfort food meal perfect for families and beginner cooks.
A warm, comforting meal brings everyone to the table, especially when life gets busy. For many home cooks, the classic chicken pot pie is the ultimate cozy dish. Still, the thought of making it from scratch can feel daunting. If you want to cook healthy, tasty meals the whole family will love without complex steps, you’re in the right place. We believe delicious, flavorful meals made easy should be a cornerstone of every home kitchen.
At Recipesmondial, we want to make family-friendly cooking an enjoyable, stress-free experience. That’s why we’re sharing our incredibly simple chicken pot pie recipe, designed to guide you step-by-step. You’ll learn how to create a golden, flaky-crusted pot pie with a rich, savory filling that tastes like it took hours but comes together easily. This simple dinner recipe is about to become a reliable favorite.
Our beginner-friendly recipe provides practical guidance to ensure great results, whether you’re a seasoned cook or just starting. We’ll show you how to achieve the perfect chicken pot pie every time, complete with helpful tips, substitutions, and variations to make it your own. Get ready to cook with confidence and serve a meal that is sure to gather rave reviews.
Why You’ll Love This Homemade Chicken Pot Pie Recipe
A perfectly baked chicken pot pie, golden-brown and flaky crust with a lovely lattice top, steam gently rising from a slice that’s been cut out, revealing the creamy, rich filling with chunks of chicken and vibrant mixed vegetables. The pie is served on a rustic wooden surface, with a cozy, warm kitchen in the softly blurred background. Professional food photography, photorealistic, high-quality food magazine photo style.
There’s nothing quite like the comforting embrace of a warm, savory homemade chicken pot pie. While it’s a true classic for any occasion, this isn’t just any pot pie recipe. We’ve designed it specifically for home cooks like you.
At Recipesmondial, we believe cooking should be enjoyable, not stressful. That’s why our easy chicken pot pie recipe delivers reliable results and incredible flavor without the fuss. Instead of being overwhelmed by complex recipes, you’ll find simple steps and practical guidance.
Here’s why you’ll absolutely love making this homemade chicken pot pie:
Effortless Comfort Food: This pot pie recipe brings cozy warmth to your table using everyday ingredients you likely already have. It’s the perfect choice for a satisfying dinner any night of the week.
Beginner-Friendly Approach: We break down every step clearly, providing step-by-step cooking guidance from start to finish. This approachable home cooking experience helps even new cooks feel confident in the kitchen.
Incredible Flavor, Made Easy: Get ready to enjoy a rich, creamy filling and a perfectly flaky crust. Our straightforward method ensures maximum taste with minimal fuss, making this a truly flavorful meal made easy.
Perfect for Busy Families: As a family-friendly meal, this chicken pot pie is a guaranteed crowd-pleaser. Plus, our meal prep tips show you how to prepare it ahead of time.
Customizable to Your Liking: Feel free to adapt this recipe by swapping vegetables or using leftover chicken. We also include variations, like a chicken pot pie casserole, to suit your taste and what you have on hand.
Say Goodbye to Mealtime Stress: Stop struggling to plan family-friendly meals. With clear directions and delicious results, this recipe lets you enjoy cooking without stress.
Get ready to create a memorable dish that will quickly become a staple in your kitchen. This chicken pie recipe proves how simple ingredients can transform into a spectacular meal. Recipesmondial is here to guide you toward culinary success!
What Ingredients Do You Need for This Pot Pie Recipe?
An overhead flat lay, professional food photography shot of all fresh, raw ingredients for an easy chicken pot pie neatly arranged on a clean, light-colored kitchen counter or rustic wooden board. Ingredients include raw chicken breast, frozen mixed vegetables (peas, carrots, corn), chicken broth, cream of chicken soup, milk, butter, all-purpose flour, salt, black pepper, and two store-bought pie crusts (one in its package, one unrolled). The ingredients are vibrant, fresh, and perfectly lit. Photorealistic, high-quality food magazine photo.
For the Creamy Chicken Filling
A rich and creamy filling is the heart of a delicious homemade chicken pot pie. Using everyday ingredients, it comes together quickly to create a comforting, flavorful meal your family will adore. This recipe makes approachable home cooking both simple and enjoyable.
Here’s what you’ll need for this savory core:
Cooked Chicken: 2 cups, shredded or diced. Leftover roast chicken or a store-bought rotisserie chicken works perfectly and saves so much time!
Unsalted Butter: 1/4 cup (4 tablespoons). This forms the base for our flavorful sauce.
Yellow Onion: 1/2 medium, chopped. It adds a sweet and savory depth.
Carrots: 1 cup, peeled and diced. They bring natural sweetness and color.
Celery: 1 cup, diced. This adds a subtle crunch and classic flavor.
All-Purpose Flour: 1/4 cup. It helps to thicken the creamy sauce beautifully.
Chicken Broth: 1 1/2 cups. Choose low-sodium to control the saltiness.
Milk: 1/2 cup (whole milk or 2%). This makes the filling wonderfully creamy.
Frozen Peas: 1 cup. No need to thaw them; they add a pop of green and sweetness.
Dried Thyme: 1/2 teaspoon. It provides that classic, aromatic pot pie taste.
Salt and Black Pepper: To taste. Start with 1/2 teaspoon salt and 1/4 teaspoon pepper, then adjust as needed.
Substitution Tip: Feel free to customize the filling! You can easily swap in other vegetables like diced potatoes, green beans, or corn. This flexibility makes it a truly family-friendly meal. For an even richer sauce, replace half the milk with heavy cream. This beginner-friendly recipe encourages creativity in your kitchen!
For the Flaky Pie Crust (Store-Bought or Homemade)
The golden, flaky crust is what makes a chicken pot pie irresistible. To create an easy chicken pot pie, we recommend a store-bought crust. It’s a great shortcut for getting this simple dinner recipe on the table fast. However, if you love to bake, a homemade crust is a wonderful and rewarding option.
Here are your crust choices:
Refrigerated Pie Crusts: 2 (one 14.1-ounce package). This is our top pick for a quick and stress-free pie. They are readily available in most grocery stores—simply unroll and use!
For the Homemade Crust (Optional, but rewarding!):
All-Purpose Flour: 2 1/2 cups.
Unsalted Butter: 1 cup (2 sticks), very cold and cut into small cubes. Cold butter is the key to a flaky crust!
Ice Water: 1/2 cup to 3/4 cup. Add it slowly until the dough just comes together.
Salt: 1 teaspoon. This enhances the flavor of the crust.
Pro Tip for Beginners: Don’t hesitate to use a store-bought crust! It’s a fantastic shortcut for a flavorful meal made easy without the extra work. Our step-by-step cooking guidance is designed to provide simple paths to delicious results. You can always tackle the homemade version when you’re feeling more adventurous. You’ll build kitchen confidence with every recipe you try!
How to Make Chicken Pot Pie Step-by-Step
A close-up, photorealistic professional food photography shot of a home cook’s hands, with clean, unadorned nails, gently placing a golden-brown, pre-made pie crust over a glass pie dish filled with a creamy chicken and mixed vegetable mixture. The hands are carefully crimping the edges to seal the pie. The background is a soft, warm, and inviting kitchen setting, slightly blurred to keep focus on the hands and the pie assembly. High-quality food magazine photo.
Step 1: Prepare and Sauté the Vegetables
Let’s begin your delicious easy chicken pot pie recipe by preparing the vegetables. Proper prep work makes the cooking process much smoother and is a great habit for meal prep.
Dice the aromatics. Finely dice one medium onion and two cloves of garlic. Smaller pieces will ensure they cook evenly.
Melt the butter. In a large pot or Dutch oven, melt two tablespoons of unsalted butter over medium heat.
Sauté the onion. Add the diced onion to the pot and sauté for about 5 minutes, stirring occasionally until it has softened.
Add remaining vegetables. Add one cup of sliced carrots and one cup of frozen peas to the pot. You can also add corn for extra sweetness.
Stir in the garlic. Add the minced garlic and cook for one more minute until you can smell its aroma.
Set the vegetables aside. Remove the cooked vegetables from the pot and transfer them to a bowl. This step prevents them from overcooking while you prepare the sauce.
Step 2: Cook the Chicken and Create the Creamy Sauce
Now it’s time to build the heart of your homemade chicken pot pie: the creamy, flavorful filling. This rich sauce is what makes a pot pie so comforting.
Cook the chicken. If using raw chicken, dice two boneless, skinless chicken breasts and cook them in the same pot with a tablespoon of olive oil until no longer pink, about 6-8 minutes. If you are using pre-cooked rotisserie chicken, you will add two cups of shredded meat later.
Make the roux. In the same pot, melt another two tablespoons of butter. Whisk in 1/4 cup of all-purpose flour and cook for 1-2 minutes, stirring constantly, to create a thickening paste.
Create the sauce. Gradually pour in 1 3/4 cups of chicken broth while whisking constantly to prevent lumps. Then, whisk in 1 cup of whole milk. Continue until the sauce begins to thicken and can coat the back of a spoon.
Season the sauce. Stir in 1/2 teaspoon of dried thyme, 1/2 teaspoon of salt, and 1/4 teaspoon of black pepper. Taste and adjust the seasonings if needed.
Combine all ingredients. Return the cooked vegetables to the pot. Add the cooked chicken (either the freshly cooked pieces or the shredded rotisserie chicken) and stir everything together. Simmer for 2-3 minutes to allow the flavors to meld.
Prepare the pie plate. Lightly grease a standard 9-inch pie plate.
Line the pie plate. Gently unroll one refrigerated pie crust and press it into the bottom and up the sides of the prepared plate. Trim any excess dough from the edge.
Add the filling. Pour the warm chicken and vegetable filling into the bottom crust and spread it out evenly.
Cover with the top crust. Place the second pie crust over the filling. Trim the edges, leaving a 1/2-inch overhang.
Seal the edges. Fold the top crust’s overhang under the bottom crust’s edge and crimp them together with your fingers or a fork to create a seal.
Vent the crust. Cut a few small slits in the top crust to allow steam to escape during baking. This helps prevent a soggy pie.
Add an optional egg wash. For a rich, golden-brown finish, brush the top crust with an egg wash (one egg beaten with a tablespoon of water).
Step 4: Bake to Golden Brown Perfection
The final step is baking. This is where the magic happens, turning simple ingredients into a classic, flavorful meal made easy. Prepare for a truly comforting chicken pot pie experience!
Bake the pie. Place the assembled pot pie in the preheated oven. Bake for 30-40 minutes, or until the crust is golden brown and the filling is bubbly.
Prevent over-browning. If you notice the edges of the crust browning too quickly, you can cover them with a strip of aluminum foil.
Check for doneness. For food safety, the internal temperature of the filling should reach 165°F (74°C) [1].
Rest the pie before serving. Once baked, remove the pot pie from the oven and let it cool for at least 10-15 minutes. This crucial step allows the creamy filling to set, so it doesn’t run out when you slice it.
Serve and enjoy! Slice the warm, homemade chicken pot pie and serve immediately. It’s a satisfying dish perfect for any night of the week.
What Are Some Tips and Variations for the Best Chicken Pie?
Time-Saving Tip: Using Rotisserie Chicken
When life gets busy, smart shortcuts in the kitchen are a lifesaver.
Using a pre-cooked rotisserie chicken is a fantastic way to make this easy chicken pot pie even quicker. This simple swap saves you valuable time, especially when you’re preparing dinner on a tight schedule.
Here’s how to do it:
Shred the Chicken: Once the rotisserie chicken has cooled, remove the skin and bones. Shred or dice the meat into bite-sized pieces. You’ll need about 2-3 cups for this recipe.
Skip a Step: Add the cooked chicken directly to your sautéed vegetables and creamy sauce. This allows you to skip the step of cooking raw chicken from scratch.
Flavor Boost: Rotisserie chicken often comes pre-seasoned, which adds an extra layer of savory flavor to your homemade chicken pot pie.
This simple trick makes preparing family-friendly, beginner-friendly meals a breeze.
Crust Alternatives: Can I use biscuits or puff pastry?
Absolutely! The beauty of a pot pie recipe is its versatility, and you can easily switch up the crust.
If you’re looking for a different texture or an even simpler approach, these alternatives are perfect for stress-free cooking.
Many home cooks enjoy these popular variations:
Flaky Puff Pastry: For an elegant, super-flaky top, use a sheet of store-bought puff pastry. Thaw it according to package directions, lay it over your filling, crimp the edges, and bake until golden brown for a beautiful, light crust.
Comforting Biscuits: Biscuit dough makes a wonderful, soft topping. You can use canned biscuit dough or your favorite homemade recipe. Simply arrange the biscuits over the filling for a more rustic, casserole-style pot pie.
No Bottom Crust: For a lighter option, you can skip the bottom crust entirely. This is a great approach when making a chicken pot pie in a bowl or in a “pot pie soup” style.
These crust alternatives open up new possibilities for creating easy and flavorful meals.
Making a Chicken Pot Pie Casserole
Transforming your chicken pot pie into a casserole is an excellent idea that’s often even easier to assemble.
This variation is perfect for feeding a crowd because it simplifies serving, making it a fantastic solution for busy family dinners.
Follow these simple adjustments:
Choose Your Dish: Prepare your creamy chicken filling as directed, then pour it into a large baking dish (like a 9×13 inch casserole dish) instead of a pie plate.
Crust on Top Only: A casserole typically has a top crust only. You can use a single pie crust, puff pastry, or biscuits. If using pie crust, you might need two sheets to cover a larger casserole dish.
Crumb Topping (Optional): For a lighter, crunchier topping, consider a savory crumb. Mix breadcrumbs with melted butter, herbs, and Parmesan cheese, then sprinkle the mixture over the filling before baking.
Bake and Serve: Bake at 375°F (190°C) for 25-35 minutes, or until the filling is bubbly and the top is golden brown. Adjust the baking time based on your dish size and topping.
This adaptation creates an approachable home cooking experience, and you’ll love how simple and delicious it is!
Meal Prep: Making the Filling Ahead of Time
Meal prep is a game-changer for stress-free cooking, and preparing your chicken pot pie filling in advance is a smart move.
This approach saves significant time, helping you get delicious, family-friendly meals on the table fast, even on the most hectic days.
Here’s how to do it efficiently:
Cook the Filling: Follow the recipe steps to prepare the creamy chicken filling, ensuring the chicken is fully cooked and the sauce is thickened.
Cool Completely: It is crucial to let the filling cool down completely before storing it. Storing it while hot can create condensation and affect freshness.
Store Properly: Transfer the cooled filling to an airtight container. It will keep in the refrigerator for up to 3-4 days or in the freezer for up to 3 months [2].
Assemble and Bake Later: When you’re ready to bake, thaw the filling if frozen and warm it gently on the stovetop. Pour it into your pie crust, add the top crust, and bake as usual.
This meal prep tip ensures you can enjoy flavorful, home-cooked meals with less last-minute effort.
How to Store and Reheat Leftover Pot Pie
Making a delicious homemade chicken pot pie is incredibly satisfying. By learning how to properly store and reheat your leftovers, you can enjoy that comforting flavor for days! Here at Recipesmondial, we want to help you make the most of every meal.
How to Store Leftover Chicken Pot Pie
To keep your leftover pot pie fresh and delicious, follow these simple storage steps:
Cool Completely: Let your chicken pot pie cool to room temperature before storing. For safety, do not leave it out for more than two hours [3].
Use Airtight Containers: Transfer the cooled leftovers into an airtight container. This keeps the pie from drying out and locks in freshness.
Refrigerate Promptly: Place the sealed container in the refrigerator, where it will stay fresh for 3-4 days. This is perfect for quick lunches or easy dinners later in the week.
Freeze for Longer Storage: For longer-term storage, freezing is an excellent option.
To Freeze a Whole Pie: Wrap the entire pot pie tightly, first in plastic wrap and then in aluminum foil.
To Freeze Individual Portions: For convenient meal prep, divide the pie into single servings before freezing. Be sure to label each container with the date.
Frozen pot pie is best if used within 2-3 months. Remember to thaw it in the refrigerator overnight before you plan to reheat it.
How to Reheat Leftover Chicken Pot Pie
Reheating your pot pie the right way is key to restoring its delicious flavor and flaky crust. Here are the best methods:
In the Oven (Recommended for Best Results): Using the oven is the best way to revive the pot pie’s crispy, flaky crust.
Preheat your oven to 300°F (150°C). A lower temperature gently reheats the filling without burning the crust.
Place the pot pie on a baking sheet. If the crust is already golden brown, cover it loosely with aluminum foil to prevent over-browning.
Bake a single slice for 20-30 minutes or a whole pie for 45-60 minutes.
The pie is ready when the filling is bubbly. For food safety, ensure it reaches an internal temperature of 165°F (74°C) [4].
To make the crust extra crispy, remove the foil for the last 5-10 minutes of baking.
In the Microwave (Quickest Option): While the oven delivers the best texture, the microwave is a great alternative when you’re short on time.
Place a slice of pot pie on a microwave-safe dish.
Cover the slice loosely with a damp paper towel to prevent it from drying out.
Heat on medium power for 2-3 minutes, checking for doneness.
If it’s not hot enough, continue heating in 30-second intervals.
Use caution when removing, as the filling can become extremely hot.
Pro Tip: To get a crispier crust after microwaving, place the slice in a toaster oven or air fryer for a few minutes. It’s the perfect trick for a quick and satisfying lunch!
Frequently Asked Questions
What makes a good old-fashioned chicken pot pie recipe?
A good old-fashioned chicken pot pie is the ultimate comfort food. It combines simple, delicious elements to create a heartwarming meal for the whole family.
Here’s what goes into a great homemade chicken pot pie:
A Rich, Creamy Filling: The heart of the pie is its luscious, savory sauce, which should coat every ingredient beautifully.
Tender Chicken: Cooked chicken, whether shredded or diced, provides the main protein. For the best result, it should be juicy and flavorful.
Classic Vegetables: A colorful mix of peas, carrots, and corn adds texture and nutrition, making the dish vibrant. Potatoes or green beans are also great additions.
A Flaky Crust: A golden, buttery crust is non-negotiable. Whether it’s a simple store-bought option or homemade, the crust seals in all the delicious flavors.
Together, these elements create a satisfying, flavorful meal that feels just like home—an easy recipe perfect for any weeknight.
Can I make this an easy chicken pot pie recipe with cream of chicken soup?
Yes, absolutely! Using canned cream of chicken soup is a great shortcut for an even easier chicken pot pie. This simple swap streamlines the filling process, making dinner quick and stress-free.
Here’s how to make it work for a simple dinner recipe:
Combine Ingredients: In a bowl, mix your cooked chicken and vegetables with a can of cream of chicken soup.
Adjust Consistency: If the filling seems too thick, add a splash of milk or chicken broth to reach your desired creamy texture.
Boost Flavor: To enhance the taste, stir in a pinch of dried thyme, a dash of garlic powder, or some freshly ground black pepper. These simple additions will elevate the flavor.
This method makes a family-friendly meal accessible for busy cooks. It’s a fantastic, beginner-friendly recipe that delivers a delicious outcome with minimal effort.
Can I make just the chicken pot pie filling?
Yes, you certainly can! Making the chicken pot pie filling ahead of time is a smart meal prep strategy. It saves valuable time on busy weeknights and makes getting dinner on the table much less of a rush.
Here are a few ways to prepare and use your chicken pot pie filling:
Make Ahead for Pot Pie: Prepare the filling as directed, then let it cool completely. Store it in an airtight container in the refrigerator for up to 3-4 days [5]. When you’re ready to eat, just assemble the pot pie and bake.
Versatile Serving Ideas: The filling is delicious on its own and can be enjoyed in several ways. Serve it over warm biscuits for a deconstructed pot pie, or thin it with a little extra broth to create a comforting chicken pot pie soup.
Freezing for Later: For longer storage, freeze the cooled filling in freezer-safe bags or containers. It will last for up to 2-3 months. Thaw it overnight in the fridge before using.
This flexibility makes meal planning much simpler, helping you enjoy a stress-free cooking experience.
What is the difference between a chicken pie and a chicken pot pie?
While the terms “chicken pie” and “chicken pot pie” are often used interchangeably, there’s a subtle difference that usually comes down to the crust and presentation.
Here’s a simple breakdown:
Chicken Pot Pie: This version features a creamy filling baked in a deep dish—or “pot.” It typically has only a top crust, which can be made from pastry, biscuits, or puff pastry. The name highlights the deep dish vessel it’s baked in, signifying a hearty, all-in-one meal.
Chicken Pie: This term often refers to a savory pie with both a top and bottom crust, similar in structure to a traditional fruit pie. In some regions, a chicken pie might also be a smaller, hand-held pastry.
Ultimately, both are comforting and delicious options for a family-friendly meal. At Recipesmondial, we focus on approachable home cooking, so we embrace both delicious styles!
Chicken thigh recipes are incredibly popular because chicken thighs are a flavorful, juicy, and budget-friendly cut of meat. They are highly versatile and can be baked, pan-seared, grilled, or cooked in an air fryer, making them perfect for quick weeknight dinners, family-friendly meals, and meal prep.
Do you dream of serving delicious, restaurant-quality meals without spending hours in the kitchen? Are you overwhelmed by complex recipes or struggling to plan family-friendly meals that everyone will love? We understand. Balancing a busy life with flavorful, satisfying food is a challenge. At Recipesmondial, we believe cooking should be an enjoyable, stress-free experience. That’s why we’re here to celebrate one of the most versatile, budget-friendly, and delicious ingredients around: chicken thighs!
This guide unlocks the potential of chicken thighs with 21 of our best recipes, each one quick, easy, and bursting with flavor. Whether you’re a beginner seeking reliable results or a seasoned pro looking for fresh inspiration, these simple dinner recipes offer practical, step-by-step guidance. It’s time to say goodbye to kitchen uncertainty and hello to a world of approachable home cooking.
From crispy oven-baked favorites to speedy air fryer options and versatile boneless recipes, we’ll show you how to transform this humble cut into a culinary masterpiece. Get ready to discover new flavors, boost your confidence in the kitchen, and make mealtime an exciting, delicious journey. Let’s dive in and explore why chicken thighs are perfect for easy meals!
Why Are Chicken Thighs Perfect for Easy Meals?
Chicken thighs are a true kitchen hero, perfect for anyone seeking easy, flavorful meals. Here at Recipesmondial, we know you need simple yet delicious options, and chicken thighs deliver with fantastic value and versatility. Naturally juicy and forgiving, these succulent cuts make weeknight cooking a joy and are ideal for both beginner cooks and creative chefs. Say goodbye to dry, boring chicken. Let’s explore why chicken thighs are a staple for stress-free, flavorful cooking.
Boneless vs. Bone-In Thighs: What’s the Difference?
Understanding the difference between boneless and bone-in thighs will help you choose the best option for your recipe. You will typically find both boneless, skinless and bone-in, skin-on varieties, each offering unique benefits.
Boneless, Skinless Chicken Thighs: Incredibly convenient, these thighs cook quickly, making them excellent for fast weeknight dinners. They readily absorb marinades and sauces, which is perfect for quick stir-fries or speedy pan-sears. They are also simple to cut into uniform pieces.
Bone-In, Skin-On Chicken Thighs: For deeper flavor and extra juiciness, choose bone-in thighs. The bone helps distribute heat evenly to keep the meat moist, while the skin crisps up beautifully for a wonderful texture. Bone-in thighs are also often a great budget-friendly option, though they do require a bit more cooking time.
Achieving perfectly juicy chicken thighs is easier than you think. With these simple tips, you can forget about dry chicken, boost your cooking confidence, and consistently create flavorful meals.
Use a Meat Thermometer: A meat thermometer is your best friend for juicy chicken. Thighs are fully cooked and safe at 175°F (80°C) [1]. Unlike breasts, they benefit from cooking past the typical 165°F, as this allows connective tissues to break down for extra tenderness.
Do Not Overcook: While thighs are forgiving, overcooking is still the primary cause of dryness. Check the internal temperature often and remove the chicken from the heat just as it reaches its target to keep it moist.
Consider a Simple Brine: A quick brine can work wonders. Soaking chicken thighs in salted water for 30 minutes to an hour helps the meat retain moisture while adding flavor [2].
Let it Rest: After cooking, always let your chicken rest for 5-10 minutes under a loose covering of foil. This crucial step allows the juices to redistribute throughout the meat, resulting in a much juicier bite.
Pat Dry Before Cooking: For crispy skin, this tip is crucial. Use paper towels to pat the chicken thighs completely dry, especially bone-in, skin-on varieties. Excess moisture creates steam and prevents the skin from browning properly.
High Heat for Crispy Skin: When cooking bone-in, skin-on thighs, start them skin-side down in the pan over medium-high heat. This technique renders the fat and creates a beautifully crispy skin.
Don’t Crowd the Pan: To get a good sear, cook chicken in a single layer without overcrowding the pan. If necessary, cook in batches. A crowded pan lowers the temperature, causing the chicken to steam instead of sear.
With these straightforward techniques, you can cook with confidence and enjoy perfectly juicy, flavorful chicken thighs every time. Recipesmondial is here to guide you to delicious, easy recipes.
Simple Oven-Baked Chicken Thigh Recipes
Professional food photography, photorealistic, high-quality food magazine photo: A beautifully plated dish of golden-brown, crispy-skinned oven-baked chicken thighs. The chicken is perfectly seared with visible juices, resting on a rustic white plate. Alongside, there’s a vibrant side of roasted asparagus spears and cherry tomatoes, lightly charred, suggesting fresh, simple ingredients. Soft, warm natural lighting from a window illuminates the dish, highlighting the textures and rich colors. The background is slightly blurred, showing a warm, inviting kitchen counter with a hint of a wooden cutting board. The overall feel is comforting, easy, and incredibly delicious.
Classic Crispy Skin Baked Chicken Thighs
Ready to master a truly satisfying dish? Our classic crispy skin baked chicken thighs recipe is the perfect place to start. This easy method promises juicy chicken with delightfully crispy skin, making it a go-to for family-friendly dinners. You’ll love how simple it is to prepare.
Why This Recipe Works for You
Beginner-Friendly: With step-by-step guidance, anyone can achieve fantastic results.
Maximum Flavor: The skin gets wonderfully crisp, sealing in all the delicious juices.
Everyday Ingredients: You likely have most of these items in your pantry already.
Versatile: It pairs well with almost any side dish.
Ingredients You Will Need
4 bone-in, skin-on chicken thighs
1 tablespoon olive oil
1 teaspoon salt
½ teaspoon black pepper
½ teaspoon garlic powder (optional)
½ teaspoon paprika (optional, for color and mild flavor)
Simple Step-by-Step Instructions
Preheat Oven: Set your oven to 400°F (200°C).
Prepare Chicken: Pat the chicken thighs thoroughly dry with paper towels. This is a crucial step for achieving crispy skin.
Season: Drizzle the chicken with olive oil and rub it evenly over all sides.
Sprinkle Seasonings: In a small bowl, combine the salt, pepper, garlic powder, and paprika (if using). Sprinkle this mixture generously over both sides of the chicken.
Arrange: Place the seasoned chicken thighs skin-side up in a single layer on a baking sheet.
Bake: Bake for 35-45 minutes. Cooking time will depend on the size of the chicken thighs.
Check Doneness: The chicken is done when its internal temperature reaches 165°F (74°C) [3]. Use a meat thermometer for an accurate reading.
Rest and Serve: Let the chicken rest for 5 minutes before serving. This step keeps it extra juicy.
Tips for Success and Variations
Extra Crispy Skin: For even crispier skin, bake the chicken on a wire rack placed over a baking sheet. This allows hot air to circulate completely.
Flavor Boost: Add a sprig of fresh rosemary or thyme to the baking sheet as the chicken cooks.
Meal Prep Idea: Cook extra thighs and shred the meat for salads or sandwiches later in the week. This makes weekly meal planning easy.
Spice It Up: A pinch of cayenne pepper in the seasoning mix will add a gentle kick.
One-Pan Lemon Herb Chicken and Veggies
Overwhelmed by complex recipes and too many dishes? This one-pan lemon herb chicken and veggies recipe is your new best friend. It delivers a full, flavorful meal on a single baking sheet, making it perfect for busy families who value simple dinners and easy cleanup.
Why This Recipe Works for You
Minimal Cleanup: Only one pan to wash—a huge win on a busy night!
Complete Meal: Your protein and vegetables cook together for a balanced dish.
Nutrient-Rich: This meal is packed with fresh vegetables and lean protein.
Approachable Home Cooking: Simple steps that deliver delicious results every time.
Ingredients You Will Need
4 boneless, skinless chicken thighs (or bone-in, skin-on for extra flavor)
1 pound small potatoes, quartered
2 cups broccoli florets
1 bell pepper (any color), chopped into 1-inch pieces
2 tablespoons olive oil
Juice of 1 lemon
1 tablespoon dried Italian herbs (or a mix of dried rosemary, thyme, and oregano)
½ teaspoon salt
¼ teaspoon black pepper
Fresh parsley, chopped, for garnish (optional)
Simple Step-by-Step Instructions
Preheat Oven: Heat your oven to 400°F (200°C). For even easier cleanup, line a large baking sheet with parchment paper.
Prepare Veggies: In a large bowl, toss the potatoes, broccoli, and bell pepper with 1 tablespoon of olive oil, half the lemon juice, ½ tablespoon of Italian herbs, salt, and pepper.
Season Chicken: Pat the chicken thighs dry. In the same bowl (or a separate one), toss the chicken with the remaining 1 tablespoon of olive oil, lemon juice, and Italian herbs.
Arrange on Pan: Spread the seasoned vegetables in an even layer on the prepared baking sheet. Place the chicken thighs among the vegetables.
Bake: Bake for 25-35 minutes. Cooking time varies based on the thickness of the chicken.
Check Doneness: The chicken is cooked through when its internal temperature reaches 165°F (74°C), and the vegetables should be tender and lightly browned.
Serve: Garnish with fresh parsley, if desired, and serve immediately.
Tips for Success and Variations
Veggie Swaps: Feel free to use carrots, zucchini, asparagus, or cherry tomatoes. Just be sure to adjust cooking times as needed.
Spice Variation: For some heat, add a pinch of red pepper flakes with the other seasonings.
Marinade Ahead: For extra flavor, marinate the chicken and veggies together for at least 30 minutes before baking.
Meal Prep Friendly: This recipe makes fantastic leftovers and is ideal for healthy lunch prep during the week.
Savory Garlic and Paprika Chicken Thighs
Unlock robust flavors with our savory garlic and paprika chicken thighs. This straightforward yet incredibly satisfying recipe is perfect for beginners and makes a tasty addition to any meal plan. It’s a simple way to create a delicious dish that will impress your family without any stress.
Why This Recipe Works for You
Flavorful Punch: Garlic and paprika combine to create a deep, savory taste.
Quick & Easy: Get maximum flavor with minimal prep time.
Versatile Pairing: This chicken is great with rice, pasta, or a simple green salad.
Budget-Friendly: Chicken thighs are an economical and delicious choice for family meals.
Ingredients You Will Need
4 boneless, skinless chicken thighs
1 tablespoon olive oil
1 tablespoon garlic powder
1 teaspoon smoked paprika
½ teaspoon onion powder
½ teaspoon salt
¼ teaspoon black pepper
Optional: Pinch of cayenne pepper for heat
Simple Step-by-Step Instructions
Preheat Oven: Preheat your oven to 400°F (200°C).
Prepare Chicken: Pat the chicken thighs dry with paper towels.
Create Spice Rub: In a small bowl, combine the garlic powder, smoked paprika, onion powder, salt, pepper, and cayenne (if using).
Season Chicken: Drizzle the chicken with olive oil. Sprinkle the spice rub evenly over all sides, patting it gently to help it adhere.
Arrange on Pan: Place the seasoned chicken thighs in a single layer on a baking sheet.
Bake: Bake for 20-30 minutes, depending on the thickness of your chicken.
Check Doneness: Use a meat thermometer to ensure the internal temperature has reached 165°F (74°C).
Rest and Serve: Let the chicken rest for a few minutes before slicing and serving. This keeps the meat tender and juicy.
Tips for Success and Variations
Marinade Option: For a deeper flavor, coat the chicken with the oil and spice rub, then refrigerate for at least 30 minutes (or up to 4 hours) before baking.
Smoked Paprika Power: Using smoked paprika provides a richer, more complex taste, but regular paprika works well too.
Make it a Sheet Pan Meal: Toss sliced onions, bell peppers, or zucchini with a little oil and salt and add them to the pan to cook alongside the chicken.
Serving Suggestion: A squeeze of fresh lemon juice just before serving brightens all the savory flavors.
Easy Boneless Skinless Chicken Thigh Recipes
15-Minute Pan-Seared Chicken Thighs with Sauce
Craving a delicious dinner in a flash? This pan-seared chicken is the perfect solution for busy evenings. Pan-searing is a quick cooking method that locks in flavor and moisture, and since boneless thighs cook so fast, you can have a restaurant-quality meal on the table in just 15 minutes.
This recipe is a game-changer for anyone short on time, and it’s also ideal for beginner cooks looking to build confidence in the kitchen. With this simple approach, you can say goodbye to overwhelming, complex recipes and see just how easy a flavorful meal can be.
Why You’ll Love This Quick Meal:
Lightning Fast: Ready from start to finish in about 15 minutes.
Big Flavor: A simple pan sauce elevates the chicken.
Easy to Master: Perfect for learning basic cooking skills.
Versatile: Pairs well with almost any side dish.
Key Ingredients (You’ll need):
Boneless, skinless chicken thighs
Olive oil or butter
Garlic
Chicken broth or white wine
Fresh herbs (like thyme or parsley)
Lemon juice
Simple Steps:
Pat your chicken thighs dry and season them well.
Heat oil in a skillet over medium-high heat.
Sear the chicken for 4-5 minutes per side until golden brown and cooked through, reaching an internal temperature of 165°F (74°C) for safety [4].
Remove the chicken from the pan and quickly make your pan sauce. Add garlic, then deglaze with broth. Stir in herbs and lemon juice.
Return the chicken to the pan to coat it in the sauce.
Tips for Success:
Don’t Overcrowd: To ensure a good sear, cook the chicken in batches if needed.
Get Creative with Sauce: Try adding a touch of cream for richness or a spoonful of Dijon mustard for tang.
Serve It Up: This dish is delicious with mashed potatoes, rice, or a fresh green salad.
Quick Honey-Garlic Chicken Stir-Fry
If you need a healthy and tasty meal on the table fast, a stir-fry is the perfect answer. This quick honey-garlic chicken stir-fry combines tender boneless chicken with vibrant vegetables in a single pan, which makes cleanup a breeze. It’s a simple, flavorful, and family-friendly meal that tastes incredible.
This dish is an excellent option for meal prep, as you can chop the veggies ahead of time to save precious minutes during the week. It’s also an easy recipe for beginners and can be adjusted to suit any dietary needs or preferences.
Why This Stir-Fry is a Winner:
One-Pan Wonder: Less washing up means more time to relax.
Customizable: Use any vegetables you have on hand.
Healthy & Balanced: Packed with lean protein and fresh produce.
Sweet & Savory: The honey-garlic sauce is a universal favorite.
Key Ingredients (You’ll need):
Boneless, skinless chicken thighs
Assorted stir-fry vegetables (broccoli, bell peppers, carrots, snap peas)
Soy sauce (or tamari for gluten-free)
Honey
Garlic and ginger
Rice vinegar
Simple Steps:
Cut the chicken and vegetables into bite-sized pieces.
In a small bowl, whisk together the honey-garlic sauce ingredients.
Heat oil in a large skillet or wok over high heat.
Cook the chicken until it is browned and nearly cooked through.
Add hardier vegetables first, then softer ones, and stir-fry until tender-crisp.
Pour in the sauce and cook until it thickens and coats everything completely.
Tips for Success:
Prep Ahead: For any stir-fry, it’s crucial to chop all your ingredients before you start cooking.
High Heat: Use high heat for searing to create that authentic stir-fry texture.
Serve with Grains: Enjoy over steamed rice, quinoa, or noodles.
Simple Chicken Thigh Casserole
For those times you need a comforting meal that practically cooks itself, this simple chicken thigh casserole is the ideal solution. It’s a fantastic, beginner-friendly recipe for busy families—just assemble the ingredients and let the oven do the work. This dish transforms simple pantry staples into a delicious and hearty dinner, making it the definition of easy home cooking.
As a stress-free meal prep solution, this casserole is a winner. You can assemble it the night before and pop it into the oven when you’re ready to eat. It’s a reliable recipe that delivers consistent, flavorful results every time.
Why This Casserole is a Family Favorite:
Minimal Effort: Enjoy hands-off cooking once it’s in the oven.
Comfort Food: Warm, hearty, and deeply satisfying.
Feeds a Crowd: Easily doubles for larger families or planned leftovers.
Budget-Friendly: Uses economical boneless chicken thighs and staple vegetables.
Key Ingredients (You’ll need):
Boneless, skinless chicken thighs
Potatoes (cut into chunks)
Carrots and celery
Onion
Cream of mushroom/chicken soup (or a homemade creamy sauce)
Chicken broth
Seasonings (salt, pepper, herbs)
Simple Steps:
Preheat your oven to the temperature specified in the recipe.
Combine the chicken, potatoes, carrots, celery, and onion in a large baking dish.
In a separate bowl, mix together the soup, broth, and seasonings.
Pour the sauce mixture evenly over the chicken and vegetables.
Bake until the chicken is cooked through and the vegetables are tender.
Tips for Success:
Add More Veggies: Bell peppers, peas, or green beans are also great additions.
Cheesy Goodness: Sprinkle shredded cheese on top during the last 15 minutes of baking.
Make Ahead: Assemble the casserole up to 24 hours in advance. Cover and refrigerate until ready to bake.
Flavorful Bone-In Chicken Thigh Recipes
Slow-Cooker BBQ Pulled Chicken
Imagine a delicious meal that practically cooks itself. Our Slow-Cooker BBQ Pulled Chicken is one of the easiest recipes you’ll ever make, making it a fantastic solution for busy weeknights or feeding a crowd.
This recipe uses bone-in chicken thighs, which become incredibly tender and flavorful as they slow cook—perfect for shredding. Loved for its ease and taste, this simple dinner recipe is a true family-friendly meal that will keep everyone at the table happy.
Ingredients:
2 pounds bone-in, skin-on chicken thighs
1 medium onion, chopped
1 bottle (18 ounces) your favorite BBQ sauce
½ cup chicken broth or water
1 tablespoon apple cider vinegar (optional, for tang)
Salt and black pepper to taste
Step-by-Step Cooking Guidance:
Season the Chicken: First, pat the chicken thighs dry with paper towels. Then, season them generously with salt and pepper on all sides.
Combine in Slow Cooker: Place the chopped onion in the bottom of your slow cooker and arrange the seasoned chicken thighs on top.
Add Liquids: In a separate bowl, whisk together the BBQ sauce, chicken broth (or water), and apple cider vinegar (if using). Pour this mixture evenly over the chicken.
Cook Low and Slow: Cover the slow cooker and cook on low for 6-8 hours or on high for 3-4 hours. The chicken is done when it’s very tender and the internal temperature reaches 165°F (74°C) [5].
Shred and Serve: Carefully remove the chicken from the slow cooker. Once it’s cool enough to handle, discard the bones and skin, then shred the meat using two forks. Return the shredded chicken to the slow cooker and stir to combine with the delicious BBQ sauce.
Tips and Variations:
Serving Suggestions: Serve on hamburger buns for classic pulled chicken sandwiches. You can also use it in tacos, wraps, or over a bed of rice. A side of simple coleslaw completes the meal.
Spice It Up: For a little kick, add a pinch of cayenne pepper or a dash of your favorite hot sauce to the BBQ mixture.
Meal Prep Idea: This recipe is perfect for meal prep. Cook a large batch on Sunday to enjoy in different meals throughout the week—a fantastic time-saver for busy families.
Hearty Roasted Chicken with Root Vegetables
Looking for an easy, flavorful meal with minimal cleanup? This Hearty Roasted Chicken with Root Vegetables is your answer. Because it’s a complete meal cooked on a single pan, it’s a great choice for beginner cooks or anyone seeking approachable home cooking.
Roasting bone-in chicken thighs alongside vegetables creates an amazing depth of flavor as the veggies absorb the savory chicken drippings. The result is a simple dinner recipe that is nourishing, satisfying, and truly comforting.
Ingredients:
4 bone-in, skin-on chicken thighs
1 pound small red potatoes, quartered
1 pound carrots, peeled and chopped into 1-inch pieces
1 medium sweet potato, peeled and cubed
1 tablespoon olive oil
1 teaspoon dried rosemary
½ teaspoon dried thyme
½ teaspoon garlic powder
Salt and black pepper to taste
Step-by-Step Cooking Guidance:
Preheat Oven: Preheat your oven to 400°F (200°C) and line a large baking sheet with parchment paper for easy cleanup.
Prepare Vegetables: In a large bowl, combine the potatoes, carrots, and sweet potato. Drizzle with olive oil and sprinkle with rosemary, thyme, garlic powder, salt, and pepper. Toss until everything is evenly coated, then spread the vegetables in a single layer on the prepared baking sheet.
Season Chicken: Pat the chicken thighs dry and season them generously with salt, pepper, and a little extra rosemary and thyme, if desired.
Roast Together: Place the seasoned chicken thighs directly on top of the vegetables.
Bake to Perfection: Roast for 35-45 minutes, or until the chicken skin is golden and crispy, the vegetables are tender, and the chicken reaches an internal temperature of 165°F (74°C).
Tips and Variations:
Vegetable Swaps: Feel free to use other root vegetables. Parsnips, butternut squash, or Brussels sprouts also work wonderfully.
Fresh Herbs: For extra aroma, use 1 tablespoon of chopped fresh rosemary or thyme instead of dried.
Add Citrus: A squeeze of fresh lemon juice over the finished dish adds a bright, fresh flavor.
Batch Cooking: As a beginner-friendly recipe, this is excellent for batch cooking. Prepare it once and have healthy meals ready for days.
Simple Italian-Style Braised Chicken
Unlock incredible flavor and tenderness with our Simple Italian-Style Braised Chicken. While “braising” might sound complex, the technique is incredibly easy and a fantastic way to transform simple ingredients into a rich, comforting meal.
Bone-in chicken thighs are ideal for this method, as they stay moist while absorbing all the delicious Italian flavors. This dish is perfect for building confidence in the kitchen, delivering an impressive meal with minimal fuss.
Ingredients:
4 bone-in, skin-on chicken thighs
1 tablespoon olive oil
1 medium onion, chopped
2 cloves garlic, minced
1 (14.5 ounce) can diced tomatoes, undrained
½ cup chicken broth or dry white wine
1 teaspoon dried oregano
½ teaspoon dried basil
Salt and black pepper to taste
Fresh parsley, chopped, for garnish (optional)
Step-by-Step Cooking Guidance:
Brown the Chicken: Pat the chicken thighs dry and season generously with salt and pepper. Heat the olive oil in a large, oven-safe pot or Dutch oven over medium-high heat. Place the chicken skin-side down and sear for 5-7 minutes, until golden and crispy. Flip and sear for another 2-3 minutes. Remove the chicken from the pot and set it aside.
Sauté Aromatics: Reduce the heat to medium. Add the chopped onion to the pot and cook for 3-5 minutes, until softened. Add the minced garlic and cook for 1 more minute, until fragrant.
Deglaze and Add Liquids: Pour in the chicken broth or white wine, using a spoon to scrape up any browned bits from the bottom of the pot. Stir in the undrained diced tomatoes, dried oregano, and dried basil. Bring the mixture to a gentle simmer.
Braise the Chicken: Return the seared chicken to the pot, nestling the pieces into the sauce. The sauce should come about halfway up the sides of the chicken. Cover the pot with a tight-fitting lid.
Cook to Perfection: Finish cooking using one of two methods: either simmer gently on the stovetop for 30-40 minutes or bake in a preheated 350°F (175°C) oven for 45-60 minutes. The chicken is ready when it’s very tender and easily pulls away from the bone.
Serve: Garnish with fresh chopped parsley before serving, if desired.
Tips and Variations:
Serving Suggestions: This dish is perfect over pasta, creamy polenta, or mashed potatoes. Don’t forget the crusty bread to soak up the delicious sauce.
Add Vegetables: To boost flavor and nutrition, add sliced bell peppers or mushrooms to the pot along with the onions.
Cheese Please: A sprinkle of freshly grated Parmesan cheese before serving adds a lovely, savory finish.
Make Ahead: The flavors in this dish deepen overnight, making it a perfect make-ahead meal. It’s great for meal prep to make your week easier.
Quick Air Fryer Chicken Thigh Recipes
The air fryer is a game-changer for busy home cooks, transforming simple ingredients into delicious meals with incredible speed and minimal mess. If you’re looking for family-friendly meals that are both quick and tasty, your air fryer is here to help. Plus, it’s a fantastic tool for achieving a crispy texture without excessive oil, offering a healthier cooking option [6].
Chicken thighs are perfect for the air fryer because they cook quickly and stay wonderfully juicy. Get ready to cook confidently and enjoy stress-free dinners with these beginner-friendly recipes.
Crispy Air Fryer Chicken Thighs
This simple go-to recipe delivers perfectly crispy chicken thighs every time. Using just a few pantry staples, it’s one of our favorite quick meals for a busy weeknight.
Ingredients:
4 bone-in, skin-on chicken thighs (about 6-8 oz each)
1 tablespoon olive oil
1 teaspoon garlic powder
1 teaspoon paprika
1/2 teaspoon salt
1/4 teaspoon black pepper
Step-by-Step Instructions:
Prepare the Chicken: Pat the chicken thighs completely dry with paper towels. This step is crucial for getting crispy skin.
Season the Chicken: In a small bowl, mix the garlic powder, paprika, salt, and pepper. Drizzle the chicken with olive oil, then rub the seasoning mixture evenly over both sides of each thigh.
Preheat the Air Fryer: Preheat your air fryer to 375°F (190°C).
Air Fry: Place the seasoned chicken thighs in a single layer in the air fryer basket, skin-side up. Cook for 18-22 minutes, flipping the thighs halfway through.
Check for Doneness: The chicken is ready when the skin is golden brown and the internal temperature reaches 165°F (74°C) on a meat thermometer.
Rest and Serve: Let the chicken rest for 5 minutes before serving. This step helps keep the meat juicy.
Tips for Success:
Don’t Overcrowd: Cook in batches if necessary to ensure hot air can circulate around each piece for maximum crispiness.
Use a Thermometer: An instant-read thermometer is the best way to ensure your chicken is cooked perfectly.
Ensure Skin is Dry: For the crispiest results, make sure all moisture is removed from the skin before seasoning.
Spicy Cajun-Style Air Fryer Chicken
Bring a burst of flavor to your dinner table with these easy Cajun-style chicken thighs. This recipe is a fantastic way to spice up your usual routine and deliver a flavorful meal without the fuss.
Ingredients:
4 bone-in, skin-on chicken thighs
2 tablespoons olive oil
2 tablespoons Cajun seasoning (store-bought or homemade)
1/2 teaspoon onion powder
1/4 teaspoon cayenne pepper (optional, for extra heat)
Step-by-Step Instructions:
Prepare the Chicken: Pat the chicken thighs dry with paper towels.
Season the Chicken: Drizzle the chicken with olive oil. In a small bowl, combine the Cajun seasoning, onion powder, and cayenne pepper (if using), then rub the mixture all over the thighs.
Preheat the Air Fryer: Preheat your air fryer to 375°F (190°C).
Air Fry: Arrange the chicken in a single layer in the air fryer basket. Cook for 20-25 minutes, flipping halfway through.
Check for Doneness: Verify the chicken’s internal temperature has reached 165°F (74°C) before removing it from the air fryer.
Rest and Serve: Let the chicken rest for a few minutes before enjoying.
Flavor Boost:
Homemade Cajun Seasoning: For a custom blend, mix paprika, garlic powder, onion powder, dried oregano, dried thyme, black pepper, cayenne pepper, and salt.
Adjust Heat: Easily increase or decrease the amount of cayenne pepper to suit your taste.
Easy Teriyaki Chicken Thighs
This recipe features tender, juicy boneless chicken thighs coated in a sticky, sweet, and savory teriyaki glaze. It’s a perfect quick dinner that doesn’t compromise on flavor.
Ingredients:
1.5 pounds boneless, skinless chicken thighs
1/2 cup teriyaki sauce (store-bought or homemade)
1 tablespoon cornstarch (optional, to thicken the sauce)
1 tablespoon water (if using cornstarch)
Sesame seeds and sliced green onions for garnish (optional)
Step-by-Step Instructions:
Prepare the Chicken: Cut the boneless, skinless chicken thighs into 1-inch pieces to ensure they cook quickly and evenly.
Marinate: In a bowl, toss the chicken pieces with the teriyaki sauce. For best results, marinate for at least 15-30 minutes in the fridge.
Preheat the Air Fryer: Preheat your air fryer to 380°F (195°C).
Air Fry: Place the chicken pieces in a single layer in the air fryer basket. Cook for 10-14 minutes, shaking the basket halfway through for even cooking.
Check for Doneness: The chicken is cooked through when it reaches an internal temperature of 165°F (74°C).
Finish and Serve: For a thicker glaze, simmer the leftover marinade in a saucepan with a cornstarch slurry (1 tbsp cornstarch mixed with 1 tbsp water) until it thickens. Toss the cooked chicken in the sauce, garnish with sesame seeds and green onions, and serve immediately.
Meal Prep Tips:
Marinate Ahead: To save time, marinate the chicken the night before you plan to cook it.
Build a Meal: Serve the teriyaki chicken over steamed rice with a side of air-fried or steamed broccoli for a complete meal.
Global-Inspired Chicken Thigh Recipes
Professional food photography, photorealistic, high-quality food magazine photo: A vibrant and colorful bowl of Mediterranean-inspired chicken thighs. The chicken pieces are tender, browned, and glistening with a lemon-herb sauce, mixed with Kalamata olives, halved cherry tomatoes, and crumbled feta cheese. Fresh parsley and oregano are generously sprinkled over the top. The dish is presented in an earthy ceramic bowl on a light blue linen tablecloth, with a fork gently resting beside it. The lighting is bright and airy, emphasizing the freshness and diversity of ingredients, evoking a sense of healthy and exotic indulgence.
Easy Chicken Thigh Curry (Indian Style)
Craving a rich, aromatic dinner without a complex recipe? Our Easy Chicken Thigh Curry is the perfect solution. This simple recipe transforms chicken thighs into a heartwarming, Indian-inspired dish full of vibrant flavors. It’s a fantastic, stress-free way to add global comfort food to your weeknight rotation.
Using readily available ingredients, you’ll create a deeply flavorful sauce that tastes like it simmered all day. This beginner-friendly dish is ideal for busy families who want a delicious, easy meal.
Key Flavors: Expect warm spices like turmeric, cumin, and coriander, with a touch of ginger and garlic for depth. Coconut milk provides a creamy finish.
Simple Steps: We guide you through each stage, from browning the chicken to building the sauce, so you can cook with confidence from start to finish.
Serving Suggestions: Pair this delicious curry with fluffy basmati rice or warm naan bread to scoop up every last bit of sauce.
Quick Tip: Use boneless chicken thighs for faster cooking, or choose bone-in thighs for even more flavor.
Sweet & Savory Asian Glazed Chicken Thighs
Looking for a quick meal that bursts with flavor? These Sweet & Savory Asian Glazed Chicken Thighs are a popular weeknight winner. This recipe is fast, tasty, and uses everyday ingredients, making it a fantastic option for family dinners. Get ready for a perfect balance of sweet, savory, and tangy notes.
The star of this recipe is the irresistible sticky glaze that perfectly coats the juicy chicken thighs. It comes together quickly, making it a go-to staple for busy evenings. This approachable dish makes home cooking easy and stress-free.
The Perfect Glaze: Our glaze combines soy sauce, honey or brown sugar, ginger, and garlic. A splash of rice vinegar balances the sweetness.
Cooking Versatility: Pan-sear these flavorful chicken thighs for a quick finish, or bake them in the oven until caramelized.
Meal Pairings: Serve over steamed rice with a side of stir-fried vegetables like broccoli or snap peas.
Beginner-Friendly Hint: For the best results, marinate the chicken for at least 30 minutes to infuse it with flavor before cooking.
Flavorful Mexican-Inspired Chicken Marinade
Want to cook healthy, tasty meals quickly? A great marinade is your secret weapon. Our Flavorful Mexican-Inspired Chicken Marinade is perfect for chicken thighs, tenderizing the meat while infusing it with bold, zesty flavors. This simple addition transforms your chicken into an exciting meal and is incredibly effective for meal prep.
Marinating chicken ahead of time saves precious minutes during a busy week, making it a perfect strategy for planning family-friendly meals. It’s a simple step that guarantees a flavorful result every time.
Marinade Must-Haves: Combine lime juice for brightness with chili powder, cumin, and paprika for authentic warmth. A touch of olive oil and minced garlic completes the blend.
How to Marinate: Combine all ingredients in a resealable bag or bowl with boneless or bone-in chicken thighs. Marinate for at least 30 minutes, or up to 4 hours for maximum flavor.
Meal Applications: Use this marinated chicken for incredible tacos, fajitas, burritos, or atop a fresh salad bowl.
Practical Tip: Marinate a larger batch of chicken at the beginning of the week. This provides a versatile protein for several quick meals [7].
How Do You Make a Good Chicken Thigh Marinade?
Professional food photography, photorealistic, high-quality food magazine photo: A close-up shot of raw, boneless, skinless chicken thighs marinating in a clear glass bowl. The marinade is rich with visible fresh ingredients like chopped garlic, rosemary sprigs, lemon slices, red pepper flakes, and a vibrant olive oil-based mixture. A hand, belonging to a home cook, is gently tossing the chicken to ensure even coating. The scene is set on a clean, light-colored kitchen counter with natural overhead light, emphasizing freshness, preparation, and the promise of flavor. The focus is sharp on the chicken and marinade ingredients.
A great marinade can transform a simple weeknight meal into something special. For chicken thighs, a marinade is a secret weapon that infuses deep flavor and tenderizes the meat, guaranteeing juicy, delicious results every time. Whether you’re cooking boneless chicken thigh recipes or bone-in varieties, a marinade effortlessly elevates your dish. Let’s dive into some easy and flavorful ideas to make your chicken thighs irresistible.
Simple All-Purpose Marinade
This versatile, all-purpose marinade works wonderfully for baking, grilling, or pan-searing. It’s the perfect choice for any home cook seeking reliable, flavorful results with chicken thighs.
Ingredients:
2 tablespoons olive oil
1 tablespoon apple cider vinegar (or lemon juice)
1 teaspoon salt
½ teaspoon black pepper
1 teaspoon garlic powder
½ teaspoon onion powder
½ teaspoon paprika (smoked or sweet)
1 teaspoon dried Italian herbs (oregano, basil, thyme blend)
Instructions:
In a medium bowl, whisk together all the marinade ingredients until well blended.
Place the chicken thighs in a large zip-top bag or shallow dish.
Pour the marinade over the chicken, ensuring each piece is fully coated.
Seal the bag (pressing out excess air) or cover the dish tightly.
Refrigerate for at least 30 minutes. For the best flavor, marinate for 2 to 4 hours, but no longer than 12 hours.
Tips for Success:
Quick Meals: In a hurry? Even 15-20 minutes of marinating will add a great flavor boost.
Spice it Up: For a little heat, add a pinch of cayenne pepper.
Herbs: If you have fresh herbs, feel free to use them. Just double the amount listed for dried herbs.
Yogurt-Based Marinade for Tender Chicken
Yogurt-based marinades create exceptionally tender and juicy chicken. The natural lactic acid in yogurt gently breaks down muscle fibers, resulting in moist and flavorful chicken thighs. It’s an excellent choice for family-friendly meals.
Ingredients:
½ cup plain yogurt (full-fat or low-fat)
1 tablespoon fresh lemon juice
2 cloves garlic, minced
1 teaspoon grated fresh ginger
1 teaspoon ground cumin
½ teaspoon turmeric powder
1 teaspoon paprika
½ teaspoon salt
¼ teaspoon black pepper
Instructions:
In a bowl, mix all the ingredients until well combined.
Add the chicken thighs to a zip-top bag or bowl.
Pour the yogurt marinade over the chicken, making sure all pieces are evenly coated.
Seal the bag or cover the bowl tightly.
Refrigerate for at least 1 hour. For optimal tenderness, marinate for 4 to 6 hours (up to 24 hours is safe).
Tips for Success:
Avoid Burning: Gently scrape off excess yogurt marinade before cooking to prevent it from burning on the pan or grill.
Spice Variations: Try adding garam masala for an Indian-inspired flavor or a dash of chili powder for extra kick.
Storage: According to the USDA, it is safe to marinate chicken in the refrigerator for up to 2 days [8].
Lemon and Herb Marinade
This vibrant marinade adds a fresh, zesty flavor to chicken thighs. It’s a perfect option for lighter, healthy and balanced meals and works especially well with boneless chicken thigh recipes.
Ingredients:
¼ cup olive oil
3 tablespoons fresh lemon juice
1 tablespoon lemon zest
2 cloves garlic, minced
1 tablespoon chopped fresh rosemary
1 tablespoon chopped fresh thyme
1 teaspoon salt
½ teaspoon black pepper
Instructions:
In a bowl, whisk together all the ingredients.
Place the chicken thighs in a zip-top bag or shallow dish.
Pour the marinade over the chicken, coating each piece well.
Seal the bag or cover the dish.
Refrigerate for at least 30 minutes and up to 4 hours to allow the flavors to develop.
Tips for Success:
Dried Herbs: If you don’t have fresh herbs, you can substitute 1 teaspoon each of dried rosemary and thyme.
Sweet Touch: A teaspoon of honey or maple syrup beautifully balances the lemon’s tang.
Meal Prep: This marinade freezes well. Make a double batch and save half for future meal prep ideas.
Frequently Asked Questions
How long does it take for chicken thighs to cook in the oven?
Cooking chicken thighs in the oven is an easy way to prepare a delicious meal, but the exact cooking time depends on your oven temperature and whether the thighs are bone-in or boneless.
For the best results, cook chicken thighs to a safe internal temperature of 175-180°F (79-82°C). This ensures they are juicy and fully cooked [5].
Here’s a simple guide for an oven set to 400°F (200°C):
Boneless, Skinless Chicken Thighs: These typically take 20-25 minutes.
Bone-In, Skin-On Chicken Thighs: Expect these to take 35-45 minutes, as the bone requires a longer cooking time.
Lower Temperatures (e.g., 375°F / 190°C): If you bake at a slightly lower temperature, add about 5-10 minutes to the times above.
Always use a meat thermometer for the most accurate results. Insert it into the thickest part of the thigh without touching the bone. This is the best way to achieve perfectly cooked chicken thighs every time.
What is the nutritional value of chicken thighs?
Chicken thighs are a flavorful and nutritious choice for a balanced diet. While they are richer in fat than chicken breasts—which is what makes them so juicy—they are still considered a good source of lean protein.
Here’s a snapshot of their key nutritional benefits:
High-Quality Protein: Chicken thighs are packed with protein, which helps build and repair muscles and keeps you feeling full.
Vitamins and Minerals: They are a good source of essential nutrients like iron, zinc, and B vitamins (such as B6 and B12), which are vital for energy and overall health.
Healthy Fats: Much of the fat in chicken thighs is monounsaturated, which can support heart health when eaten in moderation.
For a specific example, a 3.5-ounce (100g) serving of cooked, boneless, skinless chicken thigh contains roughly 209 calories, 26 grams of protein, and 10 grams of fat [9]. Keep in mind that bone-in, skin-on versions will have more fat and calories.
What is a good sauce for boneless skinless chicken thighs?
Boneless, skinless chicken thighs are incredibly versatile. Their mild flavor makes them a perfect canvas for delicious sauces, which can turn a simple protein into a quick, family-friendly meal. Here are a few popular and easy sauce ideas:
Honey Garlic Sauce: Whisk together soy sauce, honey, minced garlic, and a touch of ginger. Simmer and thicken with a cornstarch slurry for a sweet and savory winner.
Lemon Herb Sauce: For a bright, fresh flavor, combine lemon juice, olive oil, and chopped fresh herbs like parsley, thyme, or oregano with a pinch of salt and pepper.
Creamy Mushroom Sauce: Create a comforting sauce by sautéing sliced mushrooms with garlic, then stirring in chicken broth and a splash of cream. Let it simmer until it thickens.
Teriyaki Glaze: Use a store-bought teriyaki sauce or make your own with soy sauce, mirin, sugar, and ginger. This is perfect for quick stir-fries or as a glaze.
BBQ Sauce: A classic choice for a reason. Simply brush your favorite barbecue sauce over the thighs during the last few minutes of cooking.
These simple sauces can transform basic chicken into a delicious meal, and they’re easy enough for any home cook to master.
How many calories are in chicken thighs?
The number of calories in chicken thighs depends on two main factors: the cut (bone-in or boneless) and whether you eat the skin. Chicken thighs are slightly higher in calories than chicken breasts because of their higher fat content, which is also what gives them so much flavor and juiciness.
Here’s a general breakdown for a 3.5-ounce (100g) serving of cooked chicken thigh:
Boneless, Skinless Chicken Thighs: Approximately 180-210 calories [9].
Removing the skin before eating is an easy way to reduce the calorie and fat content, though the skin does add wonderful flavor and crispiness. Remember that these are estimates. To manage calories, be mindful of your portion sizes and choose lighter cooking methods like baking or grilling over frying.
Shepherd’s pie is a classic comfort food dish made with a savory filling of minced meat (traditionally lamb) and vegetables cooked in a rich gravy. This hearty filling is then topped with a generous layer of creamy mashed potatoes and baked until the top is golden brown and bubbly.
Is there anything as comforting as a warm, hearty shepherd’s pie? It’s the kind of dish that brings everyone together on evenings when you crave something truly satisfying. But if you’ve ever felt overwhelmed by complex instructions or struggled to plan family-friendly meals, you’re not alone. Many home cooks want to create flavorful meals without the stress, especially when life gets busy.
Here at Recipesmondial, we believe cooking should be an enjoyable, confidence-building experience—not a chore. That’s why we’re excited to share our easiest shepherd’s pie recipe. This beginner-friendly guide transforms simple ingredients into a rich, savory meat filling under a golden, creamy mashed potato crust. It’s a perfect example of approachable home cooking. Whether you make a classic shepherd’s pie with lamb or a cottage pie with beef, our step-by-step instructions will guide you to a perfect result every time.
Get ready to build your confidence and see just how simple this beloved dish can be. We’ll walk you through preparing each layer with ease, guiding you toward a heartwarming meal your family will love. This isn’t just another simple dinner recipe—it’s your path to creating a memorable, flavorful dinner without the fuss. Let’s get started!
What Makes This The Best Easy Shepherd’s Pie Recipe?
Are you searching for a cozy, comforting dinner without the fuss? This easy shepherd’s pie recipe is your perfect solution. We know that finding reliable, flavorful meals that don’t take hours can be a struggle. That’s why we designed this simple, satisfying recipe with you in mind.
At Recipesmondial, our goal is to make delicious cooking accessible to everyone. We want you to enjoy your time in the kitchen, not stress over complex steps. This shepherd’s pie is a perfect example of our mission in action. It transforms simple ingredients into a deeply satisfying meal the whole family will love, building your confidence with every step.
Why Our Shepherd’s Pie Recipe Shines
This isn’t just another dinner recipe—it’s a carefully designed guide that guarantees a mouth-watering result every time. Here’s what makes our easy shepherd’s pie the absolute best:
Uncomplicated Steps for Every Cook: We break down the process into clear, concise actions. Our step-by-step guidance means no guessing games, removing the anxiety that even some beginner-friendly recipes can cause.
Everyday Ingredients, Extraordinary Flavor: You won’t need to hunt down specialty items. This dish uses common pantry staples, so you can create a flavorful meal without an extra trip to the store.
Quick Preparation for Busy Lives: We know your time is precious, so this recipe is optimized for efficiency. You’ll have a hearty, homemade dinner on the table faster than you might expect, making it an ideal solution for busy families.
Reliable Results, Zero Stress: Forget recipes that leave you guessing. Our method guarantees a perfectly cooked, golden-topped shepherd’s pie every single time, so you can feel proud of your results.
A True Family Favorite: Shepherd’s pie is a classic comfort food, and our version is designed to appeal to all ages. Get ready for smiles around the dinner table!
Adaptable to Your Needs: While our classic recipe is fantastic, it’s also wonderfully versatile. We provide practical tips and substitutions later in this guide, so you can easily tweak it to suit your family’s preferences.
This simple shepherd’s pie recipe is your next step toward more confident, enjoyable cooking. It empowers you to create a delicious meal with an organized, stress-free process. Get ready to savor every forkful!
What is the Difference Between Shepherd’s Pie and Cottage Pie?
Have you ever wondered about the true difference between shepherd’s pie and cottage pie? Although many home cooks use these names interchangeably, there is one key distinction. Understanding it will make you a true comfort food connoisseur!
The key difference is simple: it’s all about the meat. This single ingredient is what separates a classic shepherd’s pie from its close cousin, cottage pie.
Shepherd’s Pie: This traditional dish features a savory filling made with ground lamb. The name itself offers a clue: shepherds tend sheep, which gives us lamb. This detail is what makes for an authentic shepherd’s pie recipe.
Cottage Pie: In contrast, cottage pie uses a hearty filling of ground beef. The term “cottage” historically referred to the humble dwellings of rural workers, who were more likely to have access to beef as a common and affordable meat.
So, the next time you’re cooking, remember this simple rule. Knowing whether to use lamb or beef is a great tip for elevating your basic cooking skills. Both versions make for fantastic family-friendly meals!
Key Similarities
Despite the difference in meat, both shepherd’s pie and cottage pie share the same core qualities that make them so beloved. Their wonderful combination of flavors and textures makes them perfect approachable home cooking dishes.
Creamy Topping: Both pies are famously crowned with a generous layer of fluffy mashed potatoes that bakes to a beautiful golden brown.
Savory Filling: Beneath the potatoes lies a rich, savory meat filling, typically simmered in a delicious gravy.
Wholesome Vegetables: Both recipes commonly include a mix of vegetables like peas, carrots, and onions, which add color, flavor, and nutrition.
Comfort Food Status: Ultimately, both dishes are the epitome of comfort food, perfect for chilly evenings or as simple dinner recipes any night of the week.
Shepherd’s Pie vs. Cottage Pie: A Quick Comparison
Here’s a clear overview of these two beloved dishes. This table will help you decide which easy recipe to make for your next meal.
Feature
Shepherd’s Pie
Cottage Pie
Main Meat
Ground lamb
Ground beef
Name Origin
‘Shepherd’ refers to tending sheep (lamb)
‘Cottage’ refers to humble country homes (beef)
Flavor Profile
Often richer, slightly gamier from lamb
Hearty, robust beef flavor
Common Vegetables
Peas, carrots, onions, celery
Peas, carrots, onions, celery
Topping
Creamy mashed potatoes
Creamy mashed potatoes
Serving Suggestion
A classic comforting meal
A popular family-friendly meal
At Recipesmondial, we believe in making flavorful meals made easy. Whether you choose a classic shepherd’s pie with lamb or a hearty cottage pie with beef, you can count on our step-by-step cooking guidance to help you achieve delicious, reliable results every time. Get ready to cook confidently and enjoy every bite!
What Ingredients Do You Need for Shepherd’s Pie?
A professional food photography shot of a perfectly arranged ‘mise en place’ for Shepherd’s Pie. All fresh ingredients are beautifully displayed on a light-colored, rustic wooden kitchen counter, bathed in bright, natural light. Components include lean ground lamb (or beef), vibrant chopped carrots, green peas, corn kernels, diced yellow onion, fresh thyme and rosemary sprigs, golden-skinned potatoes ready for mashing, butter, milk, and common seasonings like salt and black pepper in small ceramic bowls. The layout is clean, organized, and inviting, emphasizing freshness and ease for a beginner cook. Photorealistic, high-quality food magazine photo, shallow depth of field.
For the Savory Meat Filling
A rich and savory meat filling is the heart of a great shepherd’s pie. This recipe uses simple, everyday ingredients to create a comforting meal that’s both budget-friendly and quick to prepare.
Ground Lamb: 1.5 lbs (about 680g). Lamb is traditional for shepherd’s pie, offering a distinct, delicious flavor. However, feel free to use ground beef for a classic cottage pie recipe!
Olive Oil: 1 tablespoon. For sautéing your vegetables.
Onion: 1 medium, chopped. Forms the flavor base.
Carrots: 2 medium, diced. Adds a touch of sweetness and texture.
Celery: 1 stalk, diced. Another essential aromatic for depth.
Garlic: 2-3 cloves, minced. For an irresistible aroma.
All-Purpose Flour: 2 tablespoons. This helps thicken the sauce beautifully.
Tomato Paste: 2 tablespoons. Adds rich, umami depth to the sauce.
Worcestershire Sauce: 1 tablespoon. A secret weapon for savory flavor.
Beef Broth: 1.5 cups (about 360ml). Creates the gravy for the filling. Lamb broth also works wonderfully.
Frozen Peas: 1 cup. Brightens the filling and adds sweetness.
Fresh Thyme: 1 teaspoon, chopped, or ½ teaspoon dried. Provides an earthy, aromatic touch.
Salt and Black Pepper: To taste. Essential for seasoning your filling perfectly.
Together, these ingredients create a deeply flavorful filling—the perfect foundation for an easy and delicious shepherd’s pie.
For the Creamy Mashed Potato Topping
A golden, creamy mashed potato topping is the crowning glory of any shepherd’s pie. Here’s what you’ll need to create this simple yet essential layer.
Potatoes: 2 lbs (about 900g) Russet or Yukon Gold, peeled and quartered. These varieties mash beautifully and create a fluffy texture.
Unsalted Butter: 4 tablespoons (½ stick). Adds richness and flavor.
Milk: ½ cup (whole milk or 2% recommended). Makes the potatoes wonderfully creamy. For a dairy-free option, use a plant-based milk.
Salt and Black Pepper: To taste. Don’t forget to season your potatoes well!
Optional: Shredded Cheddar Cheese: ½ cup. For an extra cheesy, golden crust. This is a lovely addition to any family-friendly meal.
These straightforward ingredients guarantee a delicious, fuss-free topping every time.
How to Make Shepherd’s Pie, Step-by-Step
A close-up, inviting, professional food photography shot of a single, perfectly baked Shepherd’s Pie fresh out of the oven. The pie is in a rustic ceramic baking dish, slightly angled to show its depth. The mashed potato topping is golden brown and beautifully crusted with visible fork marks, showing subtle crispiness, while the rich, savory meat and vegetable filling gently bubbles up from the edges. A delicate wisp of steam rises from the warm dish. A sprig of fresh parsley is gently placed on top as a garnish. The lighting is warm and golden, emphasizing comfort and deliciousness. Photorealistic, high-quality food magazine photo, focus on texture and warmth.
Step 1: Prepare the Mashed Potatoes
Start by making the creamy potato topping. This step is key to a comforting shepherd’s pie, and the goal is to create a smooth, fluffy mash.
Peel and Chop Potatoes: Peel the potatoes and cut them into 1-inch pieces to ensure they cook evenly.
Boil Until Tender: Place the potato pieces in a large pot and cover with cold water. Add a generous pinch of salt, bring to a boil over medium-high heat, then reduce the heat to a simmer. Cook for 15-20 minutes, or until the potatoes are very tender when pierced with a fork.
Drain Thoroughly: Drain the potatoes in a colander and let them sit for a minute or two to allow excess steam to escape. Drier potatoes result in a creamier mash.
Mash and Mix: Return the potatoes to the warm pot. Add the butter, warm milk, salt, and pepper. Mash with a potato masher or fork until mostly smooth. For the creamiest texture, use a potato ricer.
Adjust Seasoning: Taste the mashed potatoes and add more salt or pepper if needed. Set aside while you prepare the filling.
Pro Tip: Warm milk absorbs more easily into the potatoes and keeps the mash from cooling down. Be careful not to overmix, as that can make the potatoes gummy.
Step 2: Cook the Meat Filling
Next, prepare the rich, savory meat filling. This is the heart of the shepherd’s pie and is key to developing its deep, comforting flavor.
Brown the Meat: Heat olive oil in a large skillet or Dutch oven over medium-high heat. Add the ground lamb (or beef for cottage pie) and cook for 5-7 minutes, breaking it apart with a spoon, until fully browned.
Drain Excess Fat: Carefully drain the excess fat from the skillet to prevent a greasy filling.
Sauté Aromatics: Reduce the heat to medium and add the chopped onion, carrots, and celery. Cook for 5-8 minutes until the vegetables have softened.
Add Flavor Boosters: Stir in the garlic and tomato paste and cook for one minute until fragrant. Pour in the broth, Worcestershire sauce, dried thyme, and rosemary.
Simmer and Thicken: Bring the mixture to a simmer and cook for 10-15 minutes, allowing the sauce to reduce and thicken slightly. Stir in the frozen peas and corn during the last 2 minutes of cooking. Season with salt and pepper to taste.
Prepare for Assembly: Remove the skillet from the heat and set the filling aside.
Substitution Idea: If you don’t have fresh herbs, 1 teaspoon of dried mixed Italian herbs works well as a substitute.
Step 3: Assemble the Pie
Now it’s time to assemble the shepherd’s pie. This step brings the filling and the potato topping together before baking.
Preheat Oven: Preheat your oven to 375°F (190°C).
Spread Meat Filling: Spread the cooked meat filling in an even layer in a 9×13 inch baking dish.
Top with Mashed Potatoes: Spoon the mashed potatoes over the meat filling. Use a spatula to gently spread them to the edges of the dish, creating a seal.
Create Ridges: For a classic look and extra texture, drag a fork across the top of the potatoes to create ridges. These will brown nicely in the oven.
Presentation Tip: To get an extra golden-brown top, sprinkle a little paprika or grated cheddar cheese over the potatoes before baking. This adds both color and flavor.
Step 4: Bake to Golden Perfection
The final step is baking. This will make the filling bubbly and give the potato topping a perfect golden-brown crust.
Bake Until Golden: Place the pie in the preheated oven and bake for 25-30 minutes, or until the filling is bubbly and the potato topping is golden brown.
Broil for Extra Crisp (Optional): For an even crispier top, switch the oven to broil for the last 2-3 minutes. Watch carefully to prevent burning.
Rest Before Serving: Remove the shepherd’s pie from the oven and let it rest for 10-15 minutes. This allows the filling to set, making it easier to serve.
Confidence Boost: You’ve successfully made a delicious, comforting shepherd’s pie! Enjoy your homemade, hearty meal.
Helpful Tips and Variations for the Perfect Pie
How to Make a Vegetarian Shepherd’s Pie
Looking for a delicious plant-based option? It’s simple to transform shepherd’s pie into a vegetarian delight. By substituting the meat with a hearty combination of vegetables and legumes, you can create healthy and balanced meals for everyone.
This makes a wonderful family-friendly meal that caters to different preferences. Try these ingredients for a flavorful base:
Lentil Power: Brown or green lentils are perfect. They offer a rich, earthy flavor and a satisfying texture. Cook them according to package directions.
Mushroom Magic: Sauté sliced mushrooms (cremini, button, or portobello) until golden brown. They add depth and a lovely umami taste.
Veggie Medley: Incorporate finely diced carrots, celery, peas, and corn. You can also add chopped bell peppers or zucchini for extra nutrients.
Flavor Boost: Use vegetable broth instead of beef or chicken broth. Add a touch of soy sauce or Worcestershire sauce (ensure it’s vegetarian) for savory notes. Tomato paste also deepens the flavor.
Simply sauté your chosen vegetables, then stir in the cooked lentils and seasonings. Continue with the creamy mashed potato topping as usual. This beginner-friendly recipe is packed with flavor!
What Other Meats Can I Use?
While traditional shepherd’s pie is made with lamb, don’t feel limited to just one option. This versatile dish is easy to customize with different meats based on your preference or what you have on hand. Exploring these variations is a great way to personalize your simple dinner recipes and enjoy this approachable home cooking classic.
Beef (Cottage Pie): This is the most common variation. When made with ground beef, the dish is technically called Cottage Pie. It’s incredibly popular and equally comforting.
Ground Turkey: For a lighter option, ground turkey works wonderfully. It absorbs flavors beautifully. Cook it until no longer pink, then drain any excess liquid.
Ground Chicken: Similar to turkey, ground chicken offers a mild flavor. It’s excellent for absorbing spices and herbs.
Mixed Meats: You can even combine ground lamb with ground beef. This gives a unique flavor profile that many enjoy.
Remember to adjust your cooking time slightly if using a different meat. Ensure it is fully cooked through before assembling your pie. This simple change can completely transform your flavorful meals made easy.
How to Thicken the Gravy
A rich, thick gravy is essential for a perfect shepherd’s pie. If your filling seems too thin, don’t worry—it’s an easy fix. Achieving the right consistency is key, and these practical tips will help you create a robust, flavorful gravy.
Flour Slurry: Whisk 1 tablespoon of all-purpose flour with 2 tablespoons of cold water. Stir this mixture into your simmering filling and cook for another 2-3 minutes, allowing the gravy to thicken.
Cornstarch Slurry: For a gluten-free option, use cornstarch. Mix 1 tablespoon of cornstarch with 2 tablespoons of cold water. Stir into your simmering filling and cook for 1-2 minutes. Cornstarch thickens quickly, so watch it closely.
Reduce the Liquid: Simply let your filling simmer uncovered for a bit longer. The excess liquid will evaporate, naturally thickening the sauce. This method also concentrates the flavors.
Tomato Paste: Adding an extra spoonful of tomato paste can also help create a thicker consistency while adding richness.
Always add your thickening agent gradually, as it’s easier to add more than it is to correct a gravy that’s too thick. This approach helps ensure your step-by-step cooking guidance leads to a perfect pie every time.
Make-Ahead and Freezing Instructions
Shepherd’s pie is a fantastic dish to prepare in advance, making it ideal for meal prep ideas and busy weeknights. Having a homemade meal ready to go is a perfect way to create quick and reliable meal solutions for your family.
Make-Ahead (Refrigerate):
Assemble the entire pie, including the mashed potato topping, in an oven-safe dish.
Cover it tightly with plastic wrap or foil.
Store it in the refrigerator for up to 2-3 days.
When ready to bake, let the dish sit at room temperature for 30 minutes before baking. Bake as directed, adding an extra 10-15 minutes to account for the cold temperature.
Freezing Instructions:
Unbaked Pie: Assemble the pie in a freezer-safe and oven-safe dish. Cover tightly with a double layer of foil and freeze for up to 3 months.
Baked Pie: Allow the baked pie to cool completely. Cover tightly with foil and freeze for up to 3 months.
Reheating from Frozen:
Unbaked Pie: For best results, thaw the pie overnight in the refrigerator, then bake as directed (you may need to add extra time). Alternatively, to bake from frozen, cover with foil and bake at 350°F (175°C) for 1 hour. Then, remove the foil and bake for another 30-45 minutes, or until the internal temperature reaches 165°F (74°C) [1].
Baked Pie: Thaw the pie overnight in the refrigerator. To reheat, place it covered in a 350°F (175°C) oven until warmed through. Alternatively, reheat individual portions in the microwave.
Label your frozen pies with the date for easy tracking. This makes preparing easy recipes even more convenient and helps you plan family-friendly meals with ease.
How to Store and Reheat Leftovers
If your delicious shepherd’s pie recipe yields leftovers, that’s great news! This family-friendly meal often tastes even better the next day. To help you enjoy every bite safely, we’ve gathered our best tips for storing and reheating your homemade shepherd’s pie or cottage pie.
How to Store Cooked Shepherd’s Pie
Proper storage is key to keeping your shepherd’s pie fresh, safe, and ready for future easy meals.
Cool it quickly: To prevent bacteria growth, never leave cooked shepherd’s pie at room temperature for more than two hours [2].
Use airtight containers: Once cooled, transfer the leftovers to an airtight container. This locks in moisture and keeps out other odors.
Refrigerator storage: Shepherd’s pie will stay fresh in the refrigerator for up to 4 days, making it perfect for quick lunches or another simple dinner later in the week.
Freezer storage: For longer storage, wrap the pie tightly with plastic wrap and then aluminum foil. Alternatively, place individual portions in freezer-safe containers. Frozen shepherd’s pie keeps well for up to 3 months—a fantastic meal prep solution for busy families.
How to Reheat Leftover Shepherd’s Pie
Reheating shepherd’s pie the right way ensures it stays moist and flavorful, with a perfectly creamy potato topping. Here are two simple methods to restore your pie to its delicious, freshly-baked state.
Reheating in the Oven (Recommended for Best Results)
Using the oven is the best way to restore the original texture and help the mashed potato topping become golden and crisp again.
Preheat your oven: Set it to 350°F (175°C).
Prepare the pie: Place the leftovers in an oven-safe dish and cover loosely with aluminum foil to prevent the top from drying out.
Bake until hot: Heat for 20-30 minutes from the refrigerator or 45-60 minutes from frozen. Keep the pie covered during this initial heating.
Uncover and brown: For the last 5-10 minutes of baking, remove the foil to allow the mashed potatoes to get golden and slightly crispy.
Check the temperature: For food safety, make sure the pie’s internal temperature reaches 165°F (74°C) before serving.
Reheating in the Microwave (Quickest Method)
The microwave is the ideal choice when you are short on time and need a quick meal.
Portion and plate: Place a single serving on a microwave-safe plate.
Cover loosely: Use a microwave-safe cover or a damp paper towel to trap steam and keep the pie from drying out.
Heat in intervals: Microwave on high for 2 minutes, then stir the filling if possible to ensure even heating.
Check and finish: Continue heating in 30-second intervals until the pie is heated all the way through.
Whichever method you choose, your reheated shepherd’s pie will be a comforting and delicious meal. Recipesmondial is here to make your cooking journey enjoyable and stress-free. Enjoy every flavorful bite!
Frequently Asked Questions About Shepherd’s Pie
What are the traditional ingredients for shepherd’s pie?
Traditionally, a true shepherd’s pie is made with humble, flavorful lamb. This classic comfort food brings warmth to any table. Here are the core components:
Minced Lamb: This is the defining ingredient. The name “shepherd’s” refers to the lamb, a staple of shepherds.
Vegetables: A medley of diced root vegetables adds flavor and texture. Common choices include carrots, peas, and onions, and sometimes celery is also included.
Rich Gravy: The lamb and vegetables are simmered in a savory gravy, which often features beef or lamb broth, tomato paste, and a splash of Worcestershire sauce for depth.
Mashed Potato Topping: A creamy, fluffy layer of mashed potatoes crowns the pie. It’s usually enriched with butter, milk, or cream and then browned beautifully in the oven.
This delightful combination creates a hearty and satisfying dish, making it a fantastic example of a simple, nourishing dinner recipe.
Can I use beef instead of lamb in shepherd’s pie?
Absolutely, you can use beef instead of lamb! However, if you use beef, the dish is technically called “cottage pie.” The distinction comes down to the meat used.
Shepherd’s Pie: Made with lamb.
Cottage Pie: Made with beef.
In everyday cooking, many people use the terms interchangeably. Using beef is a wonderfully easy option, especially if lamb isn’t readily available or is less preferred. Both versions offer a delicious, comforting experience, so feel free to choose the meat your family loves most!
What spices go well in shepherd’s pie?
The right blend of spices and herbs can elevate your shepherd’s pie from good to truly amazing. These additions enhance the savory lamb (or beef) filling while adding depth to the rich gravy. Here are some excellent choices:
Thyme: This herb is a classic pairing with lamb and beef, adding an earthy, slightly floral note.
Rosemary: Another traditional choice, rosemary offers a piney, pungent aroma. Use it sparingly, as its flavor can be strong.
Bay Leaf: Adding a bay leaf to the simmering gravy infuses it with a subtle, aromatic background flavor. Remember to remove it before baking.
Worcestershire Sauce: While not technically a spice, a dash of this sauce adds a tangy, umami complexity that significantly deepens the flavor profile.
Garlic Powder & Onion Powder: These pantry staples boost the savory base, ensuring a robust flavor even when you’re short on fresh aromatics.
Black Pepper: Freshly ground black pepper is essential for adding warmth and a gentle spice.
Paprika: A pinch of sweet or smoked paprika can add a lovely color and a subtle warmth.
Don’t be afraid to experiment with your favorites! Because this is approachable home cooking at its best, you can adjust the seasonings to your personal taste and create flavorful meals made easy.
How many calories are in shepherd’s pie?
The calorie count for shepherd’s pie can vary quite a bit, depending on factors like the specific ingredients you use and your portion size.
Meat Choice: Lamb tends to have a higher fat content than lean ground beef, which impacts the total calories.
Vegetables: Adding more non-starchy vegetables can slightly lower the calorie density of the dish.
Potato Topping: The amount of butter, milk, or cream in your mashed potatoes affects the final calorie count.
Portion Size: Larger servings will naturally contain more calories.
Generally, a serving of traditional shepherd’s pie can range from 350 to 550 calories or more [source: https://www.myfitnesspal.com/food/calories/shepherds-pie-homemade-500693246]. For a more precise estimate, use an online calculator to evaluate your specific recipe. If you’re looking to create a healthier, more balanced meal, consider these tips to reduce calories:
Use lean ground lamb or beef.
Increase the proportion of vegetables in the filling.
Substitute some of the butter in the mashed potatoes with plain Greek yogurt or chicken broth.
Opt for skim milk instead of full-fat milk or cream in your potatoes.
Control your portion sizes carefully.
Recipesmondial focuses on helping you make simple dinner recipes that are both delicious and adaptable. This dish is a great example—you can easily adjust it to fit your dietary goals.
Enchiladas are a traditional Mexican dish made from corn tortillas rolled around a filling, typically chicken, beef, or cheese. The filled tortillas are then covered with a savory chili pepper sauce and often topped with cheese before being baked until hot and bubbly.
Are you looking for a dinner recipe that brings smiles to the table without demanding hours in the kitchen? We’ve all stared into the fridge, wondering how to make a satisfying, family-friendly meal. It can feel overwhelming to find recipes that are both healthy and quick. It’s time to put those worries aside and discover the joy of simple home cooking.
That’s where our Easy Chicken Enchiladas recipe comes in. At Recipesmondial, we believe every home cook deserves to cook without stress. This simple dinner is a true crowd-pleaser, delivering incredible flavor with straightforward techniques. It transforms everyday ingredients into a memorable dish that’s perfect for busy weeknights and relaxed weekends alike. We’ll guide you through every step to ensure delicious results and help you build confidence in the kitchen.
This guide will make preparing this classic one of your go-to easy recipes. We’ll walk you through everything, from understanding what makes a great enchilada to following our clear, step-by-step instructions. You’ll also find delicious filling ideas, helpful meal prep tips, and ways to customize your enchiladas to perfection. Let’s dive in and create a flavorful meal together!
What Are Enchiladas?
A professional food photography shot of a rectangular baking dish filled with several perfectly baked chicken enchiladas, topped generously with melted cheese, a rich red enchilada sauce, and fresh cilantro sprigs. The cheese is golden-brown and bubbling slightly, with the vibrant red sauce peeking through. A slight blur in the background indicates a cozy, warm kitchen setting. The lighting is soft and inviting, highlighting the textures and colors of the dish. Photorealistic, high-quality food magazine photo.
Welcome to the world of enchiladas, a classic and comforting meal for good reason. As a staple in Mexican cuisine, this beloved dish has been enjoyed for centuries [1].
So, what exactly is an enchilada? At its core, the dish consists of a tortilla rolled around a savory filling. It is then covered in a flavorful sauce and typically topped with melted cheese, transforming simple ingredients into a deeply satisfying meal.
Let’s break down the key elements that make an enchilada so special:
Tortillas: Traditionally, corn tortillas are used for their authentic flavor and texture. However, flour tortillas are also a popular choice, especially for those new to rolling them.
Fillings: This is where you can be creative! Common fillings include seasoned meats like chicken or beef, but many people also use cheese, beans, or a mix of vegetables.
Sauce: The sauce is often considered the soul of the dish. The most popular varieties are red enchilada sauce and green enchilada sauce (salsa verde), each offering a distinct flavor profile.
Cheese: A layer of shredded cheese is essential. It melts during baking into a gooey, savory topping that perfectly complements the other flavors.
In essence, enchiladas are a celebration of layered flavors and textures. They make a fantastic family-friendly meal, and while they might seem complex, they are surprisingly approachable. Recipesmondial is here to guide you with our easy chicken enchilada recipe, helping you make this global comfort food a simple dinner you’ll enjoy again and again.
Why Will You Love This Easy Enchilada Recipe?
Ready to find your new favorite weeknight meal? This easy chicken enchilada recipe is your ticket to a delicious, stress-free dinner. We know it can be challenging to find simple dinner recipes that the whole family enjoys. That’s why we designed this recipe to bring vibrant flavors to your table without the fuss.
You’ll love making these enchiladas because they offer a perfect blend of simplicity and incredible taste. Say goodbye to complex, overwhelming instructions. Instead, enjoy approachable home cooking that builds your confidence. Here’s why this dish will become a staple in your kitchen:
Effortless to Make: With clear, step-by-step instructions, this beginner-friendly recipe helps you prepare a restaurant-quality meal with ease.
Bursting with Flavor: Every bite is rich and satisfying, combining savory chicken, a delicious sauce, and melted cheese for a truly flavorful meal.
A Family Favorite: These chicken enchiladas are a guaranteed crowd-pleaser. Even the pickiest eaters will be asking for seconds.
Quick Meal Solution: Perfect for busy weeknights, this recipe helps you get a wholesome, delicious dinner on the table quickly and without stress.
Boost Your Confidence: Whether you’re new to the kitchen or just expanding your skills, this recipe is designed for success. You’ll feel proud creating such a tasty dish from scratch.
Everyday Ingredients: This recipe uses simple, budget-friendly ingredients you can find at any grocery store, making preparation easy.
This recipe does more than just improve your mealtime—it builds your confidence in the kitchen. You will discover new flavors while enjoying the entire cooking process. Get ready to impress your family and yourself!
What Ingredients Do You Need for Chicken Enchiladas?
A photorealistic, high-quality food magazine photo of a rustic wooden tabletop displaying all the fresh ingredients needed for chicken enchiladas, arranged neatly and invitingly. Key ingredients include shredded cooked chicken, corn tortillas, a bowl of homemade or canned red enchilada sauce, shredded Monterey Jack and cheddar cheeses, sour cream, a bunch of fresh cilantro, diced onion, and possibly a lime. The setup should be clean, well-lit with natural light, and emphasize freshness and quality. Professional food photography, top-down view or slightly elevated angle.
Great chicken enchiladas start with fresh, simple ingredients. You don’t need anything fancy to create a flavorful meal. This recipe uses approachable, everyday staples you can easily find at any grocery store. Get ready to transform these basic items into a comforting and memorable dish.
For the Enchilada Filling
The savory, well-seasoned filling is the heart of this dish. We use shredded chicken, but feel free to adapt it to your liking.
Cooked Chicken: About 2-3 cups, shredded. Perfect for using leftover rotisserie chicken or any cooked, shredded chicken. It’s a fantastic meal prep tip!
Onion: 1 small, finely chopped. Adds a subtle sweetness and an aromatic base.
Green Chilies: One 4-ounce can, diced. Choose mild for less heat or medium for a slight kick.
Enchilada Seasoning: 1 tablespoon. Use a store-bought blend or make your own (often chili powder, cumin, and oregano).
Cream Cheese: 4 ounces, softened. This secret ingredient makes the filling incredibly creamy and rich.
Shredded Cheese: 1 cup, such as Monterey Jack or a Mexican blend. This adds extra melty goodness inside the enchiladas.
Salt and Black Pepper: To taste. Adjust to ensure your filling is perfectly seasoned.
Quick Tip: If you’re short on time, pre-cooked chicken is a lifesaver. Using a rotisserie chicken is a great recipe hack that drastically cuts down prep time.
For the Enchilada Sauce
The sauce blankets your enchiladas in rich, vibrant flavor. While store-bought sauce is a great shortcut, making a homemade enchilada sauce is surprisingly easy and rewarding.
Olive Oil or Vegetable Oil: 2 tablespoons. Used to build the roux that thickens the sauce.
All-Purpose Flour: 2 tablespoons. Helps create a smooth, velvety texture.
Chili Powder: 2-3 tablespoons. The main flavor component; adjust to your preferred spice level.
Cumin: 1 teaspoon. Adds a warm, earthy note.
Garlic Powder: 1 teaspoon. Provides a consistent garlic flavor throughout the sauce.
Onion Powder: 1 teaspoon. Complements the garlic and adds depth.
Dried Oregano: 1/2 teaspoon. Mexican oregano is an excellent choice here.
Chicken Broth: 2 cups. Use a low-sodium broth to better control the saltiness.
Tomato Paste: 2 tablespoons. Adds a subtle tang and richness.
Salt and Pepper: To taste. Always taste and adjust your seasonings.
Substitution Idea: For a super simple dinner, use two 10-ounce cans of your favorite red enchilada sauce. This is perfect for a quick meal when you’re short on time.
For Assembling the Enchiladas
These are the final key components you’ll need before the enchiladas go into the oven.
Corn Tortillas: 12-15 count, 6-inch size. These are essential for wrapping your filling.
Shredded Cheese: 1-2 cups. A generous layer on top creates an irresistible gooey, melted crust.
Essential Toppings
Toppings take your enchiladas from great to amazing. They add fresh flavor, texture, and color. Think of them as the finishing touches you add right before serving.
Fresh Cilantro: 1/4 cup, chopped. Adds a bright, herbaceous freshness.
Sour Cream or Greek Yogurt: For serving. A dollop provides a cooling, creamy contrast.
Sliced Green Onions: 2-3 tablespoons, chopped. These offer a mild oniony bite and vibrant color.
Avocado or Guacamole: Sliced or served as a dollop. Creamy avocado is always a welcome addition.
Salsa or Pico de Gallo: For an extra layer of fresh flavor.
Personalize It: Toppings are a wonderful way to customize your enchiladas. Feel free to add your family’s favorites and get creative in the kitchen!
How to Make Easy Chicken Enchiladas Step-by-Step
A photorealistic, professional food photography shot showing the hands of a home cook, a woman with a friendly demeanor, carefully rolling up a corn tortilla filled with shredded chicken and cheese filling. The scene is set in a clean, brightly lit home kitchen with a warm ambiance. A partially filled baking dish is visible in the background, ready for more rolled enchiladas. The focus is on the hands and the rolling process, conveying ease and simplicity. High-quality food magazine photo, warm tones.
Ready to make incredibly delicious chicken enchiladas? This step-by-step guide breaks down the process, helping you create a satisfying, family-friendly meal with confidence. Say goodbye to feeling overwhelmed by complex recipes!
Recipesmondial is here to make cooking enjoyable. Follow these simple steps for flavorful results every time.
Prepare Your Chicken and Sauce
First, get your main ingredients ready. Prepping everything beforehand makes the assembly process a breeze.
Shred the Chicken: If you’re using cooked chicken, shred it into bite-sized pieces. A rotisserie chicken is a fantastic time-saver for quick meals.
Warm the Sauce: Pour your enchilada sauce into a medium saucepan. Heat it gently over low heat until just warm. This makes it easier to work with. Stir occasionally to prevent sticking.
Combine Filling: In a bowl, mix the shredded chicken with about 1/2 cup of the warmed enchilada sauce. This step keeps the chicken moist and flavorful. Feel free to add a sprinkle of your favorite cheese here for extra richness.
Warm Your Tortillas
Don’t skip this crucial step for easy rolling. Warm tortillas are flexible and far less likely to crack, which is the secret to perfect enchiladas.
Microwave Method: Wrap a stack of 4-6 tortillas in a damp paper towel. Microwave for 30-45 seconds until soft and pliable. Repeat as needed.
Oven Method: Wrap a stack of tortillas in foil. Heat in a preheated 350°F (175°C) oven for 10-15 minutes.
Skillet Method: Heat each tortilla in a dry, hot skillet for about 10-15 seconds per side until softened.
Assemble Your Enchiladas
Now for the fun part: assembly! Start by lightly greasing a 9×13 inch baking dish so it’s ready to go.
Sauce the Dish: Spread a thin layer of enchilada sauce (about 1/2 cup) across the bottom of your prepared baking dish.
Dip and Fill: Briefly dip each warm tortilla into the remaining enchilada sauce, making sure both sides are lightly coated.
Add Chicken: Place about 1/4 to 1/3 cup of the chicken mixture down the center of each tortilla. Be careful not to overfill.
Roll Them Up: Roll each tortilla tightly and place it seam-side down in the baking dish. Arrange the enchiladas snugly next to each other.
Top with Sauce: Pour the rest of the enchilada sauce evenly over the rolled tortillas.
Add Cheese: Sprinkle generously with shredded cheese. This will create that irresistible, golden topping when baked.
Bake to Golden Perfection
Your enchiladas are almost ready! Baking brings all those delicious flavors together and melts the cheese perfectly.
Preheat Oven: Ensure your oven is preheated to 375°F (190°C).
Bake Covered: Cover the baking dish loosely with foil and bake for 20 minutes.
Bake Uncovered: Remove the foil. Continue baking for another 10-15 minutes, until the cheese is melted, bubbly, and lightly golden.
Garnish and Serve
The final touch makes these easy chicken enchiladas truly special. Get ready to enjoy your delicious creation!
Rest: Let the enchiladas rest for 5-10 minutes after baking. This helps them set, making them much easier to serve.
Garnish: Top with fresh cilantro, diced red onion, a dollop of sour cream, or sliced avocado.
Serve Hot: Dish them out and enjoy! This simple dinner recipe is always a crowd-pleaser.
Tips for Perfect, Stress-Free Enchiladas
Making enchiladas should be fun, not stressful. These practical tips will help you avoid common problems and cook with confidence, ensuring your meal is a hit.
Don’t Overfill: Stuffing tortillas too much makes them difficult to roll and can cause them to tear. A little less filling goes a long way.
Warm Tortillas Well: As mentioned, this is a key step. Cold tortillas are stiff and will crack when you try to roll them.
Sauce It Up: Don’t be shy with the sauce. A generous amount of sauce is essential for keeping the enchiladas moist and flavorful.
Meal Prep Magic: You can assemble the enchiladas up to 24 hours in advance. Just cover and refrigerate, then add 10-15 minutes to the baking time. This is a great strategy for busy families.
Cheese Choice: For the best results, use a good melting cheese like Monterey Jack, mild cheddar, or a Mexican blend.
With this step-by-step guide and our helpful tips, you’ll be making delicious, easy enchiladas in no time. Recipesmondial is always here to inspire your approachable home cooking journey!
What Are Some Tips for Making the Best Enchiladas?
Ready to make truly unforgettable chicken enchiladas? With a few simple tricks, you can elevate your homemade dish from great to fantastic. These tips focus on boosting flavor and texture while making the cooking process easy and enjoyable for any home cook.
Embrace a Flavorful Sauce: The sauce is the heart of your enchiladas, so a rich, well-seasoned one makes all the difference. Whether you use a homemade recipe or a high-quality store-bought option, make sure it has a deep, savory flavor.
Warm Your Tortillas: Cold tortillas can crack when rolled, so warm them briefly before filling. You can microwave them for 15-20 seconds or quickly dip them in the warm enchilada sauce. This simple step makes them pliable and prevents tearing.
Don’t Overfill: While it’s tempting to pack your tortillas, overfilling makes them difficult to roll and can cause them to burst during baking. Use a moderate amount of filling for a neater, easier-to-handle enchilada.
Layer with Love: Start by spreading a thin layer of sauce in the bottom of your baking dish to prevent the enchiladas from sticking. Once rolled, arrange them in the dish and smother them with the remaining sauce and cheese.
Choose Your Cheese Wisely: Opt for a good melting cheese like Monterey Jack, cheddar, or a Mexican blend. For the smoothest results, shred your own cheese from a block, as it melts better than pre-shredded varieties.
Bake Until Bubbly: Cover the dish with foil for the first part of baking to help the enchiladas heat through evenly. Then, remove the foil for the last 10-15 minutes to let the cheese become perfectly golden and bubbly.
Let Them Rest: Much like a good roast, enchiladas benefit from a short rest. Let them sit for 5-10 minutes after baking. This allows the flavors to meld and helps them firm up, making them much easier to serve.
Taste and Adjust Seasoning: Before you assemble, taste the filling and sauce. Adjust the salt, pepper, or other spices as needed. A well-seasoned base is the key to a delicious final dish.
Consider Fresh Toppings: Fresh toppings add a final pop of texture and brightness. A sprinkle of fresh cilantro, diced red onion, creamy avocado, or a dollop of sour cream can elevate the entire meal.
How Can You Customize Your Enchiladas?
One of the best parts about making enchiladas is their flexibility. This recipe makes it easy to switch up ingredients to suit your taste, adapt to what you have on hand, or fit different dietary needs. Let’s explore some delicious ways to personalize your next batch of flavorful enchiladas.
Vegetarian Enchilada Variations
Turning your enchiladas into a fantastic vegetarian meal is simple. These hearty and delicious variations make excellent family-friendly meals that are just as satisfying as the chicken version. Here are some easy ideas:
Black Bean and Corn: A classic choice. Combine cooked black beans and corn kernels with diced bell peppers and onions. Mix with a little cheese for a wonderfully quick meal.
Sweet Potato and Black Bean: Roast diced sweet potatoes until tender, then mix them with black beans. A touch of smoked paprika adds depth to this comforting and healthy dish.
Spinach and Cheese: Sauté fresh spinach until wilted, squeeze out any excess water, and blend it with a mix of ricotta, Monterey Jack, and cheddar for a simple, creamy filling.
Mushroom and Bell Pepper: For a savory and flavorful filling, sauté sliced mushrooms and colorful bell peppers, then season them with cumin and chili powder.
Cauliflower and Chickpea: Roast small cauliflower florets and mix them with mashed chickpeas and your favorite enchilada spices for a unique texture and taste.
To ensure your vegetarian enchiladas are packed with flavor, don’t skimp on the seasonings. A pinch more cumin or a squeeze of lime juice can make a big difference.
Other Filling Ideas
Our easy chicken enchilada recipe is just the start! You can adapt the filling in endless ways to create simple dinners or entirely new meals. Here are a few ideas:
Ground Beef or Turkey: Brown your preferred ground meat, drain the excess fat, and season it with taco seasoning or chili powder for a simple, popular, and hearty swap.
Pulled Pork: Use leftover pulled pork, or cook pork in a slow cooker until tender. For a tangy twist that’s great for meal prep, shred it and mix with a bit of barbecue sauce.
Shrimp or Fish: For a lighter option, try cooked shrimp or flaky white fish mixed with a little salsa and fresh cilantro for a refreshing, flavorful meal.
Mixed Vegetables: Sauté any combination of your favorite vegetables, like zucchini, yellow squash, carrots, and onions. Add cheese and sauce for a fantastic way to use up extra produce.
Refried Beans: For an incredibly quick and budget-friendly option, simply use refried beans mixed with some cheese and a little green chili.
Remember to cook your fillings thoroughly before rolling them into the tortillas. This ensures everything is perfectly heated through when the enchiladas come out of the oven.
Making It Spicier or Milder
Adjusting the heat level in your enchiladas is simple, ensuring everyone at your table can enjoy the meal. Whether you love a fiery kick or prefer a gentle warmth, here’s how to customize the spice:
To Make It Spicier:
Add Chili Powder: Increase the amount of chili powder in your sauce, or sprinkle some into your filling.
Include Cayenne Pepper: A small pinch of cayenne pepper adds noticeable heat. Start with a quarter teaspoon, then taste and add more if needed.
Fresh Jalapeños or Serranos: Finely dice fresh jalapeños and add them to your filling or sauce. For extra heat, use serrano peppers.
Hot Sauce: Drizzle your favorite hot sauce into the filling, or serve it on the side for individual customization.
Spicy Cheese: Choose a Monterey Jack cheese with jalapeños or pepper jack cheese for an added kick.
To Make It Milder:
Reduce Chili Powder: Use less chili powder in your enchilada sauce, or look for a mild variety.
Omit Spicy Ingredients: Simply skip any fresh jalapeños or cayenne pepper to keep the flavors mellow.
Use Mild Green Chiles: Incorporate canned mild green chiles to add flavor without the heat.
More Cheese: A generous amount of mild cheese, like cheddar or Monterey Jack, can help balance any spice.
Sour Cream or Avocado: Offer sour cream, plain Greek yogurt, or sliced avocado as toppings. These cool, creamy additions provide a nice contrast perfect for tempering heat.
Always taste your sauce and filling as you go, especially when adding spices. Remember, you can always add more heat, but you can’t take it away. Enjoy your delicious, customized enchiladas!
What Should You Serve with Enchiladas?
Your delicious Chicken Enchiladas are the star of the show, but the right side dishes can elevate the entire meal. Simple additions complement the enchiladas’ rich flavors while adding balance and freshness to your plate. At Recipesmondial, we love making mealtime easy and enjoyable. To help, we’ve gathered some fantastic, beginner-friendly ideas for what to serve with your enchiladas.
Classic Sides for a Complete Meal
These traditional pairings are always a hit, making them perfect for a family-friendly meal. They also help your dinner feel more authentic and comforting.
Fluffy Mexican Rice: This classic choice is savory and perfect for absorbing all the delicious enchilada sauce. You can find many easy recipes online.
Simple Black Beans or Refried Beans: Quick to prepare, beans add valuable protein and fiber. Simply warm them up or follow a basic recipe.
Warm Tortillas: Offer extra corn or flour tortillas on the side. They are great for scooping up any leftover sauce.
Fresh and Light Options
If you want something to cut through the richness of the enchiladas, these light sides are perfect. They add a welcome burst of freshness and color to your plate.
Crisp Green Salad: A simple salad with mixed greens, fresh vegetables, and a light vinaigrette adds a healthy touch to your meal.
Creamy Guacamole: Made with fresh avocado, lime, and cilantro, this vibrant dip offers a cool, smooth contrast to the warm enchiladas. Serve with tortilla chips or enjoy by the spoonful.
Pico de Gallo or Fresh Salsa: A quick salsa of diced tomatoes, onions, jalapeños, and cilantro adds a tangy kick that brightens every bite.
Corn Salad with Lime: Mix fresh or frozen corn with red onion, cilantro, and a squeeze of lime juice for a wonderfully refreshing side.
Easy Vegetable Additions
Adding vegetables is a great way to boost nutrition, and these simple options are perfect for a quick weeknight dinner.
Sautéed Zucchini and Bell Peppers: For added texture and vitamins, quickly sauté sliced zucchini and colorful bell peppers with a little olive oil, salt, and pepper.
Steamed or Grilled Corn on the Cob: This crowd-pleasing side is quick and easy. Simply serve sweet corn with butter and a sprinkle of chili powder.
Roasted Asparagus: For an elegant yet simple side, toss asparagus spears with olive oil and salt, then roast until tender-crisp.
No matter which sides you choose, these easy ideas will help you create a flavorful and satisfying enchilada dinner. Enjoy discovering new combinations with Recipesmondial!
How to Store and Reheat Leftover Enchiladas
Having leftover enchiladas is a fantastic win, meaning less cooking for you later. This easy chicken enchiladas recipe makes perfect family-friendly meals, and knowing how to store and reheat them properly is key to ensuring they taste just as delicious the next day. This guide provides simple steps to keep your enchiladas fresh and flavorful. Enjoy stress-free meal prep with these tips!
Storing Leftover Enchiladas
Proper storage not only prevents spoilage but also locks in that amazing flavor. Whether you need to store them for a day or a month, these tips will help you confidently preserve your flavorful meals made easy.
Refrigeration: First, let your baked enchiladas cool completely. This important step prevents them from becoming soggy. Once cool, transfer them to an airtight container or cover the baking dish tightly with plastic wrap or aluminum foil. They will stay fresh in the refrigerator for 3 to 4 days, making them great for quick lunch ideas.
Freezing for Longer Storage: Enchiladas freeze beautifully, which is ideal for meal prep ideas.
Unbaked Enchiladas: Assemble the enchiladas in a freezer-safe dish as the recipe directs, but do not bake them. Cover the dish tightly, first with plastic wrap and then with a layer of aluminum foil. Label with the date and freeze for up to 2-3 months.
Baked Enchiladas: Allow baked enchiladas to cool completely before freezing. You can freeze them whole in their baking dish or portion them into individual freezer-safe containers. Wrap tightly with plastic wrap and then foil, label with the date, and freeze for up to 2-3 months. Freezing individual portions makes simple dinner recipes even easier.
Reheating Leftover Enchiladas
Reheating correctly is essential for maintaining texture and taste. Nobody wants dry or unevenly heated enchiladas! Here are the best ways to bring your easy recipes back to life.
Oven (Recommended for Best Results): This method is highly recommended because it provides the best texture, ensures even heating, and keeps the tortillas from getting soggy.
From Refrigerator: Preheat your oven to 350°F (175°C). Place the enchiladas in an oven-safe dish, adding a splash of extra enchilada sauce if they look dry. Cover the dish loosely with foil.
Bake for 20-25 minutes, or until heated through. To crisp up the cheese, remove the foil for the last 5 minutes of baking.
From Freezer (Unbaked): For best results, thaw the enchiladas overnight in the refrigerator. Then, follow the reheating steps above, adding 10-15 minutes to the total baking time.
From Freezer (Baked): Reheat directly from the freezer. Place the covered enchiladas in a preheated 350°F (175°C) oven and bake for 30-40 minutes, or until piping hot in the center.
Microwave (Quickest Option): The microwave is the fastest method and is perfect for reheating a single serving.
Place 1-2 enchiladas on a microwave-safe plate.
Drizzle a tablespoon of water or extra sauce over the top. This creates steam and prevents them from drying out.
Cover loosely with a microwave-safe lid or a damp paper towel.
Heat on medium power for 1-2 minutes, rotating the plate halfway through, until warmed through. Be careful not to overheat, as this can make the tortillas tough.
With these storage and reheating tips for beginner-friendly recipes, your leftover enchiladas will always be a hit. Enjoy a delicious meal without the fuss!
Frequently Asked Questions About Enchiladas
How do you make homemade enchilada sauce?
Making enchilada sauce from scratch is surprisingly simple, and it adds incredible flavor to your chicken enchiladas. When you skip the canned version, you get a much fresher, more vibrant taste.
Here’s a quick guide to a basic, delicious red enchilada sauce:
Start with a Roux: Melt butter or oil in a saucepan, then whisk in flour to create a paste. Cook for a minute or two until golden. This step is key to thickening your sauce.
Add Spices: Stir in chili powder, cumin, oregano, and a pinch of garlic powder. Cook for about 30 seconds until fragrant to awaken the flavors.
Whisk in Liquid: Slowly pour in chicken or vegetable broth, whisking constantly to prevent lumps. Add a bit of tomato paste for color and richness.
Simmer and Season: Bring the sauce to a gentle simmer and cook for 10-15 minutes, or until it reaches your desired consistency. Taste and season with salt and pepper. A tiny splash of vinegar can brighten the flavor, too.
Homemade sauce is a game-changer for family meals. You can also make it ahead of time to simplify dinner prep.
Can you make these enchiladas vegetarian?
Yes, this enchilada recipe is very versatile. It’s easy to adapt for a delicious vegetarian meal by simply swapping the chicken for a different filling.
Here are some fantastic vegetarian filling ideas:
Black Bean and Corn: Combine cooked black beans, corn kernels, diced bell peppers, and your favorite taco seasoning.
Roasted Vegetables: Roast sweet potatoes, zucchini, bell peppers, and onions until tender. Mix them with a little cheese.
Lentil and Mushroom: Sauté cooked lentils with chopped mushrooms, onions, and spinach. Season with cumin and chili powder.
Refried Beans and Cheese: A classic, comforting option. Spread warm refried beans inside the tortillas with a generous sprinkle of cheese.
Remember to use vegetable broth in your enchilada sauce to keep the dish fully vegetarian. These options show how easy it is to customize your meal.
What’s the best way to roll enchiladas without them breaking?
Rolling enchiladas can be tricky, but a few simple tips will help you avoid torn tortillas and make the process easier.
Warm Your Tortillas: This is the most important step. Warm corn tortillas are more flexible and less prone to cracking. You can microwave them for 15-20 seconds or quickly dip them in the warm enchilada sauce.
Don’t Overfill: Use a moderate amount of filling. Overfilling makes the tortillas difficult to roll and more likely to break.
Sauce the Tortilla Lightly: A quick dip in warm enchilada sauce before filling also makes the tortilla more pliable and adds extra flavor.
Roll Tightly but Gently: Fold one side of the tortilla over the filling, then continue rolling until you have a neat, compact log.
Place Seam-Side Down: Arrange the rolled enchiladas seam-side down in your baking dish to help them stay together as they bake.
With these tips, you’ll be able to roll perfect enchiladas every time for a stress-free meal.
How do you pronounce enchiladas?
The correct pronunciation for “enchiladas” is en-chee-LAH-dahs.
It’s a fun word to say, especially when you’re about to enjoy a delicious, flavorful meal.
The best mac and cheese recipe starts with a classic béchamel sauce made from a butter and flour roux, whole milk, and plenty of sharp cheddar cheese. Cooked macaroni is folded into the creamy sauce and can be served immediately for a stovetop version or topped with breadcrumbs and baked until golden for a classic baked mac and cheese.
Imagine a dish so rich, so cheesy, and so utterly comforting it brings a smile to everyone’s face. That’s the magic of a truly incredible homemade mac and cheese recipe. Perhaps you’ve felt overwhelmed by complex recipes, or maybe you’re just struggling to plan family-friendly meals that everyone will love. At Recipesmondial, we believe cooking should be a joy, not a chore. We’ll show you that achieving the perfect, creamy mac and cheese is easier than you think.
At Recipesmondial, we understand you want to enjoy cooking without stress. Our goal is to turn kitchen uncertainty into confident culinary success. This easy mac and cheese recipe is your go-to solution for a quick, reliable, and flavorful meal. We’ve broken down every step into simple, approachable home cooking guidance. This ensures that even beginner cooks can achieve a delightfully creamy, perfectly cheesy result.
Get ready to transform simple ingredients into the best homemade mac and cheese your family has ever tasted. We’ll share our secrets for the creamiest sauce and tips for choosing the perfect cheeses. We’ll also offer variations to fit your busy life, like an easy baked mac and cheese or a quick instant pot mac and cheese. Say goodbye to uninspiring dinners and hello to a truly satisfying recipe that will become a staple in your home. Let’s make some magic in the kitchen!
What Makes This The Best Homemade Mac and Cheese Recipe?
A close-up, mouth-watering, eye-level shot of a golden-brown baked mac and cheese casserole, still bubbling slightly, with a generous scoop freshly taken out of the dish. The scoop reveals incredibly creamy, rich, velvety cheese sauce coating every macaroni noodle, stretching slightly. Soft, natural light highlights the texture and steam gently rising. Garnished with a sprinkle of fresh chopped parsley. Photorealistic, professional food photography, high-quality food magazine photo.
Welcome to your new favorite homemade mac and cheese! At Recipesmondial, we know you want delicious food without the fuss. That’s why we created this go-to easy mac and cheese solution. It delivers incredible flavor with minimal stress, making it more than just another recipe.
We crafted this mac and cheese recipe with home cooks like you in mind. If you feel overwhelmed by complex recipes or struggle to plan family-friendly meals, this dish is for you. We focus on clarity and simplicity so you can cook with confidence. Consider this recipe your secret weapon for a satisfying meal.
Uncomplicated and Beginner-Friendly Steps
Our approach removes all the guesswork from cooking. You don’t need to be a gourmet chef to succeed, as this recipe uses the best principles of simple dinner recipes. We break down each step so clearly that anyone can make this amazing dish. Our guidance is designed to help you build confidence in the kitchen.
Clear Instructions: We provide step-by-step cooking guidance. This makes the process incredibly straightforward.
Everyday Ingredients: You will use common items found in any grocery store. No special trips are needed.
Quick Preparation: This recipe is designed for those seeking quick meals. You will have dinner on the table in no time.
Irresistibly Creamy and Flavorful Results
The hallmark of great mac and cheese is its texture and taste, and our recipe delivers on both. We’ll show you how to achieve maximum creaminess and rich, cheesy goodness in every bite—all without any fuss. The result is a stunningly delicious dish that truly shines.
Perfectly Smooth Sauce: Say goodbye to grainy sauces. Our method ensures a silky, luscious cheese sauce.
Rich Cheese Blend: We recommend a blend that maximizes flavor. This creates a deep, comforting taste.
Consistent Excellence: Each batch will be as delicious as the last. This recipe is reliably flavorful.
Family-Friendly and Versatile
Perfect for any occasion, this homemade mac and cheese is a guaranteed crowd-pleaser that busy families will love. It’s also incredibly easy to customize to your liking. We offer delightful variations, including options for a baked mac and cheese recipe or a simple crockpot mac and cheese.
Kid-Approved: Even picky eaters will ask for seconds. This is a true family favorite.
Customizable: Add your favorite proteins or vegetables. Make it your own special dish.
Multiple Methods: Explore options like instant pot mac and cheese. You can even try smoked mac and cheese for a twist.
Reliable and Rewarding Cooking Experience
At Recipesmondial, our goal is to help you enjoy cooking without stress. This macaroni and cheese recipe is a prime example of that philosophy, offering a foolproof way to prepare a beloved classic. You’ll not only love the delicious outcome but also gain confidence with every plate you serve.
Guaranteed Success: Follow our simple steps for perfect results. You will feel proud of your creation.
Stress-Free Meals: Our approachable home cooking philosophy shines through. Dinner becomes an enjoyable event.
Inspiring Creativity: Learn the basics, then get creative. Discover new flavors and techniques easily.
This best mac and cheese recipe will truly transform your mealtime. It guides you from uncertainty to confidence, turning simple ingredients into a delicious, visually appealing meal. Get ready to enjoy the ultimate comfort food!
What are the ingredients for mac and cheese?
An overhead shot (flat lay) of all the fresh, high-quality ingredients for homemade mac and cheese artfully arranged on a light-colored marble or rustic wooden countertop. Ingredients include uncooked elbow macaroni in a small bowl, a solid block of sharp cheddar cheese, a glass measuring cup of whole milk, sticks of unsalted butter, a small pile of all-purpose flour, small bowls with mustard powder, paprika, salt, and black pepper. Everything is clean, fresh, and visually appealing, with bright, natural light. Photorealistic, professional food photography, high-quality food magazine photo.
For the Pasta
Every fantastic mac and cheese recipe starts with the perfect pasta. We choose elbow macaroni for our classic homemade version—it’s the traditional shape everyone loves!
Elbow macaroni is the ideal choice. Its small, curved shape captures the creamy cheese sauce beautifully, ensuring a delicious bite every time. Cooking your pasta properly is a simple but crucial step for success.
Elbow Macaroni: 1 pound (about 450g) is perfect. It’s the classic choice for a reason.
Water: Enough to boil your pasta.
Salt: 1-2 teaspoons for the boiling water. Seasoning the water adds flavor directly to the pasta.
Quick Tip: While elbow macaroni is a staple, feel free to use other small pasta shapes. Shells, cavatappi, or even penne work wonderfully because they also hold onto that rich, creamy sauce well. This helps you create a truly satisfying macaroni and cheese dish.
For the Creamy Cheese Sauce
The heart of any truly amazing mac n cheese recipe is its luscious, velvety cheese sauce. Better yet, this sauce is surprisingly simple to make from scratch using everyday ingredients to create a rich, flavorful base.
Our approach ensures a smooth, non-grainy sauce that melts perfectly over every piece of pasta. Get ready for the best homemade mac and cheese!
Unsalted Butter: 1/2 cup (113g). Butter creates the base of our roux and adds incredible richness.
All-Purpose Flour: 1/2 cup (60g). This combines with butter to form a roux, which thickens the sauce beautifully.
Whole Milk: 4 cups (about 960ml). Whole milk provides the creamiest texture. While 2% milk works, whole milk gives the best results.
Sharp Cheddar Cheese: 3 cups (about 340g), freshly shredded. Cheddar offers that iconic tangy flavor. Always shred your own cheese for the smoothest melt.
Gruyère Cheese: 1 cup (about 115g), freshly shredded. Gruyère adds a nutty, complex flavor and melts beautifully into the sauce.
Monterey Jack Cheese: 1 cup (about 115g), freshly shredded. This cheese brings extra creaminess with a mild, buttery taste.
Dijon Mustard: 1 teaspoon. A tiny bit of Dijon enhances the cheese flavor without making the sauce taste like mustard.
Salt: 1 teaspoon, or to taste.
Black Pepper: 1/2 teaspoon, freshly ground, or to taste.
Pinch of Nutmeg: This optional secret ingredient adds a warm, subtle complexity that complements cheese perfectly.
Pro Tip for Success: Always shred your own cheese. Pre-shredded cheeses contain anti-caking agents that can make your sauce gritty, while fresh-shredded cheese melts much more smoothly. This is a vital step for a truly creamy sauce and makes all the difference in your macaroni cheese.
Substitution Idea: For a lighter sauce, you can use 2% milk, but remember that whole milk delivers the richest flavor and texture. Feel free to experiment with your favorite cheese combinations too. Colby, fontina, or even a smoked gouda can add wonderful new twists!
How to Make Our Step-by-Step Macaroni and Cheese Recipe
A warm, inviting scene in a home kitchen. A friendly and approachable home cook, with neatly rolled-up sleeves and clean hands, is using a large serving spoon to scoop a generous portion of hot, creamy homemade mac and cheese from a rustic ceramic baking dish into a modern white serving bowl. The mac and cheese is perfectly golden and slightly crisp on top, with a rich, bubbling interior, and steam gently rising, highlighting its warmth and freshness. The background is a softly blurred, cozy kitchen countertop with hints of kitchen utensils. Photorealistic, professional food photography, high-quality food magazine photo.
Step 1: Cook the Macaroni
First, let’s cook the heart of your mac and cheese: the macaroni. This simple step sets the stage for a truly comforting dish.
Here’s how to do it perfectly:
Boil Water: Fill a large pot with about 6 quarts of water. Bring it to a rolling boil over high heat.
Season Well: Add a generous tablespoon of salt to the boiling water. This flavors the pasta from the inside out and is a key secret for a truly delicious macaroni and cheese.
Add Pasta: Pour in 1 pound (about 450g) of elbow macaroni. Stir immediately to prevent sticking.
Cook to Al Dente: Cook the pasta according to package directions, usually 7 to 9 minutes. Aim for “al dente,” meaning it’s still slightly firm to the bite. Remember, it will finish cooking in the hot cheese sauce, so avoid overcooking.
Drain: Drain the cooked macaroni in a colander. Do not rinse it. The starch left on the pasta helps the sauce stick beautifully.
Quick Tip: Cooking your pasta al dente is key for the best texture in your mac and cheese recipe. It prevents a mushy outcome.
Step 2: Create the Roux
A roux is the foundation for our creamy cheese sauce. It’s a simple mixture of butter and flour. Don’t be intimidated—this is an easy skill to master and a building block for many beginner-friendly recipes.
Follow these simple steps:
Melt Butter: In a large, heavy-bottomed pot or Dutch oven, melt 1/2 cup (113g) of unsalted butter over medium heat.
Whisk in Flour: Once the butter is melted and bubbly, add 1/2 cup (60g) of all-purpose flour.
Cook the Roux: Whisk continuously for 1 to 2 minutes until the mixture forms a thick paste. This step cooks out the raw flour taste. The roux should be pale yellow, not browned, for our homemade mac and cheese.
Why it Matters: A properly made roux ensures a smooth, lump-free sauce. It’s essential for that rich, velvety texture we crave.
Step 3: Make the Béchamel Sauce
Now, we’ll turn the roux into a luscious béchamel sauce—the perfect canvas for our cheese. Follow this step-by-step cooking guidance to create a truly comforting meal.
Here’s how to build your sauce:
Warm Milk: Gently warm 4 cups (about 1 liter) of whole milk in a separate saucepan. Do not boil it. Using warm milk helps prevent lumps when added to the roux.
Add Milk Gradually: Slowly pour the warm milk into the roux, about 1/2 cup at a time, whisking constantly as you add.
Continue Whisking: Keep whisking until each addition of milk is fully incorporated and the sauce is perfectly smooth.
Thicken the Sauce: Bring the sauce to a gentle simmer over medium heat, still whisking. Let it cook for 5 to 7 minutes, or until it thickens enough to coat the back of a spoon. It will be silky and rich.
Season: Remove the pot from the heat. Stir in 1 teaspoon of salt, 1/2 teaspoon of black pepper, and 1/4 teaspoon of nutmeg. Nutmeg adds a lovely warmth that complements cheese sauces.
Troubleshooting Tip: If your sauce has a few lumps, don’t worry. A quick pass with an immersion blender or pushing it through a fine-mesh sieve will make it perfectly smooth. It’s a great trick for approachable home cooking.
Step 4: Melt the Cheeses
This is where the magic happens! Adding cheese to your warm béchamel creates the gooey, irresistible heart of your mac n cheese recipe. Using high-quality, freshly grated cheese makes all the difference.
Let’s get cheesy:
Remove from Heat: Ensure your béchamel sauce is off the direct heat. This prevents the cheese from separating or becoming oily.
Add Cheeses in Batches: Gradually add your shredded cheeses (4 cups total, e.g., 2 cups sharp cheddar, 1 cup Gruyère, 1 cup Monterey Jack) to the warm sauce, about one-third at a time.
Stir Until Smooth: Stir constantly with a wooden spoon or whisk until the cheese is completely melted. Your sauce will become incredibly creamy and smooth.
Taste and Adjust: Taste the cheese sauce and add more salt, pepper, or a pinch of cayenne pepper if you like a little kick. This makes it your best mac and cheese recipe.
Expert Advice: Always grate your own cheese. Pre-shredded cheeses often contain anti-caking agents that can make your sauce gritty. Freshly grated cheese melts much more smoothly, leading to the creamiest macaroni cheese imaginable.
Step 5: Combine and Serve
The moment you’ve been waiting for! Let’s combine the cooked macaroni and rich cheese sauce to complete this easy mac and cheese masterpiece. It’s a flavorful meal made easy that your whole family will love.
Finish your dish with these steps:
Add Pasta to Sauce: Pour the drained, cooked macaroni directly into the pot with the warm cheese sauce.
Gently Combine: Use a large spoon or spatula to gently fold the macaroni into the cheese sauce. Make sure every piece of pasta is coated in that luscious goodness.
Serve Immediately: Transfer your glorious macaroni and cheese to serving bowls. It’s best enjoyed fresh and warm.
Optional Garnish: If desired, sprinkle with fresh parsley or chives. A dash of paprika also adds a pop of color and subtle flavor.
Mealtime Made Easy: This family-friendly meal comes together quickly, proving that simple dinner recipes can be incredibly satisfying. Stop wondering “how to cook tasty meals quickly” and start enjoying them stress-free with Recipesmondial!
How Can You Customize This Recipe?
Our classic homemade mac and cheese is wonderfully delicious as is. However, we love helping you make dishes your own! Customizing this recipe is a fantastic way to discover new flavors and tailor it to your family’s preferences. Here are some popular variations to try.
Classic Baked Mac and Cheese Variation
Transforming your stovetop mac and cheese into a bubbling, golden-brown baked version is incredibly easy. This variation adds a delightful crispy topping and a richer, more comforting texture. It’s perfect for a family-friendly meal or a potluck dish.
To make a baked mac and cheese:
Prepare your base: Follow our step-by-step guidance for the stovetop mac and cheese as described in the main recipe.
Preheat oven: Set your oven to 375°F (190°C).
Choose your dish: Lightly butter a 9×13-inch baking dish.
Add a little liquid: Stir an extra 1/4 cup of milk into your prepared mac and cheese. This helps keep it moist during baking.
Transfer: Pour the macaroni and cheese mixture into the prepared baking dish and spread it evenly.
Create the topping: In a small bowl, combine 1 cup of panko breadcrumbs with 2 tablespoons of melted butter. You can also add 1/2 cup of shredded cheddar or Parmesan for extra flavor.
Bake: Sprinkle the breadcrumb mixture evenly over the top. Bake for 20-25 minutes, or until the topping is golden brown and the cheese is bubbly.
Serve: Let it rest for a few minutes before serving. This allows the sauce to set.
This baked macaroni and cheese is a true crowd-pleaser. It’s also a simple dinner recipe that feels extra special.
Easy Crockpot Mac and Cheese Method
For days when you need a simple mac and cheese without the fuss, your Crockpot is your best friend. This hands-off method delivers a creamy dish that’s ideal for busy families. It’s also an excellent option for meal prep!
Here’s how to make Crockpot mac and cheese:
Combine ingredients: In your slow cooker, mix 1 pound of uncooked elbow macaroni, 4 cups of whole milk, 1 teaspoon of salt, 1/2 teaspoon of black pepper, and 1/4 cup of unsalted butter (cut into pieces).
Stir well: Ensure the pasta is mostly submerged in the liquid.
Cook: Cover and cook on LOW for 2-3 hours, or on HIGH for 1-1.5 hours.
Stir during cooking: Stir the mixture gently halfway through to prevent sticking and ensure even cooking. The pasta should be tender.
Add cheese: Once the pasta is cooked, stir in 8 ounces of shredded sharp cheddar and 4 ounces of shredded Gruyère or Monterey Jack until completely melted and smooth.
Serve warm: Enjoy your delicious, creamy crockpot mac and cheese!
This method saves you from boiling pasta separately. It also keeps your kitchen clean, making it a perfect quick meal solution.
Quick Instant Pot Mac and Cheese Guide
When time is short, the Instant Pot is a game-changer for making quick mac and cheese. You can have a creamy, flavorful dish on the table in minutes. It’s the perfect solution for a simple dinner after a long day.
Follow these steps for Instant Pot mac and cheese:
Add pasta and liquid: Pour 1 pound of elbow macaroni, 4 cups of water or chicken broth, and 1 tablespoon of unsalted butter into your Instant Pot. Add 1/2 teaspoon of salt.
Cook: Close the lid and set the valve to sealing. Cook on HIGH pressure for 4 minutes.
Release pressure: Once cooking is complete, perform a quick pressure release by carefully turning the valve to venting.
Stir in dairy: Open the lid and stir in 1/2 cup of whole milk or evaporated milk and 1/4 teaspoon of black pepper.
Melt cheese: Add 8 ounces of shredded sharp cheddar and 4 ounces of shredded Monterey Jack or Colby. Stir continuously until the cheese is melted and the sauce is smooth.
Serve immediately: This easy mac and cheese is best enjoyed fresh from the pot.
The Instant Pot creates a gourmet-tasting mac and cheese with minimal effort. It’s one of the best easy recipes for busy weeknights.
Smoked Mac and Cheese for Extra Flavor
Ready to elevate your homemade mac and cheese? Adding a smoky twist introduces an incredible depth of flavor. This variation is fantastic for barbecues and other gatherings. It brings a uniquely flavorful meal to your table.
There are two main ways to achieve a delicious smoked mac and cheese:
Method 1: Smoking the Assembled Dish
Prepare the base: Make our stovetop mac and cheese recipe up to the point of combining the pasta and sauce.
Transfer: Pour the creamy mac and cheese into an aluminum foil pan or a cast-iron skillet.
Preheat smoker: Set your smoker to 225-250°F (107-121°C). Use wood chips like apple, cherry, or pecan for a mild, sweet smoke. [1]
Smoke: Place the dish in the smoker for 1.5-2 hours. Stir occasionally to ensure even smoke distribution.
Add topping (optional): For the last 30 minutes, you can top it with extra shredded cheese and breadcrumbs for a crispy crust.
Serve: The result is a delightfully smoky, comforting dish.
Method 2: Incorporating Smoked Ingredients
Use smoked cheese: Swap some of the cheddar or Gruyère for a smoked gouda or smoked cheddar. This adds a subtle smoky note directly into the sauce.
Add smoked paprika: Stir 1/2 to 1 teaspoon of smoked paprika into your cheese sauce for an earthy, smoky flavor without needing a smoker.
Cook with bacon: Crispy bacon bits, or rendered bacon fat used in the roux, also imparts a fantastic smoky essence.
Smoked mac and cheese is an adventurous yet approachable option. It proves that an easy-to-make meal can also be incredibly unique.
What Are the Secrets to the Creamiest Mac and Cheese?
Choosing the Best Cheeses for Your Sauce
Crafting the perfect mac and cheese starts with amazing cheese. The right blend makes all the difference. You want a creamy, smooth sauce that’s full of flavor. Luckily, you don’t need fancy cheeses for an outstanding result.
Here’s what to look for when choosing your cheeses:
Good Melting Properties: Some cheeses melt beautifully into a silky sauce, while others can become clumpy or oily. Always pick cheeses known for melting smoothly.
Flavor Balance: A mix of sharp, mild, and nutty cheeses creates depth. This ensures your mac and cheese is neither bland nor overwhelming.
These are some of our favorite cheeses for the creamiest mac and cheese:
Sharp Cheddar: A classic for a reason. It offers that signature tangy, rich flavor.
Gouda: Known for its mild, nutty, and slightly sweet notes. Gouda melts incredibly well, adding to the silkiness.
Gruyère: This Swiss cheese brings a sophisticated, savory, and complex flavor. It melts like a dream.
Fontina: This Italian cheese is buttery and nutty. It provides an amazing stretch and creaminess to your sauce.
Monterey Jack: Mild and very easy to melt. It’s fantastic for balancing stronger flavors and ensuring a smooth texture.
Here’s a helpful tip for the best homemade mac and cheese: always shred your own cheese. Pre-shredded packages contain anti-caking agents that can make your sauce grainy or less smooth. Taking a few extra minutes to grate it fresh is well worth the effort for a perfect texture.
Tips to Avoid a Grainy Cheese Sauce
A grainy cheese sauce can be disappointing after all your effort. The secret to the best mac and cheese is a smooth, velvety sauce that elevates your family-friendly meal. Thankfully, achieving this perfect texture is easy. Avoid common mistakes with these simple tips:
Start with a Good Roux: This is the foundation of your cheese sauce. Melt butter, then whisk in an equal amount of flour. Cook it for a minute or two until it forms a paste, which cooks out the raw flour taste.
Use Warm Milk: When adding milk to your roux, make sure it’s at least room temperature, or even slightly warm. Adding cold milk to a hot roux can cause clumps.
Add Cheese Gradually: Don’t dump all your cheese in at once. Add a handful at a time, whisking each addition until fully melted before adding more.
Keep the Heat Low: Cheese melts best over low to medium-low heat. High heat can cause the proteins in cheese to seize, separating the fat and resulting in a grainy or oily texture.
Don’t Overcook: As soon as the cheese is fully melted and incorporated, remove the sauce from the heat. Continued cooking can ruin the texture as proteins tighten and fat separates.
Consider Room Temperature Cheese: Let your shredded cheese sit at room temperature for 15-20 minutes before you add it. This simple step helps it melt more smoothly and evenly into the sauce.
Following these steps will help you create a wonderfully creamy and smooth sauce every time. Your easy mac and cheese will be perfectly luxurious.
Storing and Reheating Leftover Macaroni and Cheese
Delicious mac and cheese rarely leaves leftovers. But if you have some, you’ll want to keep it tasting great. Properly storing and reheating your homemade mac and cheese ensures it’s still a delightful treat the next day. This also works as a great meal prep tip for busy families.
Here’s how to handle your leftovers:
Storing Your Mac and Cheese
Cool Quickly: Let your mac and cheese cool down to room temperature within two hours of cooking. This prevents bacterial growth [2].
Airtight Container: Transfer the cooled mac and cheese to an airtight container. This keeps it fresh and prevents it from drying out in the fridge.
Refrigeration: Store in the refrigerator for up to 3-4 days. For longer storage, you can freeze it, but the texture may change slightly upon thawing.
Reheating Leftover Macaroni and Cheese
Reheating can sometimes make mac and cheese dry, but you can bring it back to life. The secret is adding a splash of liquid.
Stovetop Method (Best for Creaminess):
Place your mac and cheese in a saucepan over low heat.
Add a splash of milk, cream, or even water. Start with a tablespoon or two.
Stir gently and continuously.
Heat until warmed through and creamy again. Add more liquid if needed.
Oven Method (Good for Baked Varieties):
Preheat your oven to 325°F (160°C).
Place mac and cheese in an oven-safe dish.
Add a few tablespoons of milk or cream over the top. Cover the dish loosely with foil.
Bake for 15-25 minutes, or until heated through.
Microwave Method (Quickest Option):
Put a single serving in a microwave-safe dish.
Add a small amount of milk or cream (about 1-2 teaspoons).
Cover and heat on medium power for 1-2 minutes.
Stir well, then continue heating in 30-second intervals until warmed.
With these simple tips, your leftover mac and cheese can be almost as good as fresh. This makes for easy lunches or quick dinners on busy days. Recipesmondial aims to make your family-friendly meals enjoyable and stress-free, even with leftovers!
Frequently Asked Questions About Homemade Mac and Cheese
What is a simple mac and cheese recipe?
Making a delicious, simple mac and cheese is easier than you think. It’s a perfect beginner-friendly recipe for a comforting meal. Our approach focuses on minimal steps and everyday ingredients.
Here’s a simplified breakdown of how to make a creamy, quick mac and cheese:
Cook your pasta: Start by boiling your favorite macaroni until it’s al dente. Drain it well, but save a little pasta water. This water adds a wonderful richness to your sauce.
Make a quick roux: In the same pot, melt some butter. Then, whisk in an equal amount of flour. Cook this mixture for about a minute. This creates the base for your creamy sauce.
Whisk in milk: Slowly pour in warm milk, whisking constantly. Continue to stir until the sauce thickens. This forms a smooth béchamel.
Melt the cheese: Remove the pot from the heat. Stir in your shredded cheeses until they are completely melted and smooth. A pinch of salt and pepper enhances the flavor.
Combine and enjoy: Add your cooked macaroni back into the cheese sauce. Stir everything together until it is perfectly coated. Serve your homemade mac and cheese immediately for the best taste!
This easy mac and cheese method delivers a flavorful, family-friendly meal with little fuss. It’s perfect for those busy weeknights.
What is the best cheese for mac and cheese?
Choosing the best cheese for mac and cheese is key to getting incredible flavor and creaminess. For the best results, use a blend of cheeses. This combination creates a rich, complex taste. It’s also important to know that some cheeses melt better than others—generally, younger cheeses melt smoother than aged ones [3].
Consider these popular options for your ultimate homemade mac and cheese:
Sharp Cheddar: This is a classic for a reason. It provides that iconic, tangy mac n cheese flavor.
Gruyère: For a nutty, sophisticated depth, Gruyère is an excellent choice. It melts beautifully into a silky sauce.
Fontina: This Italian cheese offers a wonderfully mild, buttery flavor. It adds incredible meltiness to your sauce.
Monterey Jack: A mild, semi-hard cheese that melts exceptionally well. It contributes to a super smooth texture.
Smoked Gouda: If you love a hint of smoky flavor, add some smoked Gouda. It makes for a unique twist on the traditional.
Pro Tip: Always grate your own cheese from a block. Pre-shredded cheeses often contain anti-caking agents. These can make your cheese sauce grainy or prevent it from melting smoothly. Freshly grated cheese melts like a dream, giving you the creamiest mac and cheese every time.
How do you make old fashioned baked macaroni and cheese?
An old fashioned baked macaroni and cheese takes comfort food to another level with its delightful crispy topping and deeper flavors. This baked mac and cheese recipe is ideal for feeding a crowd or a special family dinner.
Here’s how to elevate your stovetop mac and cheese into a classic baked dish:
Prepare your basic mac and cheese: Follow the steps for our creamy stovetop macaroni and cheese recipe. Make sure your cheese sauce is well-seasoned and perfectly smooth.
Preheat and prep: Preheat your oven to 375°F (190°C). Lightly grease a 9×13 inch baking dish. This prevents sticking.
Add a topping: For that signature crunch, combine breadcrumbs with a little melted butter. You can also mix in some grated Parmesan cheese for extra flavor.
Layer in the dish: Pour your prepared macaroni and cheese into the greased baking dish. Spread it evenly.
Sprinkle and bake: Generously sprinkle the breadcrumb mixture over the top of the macaroni and cheese. Bake for 20-25 minutes. Look for a bubbly sauce and a golden-brown, crispy topping.
Rest and serve: Let the baked macaroni and cheese rest for 5-10 minutes after baking. This allows the sauce to set slightly. Then, scoop out generous portions and enjoy!
This method transforms simple dinner recipes into an approachable home cooking masterpiece. It’s a truly satisfying and family-friendly meal that everyone will love.
Special diet recipes are meals designed to meet specific nutritional needs or avoid certain ingredients due to health goals, allergies, or lifestyle choices. They include popular diets like keto, vegan, gluten-free, high-protein, and low-calorie, offering flavorful and approachable options for anyone looking to cook healthy, satisfying food at home.
Does following a special diet make delicious, easy meals feel out of reach? Many people feel overwhelmed by complex recipes or struggle to plan family-friendly meals that cater to everyone. It’s a challenge to balance dietary requirements with flavorful, satisfying dishes—especially when you’re short on time and cooking confidence. But what if eating for your lifestyle could be simple, enjoyable, and tasty?
At Recipesmondial, we believe cooking should be a stress-free joy for everyone, regardless of dietary needs. That’s why we created this ultimate guide to special diet recipes as your go-to resource for approachable home cooking. We offer step-by-step guidance for everything from easy keto and vegan options to simple gluten-free and high-protein meals. Discover how simple it is to prepare flavorful dishes that fit your lifestyle, including incredible healthy dinner recipes.
Inside, you’ll find a treasure trove of beginner-friendly recipes that deliver reliable results and vibrant flavors. We’ll help you build confidence in the kitchen with everything from quick breakfast ideas and healthy snacks to simple dinner recipes. Get ready to explore inspiring meal ideas and healthy dinners that simplify your decisions, spark creativity, and make every dish a joy to prepare. Let’s dive in and make healthy eating both delicious and stress-free!
What Are Special Diet Recipes?
Why Simple, Approachable Recipes Matter
Starting a special diet can feel overwhelming. You may wonder how to cook healthy, tasty meals without spending hours in the kitchen, or struggle to find family-friendly options that suit everyone. It’s common for new dietary restrictions to shake your confidence as a home cook.
But cooking should be an enjoyable, stress-free experience. At Recipesmondial, we believe delicious food and dietary needs can go hand-in-hand. Our goal is to replace your kitchen uncertainty with the joy of confident cooking.
Simple, approachable recipes are the key. They empower you to discover new flavors without the fuss and are designed for everyone, from busy families to complete beginners.
Here’s why focusing on straightforward recipes makes all the difference:
Reduced Stress: Enjoy the cooking process with clear, step-by-step guidance that removes the guesswork.
Confidence Building: Achieve delicious, reliable results every time and watch your kitchen confidence grow.
Time-Saving: Get more time back in your day with quick breakfasts, simple dinners, and easy lunch solutions.
Family-Friendly Meals: Discover meals the whole family will love, because special diets shouldn’t require separate dishes.
Flavor First: Never sacrifice taste. Our recipes prove that healthy, diet-specific meals can be packed with flavor.
Whether you’re looking for keto, vegan, high-protein, or other healthy recipes, Recipesmondial has the guidance you need. We help you turn simple ingredients into delicious, visually appealing dishes, encouraging you every step of the way.
How to Use This Guide
Think of this guide as your go-to resource for making mealtime less stressful and more enjoyable. We’ve designed it to help you easily navigate our recipes and discover new, exciting dishes.
To help you find what you need quickly, we’ve organized our recipes into the following clear sections:
Explore by Diet Type: Jump directly to dedicated sections like “Our Favorite Keto & Low-Carb Recipes” or “Delicious & Easy Vegan Recipes For Everyone.”
Discover by Meal Time: Browse categories such as “Easy Low-Carb Breakfast Ideas” or “Simple Keto Dinner and Lunch Recipes” for quick, reliable solutions.
Find by Specific Need: Look for collections that meet your goals, like “The Best Gluten-Free Meals & Desserts” or “High-Protein Meals to Fuel Your Day.”
Get Practical Guidance: Every recipe includes easy-to-follow steps, clear ingredient lists, and helpful tips for substitutions or meal prep.
Solve Mealtime Decisions: Take the stress out of deciding what to make. Our guide helps you quickly find the perfect recipe for any occasion.
Recipesmondial is your friendly cooking companion. We offer approachable home cooking inspiration across a diverse range of recipes, including breakfasts, lunches, dinners, snacks, and salads. Let us help you build basic skills, discover simple new dishes, and cook with confidence. Prepare to enjoy every bite.
Our Favorite Keto & Low-Carb Recipes
Professional food photography, photorealistic, high-quality food magazine photo. A beautifully arranged spread of vibrant, delicious-looking keto and low-carb dishes on a rustic wooden table. Include a colorful grilled salmon salad with avocado, leafy greens, and cherry tomatoes, alongside a creamy, perfectly seasoned cauliflower mash topped with fresh chives, and a small bowl of glistening, pan-seared lemon herb chicken thighs. The lighting is warm and natural, emphasizing the texture and freshness of the ingredients. A blurred background of a cozy kitchen counter. No artistic interpretations, no illustrations.
Embarking on a keto or low-carb journey is exciting, but finding delicious and easy recipes can be a challenge. At Recipesmondial, we believe healthy eating should always be enjoyable, so we’re here to make your cooking experience stress-free. Our collection of keto and low-carb meals features simple ingredients and approachable, step-by-step guidance. Packed with flavor, these recipes will help you truly enjoy cooking again.
Discover how to create fantastic meals that fit your lifestyle and help you feel your best. Say goodbye to overwhelming, complex recipes and hello to flavorful meals made easy.
Easy Low-Carb Breakfast Ideas
Starting your day with a satisfying, low-carb breakfast is key to staying full, focused, and on track with your healthy eating goals. Our collection of simple and delicious breakfast ideas is perfect for busy mornings. You’ll find plenty of healthy, high-protein recipes that fit seamlessly into your keto or low-carb meal plan.
Here are some of our go-to choices:
Scrambled Eggs with Avocado and Spinach: This classic is incredibly quick to make. Simply scramble eggs with a handful of fresh spinach and top with sliced avocado for a protein-packed start to your day.
Keto Smoothie: For a convenient breakfast on the go, blend unsweetened almond milk, a scoop of protein powder, a handful of berries, and a tablespoon of almond butter.
Greek Yogurt Parfait (Low-Carb): Layer full-fat, plain Greek yogurt with a few low-carb berries like raspberries, and add a sprinkle of chopped nuts or seeds for a satisfying crunch.
Egg Muffins: These are ideal for meal prep. Whisk eggs with your favorite low-carb veggies like bell peppers or mushrooms, pour into muffin tins, and bake. Store them in the fridge for easy, grab-and-go breakfasts all week.
These easy and customizable recipes provide the vital nutrients you need to avoid a mid-morning slump. Plus, they help build your confidence in the kitchen.
Simple Keto Dinner and Lunch Recipes
Planning keto lunch ideas and low carb dinner ideas doesn’t have to take hours. Our collection of simple, family-friendly meals makes mealtime effortless, so everyone can enjoy delicious, healthy food without the stress.
Explore these delicious options:
Sheet Pan Chicken and Veggies: A perfect beginner-friendly recipe. Toss chicken pieces and veggies like broccoli and bell peppers with olive oil and spices, then roast on a single sheet pan. This meal offers maximum flavor with minimal cleanup.
Tuna Salad Lettuce Wraps: Mix canned tuna with sugar-free mayonnaise, celery, salt, and pepper. Serve the mixture in crisp lettuce cups for a light, satisfying, and high-protein keto lunch.
“Zoodle” Shrimp Scampi: Sauté shrimp with garlic, butter, and lemon juice, then toss with spiralized zucchini noodles instead of pasta. It’s a vibrant and healthy dinner recipe.
Cauliflower Rice Stir-Fry: For a quick and comforting dish, brown ground chicken or beef, then add frozen low-carb stir-fry veggies and riced cauliflower. Finish with a low-sugar soy sauce alternative.
These keto meals prove that healthy eating can be exciting, turning simple ingredients into delicious and visually appealing dishes. With reliable results every time, these approachable recipes will transform your meal planning.
Keto Breads, Desserts, and Low-Carb Snacks
Following a low-carb diet doesn’t mean giving up your favorite treats. With a few clever ingredient swaps, our keto recipes offer fantastic ways to satisfy your cravings, whether you’re looking for a healthy snack or a sweet finish to your meal.
Try these simple and satisfying ideas:
Keto Almond Flour Bread: This simple recipe uses almond flour to create a soft, savory loaf. Enjoy it toasted with butter or as a sandwich base for a wonderful alternative to traditional bread.
Avocado Chocolate Mousse: Blend ripe avocados with cocoa powder, a sugar substitute like erythritol, and a splash of unsweetened almond milk. Chill thoroughly for a rich, creamy, and surprisingly healthy dessert.
Berries and Cream: Whisk heavy cream with a low-carb sweetener until soft peaks form. Serve with a handful of fresh berries, which offer antioxidants and are lower in carbs than many other fruits [1].
Cheese Crisps: Place small piles of shredded cheese on a baking sheet and bake until golden and crispy. These quick and satisfying crisps are a perfect crunchy, savory low-carb snack.
Nuts and Seeds: A handful of almonds, walnuts, or pumpkin seeds makes a great snack that provides healthy fats and fiber. Just remember that portion control is key, as they are calorie-dense.
These beginner-friendly recipes make cooking enjoyable and help you discover new flavors. By incorporating them into your weekly meal prep, you can ensure you always have healthy, tasty options on hand. Gain confidence in your cooking skills while enjoying the variety of these delicious, low-carb options.
Delicious & Easy Vegan Recipes For Everyone
Professional food photography, photorealistic, high-quality food magazine photo. A real home cook, with a warm, friendly smile, is gently stirring a rich, colorful vegan lentil curry in a ceramic pot on a clean, modern kitchen stovetop. The curry is bubbling slightly, filled with visible lentils, spinach, and diced vegetables. Nearby, a freshly cooked portion is plated in a rustic bowl, garnished with fresh cilantro and a dollop of coconut cream, ready to be served. The kitchen is bright and inviting, with natural light. The focus is on the delicious, accessible nature of the vegan meal. No artistic interpretations, no illustrations.
Quick Vegan Breakfasts (Pancakes & More)
Starting your day with a delicious, energizing vegan breakfast is easier than you think. Forget feeling overwhelmed by complex instructions. Recipesmondial offers a wide range of quick breakfast ideas that are both healthy and satisfying, helping you transform simple ingredients into flavorful meals with ease.
Looking for a hearty start? Our fluffy vegan pancakes are a perfect choice. As a true crowd-pleaser, they are a fantastic option for family-friendly meals. Here’s what makes them special:
Effortless Preparation: This beginner-friendly recipe uses common pantry staples you likely already have.
Customizable Flavor: Add berries, bananas, or chocolate chips for endless, delicious variations.
Nutrient-Rich: Enjoy a breakfast that fuels your morning without feeling heavy.
Beyond pancakes, you have plenty of other speedy vegan options. A quick smoothie is ideal when you’re short on time, while overnight oats offer a grab-and-go breakfast that makes morning meal prep a breeze. With every simple, tasty dish you try, you’ll build more confidence in the kitchen.
Chef’s Tip: Prepare your dry pancake mix ingredients ahead of time and store them in a jar. For instant morning pancakes, simply add the wet ingredients. This is a great meal prep tip for busy mornings.
Hearty Vegan Meals: Burgers, Pasta, and Pizza
Many home cooks wonder if vegan meals can be truly hearty and satisfying. The answer is a resounding yes! Recipesmondial provides simple dinner recipes full of flavor, so you can discover new, comforting dishes and enjoy stress-free cooking.
Our vegan burger recipes are a game-changer. Packed with wholesome ingredients like black beans or mushrooms, they create incredibly delicious and healthy dinner recipes. Best of all, they are fantastic for family-friendly meals that everyone will love.
Easy Black Bean Burgers: Mash cooked black beans with spices and breadcrumbs, then form patties and pan-fry until golden.
Mushroom Umami Burgers: Sauté finely chopped mushrooms with onions and garlic, then mix with oats for binding.
Serving Suggestion: Serve on whole-grain buns with fresh veggies and a dollop of vegan mayo.
Next, explore our range of vegan pasta dishes, perfect for a cozy weeknight. You can create creamy sauces from cashews or roasted red peppers, or opt for a vibrant pesto. To make them truly high protein meals, simply add lentils or chickpeas. For another versatile protein option, try our tofu recipes, which are perfect for quick stir-fries.
Don’t forget about pizza night! Crafting a delicious vegan pizza is both fun and easy. Start with a store-bought or simple homemade crust, then top it with rich tomato sauce, vegan cheese, and your favorite vegetables like bell peppers, spinach, or olives. The result is a satisfying and customizable meal. Our step-by-step cooking guidance ensures you’ll be cooking with confidence.
Smart Swap: If you don’t have vegan cheese, a generous layer of nutritional yeast provides a similar cheesy flavor and makes your pizza even more budget-friendly. This is one of our most helpful meal prep tips.
Simple Vegan Desserts, from Cookies to Cakes
Ending a meal with a sweet treat is always a pleasure, and vegan desserts can be just as indulgent and delightful. Recipesmondial focuses on simple, beginner-friendly recipes that deliver reliable results, so you can bake without feeling overwhelmed.
Our vegan cookie recipes are a perfect starting point, as they require minimal fuss. Simple swaps—like using applesauce or mashed banana instead of eggs, and plant-based milk instead of dairy—make baking accessible for everyone. For example, a classic chocolate chip cookie is easy to make vegan and doubles as one of our many healthy snacks for kids and adults.
When it comes to cakes, don’t shy away. Our recipes will guide you step-by-step in creating moist, tender, and flavorful vegan cakes for any occasion, from simple vanilla to rich chocolate. Enjoying plant-based treats fits into a healthy lifestyle, as plant-based diets can be rich in fiber and vitamins [source: https://www.health.harvard.edu/staying-healthy/the-right-plant-based-diet-for-you].
Baking Success Tip: For perfect texture, always measure your ingredients precisely, especially flour and leavening agents. Also, let your plant-based butter soften to room temperature before creaming to help achieve a smooth batter.
As your go-to platform for stress-free cooking, Recipesmondial helps you create incredible vegan meals, from quick breakfasts to comforting dinners and delightful desserts. Discover new flavors and find a flavorful adventure in every dish.
The Best Gluten-Free Meals & Desserts
Professional food photography, photorealistic, high-quality food magazine photo. A tempting gluten-free feast laid out on a clean white tablecloth. In the foreground, a beautifully plated portion of gluten-free pasta primavera, bursting with colorful vegetables like bell peppers, zucchini, and cherry tomatoes, tossed in a light, herbaceous sauce. In the background, slightly out of focus but still appealing, is a slice of rich, moist gluten-free chocolate cake, dusted with powdered sugar and garnished with fresh raspberries. The scene is bright and inviting, conveying comfort and indulgence without compromise. No artistic interpretations, no illustrations.
Simple Gluten-Free Recipes for Breakfast, Lunch & Dinner
Going gluten-free doesn’t mean sacrificing flavor or dealing with complex recipes. Many delicious meals are naturally gluten-free, and we’re here to help you find them. Recipesmondial specializes in simple breakfast, lunch, and dinner ideas for your gluten-free journey, with a focus on approachable home cooking that builds confidence in the kitchen.
Breakfast Ideas to Start Your Day Right
Because mornings are often busy, a quick and healthy breakfast is essential. Our gluten-free options are designed for speed and taste, ensuring you start your day feeling energized.
Berry Smoothie Bowls: Blend your favorite fruits with gluten-free rolled oats, dairy-free milk, and a scoop of protein powder for a filling start. Top with seeds or nuts for extra texture.
Scrambled Eggs with Veggies: This classic is naturally gluten-free and comes together fast. Simply sauté bell peppers, spinach, and mushrooms before adding your eggs for a healthy meal.
Gluten-Free Oatmeal: Look for certified gluten-free oats. For a comforting and easy recipe, dress them up with fresh fruit, cinnamon, and a drizzle of honey.
Effortless Gluten-Free Lunches & Dinners
Lunch and dinner can be challenging when you’re eating gluten-free, but planning flavorful, family-friendly meals doesn’t have to be. We make it simple to enjoy delicious food without the fuss.
Chicken & Veggie Stir-Fry: Use tamari (gluten-free soy sauce) instead of regular soy sauce, then combine it with your favorite lean protein and a rainbow of vegetables. Serve over rice or quinoa for a complete, healthy dinner.
Sheet Pan Sausage & Roasted Vegetables: For a beginner-friendly meal with minimal cleanup, chop sausage and various vegetables like broccoli, bell peppers, and sweet potatoes. Toss with olive oil and seasonings, then roast on a single pan.
Lentil Soup: Lentils are naturally gluten-free and packed with protein. A hearty lentil soup is a wonderful, budget-friendly option that’s also perfect for meal prep.
Simple Salmon with Asparagus: Bake or pan-sear salmon fillets and pair them with steamed or roasted asparagus. This creates a quick, healthy, and satisfying meal.
Finding easy recipes for busy weeknights no longer needs to be stressful. We provide step-by-step cooking guidance for every dish to ensure your success.
Easy Gluten-Free Baking: Bread, Pancakes & Pie Crust
Gluten-free baking might seem daunting, but with the right guidance, it’s incredibly rewarding. Recipesmondial is here to boost your confidence by providing simple methods for all your baking needs.
Mastering Gluten-Free Basics
While many traditional baked goods rely on wheat flour, excellent gluten-free alternatives exist. Understanding these substitutions is the first step toward success.
Gluten-Free All-Purpose Flour Blends: These blends, which often combine rice flour, potato starch, and tapioca starch, are a convenient option for many recipes.
Single-Grain Flours: Flours like almond, coconut, and certified gluten-free oat flour offer unique textures and flavors for specific applications.
Xanthan Gum: This common ingredient acts as a binder, replacing the elasticity that gluten provides in traditional baking.
With our clear instructions, making delicious gluten-free staples is easier than you think.
Simple Gluten-Free Baking Projects
Fluffy Gluten-Free Pancakes: Enjoy Sunday brunch again! Our quick breakfast ideas include recipes for light and airy gluten-free pancakes, perfect with fresh fruit and syrup.
Reliable Gluten-Free Bread: Freshly baked bread can be a staple again. We offer beginner-friendly recipes for soft, flavorful loaves that are ideal for sandwiches or toast.
Versatile Gluten-Free Pie Crust: A good pie crust is essential for both sweet and savory pies. Our recipe is easy to handle and bakes up flaky and tender every time, whether for a fruit pie or a quiche.
With Recipesmondial, you will learn the basic cooking skills needed for great gluten-free baking, making the discovery of new dishes enjoyable and stress-free.
Flavorful Gluten-Free Desserts You’ll Love
Living gluten-free doesn’t mean giving up on sweet treats. Many desserts are naturally gluten-free or easily adaptable, so you can still enjoy rich, indulgent flavors. At Recipesmondial, we believe every course—including dessert—should be a delicious experience.
It’s a common misconception that gluten-free desserts lack taste or texture. With the right ingredients and techniques, they can be just as delicious as their traditional counterparts. This is great news for the approximately 1% of the global population with celiac disease and the many others who choose a gluten-free lifestyle for health reasons. [2]
Irresistible Gluten-Free Sweets
Prepare to delight your taste buds with these easy and flavorful gluten-free dessert ideas:
Chocolate Avocado Mousse: This rich, creamy dessert is naturally gluten-free and surprisingly simple to make with ripe avocados, cocoa powder, and your favorite sweetener.
Flourless Chocolate Cake: Dense and decadent, flourless chocolate cake is a classic gluten-free indulgence that uses cocoa powder and eggs for structure instead of flour.
Berry Crisps & Crumbles: Use a gluten-free oat and almond flour topping over baked fruit. These warm desserts are comforting and easy to customize with your favorite seasonal berries.
Gluten-Free Brownies: Enjoy chewy, fudgy brownies made with gluten-free flour blends. They are perfect for satisfying chocolate cravings and also make an excellent snack.
Meringue Cookies: Light, airy, and naturally gluten-free, meringue cookies are an elegant and simple treat requiring only egg whites and sugar.
These recipes prove that gluten-free desserts are an opportunity to explore new ingredients and flavors, not a compromise. Our step-by-step guidance ensures you can confidently create impressive desserts every time, making it enjoyable and stress-free to discover new dishes.
High-Protein Meals to Fuel Your Day
Welcome to a world where feeling full and energized doesn’t require complicated cooking! At Recipesmondial, we believe high-protein meals can be both incredibly simple and bursting with flavor. Protein is an essential nutrient that helps build and repair tissues and keeps you feeling satisfied longer, which can be very helpful for managing your appetite [3].
Starting your day with a high-protein breakfast is a fantastic choice to fuel your body and help maintain steady energy levels. Forget about morning hunger pangs! These high protein breakfast ideas are quick, delicious, and easy to prepare, making them perfect for busy mornings.
Speedy Scrambled Eggs with Spinach
This classic breakfast is ready in minutes and is a fantastic way to enjoy a protein breakfast that’s also packed with nutrients.
Ingredients:
2 large eggs
1/4 cup fresh spinach, chopped
1 tablespoon milk or water (optional)
1/2 tablespoon olive oil or butter
Salt and pepper to taste
Instructions:
Crack the eggs into a bowl. Whisk with milk or water, salt, and pepper.
Heat the olive oil or butter in a non-stick pan over medium heat.
Pour in the egg mixture and let it cook for about 30 seconds without stirring.
Add the chopped spinach. Gently push the cooked egg from the edges toward the center.
Continue cooking and folding for 2-3 minutes, until the eggs are set but still moist.
Serve immediately.
Tip: Add a sprinkle of cheese for extra flavor and protein. A slice of whole-grain toast makes it a complete meal.
Greek Yogurt Power Bowl
This quick breakfast idea is incredibly versatile, packed with protein, and easy to customize with your favorite toppings.
Ingredients:
1 cup plain Greek yogurt (full-fat or low-fat)
1/4 cup mixed berries (fresh or frozen)
1 tablespoon chia seeds or flaxseeds
1 tablespoon chopped nuts (almonds, walnuts, or pecans)
Drizzle of honey or maple syrup (optional)
Instructions:
Spoon the Greek yogurt into a bowl.
Top with mixed berries, chia seeds, and chopped nuts.
Drizzle with honey or maple syrup, if desired.
Enjoy right away for a super healthy snack or breakfast.
Tip: For a meal prep idea, assemble the dry toppings (nuts, seeds) in a small container. Just add fresh fruit and yogurt in the morning.
Preheat your oven to 400°F (200°C) and line a large baking sheet with parchment paper.
In a large bowl, combine the chicken pieces and mixed vegetables.
Drizzle with olive oil, sprinkle with Italian seasoning, salt, and pepper, and toss well to coat.
Spread the chicken and vegetables in a single layer on the prepared baking sheet.
Roast for 20-25 minutes, flipping halfway through, until the chicken is cooked through and vegetables are tender-crisp.
Serve hot.
Tip: This is a perfect meal prep tip! Cook a larger batch and store portions in airtight containers for quick lunches throughout the week.
Hearty Lentil Soup
Discover this comforting and nutritious soup. It’s a wonderful vegan meal that is high in protein and fiber, plus it’s incredibly budget-friendly.
Ingredients:
1 tablespoon olive oil
1 onion, chopped
2 carrots, chopped
2 celery stalks, chopped
2 cloves garlic, minced
1 cup brown or green lentils, rinsed
6 cups vegetable broth
1 (14.5 ounce) can diced tomatoes, undrained
1 teaspoon dried thyme
Salt and black pepper to taste
Fresh parsley, chopped, for garnish (optional)
Instructions:
Heat the olive oil in a large pot or Dutch oven over medium heat.
Add the onion, carrots, and celery. Cook until softened, about 5-7 minutes.
Stir in the minced garlic and cook for another minute until fragrant.
Add the rinsed lentils, vegetable broth, diced tomatoes, and dried thyme to the pot.
Bring to a boil, then reduce the heat to low. Cover and simmer for 30-40 minutes, until the lentils are tender.
Season with salt and pepper to your liking.
Ladle into bowls and garnish with fresh parsley, if desired.
Tip: For an extra boost of greens, stir in a handful of fresh spinach during the last few minutes of cooking.
Easy Protein Shake Recipes
When you need a protein boost on the go, an easy protein shake recipe is the perfect solution. These shakes are quick, delicious, and fully customizable, making them perfect healthy snacks or meal replacements you can whip up in minutes.
Berry Burst Protein Shake
This shake is refreshing and packed with antioxidants—a great way to enjoy a high protein meal in liquid form.
Ingredients:
1 scoop vanilla or unflavored protein powder
1 cup unsweetened almond milk (or your preferred milk)
1/2 cup mixed berries (fresh or frozen)
1/2 ripe banana (optional, for creaminess)
Handful of ice cubes
Instructions:
Combine all ingredients in a blender.
Blend until smooth and creamy. If the shake is too thick, add a little more milk.
Pour into a glass and enjoy immediately.
Tip: Add a tablespoon of chia seeds or flaxseeds for extra fiber and healthy fats.
Chocolate Peanut Butter Protein Dream
Indulge your sweet tooth without the guilt. This shake tastes like a treat but is packed with good-for-you protein!
Blend until smooth, adjusting the consistency with more milk if needed.
Serve chilled for a delightful and energizing boost.
Tip: For a richer flavor, use dairy milk or add a pinch of cocoa powder to enhance the chocolate taste.
What’s a good dinner meal for weight loss?
Low-Calorie Dinner Ideas
Making delicious, low-calorie dinners for weight loss doesn’t have to be complicated. At Recipesmondial, we believe healthy eating should be both simple and enjoyable. The key is to focus on nutrient-dense ingredients that leave you feeling full and satisfied.
To build balanced, flavorful meals, focus on three key components: lean protein, abundant vegetables, and whole grains. These ingredients provide essential nutrients without adding excess calories.
Here are some easy recipes to get you started:
Sheet Pan Lemon Herb Chicken and Veggies: This is one of our favorite beginner-friendly recipes. Toss chicken breast and your favorite vegetables (like broccoli, bell peppers, and zucchini) with olive oil, lemon juice, and herbs. Roast everything on a single sheet pan for a flavorful meal with quick cleanup. This fantastic healthy dinner is also a great low-carb option.
Hearty Lentil Soup: Lentils are an excellent source of plant-based protein and fiber [4]. A warm bowl of homemade lentil soup is incredibly filling yet low in calories. For extra nutrients, add plenty of vegetables like carrots, celery, and spinach. It’s a comforting and healthy meal idea.
Baked Salmon with Asparagus: Salmon is rich in protein and healthy omega-3 fatty acids. Simply bake it with fresh asparagus and a squeeze of lemon for a light yet elegant dinner. Best of all, this high-protein meal is ready in under 30 minutes, making it perfect for busy weeknights.
Turkey & Veggie Skewers: For a simple dinner that’s packed with flavor, thread lean turkey meatballs or breast cubes onto skewers. Alternate the turkey with colorful vegetables like cherry tomatoes, onions, and bell peppers. Grill or bake them for a visually appealing meal.
Shrimp Stir-Fry with Brown Rice: This quick and customizable meal is a weeknight favorite. Sauté shrimp with a rainbow of vegetables like snow peas, carrots, and broccoli florets in a light, savory sauce. Serve it over a small portion of brown rice for a satisfying healthy dinner, or use cauliflower rice for a lower-carb option.
Remember, portion control is also crucial for weight loss, so be sure to enjoy these flavorful meals in moderation.
Healthy Meal Prep for the Week
Meal prepping is a game-changer if you want to eat healthy and save time. It removes the stress of daily meal decisions and helps you stick to your weight loss goals by ensuring you always have a nutritious option ready to go.
With Recipesmondial’s step-by-step guidance, meal prep becomes simple, not stressful. You can easily prepare a full week of healthy dinner recipes without feeling overwhelmed.
Here’s how to approach healthy meal prep:
Plan Your Menu: Choose two or three healthy dinner ideas for the week. Prioritize recipes that store well and are easy to reheat.
Make a Shopping List: Create a shopping list with all the necessary ingredients. This helps you buy only what you need and avoid impulse purchases.
Designate a Prep Time: Set aside a few hours, such as on a Sunday, to focus on cooking. Having a dedicated time makes the process much more efficient.
Cook in Batches: Cook components in batches. For example, prepare larger quantities of proteins like baked chicken or ground turkey, cook whole grains like quinoa, and chop all your vegetables at once.
Assemble and Store: Portion the prepared components into individual containers for quick, grab-and-go meals. Store them in the refrigerator for up to four days.
Top Tips for Successful Meal Prep:
Use versatile ingredients: Cook a large batch of a versatile ingredient, like quinoa. You can use it as a side dish for one meal and as a base for a salad later in the week.
Keep components separate: To prevent sogginess and keep food fresh, store dressings and sauces separately until you’re ready to eat.
Embrace freezer-friendly meals: Soups, stews, and casseroles freeze wonderfully, giving you even more flexibility for future meals.
Don’t forget snacks: Prepare healthy snacks, such as chopped veggies with hummus or pre-portioned nuts, to avoid unhealthy choices between meals.
By reducing decision fatigue, meal prep helps make healthy eating a consistent habit. You’ll be able to cook confidently and eat well every day.
Cheap Healthy Meals That Don’t Skimp on Flavor
Eating healthy for weight loss doesn’t have to mean spending a fortune. While many people believe healthy food is expensive, that’s a common myth. At Recipesmondial, we’ll show you how to create flavorful, budget-friendly meals with everyday ingredients.
With a few smart choices and some creative cooking, you can enjoy delicious, healthy recipes without breaking the bank. Use our approachable home cooking tips to get your grocery budget under control.
Here are some fantastic ideas for cheap healthy meals:
Bean and Veggie Chili: Beans are incredibly affordable and packed with protein and fiber. Make a hearty chili using a mix of beans, diced tomatoes, and plenty of vegetables like onions, bell peppers, and corn. It’s a flavorful, filling meal, and you can cook a large batch for easy leftovers.
Egg Fried Rice (with brown rice): Eggs are an inexpensive source of protein. Use them to transform leftover brown rice into a quick, savory meal. Simply sauté the rice with scrambled eggs, frozen mixed vegetables, and a dash of soy sauce for a simple dinner that’s ready in minutes.
Oatmeal (for dinner!): Yes, oatmeal isn’t just for breakfast! A savory bowl topped with a fried egg, sautéed spinach, and a sprinkle of cheese makes for a surprisingly satisfying and inexpensive meal. This high-protein option works perfectly for a quick dinner.
Pasta with Lentil Marinara: Elevate your pasta night by adding red lentils to your marinara sauce. The lentils blend in seamlessly, boosting the protein and fiber to create a more substantial and healthy dinner. For even more nutrients, use whole wheat pasta.
Tuna or Chickpea Salad Sandwiches/Wraps: Canned tuna and chickpeas are inexpensive protein sources perfect for a quick meal. Mix your choice of protein with light mayonnaise or Greek yogurt, celery, and herbs. Serve in whole-wheat bread or lettuce cups for a healthy lunch or dinner. (Opt for chickpeas to make this a great vegan recipe.)
Root Vegetable Roast: Inexpensive root vegetables like potatoes, carrots, and sweet potatoes are perfect for roasting. Toss them with onions, garlic, and your favorite herbs. To make it a complete and comforting meal, add a simple protein like canned cannellini beans or a baked chicken thigh.
Smart Shopping & Cooking Tips:
Buy in Season: Produce is cheaper and tastes better when it’s in season.
Shop the Sales: Stock up on pantry staples like rice, pasta, and canned goods when they’re on sale.
Cook from Scratch: It’s almost always cheaper to make meals from basic ingredients than to buy pre-made versions.
Embrace Legumes: Beans, lentils, and chickpeas are excellent and highly affordable protein sources.
Reduce Food Waste: Plan your meals carefully to use up all your ingredients, saving money in the long run.
With Recipesmondial, discovering new, simple dishes is easy. You can enjoy flavorful, homemade meals, even when you’re on a budget.
Beginner-Friendly Recipes for Specific Needs
Easy Low-FODMAP Recipes
Navigating dietary restrictions can feel overwhelming, especially when faced with complex recipes. However, cooking for a low-FODMAP diet doesn’t have to be difficult. Recipesmondial is here to help you find easy recipes, fast.
The low-FODMAP diet is designed to help manage digestive issues by limiting certain carbohydrates that are hard for some individuals to digest [5]. Our beginner-friendly recipes simplify this process by focusing on naturally low-FODMAP ingredients, so you can cook healthy meals with confidence.
Simple Chicken & Veggie Stir-Fry
This flavorful and quick stir-fry is an easy dinner solution, especially for busy families. Best of all, it uses everyday ingredients you likely already have on hand.
Ingredients:
1 tablespoon olive oil
1 lb boneless, skinless chicken breast, cut into thin strips
2 cups mixed low-FODMAP vegetables (e.g., bell peppers, carrots, green beans, spinach)
1/4 cup gluten-free tamari or soy sauce
1 tablespoon maple syrup (optional, for a touch of sweetness)
1/2 teaspoon grated fresh ginger
Cooked white rice or quinoa for serving
Instructions:
Heat olive oil in a large skillet or wok over medium-high heat.
Add chicken strips and cook for 5-7 minutes until browned and cooked through. Remove the chicken and set it aside.
Add the low-FODMAP vegetables to the skillet. Stir-fry for 3-5 minutes until tender-crisp.
In a small bowl, whisk together the tamari, maple syrup (if using), and ginger.
Return the chicken to the skillet with the vegetables. Pour the sauce over everything.
Stir well to coat and cook for 1-2 minutes until heated through.
Serve immediately over cooked white rice or quinoa.
Tips & Variations:
Protein Swap: Use shrimp or firm tofu for a different twist.
Spice It Up: Add a pinch of red pepper flakes for heat.
Meal Prep: Cook a larger batch for healthy lunches or dinners throughout the week.
Vegetable Choice: Always check a reliable low-FODMAP guide for appropriate vegetable types and portion sizes.
Indulging in something sweet doesn’t have to mean sacrificing your health goals. Our simple sugar-free desserts are delicious options for anyone managing blood sugar or reducing their sugar intake. You can enjoy making and eating these treats, stress-free.
Easy Berry Chia Pudding
This Easy Berry Chia Pudding works as a quick breakfast, a refreshing dessert, or a healthy snack. It’s an approachable recipe for any home cook and is packed with fiber and healthy fats.
Ingredients:
1/4 cup chia seeds
1 cup unsweetened almond milk (or other milk of choice)
1/2 cup mixed berries (fresh or frozen)
1/2 teaspoon vanilla extract
Optional: Stevia, erythritol, or monk fruit sweetener to taste
Instructions:
In a jar or bowl, combine the chia seeds, almond milk, and vanilla extract. Stir well to prevent clumping.
If using a sweetener, add it now and stir again.
Gently stir in the mixed berries.
Cover and refrigerate for at least 2 hours, or preferably overnight, until the pudding has thickened.
Stir again before serving and enjoy!
Tips & Variations:
Flavor Boost: Add a pinch of cinnamon or a squeeze of lemon juice.
Creamier Texture: For a smoother pudding, blend half the berries into the milk mixture before adding the chia seeds.
Toppings: Garnish with a few extra berries, chopped nuts, or sugar-free shredded coconut.
Meal Prep: Make several servings at once for grab-and-go snacks.
Plant-Based Staples: Tofu, Lentil, and Chickpea Recipes
Looking for high-protein meals or flavorful vegan recipes? Tofu, lentils, and chickpeas are versatile, budget-friendly staples you should know. They form the base of many easy and delicious beginner-friendly recipes. Here, Recipesmondial provides simple, step-by-step guidance to help you master them.
Crispy Baked Tofu
Tofu can seem intimidating, but this simple recipe transforms it into a delicious, crispy protein source perfect for salads, stir-fries, or enjoying as a main dish.
Press the Tofu: This step is crucial for crispiness. Drain the tofu and wrap it in a few layers of paper towels. Place a heavy object (like a cookbook or cast-iron skillet) on top and let it press for at least 30 minutes to remove excess water.
Preheat your oven to 400°F (200°C) and line a baking sheet with parchment paper.
Unwrap the pressed tofu and cut it into 1/2-inch cubes or triangles.
In a medium bowl, combine the olive oil, soy sauce, and optional seasonings. Add the tofu and gently toss to coat.
Sprinkle the cornstarch over the tofu and toss again until evenly coated.
Spread the tofu in a single layer on the prepared baking sheet.
Bake for 25-35 minutes, flipping halfway through, until golden brown and crispy.
Use in a Buddha bowl, stir-fry, or as part of a delicious vegan dinner.
Tips & Variations:
Marinade Power: For extra flavor, marinate the tofu for at least 30 minutes (or overnight) before coating and baking.
Air Fryer Method: Air fry at 375°F (190°C) for 15-20 minutes, shaking the basket occasionally until crispy.
Serving Suggestion: Serve with steamed veggies and brown rice for a complete, healthy meal.
Quick & Easy Lentil Soup
Nutrient-rich and quick-cooking, lentils are perfect for this hearty and comforting soup. Packed with plant-based protein, it’s a family-friendly meal that doesn’t require any pre-soaking.
Ingredients:
1 tablespoon olive oil
1 medium onion, chopped
2 carrots, chopped
2 celery stalks, chopped
2 cloves garlic, minced
1 cup brown or green lentils, rinsed
4 cups vegetable broth
1 (14.5 oz) can diced tomatoes, undrained
1 teaspoon dried thyme
Salt and black pepper to taste
Fresh parsley for garnish (optional)
Instructions:
Heat olive oil in a large pot or Dutch oven over medium heat.
Add the onion, carrots, and celery. Cook for 5-7 minutes, until softened.
Stir in the minced garlic and dried thyme, and cook for 1 minute more until fragrant.
Add the rinsed lentils, vegetable broth, and diced tomatoes (with their juice).
Bring the soup to a boil, then reduce the heat to low. Cover and simmer for 25-30 minutes, or until the lentils are tender.
Season with salt and pepper to taste.
Serve hot, garnished with fresh parsley if desired.
Tips & Variations:
Greens Power: Stir in a handful of spinach or kale during the last 5 minutes of cooking for added nutrients.
Smoky Flavor: Add a teaspoon of smoked paprika along with the thyme.
Make it Creamy: For a thicker texture, use an immersion blender to blend a small portion of the soup.
Meal Prep: This soup tastes even better the next day and is ideal for meal prep.
Speedy Chickpea Salad Sandwich
With their satisfying texture, chickpeas are a fantastic base for vegan meals. This simple chickpea salad, which mimics classic tuna or chicken salad, makes for a quick lunch or a light dinner.
Ingredients:
1 (15-oz) can chickpeas, rinsed and drained
1/4 cup vegan mayonnaise or mashed avocado
2 tablespoons finely chopped celery
2 tablespoons finely chopped red onion
1 tablespoon fresh dill, chopped (optional)
1 teaspoon Dijon mustard
Salt and black pepper to taste
Bread, crackers, or lettuce cups for serving
Instructions:
In a medium bowl, use a fork or potato masher to mash the chickpeas until they are mostly broken down but still have some texture.
Add the vegan mayonnaise (or avocado), celery, red onion, dill (if using), and Dijon mustard.
Mix well until all ingredients are combined.
Season with salt and black pepper to your liking.
Serve immediately on your favorite bread, with crackers, or in lettuce cups for a light and healthy meal.
Tips & Variations:
Herb Power: Experiment with other fresh herbs like parsley or chives.
Crunch Factor: Add some chopped pickles or walnuts for extra texture.
Spicy Kick: A pinch of cayenne pepper or a dash of hot sauce works wonders.
Meal Prep: This salad stores well in the refrigerator for 3-4 days, making it perfect for quick lunches.
Frequently Asked Questions
What is the healthiest dinner to eat?
The “healthiest” dinner is not one specific meal, but a balanced plate that focuses on whole, unprocessed ingredients. A good rule of thumb is to combine lean protein, a wide variety of colorful vegetables, and a source of healthy fat. You can also include a complex carbohydrate for sustained energy.
Here’s what a balanced, healthy dinner often includes:
Lean Protein: This helps build and repair tissues. Good choices include chicken breast, fish, tofu, lentils, or beans.
Plenty of Vegetables: Fill your plate with non-starchy veggies like broccoli, spinach, bell peppers, and zucchini. They offer essential fiber, vitamins, and minerals. Fiber is key for digestion and satiety [6].
Healthy Fats: These are vital for nutrient absorption and overall health. Good sources include avocado, olive oil, nuts, and seeds.
Complex Carbohydrates (Optional): For lasting energy, consider adding a small portion of quinoa, brown rice, or sweet potato.
Recipesmondial offers many healthy dinner recipes. You can find delicious vegan meals, keto dinner ideas, and high protein meals. We make healthy eating simple and flavorful for everyone.
What is a good lazy dinner?
On busy nights, you want a delicious meal without a lot of effort. A good lazy dinner is a time-saving recipe that requires minimal prep and simple cooking, reducing stress in the kitchen.
Recipesmondial specializes in approachable home cooking. We have many options for a quick, satisfying lazy dinner:
One-Pan or Sheet Pan Dinners: Simply toss your protein and vegetables onto a single baking sheet and roast them together. This method makes cleanup a breeze. Our sheet pan chicken with roasted vegetables is a family favorite.
Quick Pasta Dishes: While your pasta cooks, whip up a simple sauce with canned tomatoes and herbs. Finish with a sprinkle of cheese for an easy, special touch.
Stir-Fries: Use pre-cut veggies and quick-cooking proteins to get dinner on the table in minutes. A flavorful sauce comes together quickly to serve over instant rice or noodles.
Loaded Baked Potatoes or Sweet Potatoes: Bake potatoes and prepare simple toppings like chili, cheese, or steamed veggies for a customizable and effortless meal.
Easy Tacos or Quesadillas: Fill store-bought tortillas with seasoned ground meat or beans, cheese, and salsa. These are fun, family-friendly meals that are ready in no time.
Our goal is to make cooking enjoyable, even on your busiest days. You can find many simple dinner recipes that are big on flavor and low on effort.
What is a good meal for dinner?
A “good” dinner offers both nutrition and enjoyment. It should be satisfying, fit your lifestyle, and—most importantly—be easy and flavorful to make. Recipesmondial focuses on helping you achieve this every night.
Consider these elements when planning a good dinner:
Balance: Aim for a mix of protein, vegetables, and a healthy carb or fat. This combination will keep you full and energized.
Flavor: Good food should taste great, so use fresh herbs, spices, and quality ingredients. Our step-by-step cooking guidance helps you build delicious flavors.
Ease of Preparation: Choose beginner-friendly recipes with clear instructions and common ingredients to help build your confidence in the kitchen.
Family-Friendly: A good dinner often appeals to everyone at the table. Look for customizable recipes or classic dishes that everyone loves.
Some popular and reliable dinner ideas include:
Chicken and Vegetable Stir-fry: Quick, adaptable, and full of flavor.
Baked Salmon with Asparagus: A light, healthy, and elegant option.
Lentil Soup or Chili: Comforting, budget-friendly, and perfect for meal prep.
Easy Homemade Pizza: A fun way to use up ingredients and please everyone.
Tofu Scramble or Curry: Great vegan dinner recipes that are packed with protein.
At Recipesmondial, we empower you to cook confidently. We offer diverse easy recipes for every taste and skill level. Say goodbye to stressful meal prep and hello to enjoyable cooking!
How do you find recipes for multiple dietary restrictions?
Navigating multiple dietary restrictions can feel overwhelming, but planning meals that meet everyone’s needs is easier than you think. With the right approach, any home cook can succeed.
Here are practical tips for finding delicious recipes for multiple dietary needs:
Start with Naturally Compliant Dishes: Many cuisines offer dishes that naturally fit certain restrictions. For example, a simple vegetable stir-fry can be both vegan and gluten-free. Focus on recipes built around ingredients like rice, quinoa, and fresh produce.
Use Specific Search Terms: When searching online, combine your restrictions to narrow down results. Try terms like “keto vegan dinner recipes” or “gluten-free dairy-free dessert.”
Filter on Recipe Websites: Using the search filters on reputable recipe platforms like Recipesmondial is a huge time-saver. You can select for gluten-free, dairy-free, vegan, low carb meals, and more.
Adapt Existing Recipes: Learn common substitutions to adapt your favorite recipes. For instance, flax eggs can replace chicken eggs in vegan baking, almond flour can be used instead of wheat flour in gluten-free recipes, and coconut milk is a great dairy-free alternative.
Focus on Ingredient-Based Meals: Build your meal around a core ingredient everyone can eat, such as tofu recipes or lentil dishes. Then, adjust seasonings and other components to fit all restrictions.
Utilize Meal Prep Tips: Prepare basic components ahead of time that can be combined in different ways. For example, roasting a large batch of vegetables or cooking a pot of quinoa ensures you have versatile, compliant options ready to go.
Recipesmondial is designed to make this process simple. Our beginner-friendly recipes offer clear guidance and often include substitution suggestions. This empowers you to cook delicious, inclusive meals for every lifestyle, without stress.