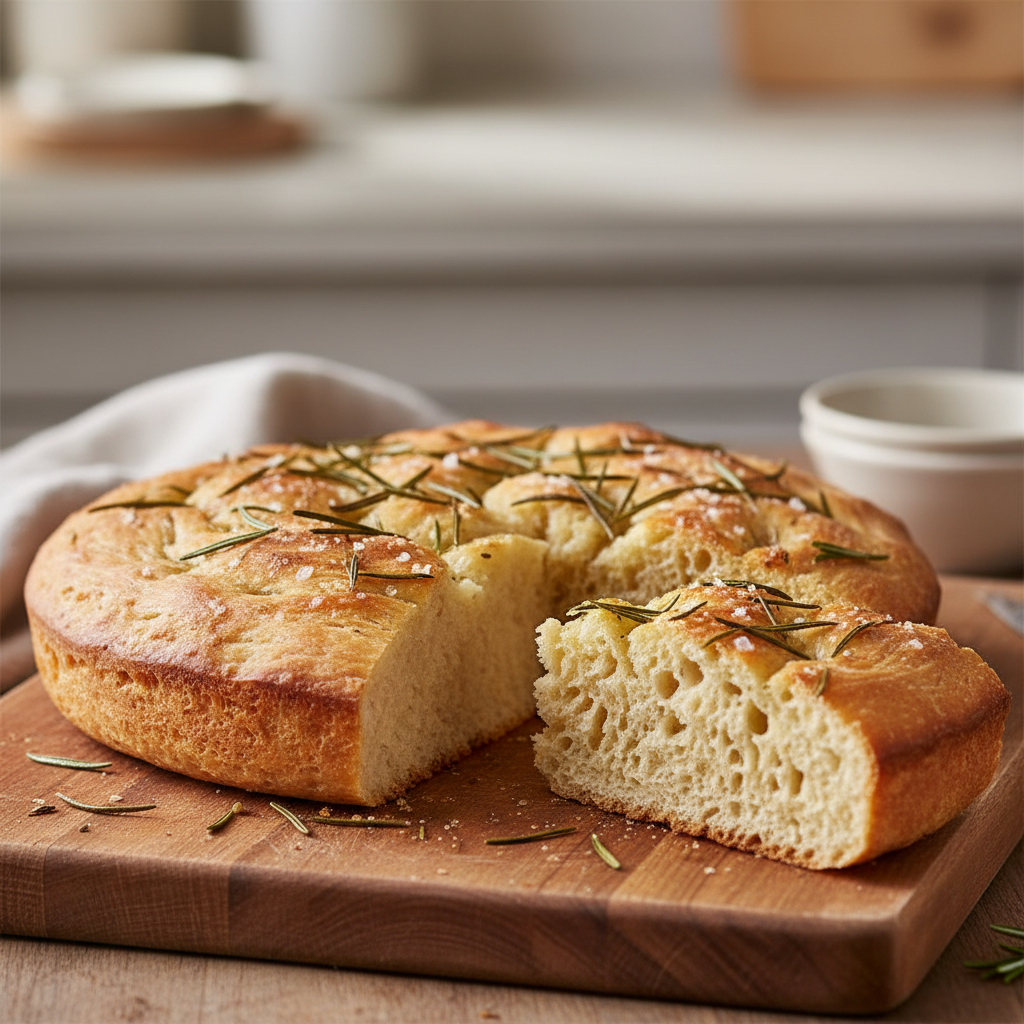
Focaccia is a classic Italian flatbread known for its signature dimples, soft and airy texture, and rich olive oil flavor. This beginner-friendly bread is incredibly versatile and can be enjoyed plain with sea salt or customized with various toppings like herbs, vegetables, and cheeses.
Imagine the aroma of freshly baked bread filling your kitchen. Picture a golden crust that gives way to a soft, airy interior. For many home cooks, baking bread can feel daunting, with technical terms and complex steps that lead to overwhelming recipes. But creating this culinary magic can be surprisingly simple. That’s where homemade focaccia comes in. This beautiful, versatile Italian flatbread is not only delicious but also one of the most forgiving and beginner-friendly breads you can tackle.
At Recipesmondial, we believe cooking should be a delightful adventure, not a source of stress. That’s why we’re excited to share our ultimate easy focaccia recipe. Our step-by-step guidance will walk you through every stage, helping you build confidence and create an impressive, flavorful bread with ease. Whether you’re looking for a delightful side dish for family-friendly meals or a delicious base for sandwiches, this focaccia recipe will quickly become a favorite in your kitchen. Say goodbye to baking anxiety and hello to delicious success!
We’ve broken down the art of making focaccia into simple instructions using everyday ingredients and basic techniques. You’ll learn how to achieve its signature dimpled top, a crisp bottom, and a perfectly fluffy crumb—all without intimidating culinary jargon. Enjoy a stress-free experience as we guide you from mixing to baking. Let’s dive in and discover why this is the easiest focaccia recipe you’ll ever make, transforming simple ingredients into a show-stopping dish!
Why Is This The Easiest Focaccia Recipe You’ll Ever Make?
Welcome to the world of homemade bread, where you can bake with confidence! We know that baking bread can feel like a big challenge. That’s why we’ve designed this recipe to be the easiest focaccia you’ll ever make, especially for home cooks and beginners.
Focaccia is a beloved Italian flatbread with ancient origins, evolving from simple hearth-baked doughs [source: https://www.britannica.com/topic/focaccia]. We’ve taken that rich tradition and made it incredibly approachable. You won’t find complex steps or technical jargon here. Instead, our clear, step-by-step instructions are designed to build your confidence in the kitchen.
This recipe turns what seems like a difficult task into an enjoyable, stress-free experience. We focus on simple techniques and common ingredients so you can create a flavorful, impressive bread, even if you’re new to baking.
Here’s why this particular focaccia recipe is so beginner-friendly:
- No-Knead Method: Forget strenuous kneading! Our simple, no-knead method requires minimal effort. It’s perfect for anyone intimidated by traditional bread-making techniques.
- Everyday Ingredients: You won’t need any special flour or hard-to-find items. This recipe uses basic pantry staples, which simplifies your shopping list.
- Long, Slow Rise: Most of the work is passive. The dough develops its amazing flavor and texture while it rests, making this a relaxing, hands-off process.
- Forgiving Dough: Focaccia is incredibly resilient. It’s hard to truly mess up! This allows you to experiment and learn without fear of failure.
- Visual Cues: Our step-by-step instructions guide you with clear visual indicators. You’ll know exactly what to look for at each stage, making the process intuitive.
- Versatile Toppings: From classic herbs to fresh vegetables, focaccia welcomes creativity. You can easily adapt it to your taste or whatever ingredients you have on hand.
We’re passionate about making home cooking easy and enjoyable. This focaccia recipe is a fantastic way to learn basic baking skills and add a delightful homemade bread to your repertoire. Get ready to bake with confidence and impress your family and friends with minimal fuss!
What Exactly is Focaccia Bread?
Are you ready to explore the wonderful world of focaccia bread? Far more than a simple side dish, this delightful Italian flatbread is a fantastic project for home cooks seeking easy recipes. At Recipesmondial, we love showing you how simple it is to create flavorful meals made easy.
Think of focaccia as Italy’s beloved, savory flatbread. It boasts a unique texture, with a wonderfully golden, crisp crust and a soft, airy crumb full of delightful pockets. This signature texture is created by a generous amount of olive oil, which also contributes to its distinct and memorable appearance.
What makes focaccia bread instantly recognizable? It has several key characteristics:
- Golden Crust: Baking in olive oil gives the crust its signature deep golden brown color.
- Irregular Dimples: Gently pressed into the dough to hold pools of olive oil and toppings.
- Airy Interior: An open, chewy crumb that feels both light and satisfying.
- Savory Toppings: Classic toppings include coarse sea salt and fresh herbs like rosemary, though many creative variations exist.
The history of focaccia is truly ancient, with roots dating back to the Etruscans and ancient Romans who baked a similar flatbread over hot coals. The name itself comes from the Latin “panis focacius,” meaning “hearth bread” or “baked on the hearth” [1], highlighting its deep historical origins.
As a beginner-friendly recipe, focaccia bread is incredibly forgiving and doesn’t require complex techniques. It’s the ideal easy recipe for making fresh bread at home, and you’ll be amazed at how quickly you can achieve professional-tasting results. Say goodbye to feeling overwhelmed by complex recipes; this focaccia recipe will help you start cooking confidently so you can share a truly special homemade bread.
Ready to discover what simple ingredients bring this classic to life? Let’s dive in!
What Ingredients Do You Need for Focaccia?
Making delicious focaccia bread is simpler than you might think, and you don’t need fancy ingredients. In fact, you probably have most of what you need in your pantry already. At Recipesmondial, we believe in using everyday ingredients for our easy recipes to make your cooking journey stress-free and enjoyable. Let’s gather the ingredients for this beginner-friendly recipe.
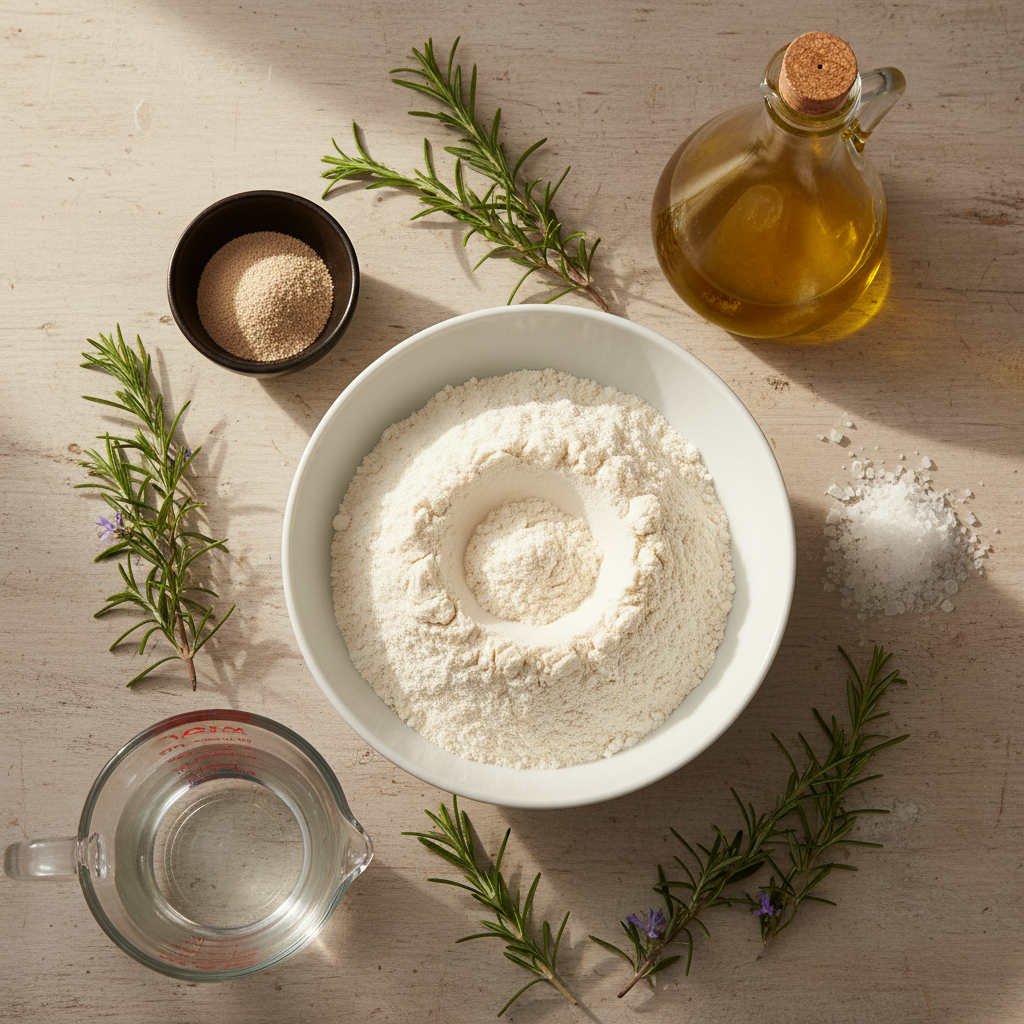
For the Focaccia Dough
A simple yet robust dough is the foundation of any great focaccia. These basic ingredients create a wonderfully chewy texture and are surprisingly easy to work with, even if you’re new to baking bread.
- Warm Water: This helps wake up the yeast. Aim for lukewarm, about 105-115°F (40-46°C). It should feel warm to the touch, not hot.
- Active Dry Yeast: This is the magic ingredient that makes the bread rise. If you’re using instant yeast instead, you can skip the activation step and mix it directly with the flour.
- Granulated Sugar: Just a pinch is needed to feed the yeast, helping it activate quickly and develop flavor.
- All-Purpose Flour: A pantry staple, all-purpose flour works perfectly for a soft, airy focaccia. For a slightly chewier result, you can use bread flour.
- Salt: Essential for flavor. We recommend kosher or fine sea salt to balance the dough and enhance the overall taste.
- Extra Virgin Olive Oil: The heart of Italian cooking! A good quality extra virgin olive oil adds incredible flavor and richness to the dough and is also used for drizzling on top.
With just these simple components, you’re on your way to a flavorful meal made easy. You’ll be amazed at the delicious bread you can create from scratch.
For the Topping
Toppings are where your focaccia truly shines, adding delightful texture and aroma. These classic choices are simple but create a huge impact on flavor.
- Extra Virgin Olive Oil: Drizzled generously before baking, it creates a crispy, golden crust and infuses the bread with its signature rich taste.
- Flaky Sea Salt: A must-have! Sprinkling flaky sea salt on top provides bursts of briny flavor and adds a wonderful crunchy texture.
- Fresh Rosemary: The quintessential focaccia herb. Its fragrant, piney notes are simply irresistible. Feel free to use other fresh herbs like thyme or oregano too.
These toppings transform the simple dough into an amazing focaccia, adding a fresh and aromatic finish. Best of all, these ingredients are easy to find, making this a perfect approachable home cooking project.
How to Make Focaccia Bread Step-by-Step
Step 1: Activate the Yeast and Mix the Dough
This first step brings together simple ingredients to create a soft, pliable dough. You’ll be amazed at how easy it is to start this delicious bread.
- Warm the Water: In a large mixing bowl, pour 1 ½ cups (360ml) of lukewarm water. The ideal temperature is between 105–115°F (40–46°C), which should feel warm but not hot to the touch. This temperature is crucial for activating the yeast [2].
- Add Sweetness and Yeast: Stir in 1 teaspoon of granulated sugar. Then, sprinkle 2 ¼ teaspoons (one packet) of active dry yeast over the water.
- Let it Bloom: Let the mixture sit for 5–10 minutes until it becomes foamy and bubbly. This “bloom” indicates the yeast is active. If it doesn’t foam, your yeast may be inactive, or the water was too hot or cold.
- Combine Dry Ingredients: In a separate bowl, whisk together 3 ½ cups (420g) of all-purpose flour and 2 teaspoons of fine sea salt.
- Mix the Dough: Pour the yeast mixture and ¼ cup (60ml) of olive oil into the flour mixture. Use a wooden spoon or spatula to mix until just combined. The dough will be shaggy and sticky—this is normal for focaccia.
- Gentle Knead: Briefly knead the dough in the bowl for 1–2 minutes to develop the gluten. The goal is to form a cohesive, sticky ball.
Chef’s Tip: Don’t worry about perfect kneading. Focaccia is a forgiving bread; the goal is simply to bring the ingredients together for minimal effort and maximum flavor.
Step 2: Let the Dough Rise (First Proof)
Now it’s time for the first rise, or “proof.” During this step, the yeast will transform the dough into a light, airy base, which is crucial for achieving that signature fluffy focaccia texture.
- Oil the Bowl: Lightly coat a clean, large bowl with about a tablespoon of olive oil.
- Transfer the Dough: Place the dough ball into the oiled bowl and turn it once to coat all sides. This prevents a dry crust from forming.
- Cover and Rise: Cover the bowl tightly with plastic wrap or a clean kitchen towel.
- Find a Warm Spot: Place the bowl in a warm, draft-free location. A sunny spot on your counter or inside a slightly warm (but turned off) oven works well.
- Watch it Grow: Let the dough rise for 1 to 1 ½ hours, or until it has doubled in size. It should look puffy and be full of air bubbles.
Chef’s Tip: If your kitchen is on the cooler side, the dough may need more time to rise. Patience is key for this simple recipe.
Step 3: Shape and Dimple the Focaccia
In this step, you’ll shape and dimple the dough, creating the classic focaccia look. These signature pockets are perfect for holding olive oil and toppings.
- Prepare Your Pan: Generously coat a 9×13-inch baking pan or a large cast-iron skillet with 2–3 tablespoons of olive oil. A well-coated pan prevents sticking and creates a crispy bottom crust.
- Transfer the Dough: Gently scrape the risen dough into the prepared pan, trying not to deflate it too much.
- Spread Gently: Using oiled fingertips, gently press and stretch the dough toward the edges of the pan. If it springs back, let it rest for 5–10 minutes before continuing.
- The Dimpling: Press your fingertips deep into the dough to create indentations all over the surface, being careful not to press all the way through. These iconic dimples are what make focaccia so recognizable.
- Second Rise: Loosely cover the pan and let the dough rise again in a warm spot for another 30–45 minutes, until it becomes visibly puffy.
Chef’s Tip: Don’t be shy when dimpling the dough. Deeper indentations are better for catching olive oil and creating that classic focaccia texture.
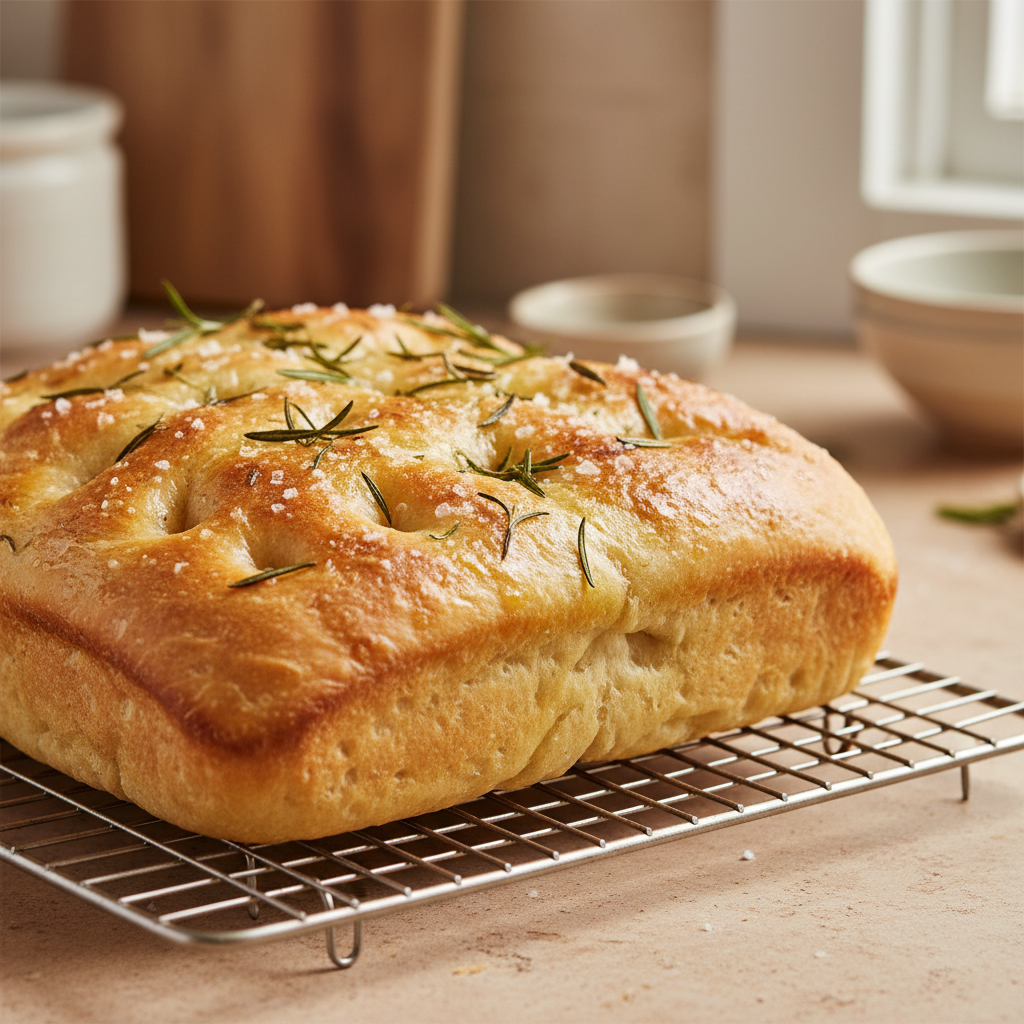
Step 4: Add Toppings and Bake to Perfection
You’re at the final, most rewarding stage: topping and baking. Your kitchen will soon be filled with the irresistible aroma of fresh focaccia.
- Preheat Your Oven: While the dough is on its second rise, preheat your oven to 425°F (220°C).
- A Final Drizzle: After the second rise, uncover the dough and drizzle it with another 2–3 tablespoons of good-quality olive oil. Allow the oil to pool in the dimples.
- Add Your Toppings: Sprinkle generously with flaky sea salt, followed by any other toppings. Fresh rosemary is a classic choice, and you can find more ideas in our “Best Focaccia Toppings” section.
- Bake Until Golden: Bake in the preheated oven for 20–30 minutes, until the top is golden brown and springy to the touch. The bottom should also be golden and crisp.
- Cool and Serve: Carefully remove the pan from the oven. Immediately transfer the focaccia to a wire rack to cool slightly before slicing and serving.
Chef’s Tip: A generous drizzle of olive oil before baking is essential. It creates a wonderfully crispy crust and adds incredible flavor, making this bread a perfect appetizer or side dish.
What Are The Best Focaccia Toppings?
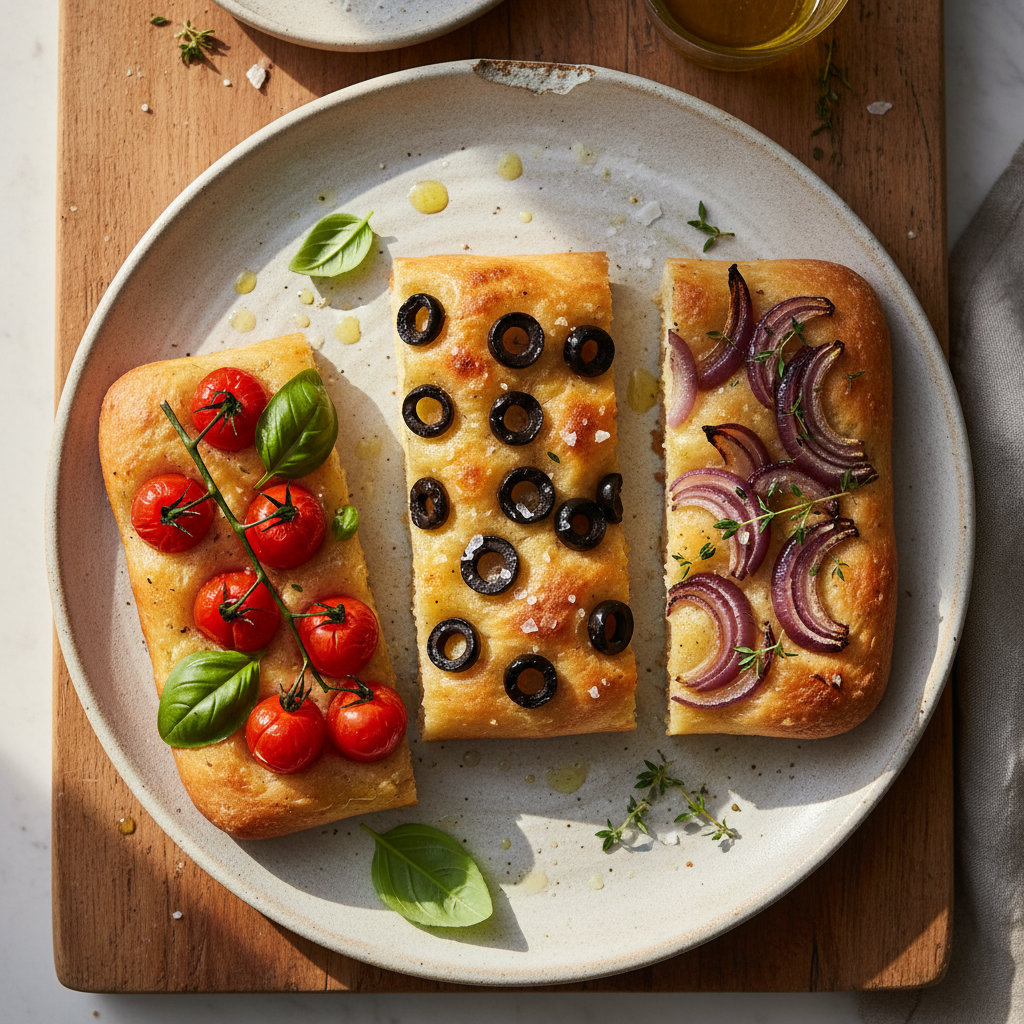
Classic Herb and Salt
Sometimes, the simplest things are the most delicious. The classic combination of fresh herbs and flaky sea salt is a timeless topping for homemade focaccia. It’s a fantastic starting point for beginners and an easy way to create a flavorful, fuss-free bread. This simple topping highlights the natural goodness of the focaccia itself.
Here are some popular choices for a classic herb and salt focaccia:
- Fresh Rosemary: This is the iconic herb for focaccia. Its piney, fragrant notes complement the rich olive oil beautifully.
- Fresh Thyme: A wonderful alternative or addition to rosemary, offering a slightly more delicate, earthy flavor.
- Dried Oregano: If fresh herbs aren’t available, dried oregano works well. Sprinkle it generously over the dough before baking.
- Flaky Sea Salt: This is crucial! The large, irregular flakes provide a satisfying, salty crunch. The texture is a significant upgrade from regular table salt.
- High-Quality Olive Oil: Drizzle generously over the dough before adding herbs and salt. It infuses flavor and helps create a lovely crisp crust.
Pro Tip: Gently press the herbs into the dough’s dimples. This helps them adhere and release their aromatic oils during baking.
Vegetable and Cheese Variations
Focaccia is wonderfully versatile and acts as a blank canvas for your favorite flavors. By exploring vegetable and cheese variations, you can create family-friendly meals or creative snacks. These toppings add color, texture, and a burst of savory goodness to your bread.
Consider these fantastic toppings:
- Cherry Tomatoes: Halve or quarter colorful cherry tomatoes. They become sweet and juicy when baked.
- Olives: Sliced black or green olives, especially Kalamata, add a briny, savory punch that is a staple in Mediterranean cooking.
- Caramelized Onions: Sweet, tender onions bring incredible depth of flavor. This takes a little extra time but is well worth the effort.
- Bell Peppers: Thinly sliced red, yellow, or orange bell peppers add vibrant color and a sweet crunch.
- Thinly Sliced Zucchini or Asparagus: These vegetables become tender and slightly caramelized on top of the focaccia.
- Parmesan Cheese: Sprinkle grated Parmesan for a salty, nutty, and cheesy crust. It’s always a crowd-pleaser.
- Mozzarella: Cubed or shredded fresh mozzarella melts beautifully, creating gooey pockets of cheese.
- Feta Cheese: Crumbled feta adds a tangy, salty kick that pairs wonderfully with tomatoes or olives.
- Goat Cheese: Creamy goat cheese adds a delicate tang, especially when combined with fresh herbs or roasted red peppers.
Get Creative: Try combinations like cherry tomatoes and basil with mozzarella, or Kalamata olives with feta. For a heartier meal, add thinly sliced pepperoni or cooked sausage. These variations can be easily adapted to suit any taste.
Sweet Focaccia Ideas
Focaccia doesn’t have to be savory. A sweet version makes a delightful surprise for breakfast, brunch, or a unique dessert. This creative twist transforms your basic focaccia recipe into a delicious sweet treat.
Here are some inspiring sweet focaccia toppings:
- Grapes and Rosemary: This Italian classic features juicy red or green grapes that caramelize slightly in the oven. A hint of fresh rosemary provides an unexpected, elegant aroma.
- Fig and Honey: Sliced fresh figs paired with a drizzle of honey before baking create a wonderfully sweet and sophisticated focaccia.
- Apple and Cinnamon: Use thinly sliced apples (like Granny Smith or Honeycrisp) with a sprinkle of cinnamon and sugar. It tastes like apple pie in bread form!
- Mixed Berries: Fresh raspberries, blueberries, or sliced strawberries dotted over the dough, perhaps with a dusting of sugar, make a colorful and fruity treat.
- Citrus Zest and Sugar: Orange or lemon zest mixed with a little sugar creates a bright, fragrant topping.
Serving Suggestion: Sweet focaccia is wonderful on its own, but you can also serve it with a dollop of whipped cream, a scoop of vanilla ice cream, or a drizzle of balsamic glaze for an extra special touch. It works well as a quick breakfast or a unique dessert.
What Are Some Tips for Perfect, Fluffy Focaccia?
Making delicious, fluffy focaccia is surprisingly simple, and you don’t need to be a seasoned baker to create a masterpiece. With a few practical tips and a little patience, you’ll achieve that perfect airy texture and golden crust every time. These beginner-friendly techniques will boost your confidence and make this recipe an absolute joy to bake, freeing you from complicated instructions.
- Give Your Yeast a Good Start: Active yeast is the secret to a light, airy focaccia. To activate it properly, always use warm water—around 105–115°F (40–46°C). Water that’s too hot will kill the yeast, while water that’s too cold will prevent it from activating. After 5–10 minutes, you should see a foamy layer on the surface, which signals your yeast is ready to work. This critical step ensures a reliable rise.
- Embrace the Sticky Dough: Focaccia dough has high hydration, which means it will be wet and sticky. Resist the temptation to add too much extra flour, as this sticky texture is essential for creating a wonderfully open and airy crumb. To make handling easier, simply coat your hands with a little olive oil. Remember, a sticky dough means you’re on the right track for perfect focaccia.
- Patience with Proofing Pays Off: Proper proofing, or rising, is crucial for developing flavor and texture. For the first rise, let the dough rest for at least 1–2 hours in a warm spot; this slow process builds a deeper, more complex taste. For even better results, try an overnight cold proof in the refrigerator. This longer fermentation significantly enhances both the flavor and chewiness [3]. Don’t rush this step—it’s the key to irresistible focaccia.
- Don’t Skimp on Olive Oil: Extra virgin olive oil is fundamental to focaccia, adding rich flavor and contributing to its tender texture. Start by generously oiling your baking pan to prevent sticking and create a crispy bottom crust. Before baking, drizzle plenty of oil over the dough as well. This not only ensures a moist interior but also infuses every bite with classic focaccia flavor.
- Master the Dimple: Focaccia’s iconic dimples aren’t just for looks; they are key to its unique texture. To create them, gently press your fingertips all over the proofed dough. This action prevents large air pockets from forming and creates signature wells that catch olive oil, salt, and other toppings. As a result, every bite is bursting with concentrated flavor.
- Preheat Your Oven Thoroughly: A fully preheated oven is essential. The initial burst of high heat creates “oven spring,” causing the dough to rise quickly. This vital step leads to a lighter, fluffier interior and helps form a desirable golden-brown, crispy crust. Giving your oven enough time to reach the target temperature ensures consistent, professional results.
- Bake Until Golden, Not Dry: Keep a close eye on your focaccia as it bakes, aiming for a beautifully golden-brown top and crisp, inviting edges. Overbaking can easily lead to a dry loaf. The goal is a perfect balance: soft and airy on the inside with a satisfying crunch on the outside. Since every oven is different, trust your senses more than the timer for the best results.
How Should You Store and Serve Focaccia?
Serving Suggestions
Focaccia is incredibly versatile, perfect as a simple side dish or a satisfying meal on its own. Think of it as your new favorite bread for any occasion. Here are some easy serving ideas for your homemade focaccia:
- Alongside Soups and Salads: Focaccia is the perfect companion to soups and salads. Serve it alongside a hearty minestrone to dip into the broth, or use it to scoop up a fresh garden salad.
- With Dips and Spreads: For a simple appetizer, offer warm focaccia slices with dips like olive oil and balsamic vinegar, pesto, or hummus.
- As a Sandwich Base: Slice focaccia horizontally to create a delicious sandwich base, great for quick lunches or picnics. Fill it with your favorite ingredients, such as deli meats, cheeses, roasted vegetables, or grilled chicken.
- Breakfast or Brunch Treat: Enjoy a plain or sweet slice of focaccia with your morning coffee for a delightful start to the day. It’s wonderful with a light spread of cream cheese or jam.
- Part of a Charcuterie Board: Elevate any gathering by adding slices of focaccia to a charcuterie board alongside cheeses, cured meats, olives, and fresh fruit.
- To Mop Up Sauces: Its soft, porous texture is ideal for mopping up flavorful sauces from pasta dishes or stews.
Storage and Reheating Instructions
While focaccia is best enjoyed the day it’s baked, proper storage will keep it fresh and delicious for longer. Here’s how to effectively store and reheat your homemade focaccia:
Storing Your Focaccia
- Room Temperature:
To keep focaccia soft and ready to eat, wrap it tightly in plastic wrap or aluminum foil and store it at room temperature. It will stay fresh for up to 2 days.
- Refrigeration:
For longer storage, wrap the focaccia securely and refrigerate it for up to 4-5 days. Note that refrigeration can slightly alter the texture, making it drier.
- Freezing for Longer Storage:
Focaccia freezes beautifully, making it a great option for meal prep. Once it has cooled completely, wrap individual slices or the whole loaf tightly in plastic wrap, then place it in a freezer-safe bag. It will keep for up to 3 months.
Reheating Your Focaccia
Reheating restores focaccia’s wonderful warmth and soft texture. Follow these simple steps for the best results:
- From Room Temperature or Refrigerator:
- Preheat your oven to 350°F (175°C).
- Place the focaccia on a baking sheet or directly on the oven rack.
- Heat for 5-10 minutes, or until warmed through.
- For a crispier crust, lightly mist the top with water before reheating.
- From Frozen:
- You can reheat focaccia directly from the freezer; no thawing is necessary.
- Preheat your oven to 375°F (190°C).
- Place the frozen focaccia on a baking sheet.
- Bake for 15-20 minutes, or until thawed and heated through.
- Check that the center is warm before serving.
- Quick Reheating (Single Slices):
For a single slice, use a toaster oven or a dry skillet over medium heat. Warm until heated through and slightly crispy, being careful not to dry it out.
Frequently Asked Questions About Focaccia
Is focaccia bread healthy?
Focaccia is a delicious treat! However, like most breads, its healthfulness depends on two main factors: the ingredients you use and your portion size.
A typical focaccia recipe includes white flour, olive oil, water, yeast, and salt. The extra virgin olive oil provides healthy monounsaturated fats, making it a great addition to your diet when enjoyed in moderation [4].
Here are a few tips for making focaccia a healthy part of your diet:
- Moderation is Key: Enjoy focaccia in reasonable portion sizes, as you would with any delicious food.
- Choose Whole Grains: Try using a portion of whole wheat flour in your recipe. This adds more fiber to your focaccia.
- Go Easy on the Oil: While olive oil is a healthy fat, too much of it increases the overall calorie count. Be mindful of the amount you drizzle.
- Load Up on Veggies: Top your focaccia with colorful vegetables like roasted bell peppers, cherry tomatoes, or spinach to boost nutrients and flavor.
- Pair Wisely: Serve focaccia with a fresh salad or a lean protein to create a well-rounded, family-friendly meal.
Ultimately, focaccia can be a wonderful part of a balanced diet. The key is to prepare and enjoy it thoughtfully!
What flour is best for focaccia?
Choosing the right flour is key to achieving the perfect focaccia texture: a fluffy inside with a crispy crust. Fortunately, the best options are simple and easy to find.
Here are the best flour options for your focaccia:
- All-Purpose Flour: This is a fantastic choice for home cooks. It’s readily available, easy to work with, and creates a soft, tender crumb that’s perfect for beginner recipes.
- Bread Flour: Preferred by many bakers, bread flour has a higher protein content than all-purpose. This extra protein develops more gluten, resulting in a chewier, more structured focaccia with great elasticity.
- “00” Flour: This finely milled Italian flour, often used for pasta and pizza, can give focaccia a very delicate and airy texture. However, it can be difficult to find in regular grocery stores and isn’t necessary for a delicious result.
For your first focaccia, stick with all-purpose or bread flour. You will get amazing results either way!
How do you pronounce focaccia?
Learning to pronounce “focaccia” is fun and easy! Say it like this: “foh-KAH-chuh.”
In this Italian word, the “cc” is pronounced like a “k” sound. Now you can confidently order or talk about your delicious homemade focaccia!
Can you make a quick focaccia recipe?
Yes, you absolutely can make a quicker version of focaccia! While traditional recipes involve long proofing times to develop flavor, several methods can speed up the process when you’re short on time.
Here are a few tips for making focaccia more quickly:
- Warm Environment: Place your dough in a warm spot to rise. A slightly warm oven (turned off!) or a sunny windowsill helps yeast activate faster.
- Active Dry or Instant Yeast: Both work well for speeding up the process. Instant yeast is particularly useful as it often doesn’t require prior activation, shaving off a few minutes.
- Single Rise: Some quick recipes skip the second proofing. Instead, you can shape the dough, add toppings, and bake after just one rise. This method is perfect for a simpler, beginner-friendly focaccia.
Keep in mind that while these shortcuts work, a longer, slower rise typically develops more complex flavors. The goal is to find a recipe that balances speed with fantastic results, saving you time without sacrificing taste.