
Baklava is a rich, sweet dessert pastry made from layers of flaky filo dough filled with chopped nuts and held together with a sweet syrup or honey. This iconic dessert, popular across the Middle East and Mediterranean, is celebrated for its crispy texture and deliciously sweet, nutty flavor.
Many of us dream of creating perfect, flaky baklava at home—layers of golden filo pastry, a sweet and spiced nut filling, all drenched in fragrant syrup. This dessert evokes warmth and celebration, but the thought of making it can feel overwhelming. You may have admired it from afar, thinking an authentic recipe is too complex for your kitchen, leaving you unsure of where to start.
At Recipesmondial, we believe that every home cook, regardless of experience, deserves to create incredible flavors without intimidation. That’s why we’re sharing our simple baklava recipe, designed with beginner-friendly steps and everyday ingredients. Our approachable home cooking guide walks you through each stage, building your confidence and ensuring a satisfying result.
Get ready to transform simple ingredients into a show-stopping dessert that is as delicious as it is rewarding to make. With our clear, step-by-step guidance, you’ll see how easy it is to achieve crisp, buttery layers and a perfectly balanced sweet syrup. Stop struggling with intricate desserts and discover the joy of making the best homemade baklava. Let’s start creating your new favorite treat!
Why Is This the Best Baklava Recipe for Home Cooks?
Welcome to your new favorite baklava recipe! We know making baklava at home can seem daunting, especially if you’ve been overwhelmed by complex recipes in the past. Here at Recipesmondial, we believe every home cook can create amazing dishes with confidence. That’s why we designed this simple, clear recipe just for you.
We’ve simplified traditional techniques without sacrificing any of the incredible flavor, allowing you to enjoy cooking without the stress. This guide will help you create a delicious, golden, and perfectly sweet baklava that you’ll be proud to share with your loved ones.
So, why is this the best baklava recipe for home cooks? It’s all about making gourmet accessible. Here’s what makes our recipe stand out:
- Simplified Steps for Success: We break down the process into simple, easy-to-follow actions. You won’t find any overwhelming technical terms here, just clear guidance to build your confidence in the kitchen.
- Everyday Ingredients, Exceptional Flavor: This recipe uses readily available ingredients you likely already have in your pantry. We’ll show you how to transform these simple items into a dessert with a rich, authentic taste.
- Perfectly Crisp Results: Soggy baklava can be disappointing, but not with this recipe. Our specific tips for baking and pouring the syrup guarantee a delightfully crisp, flaky pastry every time.
- Beginner-Friendly Approach: This is a truly beginner-friendly recipe. You will succeed even if you’ve never worked with filo dough before.
- Practical Tips and Troubleshooting: We include helpful advice throughout to ensure a smooth process. You’ll learn how to handle filo dough and avoid common mistakes, boosting your cooking skills along the way.
- Inspiring Creativity: We offer suggestions for customizing your baklava, such as using different nuts or adding new flavorings. We encourage you to experiment and make this recipe your own.
- Reliable and Rewarding: By following our clear instructions, you’ll transform simple ingredients into a visually stunning and incredibly tasty dessert. The process is designed to be as rewarding as the final result.
At Recipesmondial, our mission is to make home cooking enjoyable and stress-free. This baklava recipe perfectly embodies that philosophy. Get ready to impress yourself and your family with this surprisingly simple and delicious treat!
What Ingredients Do You Need for Baklava?

Crafting delicious homemade baklava is much simpler than you might imagine, and this easy recipe relies on just a few core ingredients, most of which are available at your local grocery store. Don’t be overwhelmed by the idea of making this impressive dessert. We’ll break down what you need for each component, focusing on common items for approachable home cooking. Our goal is to make family-friendly meals and treats accessible to everyone.
You’ll need specific ingredients for the pastry layers, the flavorful nut filling, and the sweet, glistening syrup. Let’s gather your essentials for this beginner-friendly recipe!
For the Filo Layers
The magic of baklava starts with delicate filo pastry, which provides those incredibly crisp, golden layers. Here’s what you’ll need:
- Filo Dough (Frozen): This is your primary building block. Look for it in the freezer section and thaw it completely in the refrigerator overnight before baking to help prevent tearing. Using pre-made filo makes this an easy recipe for home cooks.
- Unsalted Butter: You’ll need a generous amount of melted unsalted butter, which we’ll brush between each layer of filo to create a beautiful golden-brown color and flaky texture. While clarified butter (ghee) is an option for a richer flavor, regular melted butter works perfectly for a delicious result.
Working with filo can seem intimidating at first. However, the key is to keep it covered with a damp cloth to prevent it from drying out. You’ll master it in no time!
For the Nut Filling
The heart of your baklava is its aromatic nut filling, which gives the pastry its signature crunch and flavor. You have some flexibility here, which is great for creative, flavorful meals.
- Chopped Nuts: We recommend either walnuts or pistachios, but a mixture of both creates a delightful taste and texture. Walnuts are a classic choice, while pistachios offer a vibrant color and distinct flavor. Nuts are also a great source of healthy fats and protein [1].
- Granulated Sugar: A small amount of sugar enhances the sweetness of the nuts.
- Ground Cinnamon: This spice adds warmth and depth to the nut mixture and is a key flavor in many traditional baklava recipes.
- Optional: Ground Cloves: A tiny pinch of ground cloves can add an extra layer of fragrant spice.
For simple dinner recipes and desserts, a food processor makes chopping nuts a breeze. Just pulse them until they are finely chopped but not yet a paste.
For the Sweet Syrup
The final touch for your baklava is the sweet, fragrant syrup that transforms the crispy pastry into a luscious treat. Getting this part right is crucial for a perfect, non-soggy outcome.
- Granulated Sugar: This forms the base of your syrup.
- Water: This dissolves the sugar and creates the right consistency.
- Fresh Lemon Juice: A squeeze of lemon juice is essential, as it prevents the sugar from crystallizing and adds a bright, fresh counterpoint to the sweetness.
- Optional: Honey: Adding a touch of honey gives the syrup extra richness and a beautiful golden hue, a common variation in many easy baklava recipes.
- Optional: Orange Blossom Water or Rose Water: For a truly authentic flavor, consider adding a teaspoon of either of these floral waters to impart a wonderful aroma.
Preparing the syrup is straightforward: simply combine and simmer the ingredients. The key is to let it cool completely before pouring it over your hot, freshly baked baklava. This temperature difference is what keeps the pastry wonderfully crispy. It’s a vital tip for beginner-friendly recipes like this!
How to Make Baklava: A Step-by-Step Guide
Step 1: Prepare the Sweet Syrup
Begin by making the syrup, as it needs several hours to cool completely. The contrast between the cool syrup and hot pastry is the secret to crispy baklava.
- In a medium saucepan, combine the sugar, water, and honey.
- Add a strip of lemon peel and a cinnamon stick for flavor.
- Bring the mixture to a boil over medium-high heat, stirring just until the sugar dissolves.
- Reduce the heat to low and simmer gently for 10-15 minutes, or until the syrup thickens slightly.
- Remove the saucepan from the heat. Discard the lemon peel and cinnamon stick.
- Set the syrup aside to cool completely to room temperature, which can take several hours.
Chef’s Tip: Avoid stirring the syrup once it boils, as this can cause it to crystallize. A squeeze of lemon juice added at the end also helps prevent crystallization [2].
Step 2: Create the Nut Filling
Next, prepare the nut filling. This mixture is the flavorful heart of the baklava and comes together in just a few minutes.
- Place your chosen nuts (walnuts, pistachios, or a mix) in a food processor.
- Pulse until the nuts are finely chopped but still have texture. Avoid processing them into a paste.
- Transfer the chopped nuts to a medium bowl.
- Add the ground cinnamon and a pinch of ground cloves, if using.
- Add the granulated sugar and stir until all ingredients are well combined.
Chef’s Tip: Be careful not to over-process the nuts. A coarse, crumbly texture—not a fine powder—is essential for the baklava’s satisfying bite.
Step 3: Assemble the Baklava Layers
Now it’s time to assemble the baklava. Don’t be intimidated by the filo dough; working with it is easier than it looks. Follow these steps carefully for a stunning result.
- Preheat the oven to 325°F (160°C).
- Melt 1 cup (226g) of unsalted butter.
- Carefully unroll the filo dough. To prevent it from drying out, keep the stack covered with a damp kitchen towel while you work.
- Brush the bottom and sides of a 9×13 inch baking pan with melted butter.
- Lay one sheet of filo in the pan and lightly brush its entire surface with butter. Repeat to create a base of 8-10 buttered layers.
- Sprinkle one-third of the nut mixture evenly over the top layer of filo.
- Layer another 5-6 sheets of filo on top, brushing each one with butter.
- Add the second third of the nut mixture.
- Repeat with another 5-6 buttered filo sheets.
- Spread the remaining nut filling over the top.
- Finish by layering the last 8-10 filo sheets, making sure to butter each one, including the very top layer.
Chef’s Tip: Work gently with the filo dough. If a sheet tears, don’t worry—simply patch it with another piece or cover it with the next buttered sheet. Minor imperfections will be hidden in the final layers.
Step 4: Cut the Baklava Before Baking
It’s crucial to cut the baklava before baking. This allows the syrup to penetrate every layer and creates clean, individual portions.
- Using a very sharp knife, cut the assembled baklava all the way through to the bottom of the pan.
- Make straight cuts across the width of the pan, about 1.5 to 2 inches apart.
- To create the classic diamond pattern, make diagonal cuts across the length of the pan.
Chef’s Tip: For the cleanest cuts, warm your knife under hot water and wipe it dry between slices. A ruler can also help you create perfectly uniform pieces.
Step 5: Bake Until Golden Brown
Now, it’s time to bake the baklava. Your kitchen will soon be filled with a delightful aroma.
- Place the pan in the preheated 325°F (160°C) oven.
- Bake for 50-60 minutes, until the top is a deep golden-brown and the layers look crisp.
- If the top begins to brown too quickly, loosely cover it with aluminum foil for the remaining bake time.
- Carefully remove the baklava from the oven.
Chef’s Tip: Oven temperatures can vary, so start checking the baklava after 45 minutes. It’s ready when the top is a uniform golden-brown.
Step 6: Pour Syrup Over the Hot Pastry
This final step is what makes baklava so special. The sizzling sound of cool syrup hitting the hot pastry is not only satisfying—it’s the key to a perfectly crisp and sweet result.
- As soon as you take the baklava out of the oven, slowly and evenly pour the cooled syrup over the entire surface.
- Allow the baklava to cool completely in the pan at room temperature for at least 4-6 hours, or preferably overnight. This gives it time to absorb the syrup and become crisp.
- Once fully cooled, carefully re-cut along the original lines to separate the pieces.
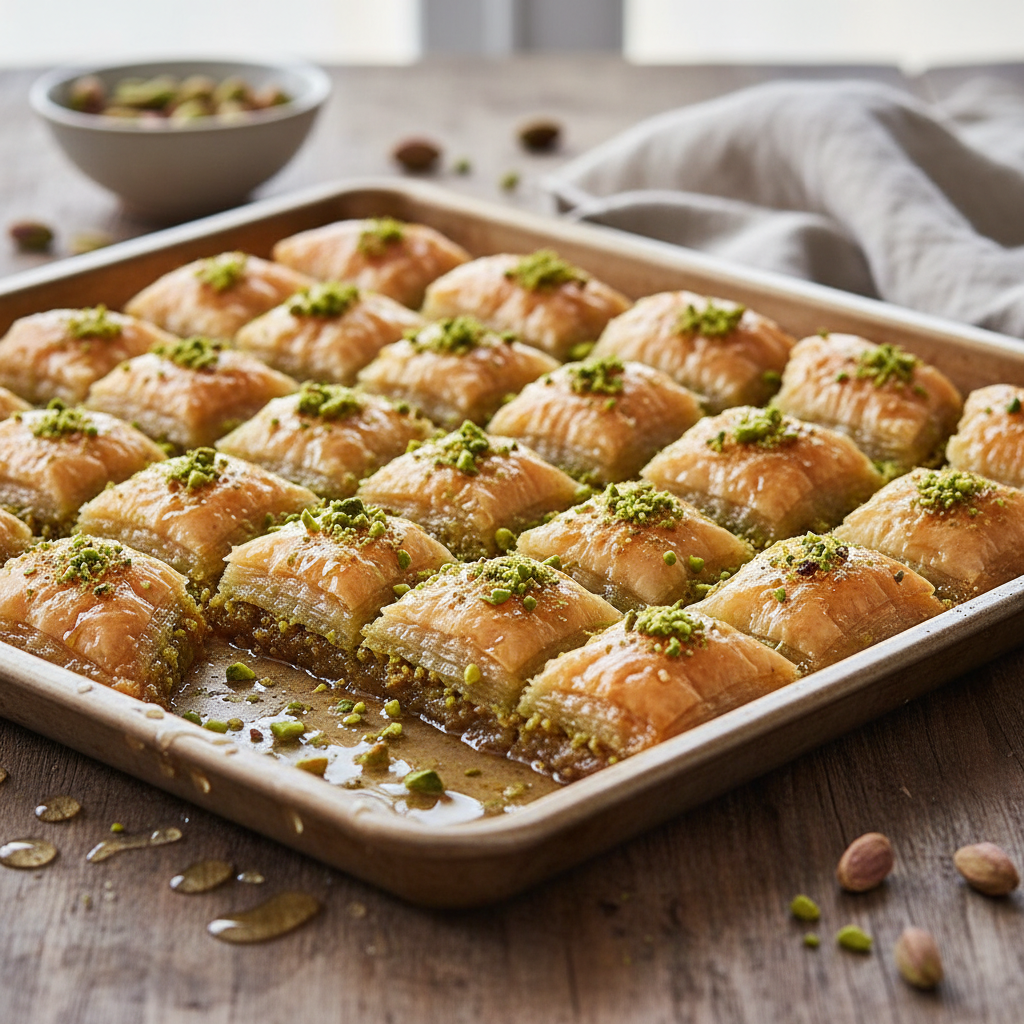
- Garnish with crushed pistachios before serving, if desired.
Chef’s Tip: Patience is essential. Resist the temptation to serve the baklava warm. The long cooling time is necessary for the syrup to fully permeate the layers, creating the perfect balance of crisp pastry and sweet filling.
Expert Tips for a Perfect, Non-Soggy Baklava

Mastering the Syrup Application
A perfect baklava—golden, crisp, and sweet without being soggy—is achievable for any home cook. At Recipesmondial, we want to make complex desserts simple and stress-free. For baklava, the secret to success is the syrup. While it’s a common concern for beginners, one simple trick ensures perfect results every time: creating a temperature contrast for optimal absorption.
- Hot Baklava, Cold Syrup: This is the golden rule. Take your baklava straight from the oven while it’s piping hot. In contrast, your syrup must be completely cool, either at room temperature or slightly chilled. Pouring cold syrup over hot pastry allows the filo to absorb the sweetness slowly and evenly, preventing it from getting waterlogged. If both are hot, the baklava essentially “cooks” in the syrup and turns mushy.
- Pour Slowly and Evenly: Resist the urge to dump the syrup all at once. Instead, use a ladle to drizzle it gradually over the entire surface. Make sure to cover the edges and pour along the pre-cut lines so every piece gets an equal share. This careful method ensures even absorption and prevents any single area from becoming too saturated.
- Let It Rest: Patience is key after you’ve poured the syrup. Your baklava needs to rest uncovered at room temperature for at least 6-8 hours, or preferably overnight. This crucial waiting period allows the pastry to fully absorb the syrup, which develops a deeper flavor and guarantees that signature, non-soggy crunch.
Butter Up for Success
Butter is a vital component for both flavor and texture in baklava. Choosing the right kind—and using the right amount—is essential for achieving maximum crispiness.
- Use Clarified Butter (Ghee): While regular unsalted butter is acceptable, clarified butter (ghee) is the best choice for baklava. It has a higher smoke point because the milk solids have been removed. These solids can burn during baking, resulting in a bitter taste and less crispy texture. To make your own for a professional touch, simply melt butter over low heat, skim the foam from the top, and carefully pour off the clear golden liquid, leaving the milky solids behind.
- Brush Lightly, Not Heavily: To get crisp layers, you need enough butter to lightly coat the filo sheets. However, too much will make the final product greasy. The goal is a light, even brushing on every layer, not a pool of butter. This perfect balance creates that signature flaky texture and rich flavor without being oily.
Handling Filo Dough Like a Pro
Delicate filo dough can seem intimidating to beginners, but it’s easy to manage with a few key techniques. Follow these tips to build beautiful, crisp layers for your homemade baklava, stress-free.
- Keep It Covered: Filo dough dries out extremely fast when exposed to air, causing it to crack and become brittle. To prevent this, always keep the stack of filo you aren’t using covered with a damp—but not wet—kitchen towel. Only uncover one sheet at a time as you work.
- Handle Layers Gently: The magic of baklava is in its numerous, paper-thin layers. As you work, lay each sheet down gently without pressing. A light, even brushing of butter between layers is all you need. This technique traps small pockets of air that expand during baking, creating that essential, flaky crunch.
- Score Before Baking: This is a non-negotiable step. Before the baklava goes into the oven, use a sharp knife to cut it into your desired shapes, like diamonds or squares. Be sure to cut all the way through to the bottom of the pan. This serves two crucial purposes: it helps the layers cook evenly, and it creates channels for the syrup to penetrate every piece for perfect flavor distribution.
By following these simple tips, you can confidently create a stunning, non-soggy baklava that will impress everyone. At Recipesmondial, we believe cooking should be enjoyable. Our guidance is here to help you build kitchen confidence, one delicious recipe at a time.
How Can You Customize Your Baklava?
Choosing Your Nuts: Pistachio vs. Walnut
Baklava is wonderfully versatile, and its flavor profile changes significantly based on the type of nut you use. Let’s explore the two most popular options for your homemade recipe.
- Classic Walnuts: Walnuts offer a robust, earthy flavor and a slightly coarser texture. Because they are often more affordable, walnuts are a great choice for budget-conscious baking and a staple in many traditional baklava recipes.
- Elegant Pistachios: Pistachios provide a delicate, sweet, and slightly floral taste with a finer, almost buttery texture. Their vibrant green color gives the final dessert a stunning, elegant appearance. However, keep in mind that pistachios can be more expensive [3].
Tips for Your Nut Choice:
- Flavor Preference: Do you prefer a strong, traditional taste? Choose walnuts. For a milder, sweeter note, go with pistachios.
- Budget-Friendly: For a more economical option, especially for everyday baking, walnuts are typically the less expensive choice.
- Visual Appeal: The beautiful green hue of pistachios makes for a visually striking dessert.
- Mixing Nuts: Don’t feel limited to just one type of nut. A blend of walnuts and pistachios creates a delightful complexity in both flavor and texture. You can also add a touch of almond to enhance the richness.
Recipe Variations: Greek, Turkish, and More
Baklava boasts many regional variations, each with its own unique character. Exploring these different styles can inspire your own homemade baklava recipe.
Popular Regional Styles:
- Greek Baklava: Often featuring a rich, spicy flavor, this style typically includes walnuts with a generous amount of cinnamon and cloves. The syrup is usually honey-based, sometimes flavored with lemon or orange zest. Greek baklava also tends to have fewer, thicker layers than its Turkish counterpart.
- Turkish Baklava: Turkish baklava is typically less spicy, highlighting the delicate flavor of pistachios. It’s known for having numerous, paper-thin layers that create an incredibly delicate and crispy texture. The syrup is usually a lighter, sugar-based concoction, sometimes infused with a hint of lemon juice or rosewater [4].
Other Exciting Ways to Customize Your Baklava:
- Spice It Up: Add other spices like cardamom, nutmeg, or a dash of allspice to your nut filling for a unique flavor profile.
- Syrup Swaps: Experiment with the syrup by infusing it with orange blossom water for a floral note or rosewater for a fragrant touch. To create a lighter dessert, simply reduce the amount of sugar.
- Add Dried Fruits: For extra chewiness and flavor, include finely chopped dried apricots or figs in your nut mixture. This adds a lovely fruity twist.
- Chocolate Drizzle: For a decadent, modern twist, drizzle melted dark or white chocolate over the baklava after it has cooled.
- Shape Shifters: Instead of using a classic rectangular pan, try making individual rolls, triangles, or cups. For an easy, beginner-friendly approach, use muffin tins to create mini baklava portions.
- Dietary Adjustments: To accommodate dietary needs, consider using a sugar substitute in the syrup or exploring vegan butter alternatives for a dairy-free version.
Remember, the best part of home baking is making a recipe your own. Feel free to mix and match these ideas to create your perfect baklava. Enjoy the journey of discovering your favorite customization!
How Should You Store Homemade Baklava?
You’ve put in the effort to create the perfect homemade baklava. Storing it correctly is the key to ensuring every bite remains as delightful as the first. Proper storage maintains its crisp texture and rich flavor.
Baklava has unique storage needs. Its generous syrup acts as a natural preservative because sugar reduces water activity. This process inhibits microbial growth and keeps your pastry fresh longer [5].
Room Temperature Storage (Recommended)
For the best texture and flavor, storing baklava at room temperature is the recommended method. This approach keeps the filo layers delightfully crisp and ensures the syrup remains liquid and fully infused throughout the pastry.
- Airtight Container: Always store your baklava in a tightly sealed, airtight container. This is crucial for protecting its delicate layers from humidity, which can make it soggy.
- Location: Choose a cool, dry spot in your kitchen away from direct sunlight or heat sources like appliances.
- Shelf Life: When stored this way, homemade baklava stays fresh for up to two weeks, making it an ideal dessert to prepare in advance.
Refrigeration
While refrigerating baklava isn’t usually necessary, it’s a good option if you live in a very warm climate or want to extend its shelf life. Be aware, however, that the cold can alter the pastry’s texture.
- Airtight Container: As with room temperature storage, an airtight container is essential to prevent the baklava from absorbing refrigerator odors or drying out.
- Potential Changes: The cold can make the filo dough less crisp and may cause the syrup to thicken or crystallize.
- Serving Tip: To restore its best qualities, let refrigerated baklava sit at room temperature for about 30 minutes before serving. Stored in the fridge, it can last for up to three weeks.
Freezing for Long-Term Storage
Freezing is an excellent choice for long-term storage, especially if you’ve made a large batch. This method ensures you always have a delicious treat ready for future guests or cravings, making entertaining effortless.
- Prepare for Freezing: Allow the baklava to cool completely so the syrup can fully set.
- Wrap Individually: For easier serving later, wrap individual pieces or small sections tightly in plastic wrap.
- Foil and Container: For extra protection against freezer burn, add a second layer of aluminum foil over the plastic wrap. Then, place the pieces in a freezer-safe airtight container or a heavy-duty freezer bag.
- Shelf Life: Frozen baklava can last for up to three months.
- Thawing: To thaw, move the baklava from the freezer to the refrigerator to rest overnight. Allow it to come to room temperature before serving to ensure it thaws gently and retains its optimal quality.
By following these simple tips, you can enjoy your homemade baklava at its peak. Proper storage ensures your delicious creation stays perfectly crisp and flavorful for longer, adding joy to your home cooking experience with Recipesmondial!
Frequently Asked Questions About Making Baklava
How many calories are in baklava?
As a rich dessert, baklava is best enjoyed in moderation. The exact calorie count can vary significantly depending on the ingredients and serving size. For example, recipes that use more butter or sugar will naturally have more calories.
A single piece of baklava (about 40 grams) generally contains 250 to 300 calories [6], but this number can fluctuate. Our easy recipes focus on great flavor without unnecessary extras. Knowing the calorie count helps you make informed choices while still enjoying your favorite treats.
What are the main baklava ingredients?
Making baklava is surprisingly simple, relying on a few core ingredients to create its signature flaky layers and sweet flavor. The primary components are:
- Filo Pastry: These paper-thin sheets of dough bake into crispy, golden layers.
- Nuts: A generous filling of chopped nuts is essential. Walnuts and pistachios are most common, but you can also use pecans or almonds.
- Butter: Melted butter or clarified butter (ghee) is brushed between each filo layer to create a wonderfully flaky texture.
- Sweet Syrup: A simple syrup made from sugar, water, and often lemon juice is poured over the hot, baked baklava. Some recipes also add honey or floral water (like rose or orange blossom) for extra flavor.
Together, these components create an irresistible dessert, proving that simple ingredients can produce a truly stunning result.
What is the difference between Greek and Turkish baklava recipes?
While both Greek and Turkish baklava are delicious, several key differences highlight the unique culinary traditions of each region. Here’s a quick comparison:
| Feature | Greek Baklava | Turkish Baklava |
|---|---|---|
| Main Nuts | Primarily walnuts, though almonds are also used. | Traditionally made with finely ground pistachios. |
| Spices | Spiced with cinnamon and cloves for a warm, aromatic flavor. | Uses fewer spices, sometimes with a subtle hint of cardamom. |
| Syrup Base | Uses a honey-based syrup, often with lemon juice for brightness. | Uses a sugar-based syrup, sometimes flavored with rose or orange blossom water. |
| Sweetness | Tends to be sweeter due to the richness of the honey. | Offers a more balanced sweetness, allowing the pistachio flavor to stand out. |
| Cut/Shape | Often cut into diamond or rectangular shapes. | Found in various shapes, including squares, triangles, or cylindrical rolls. |
| Number of Layers | May have fewer layers compared to some Turkish varieties. | Known for having many very thin layers of filo. |
Ultimately, both versions are a testament to skillful layering and offer a unique, delightful experience. Our beginner-friendly recipes make it easy to try either style at home!
How do you pronounce baklava?
Wondering how to say the word? You’re not alone. The pronunciation is quite straightforward: “BAH-klah-vah.”
The key is to emphasize the first syllable. Now you can confidently order or discuss this wonderful dessert.
Sources
- https://www.heart.org/en/healthy-living/healthy-eating/eat-smart/nutrition-basics/nuts-and-your-heart
- https://www.seriouseats.com/how-to-prevent-sugar-syrup-crystallization
- https://www.baklava.org/faq
- https://www.istanbul.com/blog/turkish-baklava-a-history-of-sweetness
- https://nchfp.uga.edu/publications/nchfp/factsheets/FoodPres.pdf
- https://fdc.nal.usda.gov/fdc-app.html#/food-details/172283/nutrients